1
USER MANUAL
575 SPOT
Technical specifications
Power supply 220-250 V AC, 50/60 Hz ~
Power consumption 900 W
Fuse T 5 A, 250 V
Lamp OSRAM HSR575/2 or PHILIPS MSR 575/2, MSD575
Optical System
- High luminous-efficiency parabolic mirror and double condenser system
- Multi-Step Zoom (15°, 18°, 22°)
- All lenses are anti-reflection coated
Colors: Color wheel 1, 9 dichroic-filters plus white, color-wheel with variable rotation speed
Color wheel 2, 6 dichroic-filters, color temperature filters 3200 K and 6000 K, UV filter plus white
Gobos:Static gobos, 9 metal gobos plus full circle, Static gobo wheel cont. rotation
Rotating gobos, 3 metal gobos, 1 glass gobo and 2 multicolor dichroic gobo rotating in both directions at
different speeds, Gobo indexing, Rotating gobo-wheel cont. Rotation,
Strobe:Strobe effect with variable speed (1 - 10 flashes per second)
Dimmer :Smooth dimmer from 0 - 100 %
Prism :3-facet-prism rotating in both directions at different speeds
Focus:Motorized focus from near to far
Iris :Motorized iris for different beam diameters
Effects: 16 Prism-Gobo Macros, Gobo-Shake function for static gobo-wheel, Preprogrammed pulse-effects
Motor :12 high-quality stepping-motors controlled by microprocessors
Pan/Tilt :Pan movement range 530°, Tilt movement range 280°,8/16 bit movement resolution
Temperatures: Maximum ambient temperature, 45° C, Maximum housing temperature, 80° C
Dimensions and weight, L x W x H: 470x450x580 mm
Net Weight 33 kg
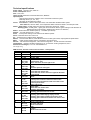
DMX-Protocol, Function of the control channels - 16 bit protocol
Channel Value
Function
1
Pan
0-
-255
2
Pan fine 16bit
0-
-255
3
Tilt
0-
-255
4
Tilt fine 16bit
0-
-255
5
Pan/Tilt move speed from fast to slow
0-
-250
Pan/Tilt move fast
251-
-252
Move fast when move the light is out
253-
-255
6
Switch on/off the lamp
0-
-125
Reset
126-
-139
Increase speed of cooling fan
140-
-255
7
Color-wheel1
0-
-127
Color flow from fast to slow
128-
-190
Color flow from slow to fast in the opposite direction
191-
-255
8
Color-wheel2
0-
-127
White
128-
-255
9
No prism
0-
-2
3-facet prism clockwise rotate from fast to slow
3-
-64
3-facet prism anticlockwise rotate from slow to fast
65-
-127
6 kind of prism effect
128-
-255
10
Static gobo-wheel
0-
-79
Gobo shake
80-
-223
Gobo flow from slow to fast
224-
-255
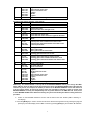
11
12
13
14
15
0-
-222
223-
-225
0-
-2
3-
-127
128-
-191
192-
-255
0-
-255
0-
-87
88-
-170
171-
-255
0-
-30
31-
-63
64-
-95
Rotating gobo-wheel
Rotating gobo flow from slow to fast
No function
Rotating gobo rotate step by step by control
Rotating gobo rotate clockwise from fast to slow
Rotating gobo rotate anticlockwise from slow to fast
Iris from big to small
Zoom out and focus
No zoom and focus
Zoom in and focus
Dark
Lighten
Strobe from slow to fast
15
16
96-
-127
128-
-145
146-
-161
162-
-191
192-
-223
224-
-255
0-
-255
Lighten
Fade out from slow to fast
Fade in from fast to slow
Lighten
Strobe
Lighten
Dimmer from dark to brightest
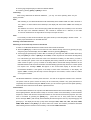
Function of the control channels - 8 bit protocol:
Channel Value
Function
1
0-
-255
Pan
-255
2
0-
Tilt
-249
3
0-
Pan/Tilt move speed from fast to slow
250-
-252
Pan/Tile move fast
253-
-255
Move fast when move the light is out
-255
4
0-
Lamp on/off
-127
5
0-
Color-wheel1
128-
-191
Color flow from fast to slow
192-
-255
Color flow from slow to fast in the opposite direction
-127
6
0-
Color-wheel2
128-
-255
White
-2
7
0-
No prism
3-
-64
3-facet prism rotate clockwise from fast to slow
65-
-127
3-facet prism rotate anticlockwise from slow to fast
128-
-255
6 kind of prism effect
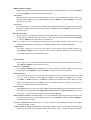
8
9
10
11
12
13
14
-79
0-
80-
-223
224-
-255
-222
0-
223-
-255
-2
0-
3-
-127
128-
-191
192-
-255
Static gobo-wheel
Static gobo shake
Static gobo flow from slow to fast
Rotating gobo-wheel
Rotating gobo flow from slow to fast
No function
Rotating gobo rotate step by step by control
Rotating gobo rotate clockwise from fast to slow
Rotating gobo rotate anticlockwise from slow to fast
-255
0-
-87
0-
88-
-170
171-
-255
-30
0-
31-
-63
64-
-95
96-
-127
128-
-145
146-
-161
162-
-191
192-
-223
224-
-255
0-255
Iris from big to small
Zoom out and focus
No zoom and focus
Zoom in and focus
Dark
Lighten
Strobe from slow to fast
Lighten
Fade out from slow to fast
Fade in from fast to slow
Lighten
Strobe
Lighten
Dimmer from dark to brightest
Addressing:The Control Board on the top side of the MOVING HEAD575 allows you to assign the DMX
fixture address, which is defined as the first channel from which the MOVING HEAD575 will respond to the
controller. If you set, for example, the address to channel 5, the MOVING HEAD575 will use the channel 5
to 20 for control. Please, be sure that you don’t have any overlapping channels in order to control each
MOVING HEAD575 correctly and independently from any other fixture on the DMX data link. If two, three
or more MOVING HEAD575 are addressed similarly, they will work similarly.For address setting follow this
procedure:
1.
Switch on the MOVING HEAD575 and wait until the fixture reset has finished ("rSt" is flashing at
the display).
2. Press the [Mode] key in order to access the main menu. Browse through the menu by pressing the [Up] and
[Down] keys until the display shows "A001". Confirm by pressing [Enter] key and the letter "A" will flash.
2
3. Use the [Up] and [Down] keys to select the desired address.
4. Confirm by pressing [Enter] or [Mode] to cancel.
Controlling:
After having addressed all MOVING HEAD575 , you may now start operating these via your
lighting controller.
Note:
After switching on, the MOVING HEAD575 will automatically detect whether DMX 512 data is received or
not. If there is no data received at the DMX-input, the display will start to flash "A001" with actually set
address.
This situation can occurr if: the 3 PIN XLR plug (cable with DMX signal from controller) is not connected
with the input of the MOVING HEAD575, The controller is switched off or defective, if the cable
or connector is defective or the signal wires are swap in the input connector.
Note:
It’s necessary to insert the XLR termination plug (with 120 Ohm) in the last lighting in the link in order
to
ensure proper transmission on the DMX data link.
Remotely controllable functions
Switching on and off the lamp via the Control Board
1. Switch on the MOVING HEAD575 and wait until the fixture reset has finished.
2. Press the [Mode] key in order to access the main menu. Browse through the menu by pressing the [Up]
and [Down] keys until the display shows "LAMP". Confirm by pressing [Enter] key.
3. Use the [Up] and [Down] keys to select "On" for switching on the lamp and "Off" for switch off the lamp
and press [Enter] to confirm or [Mode] to cancel.Note, It is also important to note that the discharge lamp
is a cold restrike type, which means that it has to be cold before re-striking. For this reason, you have to
wait 5 minutes (max. speed of fan must be adjusted) after having switched off the lamp before you can
switch it back on again. If you try to switch on the lamp within 5 minutes after having switched it off, the
MOVING HEAD575 will store this information and automatically ignite the lamp when the 5 minutes period
has expired. The message "HEAt" will appear on the control board display at the back side of
the MOVING HEAD575. If the ignition of the lamp is seven times unsuccessful, on the display will
appear "LA.Er", meaning that the lamp could be damaged or even missed, or there could be a failure
on the ignitor or ballast.
Fan:
The MOVING HEAD575 is cooled by three axial fans - one each in the projector head and one in the base.
The speed of the fan (and of course the noise) can be continuously reduced if very quiet performance is
required.By the Control Board using the "FAnS" function you can choose 5 types of low fan speed operating.
Please refer to the instructions under SPEC -Special functions.
Control Board:
The Control Board situated on the top side of the MOVING HEAD575 offers several features. You can simply
set the lighting address, read the number of lamp or unit hours, switch on and off the lamp, run demonstration
sequences, make a reset and also use special functions for manual control and service purposes. The main
menu is accessed by pressing the [Mode] key -
press this one so many times until the display
shows message "A001" (with actually stored address). Browse through the menu by the pressing [Up] and
[Down] keys - the display shows step by step these messages: A001, rPAn, rTilt, 16br, Lati, Poti, LAMP,
dEMo, rESE, SPEC. Press [Enter] if you wish to select one of them. The functions provided are described
inthe following sections and the function hierarchy is shown below.Main functions
3
- DMX 512 Address settings:
The letter "A" flashes. Use the [Up] and [down] keys to select required address (001 - 512) and press [Enter]
to confirm or [Mode] to cancel and return to the main menu.
- Pan reverse:
This function allows you to invert the Pan-movement. Use the [Up] and [Down] keys to select "On" if you
wish this feature or "Off" if you don’t wish this feature and press [Enter] to confirm or [Mode] to cancel and
return to the main menu.
- Tilt reverse:
This function allows you to invert the Tilt-movement. Use the [Up] and [Down] keys to select "On" if you wish
this feature or "Off" if you don’t wish this feature and press [Enter] to confirm or [Mode] to cancel and return
to the main menu.
Movement resolution:
By this function you can adjust the desired movement resolution 8 or 16 bit. Use the [Up] and [Down] keys
to select ‘On’ if you wish the 16bit high resolution or "Off" if you wish only 8 bit resolution and press [Enter]
to confirm or [Mode] to cancel and return to the main menu.
Note:If you adjust the 16 bit resolution the fixture will occupy 16 DMX channels, if you adjust the 8 bit
resolution,the fixture will be operated by only 14 DMX channels. Please, check the DMX protocol.
- Lamp On time:
This option enables you to read the total number of hours that the lamp has been powered on.
Press [Enter]or [Mode] to return to the main menu. In order to reset the counter to 0, you have to hold
the Up- and Downbutton and press the Enter-button.
- Power On time:
By this option you can read the total number of hours that the MOVING HEAD575 has been powered on.
Press [Enter] or [Mode] to return to the main menu.
- Switch on / off the lamp:
Use the [Up] and [Down] keys to select "On" if you wish the switch on the lamp or "Off" if you wish switch
off the lamp and press [Enter] to confirm or [Mode] to cancel and return to the main menu.
- Demo sequences:
This function allows you to run a special demo-test sequences without an external controller, which will
show you some possibilities of using MOVING HEAD575. Press [Up] and [Down] keys to select
the "Mod1" or "Mod2"sequences. The "Mod1" is suitable for projections on the wall, ceilling or ground
without any headmovement, the "Mod2" uses all
MOVING HEAD575 functions and therefore is
good for a complete introduction of the fixture.45
- Reset Function:
Press [Enter] key to run reset. This option enables the MOVING HEAD575 to index all effects (functions)
and return to their standard positions. SPEC -Special functions Use the [Up] and [Down] keys to browse
through the
special functions and select the one by pressing [Enter].
- Manual control of effects: This function allows you to control manually the channel functions of the fixture. Use
the [Up] and [Down] keys to select desired function and press [Enter] to adjust the effect or [Mode] to
cancel and return to the menu.
- Lamp On automatically:This menu allows you to turn the lamp on after switching the fixture on and switch
on/off the lamp light
sensor.
- Lamp On after switching the fixture on: This function enables to switch on the lamp automatically after
switching on the fixture. Use the [Up] and [Down] keys to select „On” if you wish to switch on the lamp
4
automatically after
switching on the fixture or „Off” if you wish the lamp off after switching on the fixture and press [Enter] to
confirm or [Mode] to cancel and return to the menu.
- Switch On/Off the lamp light sensor:
lamp light sensor On and
Use the [Up] and [Down] keys to select "On" if you wish to switch the
press [Enter] to confirm or [Mode] to cancel and
return to the
menu.The option"On" is for the 46 standard operation. Use the [Up] and [Down] keys to select "Off" if
you wish to switch the lamp light sensor Off and
press [Enter] to confirm or [Mode] to cancel and return to the menu.
Important: The option"Off" is for "emergency operation" only if the lamp light sensor is
defective and you will wait for a delivery of the spare light sensor! If the lamp light sensor was switched Off,
the error messages "LAEr,SnEr,HEAt" will not appear on the display (only the message "HEAt" will appear
if the lamp was turned Off and On within 5 minutes ) and at switching On of the lamp the electronics will still
try to ignite the lamp until it shines (even when the lamp is damaged or absent), on this account
some electronics parts could be damaged!
- DMX values: Readout DMX values of each channel received by the fixture. Use the [Up] and [Down] keys to
select desired channel and press [Enter] to read its value coming to the fixture or [Mode] to cancel and
return to the menu.
- Display-adjusting: This function allows you to adjust the display settings:
- Display intensity:With this function, you can adjust the display-intensity from 20 % to 100 %. Use the [Up] and
[Down] keys to select the level of the display-intensity and press [Enter] to confirm or [Mode] to cancel and
return to the menu.
- Display-reverse: With this function, you can rotate the display by 180°. Use the [Up] and [Down] keys to select
"normal display" or "display turned by 180°" and press [Enter] to confirm or [Mode] to cancel and return
to the menu.
- Display-On: This function allows you to keep the display on or to turn off automatically 2 minutes after last
pressing any key on the control board. Use the [Up] and [Down] keys to select "On" if you wish to keep the
display on or "Off" if you wish to turn off automatically 2 minutes after last pressing any key on the Control
Board and press [Enter] to confirm or [Mode] to cancel and return to the menu.
- PAN/TILT-Feedback: This function allows to return the Mowing Head to the required position after changing the
position by external force (e. g. by stroke). Use the [Up] and [Down] keys to select "On" if you wish to
enable this function or "Off" if you wish not to return the Moving Head to the required position and press
[Enter] to confirm or [Mode] to cancel and return to the menu.
Note: If feedback was switched Off, the PAN/TILT-position is changed by external force and feedbeck is switched
On again, the Moving Head might not to be synchronized with the DMX signal. You have to make a reset in
order to synchronize the Moving Head with the DMX signal.
- Lamp off via DMX: This function allows you to switch off the lamp by DMX. Use the [Up] and [Down] keys to
select "On" if you want to switch off the lamp by DMX or "Off" if you don’t want to switch off the lamp by
DMX and press [Enter] to confirm or [Mode] to cancel and return to the menu.47
- Temperature
Inside temperature readouts of the fixture in Celsius. Inside temperatures below 80° C are not critical. 80° C
and more lead to the lamp being switched off. Please note that the outside temperature should not exceed
45° C.
- Fan speed operating
By using this function you can choose 5 types of fan speed operating. Browse through this menu by the
pressing [Up] and [Down] keys - the display shows step by step the following messages: "Auto, HIGH, reG,
Lo.HI, Lo.OF". Press [Enter] if you wish to select one of them or [Mode] to cancel and return to the menu.
5
- continuous controlling of the fan speed without the DMX value
This mode is similar to "reG", but the initial level of the fan speed can´t be adjusted by DMX.
- high speed of the fans
The cooling fans work on max. speed (max. cooling).
- continuous controlling of the fan speed
The fan automatically raises its speed in order to control inside temperature of the lighting, if the
temperature inside increases about certain level (the low fan speed reduces the cooling of the lighting). This
cycle can repeat several times until the temperature inside is on a suitable level.
- low/high speed of the fan operating
The fan keeps the adjusted low speed until the temperature exceeds max. inside temp. of the fixture, then
the MH-840 automatically switches from low to high fan-speed.
- low speed / switch off the lamp operating
The fan keeps the adjusted low speed until the temperature exceeds max. inside temp. then the MH-840
automatically switches off the lamp.
Note: In the mode “HIGH“ and “Auto“- the fan speed can´t be adjusted by DMX.
- Default settings
Press [Enter] to reset all fixture personalities (not the adjusting functions) to the default values. On the
display will appear „rSt” meaning that the fixture makes the reset. See the table of personality setting and
their default positions. PAN-reverse TILT-reverse Resolution Lamp On automatically Display permanent on
Displayintensity Displayreverse Feedbackfonction Lamp Off via DMX Ventilation fan
Display Default value (shaded) Personality: Switch on/off lamp light sensor 48
- Adjusting the default positions of colour, gobo and effect wheels
By this function you can calibrate and adjust the colour, gobo and effect wheels to their standard/right
positions. Use the [Up] and [Down] keys to browse through the adjusting menu - the display shows step by
step these messages: " PAn, Tilt, SPEd, Col1, Col2, PriS, SGob, rGob, Grot, IriS, Foc, Stro, dimr,
FCAL " by which you can adjust the fixture to the required / desired position (0-255) before the function
calibration. Then when the positioning is finished use the last "FCAL" function (Fixture calibration).
1. Calibration via the control board: Press [Enter] and the [Up] and [Down] keys in order to display
the following messages: "Col1, Col2, PriS, SGob, rGob, Grot " for very smooth function calibration. Select
one of them, press [Enter] and use the [Up] and [Down] keys in order to adjust their right value from 0 to
255. Then press [Enter] to confirm or [Mode] to cancel and return to the menu. This can be repeated for
each calibration parameter if it is required. When the calibration is finished, it is necessary to use the
"ArES" function in order to write the calibration values to the memory (EEPROM) and to make a reset in
order to check the newly adjusted positions of the colour, gobo and effect wheels. When the reset of the
fixture is finished, the display will show the "FCAL" message. Press [Enter] to repeat the calibration or
[Mode] to return to the "AdJ" menu.
2. Calibration via the external controller: Press [Enter] and the [Up] and [Down] keys in order to display the
following messages: "Colo, EFEC, rGob, Grot" - calibration parameters. Select
one of them and
press [Enter]. Now you can calibrate the colour, gobo and effect wheel by your controller. The DMX
calibration protocol is described in the table mentioned below.
DMX Calibration protocol:
After having calibrated required functions press [Enter] to confirm (or [Mode] to cancel and return to the
menu without reset by the "ArES" function) and use the "ArES" function in order to write the calibration
values to the memory (EEPROM) and to make a reset in order to check the new adjusted positions of the
colour, effect and rot. gobo wheels and gobo indexing. Error and information messages This message
appears if you try to switch on the lamp within 5 minutes after having switched it off (the lamp is too hot).
6
The message will appear on the display if the lamp doesn't ignite within 28 seconds.
The
MOVING HEAD575 will store this information and automatically ignite the lamp when the 5 minutes
period has expired. Caution: Please note that this function is disabled if the lamp light sensor is switched
off (function "EnSn"). The ignition of the lamp is seven times
unsuccessful (the HEAt message
appeared six times before), and the display shows "LAEr", meaning that the lamp could be damaged
or even missed, the fixture is overheating (this can occur if the ambient temperature is 45° C or more) or
there could be a failure on the ignitor or ballast. Please place or replace the lamp, check the ambient
temperature or contact your dealer if the situation was not caused by the lamp. Caution: Please note that
this function is disabled if the lamp light sensor is switched off (function "EnSn"). This message informs
you that the main PCB does not communicate correctly with the Control Board. (Color-wheel 1 error)
This message will appear after the reset of the fixture if the magnetic-indexing circuit malfunctions
(sensor failed or magnet missing) or the stepping-motor is defective (or its driver circuit on the main
PCB). The color-wheel is not located in the default position after the reset. (Color-wheel 2 error) This
message will appear after the reset of the fixture if the magnetic-indexing circuit malfunctions (sensor
failed or magnet missing) or the stepping-motor is defective (or its driver circuit on the main PCB). The
color-wheel is not located in the default position after the reset. (Rotating gobo-wheel error) This
message
will
appear after the reset of the fixture if the magnetic-indexing circuit malfunctions
(sensor failed or magnet missing) or the stepping-motor is defective (or its driver circuit on the main PCB).
The rotating gobo-wheel is not located in the default position after the reset. (Rotating gobo indexing error)
This message will appear after the reset of the fixture and if the magneticindexing circuit malfunctions
(sensor failed or magnet missing) or the stepping-motor is defective (or its driver circuit on the main PCB).
The rotating gobo is not located in the default position after the reset. (Static gobo-wheel error) This
message will appear after the reset of the fixture if the magnetic-indexing circuit malfunctions (sensor
failed or magnet missing) or the stepping-motor is defective (or its driver circuit on the main PCB). The
gobo-wheel is not located in the default position after the reset.(Prism-wheel error) This message will
appear after the reset of the fixture if the magnetic-indexing circuit malfunctions (sensor failed or magnet
missing) or the stepping-motor is defective (or its driver circuit on the
ain PCB). The prism-wheel is
not located in the default position after the reset. This error message informs you that the fixture was
overheating (occured if the ambient temperature is 45° C or more) and that the relay switched off the
lamp. This message will appear on the display until the temperature will be on a suitable level, then the
display will show the HEAt message meaning the lamp is too hot (explanation see above). This
message appears if the lamp lighting sensor is failed. Please contact your dealer.
Caution: Please note that this function is disabled if the lamp light sensor is switched off (function "EnSn"). This
message will appear if the fixture was shortly disconnect from the mains. (PAN-yoke movement error) This
message will appear after the reset of the fixture if the yoke’s magneticindexing circuit malfunction (sensor
failed or magnet missing) or the stepping-motor is defective (or its driving IC on the main PCB). The yoke is
not located in the default position after the reset. (TILT-head movement error) This message will appear
after the reset of the fixture if the head’s magneticindexing circuit malfunctions (sensor failed or magnet
missing) or the stepping-motor is defective (or its driving IC on the main PCB). The head is not located in the
default position after the reset. This message will appear if the frequency of the mains is not standard 50 or
60 Hz.
Cleaning and maintenance
The operator has to make sure that safety-relating and machine-technical installations are inspected by an
expert after every four years in the course of an acceptance test. The operator has to make sure
that safety-relating and machine-technical installations are inspected by a skilled person once a year.
The following points have to be considered during the inspection:
7
1) All screws used for installing the devices or parts of the device have to be tighly connected and must not be
corroded.
2) There must not be any deformations on housings, fixations and installation spots (ceiling, suspension,
trussing).
3) Mechanically moved parts like axles, eyes and others must not show any traces of wearing (e.g. material
abrading or damages) and must not rotate with unbalances.
4) The electric power supply cables must not show any damages, material fatigue (e.g. porous cables) or
sediments. Further instructions depending on the installation spot and usage have to be adhered by
a skilled installer and any safety problems have to be removed.
Disconnect from mains before starting maintenance operation!
DANGER TO LIFE! We recommend a frequent cleaning of the device. Please use a moist, lint-free cloth.
Never use alcohol or solvents!
The lens has to be replaced when it is obviously damaged,
so that its function is impaired, e. g. due to cracks or deep scratches!
CAUTION! The objective lens will require weekly cleaning as smoke-fluid tends to building up residues,
reducing the
Light-output very quickly. The cooling-fans should be cleaned monthly. The gobos may be cleaned with a soft
brush. The interior of the fixture should be cleaned at least annually using a vacuum-cleaner or an air-jet. The
dichroic colour-filters, the gobo-wheel and the internal lenses should be cleaned monthly. To ensure a proper
function of the gobo-wheel, we recommend lubrication in six month intervals. The quantity of oil must not be
excessive in order to avoid that oil runs out when the gobo-wheel rotates. There are no serviceable parts
inside the device except for the lamp and the fuse. Maintenance and service operations are only to be carried
out by authorized dealers. Please refer to the instructions under "Installing/Replacing the lamp".
Replacing the fuse
If the lamp burns out, the fine-wire fuse of the device might fuse, too. Only replace the fuse by a fuse ofsame
type and rating.
Before replacing the fuse, unplug mains lead.
Procedure:
Step 1: Unscrew the fuseholder on the rearpanel with a fitting screwdriver from the housing (anticlockwise).
Step 2: Remove the old fuse from the fuseholder.
Step 3: Install the new fuse in the fuseholder.
Step 4: Replace the fuseholder in the housing and fix it.
Should you need any spare parts, please use genuine parts. If the power supply cable of
device becomes damaged, it has to be replaced by authorized dealers only
Should you have further questions, please contact your dealer.
8
this
in order to avoid hazards.