1
2
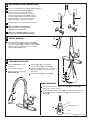
MAKE WATER SUPPLY CONNECTIONS
Turn off hot and cold water supplies before beginning.
Connect FLEXIBLE SUPPLIES (1, 2) directly
to wall supplies. Connection on fitting
supplies are 3/8" compression. Connect
left supply (Marked with a Red Stripe) to Hot
and right supply (Marked with Blue Stripe) to
Cold wall supply. Use adjustable wrench to
tighten connections. Do not over tighten.
2
1
Faucet supplies are 21" long from faucet base.
COLD
Note: If additional supply length is
required, installer must purchase
additional parts separately.
HOT
Important: If SUPPLY HOSES (1, 2) are
too long, loop as illustrated to avoid kinking.
3
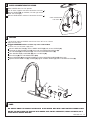
INSTALL WEIGHTS
2
With HAND SPRAY (1) seated in SPOUT (2),
install two sets of WEIGHTS (4) onto HOSE (3)
using two SCREWS (5). Locate the WEIGHTS (4)
16 inches from the underside of the sink deck.
Tighten SCREWS (5) firmly.
4
1
TEST INSTALLED FAUCET
Move HANDLE (1) into "off"
position.
With HANDLE (1) in "off" position,
unthread SPRAY (3) from HOSE (2).
Turn on water supplies.
Operate handle back to front, in COLD
and HOT positions, to flush water lines
thoroughly.
Check connections for leaks.
(See Section 5)
16"
Replace SPRAY (3) onto HOSE (2).
4
5
3
SPRAY OPERATION
With FAUCET on press TOGGLE BUTTON (4) on SPRAY (3) to
switch from stream to spray.
Press and hold PAUSE BUTTON (5) to temporarily stop flow from
SPRAY (3). Release PAUSE BUTTON (5) to resume flow from
SPRAY (3).
2
3
1
5
REMOVE
3
STREAM (AERATOR)
4
SPRAY
M 9 6 5 0 3 6 R ev 1. 2