1
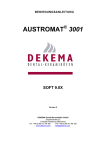
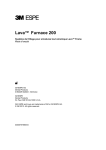
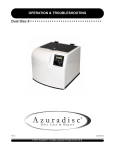
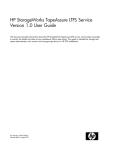
DREAM®: DEKEMA Remote Access Management
Version 2.2
DREAM® is software for the external programming, archiving and quality management of your
AUSTROMAT® machine. DREAM® supports you in the following tasks:
o
o
o
o
o
Administering and archiving firing programs
Interactive creation and editing of firing programs
Transfer of firing programs
Reading out and archiving QM reports
Converting firing programs
SUPPORTED DEVICES
o
o
o
o
o
o
o
AUSTROMAT® M starting SW version 2.2X
AUSTROMAT® 3001 starting SW version 7.2X
AUSTROMAT® 3001 press-i-dent® starting SW version 10.5X
AUSTROMAT® D2 starting SW version 1.25
AUSTROMAT® D4 starting SW version 1.30
AUSTROMAT® D4press
AUSTROMAT® D2HD
Hardware
requirements
SUPPORTED OPERATING SYSTEMS
o
o
o
Supported
operating systems
Windows® NT
Windows® 2000
Windows®XP
SYSTEM REQUIREMENTS
o
o
o
30 MB of free hard disk space
Pentium-compatible processor (i586)
At least one serial interface. If your computer does not have a serial interface, you can
use a USB RS232 adapter. If you have any questions regarding compatible adapters, System
requirements
please contact us.
DEKEMA Dental-Keramiköfen GmbH, DREAM V2.2
Page 1
1
INSTALLATION AND CONNECTION ........................................................................................... 3
2
STARTING THE PROGRAM ....................................................................................................... 4
3
PROGRAM MANAGER ............................................................................................................. 6
3.1
3.2
3.3
3.4
3.5
3.6
TERMS
6
THE ACTIVE SET
7
LOADING PROGRAMS FROM A FILE
7
DOWNLOAD SET FROM THE INTERNET
8
NAVIGATION
8
TRANSFERRING PROGRAMS INTO THE ACTIVE SET
9
3.6.1
TRANSFERRING A SET............................................................................................... 9
3.6.2
TRANSFERRING INDIVIDUAL PROGRAMS ..................................................................... 9
3.7
LOADING PROGRAMS FROM A CONNECTED AUSTROMAT®
9
3.8
MAKING CHANGES TO THE ACTIVE SET: COPYING, INSERTING, CUTTING
9
3.9
SAVING ACTIVE SETS
9
3.10
PRINTING ACTIVE SETS
10
3.11
TRANSFERRING PROGRAMS TO AN AUSTROMAT®
10
3.11.1
TRANSFERRING SETS ......................................................................................... 10
3.11.2
SEND SELECTION ............................................................................................... 10
3.11.3
EXAMPLES ......................................................................................................... 10
3.12
CONVERTING PROGRAMS
12
3.12.1
CONVERSION POSSIBILITIES ................................................................................ 12
3.12.2
EXAMPLE ........................................................................................................... 12
3.13
QUALITY MANAGEMENT
13
3.14
SELECTING THE LANGUAGE
13
4
EDITING PROGRAMS: EDITOR MODE ..................................................................................... 14
4.1
4.2
4.3
4.4
4.5
4.6
4.7
GENERAL INFORMATION
14
4.1.1
PROGRAMS ............................................................................................................ 14
4.1.2
HEADINGS ............................................................................................................. 14
4.1.3
LEAVING EDITOR MODE ........................................................................................... 14
4.1.4
SEQUENCE KEYS .................................................................................................... 15
D2 EDITOR
15
THE D2HD EDITOR
16
M EDITOR
16
D4 EDITOR
17
4.5.1
TEMPERATURES ..................................................................................................... 18
4.5.2
RATES OF RISE AND COOLING (GRADIENTS) ............................................................. 19
D4PRESS EDITOR
19
EDITOR FOR 3001 AND 3001 PRESS-I-DENT®
20
4.7.1
GRAPHIC DISPLAY .................................................................................................. 21
4.7.2
PROGRAMMING USING C, V, T AND L ...................................................................... 22
4.7.3
PROGRAMMING USING DIALOG-GUIDED BUTTONS ..................................................... 22
4.7.3.1 TEMPERATURE ................................................................................................... 23
4.7.3.2 VACUUM ............................................................................................................ 23
4.7.3.3 HOLDING PERIOD ................................................................................................ 24
4.7.3.4 LIFT ................................................................................................................... 24
4.7.3.5 PROGRAM NAME, SIGNAL AND PROGRAM JUMP ..................................................... 24
4.7.3.6 PRESSURE, PTA AND ACTIVE COOLING IN THE AUSTROMAT® 3001 PRESS-I-DENT®
...................................................................................................................................... 24
DEKEMA Dental-Keramiköfen GmbH, DREAM V2.2
Page 2
1 INSTALLATION AND CONNECTION
Extract the file “Dream_Installer.zip” into a directory of your choice (such as c:\temp). Installation
is started by activating the file “setup.exe”. Please follow the instructions in the dialog windows
of the installer.
Installation
You can also use DREAM® without being connected to an AUSTROMAT®. To transmit data, the
appropriate AUSTROMAT® must be connected, however.
AUSTROMAT® M, 3001 and 3001 press-i-dent® need a “normal“ uncrossed serial cable in which
pins 2, 3 and 5 are assigned. These cables each have a sub-D 9-pin socket connector, and a
sub-D 9-pin male connector.
Fig. 1: Pin assignment for the AUSTROMAT® M, 3001 and 3001 press-i-dent®
AUSTROMAT® D2 and D4 need a crossed zero-modem cable. In this case as well, only pins 2,
3 and 5 are needed. These cables have a sub-D 9-pin socket connector on both ends.
Fig. 2: : Pin assignment for the AUSTROMAT® D2 and D4
DEKEMA Dental-Keramiköfen GmbH, DREAM V2.2
Page 3
Connection
2 STARTING THE PROGRAM
After finishing installation, you can start DREAM® from the start menu of your computer:
Starting DREAM
Go to: Start (left bottom on the task bar) -> Programs -> DREAM -> DREAM
After the program starts, DREAM® first searches for the computer’s serial interfaces. A menu
appears with all the available AUSTROMAT® devices. If you want to work offline (see below),
you can terminate the search at any time. Fig. 3 shows that an AUSTROMAT® D4 is connected
to the COM4 interface. If you want to work with this AUSTROMAT®, mark it, and press the
“Select” button.
Fig. 3: Selecting a furnace in the program manager
If several AUSTROMAT® devices are connected to various interfaces, all the devices appear in
the list along with the corresponding interface.
To work with a specific furnace type without it being connected to your computer, you can select
an AUSTROMAT® offline, for example to create and group firing programs. However,
transmissions cannot be sent to and from the furnace. The corresponding buttons are
deactivated.
By clicking the “select furnace” button in the left function list, the connected AUSTROMAT®
devices are again found. It is also possible to connect an AUSTROMAT® to your computer and
then select it when the program is running.
To use connected AUSTROMAT® devices, you need a registered version of DREAM, or a
registration key. If an AUSTROMAT® connected to an interface is recognized, you will be asked
to enter a corresponding registration code. You can obtain the key free of cost on our Internet
site, www.dekema.com. Enter the displayed question code (see Fig. 4).
DEKEMA Dental-Keramiköfen GmbH, DREAM V2.2
Page 4
COM and offline
Fig. 4:Registering the DREAM®
After selecting an AUSTROMAT® online or offline, the Program Manager automatically opens.
DEKEMA Dental-Keramiköfen GmbH, DREAM V2.2
Page 5
3 PROGRAM MANAGER
3.1
TERMS
In order to program your AUSTROMAT®, you first need to become familiarized with the terms
that are used:
Fig. 5. Program manager
Furnace types: DREAM® supports the following furnaces: AUSTROMAT® M, AUSTROMAT®
3001, AUSTROMAT® 3001 press-i-dent®, AUSTROMAT® D2 and AUSTROMAT® D4. The
furnace type that you select when starting the program or after pressing the [select furnace]
button is termed the current furnace type.
Program: Firing programs or other programs contain the individual control commands for the
AUSTROMAT®. A typical example of a program is the preheating program that is the first
program memory for most furnaces.
Furnace type
Program
Program parameters: The individual values within a program are termed the program
parameters. The program parameters of the AUSTROMAT® D2 are for example the start
temperature, drying time, closed time, or vacuum level.
Program
parameters
Set: Group of programs for the respective AUSTROMAT®. The number of programs in the set
corresponds to the number of memories for the respective AUSTROMAT®:
Set
AUSTROMAT® M
AUSTROMAT® 3001
AUSTROMAT® 3001 press-i-dent®
AUSTROMAT® D2 and D2HD
AUSTROMAT® D4 and D4press
DEKEMA Dental-Keramiköfen GmbH, DREAM V2.2
100 memories
100 memories
100 memories
120 memories
200 memories
Page 6
3.2
THE ACTIVE SET
The central element of the program manager is the active set. The Program Manager offers a
program list on the left. You can edit, copy, delete, move and insert programs at another
location before you send them to the AUSTROMAT®, print them or save them.
Active set
The active set is initially empty after the program starts. There are several ways to create
program memories:
o
o
o
o
by loading them from a file (see 3.3 )
by loading them from the Internet (see 3.4 )
by loading them from an AUSTROMAT® (see 3.7 )
by creating you own programs (see section 4 )
A firing program is displayed in an active set with its number and name. When you select a
program (by clicking with the mouse or using arrow keys), a summary appears in the window
section directly below the active set. The parameters shown here refer to the entries in the
program editor. They depend on the selected furnace type. This information enables routine
users to immediately see the most important parameters such as the firing temperature or
holding period without changing to programming mode (see section 4 ).
3.3
LOADING PROGRAMS FROM A FILE
To load firing programs from a file, press [load set from file] (top left) in the Program Manager.
You can choose a 'dds' file from the selection dialog box. The selected set appears on the left.
Fig. 6: Loading a set from a file
Where are the sets located? dds files must be saved on your computer, or they can by
obtained via a connected network drive. If you do not yet have any sets on your computer, you
can create them yourself (see section 4), or download them from our website
http://www.dekema.com/german/download/dds.html. To directly dowload firing programs, select
the menu “Download set from internet” (see 3.4 ).
DEKEMA Dental-Keramiköfen GmbH, DREAM V2.2
Page 7
Loading from
the file
dat files that were created and/or saved with TERM or AUSTROTERM can also be entered
and processed.
When the program is started, you are asked to select a furnace type. If the file you selected
contains programs for a different type of furnace, you are given a warning. If desired, you can
convert the programs to the selected furnace type (see 3.12 ).
Converting
Warning
message
The file is still opened even if individual programs in the entered set contain errors. You are
given a warning with the numbers of the program that are flawed. Please carefully review
these programs (see section 4 ). They can contain errors!
DREAM® checks the data format and makes sure that only permissible files are loaded. If files
are damaged or were improperly edited, an error message appears.
3.4
Error message
DOWNLOAD SET FROM THE INTERNET
To download firing programs directly from our Internet database, press [Download set from the
Internet] in the Program Manager. After connecting to the Internet, you can choose a 'dds' file
from the selection dialog box. The sets are listed according to manufacturer.
Downloading
from the
Internet
Fig. 7: Download set from the Internet database
One or more sets are available depending on the number of firing programs and selected oven
type. The selected set appears on the left in the Program Manager after it is downloaded.
To use this function, your computer must have Internet access. Note the settings of your
network peripherals (firewall, proxy server, etc.). Contact your network administrator if
necessary.
3.5
NAVIGATION
Lines from the program list can be selected in the set with the mouse or the arrow keys. The
up/down arrows move the selected line within a list. Use the left/right arrows to change between
the entered set and active set. By pressing the “Ctrl” key, the selection moves simultaneously in
both lists.
Internet
connection
If the programs selected in the left and right list are identical, the text “Identical programs”
appears below the lists.
Programs can also be identical even when they are saved under different names.
Spaces between program parameters are not noted. For example, the two following programs
of the AUSTROMAT® 3001 are identical: “C100 T120 C0” and “C100T120C0”
DEKEMA Dental-Keramiköfen GmbH, DREAM V2.2
Page 8
Selection
Comparing
programs
3.6
TRANSFERRING PROGRAMS INTO THE ACTIVE SET
3.6.1
TRANSFERRING A SET
To transfer the entire entered set into the active set,
o select the first memory in the active set as the start position for the transfer.
o press [select all]
o then press [apply]. Now the entire entered set is in the active set.
3.6.2
Transferring a
set
TRANSFERRING INDIVIDUAL PROGRAMS
To transfer individual programs or program blocks:
o First select the desired programs in the entered set. You can do this either by holding
down the left mouse key and dragging the mouse, or clicking the programs with the
mouse. Press the Shift key to select a block.
o Use the selection keys to:
Transferring
Mark the start position in the active set. This is where the first program programs with
in the selection is to be located.
selection keys
Press [accept]. The selection is inserted into the active set. If a program
in the active set will be overwritten, you are given a warning.
o Or you can use drag and drop:
Transferring
Hold down the left mouse key, and drag selected blocks to the desired programs with
position of the active set.
drag and drop
Press the [close] button, and the entered set disappears.
You can transfer programs from several sets to the active set. Just load another set from a
file, and follow the above procedure. Any number of individual sets with any desired
programs can be created without programming.
3.7
LOADING PROGRAMS FROM A CONNECTED AUSTROMAT®
Just as easy as loading programs from files, you can load programs from a selected, connected
AUSTROMAT®. Press the button [load set from file]. You can now transfer the programs to the
active set as described under section 3.6
Loading from
the furnace
The transfer progress is displayed. You can terminate the loading process during the
transfer. The programs that were transferred up to this point are displayed.
3.8
MAKING CHANGES TO THE ACTIVE SET: COPYING, INSERTING,
CUTTING
Programs in the active set can be copied, deleted and moved as desired. Use the function keys
to the right of the active set.
o
o
o
3.9
By pressing [copy], the selected programs are copied to an (invisible) buffer. Select the
memory to which you want to copy the selection, and press [insert]. If existing memories
will be overwritten, you will be given a warning.
Moving functions the same as copying. First select the programs you want to move, and
then press [cut]. The selected programs will disappear, but they still exist in the
(invisible) buffer. Select the program site to which you want to copy the selection (as in
copying), and press [insert].
[cut] deletes all selected programs (with a blue background) in the active set and moves
them to the buffer.
Save set
SAVING ACTIVE SETS
You can save the active set at any time. Press [save set]; you can enter the file names and
desired folder in the following dialog box.
DEKEMA Dental-Keramiköfen GmbH, DREAM V2.2
Copy, insert,
cut
Page 9
Since you cannot see the type of furnace for which a saved set was created, it is
recommendable to include the furnace type in the file name (such as
'D4_Edelbrand_64Prozent.dds')
3.10
PRINTING ACTIVE SETS
By pressing the [print set] button, you can send the active set to a connected printer. In the
dialog box, you are asked to select a printer connected to your computer. If several printers are
available, they appear in the selection list.
Print set
DREAM® can use all the printers installed in your operating system. You can view them in
Windows by going to Start -> settings -> control panel-> printers and faxes. You can also
install new printers at this location.
3.11
TRANSFERRING PROGRAMS TO AN AUSTROMAT®
The are two functions you can use to transfer programs to a connected AUSTROMAT®.
3.11.1
Transfer to
furnace
TRANSFERRING SETS
Pres the button [send set] to transfer all the programs of the active set to the AUSTROMAT®.
Before the transfer is finalized, you are given a warning that the programs saved in the
AUSTROMAT® will be overwritten or deleted.
Programs that are empty in the active set delete the corresponding programs in the
AUSTROMAT®!
3.11.2
SEND SELECTION
Pres the button [send selection] to transfer only the marked programs of the active set to the
AUSTROMAT®. The memories of the programs are retained.
3.11.3
EXAMPLES
Press [send selection]. After the transfer, the program “test program” is at memory number 17 in
the AUSTROMAT®. All other programs are retained in the AUSTROMAT®. If, using the same
example, you press the [send set] button, all programs will be transferred. Empty memories in
the active set cause the programs to be deleted at the corresponding memory numbers in the
AUSTROMAT®.
DEKEMA Dental-Keramiköfen GmbH, DREAM V2.2
Page 10
Send selection
Fig. 8: Example: Send selection
In this example, you want to send program No. 17 (test program) in the active set to program
No. 20 in the AUSTROMAT®. Since the program position always remains the same when
transferring, you first need to copy or insert program No. 17 in the active set to memory No. 20
in the active set. Then select program memory No. 20, and press [send selection] After the
transfer, the test program is at memory No. 17 in the AUSTROMAT®.
In this example, you want to transfer a single program from a file to a free memory in the
AUSTROMAT® such as memory 20. How do you know which memory is free?
There are three options:
1. First press the button [load set from furnace]. After transmission is over, all of the
AUSTROMAT® programs appear to the left in the entered set. In the active set, move
the program to be transferred to memory 20, and press [send selection].
2. First press the button [load set from furnace]. After transmission is over, all of the
AUSTROMAT® programs appear to the left in the entered set. Transfer the entire
entered set into the active set. In the active set, you see the free and taken memories.
Copy the desired program to memory 20 in the active set, and press [send selection].
3. Use the AUSTROMAT® Program Manager to find unfilled memories (please read the
operating instructions for the specific furnace). If you determine for example that
memory No. 20 is free on your AUSTROMAT®, copy the desired program to No. 20 in
the active set, and press [send selection].
Programs that are deleted on the AUSTROMAT® are deleted permanently!
We recommend backing up programs saved in the AUSTROMAT® each time before a change is
made. Observe the following procedure:
Press [load set from furnace]: The furnace set is loaded and appears on the left.
Press [select all] and then [apply] to transfer the entire furnace set to the active set.
Press [save set]. Select a descriptive name such as “D4_Nr3_12Jan05.dds” to save the set.
You can load this file at any time using DREAM® and transfer it to your AUSTROMAT®.
DEKEMA Dental-Keramiköfen GmbH, DREAM V2.2
Page 11
3.12
CONVERTING PROGRAMS
3.12.1
Convert/import
CONVERSION POSSIBILITIES
You can use programs created for a specific type of furnace for other furnace types. However,
some furnaces are not compatible with other furnaces.
The following relationships exist:
M <-> D2 -> D4 -> 3001 <-> 3001 press-i-dent®
D4press ->3001 press-i-dent®
o
o
o
o
o
o
o
AUSTROMAT® M programs can be run on the AUSTROMAT® D2 and visa versa
(mutual compatibility).
M and D2 programs can also be used on the AUSTROMAT® D4, 3001, and
3001 press-i-dent® (upwardly-compatible).
You cannot convert D4, 3001 and 3001 press-i-dent® programs to M or D2 due to the
expanded functionality of these AUSTROMAT® devices.
Programs are upwardly compatible from AUSTROMAT® D4 to AUSTROMAT® 3001
and 3001 press-i-dent®.
You cannot convert 3001 and 3001 press-i-dent® programs to D4 due to the expanded
functionality of these AUSTROMAT® devices.
Programs can be exchanged between the AUSTROMAT® 3001 and 3001 press-ident®; however, the AUSTROMAT® 3001 does not support the commands 'press
force’, 'shorten press time’ and 'active cooling’.
Press programs for the D4press can be converted for the AUSTROMAT® 3001 press-ident®.
Since the program names of the individual AUSTROMAT® devices are not necessarily the
same length, the names may be shortened when the programs are converted.
To convert sets, first select the AUSTROMAT® on which the programs are to be used by
pressing the button [select furnace], and then press [load set from file]. Then select a set with
programs that was created for a different type of furnace.
Fig. 9: Import
Fig. 10: Conversion not possible
If the file set is convertible for the target furnace, you will be notified in a message about the
conversion process (Fig. 9).
By pressing the [import] button, the complete set is converted and will be ready to use on the
selected furnace. If the conversion is not possible, you will also be notified.
3.12.2
EXAMPLE
In this example, you want to save a D2 set for an AUSTROMAT® 3001. First select the target
furnace ([select furnace], ‘offline: 3001’) and load the set to be converted. The dialog box from
Fig. 9: will appear. Press [import]. The entered set appears after conversion. Press [select all]
and then [apply] to copy the entered set to the active set. Then save the active set [save set].
DEKEMA Dental-Keramiköfen GmbH, DREAM V2.2
Page 12
3.13
QUALITY MANAGEMENT
Present AUSTROMAT® ceramic furnaces allow you to print out a record of the last firing.
By selecting the [quality management] button in the left function list, you can retrieve this record
and then print it, or save it in HTML format.
After saving it, Internet Explorer is automatically started and shows the saved record.
In the AUSTROMAT® M, 3001 and 3001 press-i-dent®, the QM (quality management module)
must be activated on the furnace. Please read “The Quality Management Module” in the
operating instructions of your AUSTROMAT®.
The [quality management] button is only activated if you have selected a connected furnace.
(see 2 ). For explanations of the record, please consult the operating instruction of your
AUSTROMAT®.
3.14
SELECTING THE LANGUAGE
The flag in the top left corner shows the selected language. To switch to another language, click
the flag and select the language you want. When DREAM® is restarted, the last selected
language is always used.
DEKEMA Dental-Keramiköfen GmbH, DREAM V2.2
Page 13
4 EDITING PROGRAMS: EDITOR MODE
4.1
4.1.1
GENERAL INFORMATION
PROGRAMS
You can get to editor mode by clicking the buttons [change program] or [create program]. Here
you can create or edit programs in the active set. You can also start editing mode by doubleclicking a line in the active set. The editor is adapted to the respective furnace type and offers
corresponding functions.
To create a new program, select a free program memory in the active set, and press [create
program]. An empty program appears in the editor (for the AUSTROMAT® 3001 and 3001
press-i-dent®) or a preset standard program that can be adapted as desired (for the
AUSTROMAT® M, D2 D2HD, D4 and D4press).
If you select an existing program in the Program Manager, the words on the button change to
[change program]. The parameters of the selected program are transferred to the editor.
Change
programs
In all program editors, the program number and name appear in the top fields. The program
number cannot be changed. It refers to the program selected in the active set.
Program
number
Create
programs
To change the program number, leave the editor by pressing the [ESC] button among the
function buttons in the dialog box, or press [ESC] on your keyboard. You will return to the
Program Manager without any changes occurring, and you can select the desired memory.
Press [create program] to go to editor mode.
The name of the program can be changed. Click the mouse in the name field, and enter or
change a name. In addition, the [change program name] button in the function list can be used
to quickly go to the name field.
Change
program names
Program names exclusively consist of the numbers 0 to 9, upper-case letters A to Z, and
spaces. Spaces can also be used in the furnace program editor. Impermissible characters are
ignored, and small letters are changed to capital letters. The only exception are parentheses
“(‘)“ and periods “.“ that can be used with the AUSTROMAT® 3001 and 3001 press-i-dent® and
are therefore permitted on all furnaces for reasons of compatibility.
4.1.2
HEADINGS
To organize programs more clearly, memories can also be given headings without a firing
program in the background.
With the AUSTROMAT® M, D2, D2HD, D4 and D4press, there is a checkbox next to the name
field for creating headings in editing mode. If you place a check in the box and leave the editor
by pressing [apply], only the program name appears in the Program Manager. With the
AUSTROMAT® D4 and D4press, a heading can also be created by selecting “Heading“ in the
Editor selection window (see ). A program is not saved.
You can also create headings for AUSTROMAT® 3001 and 3001 press-i-dent® furnaces. Just
provide a name and leave the program line empty (or delete it if you want to create a heading
from an existing program).
4.1.3
Create
headings
LEAVING EDITOR MODE
To leave the editor, press [apply] or [ESC] (Escape). If you have created or changed a program,
this program will be accepted into the active set by pressing the [accept] button. If you want to
return to the Program Manager without accepting the changes, press [ESC] in the function list
or on your keyboard.
DEKEMA Dental-Keramiköfen GmbH, DREAM V2.2
Page 14
[ESC] and
[apply]: back to
Program
Manager
4.1.4
SEQUENCE KEYS
The sequence keys [-->] and [<--] move the cursor through the individual fields similar to
programming on the AUSTROMAT®. You can of course also select the fields directly with the
mouse.
4.2
D2 EDITOR
D2 editor
Fig. 11: D2 editor
If you selected an AUSTROMAT® D2 in the Program Manager, the D2 editor appears whose
arrangement and functionality corresponds to the program editor of the AUSTROMAT® D2.
In the program line, you can adapt the individual program parameters. By placing the mouse
arrow over the input fields, you are given information in the information window on the range of
the corresponding parameter. For the program sections “Dry” and “Close”, you only have to
enter the duration in the time column (right column). While the program is running on the
furnace, the associated temperatures and lift positions are automatically calculated by the
“Autodry” function (for further information, consult the user manual of the AUSTROMAT® D2).
The values can either be entered via the keyboard, or by the arrows in higher or lower
increments. When a value is entered that lies outside of the range, the entry is corrected to the
closest permissible value.
The graph in the right top of the editor shows the temperature and vacuum curves during the
program. The end of the vacuum holding period is indicated by the vertical blue line.
The vacuum holding period cannot be longer than the end temperature holding period, and
entries are correspondingly limited. If the vacuum holding period and the end temperature
holding period are to be increased, the end temperature holding period must first be entered.
DEKEMA Dental-Keramiköfen GmbH, DREAM V2.2
Page 15
4.3
THE D2HD EDITOR
The AUSTROMAT® D2HD furnace is for long sintering firings. The programming offers longer
program steps, and the vacuum function was discarded. In contrast to the D2, the times for
closing, preheating and holding are indicated in hours and minutes. The values are entered the
same way they are for the D2 furnace (section 4.2 ).
D2HD editor
Fig. 12: D2HD editor
4.4
M EDITOR
The editor for the AUSTROMAT® M is not very different from the D2 editor. However, in the
AUSTROMAT® M, the vacuum holding period is programmed using the letters “a” to “d” (see
operating instructions for the AUSTROMAT® M).
Table 1 shows the differences in programming the vacuum holding period between the
AUSTROMAT® M and D2. A firing temperature holding period of 10 minutes is assumed.
M furnace
D2 furnace
End-temperature Vacuum holding
holding period
period
Vacuum holding
period
End-temperature
holding period
10:00
.
00:00
10:00
10:00
a
02:30
10:00
10:00
b
05:00
10:00
10:00
c
07:30
10:00
10:00
d
10:00
10:00
Table 1: Programming the vacuum holding period in the M and D2 editors
DEKEMA Dental-Keramiköfen GmbH, DREAM V2.2
Page 16
M-Editor
4.5
D4 EDITOR
To create a D4 program, you can use the Standard and Professional editors. Double-click an
empty memory, or press the button [create program] to go to the Editor selection window (Fig.
13). You can edit an existing program by pressing the button [change program] or doubleclicking. The corresponding editor is automatically selected since an existing program can only
be edited with the corresponding editor.
The D4 standard editor allows you to enter programs where the temperature levels are specified
for cooling and relaxing (see Fig. 14). If you select the D4 Professional Editor, you can freely
define all the temperatures and rise rates.
Fig. 13: D4 editor selection
Fig. 14: D4 Standard Editor
The graph window shows the temperature curve of the program. The time window for the
vacuum is marked by a blue line. The end of the vacuum holding period is indicated by the
vertical blue line. The graph is automatically updated when the program parameters in the table
are changed.
The program itself is processed line by line. For the program sections “Dry” and “Close”, you
DEKEMA Dental-Keramiköfen GmbH, DREAM V2.2
Page 17
D4 editor
only have to enter the duration in the time column (right column). While the program is running
on the furnace, the associated temperatures and lift positions are automatically calculated by
the “Autodry” function (for further information, consult the user manual of the AUSTROMAT®
D4)
Fig.15: D4 Editor
4.5.1
TEMPERATURES
In the first column, enter the temperatures for the program sections “Preheating”, “Temperatures
1 to 3” and the vacuum end temperature “VAC”.
Lines that are not used are gray and deactivated. If you want to use a deactivated line, doubleclick the temperature field of this line. You can then enter a temperature and edit the remaining
fields of the line.
Enter a “0” in the temperature field to deactivate a line.
Entering
temperatures
Only the lines “Temperatures 1 to 3” and “VAC” can be deactivated. In addition, at least one
temperature must always be indicated. It is hence impossible to deactivate all three
temperature lines (1 to 3). If you try to deactivate the only active line by entering a “0”, the
minimum value of this temperature will be entered.
To ensure that the program runs smoothly, the permissible ranges and relationships between
the different fields are checked against each other when the values are entered. A change in
one temperature may cause a temperature to be changed in another field.
DREAM® independently makes these changes; however, a warning is issued for each change.
Temperature
ranges
In addition to the ranges of the individual fields, the following conditions are checked:
o
o
o
The first entered temperature must be greater than the preheating temperature.
The final vacuum temperature (the chamber is flooded when this is reached) must be
less than the highest temperature in temperatures 1 to 3 (otherwise, this temperature
would never be reached).
The vacuum hold time can be as long as the temperature hold time to which the VAC
temperature refers.
DEKEMA Dental-Keramiköfen GmbH, DREAM V2.2
Page 18
Vacuum
parameters
Fig. 16: D4 program example
Explanatory note regarding vacuum parameters (VAC line):
The vacuum entered in the field “VAC Level” is generated after the preheating step, that is,
after the preheating temperature is reached and the preheating period is over. In Fig. 16, this
is 5 minutes. The vacuum is held until the temperature in the “VAC” field is reached. In Fig.
16, the vacuum end temperature is the same as temperature 1 (termed T1 in the following).
Hence when T1 is reached, the firing chamber is flooded.
Since a hold time is stipulated after T1 is reached (in Fig. 15, 1:00 minute is entered on the
right in the T1 line), a maximum vacuum holding time of 1:00 minutes can be entered.
It is not possible to enter a vacuum holding time when the vacuum end temperature lies
within a rise period, i.e., not on a temperature plateau (see Fig. 16). The vacuum end
temperature is reached after 10 minutes, but the temperature continues to rise. For this
reason, there can be no vacuum holding time when the temperature remains constant.
In the example in Fig. 16, we can also see that the chamber is flooded upon first reaching
the VAC temperature, even when the temperature curve again reaches the VAC temperature
of 750°C after approx. 13 minutes.
4.5.2
RATES OF RISE AND COOLING (GRADIENTS)
The speed at which the D4 should heat up or cool down from one temperature to the next can
be determined in the middle column for temperatures 1 – 3. The permissible range is 2 to
99°C/min. A low value means a slow rise, and higher values shorten the heating or cooling
time. By entering “0”, the maximum possible heating and cooling rates are used.
The maximum rise rate depends on your AUSTROMAT® D4 (see operating instructions and
check program). In the graph, this maximum gradient is assumed to be 100°C/min. If you
use maximum rise rates, the program in the furnace may progress faster than displayed in
the graph. The times in the graphic are only approximate values.
4.6
D4PRESS EDITOR
The AUSTROMAT® D4press was developed from the D4 and has a pressing function in
addition to the functions of the D4 furnace. To create a press program, select a free program
memory in the active set, and press the button [create program]. Or you can double-click an
empty memory. In the editor selection window, select the entry “Press”.
DEKEMA Dental-Keramiköfen GmbH, DREAM V2.2
Page 19
Gradients
(change rates)
The editor is used in the same manner as the editors described above. The start and end
temperature, the rise rate, the holding time, pressing time, and the press level can all be edited
in the press program. The graphic in the top area of the window shows the temperature curve
and the pressing time (in red).
Fig. 17: D4press editor
4.7
EDITOR FOR 3001 AND 3001 PRESS-I-DENT®
The AUSTROMAT® 3001 and 3001 press-i-dent® are the most versatile and flexible
AUSTROMAT® models. However, you will need a bit of practice as well as an understanding of
ceramics and the corresponding firing techniques to program with the CVTL commands that are
used.
The DREAM® software makes it easier for you to program since, in addition to the CVTL
commands, you can create all the commands guided by a dialog using the function buttons on
the left and right side. In addition, the graphs provide information on the parameters of the
selected programs. You can select various editors to create new programs. Select an empty
memory in the active set, and press the [create program] button. You can also double-click an
empty memory. The Editor Selection dialog appears as shown in Fig. 18. Select the Classic
Editors to go to the editing window of the AUSTROMAT 3001 (press-i-dent) that is described in
section 4.7.2 . You can also use the D4 Editor (Standard, Professional or Press). Their use is
described in sections 4.5 and 4.6 . After entering your program, press the [accept] button in the
respective editor. This will return you to the Program Manager. However, you can only change
existing programs in the AUSTROMAT 3001 (press-i-dent) editor.
DEKEMA Dental-Keramiköfen GmbH, DREAM V2.2
Page 20
Editor for 3001
and press-ident
Fig. 18: Editor selection window of the AUSTROMAT® 3001 press-i-dent®
4.7.1
GRAPHIC DISPLAY
The graphs indicate the status of the parameters at any desired time.
The graph in the right bottom of the editor shows the temperature and vacuum curves during
the program. The end of the vacuum holding period is indicated by the vertical blue line.
The pressure is also shown in the top graph in the AUSTROMAT® 3001 press-i-dent® (Fig. 14).
The individual commands that you seen in the program line below the graph change individual
parameters.
In Fig. 14, the command “T055.C1000” is marked in violet. This command represents a
temperature change to 1000°C with a rise rate of 55°C/min. The time range in which the change
occurs is marked in green in the graphs.
In addition, the [temperature] button (top in the right function list) is marked orange. If you want
to change this command, you can do so by clicking [temperature] (see below).
DEKEMA Dental-Keramiköfen GmbH, DREAM V2.2
Page 21
Status display
Fig. 19: 3001-Editor
4.7.2
PROGRAMMING USING C, V, T AND L
For those who are used to editing the command sequence and enjoy the associated
advantages, the editor corresponds to the AUSTROMAT® programming menu.
The programming commands can be entered in the command window below the graph using
your computer keyboard. The syntax is checked when you click on an area outside of the
program line. You can recognize a faulty program by the green background of the program line
(see Fig. 19). The graphic display is also updated.
If you find an error in your program, the program line is given a red background, and the faulty
element is marked. The graph simultaneously disappears.
Conventional
operation:
CVTL
commands
If there is an error in the program line, all buttons except for [ESC] are deactivated. The error
must be eliminated in the program line.
If you are unable to eliminate the error, it is recommendable to terminate editing by pressing the
[ESC] button or by pressing “ESC” on your keyboard. This will return you to the Program
Manager. The changes will not be made.
If you have any questions regarding programming using CVTL commands, please read the
corresponding section in the operating instructions for your AUSTROMAT® 3001 or 3001 pressi-dent®.
4.7.3
PROGRAMMING USING DIALOG-GUIDED BUTTONS
You can use all the CVTL commands guided by dialog boxes via the buttons on the side.
During programming, the corresponding program line appear in the text field below the graph.
By using the sequence keys, you can move forwards and backwards in the program. You can
also use the mouse to mark a specific command.
Programming
with buttons
Insertion mode
and change
mode
If the cursor is between two commands, you are in “insertion mode”. You can now press any
function key to insert the corresponding command. If the cursor is in the middle of a
command, you can only use the function key marked orange to change the current
command.
In addition, you can use the functions from the bottom button bar. You can delete the marked
text from here, or go to insert mode by pressing the [insert before <COMMAND>] in insert
mode.
DEKEMA Dental-Keramiköfen GmbH, DREAM V2.2
Page 22
4.7.3.1 TEMPERATURE
Press the [Temperature] button to go to the temperature dialog (Fig. 20). This dialog box serves
to set the temperature over the course of the program.
Temperature
dialog
Fig. 20 Temperature menu
It has three functions:
o
o
o
The heating can be turned on and off. To do this, press the [heat ON/OFF] button. Any
additionally entered temperature is approached at the maximum heating rate.
Select “linear change”: You can enter the gradients in °C per minute in the entry field.
(Example: A gradient of 55°C/min means that the temperature rises or falls each
minute by 55°C until the target temperature is reached).
Select the option “time dependent change”: Here you can enter the period in which the
target temperature should be reached. The temperature rises or falls linearly until it
reaches this temperature.
Vacuum dialog
4.7.3.2 VACUUM
Fig. 21: Vacuum menu
In the vacuum dialog box, you can enter a vacuum between 0 (low vacuum) and 9 (maximum
vacuum).
DEKEMA Dental-Keramiköfen GmbH, DREAM V2.2
Page 23
4.7.3.3 HOLDING PERIOD
The duration of states is entered in the “hold time” dialog box. The dialog corresponds to Fig.
21.
4.7.3.4 LIFT
Lift dialog
The lift position can also be programmed in 10 steps (0=open to 9=closed). There is a
corresponding option in the lift menu for time-controlled movement (Fig. 22).
Fig. 22: Lift menu
4.7.3.5 PROGRAM NAME, SIGNAL AND PROGRAM JUMP
A program can contain a maximum of 66 characters. Spaces are not recognized by the editor.
Program name
An acoustic signal can be generated by pressing the “signal” button. A range of 1 to 9 is
available.
Signal
A “program jump” can follow the end of a program. The entered value corresponds to the
memory number of the following program to be executed. This command can be used to allow
programs to run one right after the other.
Program jump
After a program jump, all the function keys are blocked since the program jump always marks
the end of a program. If you accidentally enter a program jump, delete the corresponding
command in the program line (such as command to jump to program No. 33: “/33”).
4.7.3.6 PRESSURE, PTA AND ACTIVE COOLING IN THE AUSTROMAT® 3001 PRESS-I-DENT®
The left function list contains special functions. The buttons [press force], [press time automatic]
and [active cooling] are only activatable when using an AUSTROMAT® 3001 press-i-dent®.
The pressure is entered in steps of 0 (application of the muffle) to 9 (maximum pressure) as in
the case of the vacuum and lift parameters.
Pressure
The automated press time function can only be activated when pressure was applied in a
prior command. The automated press time can be used to automatically shorten the length of
pressure corresponding to the material behavior.
PTA: press
time automatic
Example:
A hold time of 400 sec. and a shortening of 1 (T400.1) has the following effect: The pressure is
applied for a maximum of 400 sec. If force needs to be readjusted within 35 seconds, the
remaining pressure time is reduced by 10%. Additional reductions by 10% of the remaining
DEKEMA Dental-Keramiköfen GmbH, DREAM V2.2
Page 24
press time are calculated after another 5 seconds if there is no readjustment within this period.
Readjusting the force is no longer necessary when the material is completely compressed. If
readjustment is necessary, the PTA is interrupted until the conditions are constant. For further
instructions on using the automated press time, see the user manual of your AUSTROMAT®
3001 press-i-dent®.
The press time is shortened depending on the material properties and hence cannot be
included in the graph.
DEKEMA Dental-Keramiköfen GmbH, DREAM V2.2
Page 25