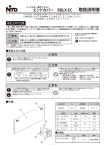
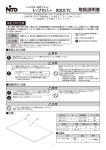
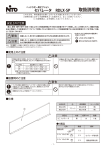
1
 CMSi Admin Manual CMSi Admin Manual _________________________________________________________________________ Contents 1 2 3 4 5 Introduction ....................................................................................................................................3 System Requirements .....................................................................................................................3 Installing CMSi.................................................................................................................................3 Upgrading from other versions of CMS ..........................................................................................4 Setting up and customising CMSi....................................................................................................6 5.1 General Setup .........................................................................................................................6 5.1.1 Extra options if outside the UK .......................................................................................7 5.1.2 CMSi Look and Feel (styles, colours)...............................................................................7 5.2 System Settings .......................................................................................................................8 5.3 Lookup Codes..........................................................................................................................8 5.4 Setting up Remote Work Recording webpage......................................................................14 6 User Management and Permissions .............................................................................................15 6.1 Adding Users .........................................................................................................................15 6.2 User Interest Groups.............................................................................................................16 6.2.1 Assign Staff to Organisation Hierarchy .........................................................................17 6.3 Permissions ...........................................................................................................................19 6.3.1 Example User Permission requirement ........................................................................19 6.3.2 How to set up Permission Groups and Permission Sets ...............................................22 7 Language Translations and Re‐labelling........................................................................................26 7.1.1 Setting up your Organisation and Translation Collection .............................................26 7.1.2 Translating labels, tabs, buttons and form names........................................................26 7.1.3 Translating System Messages .......................................................................................28 7.1.4 Translating Tree Tooltips...............................................................................................28 7.1.5 Translating Mapping Info Panels...................................................................................29 8 Customising MyCMSi ....................................................................................................................30 8.1 Setting up MyCMSi................................................................................................................30 8.2 Filtering MyCMSi tasks to particular users ...........................................................................32 9 Mapping ........................................................................................................................................33 9.1 Base mapping layers .............................................................................................................33 9.2 Core CMSi mapping layers ....................................................................................................34 9.3 Adding and styling new mapping layers ...............................................................................35 9.4 Managing Metadata..............................................................................................................35 9.5 Managing core CMSi mapping data......................................................................................35 10 Importing and Exporting data .......................................................................................................36 11 Reporting ......................................................................................................................................37 11.1 How reporting works ............................................................................................................37 11.2 Writing your own Standalone Reports .................................................................................37 11.2.1 Using the Standalone reports from within CMSi ..........................................................41 11.3 Writing your own Filtered reports ........................................................................................44 11.3.1 Configuring Filtered Reports .........................................................................................44 11.3.2 Creating New Reports ...................................................................................................46 11.3.3 Inserting Images............................................................................................................56 11.3.4 General Assistance with DataDynamics reports ...........................................................56 12 Backing up CMSi............................................................................................................................58 13 CMSi Help......................................................................................................................................58 14 CMSi Entity Diagrams....................................................................................................................61 _________________________________________________________________________ Page 1 Manual v 2 ©CMS Consortium 2012 CMSi Admin Manual _________________________________________________________________________ 14.1 14.2 14.3 14.4 14.5 Sites.......................................................................................................................................61 Features ................................................................................................................................61 Tree .......................................................................................................................................61 CMSi Data..............................................................................................................................61 Annual Projects .....................................................................................................................61 _________________________________________________________________________ Page 2 Manual v 2 ©CMS Consortium 2012 CMSi Admin Manual _________________________________________________________________________ 1 Introduction This User Manual is targeted at the CMSi administrator. It describes how to setup, configure and manage the system. It does not describe how to use the system for data entry, filtering and reporting. This is covered by the CMSi User Manual. You can either read this manual and search for items using the standard FIND (ctrl+ F) functionality within the pdf or from within CMSi, you can use the form Help button available on most admin forms to jump to the section of this manual that is specific to that form. If you need more help, technical support and maintenance contracts are available. Contact [email protected]. 2 System Requirements CMSi uses SQL Server 2008 R2 as the database platform and is written in .NET Framework 4. This defines the system requirements as: Supported Operating Systems Supported Architectures RAM Minimum Disc Space Windows 7; Windows Server 2008; Windows Server 2003; Windows Vista; Windows XP* x86, x64, ia64 512 MB (minimum); 1 GB (recommended) CMSi: 60Mb minimum SQLServer 2008 R2 Express: 2.2Gb Processor type Pentium III compatible processor or faster Processor speed Minimum 1.0 GHz Display 1024 x 768, 256 colours (minimum); but higher resolution screens especially widescreen monitors will improve the experience. *At least certain Service Packs are required for different setups. More information on this is available at: •
•
http://www.microsoft.com/net/download.aspx for more information about the requirements of .NET Framework 4. http://msdn.microsoft.com/en‐us/library/ms143506.aspx for more information on the requirements for SQL Server 2008 R2. 3 Installing CMSi CMSi can be installed on a local PC as a standalone application, on multiple PCs in an office sharing the same database or on a Terminal Server or Citrix environment where users based in different offices work on the same centralised database. This last option is the recommended option as it means there is a single centralised database with no requirement to merge multiple remotely held databases, the data is always up to date and database maintenance and upgrades are simple to manage. exeGesIS also offer hosting packages for a centralised CMSi database which mean that you do not have to worry about hardware infrastructure, installations, running upgrades, or backups and _________________________________________________________________________ Page 3 Manual v 2 ©CMS Consortium 2012 CMSi Admin Manual _________________________________________________________________________ makes technical support more efficient. For more information, see http://www.software4conservation.com/pricing#software‐as‐a‐service. For instructions on running the installation process – see the CMSi Installation Guide. 4 Upgrading from other versions of CMS To upgrade from CMS7, you first install CMSi before uninstalling CMS7. From the CMSi Tools menu, choose the Upgrade option to open the Upgrade form. Data must be in CMS7.5 format. If you are trying to upgrade an older dataset, contact [email protected]. Select your Projects7.mdb, CMSCust7.mdb and your CMS7 datavolume (the default is cmsdata.mdb) to import your CMS7 data. When the Upgrade process has finished, you will need to refresh the CMSi Site Tree (using the button) to see all your sites. Once your CMS7 data has been imported and you are happy with it, you can uninstall CMS7 although it is recommended that you retain your data files. CMS7 data will be imported into CMSi and you will be able to use it straight away although you may have to tidy up some data issues. They are: •
•
•
Your CMSi dataset will have no associated mapping data. The Site and Compartment boundaries are the most important to import – see the CMSi User Manual on how to import data from an external mapping layer and link to your CMSi data. exeGesIS can also help import and link existing GIS data to CMSi layers automatically. If your import found CMS7 data in tables that used Lookup Codes that were no longer in your CMSCust7.mdb, a record will be put into your Lookup table prefixed with “Missing”. This can happen if codes have been deleted from your CMS7 lookup tables or if a remote install has added codes but not given them to the centrally maintained cust file. You will have been given a report to identify these in CMS7 before upgrading to give you the opportunity to clean up this data. There may be some text sections in which the formatting isn’t quite what you expect. This will only happen with complicated formatting. Text in the Site Description sections will be less likely to have problems than text in the planning sections but we do not anticipate this to be a large problem. Your original data has been imported into CMSi into a hidden field so it can be retrieved if needs be so contact [email protected] about this if you have to. _________________________________________________________________________ Page 4 Manual v 2 ©CMS Consortium 2012 CMSi Admin Manual _________________________________________________________________________ •
•
•
•
•
•
At the Site level, if you have entered Admin Areas (CMS7 = Regions), you may want to identify the Admin Area Type now that you have the ability to do this or convert some into a Organisational Hierarchy so that the sites become structured under this organisational region in the Site Tree (see CMSi User Manual). If you do not use Features, as mentioned above, you will need to use a prepared customisation in CMSi that translates certain labels and hides other ones. Your CMS Support team will have the appropriate customisation settings to do this. In the rare case of having one Objective for two or more Features in CMS7, the shared objective and related Factors, Attributes and Management will be copied into the individual Feature records. This is because the Feature and Objective levels have been combined for simplicity in CMSi. In CMS7, there were memo fields to discuss why you chose some Factors & Limits and Attributes & Limits on the Objective form and then you identified the actual Factors and Attributes you wanted to use as performance indicators in the Site Tree. The problem with this was that the text discussing an individual Factor was “lost” in a larger block of text on the Objective form. In CMSi, at the Factor / Attribute / Management level, there is a new Description field in which you can discuss that particular Factor, Attribute or Management. Hence the field at the Feature level has now become more of an overall discussion field where you can also list ones you considered but did not choose as performance indicators. You may want to reorganise your text to fit this new structure but this can be done over time. In CMS7, you could plan which compartments an Annual Project should occur within. This information was stored in a table that linked the Annual Project to the Compartment code. This is handled differently within CMSi in that this is linked to the Compartment GIS polygon. Hence before this data is visible in CMSi, you need to create the spatial boundaries for the compartments. If you then contact [email protected], you will be told how to relink the Annual Projects to the Compartments once you have done this. If you have planned staff time in hours in CMS7, you will need to use the Hours customisation in your setup (see Customisation section below). _________________________________________________________________________ Page 5 Manual v 2 ©CMS Consortium 2012 CMSi Admin Manual _________________________________________________________________________ 5 Setting up and customising CMSi 5.1 General Setup There are a number of aspects to CMSi that are customisable. exeGesIS will help you do this as part of installing CMSi and all you have to do is tell us your options. These aspects are: Aspect Description Requirement Start Month of Financial Year The Month name Admin User Keys This controls which users have access to the tools to translate labels or make fields hidden or read only You first set up the users in CMSi and tell us the code of the users that are allowed to do this Use Windows Identity This allows you to use your Windows login to login to CMSi. The Windows user names need to match the CMSi User Name (not the CMSi User Key). Yes/no Organisation Name Controls your name on the title bar of the program Show Factors See Management planning guide Yes/no Show Attributes See Management planning guide Yes/no Default Font in Text Fields Allows you to use a corporate standard font in text fields Default Font Size in Text Fields Allows you to use a corporate standard font size in text fields Location of Report files File Location If you want to store your report files outside of the default location. This maybe useful if you have installed CMSi on a LAN and want to share report files centrally GIS Gazetteer CMSi comes with a UK gazetteer of place names but if you have your own gazetteer, the data could be _________________________________________________________________________ Page 6 Manual v 2 ©CMS Consortium 2012 CMSi Admin Manual _________________________________________________________________________ Aspect Description Requirement used in CMSi. Please discuss this with exeGesIS as the data needs to be in a certain format. If the gazetteer is in a standard database format with a place name, X and Y coordinates, it should be possible to import into CMSi . Splash Screen image You can use your own splash screen image on the CMSi logon screen. A jpeg image 5.1.1 Extra options if outside the UK Aspect Your Mapping Projection Description The official GIS name of your mapping projection Requirement The epsg value if known or else what ArcGIS or MapInfo calls your countries mapping projection 5.1.2 CMSi Look and Feel (styles, colours) As discussed in the CMSi User Manual, the CMSi look and feels (font type and size, tree icon colours, form background colours etc) are controlled by a Style file that you can choose in the Tools – Application Style dropdown. CMSi ships with some different style options offering different font sizes and tree icon design. If you want to create some new styles covering these issues, contact [email protected]. _________________________________________________________________________ Page 7 Manual v 2 ©CMS Consortium 2012 CMSi Admin Manual _________________________________________________________________________ 5.2 System Settings Most of the configuration settings listed in General Setup section above can be viewed and edited in the System Settings form under System Administration on the Permissions menu. This form lists all the system configuration settings. NB. These are important settings for how the application runs and should only be edited with care. For example, you can set or change your Organisation Name, which appears in the title at the top of the CMSi window. 5.3 Lookup Codes To access all the Lookup Codes, from the Tools Menu, choose Manage Lookup Tables. _________________________________________________________________________ Page 8 Manual v 2 ©CMS Consortium 2012 CMSi Admin Manual _________________________________________________________________________ Important: In many of these Lookup Tables, there is a field called “Current”. A rule must be that if a lookup table value has ever been used in CMSi, it must never be deleted but instead made “non‐
current” (it is a true/false field). Then if you are planning ahead, the lookup value will not be one of the options presented but historical data will still find the lookup value description. A summary of the tables follows and more information on each can be read in the relevant sections of the CMSi User Manual. The tables are grouped into categories according to their function within different parts of CMSi. Configuration tables: Lookup Table Help Links Description The links to the relevant help from CMSi forms HTML Template Groups This table holds any HTML templates being used in the text editor windows. It is not recommended to edit the values here but records can be deleted here This can be used in the Time tab on the User form when setting up a user, to record their Leave It is not recommended to edit these codes from the Manage Lookups interface but instead from the Translations form These set up Organisations for use in Translations It is not recommended to edit these codes from the Manage Lookups interface but instead from the Permissions form These set up the Permission sets that can be allocated to a Permission Group (see below) These are the individual permission settings. It is not recommended to edit these from the Manage Lookups interface but instead using the <F11> tool Annual Project priorities Used for tracking when decisions were made related to one‐off projects Leave Type Organisation Translations Organisations Permission Groups Permission Sets Permission Settings Priority Codes Project Decision Status Resources for Site groups Edit Priority Do not edit unless you are creating your own help documents Some example templates are supplied in the Tutorial database Advanced option – specific to Dutch users Not in this interface Optional Edit Optional edit Optional Edit Not in this interface Default values supplied. Example values supplied. Used optionally Advanced option – specific to Dutch users _________________________________________________________________________ Page 9 Manual v 2 ©CMS Consortium 2012 CMSi Admin Manual _________________________________________________________________________ Lookup Table Role Based Tasks Section Reports Translation Collections Translations User Roles Xml Export Type Description This is how to customise MyCMSi and is discussed in more detail below This controls which reports can be run from individual forms and includes what parameters can be taken from that form to filter the report These set up the different Translation collections that can be allocated to an organisation (see below) These are the individual translated labels. It is not recommended to edit these from the Manage Lookups interface but instead using the F12 tool It is not recommended to edit these codes from the Manage Lookups interface but instead from the Permissions form Used for export financial information to external applications Edit Priority Some examples supplied but see below Some defaults provided and you can add more. Optional edit Not in this interface Not in this interface Advanced option – specific to Dutch users Planning: Lookup Table Annual Project Resource Status Description Relates to the process that restricts editing rights on resources, planning and recording, to certain roles depending on the stage of the budget approval process Assessment Status Relates to the assessment at Project level on the overall success of that particular project Feature Classification Categories Features can be classified into different types this is useful for filtering. It could be worth restricting this to types of statutory designations, e.g. “Natura2000”, “SSSI”, “NNR”, “Local Wildlife Site” Feature Classifications An optional additional level allowing you to add, for example, which individual Habitats Directive Habitat or Species code the Feature corresponds to. Feature Status Codes The standard values are supplied but Edit Priority Default values supplied. Optional edit Default values supplied. Optional edit Example values supplied. Optional edit Example values supplied. Optional edit Default values supplied. _________________________________________________________________________ Page 10 Manual v 2 ©CMS Consortium 2012 CMSi Admin Manual _________________________________________________________________________ Lookup Table Library Projects Monitoring Status One off Project Action Rules Priority Codes Progress Status Project Approval Role Project Codes Project Codes for Site Types Project Decision Status Project Tags Staff Costs Staff, Finance, Equip Codes Sub Feature Categories Description can be edited Any Project created as a Library Project is held here. You are unlikely to edit from here although you can delete a Library project from here This contains the codes used in assessing monitoring at the Factor or Attribute level Annual Project priorities Used at the Annual Project level to indicate how work is progressing Used for tracking approval given for one‐off projects Ideally, project codes are managed centrally so if you want new project codes, these are added by the CMS Support team and provided to all CMSi users. You can however edit the codes in terms of ValidCode as this allows project codes to be selectable. You could for instance make codes selectable at the two character level if you wanted to keep the codes simple. This allows you to link particular project codes, e.g. R for Recording projects with Sites of a certain type, e.g. N for Nature sites. The codes must exist in the respective tables Used for tracking when decisions were made related to one‐off projects Used to tag Projects and Annual Projects. See CMSi User Manual for example codes. An average cost per role to allow costs to be calculated from staff time values Staff, Expenditure, Income and Equipment codes See CMSi User Manual for a description of what Sub Feature Types are. All Sub Features must have Edit Priority Optional edit Not in this interface Default codes provided Advanced option – specific to Dutch users Default values supplied. Example values supplied. Example values supplied. Used optionally Default values supplied. You can edit what codes can be selected Optional Example values supplied. Used optionally Important. Some examples supplied Optional Critical. You cannot plan work without codes in here Example values supplied. Used optionally _________________________________________________________________________ Page 11 Manual v 2 ©CMS Consortium 2012 CMSi Admin Manual _________________________________________________________________________ Lookup Table Sub Features Description Edit Priority a category with examples being “Archaeology” or “Breeding Bird Assemblage” Within the categories, the Sub Example values supplied. Features could be further subdivided, Used optionally e.g. “Listed Building”, “State Care Monument”, “Scheduled Monument” Sites: Lookup Table Admin Area Types Admin Areas Compartment Types Habitat Codes Organisational Hierarchy Site Description Headings Description This distinguishes between types of Admin Areas that a Site can be tagged to, e.g. County, Council area, LBAP region, community This contains the actual admin areas and their type (see above) that a Site can be tagged to, e.g. “Devon”; Type = “County” There may be different compartment types used on a site e.g. a management unit or a recreation zone Additional classification systems can easily be added if required Edit Priority Optional but useful Optional but useful Example values supplied. Optional edit Default codes provided for Corine, EUNIS, NVC, Phase 1 and UK BAP Optional but useful If you need to show in the Site Tree the hierarchy that a Site sits within, the higher levels are entered here. You can create multi‐levels by making one code the parent of another code The Headings used in the Site Default values supplied Description. You can create new but you could well add groups and headings here. Each Plan your own. Group must have a Heading Code of 0 which contains the Plan Group name. The Heading Codes must be structured hierarchically and if a Heading is just a heading and should not contain text, do not tick it as Editable. Note: If you want to sort this table Plan Group followed by Heading Code, click the Plan Group column and then Shift‐Click the Heading Code column _________________________________________________________________________ Page 12 Manual v 2 ©CMS Consortium 2012 CMSi Admin Manual _________________________________________________________________________ Lookup Table Site Status Site Type Description Site Status designations A simple way to say if a plan is for a nature site, species, workshop or office Edit Priority Default values supplied Example values supplied. Description Used for the biological recording tab on the Annual Project allowing you to state the abundance value type Species names for biological recording tab at Annual Project level Edit Priority Default NBN units provided. Species tables: Lookup Table Species Abundance Units Species Names Default NBN species names provided. The Contacts module also has a set of Lookup Tables. These are as follows: Address tables: Lookup Table Address Location Description Used to denote locality in an address, e.g. By or Opposite Edit Priority Address Types Types of address, e.g. Work, Billing etc Example values supplied. Used optionally Counties List of counties or provinces Country List of countries Dutch Postcodes Postcodes Can be used for a standard postcode list Default values not supplied Statuses To denote Active or Inactive status System required and therefore not editable Description List of standard roles to link a Contact to a data item. The roles can differ depending on where they Edit Priority Optional Contacts: Lookup Table Contact Roles _________________________________________________________________________ Page 13 Manual v 2 ©CMS Consortium 2012 CMSi Admin Manual _________________________________________________________________________ Lookup Table Description are used, e.g. a person’s role within an organisation can be one group and roles relating to site management can be another group Edit Priority Contact Types These are fixed values for Organisation and Person System required and therefore not editable Genders Fixed values for Person gender Default values supplied Legal Statuses List of types of organisation by their legal status, e.g. NGO, Government organisation, Company, etc. Default values supplied Statuses To denote Active or Inactive status System required and therefore not editable The names of all the Lookup Tables can be translated into other languages using the “LUT_” entries on the Translate Messages form (see below). 5.4 Setting up Remote Work Recording webpage This should be done in conjunction with exeGesIS and detailed guidance is being prepared. _________________________________________________________________________ Page 14 Manual v 2 ©CMS Consortium 2012 CMSi Admin Manual _________________________________________________________________________ 6 User Management and Permissions 6.1 Adding Users CMSi comes with two default users – “Administrator” and “CMSAdmin”. We advise not using “CMSAdmin” so your CMS Support staff can use this to see CMSi in their own language if trying to help you. You should use “Administrator” and when you log in for the first time, the password will also be “Administrator”. Everyone who uses CMSi must be set up as a user. This includes volunteers using the remote work recording. If you have chosen to use Windows Authentication, then the CMSi User Names will need to match user’s Windows logon. Everyone must have a password and have an organisation assigned to them so the system knows what labels to use and a permission set assigned to them. To add a new user, open the Users form from the Permissions menu and click on the Add button below the list of user names. A wizard will take you through the steps to set one up. In Step 1 you must enter a User Key and Name and a password. NB. The default password validation requires a minimum of 6 characters (containing characters A‐Z, a‐z, 0‐9) but this is configurable in the System Settings. Do not include special characters (%, *, \) in the User key. In Step 2 of the wizard (and on the User form), you can allocate various items which will be described next: _________________________________________________________________________ Page 15 Manual v 2 ©CMS Consortium 2012 CMSi Admin Manual _________________________________________________________________________ •
•
•
•
•
an Organisation (what language or label set the organisation uses) a MyCMSi Group (this controls what the user sees in MyCMSi) – see Setting up MyCMSi a User Interest Group (what Sites or Projects that user can edit) a Permission group (what they can see or edit) a Staff Resource Code which helps produce reports specific to their role e.g. work plans. This may be blank for some roles like the administrator The green arrows beside the forms can take you directly to those forms. If a user leaves the organisation, the Active checkbox can be unticked. 6.2 User Interest Groups User Interest Groups allow you to allocate Sites, Projects and the Annual Project Edit Status and Transitions to groups of users rather than individuals making the system easier to maintain. For example, the warden, assistant warden and the team of estate workers that are responsible for a group of sites could all belong to the same User Interest Group that lists their Sites. For any group, the members will only be able to edit the sites that that group has been allocated. All other sites will be read only. Note that you can sort your sites on an Organisational Hierarchy making it easy to allocate blocks of sites to user interest groups. In the example above, the ‘North Region’ user interest group has the 3 sites belonging to the North Region hierarchy listed in the Associated Sites list on the right. If no sites are allocated to the Associated Sites list, then all users in _________________________________________________________________________ Page 16 Manual v 2 ©CMS Consortium 2012 CMSi Admin Manual _________________________________________________________________________ that User Interest Group can edit all sites unless in they have been allocated a read‐only Permission Set (see below). Group members may only edit projects that belong to their list of allocated Sites. If there are no projects allocated in the group then group members may edit all the projects that belong to their sites, otherwise they may only edit the project codes associated with the group. For example, a species or habitat specialist or a finance staff member may be allocated no sites but just a set of project codes. This will mean that they may only edit these particular project codes, but on all sites. The Annual Project Edit Status process is described in the CMSi User Manual but here you can allocate the different roles in this process to a User Interest Group. The typical setup for a site manager could be as follows, whereby they cannot edit projects with Allocated or Planned resources have been Allocated once those projects have had their Edit Status changed from ‘Concept’ : Annual Project Transitions allow you to control who can transfer the status from which status to another on the form “Annual Projects Status” in MyCMSi. Note that if nothing is filled in on these tabs, everyone can plan or allocate resources regardless of their status so this is the default situation. This functionality is an optional extra. In a simple organisational setup with only a couple of staff members who do everything, you do not have to use User Interest Groups. If you are allocated no sites, no projects and no permission sets, you will be able to edit everything. A Permission set , described below will override the User Interest Group so you can make certain fields, e.g. financial fields, read only even on Sites a user has been allocated here. 6.2.1 Assign Staff to Organisation Hierarchy _________________________________________________________________________ Page 17 Manual v 2 ©CMS Consortium 2012 CMSi Admin Manual _________________________________________________________________________ Advanced Assigning Staff Resources to the Organisation Hierarchy The Assign Staff to Organisation Hierarchy option on the Tools menu allows you to allocate staff resource codes to parts of the hierarchy in order to limit the list of resource codes available when planning on sites allocated to that region. So, for example, if some of your resource codes represent staff that only work within one region of your organisation, then you can link just those codes to that part of the hierarchy. In the form, select a region from your hierarchy, then select one or more resource codes from the list of Available Staff and use the arrow buttons to move them into the Linked Staff list. Click on Apply to save these settings. These staff assignments are made for one financial year at a time, using the Year dropdown list. You can also copy the settings from one year to another by selecting a year to Copy From and a year to Copy To. When Resources are planned in the Planning tab on an Annual Project form, the list of resource codes will be now filtered to just those assign to the region that the site lies in. _________________________________________________________________________ Page 18 Manual v 2 ©CMS Consortium 2012 CMSi Admin Manual _________________________________________________________________________ 6.3 Permissions CMSi User Permissions allow you to make various tabs, forms or fields either hidden, editable or read only for different groups of users. To use this, you create Permission Groups and Permission Sets. A user will be assigned one Permission Group which defines what they see and what is editable. A Permission Group may have any number of Permission Sets assigned to it. These are prioritised with the set at the top of the list overwriting those below. You must keep Permission Sets controlling whether elements are hidden or not in a different set from ones that store whether elements are editable or read only. The “hide sets” must be at the top of the prioritised lists above the “edit sets” (see screenshots in the worked example below). 6.3.1 Example User Permission requirement The requirement in this example is as follows: •
To create a corporate view of CMSi making sections of the database (e.g. forms/tabs/fields) invisible if they are not corporately required. •
To set up different user groups with the following roles: o
o
o
o
System Administrator. They are the only ones who can set up User permissions, create users etc. Site Managers. They can edit all the sites in their region except for certain site level data fields which are maintained by a Headquarter Reserve admin section, e.g. Site Code and Site Name. Once their annual bids have been sent into HQ, they cannot edit planned or allocated budget figures. Estate workers who work on all sites within a region but who would only be allowed to log what work they have done. Headquarters staff who are the only group allowed to edit certain site level data fields, e.g. Site Status and Site Name. To achieve this, the following Permission Sets were set up to cover the Hidden fields: •
Your Organisation All Staff (hide set): This set stores all the fields that are hidden for the organisation and will be used for all staff including your system administrator so everyone is seeing the same view of CMSi. •
Your Organisation Non Admin (hide set): This set hides a further set of elements that need to be invisible for all non‐admin staff (e.g. the Permissions menu and items on the Tools menu like ‘Manage Lookups’) but visible to the system administrator. The combination of these two sets controls hiding fields for all non‐admin staff whereas the system administrator only needs the Your Organisation All Staff (hide set) allocated to them. The following Permission Sets were created to control read only/edit rights: _________________________________________________________________________ Page 19 Manual v 2 ©CMS Consortium 2012 CMSi Admin Manual _________________________________________________________________________ •
Read Only (edit set): This set makes nearly all form elements and menu options read only. •
Work Recording On (edit set): In this set just the fields on the Annual Report Work Recording tab relating to Staff are made editable. •
Your Organisation Non Admin (edit set): This set makes just the Site Code and Site Name fields read‐only so that staff cannot edit the data. By controlling the combination and order of these Permission sets in Permission Groups, you can achieve the requirement as shown below. The Permission Groups created are: •
Administrator: This group only has one Permission Set, Your Organisation All Staff (hide set), which controls which fields are made invisible for your whole organisation. All system administrator fields like the Permissions menu or Manage Lookups are visible as the Your Organisation Non Admin set is not assigned. All fields are editable as none of the “edit” permission sets are applied. •
Site Managers: This group has both the Your Organisation All Staff (hide set) switching off non‐ required fields and Your Organisation Non Admin (hide set) to hide the system administrator functions. In addition, it also has the Your Organisation Non Admin (edit set) so that the Site Name and Code fields cannot be edited. Note that the edit set is applied at the bottom of the list, with the hide sets above it having higher priority. _________________________________________________________________________ Page 20 Manual v 2 ©CMS Consortium 2012 CMSi Admin Manual _________________________________________________________________________ •
Estate Workers. This group has the two all staff hide sets for non‐required fields, but also has the Read Only (edit set) and above it the Work Recording On (edit set). By applying the Work Recording set above the Read Only set, the work recording fields are made editable by over‐riding the read only setting. This means that to create this set is very quick and easy to maintain as only a handful of fields have to be made editable. •
Headquarters Staff: This group just has the two all staff sets hiding non‐required fields. Without the All Staff (edit set) members of this group are able to edit the SiteName and Code fields. _________________________________________________________________________ Page 21 Manual v 2 ©CMS Consortium 2012 CMSi Admin Manual _________________________________________________________________________ 6.3.2 How to set up Permission Groups and Permission Sets The first step is to create Permission Groups and Permission Sets. 6.3.2.1 Set up Permission Groups You can do this via the Permission Group lookup under the Manage Lookups menu option under Tools. Click in the new row at the top of the grid and enter a Key and Name for the group. Click OK to save it. You can also do this on the Permissions form via Permissions on the Permissions Menu. To set up a Permission Group, click the Add button on the bottom left of the form and enter a Key and Name at the top. Click Apply to save the new group. 6.3.2.2 Create Permission Sets _________________________________________________________________________ Page 22 Manual v 2 ©CMS Consortium 2012 CMSi Admin Manual _________________________________________________________________________ You need to do this via the Permission Set lookup under the Manage Lookups menu option under Tools. 6.3.2.3 Setting Permissions on individual form elements. Once the Permission Sets are created, you can then set permissions on individual fields by opening the appropriate form, e.g. the Site form, then hovering the mouse over the required field or form element and pressing <F11>. This opens the Permission Settings Form. You first choose which Permission Set you are making the setting for. Then you choose the appropriate radio button relating to Editable / Read only / Hidden. Setting Permissions on Tabs Setting a permission on a whole tab unless you are hiding it is not advisable because, if the whole tab is read only, clicking on it will not open the tab. Setting Permissions on Data Grids _________________________________________________________________________ Page 23 Manual v 2 ©CMS Consortium 2012 CMSi Admin Manual _________________________________________________________________________ You have to be a bit careful when working with a data grid, e.g. on the Site form, the tabs Status, Compartment, Habitats, Site Manager and Admin Areas all include data grids. As shown below, if the mouse was hovering over a cell in a column as indicated by the red arrow, you would be controlling whether that column was visible or editable. If however, the mouse was over one of the grey cells to the left of the data grid, you would be controlling whether the whole grid was visible or editable. Note the control name in the two examples. If working with a column as above, the control name is grdSiteCompartments#Compartment Code whereas if working with a grid, the control name is _________________________________________________________________________ Page 24 Manual v 2 ©CMS Consortium 2012 CMSi Admin Manual _________________________________________________________________________ grdSiteCompartments. It is important to keep an eye on this in case you are accidentally making the wrong element editable or hidden. If you want to make a grid read only for some users and editable for others as in this scenario, you must set the permissions at the grid level. If you set permissions at the column level, users with read only permissions will still be able to undertake actions at the grid level like add a new record or delete a record. If you have trouble getting the Permission window to appear by < F11>, make sure the active cell on the form is not a dropdown field. If it is, use the tab key or click out of it and then repeat. Setting Permissions on Menu Options, Map window or the right click context menus on the Site or Project Trees Setting permissions on Menus, form titles or the mapping toolbar icon tooltips are special cases. The rule is to close all other forms and panes down leaving only the pane in question that you need to work with. For instance, if you want to hide or set permissions on the Options menu on the Site Tree, you will have to close MyCMSi and the Map form (and any other data forms in the central pane of CMSi) before < F11> will work. If you want to hide or set permissions for a mapping toolbar icon tooltip, you will have to close the CMSi Tree and MyCMSi before <F11> will work. If you want to hide or set permissions on items on the main CMSi toolbar, you will need to close everything (the CMSi Tree, the Map and MyCMSi ) before you will be able to do this. _________________________________________________________________________ Page 25 Manual v 2 ©CMS Consortium 2012 CMSi Admin Manual _________________________________________________________________________ 7 Language Translations and Re‐labelling 7.1.1 Setting up your Organisation and Translation Collection CMSi comes with a “Default Organisation” and a “Default Translation collection” which you should not edit. Go to Manage Lookups and choose the Organisations table from the Lookup List. Add a new Organisation by clicking in the blank row of the data grid and entering a Key and Name for your Organisation. Also add a new Organisation Translation record by selecting Organisation Translations from the Lookup List and adding a new record, as before. You could have more than one translation collection, e.g. “Dutch”, followed by a second Translation Collection called “Natuurmonumenten” as this organisation may want some different labels than the standard language translation. In this case “Natuurmonumenten” would have a priority of 2 so that any translations in this collection would overwrite translations in the lower “Dutch” collection. 7.1.2 Translating labels, tabs, buttons and form names Any label, tab, menu, button or form name can be re‐labelled or translated by pointing the mouse at the text and hitting <F12>. You can control who has the permissions to do this by a configuration setup which will be done as part of your CMSi setup (see above). _________________________________________________________________________ Page 26 Manual v 2 ©CMS Consortium 2012 CMSi Admin Manual _________________________________________________________________________ In this screen, you first choose the correct Translation Collection that you set up in the previous step and then simply type in the Translated Value, e.g. you might want the label ‘Organisational Hierarchy’ to simply be called ‘Regions’. Special Cases If you have trouble getting the Translation window to appear by < F12>, make sure the active cell on the form is not a dropdown field. If it is, use the tab key or click out of it and then repeat. To translate the column headers within a dropdown control, e.g. the columns in the Address dropdown, you will need to do the following: •
<F12> on the form to open the translation form (it may show a red message saying it can't translate the item) •
click back in the form you are trying to translate leaving the translate form open but do not click on the dropdown column header ‐ click instead in the dropdown form itself. •
open up the address dropdown again and move the cursor over the column then <F12>. This time the Translate form should recognise the control and you will be able to translate. The knack is in the order that the forms are opened. Menus, form titles or the mapping toolbar icon tooltips are often special cases however. The rule is to close all other forms and panes down leaving only the pane in question that you need to work with. For instance, if you want to translate the Options menu on the Site Tree, you will have to close the Project Tree, MyCMSi and the Map form (and any other data forms in the central pane of CMSi) before < F12> will work. If you want to translate a mapping toolbar icon tooltip, you will have to close the Site Tree, Project Tree and MyCMSi before <F12> will work. If you want to translate items _________________________________________________________________________ Page 27 Manual v 2 ©CMS Consortium 2012 CMSi Admin Manual _________________________________________________________________________ on the main CMSi toolbar, you will need to close everything (the Site Tree, Project Tree, the Map and MyCMSi) before you will be able to do this. This method of translation is both fast and allows you to see the context of the word you are translating when you are actually doing the translation. 7.1.3 Translating System Messages Not all messages are accessible by < F12>. There are many system messages that popup. These can be translated by using TOOLS – TRANSLATE MESSAGES. Note here you cannot translate Default Translations so choose your own Translation Collection and work your way through the list translating the messages. The Comment field (not shown above) contains information to explain the context of each message. 7.1.4 Translating Tree Tooltips The labels used in the tooltips can be translated in Translate Messages. Any entry in this table with the prefix “TT_” refers to a tooltip message and the one shown below in the Site Tree is “TT_ANN_PRJ_BDGT_SMMRY”. _________________________________________________________________________ Page 28 Manual v 2 ©CMS Consortium 2012 CMSi Admin Manual _________________________________________________________________________ 7.1.5 Translating Mapping Info Panels If you click the Info tool on the Map, an info panel will appear. The labels for these can easily be translated although it is not done through the CMSi interface. You can be provided with a list of terms for translation and the rest can be done via your support contract. _________________________________________________________________________ Page 29 Manual v 2 ©CMS Consortium 2012 CMSi Admin Manual _________________________________________________________________________ 8 Customising MyCMSi 8.1 Setting up MyCMSi All the items that appear in the different panels in MyCMSi are defined in the Role Based Tasks Lookup table. They are categorised by type in the Select Task Type dropdown. The different types have different fields in the main grid. The types StandaloneReports, Help, Custom and Plugins require particular data fields; all the other types have a base set of fields which are described first. Group Name allocates the task to a group in MyCMSi. It is not a dropdown as the groups are created dynamically based on unique entries in this field. For example, ‘Plan Management’ is a group name and all role‐based tasks with this group name (of any Type) will appear in the Plan Management panel in MyCMSi . Task Name is the name of the task, e.g. ‘Assign Staff to Resource’. Order In Group controls the display order within the group Description is a useful descriptor so that other people can understand what the task is doing Is Current allows you to switch off the task if no longer relevant. Type = Custom and Type = Plugins Tasks in these categories use tools developed outside of CMSi. They require one extra column called “Custom Task ID” which stores the id of this particular task within that tool. You will have to speak with the developer of the tool to find out what that ID is. _________________________________________________________________________ Page 30 Manual v 2 ©CMS Consortium 2012 CMSi Admin Manual _________________________________________________________________________ Type = StandaloneReport The tasks in this type run reports in the Standalone report folder. This type has two extra columns – Report Name and Report Parameter. Report Name must refer to a report title held in your StandaloneReports folder in the ReportLibrary folder. Further details of how to set up the reports and Report Parameter is given in section Using Reports in MyCMSi. Type = “Help” This has 10 extra html fields that create the “walk through” in these help pages. You can write the html in any html editor and paste into these fields in the order you want them to appear (it would not be easy to type directly into this interface). You do not need to fill in all 10 pages as the walk through finishes at the last entry. Tip: some html keys need special attention in this format. <br> must be <br/> for a line break. Also do not add ampersands into the text. _________________________________________________________________________ Page 31 Manual v 2 ©CMS Consortium 2012 CMSi Admin Manual _________________________________________________________________________ 8.2 Filtering MyCMSi tasks to particular users This allows you to restrict MyCMSi tasks to particular user roles. For example, senior staff might only see corporate reporting options or estate workers might only see work recording forms, certain help items and a work plan report . This allows you to simplify the interface for particular staff. You do this through the MyCMSi Group interface (under Permissions – MyCMSi Groups) In the left hand panel, you can create different MyCMSi Groups, and in the right panel, you can allocate the MyCMSi tasks to that group by moving it into the Linked Tasks pane. Then on the User form, you can allocate individual Users to a MyCMSi Group. _________________________________________________________________________ Page 32 Manual v 2 ©CMS Consortium 2012 CMSi Admin Manual _________________________________________________________________________ 9 Mapping The inbuilt mapping in CMSi uses the Open Source Dot Spatial library (http://dotspatial.codeplex.com/) and MapServer (http://mapserver.org). There are some limitations especially in terms of advanced editing like snapping and tracing which are not possible. If you need tools like this, the additional MapLink module will allow you to jump out to ArcGIS or MapInfo to perform these tasks. Setting up MapLink is described in the MapLink manual. Another important concept to understand is that the core CMSi mapping layers (Sites, Compartments, Features, Projects, Annual Projects and Work Records) are not separate mapping layers from the CMSi database as with traditional GIS layers (shapefiles or tab files etc.). The geometry or digitised points are held in a special spatial data field directly in the CMSi SQL Server 2008 database. This is an advantage which means that there are no longer problems keeping attributes in each layer synchronised and mapping works more efficiently. If you need to save the data out as a shapefile or tab file, you can do this via full GIS. 9.1 Base mapping layers Depending on which country you are in, different default base layers will be shipped with CMSi. If you are in the UK, the Ordnance Survey Open Data will be shipped as a base layer along with an outline map of the British Isles. If you are outside the UK, Open Street Maps will be shipped as a base layer. If you have access to other base mapping layers like aerial photographs, Ordnance Survey MasterMap or other mapping layers not offered as part of OS OpenData, or detailed mapping for your own country, these can be configured. For performance and management reasons, it is simpler to deliver these layers as a web mapping service (WMS) or web feature service (WFS) and your organisation may have this already set up. Using this method, you have more control over styling options. If you do not have an organisational WMS service, exeGesIS can give advice on how to set one up. If a WMS is not possible (e.g. you have a poor internet connection), the base layers can be files held locally. You will need an index file for each group of map files (e.g. 1:250,000, 1:50,000 and 1:10,000) and exeGesIS will advise on setting this up. You can add and style the base mapping layers or your own layers using Tools – Edit Map Files ‐ Edit Base and Custom Layers tool. This editor allows a certain level of styling including opacity, outline colours and fill colours. We recommend you back up your Map directory before editing these just in case. _________________________________________________________________________ Page 33 Manual v 2 ©CMS Consortium 2012 CMSi Admin Manual _________________________________________________________________________ 9.2 Core CMSi mapping layers The core CMSi mapping layers (Sites, Compartments, Features, Projects, Annual Projects and Work Records) will be setup for use in CMSi. You can control the styling of these layers using the Tools – Edit Map Files – Edit CMSi layer colours. We recommend you back up your Map directory before editing these just in case. _________________________________________________________________________ Page 34 Manual v 2 ©CMS Consortium 2012 CMSi Admin Manual _________________________________________________________________________ NOTE: One important requirement to be established before you use CMSi outside the UK is that of your mapping projection and this will be discussed with you. You cannot use more than one mapping projection for your core CMSi layers. 9.3 Adding and styling new mapping layers You may want to add other mapping layers to your CMSi map, for example habitat maps. As discussed with the base mapping layers, the easiest way to do this is via a web mapping service (WMS) but it can also be done for local mapping files. Local mapping files are a bit more complicated to set up and maintain but you can use the layer control tool described in 9.1 above. However if you want to set up thematic mapping, discuss this with exeGesIS. 9.4 Managing Metadata The CMSi Layer window allows you to right click a layer name to view metadata for that layer. You need to provide the links to us to help you setup the metadata links. 9.5 Managing core CMSi mapping data As the core CMSi mapping layers are part of the CMSi database, if you want to export these files to a different GIS format so that you can share these files with other organisations, you cannot do this from within CMSi but must do this within full GIS. MapLink will help you do this. You can also make mapping layers read only for all users, e.g. if you want to make Compartment or Site boundaries read only. Advise exeGesIS if you wish to do this and this will be included in your setup. 10
_________________________________________________________________________ Page 35 Manual v 2 ©CMS Consortium 2012 CMSi Admin Manual _________________________________________________________________________ Importing and Exporting data The ability to import and export data allows you to manage distributed copies of CMSi. CMSi is ideally held on a central server accessible remotely but there are scenarios due to poor internet connections that this is not possible. In this case, CMSi can be installed locally with data exported, sent to headquarters and merged into a corporate reporting version of CMSi. Additionally, the CMSi administrator may manage the organisational lookup tables and send these out to the local installations so that everyone is using the same codes, which is very important. The tools that allow this are opened from Tools – Import / Export. Export data This tool only works on currently selected sites. Hence if you have a remote site, they can still have the full corporate list of sites on their local copy for learning from other management plans but whenever they run the export, they run it on their selected sites. As a CMSi administrator, you could also export all the lookup data so remote sites can import and keep their lookup table values consistent with all other corporate users. Import data These options are self explanatory. Import/Export Individual Tables This tool would probably be rarely used but would allow users to send a possible problem table to CMSi Support to see what a problem might be. _________________________________________________________________________ Page 36 Manual v 2 ©CMS Consortium 2012 CMSi Admin Manual _________________________________________________________________________ 11 Reporting 11.1 How reporting works Reporting in CMSi uses a third party application called DataDynamics Reports (http://www.datadynamics.com). Reports can be divided into Standalone reports and Filtered reports. The latter group can be further divided into reports that just control the information displayed within the main application (the report results form) and those that also have a DataDynamics report associated with them. CMSi comes with default sets of both types of reports but it is envisaged that the report library will grow and users will be able to download new reports from the CMSi website. Tools are included in CMSi to write your own reports. To do so, some experience of Transact SQL would be useful. To open the Report Designer, go to your CMSi system folder and open ReportDesigner.exe. The two types of report are stored in separate folders inside the \ReportLibrary folder of the main application. The location of these subfolders is set during the CMSi setup (see above). If you need to move the location, you can amend the value in the ReportSubFolder_Planning setting in the System Settings form. 11.2 Writing your own Standalone Reports These DataDynamics reports are the simplest type of report to set up. They can run independently of the main application or can be called from within it. If the report has parameters then these can be supplied by the main application at runtime or entered by the user once the report previewer opens So that you don’t have to reconfigure the report’s connection to the main database each time a new report is created, these reports can use a shared data source file. The report designer will save the full path to this file, so after completing the report you need to open the report’s rdlx file using NotePad and change the path to a relative path. This will ensure that the report can still find its data source file if the reports are moved to a different location. Change the DataSourceReference from this: To this: _________________________________________________________________________ Page 37 Manual v 2 ©CMS Consortium 2012 CMSi Admin Manual _________________________________________________________________________ You may also need to edit the CMSI.rdsx file so that you can log into the database on a different server: To use a shared data source file, open a new report and add a new DataSource. On the General tab tick the Shared Reference box and then browse to the shared data source file. There is one of these in the main reports folder called CMSI.rdsx. Once you have created the DataSource, create a dataset for any lookup tables you might need. These will be used to provide a dropdown checklist for parameters that have multiple values. Next set up the report’s parameters using the Report Parameters option of the Reports menu. If the parameter can have multiple values, tick the Multivalue box and configure it to use the appropriate dataset to get values for its drop down list. Note that multivalue parameters are case _________________________________________________________________________ Page 38 Manual v 2 ©CMS Consortium 2012 CMSi Admin Manual _________________________________________________________________________ sensitive, i.e. not only must values passed to them exist in the drop down list associated with them, the values must also match the case of the Value Field in their dropdown list. Make sure you set the data type correctly. _________________________________________________________________________ Page 39 Manual v 2 ©CMS Consortium 2012 CMSi Admin Manual _________________________________________________________________________ If your parameter is a date then add a default value (e.g. set it to today’s date). The date field on the user interface will show today’s date for null values. This is confusing because the report looks like it has all the parameter values it needs but won’t run until the user has actually clicked into the date field and selected a value. Setting a default for the date avoids this issue. _________________________________________________________________________ Page 40 Manual v 2 ©CMS Consortium 2012 CMSi Admin Manual _________________________________________________________________________ Now create the dataset for the report’s data and connect the dataset’s parameters to the report’s parameters Selecting the Expression option from the Value dropdown brings up a dialog where you can set a dataset parameter to get its value from one of the report’s parameters. Once the dataset parameters have been set up the query string can be entered. Information returned from the database can be filtered in the query’s Where clause using the dataset parameters as follows: where s.SiteCode in (@pSiteCode)
and r.ResourceCode in
(@pStaffCode)
and (PlanStartDate<@pEndDate and
PlanEndDate > @pStartDate)
As usual, press the green tick (top right of query text box) to populate the dataset’s field list) Press Accept once you have finished so that you save the changes. You can now design the report. 11.2.1 Using the Standalone reports from within CMSi There are two main areas within CMSi where standalone reports can be configured. The first is for use with MyCMSi and the second is to allow access to reports from the reporting menu on the main data forms (e.g. Site Form, Features Form, Project Form, Annual Project Form, etc.) _________________________________________________________________________ Page 41 Manual v 2 ©CMS Consortium 2012 CMSi Admin Manual _________________________________________________________________________ 11.2.1.1
Using Reports in MyCMSi Open the Role Based Task lookup table from the Manage Lookup Tables option on the Tool menu. Choose the option “StandaloneReport” in the Select Task Type dropdown. There are several fields in this table that are used to configure the report. Column in table Value to set Group Name The Group Heading in MyCMSi (see above) A display name for the report Task Name Order in Group Description ReportName ReportParameters1 Is Current The sort order within the MyCMSi group An optional field describing it in more detail The name of the report (no path or file extension) e.g. StaffWorkPlan – Standalone Separate parameters with “&”, no text qualifier needed e.g. SiteCode=SC100, SC101, SC102&StaffCode=W&StartDate=31/05/11 If this is not ticked, it will not be shown in MyCMSi. This could be useful if you want to make a report temporarily invisible rather than deleting it. 1
See also below for special parameters that can be used 11.2.1.2
Adding standalone reports to the data forms The standalone reports that can be used in the data forms are controlled by the Section Reports lookup table. Column in table Value to set Section KEY Name of the data form whose report menu you would like to add the report to. The name of the report (no path or file extension) e.g. StaffWorkPlan – Standalone Report Name Is Current If this is not ticked, it will not be shown in MyCMSi. This could be useful if you want to make a report temporarily invisible rather than deleting it. _________________________________________________________________________ Page 42 Manual v 2 ©CMS Consortium 2012 CMSi Admin Manual _________________________________________________________________________ Report Parameters Report Title Separate parameters with “&”, no text qualifier needed e.g. SiteCode=SC100, SC101, SC102&StaffCode=W&StartDate=31/05/11 The text to use on the reports menu for this report 11.2.1.3 Parameter values with special meaning The following special values for parameters are also valid and will be converted at runtime %SITES% A list of currently filtered sites %CONTACTS% A list of currently filtered contacts %STAFFCODE% The current user’s StaffResourceCode %DATE% Current date %WEEK% First day of current week (Sunday) %ENDWEEK% Last day of current week (Saturday) %MONTH% First day of current month %YEAR% First day of current year %ENDYEAR% Last day of current year %FINANCIALYEAR% First day of current financial year %ENDFINANCIALYEAR% Last day of current financial year These date related values can have a suffix to offset them from the default value %DATE+7% Current date + 7 days %DATE‐7% Current date – 7 days %WEEK+3% Current week + 3 weeks %MONTH+6% Current month + 6 months %YEAR‐1% Current year – 1 year The following are designed to work when reports are called from the editors, where there is information on the item being edited that can be used to filter the report. %SITECODE% The site code of the item being edited %FEATURENUMBER% The feature number for the feature being edited %PROJECTCODE% The project code of the item being edited %PROJECTNUMBER% The Project number of the item being edited %FINANCIALYEARSTART% The Financial Year Start for the item being edited The next two settings define a map and photo thumbnails for a report. Since this is a parameter setting there will only be one image per report. i.e. you can’t use this to get maps for each site in a list of sites. %MAP_T,X,Y% This is used to request a map. T = Type and can be one of the following characters: S(site), F(feature), C(compartment), P(project), A(annual project) X and Y are optionally used to define the image size. If neither is given then the map is 400 x 400 pixels. If only X is given then a square map is created with width and height equal to X. Y is used if the map is to have different height and width %PHOTO_T,X% This is used to request a strip of thumbnails from LibraryLink _________________________________________________________________________ Page 43 Manual v 2 ©CMS Consortium 2012 CMSi Admin Manual _________________________________________________________________________ Valid settings for T are as above. X is the width of the thumbnails strip. If X is not specified then the strip will be 675 pixels wide. If there are too many thumbnails to fit on one line they will wrap round to the next line. NB Since it is likely that maps / photos may not be available it is important to tick the Allow Blank Value box when adding the parameter to the report. 11.3 Writing your own Filtered reports There are two basic types of filtered report. In their simplest form, these reports define what should appear on the results grid of the Report Result form. The Report Result form is accessed by selecting a report from the menu on the Annual Project Filter form. In addition to any filters applied by the main application, this results grid has powerful filtering, grouping and sorting options of its own. Columns can be hidden and moved as required and groups can show summary data. The results grid can be printed or exported to Excel / Access and the grid layout can also be saved and reloaded next time the report is accessed. In addition to this basic reporting level, some reports also have a DataDynamics report associated with them. If this is the case then the Report Result form will show an additional button to allow the user to preview this report and generate a printed copy if required. Reports that have a DataDynamics report associated with them are also available in other parts of the main application. 11.3.1 Configuring Filtered Reports All reports are configured using an xml file. The tags in here are defined as follows: <ReportName> Used to indicate the name of the associated DataDynamics report If the report definition file has a DataDynamics report associated with it then there will be another file in the reports folder called <ReportName>.rdlx The ReportName should be unique as it is used elsewhere to store preferences for the report. <ReportGroup> A comma delimited list of groups that the report belongs to. This is used to group the reports on the report dropdown on the Annual Project Filter form. The drop down has a sub menu for each ReportGroup value encountered when building the reports list. <Title> Display name for the report on the list of reports presented to the user. <Description> Short description indicating the reason for creating this report. It is only used within this file. <Author> Identifies the report’s author. It is only used within this file. <UserGroups> Indicates who has permission to use this report. If this is empty then everyone can use this report. Alternatively a comma separated list of user _________________________________________________________________________ Page 44 Manual v 2 ©CMS Consortium 2012 CMSi Admin Manual _________________________________________________________________________ <ViewName> groups could be provided, in which case only members of the groups present will be able to see this report on the list of reports available. This section defines the report’s data source. It can be either the name of a view, a table or a valid T‐SQL select statement. To ensure you get the items currently filtered you should join to the following tables: CMSI dbo.TempAnnualProjectTasks AMS Agreements AMS.FLT_TempAgreements Buildings AMS.FLT_TempBuildings Cadaster AMS.FLT_TempCadasters Contacts AMS.FLT_TempContacts Elements AMS.FLT_TempElements Grants AMS.FLT_TempGrants Legal Rights AMS.FLT_TempLegalRights Parcels AMS.FLT_TempParcels Property Transactions AMS.FLT_TempPropertyTransactions Always include the UserID field from the filter table, and for CMSI, check that Start=0 to only return filtered records. If a T‐SQL select statement is used to define the report’s data source then the content should also be valid XML. <FieldList> <ResourceFilter> <ChildViews> <ChildView> <ChildTableName> <ViewName> <LinkedFieldList> A comma separated list to select fields of interest. If this is empty then all information is returned from the data source. There will be only one row of data returned for each distinct combination of values in the field list. If 1 then the temporary tables used for filtering resources are also populated. Set to 0 to ignore. This section is used to add data tables to the report dataset when creating sub‐reports within a DataDynamics report. Each child view is described within here Name of the child’s data table in the report data set. A view name or SQL select statement used to get the data for the sub‐report A list of one or more fields used to link the child view to the main table. These will be used for the report parameters that link the main report to its sub‐report. The starting point for all reports is to set up an XML configuration file for them. Reports that additionally have a DataDynamics report associated with them will also have an RDLX file of the same name as their XML configuration file. _________________________________________________________________________ Page 45 Manual v 2 ©CMS Consortium 2012 CMSi Admin Manual _________________________________________________________________________ 11.3.2 Creating New Reports 11.3.2.1
Create the report definition file For most reports, configuring the definition file is all that is required. The XML definition file should have the same name as the ReportName element. See below for a simple example defining a list of sites. The file is called ExampleReport.xml <?xml version="1.0" encoding="utf-8" ?>
<ReportDefxmlns:xsi="http://www.w3.org/2001/XMLSchemainstance"xmlns:xsd="http://www.w3.org/2001/XMLSchema">
<ReportName>ExampleReport</ReportName>
<ReportGroup>Sites</ReportGroup>
<Title>Sites and Compartments</Title>
<Description>Example report to show use of child views to create a report with a
subreport</Description>
<Author>ExeGesis</Author>
<UserGroups>accounts,managers,public</UserGroups>
<ViewName>
select distinct t.UserID, t.SiteCode, s.SiteName, s.PlanStartYear, s.LengthOfPlan from
dbo.TempAnnualProjectTaskst join dbo.Sitess ont.SiteCode = s.SiteCode where Start=0
</ViewName>
<FieldList>SiteCode, SiteName, PlanStartYear, LengthOfPlan</FieldList>
<ResourceFilter>false</ResourceFilter>
<ChildViews />
</ReportDef>
This report will now appear in the Sites section of the Annual Project Filter form’s reports menu next time the application starts. Here is the same example now extended to define data for a DataDynamics report that has a sub‐
report showing compartments within each site. <?xml version="1.0" encoding="utf-8" ?>
<ReportDefxmlns:xsi="http://www.w3.org/2001/XMLSchemainstance"xmlns:xsd="http://www.w3.org/2001/XMLSchema">
<ReportName>ExampleReport</ReportName>
<ReportGroup>Sites</ReportGroup>
<Title>Sites and Compartments</Title>
<Description>Example report to show use of child views to create a report with a
subreport</Description>
<Author>ExeGesis</Author>
<UserGroups>accounts,managers,public</UserGroups>
<ViewName>
select distinct t.UserID, t.SiteCode, s.SiteName, s.PlanStartYear, s.LengthOfPlan from
dbo.TempAnnualProjectTaskst join dbo.Sitess ont.SiteCode = s.SiteCode where Start=0
</ViewName>
<FieldList>SiteCode, SiteName, PlanStartYear, LengthOfPlan</FieldList>
<ResourceFilter>false</ResourceFilter>
<ChildViews>
<ChildView>
<ChildTableName>SiteCompartments</ChildTableName>
_________________________________________________________________________ Page 46 Manual v 2 ©CMS Consortium 2012 CMSi Admin Manual _________________________________________________________________________ <ViewName>
selectSiteCode, CompartmentCode, CompartmentType, Name
CompartmentName, Area
CompartmentArea from SitesCompartments
</ViewName>
<LinkedFieldList>SiteCode</LinkedFieldList>
</ChildView>
</ChildViews>
</ReportDef>
11.3.2.2
Creating the DataDynamics report dataset In order to create a DataDynamics report you will need to use a dataset containing the information you need for the report designer. The simplest way to generate the report’s dataset is to select it from the reporting menu on the Annual Project Filter form. This will present the report’s data on the results grid of the Report Results form. Once the results grid is displayed, use the button at the top of the form to export the report dataset to an Access database. The Access database can be called whatever you like and does not need to be located in the main reports folder. 11.3.2.3
Designing the report Open the report designer and save the new report with the same name as the XML definition file, as described above. In this example it is called “ExampleReport.rdlx”. Check the box to select a master template and browse to the template. CMSi.rdlx‐master and CMSi‐
L.rdlx‐master are two templates used for portrait and landscape reports. You can create other templates, but if you do so, keeping the names of the editable regions the same as for each template will make it easier for you to switch existing reports to use the new template. After saving the report, open it using NotePad and check that the path to the report template is a relative path, not an absolute path. This will make it easier to move reports about at a later date: + to create a new data From within the report designer, highlight Data Source and use the green
source. _________________________________________________________________________ Page 47 Manual v 2 ©CMS Consortium 2012 CMSi Admin Manual _________________________________________________________________________ _________________________________________________________________________ Page 48 Manual v 2 ©CMS Consortium 2012 CMSi Admin Manual _________________________________________________________________________ Use the General tab to call the datasource CMSi and configure it to use the Access database you just created. Press Accept to save your changes. +again) and select Add Dataset Right –click on the new CMSi data source (or press the
On the General tab call the dataset CMSi Parent. In the Query tab enter the select statement to retrieve all fields from the main table and then press the green tick to generate the report fields. On the fields tab check the fields have been created and then press Accept to save your settings _________________________________________________________________________ Page 49 Manual v 2 ©CMS Consortium 2012 CMSi Admin Manual _________________________________________________________________________ 11.3.2.4
Configuring the sub‐report The sub report should be created in the same folder as the main report. The datasource for the sub‐
report should be set up the same as for the main report. The data set needs to point to the child table containing the sub‐report’s data. In this example the ChildTableName element for the report definition creates a table called SiteCompartments. Naming child data tables logically will allow you to share sub‐reports, e.g. if you want to use an existing sub‐report, check what the sub‐report is expecting its data table to be called and then set your ChildTableName element to the same name. Also check what parameters the sub‐report is using to connect to the main report and make sure you are including these fields in your main select statement. _________________________________________________________________________ Page 50 Manual v 2 ©CMS Consortium 2012 CMSi Admin Manual _________________________________________________________________________ _________________________________________________________________________ Page 51 Manual v 2 ©CMS Consortium 2012 CMSi Admin Manual _________________________________________________________________________ To create a parameter for a new sub‐report, right click on the Parameters branch (below the Dataset) and select Add New Parameter. Make sure the Parameter name(s) and data type(s) match the fields in the LinkedFieldList element of the report definition file. Press Accept to save your changes. _________________________________________________________________________ Page 52 Manual v 2 ©CMS Consortium 2012 CMSi Admin Manual _________________________________________________________________________ 11.3.2.5
Create the main report To link the main report to the sub report drag the Subreport control from the toolbox, right click on it and select properties. _________________________________________________________________________ Page 53 Manual v 2 ©CMS Consortium 2012 CMSi Admin Manual _________________________________________________________________________ _________________________________________________________________________ Page 54 Manual v 2 ©CMS Consortium 2012 CMSi Admin Manual _________________________________________________________________________ 11.3.2.6
Configure the report for CMSi In order for the report to work correctly with the main application it will need to be able to load its data dynamically at runtime. To do this you need to edit the datasource for both main report and sub report as shown. Make sure you leave the connection string blank. This will trigger the report to dynamically load its information from the dataset provided to it by the main CMSi application. 11.3.2.7 Inserting Filter Criteria The main dataset for filtered reports contains a hidden field called CurrentFilterSettings. You can include this field at the top of your report to display the filters used to generate the information for the report. This doesn’t include any additional filters applied to the results grid after the initial dataset has been generated. _________________________________________________________________________ Page 55 Manual v 2 ©CMS Consortium 2012 CMSi Admin Manual _________________________________________________________________________ 11.3.3 Inserting Images 11.3.3.1
•
•
•
•
If the field list contains a field called MapType then the report will pull a map into the dataset See below for a table showing the valid settings of the MapType field and a list of additional fields required in the dataset to support each setting MapType value Additional fields required in the dataset Site SiteCode Feature SiteCode, FeatureCode Project SiteCode, ProjectCode, ProjectNumber AnnualProject SiteCode, ProjectCode, ProjectNumber, FinancialYearStart A new field is created in the main table of the output dataset called MapImage which can then be used to pass a value into image controls on the main report When setting the image control’s value to MapImage also check that the Source property is set to Database and not Embedded. 11.3.3.2
•
•
•
•
•
•
•
Map images Photo Images If the field list contains a field called PhotoType then the report dataset will include images saved with LibraryLink. Valid settings for the PhotoType field are the same as for the MapType field (see above). The report generator will create an additional data table called CMSi Photo containing the fields PhotoKey and Photo. A new field in the main table will also be created called PhotoKey. PhotoKey can be used to connect the main report to a sub‐report containing the LibraryLink images. Set PhotoKey as the report parameter to link to the sub‐report. At present only thumbnails are extracted for the report. 11.3.4 General Assistance with DataDynamics reports There are several walk through examples shown here: http://www.datadynamics.com/Products/DDRPT/Walkthroughs.aspx Also a few useful screencasts here: http://www.datadynamics.com/Products/DDRPT/Screencasts.aspx _________________________________________________________________________ Page 56 Manual v 2 ©CMS Consortium 2012 CMSi Admin Manual _________________________________________________________________________ Advanced Resetting the database connection for Standalone Reports There is a utility that allows you to reset the data source in the master CMSi.rdsx file which is only used if you want to run the reports from within the DataDynamics ReportDesigner. To open this utility, go to your CMSi system folder and open ReportDesignerDataSource.exe. In the first section, browse to the location of the Standalone Report folder and click on Reset the location of the data source, if this has changed. Then select the data source within this (the default files in CMSi.rdsx) and edit the connection string if necessary. You connection string parameters are found near the top of the application config file (CMSi‐MDI.exe.config). The datasource value is the name of the SQLServer instance and the initial catalog is the name of your main CMSi database. _________________________________________________________________________ Page 57 Manual v 2 ©CMS Consortium 2012 CMSi Admin Manual _________________________________________________________________________ 12 Backing up CMSi Using the Tools – Backup Database option, you can create a backup of your CMSi database. It will be stored in the default backup location for SQLServer and you will be told where it was saved to. The backup file name will contain the date of backup. 13 CMSi Help You can control what is opened when you click any icon on the CMSi data forms or open the actual manuals from Help Menu on the main toolbar. This is all controlled by the Section Help lookup table and can be managed from Manage Lookups. This table will be already populated pointing to the relevant sections of the master documents held on the CMS website. This way, you will always be pointing to the master document. If you do not have internet access, you could change the locations to the help documents stored locally in the Help folder in the CMSi directory. You could alternatively create your own help documents maybe in your own language and point to these. If you do this, you will have to maintain your own help documents in the future. The default help files use pdfs. You can jump to destinations (see below) within a pdf by putting a hash key and the name of the destination after the URL, for example http://www.cmsconsortium.org/manuals/CMSiUserManual.pdf#nameddest=CMSiOverview&zoom=
100. Note the destination is preceded by “nameddest=”. This is not now strictly necessary for Adobe but if you want to control the zoom level that the pdf opens at, e.g. “&zoom=100”, then it is needed. If you do not use this, Adobe Acrobat Reader will often open at 150% and centre off the destination. _________________________________________________________________________ Page 58 Manual v 2 ©CMS Consortium 2012 CMSi Admin Manual _________________________________________________________________________ In the Section Help table, you do not need to enter the hash key (#). You need the docname, bookmark and to say if it is a URL or not. If the document is a local file location rather than a URL, you would just fill in ‘C:\Manuals\CMSiUserManual.pdf’ in the DocName field and do not need to prefix this with “File:///”. Bookmarks and Destinations If the master document used for your manual is a Microsoft Word document, you can create bookmarks for the different sections. If however you create a pdf from a Word document using Adobe Acrobat or a similar tool that converts Word bookmarks and Tables of Contents into pdf format and then want to link to this pdf from CMSi, note that a Microsoft Word bookmark is not the same thing as an Adobe Destination and will not work. You can create Adobe Destinations manually using full Adobe Acrobat but if you want to maintain the master document in Word and create pdfs from this, you can use commercial tools (e.g. http://www.mindtheflex.com/?p=86), OpenOffice which does it automatically or some free Word macros that can be found on the internet. If you are creating your own links, do not delete the default list. Make them non‐current and then you will have all the original entries as a reference as you must get the Section Keys correct in your lines. As a reference, the following are the default entries in this table (the docname could be on the CMSi website or held locally): SectionKEY
Bookmark
AddLibraryProject
nameddest=LibraryProjects&zoom=100
AdjustBudgetForm
nameddest=AdjustBudget&zoom=100
adminManual
nameddest=zoom=100
AnnualProjectFilter_Details
nameddest=ResourceFilterOverview&zoom=100
AnnualProjectFilter_General
nameddest=ResourceFilterOverview&zoom=100
AnnualProjectFilter_PlannedResource
nameddest=ResourceFilterOverview&zoom=100
AnnualProjectFilter_PlannedResource_Individual
nameddest=ResourceFilter&zoom=100
AnnualProjectFilter_PlannedResource_Overall
nameddest=ResourceFilter&zoom=100
AnnualProjectFilter_Tasks
nameddest=ResourceFilterOverview&zoom=100
AnnualProjectFilter_vResourceAllocation
nameddest=ResourceFilterOverview&zoom=100
AnnualProjectFilter_vResourceAllocation_Individual nameddest=ResourceFilter&zoom=100
AnnualProjectFilter_vResourceAllocation_OveraIl nameddest=ResourceFilter&zoom=100
_________________________________________________________________________ Page 59 Manual v 2 ©CMS Consortium 2012 CMSi Admin Manual _________________________________________________________________________ SectionKEY
Bookmark
AnnualProjectFilter_vResourceProjection
nameddest=ResourceFilterOverview&zoom=100
AnnualProjectFilter_vResourceProjection_Individual nameddest=ResourceFilter&zoom=100
AnnualProjectFilter_vResourceProjection_Overall nameddest=ResourceFilter&zoom=100
AnnualProjectFilter_WorkRecord
nameddest=ResourceFilterOverview&zoom=100
AnnualProjectFilter_WorkRecord_Individual
nameddest=ResourceFilter&zoom=100
AnnualProjectFilter_WorkRecord_Overall
nameddest=ResourceFilter&zoom=100
AnnualProjectFilterForm
nameddest=ProjectFilter&zoom=100
AnnualProjectForm
nameddest=AnnualProjects&zoom=100
AnnualProjectStatusView
nameddest=APStatus&zoom=100
DiaryEntryForm
nameddest=Diary&zoom=100
EditExistingResources
nameddest=EditResources&zoom=100
EditTasks
nameddest=EditTasks&zoom=100
FeatureForm
nameddest=Features&zoom=100
FeatureObjectiveHistory
nameddest=ObjHistory&zoom=100
ImportExportForm
nameddest=Importing&zoom=100
LookupAdminForm
nameddest=LUTs&zoom=100
MapForm
nameddest=Mapping&zoom=100
MDIForm
nameddest=CMSiOverview&zoom=100
mycmsi
nameddest=MyCMSi&zoom=100
OrganisationsForm
nameddest=Translations&zoom=100
PermissionsForm
nameddest=Permissions&zoom=100
PlanInitialResources
nameddest=PlanResources&zoom=100
planningGuidance
nameddest=zoom=100
PlanOutline
nameddest=SiteDescription&zoom=100
PlanOutlineHistoryForm
nameddest=SDHistory&zoom=100
PrescriptionForm_Attribute
nameddest=attributeform&zoom=100
PrescriptionForm_Factor
nameddest=factorform&zoom=100
PrescriptionForm_Management
nameddest=managementform&zoom=100
ProjectAdd_Step1
nameddest=AddProject&zoom=100
ProjectAdd_step2_existing
nameddest=AddProject&zoom=100
ProjectAdd_step2_new
nameddest=ProjectCodes&zoom=100
ProjectAdd_step2_template
nameddest=LibraryProjects&zoom=100
ProjectAdd_Step3
nameddest=AddProject&zoom=100
ProjectForm
nameddest=Projects&zoom=100
ProjectPlanHistoryForm
nameddest=PPlanHistory&zoom=100
ProjectPlanProject_step1
nameddest=PlanningAPs&zoom=100
ProjectRollForwardsForm
nameddest=RollPlanForwards&zoom=100
projecttree
nameddest=ProjectTree&zoom=100
_________________________________________________________________________ Page 60 Manual v 2 ©CMS Consortium 2012 CMSi Admin Manual _________________________________________________________________________ SectionKEY
QuickWorkRecordingForm
ReportResultForm
SiteFilter_Details
SiteFilter_Features
SiteFilterForm
SiteForm
sitetree
SpeciesRecord
TranslateMessagesForm
TxTextControl
UpgradeForm
UserForm
UserGroupsForm
UserInterestGroupsForm
userManual
Bookmark
nameddest=QuickDiary&zoom=100
nameddest=Reporting&zoom=100
nameddest=SiteFilter&zoom=100
nameddest=SiteFilter&zoom=100
nameddest=SiteFilter&zoom=100
nameddest=Sites&zoom=100
nameddest=SiteTree&zoom=100
nameddest=Species&zoom=100
nameddest=TranslateMessages&zoom=100
nameddest=TxText&zoom=100
nameddest=Upgrading&zoom=100
nameddest=Users&zoom=100
nameddest=userGroups&zoom=100
nameddest=UserInterestGroups&zoom=100
nameddest=zoom=100
14 CMSi Entity Diagrams 14.1 Sites 14.2 Features 14.3 Tree 14.4 CMSi Data 14.5 Annual Projects _________________________________________________________________________ Page 61 Manual v 2 ©CMS Consortium 2012 CMSi Admin Manual _________________________________________________________________________ SitesGeom
SitesStatus
guid
SiteStatusLUT
SiteCode
SiteCode
Status.. .
StatusCode
Geom
Descri. ..
VersionNumber
VersionNumber
Versio.. .
Modified
MI_PRINX
Modified
ModifiedBy
Modified
Modifi.. .
Created
ModifiedBy
Created
CreatedBy
Created
SitesCompartments
SiteCode
PlanOutlineLUT
CompartmentCode
PlanGroup
CompartmentType
HeadingCode
Name
Description
Area
Editable
VersionNumber
VersionNumber
guid
Modified
Modified
ModifiedBy
ModifiedBy
Created
C
t d
Sites
guid
SiteCode
PlanText
SiteTreeCodeParent
SitesCompartmentsGeom
SiteCode
SiteName
SiteCode
PlanStartYear
CompartmentCode
LengthOfPlan
Geom
PlanHeadings
VersionNumber
Description
MI_PRINX
DescriptionOld
guid
VersionNumber
Modified
Area
ModifiedBy
Location
Created
Modified
PlanGroup
HeadingCode
Text
VersionNumber
Modified
ModifiedBy
Created
CreatedBy
ModifiedBy
Created
SiteNBNRecorderLocatio
SitesRelatedAreas
SiteCode
SiteCode
RecorderLocationKey
VersionNumber
VersionNumber
Modified
Modified
ModifiedBy
ModifiedBy
Created
Created
CreatedBy
CreatedBy
guid
AreaType
SiteTree
SiteHabitats
SiteManagerHistory
SiteTreeCode
SiteCode
SiteCode
ParentSiteTreeCode
StartDate
HabitatCodeId
SiteTreeName
EndDate
Area
SiteTreeO rder
SiteManager
VersionNumber
VersionNumber
VersionNumber
Modified
Modified
Modified
ModifiedBy
ModifiedBy
ModifiedBy
Created
Created
Created
CreatedBy
CreatedBy
CreatedBy
guid
Sites _________________________________________________________________________ Page 62 Manual v 2 ©CMS Consortium 2012 CMSi Admin Manual _________________________________________________________________________ SiteFeatureCompar
SiteCode
FeatureNumber
Compartmen. ..
SitesGeom
StatusDate
guid
Status
FeatureCompartme
SiteCode
VersionNumber
SiteCode
Geom
Modified
FeatureNumber
VersionNumber
ModifiedBy
MI PRINX
Compartmen.. .
VersionNumber
Modified
ModifiedBy
Created
Sites
guid
SiteCode
SiteTreeCodeParent
SiteName
PlanStartYear
LengthOfPlan
PlanHeadings
Description
FeatureStatusCodes
DescriptionOld
StatusCode
VersionNumber
Description
SortOrder
VersionNumber
Modified
Features
ModifiedBy
SiteCode
FeatureStatus
SiteCode
FeatureNumber
StatusDate
SitesCompartments
FeatureNumber
SiteCode
FeatureNumb.. .
Compartment. ..
FeatureName
Compartment. ..
FeatureDescri.. .
Name
FeatureOpti...
Area
ObjectiveDesc.. .
VersionNumber
Rationale
guid
ObjectiveOpti.. .
Modified
SitesCompartmentsGeom
SiteCode
CompartmentCode
Geom
VersionNumber
MI_PRINX
FeatureStatus
ModifiedBy
Condition
Created
ConditionOld
VersionNumber
Assessor
FeaturesGeom
Modified
guid
FeatureSubType
CompartmentTypeLUT
SiteCode
CompartmentType
FeatureNumber
TypeName
Geom
IsBase
VersionNumber
VersionNumber
MI_PRINX
SiteCode
Modified
FeatureNumber
ModifiedBy
SubFeatureN. ..
SubFeatureN. ..
SubFeatureT. ..
SubFeatureT. ..
LastUpdatedBy
ObjectiveHistory
LastUpdatedOn
SiteCode
VersionNumber
FeatureNumber
Modified
Date
ModifiedBy
Description
Comment
LastUpdated. ..
LastUpdatedOn
VersionNumber
Modified
Features _________________________________________________________________________ Page 63 Manual v 2 ©CMS Consortium 2012 CMSi Admin Manual _________________________________________________________________________ FeatureSubTypeCatego
PrescPlans
Prescriptions
SiteCode
SiteCode
FeatureNumber
PrescriptionType
PrescriptionNumber
ProjectCode
VersionNumber
FeatureNumber
SiteCode
PrescriptionType
FeatureNumber
PrescriptionNumber
Geom
Modified
ModifiedBy
Created
VersionNumber
DescriptionOld
VersionNumber
Description
guid
Description
ProjectNumber
SubTypeCategory
FeaturesGeom
CreatedBy
MI_PRINX
FeatureSubTypeCategoryId
VersionNumber
Modified
IsCurrent
Name
ModifiedBy
Modified
Created
ModifiedBy
FeatureSubType
SubTypeCa...
AttributeScores
SubTypeCode
SiteCode
Description
FeatureNumber
Conservatio...
PrescriptionType
VersionNum...
PrescriptionNumber
Modified
ScoreCategory
ModifiedBy
ScoreDate
Created
Score
CreatedBy
Assessor
Description
VersionNumber
Modified
ModifiedBy
Features
ProjectPlans
guid
SiteCode
ProjectCode
ProjectNumber
QualifyingPhrase
Months
Priority
UpperLimit
LowerLimit
LimitUnits
ProjectDescriptionOld
ProjectDescription
Finished
ProjectHistory
PropertyRef
AutoReplan
Assessment
Sites
SiteCode
FeatureNumber
FeatureNumber
FeatureNumberOrder
SubFeatureNumber
FeatureName
SubFeatureName
FeatureDescription
SubFeatureTypeCategory
FeatureOptimalDescrip...
SubFeatureType
ObjectiveDescription
LastUpdatedBy
Rationale
LastUpdatedOn
ObjectiveOptimalDescr...
VersionNumber
FactorLimits
Modified
AttributeLimits
ModifiedBy
guid
ArchiveDate
Created
SiteCode
ArchiveReason
CreatedBy
SiteTreeCodeParent
FeatureDescriptionOld
guid
SiteName
FeatureOptimalDescrip...
PlanStartYear
LengthOfPlan
FeatureClassification
PlanHeadings
Description
SiteCode
DescriptionOld
FeatureNumber
VersionNumber
OutcomeNotesOld
StatusDate
OutcomeSummary
FeatureStatus
OutcomeNotes
Condition
N
TypeCode
SiteCode
FeatureNumber
i
TypeCategory
FeatureStatus
Area
OutcomeSummaryOld
V
FeatureSubType
SiteCode
VersionNumber
Modified
ModifiedBy
Created
CreatedBy
b
guid
ProjectTagsLUT
TagCode
TagName
ProjectPlansTags
SiteCode
ProjectCode
ProjectNumber
TagCode
VersionNumber
Modified
ModifiedBy
TagDescription
IsCurrent
FeatureClassificationLUT
VersionNumber
TypeCategory
Modified
TypeCode
ModifiedBy
Description
Created
ConservationFeature
CreatedBy
VersionNumber
ProjectTagId
Modified
Created
ModifiedBy
CreatedBy
Created
guid
CreatedBy
FeatureClassificationId
IsCurrent
FeatureClassificationCategoryLUT
TypeCategory
Description
VersionNumber
Modified
ModifiedBy
Created
CreatedBy
FeatureClassificationCategoryId
IsCurrent
Tree _________________________________________________________________________ Page 64 Manual v 2 ©CMS Consortium 2012 CMSi Admin Manual _________________________________________________________________________ AnnualProjectTaskGeomLinks
guid
SiteCode
ProjectCode
ProjectNumber
FinancialYearStart
TaskId
GeomGuid
IsActual
Completed
MI_PRINX
SharedGeom
ProjectPlans
guid
AnnualProjects
guid
SiteCode
SiteCode
Geom
SiteCode
ProjectCode
ProjectCode
ProjectNumber
ProjectNumber
FinancialYearStart
QualifyingPhrase
ShortDescription
Months
AnnualReportOld
Priority
AnnualReport
UpperLimit
AnnualSummaryOld
LowerLimit
AnnualReportSummary
LimitUnits
LinkedFile
ProjectDescriptionOld
Photo
ProjectDescription
Status
Finished
RecordCompleted
guid
ProjectHistory
Map
SiteCode
PropertyRef
WorkProgrammeOld
AutoReplan
WorkProgramme
Assessment
UpperLimit
OutcomeSummaryOld
LowerLimit
guid
AssetValue
OutcomeNotesOld
LimitUnits
SiteCode
GeomGuid
OutcomeSummary
VersionNumber
ProjectCode
Description
OutcomeNotes
ProjectData
ProjectNumber
ExternalAss...
VersionNumber
Modified
GeomGuid
ExternalAss...
FromLibary
ModifiedBy
MI_PRINX
MI_PRINX
Description
SourceGuid
SourceVersionNumber
SystemType
SystemSupplied
IsCurrent
Assets
AssetId
AssetParentId
ProjectPlansGeomLink
HeadingCode
AssetName
VersionNumber
Modified
ModifiedBy
ProjectCodesLUT
ProjectCode
Description
ValidCode
ProjectOrder
CodeLength
LastLevel
LastLevelNum
Parent
IsParent
VersionNumber
Modified
ModifiedBy
C
d
SiteTree
SitesCompartments
SitesCompartmentsGeom
SiteTreeCode
SiteCode
ParentSiteTreeCode
CompartmentCode
SiteCode
SiteTreeName
CompartmentType
CompartmentCode
SiteTreeOrder
Name
Geom
VersionNumber
Area
VersionNumber
VersionNumber
MI_PRINX
guid
guid
Modified
Modified
Sites
SiteManagerHistory
guid
SiteCode
SiteCode
StartDate
SiteTreeCodeParent
EndDate
SiteName
SitesStatus
SiteManager
PlanStartYear
SiteCode
VersionNumber
LengthOfPlan
StatusCode
CompartmentTypeLUT
CompartmentType
PlanHeadings
VersionNumber
TypeName
Description
Modified
IsBase
DescriptionOld
VersionNumber
VersionNumber
Modified
Area
Location
PlanOutlineLUT
PlanGroup
HeadingCode
Description
Editable
VersionNumber
SitesRelatedAreas
SitesGeom
PlanText
SiteCode
guid
SiteCode
VersionNumber
SiteCode
PlanGroup
Modified
Geom
HeadingCode
ModifiedBy
VersionNumber
Text
Created
MI_PRINX
VersionNumber
difi d
SiteNBNRecorderLocations
SiteCode
RecorderLocationKey
SiteHabitats
VersionNumber
SiteCode
Modified
HabitatCodeId
Area
VersionNumber
Modified
CMSi Data _________________________________________________________________________ Page 65 Manual v 2 ©CMS Consortium 2012 CMSi Admin Manual _________________________________________________________________________ AnnualProjectTaskGeomLinks
guid
SiteCode
ProjectCode
ProjectNumber
FinancialYearStart
TaskId
GeomGuid
IsActual
Completed
MI_PRINX
SharedGeom
ProjectPlans
guid
AnnualProjects
guid
SiteCode
SiteCode
Geom
SiteCode
ProjectCode
ProjectCode
ProjectNumber
ProjectNumber
FinancialYearStart
QualifyingPhrase
ShortDescription
Months
AnnualReportOld
Priority
AnnualReport
UpperLimit
AnnualSummaryOld
LowerLimit
AnnualReportSummary
LimitUnits
LinkedFile
ProjectDescriptionOld
Photo
ProjectDescription
Status
Finished
RecordCompleted
guid
ProjectHistory
Map
SiteCode
PropertyRef
WorkProgrammeOld
AutoReplan
WorkProgramme
Assessment
UpperLimit
OutcomeSummaryOld
LowerLimit
guid
AssetValue
OutcomeNotesOld
LimitUnits
SiteCode
GeomGuid
OutcomeSummary
VersionNumber
ProjectCode
Description
OutcomeNotes
ProjectData
ProjectNumber
ExternalAss...
VersionNumber
Modified
GeomGuid
ExternalAss...
FromLibary
ModifiedBy
MI_PRINX
MI_PRINX
Description
SourceGuid
SourceVersionNumber
SystemType
SystemSupplied
IsCurrent
Assets
AssetId
AssetParentId
ProjectPlansGeomLink
HeadingCode
AssetName
VersionNumber
Modified
ModifiedBy
ProjectCodesLUT
ProjectCode
Description
ValidCode
ProjectOrder
CodeLength
LastLevel
LastLevelNum
Parent
IsParent
VersionNumber
Modified
ModifiedBy
C
d
SiteTree
SitesCompartments
SitesCompartmentsGeom
SiteTreeCode
SiteCode
ParentSiteTreeCode
CompartmentCode
SiteCode
SiteTreeName
CompartmentType
CompartmentCode
SiteTreeOrder
Name
Geom
VersionNumber
Area
VersionNumber
VersionNumber
MI_PRINX
guid
guid
Modified
Modified
Sites
SiteManagerHistory
guid
SiteCode
SiteCode
StartDate
SiteTreeCodeParent
EndDate
SiteName
SitesStatus
SiteManager
PlanStartYear
SiteCode
VersionNumber
LengthOfPlan
StatusCode
CompartmentTypeLUT
CompartmentType
PlanHeadings
VersionNumber
TypeName
Description
Modified
IsBase
DescriptionOld
VersionNumber
VersionNumber
Modified
Area
Location
PlanOutlineLUT
PlanGroup
HeadingCode
Description
Editable
VersionNumber
SitesRelatedAreas
SitesGeom
PlanText
SiteCode
guid
SiteCode
VersionNumber
SiteCode
PlanGroup
Modified
Geom
HeadingCode
ModifiedBy
VersionNumber
Text
Created
MI_PRINX
VersionNumber
M difi d
SiteNBNRecorderLocations
SiteCode
RecorderLocationKey
VersionNumber
Modified
SiteHabitats
SiteCode
HabitatCodeId
Area
VersionNumber
Modified
Annual Projects _________________________________________________________________________ Page 66 Manual v 2 ©CMS Consortium 2012