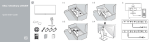
1
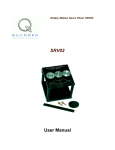
Rotary Motion Servo Plant: SRV02
SRV02 Ball and Beam
User Manual
BB01 User Manual
Table of Contents
1. PRESENTATION..........................................................................................................................................1
1.1. Description........................................................................................................................................1
1.2. Remote Sensor Option......................................................................................................................1
2. BALL AND BEAM COMPONENTS..................................................................................................................1
2.1. Component Nomenclature................................................................................................................2
2.2. Component Description....................................................................................................................3
2.2.1. Ball Position Sensor...............................................................................................................................3
2.2.2. Remote Sensor.......................................................................................................................................3
3. BALL AND BEAM SPECIFICATIONS...............................................................................................................3
4. SYSTEM SETUP..........................................................................................................................................5
4.1. Assembly..........................................................................................................................................5
4.2. Calibration........................................................................................................................................6
5. WIRING PROCEDURE.................................................................................................................................7
5.1. Cable Nomenclature.........................................................................................................................7
5.2. Typical Connections for UPM..........................................................................................................9
5.3. Typical Connections for Q3............................................................................................................12
6. TESTING AND TROUBLESHOOTING.............................................................................................................14
6.1. SRV02 Motor and Sensors.............................................................................................................14
6.2. Testing the Ball Position Sensor.....................................................................................................14
6.2.1. Testing.................................................................................................................................................14
6.2.2. Troubleshooting...................................................................................................................................15
Document Number 709 ♦ Revision 2.1 ♦ Page i
BB01 User Manual
7. TECHNICAL SUPPORT...............................................................................................................................16
8. REFERENCES...........................................................................................................................................16
APPENDIX A: LINEAR TRANSDUCER SPECIFICATION SHEET............................................................................17
Document Number 709 ♦ Revision 2.1 ♦ Page ii
BB01 User Manual
1. Presentation
1.1. Description
The Quanser Ball and Beam module, pictured in Figure 1, consists a track on which the metal ball is
free to roll. The track is fitted with a linear transducer to measure the position of the ball, i.e. it outputs
a voltage signal proportional to the position of the ball. One side of the beam is attached to a lever arm
that can be coupled to the load gear of the Quanser SRV02 unit. By controlling the position of the
servo, the beam angle can be adjusted to balance the ball to a desired position.
Figure 1: SRV02 Ball and Beam Module
1.2. Remote Sensor Option
The SRV02 Ball and Beam module can also be accompanied by a remote ball sensor called the SS01
module. This permits a master-slave configuration where the ball command is generated by the SS01
instead of through a program.
2. Ball and Beam Components
The Ball and Beam components are identified in Section 2.1. Some of the those components are then
described in Section 2.2.
Document Number 709 ♦ Revision 2.1 ♦ Page 1
BB01 User Manual
2.1. Component Nomenclature
The components of the Ball and Beam module, i.e. the BB01 device, and the Remote Sensor system,
i.e. SS01, are listed in Table 1 below and labeled in Figure 2 and Figure 3.
ID #
Component
ID #
Component
1
SRV02
8
Support base
2
Lever arm
9
Support arm screws
3
Coupling screw
10
Analog ball position sensor connector
4
Steel ball
11
Calibration base
5
BB01 Potentiometer sensor
12
SS01 Potentiometer sensor
6
BB01 Steel rod
13
SS01 Steel rod
7
Support arm
14
Analog remote sensor connector
Table 1: BB01 components.
Figure 2: Components of SRV02 BB01 module.
Document Number 709 ♦ Revision 2.1 ♦ Page 2
BB01 User Manual
Figure 3: Remote sensor components.
2.2. Component Description
2.2.1. Ball Position Sensor
The track of the BB01 linear transducer module on which the metal ball is free to roll consists of a steel
rod in parallel with a nickel-chromium wire-wound resistor forming the track. The resistive wire is the
black strip that is stuck on the plastic which is fastened onto the metal frame. The position of the ball is
obtained by measuring the voltage at the steel rod. When the ball rolls along the track, it acts as a wiper
similar to a potentiometer resulting in the position of the ball.
WARNING: Regular cleaning of the beam is recommended to ensure proper operation of the ball and
beam experiment. Clean both the beam and the steel ball using rubbing alcohol.
2.2.2. Remote Sensor
Similarly to the BB01, the SS01 has a wiper potentiometer sensor that detects the position of the ball.
3. Ball and Beam Specifications
Table 2, below, lists and characterizes the main parameters associated with the BB01. See Figure 4 for
an illustration of the Ball and Beam dimensions and the variables α, θ, and x that are associated with
the system. Some of the parameters listed in Table 2 are used in the mathematical model. See Appendix
A for more information on the BB01 linear transducer used to measure the ball position.
Symbol
Description
Mass of ball and beam module
Calibration base length
Matlab
Variable
Value
Unit
Variati
on
0.65 kg
50 cm
Document Number 709 ♦ Revision 2.1 ♦ Page 3
BB01 User Manual
Symbol
Description
Matlab
Variable
Calibration base depth
Lbeam
Beam length
Distance between SRV02 output gear
shaft and coupled joint
Unit
Variati
on
22.5 cm
L_beam
Lever arm length
rarm
Value
42.55 cm
12.0 cm
r_arm
cm
2.54
Support arm length
16.0 cm
rb
Radius of ball.
r_ball
1.27 cm
mb
Mass of ball.
m_ball
0.064 kg
Kbs
Ball position sensor sensitivity
K_BS
-4.25 cm/V
Vbias
Ball position sensor bias power
Vrange
Ball position sensor measurement range
±12 V
±5 V
Table 2: Ball and beam system specifications.
Figure 4: Ball and beam schematic.
Document Number 709 ♦ Revision 2.1 ♦ Page 4
BB01 User Manual
4. System Setup
See Section 4.1 for instructions on how to to put the ball and beam plant together. Then, go through the
calibration procedure in Section 4.2 before performing the laboratory.
4.1. Assembly
Follow this procedure to setup the Ball and Beam module for experimental use:
1. Before beginning, ensure the SRV02 is setup in the high-gear configuration as detailed in
Reference [2].
2. Lay the calibration base, component #11 in Figure 2, flat on a table surface.
3. As pictured in Figure 5, place the SRV02 on its side such that the potentiometer gear fits into
the cut-out section of the calibration base. Notice that the top gear of the SRV02 should be the
small 24-tooth motor pinion gear.
Figure 5: Setting up the SRV02-side of the BB01 plant.
4. Fasten the coupling screw, component #3, into the screw hole of the large 120-tooth load gear
as depicted in Figure 5.
5. Place the support base of the ball and beam, component #8 into the cut-out section of the base,
as pictured in Figure 2.
Document Number 709 ♦ Revision 2.1 ♦ Page 5
BB01 User Manual
4.2. Calibration
Once the BB01 is setup, follow this procedure to calibrate the beam:
1. Using an 9/64 Allen Key loosen the screws on the support arm, which are shown in Figure 2 by
ID #9.
2. Place the steel ball on the beam such that it rests on the SRV02 side, as pictured in Figure 5.
3. As illustrated in Figure 6, below, manually rotate the servo load gear to the 0 degree position.
That is, the coupling screw should be aligned with the 0 degree position, .
Figure 6: BB01 Calibration: move SRV02
load gear to 0 degree position.
4. While holding the load gear at 0 degrees, vary the height of the support arm, component #7,
such that the beam is horizontal. When the ball is centered on the beam it should lie motionless.
Figure 7: Calibrated BB01: ball is balanced when centered on beam.
Document Number 709 ♦ Revision 2.1 ♦ Page 6
BB01 User Manual
5. Once the beam is balanced, tighten the screws on the support arm, as shown in Figure 8 below,
to finalize the calibration of the BB01 experiment.
Figure 8: BB01 calibration: tighten
support arm screws once beam is
balanced.
5. Wiring Procedure
The following is a listing of the hardware components used in this experiment:
● Power Amplifier:
Quanser UPM 1503/2405, or equivalent.
● Data Acquisition Board:
Quanser Q8, Q4, or equivalent.
● Rotary Servo Plant:
Quanser SRV02, SRV02-T, SRV02- E, SRV02- EHR, or
SRV02-ET.
● Ball and Beam Module:
Quanser BB01 Module
● Remote Sensor (optional)
Quanser SS01 Module
See the references listed in Section 8 for more information on these components. The cables supplied
with the BB01 are described in Section 5.1 and the procedure to connect the above components when
using the UPM is given in Section 5.2 and when using the Q3 device is described in Section 5.3.
5.1. Cable Nomenclature
Table 3, below, provides a description of the standard cables used in the wiring of the BB01 system.
Document Number 709 ♦ Revision 2.1 ♦ Page 7
BB01 User Manual
Cable
Designation
Description
5-pin-DIN
to
RCA
This cable connects an analog output of the
data acquisition terminal board to the power
module for proper power amplification.
4-pin-DIN
to
6-pin-DIN
This cable connects the output of the power
module, after amplification, to the desired
DC motor on the servo. One end of this
cable contains a resistor that sets the
amplification gain. For example when
carrying a label showing "5" at both ends,
the cable has that particular amplification
gain. Typically a load cable gain of “1” is
used for most SRV02 experiments.
5-pin-stereoDIN
to
5-pin-stereoDIN
This cable carries the encoder signals
between an encoder connector and the data
acquisition board (to the encoder counter).
Namely, these signals are: +5VDC power
supply, ground, channel A, and channel B.
6-pin-miniDIN
to
6-pin-miniDIN
This cable carries analog signals (e.g., from
joystick, plant sensor) to the UPM, where
the signals can be either monitored and/or
used by a controller. The cable also carries a
±12VDC line from the UPM in order to
power a sensor and/or signal conditioning
circuitry.
Figure 9 "From Digital-To-Analog" Cable
Figure 10 "To Load" Cable Of Gain 1
Figure 11 "Encoder" Cable
Figure 12 "From Analog Sensors" Cable
Document Number 709 ♦ Revision 2.1 ♦ Page 8
BB01 User Manual
Cable
Designation
Description
5-pin-DIN
to
4xRCA
This cable carries the analog signals,
unchanged, from the UPM to the Digital-ToAnalog input channels on the data
acquisition terminal board.
Figure 13 "To Analog-To-Digital" Cable
Table 3 Cable Nomenclature
5.2. Typical Connections for UPM
This section describes the typical connections used for to connect the BB01 plant to a data-acquisition
board and a power amplifier. The connections are described in detail in the procedure below and
summarized in Table 4.
Follow these steps to connect the BB01 system:
1. It is assumed that the Quanser Q4 or Q8 board is already installed as discussed in the Reference
[1]. If another data-acquisition device is being used, e.g. NI M-Series board, then go to its
corresponding documentation and ensure it is properly installed.
2. Make sure everything is powered off before making any of these connections. This includes
turning off your PC and the UPMs.
3. Connect the 5-pin-DIN to RCA cable from the Analog Output Channel #0 on the terminal
board to the From D/A Connector on the Quanser Universal Power Module, or UPM. See cable
#1 shown in Figure 14 and Figure 15. This carries the attenuated motor voltage control signal,
Vm/Ka, where Ka is the UPM amplifier gain.
4. Connect the 4-pin-stereo-DIN to 6-pin-stereo-DIN that is labeled Gain 1 from To Load on the
UPM to the Motor connector on the SRV02. See connection #2 shown in Figure 15 and Figure
16. This cable sets the gain of the amplifier to 1 and the connector on the UPM-side is black in
colour. The cable transmits the amplified voltage that is applied to the SRV02 motor and is
denoted Vm.
5. Connect the 5-pin-stereo-DIN to 5-pin-stereo-DIN cable from the Encoder connector on the
SRV02 panel to Encoder Input # 0 on the terminal board, as depicted by connection #3 in
Figure 14 and Figure 16. This carries the load shaft angle measurement and is denoted by the
variable θl.
CAUTION: Any encoder should be directly connected to the Quanser terminal board (or
equivalent) using a standard 5-pin DIN cable. DO NOT connect the encoder cable to the
UPM!
Document Number 709 ♦ Revision 2.1 ♦ Page 9
BB01 User Manual
6. Connect the To A/D socket on the UPM to Analog Inputs #0-3 on the terminal board using the
5-pin-DIN to 4xRCA cable, as illustrated in Figure 14 and Figure 15 by connection #4. The
RCA side of the cable is labeled with the channels. Note that the cable with label "1" is goes to
Analog Input Channel #0.
7. Connect the S1 & S2 connector on the SRV02 to the S1 & S2 socket on the UPM using the 6pin-mini-DIN to 6-pin-mini-DIN cable. See connection #5 in Figure 15 and Figure 16. This
carries the voltage signal from the potentiometer that is proportional to the load shaft angle and
is represented by variable θl.
8. Connect the Ball Position Sensor connector on the BB01 to the S3 socket on the UPM using
the 6-pin-mini-DIN to 6-pin-mini-DIN cable. This connection is labeled #6 in Figure 15 and
Figure 17. It carries the measured ball position from the beam potentiometer and is denoted by
the variable x.
9. If the SS01 remote sensor module (shown in Figure 3) will be used to command the ball
position, then connect the Ball Position Sensor connector on the SS01 to the S4 socket on the
UPM using the 6-pin-mini-DIN to 6-pin-mini-DIN cable. This connection is labeled #7 in
Figure 15 and Figure 18. It carries the measured ball position from the remote beam
potentiometer and is denoted by the variable xd.
Figure 14: Connections on the Quanser Q8 Terminal
Board.
Figure 15: Connections on UPM.
Document Number 709 ♦ Revision 2.1 ♦ Page 10
BB01 User Manual
Figure 16: Connection on the SRV02..
Figure 17: Connections
on BB01.
Figure 18: Connections on SS01.
Cable #
From
To
1
Terminal Board:
Analog Output #0
UPM "From D/A"
connector
2
UPM "To Load"
connector
SRV02 "Motor"
connector
3
Terminal Board:
Encoder Input #0
SRV02 "Encoder"
connector
4
UPM "To A/D"
connector
5
UPM "S1 & S2"
connector
Signal
Control signal to the UPM
Power leads to the SRV02 DC motor.
Encoder load shaft angle measurement.
Terminal Board:
Carries the analog signals connected to the
S1 to Analog Input #0 S1 & S2, S3, and S4 connectors on the UPM
S2 to Analog Input #1 to the data-acquisition board.
S3 to Analog Input #2
S4 to Analog Input #3
SRV02 “S1 & S2”
connector
Potentiometer load shaft angle measurement.
Document Number 709 ♦ Revision 2.1 ♦ Page 11
BB01 User Manual
Cable #
From
To
Signal
6
UPM "S3"
connector
BB01 Ball Position
Sensor connector
BB01 ball position measurement.
7
UPM "S4"
connector
SS01 Ball Position
Sensor connector
SS01 ball position measurement.
Table 4 BB01 system wiring summary when using a UPM.
5.3. Typical Connections for Q3
This section describes the typical connections used for to connect the BB01 plant to the Q3 dataacquisition / power amplifier board. The connections are described in detail in the procedure below and
summarized in Table 5.
Follow these steps to connect the BB01 system:
1. It is assumed that the Quanser Q3 board is already installed as discussed in the Reference [4].
2. Make sure everything is powered off before making any of these connections. This includes
turning off your PC and the Q3.
3. Connect the 4-pin-stereo-DIN to 6-pin-stereo-DIN from PWM Output #0 on the Q3 to the
Motor connector on the SRV02. See cable #2 shown in Figure 16 and Figure 19. The cable
transmits the controlled current that is applied to the SRV02 motor and is denoted Im.
4. If the SRV02 has the -E option then the encoder can be used to measure the load shaft angle.
Connect the 5-pin-stereo-DIN to 5-pin-stereo-DIN cable from the Encoder connector on the
SRV02 panel to Encoder Input # 0 on the Q3 board, as depicted by connection #3 in Figure 16,
above.
5. Connect the Ball Position Sensor connector on the BB01 to the Sensor 1 socket on the Q3
Analog 2:1 Buffer box using the 6-pin-mini-DIN to 6-pin-mini-DIN cable. This connection is
labeled #6 in Figure 17 and Figure 20. It carries the measured ball position from the beam
potentiometer and is denoted by the variable x.
Remark 1: Ensure the BB01 sensor is passed through the Q3 Analog 2:1 Buffer box.
Otherwise the measured ball position signal will contain jitter and make the experiment
difficult to control.
Remark 2: Make sure the switch on the Q3 Analog 2:1 Buffer box is set to the downward
“Secondary Sensor” position when using the BB01.
6. If the SS01 remote sensor module (shown in Figure 3) will be used to command the ball
position, then connect the Ball Position Sensor connector on the SS01 to the Sensor 2 socket
on the Q3 Analog 2:1 Buffer box socket using the 6-pin-mini-DIN to 6-pin-mini-DIN cable.
This connection is labeled #7 in Figure 18 and Figure 20. It carries the measured ball position
from the remote beam potentiometer and is denoted by the variable xd.
7. Connect the To Q3 connector on the Q3 Analog 2:1 Buffer box to the Analog Input connector
on the Q3 using the 6-pin-mini-DIN to 6-pin-mini-DIN cable. This connection is labeled #8 in
Figure 19 and Figure 20. It carries the conditioned measured ball position from the beam
Document Number 709 ♦ Revision 2.1 ♦ Page 12
BB01 User Manual
potentiometer and, if used, the remote beam potentiometer.
Figure 19: Connections on the Q3 board from the Analog 2:1 Buffer box and the BB01.
Figure 20: Connections on the Q3 Analog 2:1 Buffer box.
Document Number 709 ♦ Revision 2.1 ♦ Page 13
BB01 User Manual
Cable #
From
To
1
Q3: “Motors #0”
connector
SRV02 “Motor”
connector
3
Q3: “Encoders #0”
connector
SRV02 "Encoder"
connector
6
BB01 Ball
Position Sensor
connector
Q3 Analog 2:1 Buffer: BB01 ball position measurement.
“Sensor 1” connector
7
SS01 Ball Position
Sensor connector
Q3 Analog 2:1 Buffer: SS01 ball position measurement.
“Sensor 2” connector
8
Q3 Analog 2:1
Buffer: “To Q3”
connector
Q3: “Analog Input”
connector
Signal
PWM signal to the DC motor.
Encoder load shaft angle measurement.
Conditioned ball measurement on the BB01
and SS01.
Table 5 BB01 system wiring summary when using the Q3.
6. Testing and Troubleshooting
This section describes some functional tests to determine if your Ball and Beam system is operating
normally. It is assumed that the SRV02 is connected as described in the Section 5.2, above. To carry
out these tests, it is preferable if the user can use a software such as Quarc or LabVIEW to read sensor
measurements and feed voltages to the motor. See Reference [3] to learn how to interface the SRV02
with Quarc. Alternatively, these tests can be performed with a signal generator and an oscilloscope.
6.1. SRV02 Motor and Sensors
See Reference [2] for information on testing and troubleshooting the SRV02 separately.
6.2. Testing the Ball Position Sensor
6.2.1. Testing
Test the ball position sensor from the BB01 or the SS01 with the following procedure:
1. Using a program such as Quarc, measure the analog input channel #2 to test the BB01 sensor or
analog input channel #3 to test the SS01 sensor.
2. A typical signal response of the ball position sensor is illustrated in Figure 21. For the BB01, the
ball position sensor should output a voltage of about 4.5 V when it is closest to the SRV02. As
the ball is rolled away from the SRV02 the measured voltage signal should be decreasing down
Document Number 709 ♦ Revision 2.1 ♦ Page 14
BB01 User Manual
to approximately -4.5 V when the ball reaches the other end of the beam. Sometimes when the
ball is sitting at the very end of the beam it may not be in contact with the sensor. In this case
the reading will initially be 0 V but when the ball begins moving the sensor signal will jump up
to about 4.5 V and then begin decreasing. Besides the ends of the beam, the signal should have
no discontinuities and little noise. Similarly for the SS01 sensor, the voltage signal should
decreasing from approximately 4.5 V to -4.5 V as the ball travels towards the end of the beam
with the analog connector.
Figure 21: Typical voltage signal from BB01 ball position sensor.
6.2.2. Troubleshooting
Follow the steps below if the potentiometer is not measuring correctly:
● Verify that the power amplifier is functional. For example when using the Quanser UPM
device, is the red LED in the top-left corner lit? Recall that the analog sensor signal goes
through the UPM before going to the data-acquisition device. Therefore the UPM needs to be
turned on to read the potentiometer.
● Check that the data-acquisition board is functional, e.g. the red LED on the Quanser Q4/Q8
terminal board should be bright red. If not then the DAC board fuse may be burnt and need
replacement.
● Measure the voltage across the potentiometer. Ensure the potentiometer is powered with a ±12V
at the 6-pin-mini DIN connector on the BB01, component #10 in shown in Figure 2, or on the
SS01, component # 14 in Figure 3. The two bottom pins of the DIN connector are GND pins
and the leftmost pin, i.e. where the green cable is connected to, outputs the voltage of the ball.
Using a voltmeter, connect one probe to the middle-left pin and the other to the bottom GND
pins. The voltage should vary between about ±4.5 volts as the ball position is changed. If the
voltage does not change when you rotate the potentiometer shaft, your potentiometer needs to be
Document Number 709 ♦ Revision 2.1 ♦ Page 15
BB01 User Manual
replaced. Please see Section 7 for information on contacting Quanser for technical support.
7. Technical Support
To obtain support from Quanser, go to http://www.quanser.com/ and click on the Tech Support link.
Fill in the form with all the requested software and hardware information as well as a description of the
problem encountered. Also, make sure your e-mail address and telephone number are included. Submit
the form and a technical support person will contact you.
Note: Depending on the situation, a support contract may be required to obtain technical
support.
8. References
[1] Quanser. Q4/Q8 User Manual.
[2] Quanser. SRV02 User Manual.
[3] Quanser. Rotary Experiment #0: SRV02 Quarc Integration.
[4] Quanser. Q3 Manual.
Document Number 709 ♦ Revision 2.1 ♦ Page 16
BB01 User Manual
Appendix A: Linear Transducer Specification Sheet
Document Number 709 ♦ Revision 2.1 ♦ Page 17