1
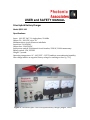
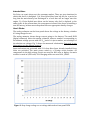
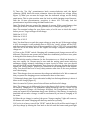
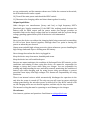
USER and SAFETY MANUAL Prius Hybrid Battery Charger Model QDPC-‐100 Specifications: Input: 100-‐125 VAC, 7A, single phase, 50-‐60Hz Output: 50 – 300 VDC, up to 3A Maximum short circuit tolerance: indefinite Input fuse: 12A 450VAC Output fuse: 12A 450VDC Input power switch: 50A thermal circuit breaker, 250VAC, 1000A momentary Battery switch: 15A, 250VDC Weight: 7 pounds Operating temperature: 0C – 40C [32°F – 105°F] ambient, noncondensing humidity Auto charge inhibit: on negative battery voltage or reaching set level (+/-‐ 1V) Figure 1: The model QDPC-‐100 Prius hybrid battery charger [August, 2002]. Intended User: For Prius car repair shops, not the consumer market. There are two situations for which this device is designed: 1) A Prius Hybrid has been left idle for a period so long that the main battery has discharged to a level that will no longer start the engine, 2) A Prius Hybrid was driven on the battery after fuel is depleted, to the same result. At the present time, the consequence in most Prius shops is installing a new HV battery, because most shops don’t have an appropriate battery charger. How it Works: The analog voltmeter on the front panel shows the voltage at the battery, whether it’s being charged or not. The analog ammeter shows charge current going to the battery. The small DVM (digital voltmeter) below the analog voltmeter shows a number corresponding to the ultimate voltage you set with the Vset knob. It is just a marker, not a multiple of the absolute set voltage. Fig. 2 shows the measured relationship. You need to use this graph to set the charger properly. Input and output are protected with 12-‐A slow blow fuses, already installed. Extra fuses are provided. The main power switch is a 50-‐amp circuit breaker. All components in the high voltage circuit are rated for 800 volts or higher; the main rectifier is rated at 2,000 volts, 35A. Charging cables are rated 10A, 1,000V. Figure 2: Stop-‐charge voltage vs. set voltage indicated on front panel DVM Operating Sequence It is important to follow this sequence. Although damage will not always occur when it is not followed, proper operation may be compromised. 1) Both front panel switches should be in the “off” position. Note! Although it is possible to charge the HV battery while it is still in the automobile, Photonic Associates, LLC has not tested the charger’s operation in that case and recommends that the battery be removed before charging. If it cannot be removed, at least disconnect it from the car’s electrical system. Note! Put on approved high voltage gloves, and always connect clips to terminals with one hand only. It is also recommended that you stand on a rubber pad. Note! You must know where the correct terminals are located on the battery, and you must know where the “safety jumper” is located and how to properly bypass it. 2) Plug the device in to 120VAC 60Hz single phase power. 3) Turn on the main power switch. Wait a second. The fan will start, and the internal sensing circuits will come to life. 4) Attach the Prius charger to the proper battery terminals. 5) The voltmeter will register battery voltage. If the alarm sounds and the red panel light comes on bright continuously, you have the battery connected backward. 6) Turn the “Vset” knob clockwise until the buzzer and the “charge complete” green light goes out. The light and buzzer may not come on if the battery is completely dead. Figure 3: Normal charge voltage and current vs. time. Red curve is current. 5) Turn the “Set Chg” potentiometer knob counterclockwise until the digital voltmeter (DVM) below the main voltmeter shows the desired set voltage (using Figure 2). What you set must be larger than the indicated voltage on the analog panel meter. This is quite sensitive near the level at which charging stops. However, with the 10-‐turn potentiometer, precision is about 10V. You may lock the potentiometer in position using the small brake lever. Note! The knob does not control the amount of current. With a good battery, that will begin at about 3.3A and decrease gradually as it is charged [see Figure 3]. Note! The nominal voltage for your Prius varies, a lot. Be sure to check the model before you set. Target voltages at full charge: 2000 Gen 2: 274 V 2004 Gen 3: 202 V 2010 Gen 4: 202 V Note! You don’t have to reach the target voltage to start the car! If the target voltage is 202, for example, it will probably start at 100V, the “ready” voltage will be 150V, and the normal operating cycle of the automobile is 100 to 235V. You can probably start the car in one hour, and let the engine and charge computer determine the charge rate. 6) Turn on the “HVDC” switch. Charging will commence and charge current will be indicated. The device can operate into a dead short indefinitely, but there is no point in doing this if the battery is not charging. Note! Watch the analog voltmeter for the first minute or so. With bad batteries, it may rise rapidly. Or, current may be zero and the analog panel meter indicates maximum voltage instantly, indicating an open circuit. In either case you should turn off the HVDC switch immediately. One reason for this may be that you did not bypass the “safety jumper” properly, or connected on the wrong side of the internal relay. You should check on it every thirty minutes after that to be sure problems aren’t developing. Note! This charger does not measure the voltage on individual cells. We recommend that you pause the charging process and measure these at least once. 7) Estimated charge time for an otherwise healthy but discharged battery is about 4 hours to full charge [Figure 3]. Note! As stated in 5) above, most Prius will start well below full charge. Note! The charge rate is deliberately low so that there is little chance of overheating the battery. Compared to the maximum charge/discharge rate of a Prius cell in normal operation (Charge +40, Discharge -‐90 amps), 3A is insignificant, about 0.23 watts per normal cell at maximum charge rate. However, if the battery is completely dead and will not take a charge, it could be overheated if you leave it charging at 3A for hours. 8) When the set charge is reached, the green “charge complete” light will come on, the buzzer will sound. Charging will then stop and start cyclically. 9) If you’re in a hurry, turn off the “HVDC” switch. But its life will be much longer if you stop charge by turning the Vset knob to the left until the buzzer and green light are on continuously and the ammeter shows zero. Unlike the contacts in the switch, the SCR inside doesn’t make a spark. 10) Turn off the main power switch and the HVDC switch. 11) Disconnect the charging cables and short them together for safety. Unique Capabilities: Other chargers use transformers (heavy and hot) or high frequency IGBT’s [Insulated gate, bipolar transistors]. If the IGBT fails, nothing stands between the battery with its 30kW output and the power mains. Our charger provides an automatic limit on the charge voltage that can be attained, and also a preset charge voltage, guarding against battery fires if the device is left unattended. Safety: Never turn the device on without the charging leads being connected to something. It’s OK to have them shorted together, although there’s no point in leaving the power on when they are shorted. Always wear suitable high-‐voltage protective gloves whenever you are handling the high-‐voltage leads and clips or working near the battery. Never change fuses when the device is plugged in. Keep the device away from water, humidity and steam. Keep the device in a well-‐ventilated space. Because we cannot anticipate the condition of discharged Prius HV batteries, or the conditions and training of those using this device, we cannot be responsible for damage or injury that occurs while using our charger. You are responsible for reading and understanding the user and safety manual, monitoring the condition of battery cells while charging, and for using proper safety precautions to protect personnel from injury from high voltages. You assume all responsibility for using this device. There is an internal resistor which automatically discharges the capacitors in the unit after the power is turned off. The only way you will come in contact with high voltage generated by the unit after power is turned off is if the HVDC switch is left on, the charging cables are not shorted together, and that only for sixty seconds. The internal cooling fan must be operating to avoid damage to the charger. We welcome: Your interest, opinions and questions. Send them to [email protected].
![(資料編) [1602KB ]](http://vs1.manualzilla.com/store/data/006632912_2-61e2e04d85002e3dfcae9cc601d10470-150x150.png)