1
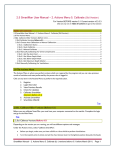
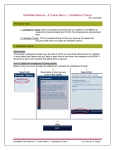
SmartMan User Manual – 2. Actions Menu 5. Calibrate V5.1 and later The Actions Menu The Actions Menu is where you perform actions which are required by the program and you can view previous results of activities and tests performed by the person who is logged in. Click on any item to perform the required action. Actions Menu 1. 2. 3. 4. 5. 6. 7. Register Login Next User View Previous Results Check for Updates Calibrate SmartMan Activate SmartMan SmartMan ONLINE 5. Calibrate Before you can calibrate SmartMan, you must have your computer connected to the manikin. Complete the login and go to the Main Menu. Calibrate v5.3.1.1 and later From version v5.3.1.1 onwards SmartMan will automatically calibrate. It will do this each time it goes to the Main Menu. If it finds and unexpected reading (it is too far out to be an accurate reading), you will see a message in a popup window giving you suggestions on how the problem can be fixed. You cannot perform activities until the calibration reading is brought back into an expected measurement. Example of a problem, it is possible for air to remain in the lungs. In that case the message would be to press on the chest a couple of times. This would empty the lungs completely and the auto calibration would now find the result within its parameters and it would allow access to the activities. Press F5 If for some reason you wish to force a re-calibration, go back to the Main Menu, press F5 Calibration Readings The calibration readings are in the upper right of the Main Menu. These are the active readings for the sensors inside of the manikin. SmartMan User Manual – 2. Actions Menu 5. Calibrate (v5.3 Mar 2011) Page 1 5. Calibrate Older Versions Depending on the version you are running, you will see different options and messages. Under the Actions menu, select 'Calibrate SmartMan'. Before you begin, make sure you have a BVM or a face shield to perform Ventilations. Turn the manikin onto its chest and set the chest tension lever to the lightest position (towards the head). Push down the blind slider if it is covering the scale plate. Login and from the Main Menu select 5. Calibrate SmartMan from the Actions menu. When you calibrate, you provide several consecutive readings for both compressions and ventilations. Choose Auto Calibration or Manual Calibration Calibration Status If this is the first time that you have calibrated SmartMan you will not have any readings for compressions and ventilations showing in the 'Calibration Status' records. If the manikin was previously calibrated on this computer, it will show the current readings such as in the following picture. SmartMan User Manual – 2. Actions Menu 5. Calibrate (v5.3 Mar 2011) Page 2 To the right is an example of calibration readings for a manikin that has already been calibrated. The important thing to see is the chest sensor. If either or both of the Chest Sensor and Lung Sensor are zero the manikin is not properly connected to the computer Auto Calibrate If you select “Auto Calibration”, the program will search on the internet for the factory calibration file for your particular SmartMan. You will be asked to enter the panel number. The panel number is on the side of the popup instrument panel on the side opposite to where the USB cable connects. If your internet connection is poor or if you do not have permission to write a file from the internet onto your hard drive you will see an error report. Manual Calibrate When you select this option, you will perform several tasks to verify how deeply the chest is being compressed and what volume is being put into the lungs. You will have to repeat the action several times so that the software can confirm the readings. Accuracy and not speed is what is required during calibration SmartMan User Manual – 2. Actions Menu 5. Calibrate (v5.3 Mar 2011) Page 3 Manually Calibrating For Chest Compressions The computer will automatically calibrate the zero point. You will be asked to press the chest 3 times to a consistent depth of 50mm, 30mm and the maximum depth. You will perform each compression 3 times. If the compressions are not close enough to the same depth, you will have to repeat that process until they are consistent. Use the panel to judge how far you are compressing. Speed is NOT important here. Press slowly until the marker is exactly on the correct mark. Perform 3 in a row as close to the same spot as possible. Set the Zero Point Click on “Zero Compression Calibration”. This will set the zero point for chest compressions. The software will take 5-10 seconds. If you do not want to continue with calibrating, click on the button to keep the current compression values. When it has finished, the software will move automatically to the next stage. Set 50mm Depth Mark Click on “50mm Compression Calibration” or the press the Space Bar. It will say that it is waiting for you to perform you first attempt. SmartMan User Manual – 2. Actions Menu 5. Calibrate (v5.3 Mar 2011) Page 4 Now press the chest until the pointer (see the green circle in the picture above) moves to 50mm. Speed is NOT important here. Press slowly until the marker is exactly on the 50mm marker. You must do this 3 times as precisely as you can. As you perform to the 50mm mark, release the chest fully. You will see the readings appear. In the example below the first attempt gave a reading of 651, the second attempt gave 647. If the third attempt provides a reading close to this, you will see the following 'Congratulations' window . Press the SPACE BAR and you will move directly to the next setting. If the screen is still displaying the 50mm Button, then the three attempts are not to the accuracy tolerance required. Perform 3 more to a depth of 50mm. When you are successful, the program will move automatically to the 30mm settings. SmartMan User Manual – 2. Actions Menu 5. Calibrate (v5.3 Mar 2011) Page 5 Set 30mm Depth Mark If the Congratulations window is still showing press the SPACE BAR. It will say that it is waiting for you to perform your first attempt. Now press the chest (see the green circle in the picture above) moves to 30mm. Again, Speed is NOT important here. Press slowly until the marker is exactly on the 30mm marker. You must do this 3 times as precisely as you can. As you perform to the 30mm mark, release the chest fully. You will see the readings appear. In the example below the first attempt gave a reading of 361, the second attempt gave 366. If the third attempt provides a reading close to this, you will see the following 'Congratulations' window Press the SPACE BAR and you will move directly to the next setting. SmartMan User Manual – 2. Actions Menu 5. Calibrate (v5.3 Mar 2011) Page 6 If the screen is still displaying the 30mm Button, then the three attempts are not to the accuracy tolerance required. Perform 3 more to a depth of 30mm. When you are successful, the program will move automatically to maximum depth. Set Maximum Depth Marker Click on the “Maximum Compression Calibration” Button or press the space bar. It will say that it is waiting for you to perform your first attempt. Now press the chest until you feel the chest hit the bottom. It is important that your hands are placed correctly on the chest because if they are in the wrong part of the chest you may not reach the correct maximum depth. And again, speed is NOT important here. You must do this 3 times within a small range of accuracy. As you perform to the maximum depth mark, release the chest fully. If you are doing this correctly the manikin should provide readings above 845. You will see the readings appear. In the example below the first attempt gave a reading of 963, the second attempt gave 963. If you do not get the three attempts close enough to each other, the software will have you do it again until you are successful. When you are successful, the program will move automatically to the next stage. The following window will appear. SmartMan User Manual – 2. Actions Menu 5. Calibrate (v5.3 Mar 2011) Page 7 Manually Calibrating For Ventilations When you have successfully completed the chest compressions calibration the software will automatically move to ventilations calibration. With the previous window showing, press the SPACE BAR and the software will automatically perform the zero setting for the lungs. This may take 10-15 seconds. Your next prompt will be to set the “0.6L Ventilation Calibration”. To perform this action, look at the scale plate (green circle below). You will see the following display waiting for you to perform 4 ventilations. The first one is NOT counted. Now inflate the lungs until the marker moves to the 0.6 indication. Speed is NOT important at this stage. Squeeze slowly concentrating on accuracy until the pointer is exactly on the 0.6l marker. You must do this 4 times within a small range of accuracy. As you perform the volume will be indicated. In the example below the first attempt gave a reading of 210, the second attempt gave 209. SmartMan User Manual – 2. Actions Menu 5. Calibrate (v5.3 Mar 2011) Page 8 If you do not get the last three attempts within the SmartMan tolerances, the software will prompt you do it again until you are successful. When you are successful, the program will give you a 'congratulations' pop up window. Press the SPACE BAR and the program will return to the Main Menu. SmartMan is now correctly calibrated. Importance of Correct Calibration To use SmartMan, the calibration must be kept up to date and accurate. Each time a computer is changed to another manikin, it must be calibrated. It is also good practice to re-calibrate the manikin if it has been transported or not used for some time. Calibration information is stored as part of the data for every skills performance. The calibration status can be seen for compressions and ventilations from the Main Menu in the upper right window. (See picture below). If at any time the USB connection comes loose, this will show the calibration as zero or as being invalid. If the USB connection is connected properly and the calibration status shows as invalid, then the manikin must be recalibrated. SmartMan User Manual – 2. Actions Menu 5. Calibrate (v5.3 Mar 2011) Page 9 SmartMan User Manual – 2. Actions Menu 5. Calibrate 10 (v5.3 Mar 2011) Page