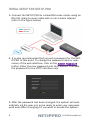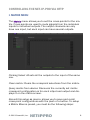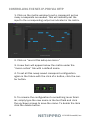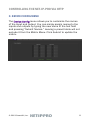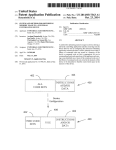
1
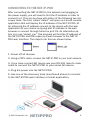
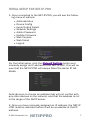
ETHERNET/RS232 SERVER CONTROL MOST SMARTAVI MATRIX SWITCHES FROM ANYWHERE IN THE WORLD USER MANUAL NET-IP-PRO has been tested with the Chrome and Firefox web-browsers. Internet Explorer is not supported. TABLE OF CONTENTS Introduction ................................................................... 4 Features ........................................................................ 4 Applications................................................................... 4 What’s in the box .......................................................... 4 Technical Specifications .............................................. 4 Connecting to the NET-IP-PRO ....................................... 5 Initial Setup for NET-IP-PRO........................................... 7 Controlling the NET-IP-PRO via HTTP ............................. 9 Matrix Menu .................................................................. 9 Device Config Menu ..................................................... 11 Web Based Telnet......................................................... 12 Controlling the NET-IP-PRO via TELNET ......................... 13 Upgrading the NET-IP-PRO ............................................ 13 Limited Warranty Statement ......................................... 16 © 2013 SmartAVI, Inc. 3 INTRODUCTION The NET-IP-PRO is an RS-232 control module that allows most SmartAVI switching matrixes to be controlled remotely via HTTP or TELNET. Manage the switching functions of your matrix with ease from anywhere in the world. With NET-IP-PRO you can save present input/output configurations for easy access. TELNET access provides transparent command control of your matrix, perfect for use with automated third-party control software. Note: Telnet access requires telnet or similar. First find the IP address using the “detect” application, or if you have configured the IP address manually, telnet the IP address port 23. FEATURES Supports HTTP and TELNET control 10/100 Ethernet Interface Up to 10 user-definable configurations Password Protected Up to 5 Users can Control the Matrixes IP Configuration via TCP/IP and RS-232 Flexible control of several types of matrixes APPLICATIONS Server Collocation Digital Signage Airports Dealer Rooms Control Rooms Audio/Visual Presentations Hotels/Resorts WHAT’S IN THE BOX? PART NO. QTY DESCRIPTION NET-IP-PRO 1 NET-IP-PRO Device PS5VDC2A 1 5VDC2A Power Supply CCRS232-X 1 Serial male to male cross-over cable TECHNICAL SPECIFICATIONS Power External 100-240 VAC/5VDC2A @10W Dimensions 2.8125”W x 1”H x 3.375”D Weight 0.5 lbs Approvals UL, CE, ROHS Compliant Operating Temp. 32-131°F (0-55 °C) Storage Temp. -4-185 °F (-20-85 °C) Humidity Up to 95% 4 © 2013 SmartAVI, Inc. CONNECTING TO THE NET-IP-PRO After connecting the NET-IP-PRO to the network and plugging in the power supply, you will need to find the IP address in order to connect to it. This can be done with either of the following two discovery tools. The first, called “detect” will open up a small console application that will display the IP address of the NET-IP-PRO. After obtaining the IP address connect to the device with the web application of your choice by typing that IP address in the web browser or connect through telnet on port 23. An alternative option is to use “detect_gui,” this program will find the IP address of the NET-IP-PRO and then open up a web browser to the NET-IPPRO web interface. The steps to do this are shown below. 1. Power off all devices. 2. Using a CAT5 cable, connect the NET-IP-PRO to your local network. 3. If you have a smart-AVI device use your RS-232 male to male cable to connect the NET-IP-PRO to your smart-AVI device. 4. Plug the power into the NET-IP-PRO. 5. Use one of the discovery tools (mentioned above) to connect to the NET-IP-PRO web interface or telnet application. © 2013 SmartAVI, Inc. 5 CONNECTING TO THE NET-IP-PRO ************************** * SmartAVI control is UP * * version 10.12.20#6 * ************************** addr:192.168.1.102 Mask:255.255.255.0 gtwy:192.168.1.1 ************************** NOTE: the above IP address is for demonstration purposes only. Actual results may be different. 6. Open a web browser and navigate to the IP address that is indicated. You will be prompted to enter a username and password. 7. To access the web interface of NET-IP-PRO, log in with the following information: User ID: admin Password: admin 6 © 2013 SmartAVI, Inc. INITIAL SETUP FOR NET-IP-PRO 1. Once connected to the NET-IP-PRO, you will see the following menu of options: Administration Device Config Input/Output Select Network Settings Admin Password Update Firmware Web Console Web Telnet Logout For the initial setup, click the Network Settings button and manually assign an IP address to the NET-IP-PRO. This will assure that the NET-IP-PRO will always have the same IP ad- dress. Note: Be sure to choose an address that will not conflict with any other devices on the network, and that the address is not in the range of the DHCP server. 2. Once you have manually assigned an IP address, the NET-IP -PRO must be restarted before it will be accessible at that IP address. © 2013 SmartAVI, Inc. 7 INITIAL SETUP FOR NET-IP-PRO 3. Connect the NET-IP-PRO to a SmartAVI video matrix using an RS-232 (male-to-male) cable with a null modem adaptor (refer to the figure below): 4. It is also recommended that you set a password for the NETIP-PRO at this point. To change the password (and/or username) of the web interface, click on the Admin Password button. Enter the new password and click Submit. This sets the password for the HTTP interface only. 5. After the password has been changed, the system will automatically log the user out, so be ready to enter your new password soon after changing it if you want to access the system. 8 © 2013 SmartAVI, Inc. CONTROLLING THE NET-IP-PRO VIA HTTP I. MATRIX MENU The Matrix menu allows you to set the cross-points for the matrix. Cross-points are used to route signals from the individual inputs to individual outputs. The output channels can only have one input, but each input can have several outputs. Clicking Select All sets all the outputs to the input of the same row. Clear matrix: Clears the crosspoint selections from the matrix. Query matrix from device: Discovers the currently set matrix crosspoint configuration is for each intput and output and displays it on the matrix screen. Record this setup as macro: allows you to save and recall cross-point configurations with the push of a button. To setup a Matrix Macros preset, you must do the following steps: © 2013 SmartAVI, Inc. 9 CONTROLLING THE NET-IP-PRO VIA HTTP 1. Click on the matrix window to set a crosspoint; set as many crosspoints as needed. This will instantly set the input to the corresponding output as indicated in the matrix. 2. Click on “record this setup as macro” 3. A new item will appear below the matrix under the “macro action” tab with a default name. 4. To set all this newly saved crosspoint configuration again in the future with the click of a button, click the center button. 5. To rename the configuration to something more familiar, simply type the new name in the text field and click the up/down arrows to save the name. To delete the item click the delete button. 10 © 2013 SmartAVI, Inc. CONTROLLING THE NET-IP-PRO VIA HTTP II. DEVICE CONFIG MENU The Device Config menu allows you to customize the names of the Input and Output. You can simply assign names to the inputs and outputs by typing the new name in the text field and pressing “Submit Names.” Leaving a preset blank will not exclude it from the Matrix Menu. Click Submit to update the matrix. © 2013 SmartAVI, Inc. 11 CONTROLLING THE NET-IP-PRO VIA HTTP III. WEB-BASED TELNET The Web Telnet button allows you to send commands to the matrix via a web-based TELNET connection to the NET-IP-PRO through a Java internet application. This application is similar to telnet clients such as HyperTerminal or PuTTy. Use the same username and password from the web interface login. Once logged in, NET-IP-PRO is ready to accept commands. Note: Please see user manual for the matrix you are using for a list of the available commands. 12 © 2013 SmartAVI, Inc. CONTROLLING THE NET-IP-PRO VIA TELNET Commands may be sent transparently to the matrix via a TELNET connection to the NET-IP-PRO. To use this function, use a telnet client such as Hyperterminal or PuTTY to connect to the IP address of the NET-IP-PRO. You will be prompted for a username and password - this will be the same as the login information via HTTP. Once logged in, the NET-IP-PRO is ready to accept the standard RS-232 commands. For a list of the available commands, please see the user manual for the matrix you are using. Although the commands are not echoed to the client display, the commands are being issued to the matrix. Should you need commands to be echoed, please see the instructions for your TELNET client. UPGRADING THE NET-IP-PRO To updgrade the NET-IP-PRO with the latest firmware, contact your sales representative at 800-AVI-2131, 818-503-6200 or contact us at www.smartavi.com. © 2013 SmartAVI, Inc. 13 14 © 2013 SmartAVI, Inc. © 2013 SmartAVI, Inc. 15 NOTICE The information contained in this document is subject to change without notice. SmartAVI makes no warranty of any kind with regard to this material, including but not limited to, implied warranties of merchantability and fitness for particular purpose. SmartAVI will not be liable for errors contained herein or for incidental or consequential damages in connection with the furnishing, performance or use of this material. No part of this document may be photocopied, reproduced, or translated into another language without prior written consent from SmartAVI Technologies, Inc. Designed and Manufactured in the USA 800.AVI.2131 Tel: (818) 503-6200 Fax: (818) 503-6208 11651 Vanowen St. North Hollywood, CA 91605 SmartAVI.com Many industry-leading companies have recognized the innovation and power of SmartAVI’s technologies and have successfully implemented them within their systems. Users of SmartAVI technology include: