1
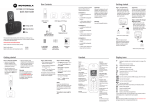
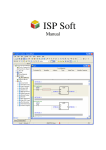
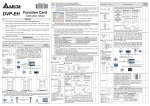
GE Fanuc Automation
CIMPLICITY Monitoring and Control Products
CIMPLICITY HMI for CNC
CNC Machining Interface
Installation and
Configuration Manual
GFK-1566D
November 1999
GFL-002
Warning notices are used in this publication to emphasize that hazardous voltages, currents, temperatures,
or other conditions that could cause personal injury exist in the equipment or may be associated with its use.
In situations where inattention could cause either personal injury or damage to equipment, a Warning notice
is used.
Caution notices are used where equipment might be damaged if care is not taken.
Note
Notes merely call attention to information that is especially significant to understanding and operating the
equipment.
This document is based on information available at the time of publication. While efforts have been made
to be accurate, the information contained herein does not purport to cover all details or variations in
hardware or software, nor to provide for every possible contingency in connection with installation,
operation, or maintenance. Features may be described herein which are not present in all hardware and
software systems. GE Fanuc Automation assumes no obligation of notice to holders of this document with
respect to changes subsequently made.
GE Fanuc Automation makes no representation of warranty, expressed, implied, or statutory with respect to,
and assumes no responsibility for the accuracy, completeness, sufficiency, or usefulness of the information
contained herein. No warranties of merchantability or fitness for purpose shall apply.
CIMPLICITY is a registered trademark of GE Fanuc Automation North America, Inc.
Windows NT and Windows 95 are registered trademarks of Microsoft Corporation
Copyright 1998 GE Fanuc Automation North America, Inc.
All rights reserved
Contents
Introduction ........................................................................................................................................ 1-1
Reference Manuals ................................................................................................................ 1-2
Installation ......................................................................................................................................... 2-1
Installation Overview............................................................................................................. 2-1
Installing Licensed Windows NT .......................................................................................... 2-1
Installing the Ethernet System ............................................................................................... 2-2
Registration of CIMPLICITY HMI and CIMPLICITY HMI for CNC ................................. 2-3
Setup of CNC Machining Interface Auto-Boot on Power-Up............................................... 2-3
Setup of Ladder Edit and Display.......................................................................................... 2-3
Introduction ........................................................................................................................................ 3-1
Overview ............................................................................................................ 3-1
Configuring CNC Data Points ............................................................................................... 3-2
Using the Configuration Editor ............................................................................................. 3-4
Machine Characterization...................................................................................................... 3-5
AutoStart Sequence Configuration........................................................................................ 3-8
Maintenance......................................................................................................................... 3-10
Manual Sequence Configuration ......................................................................................... 3-11
Safety Features Associated with the Manual Operations Screen ........................................ 3-16
Machine Cycle Count Screen .............................................................................................. 3-17
Machine Cycle Time Screen................................................................................................ 3-18
Machine Cycle Time Log Screen ........................................................................................ 3-19
Machine Cycle Count Log Screen....................................................................................... 3-20
Shift Setup Screen ............................................................................................................... 3-21
Automatic Launch of CNC Machining Interface Project at Display Station Boot-Up............... A-1
GFK-1566DD
iii
1
Introduction
This document is supplied to the Original Equipment Manufacturer and End User to document the
installation and configuration of the following software:
•
Microsoft Windows NT ® Workstation
•
CIMPLICITY ® HMI Base System
•
CIMPLICITY ® HMI for CNC
•
CIMPLICITY ® CNC Machining Interface
•
GE Fanuc Ladder Edit and Display
Note
This assumes that the supplied hardware is a Display Station–Series 2000 with
the CNC Machining Interface Install hard disk.
Please review this document before installing your system. Installation should be performed using a
temporary keyboard and pointing device.
GFK-1566D
1-1
1
Reference Manuals
For more information, please refer to the following manuals:
Publication Number
GFK-1542
CIMPLICITY HMI for CNC – CNC Machining Interface Operations Manual
GFK-1180
CIMPLICITY HMI for Windows NT/95 - Base System
GFK-1283
CIMPLICITY HMI for Windows NT/95 - Basic Control Engine
GFZ-62994EN/01
GFK-1422
GFZ-62884EN/01
1-2
Description
Basic Operation Package (BOP) 1 for Windows NT/95 Operator's Manual
Open Systems User's Manual (Type II High Speed Serial Bus Setup for Windows
NT/95)
Open Systems Operator's Manual ( Ladder Editing Package)
—
GE Fanuc OI Display Station (Series 2000 User Manual)
—
GE Fanuc OI Display Station (PC Mother Board User Manual)
—
GE Fanuc OI Display Station (PC Ethernet User Manual)
CNC Machining Interface Installation and Configuration Manual
GFK-1566D
2
Installation
Installation Overview
1.
Unpack the unit.
2.
Connect the power cord and HSSB cable to the Operator Interface (OI) system.
3.
Set the CNC parameters for Open Systems operations.
4.
Check on the licenses for the Ladder Editing package.
Installing Licensed Windows NT
Note
You must have a temporarily installed keyboard.
5.
Read the on-screen licensing agreement, and tab down to “[I AGREE]”.
6.
Press ENTER or tab to “Next” to continue.
7.
Enter your Name and Organization in the specified fields.
Note
Use TAB to move between fields. Hold down the FN key to access alphabetic
characters.
8.
Press ENTER or tab to “Next” to continue.
9.
Get the license number for the Windows NT registration. It should be on the book that came
packaged with the CD. Press ENTER or tab to “Next” to continue.
10. Enter your computer name, and press ENTER or tab to “Next” to continue.
GFK-1566D
2-1
2
11. Enter the administrator password (ge) twice to confirm, and press ENTER or tab to “Next” to
continue. The password must be entered in lower case letters.
Note
This password is already defined and should not be changed.
Installing the Ethernet System
12. Enter to start networking setup, and press ENTER or tab to “Next” to continue.
13. Specify your network configuration, and press ENTER or tab to “Next” to continue.
Note
If the window title bar turns gray and loses focus, hold ALT and press TAB to
restore it.
14. Tab down to the "To Select from List" button to select the hardware.
15. Tab over to “Have Disk…”.
16. Enter the path c:\3com when prompted.
17. Select 3C900 from the list. (This is usually not the first selection on the list.)
18. Press ENTER or tab to “OK” to continue.
19. Press ENTER to accept the TCPIP protocol, which should be selected by default.
20. Press ENTER or tab to “Next” to continue.
21. Press OK to close the success window.
22. Close "3 Comm NIC Diagnostic VI.0".
23. Select NOT to use DHCP.
24. Tab to the IP address field and enter your IP address. Use the left and right arrows to move
between decimal points. Press OK.
25. Press ENTER or tab to “Next” to continue.
26. Enter your workgroup or domain name, and press ENTER or tab to “Next” to continue.
27. Restart you computer.
2-2
CNC Machining Interface Installation and Configuration Manual
GFK-1566D
2
Registration of CIMPLICITY HMI and CIMPLICITY HMI for CNC
Note
Proceed to Step 35 if you have already registered your CIMPLICITY product.
28. After your computer starts up, go to Registration, which can be found using this path:
Start ! Programs ! CIMPLICITY ! HMI ! Registration
29. Select New Registration. Read and accept the license agreement.
30. To proceed, enter your personal information.
31. Enter the Base System registration, and click the button to add licenses.
32. Enter CIMPLICITY for the CNC license number.
33. Press ENTER or tab to “Next” to continue.
34. Call the telephone number displayed on the screen to obtain your registration number. Enter
this number on the next screen.
Note
If you are unable to register CIMPLICITY software immediately, you may run the system
for up to 4 days without having a registration number entered.
Setup of CNC Machining Interface Auto-Boot on Power-Up
35. Configure Auto-boot, which is covered in Appendix A, Automatic Launch of CNC Machining
Interface Project at Display Station Boot-Up.
Setup of Ladder Edit and Display
Note
Disregard steps below if you have already setup Ladder edit and display.
36. Go to Start ! Run and type c:\temp\lepsetup.bat. After it runs, reboot the
system.
37. Reference section 2.5 of the “Ladder Editing Package Operator’s Manual”, GFZ-62884 for
additional information.
GFK-1566D
Chapter 2 Installation
2-3
3
Configuration
Overview
The CNC Machining Interface contains a set of standard screens. Many of the screens, such as the
Program Check or Axes screens, are application independent. Several screens, such as the
Autostart sequence, can be customized for a specific application.
In order to customize your CNC Machining Interface project, you must perform the following steps:
1.
Back up the CNC Machining Interface project.
2.
Configure CNC data points (i.e. input and output tags).
3.
Run the Configuration Editor to:
A. Enter machine characteristics
B. Configure an auto-start sequence
C. Generate I/O lists for maintenance screens
4.
GFK-1566D
Configure manual sequences.
3-1
3
Configuring CNC Data Points
The procedure for defining data points is described in detail in GFK-1180, CIMPLICITY HMI for
Windows NT and Windows 95 Base System User’s Manual. Information specific to configuring
CNC data points is described in GFK-1341, HMI for CNC Operation Manual.
This section describes the absolute minimum information that must be specified in order to
configure a point. Refer to GFK-1180 and GFK-1341 for detailed information about each step.
To create a new point:
1.
Activate your project’s Configuration cabinet.
2.
If your project is not currently executing, you should start your project. You can do this by
selecting the Run option from the Project menu.
3.
After your project has started, select the Dynamic option from the Tools menu to enable
dynamic configuration. The CIMPLICITY login dialog box opens. Enter
administrator, and then press OK.
4.
Select the Points icon to activate the Point Configuration window.
5.
Press the NEW ITEM button on the Point Configuration window to add a new CIMPLICITY
HMI point.
6.
The New Point dialog box opens, prompting you to specify information about your new point.
7.
Enter a unique Point ID for the point.
8.
Press the DEVICE POINT button, and enter the name of the device associated with your CNC in
the Device ID field. The device name is CNC.
9.
Select Analog or Digital for the Point Class, as appropriate.
10. In the Description field, enter the I/O address of the point you are defining. The Description
field will be displayed in the I/O address column of the Maintenance screen, and should be in
the same format as the electrical print I/O address.
11. In the Resource Id field, enter the appropriate function group for the point. If the point is an
input, select a function group that ends in _I. If the point is an output, select a function group
that ends in _O.
You may create new resources to represent additional function groups or to describe the
function group in another language by clicking on the resource icon in the project’s
Configuration cabinet. Each function group must have one resource that ends in _I for inputs
and one resource that ends in _O for outputs. The resource name is displayed on the
Maintenance screen when I/O is sorted by function group; however, the _I or _O suffix is not
displayed.
12. Under the Data Structure field, set the Type field to an appropriate data type for the point you
are defining.
13. Under the Access field, select Read or Read/Write, as appropriate, for the type of point you
are defining.
3-2
CNC Machining Interface Installation and Configuration Manual
GFK-1566D
3
14. In the Logging field, select Log Alarm to log alarms associated with this point to the CNC
Machine Interface message log.
15. Select the Device property sheet to specify the address for your point.
16. In the Address field, enter a valid address for the point.
17. If you are defining a digital point, you may also be required to enter data in the Address Offset
field to specify the particular bit of data you would like to reference.
18. Set the Update Criteria field to On Change.
19. Select the Alarm property sheet to define an alarm for this point.
20. Under the Definition field, enter an Alarm Class and Alarm Message.
21. Under the Alarm Criteria field, select Absolute to generate an alarm on transition to a fault
state or On Update to generate an alarm each time the point changes value.
22. If Absolute was selected for an Alarm Criteria, select Alarm Limits.
23. Select the Alarm Routing property sheet to select the roles that can view any alarms generated
by this point.
24. Add all the roles if you wish this alarm to be viewed by all users.
25. Select the Alarm Options property sheet to set alarm display options.
26. Under the Deletion Requirements field, select Reset if you wish the alarm to be removed
from the active system messages when the point changes to a value that is not in a fault state.
27. Select OK to save the point configuration.
GFK-1566D
Chapter 3 Configuration
3-3
3
Using the Configuration Editor
The Configuration Editor allows you to specify the Machine Characterization and Autostart
Sequence information for the CNC Machining Interface project. To activate the Configuration
Editor, double click on the CFG_GEFSOI.CIM file located in the c:\GEFSOI\SCREENS directory of
the CNC Machining Interface project.
A window, similar to the one shown below, will appear. In addition, four MS-DOS command
prompt windows will briefly appear on your screen. After these four windows are no longer
displayed, you can begin the configuration process.
3-4
CNC Machining Interface Installation and Configuration Manual
GFK-1566D
3
Machine Characterization
Pressing the MACHINE CHARACTERIZATION button from the Configuration Editor after activating
CFG_GEFSOI.CIM displays the following window:
To change a value on this screen, click on the value or tab to the value, and press the ENTER key.
Enter a new value, and then press ENTER again to make the change.
GFK-1566D
Chapter 3 Configuration
3-5
3
The Machine Characterization screen allows you to specify the following information:
Table 3 - 1. Machine Characterization Screen
Item
Description
Communication Mode
Not currently used.
Screen Layout
Contains one of two screen layout designations:
•
VERITCAL DISPLAY formats the screen with five keys, positioned
vertically on either side of the screen. This screen layout resembles
the Flo Pro screen layout.
•
HORIZONTAL DISPLAY formats the screen with ten function keys
across the bottom.
The functionality remains exactly the same with either display type.
Configure on Startup
Not currently used.
Brass Tag Number
Contains the brass tag number of the machine. It is displayed, along with
other machine specific identification information, on the main screen.
Operation
Contains the operation number of the machine. It is displayed, along with
other machine specific identification information, on the main screen.
Machine Name
Contains the name of the machine. It is displayed, along with other machine
specific identification information, on the main screen.
Electrical Print Number
Contains the reference number of the electrical prints for the machine. It is
displayed, along with other machine specific identification information, on
the main screen.
Hydraulics Print Number
Contains the reference number of the hydraulic prints for the machine. It is
displayed, along with other machine specific identification information, on
the main screen.
Mechanical Print Number
This field contains the reference number of the mechanical prints for the
machine. It is displayed along with other machine specific identification
information on the main screen.
System Password
Contains the system level password, which provides access to these
functions:
•
•
•
•
•
•
•
•
Operation Password
Contains the operator level password. The operator password provides
access to the following functions:
•
•
3-6
Purge Error Log
Set Message Display Delay Time
Set Target Cycle Time
Backup History Log
Change Passwords
Reset Machine Cycle Counter
Setup Machine Cycle Target Count and Shift Start and End Times
Select Part Program
Purge Error Log
Select Part Program
CNC Machining Interface Installation and Configuration Manual
GFK-1566D
3
Item
Description
Message Display Delay
Time (minutes)
Contains a value in minutes for the error message display window delay
time. This determines the time delay for displaying the system error
message screen if there are active system messages that have not been
cleared.
If there is an active system message indicating a machine condition that is in
a fault state or a warning state, the error message window will pop up at the
frequency defined in this field in the machine characterization file. Each
time the user exits the screen, the timer will be reset and begin timing from
zero to the message display delay time.
Target Cycle Time
This field contains the value in seconds of the target cycle time for the
machine. This value is used on the cycle time display screen to display a
comparison between a running average cycle time and the target cycle time
for the machine.
Language Selection
This field allows you to toggle the user interface between ENGLISH and
SPANISH modes.
CNC Serial Number
This field allows you to enter the serial number of the CNC.
Press OK after you have specified all of the above items.
GFK-1566D
Chapter 3 Configuration
3-7
3
AutoStart Sequence Configuration
Pressing the AUTOSTART SEQUENCE button from the Configuration Editor after activating
CFG_GEFSOI.CIM allows you to configure the Autostart sequence steps.
Note
The Equipment Supplier must interlock the ability to enter Automatic mode and
activate a part program with the completion of the configuration of all the
Autostart sequence steps. In other words, the ladder logic must inhibit Automatic
mode and part program cycle start until all the steps are completed.
If all conditions are met, a part program is activated, and if one of the conditions
fails, that does not mean the cycle will stop immediately and exit Automatic
mode, unless that is part of the Equipment Supplier’s standard procedure.
3-8
CNC Machining Interface Installation and Configuration Manual
GFK-1566D
3
You may configure up to 16 steps. First, select the number of steps in the Automatic startup
sequence. Then, configure each step by clicking on the step. Selecting a step will display the
following dialog that allows you to specify the information specific to that step:
The following information may be specified for each step:
Table 3 – 2. Step Configuration Information
Item
Description
Step Description
Specifies a description for the step. The step description is displayed in the
center column of the Automatic Startup sequence.
ON/OFF Text
Specifies the text to be incorporated into the operator message when the step
is either ON or OFF. Available options include:
•
•
•
•
•
•
•
•
•
•
•
•
•
•
•
•
•
•
•
•
•
GFK-1566D
Chapter 3 Configuration
ON/OFF
OFF/ON
OPEN/CLOSED
CLOSED/OPEN
ADVANCED/RETRACTED
RETRACTED/ADVANCED
LOCKED/UNLOCKED
UNLOCKED/LOCKED
OK/NOT OK
NOT OK/OK
UP/DOWN
DOWN/UP
ESTOP/NO ESTOP
NO ESTOP/ESTOP
FAULT/NO FAULT
NO FAULT/FAULT
HOMED/NOT HOMENOT HOMED/HOMED
LOADED/NOT LOADED
NOT LOADED/LOADED
READY/NOT READY
NOT READY/READY
3-9
3
•
•
•
•
RUNNING/NOT RUNNING
NOT RUNNING/RUNNING
STARTED/IDLE
IDLE/STARTED
Note: These values have been pre-configured. You may change this list if
additional values are required or if you wish the labels to be in another
language. To modify the list, use an editor such as Notepad to edit the file
ON_OFF_LABELS.CFG located in the C:\GEFSOI\SCRIPTS directory. On each
line of the file is an On/Off pair separated by the character “/”.
Input Dependencies
Specifies up to eight CIMPLICITY points whose values will be used in
determining whether or not this step is complete.
States
For each CIMPLICITY point, specifies whether that point should have a
value of 1 (ON) for the condition to be true, or 0 (OFF).
ON/OFF Text
For each CIMPLICITY point, specifies the ON/OFF text to be associated
with this point. This label will be used to construct informational messages
about input dependencies for the Check Status function (F1) on the Auto
Startup screen.
Custom Message for
Sequence Step
Specifies a custom message for the step. This message is displayed when the
user selects the Check Status function (F1) on the Auto Startup screen. After
this message is displayed, the user is asked if they wish to see additional
information about each input dependency.
Maintenance
After specifying the Machine Characterization and Autostart Sequence information, press the
MAINTENANCE button from the Configuration Editor after activating CFG_GEFSOI.CIM to update the
system. The following dialog will be displayed:
Selecting this option builds the I/O lists used by the maintenance screen. Whenever you add more
points to your system, you must reselect this option before your new points can be displayed on the
Maintanance screen.
You may then select Exit Configuration to exit from the Configuration Editor.
3 - 10
CNC Machining Interface Installation and Configuration Manual
GFK-1566D
3
Manual Sequence Configuration
The Manual Sequence Configuration screen allows maintenance personnel to debug machine
electrical and mechanical sequences of machine operation. For example, if the operator is
experiencing tool changer problems, he could configure the Manual Sequence Configuration screen
to allow him to single step through a complete tool change, monitoring all outputs (solenoids) and
inputs (limit switches). Correct operation could be documented and published for future
troubleshooting.
The Manual Sequence screens contain eight rows and three columns of boxes. The boxes in the left
and right columns represent operations that can be performed. The boxes in the center column can
be used as either a label for the current step or as a transfer mechanism to another screen.
There are nine screens configured for use. The main Manual Sequence screen is
GEFSOI_MANUAL_OP.CIM. Each row may be configured to transfer to an additional Manual
Operations screen. These screens are GEFSOI_MANUAL_OP1.CIM through GEFSOI_MANUAL_OP8.CIM.
For example, if you configure the center column in the third row as a transfer point, then, when the
user selects the activate button while on that box, the screen GEFSOI_MANUAL_OP3.CIM will be
displayed.
To configure the Manual Sequence screens, you must open the appropriate screen in Cimedit. For
more information on the operation of CimEdit, please refer to GFK-1396, CIMPLICITY HMI for
Windows NT and Windows 95 CimEdit Operation Manual.
Configuring a Gray Box in the Center Column
To configure a gray box in the center column:
1.
Double click on the CimEdit icon in the Projects Configuration cabinet.
2.
Open the file named GEFSOI_MANUAL_OP.CIM from the Projects Screens directory. Eight rows
of gray boxes will be displayed.
3.
To configure a row as step in a manual sequence, double click on the gray box in the center
column.
4.
Select the Variables property page.
5.
Click on the variable label. The variable label will appear in the Name field at the bottom of
dialog box.
6.
Enter the name of the step in the Value field. The name must be enclosed in double quotes.
7.
Click on APPLY.
8.
Click on the variable new_sequence.
9.
Enter 0 in the Value field. A value of 0 indicates that this center box is a sequence label and
performs no action.
10. Click on APPLY.
11. Click on OK.
GFK-1566D
Chapter 3 Configuration
3 - 11
3
Configuring a Gray Box to the Left of the Center Column
To configure a gray box to the left of the center column:
1.
Double click on the gray box to the left of the center box you just configured.
2.
Click on the variable activation_condition. The activation condition is an expression which
represents a condition that must be true before the step can be activated.
A. If the step can always be activated, enter 1 in the Value field.
B. If the step requires an activation condition, use the expression editor to enter an
expression. For more information on entering expressions, refer to the CimEdit Manual.
For example, if the step can only be activated if POINT1 has a value of 1 and POINT2 has
a value of 0, enter (POINT1 EQ 1) AND (POINT2 EQ 0). You may include up to eight
points in your equation.
3.
Click on the variable input_for_completion.
4.
Enter the name of the point that must be checked to determine if the step has been completed in
the Value field. You may use the browser button to browse for the appropriate point.
5.
Click on APPLY.
6.
Click on the variable completed_state.
7.
Enter the value that the point entered for input_for_completion must have for the step to be
completed in the Value field.
8.
Click on APPLY.
9.
Click on the variable trigger_output.
10. Enter the name of the point in the Value field that will be activated when the button is selected.
You may use the browser button to browse for the appropriate point name.
11. Click on APPLY.
12. Click on the variable trigger_type.
13. Enter one of the following values in the Value field:
1
Momentary OFF
Point is set to 0 and then to 1.
2
Momentary ON
Point is set to 1 and then to 0.
3
OFF
Point is set to 0.
4
ON
Point is set to 1.
This type value indicates the action that will be taken on the point entered for the variable
trigger_output, when the step is activated.
3 - 12
CNC Machining Interface Installation and Configuration Manual
GFK-1566D
3
14. Click on APPLY.
15. Click on the variable operation_label.
16. Enter the label for the step in the Value field enclosed in quotes.
17. Click on APPLY.
18. If the activation condition configured in step 2 contains points to complete the activation, then
you must assign values to the following variables:
•
tag1 through tag8.
•
val1 through val8.
•
on_text1 through on_text8.
The information assigned to these variables is used to construct the status message that is
displayed when the user selects Check Status on a step that is not ready to be activated.
For example, if the activation condition is:
(MYPOINT1 EQ 1) AND (MYPOINT2 EQ 2)
The following variable assignments should be made:
•
Tag1 should be assigned the value MYPOINT1.
•
Tag2 should be assigned the value MYPOINT2.
•
Val1 should be assigned the value 1.
•
Val2 should be assigned the value 2.
On_text1 and on_text2 should be assigned a label that represents the on value of the tag, such
as ON.
To assign a value to each variable, perform the following:
GFK-1566D
1.
Click on the appropriate variable from the Variables property page.
2.
Enter a value.
3.
Click on APPLY.
Chapter 3 Configuration
3 - 13
3
Configuring a Gray Box to the Right of the Center Column
To configure a gray box to the right of the center column, repeat steps 1 – 18, as already described
for “Configuring a Gray Box to the Left of the Center Column”.
Note
It is intended that the left and right columns perform opposing actions. If the left
action was SLIDE ADVANCE, the right action should be SLIDE RETRACT.
Configuring a Step as a Transfer Point
To configure a step as a transfer point to another Manual Sequence screen:
1.
Double click on a gray box in the center column to configure a row as a step in a manual
sequence.
2.
Select the Variables property page.
3.
Click on the variable label. The variable label will appear in the Name field at the bottom of
dialog box.
4.
Enter the name of the new manual sequence in the Value field. The name must be enclosed in
double quotes.
5.
Click on APPLY.
6.
Click on the variable new_sequence.
7.
Enter 1 in the Value field.
Entering a value of 1 on the main screen GEFSOI_MANUAL_OP.CIM will cause a transfer point to
one of the eight secondary screens GEFSOI_MANUAL_OP1.CIM through
GEFSOI_MANUAL_OP8.CIM, depending upon whether it is the first center button or the eighth
center button.
Entering a value of 1 on a secondary screen GEFSOI_MANUAL_OP1.CIM through
will cause a transfer point back to the main manual operations
screen GEFSOI_MANUAL_OP.CIM. In this case, the label variable should be set to “Main
Menu”.
GEFSOI_MANUAL_OP8.CIM
8.
Click on APPLY.
9.
Press OK.
10. Now, you must configure the screen that this is a transfer point to. For example, if you just
configured the center box in the second column on the main screen, then you must configure
the screen GEFSOI_MANUAL_OP2.CIM.
3 - 14
CNC Machining Interface Installation and Configuration Manual
GFK-1566D
3
Note
Unused steps should have the activation_condition variable set to 0,
input_for_completion varaible set to 0, and completed_state set to 1. All steps
are initially set to these values.
The following table summarizes each of the variables that must be configured for a left or right step.
Table 3 – 3. Variables for a Left or Right Step
Item
activation_condition
Cell_num
Description
Enter an expression that must be true before the selected operation can be
initiated. If the step can always be selected, enter 1.
Do not change this value. Each gray rectangle has a cell number associated
with it. Cells are numbered left to right, top to bottom.
Conpleted_state
Enter the On/Off state for the point entered in the input_for_completion
field.
Input_for_completion
Enter the input point that is checked to indicate whether or not a given
operation or action has been completed.
On_text1-on_text8
Operation _label
Enter the text that indicates the ON state for each of the points entered in
tag1-tag8.
Enter the label you wish to appear on the step enclosed in quotes. For
example, “SLIDE ADVANCE”.
Tag1-tag8
Enter the names of the points that are contained in activation_condition.
Trigger_output
Tag name for the output that triggers the operation. You may browse for
point Ids by selecting the browser button.
Trigger_point
Do not change this value.
Trigger_type
Enter 1 for Momentary OFF.
Enter 2 for Momentary ON.
Enter 3 for Turn OFF.
Enter 4 for Turn ON.
Val1-val8
GFK-1566D
Chapter 3 Configuration
Enter the value each of the points entered in tag1-tag2 must have in order to
be considered ON.
3 - 15
3
Safety Features Associated with the Manual Operations Screen
The Manual Operations Display screen is not designed to directly replace any hardware
pushbuttons. This screen is designed as an alternate to using hardware pushbuttons. The Equipment
Supplier must determine all machine functionality and if the machine functionality is to be operated
from hardware pushbuttons or the software pushbuttons in this screen.
It is recommended that all machine functionality required to run a machine in automatic mode or to
continue machine operation in automatic mode be programmed using hardware pushbuttons. Since
the Manual Operations Display screen runs on the PC, the machine functionality programmed with
software pushbuttons may be temporarily lost if communication failure between the PC and the
CNC occurs.
To allow for greater safety when using the CMI, the following features exist:
3 - 16
•
A “Heart Beat” or “Watch Dog” signal has been implemented. The CMI application will set
R1109.0 to logic ‘1’ every 250 msec. The Equipment Supplier can monitor this signal and set
this signal back to a logic ‘0’. If the signal is not set back to logic ‘1’ within 250msec., the
equipment supplier can determine that communications between the PC and the PMC Ladder
Logic has failed. The equipment supplier can use this failure condition to clear all necessary
manual function interface bits and create a FAULT condition if necessary.
•
A “Manual Operations Display Screen” ACTIVE signal has been implemented. The CMI
application will set R1109.1 to logic ‘1’ whenever the Manual Operations Display screen is
active. The CMI application will set this bit to logic ‘0’ whenever the Manual Operations
Display Screen is not active. The equipment supplier can monitor this signal to validate manual
function activation. Also, if the equipment supplier creates an additional application which is
activated or another application within the CMI is activated, the communications between the
PC and the PMC Ladder Logic may “slow down”. This is dependent upon the configuration or
programming of this additional application. If the equipment supplier’s additional application
does “slow down” the communications, the equipment supplier can use this signal along with
the “Heart Beat” signal to verify proper Manual Operations Display operation.
•
Each of the cells on the Manual Operations Display Screen has been assigned a unique number.
There is a total of 24 cells on each Manual Operations Display Screen, and a total of 9 possible
Manual Operations Display screens that can be configured. The cell number increases as the
cells move from right to left and top to bottom of the screen. The selection of a given cell is
accomplished by using the cursor keys. As the operator selects a different cell using the cursor
keys, registers R1110 and R1111 will be updated to contain the value of the cell number for
the selected cell on the Manual Operations Display screen. The equipment supplier can
monitor these registers to determine if the cursor keys have been used to select another cell.
The equipment supplier can then either clear or reset the desired machine functions not
associated with the selected cell.
•
As the operator uses the cursor keys to select different cells in the Manual Operations Display
screen, the border around the currently selected cell will always be highlighted with a “flashing
yellow” border. When a particular cell has been activated using the “F4 – Activate Selection”
button, the highlight will be a solid yellow border after the operator moves off of that cell
using the cursor keys. The solid yellow border will remain until the opposite action associated
with that step is activated.
CNC Machining Interface Installation and Configuration Manual
GFK-1566D
3
Machine Cycle Count Screen
The following functions can be activated from the Machine Cycle Count screen:
Button
Description
Function
Password
F1
F2
Machine Cycle Times
Activates Machine Cycle Times screen
N/A
F3
Machine Cycle Count
Log
Activates Machine Cycle Count Log screen
N/A
Setup
Activates Shift Setup screen
F4
F5
F6
System
F7
F8
Cycle Diagnostics
Activates Cycle Diagnostics screen
System
F9
Reset Cycle Count
Resets Actual Machine Cycle Count value only
System
F10
Previous Screen
Returns to CNC Machining Interface Main menu
N/A
The following data values are displayed on the Machine Cycle Count screen:
Data Title
GFK-1566D
Origin
Definition
Actual Machine Cycle
Count
D1170-D1171
Value represents the cycle count for the current shift. The
internal cycle counter must be made available through
ladder logic. The point GMOI_MCYCCNT must be
configured for this address. By default, it is set to D1170,
but it may be changed. Value is incremented when a part
has been produced at end of a cycle.
Target Cycle Count
CIMPLICITY
point
Value is set by calculation based on time elapsed from
current shift and Target Part Count for current shift (set on
the Shift Setup screen). Value is a pro-rated count over
the total shift time.
Difference (Actual –
Target)
CIMPLICITY
point
Value is set by subtracting Target Cycle Count from
Actual Machine Cycle Count.
If value is positive, it appears with white lettering and
green background. This indicates Cycle Count is ahead of
schedule.
If value is negative, it appears with white lettering and red
background. This indicates Cycle Count is behind
schedule.
Total Target for current
shift
CIMPLICITY
point
Total Actual Machine Cycle Count Target for current
shift. Value shown here is entered in Target Part Count
on Shift Setup screen. Description for current shift comes
from Shift Setup screen TIME BLOCK DESCRIPTION.
Last Shift 1 Cycle count
CIMPLICITY
point
Actual Machine Cycle Count at end of the Last Shift 1
time schedule. (Note: Shift 1 defined in Shift Setup
screen)
Chapter 3 Configuration
3 - 17
3
Last Shift 1 OT Cycle
Count
CIMPLICITY
point
Actual Machine Cycle Count at end of the Last Shift 1 OT
time schedule. (Note: Shift 1 OT defined in Shift Setup
screen)
Last Shift 2 Cycle count
CIMPLICITY
point
Actual Machine Cycle Count at end of the Last Shift 2
time schedule. (Note: Shift 2 defined in Shift Setup
screen)
Last Shift 2 OT Cycle
Count
CIMPLICITY
point
Actual Machine Cycle Count at end of the Last Shift 2 OT
time schedule. (Note: Shift 2 OT defined in Shift Setup
screen)
Machine Cycle Time Screen
The following buttons are displayed on the Machine Cycle Time screen:
Button
Description
Function
Password
F1
Set Target Cycle Time
Allows entry to change Target Cycle Time.
System
F3
Machine Cycle Time
Log
Activates Machine Cycle Time Log Screen
N/A
F10
Previous Screen
Returns to Machine Cycle Count screen.
N/A
The following data values are displayed on the Machine Cycle Time screen:
Data Title
3 - 18
Origin
Definition
Last Cycle Time
D1114-D1115
The Last Cycle completed for the current shift must be
made available through ladder logic. The point
MACHINE_CYCLE_TIME must be configured for this
address. By default, it is set to D1114, but it may be
changed. Value is determined by interface bits from Cycle
Begin to Cycle End. Value displayed is the Last
completed Cycle Time. Value is shown in 0.1 second
increments.
Target Cycle Time
CIMPLICITY
point
Value is set via entry from F1 Set Target Cycle Time
button. Value represents desired target cycle time of
machine. Value to be entered in 0.1 second increments.
Average Cycle Time
CIMPLICITY
point
This value contains the running average cycle time.
Difference
(Target - Average)
CIMPLICITY
point
Value is determined by subtracting the Average Cycle
Time from the Target Cycle Time.
If value is positive, it appears with black lettering and
green background. This indicates the Average Cycle Time
is faster than the Target Cycle Time.
If value is negative, it appears with black lettering and red
background. This indicates the Average Cycle Time is
slower than the Target Cycle Time.
CNC Machining Interface Installation and Configuration Manual
GFK-1566D
3
Value to be displayed in 0.1 second increments.
Accumulated Cycle Time
D1118-D1121
Value represents total Accumulated Cycle Time for
current shift. D1118-D1121 are CNC addresses set
through ladder logic. Value is determined by adding every
cycle time for the current shift together. Value is shown in
0.1 second increments.
Machine Cycle Time Log Screen
The following buttons are displayed on the Machine Cycle Time Log screen:
Button
Description
Function
Password
F4
Next
Pages the Machine Cycle Time Log screen
forward.
System
F5
Previous
Pages the Machine Cycle Time Log screen
backward.
System
F6
Backup to File
Activates a popup window which provides the
ability to backup data contained on this screen to a
comma-separated file.
System
F10
Previous Screen
Returns to MACHINE CYCLE Time screen
N/A
The following data values are displayed on the Machine Cycle Time Log Screen:
Data Title
GFK-1566D
Definition
Date
Date of Shift the data within the row represents.
Shift
Shift Description the data within the row represents.
Last Cycle Time
Last Cycle Time Value. Cycle Time at completion of last
Cycle.
Target Time
Target Cycle Time.
Chapter 3 Configuration
3 - 19
3
Machine Cycle Count Log Screen
The following buttons are displayed on the Machine Cycle Count Log screen:
Button
Description
Function
Password
F4
Next
Pages the Machine Cycle Log screen forward
System
F5
Previous
Pages the Machine Cycle Log screen backward
System
F6
Backup to File
Activates a popup window which provides the
ability to backup data contained on this screen to a
comma-separated file.
System
F10
Previous Screen
Returns to MACHINE CYCLE COUNT screen
N/A
The following data fields are displayed on the Machine Cycle Log screen:
Data Title
Date
Description
Date of Shift the data within the row represents.
Shift End Time
Time set for End of Shift time the data within the row represents. Same time as Time
Block x setting time for End Time as shown in Section IV.
Shift
Shift Description the data within the row represents. Same Description as Time Block
x setting for Time Block Definition as shown in Section IV.
Part Count
Final Machine Cycle Count of the Shift the data within the row represents.
At the end of every shift, this data must be set into consecutive rows in the table on the Machine
Log screen. When the data is set, the table on the Machine Log screen must increment one row and
be available for end of next shift data setting values.
If (F9) RESET CYCLE COUNT is activated from the Machine Cycle Count screen, the point
RESET_CYCLE_COUNT is set to 0. Ladder logic must be written to reset the cycle count when
this point is set to 0. The default address for this point is D1112.5, but it may be changed.
3 - 20
CNC Machining Interface Installation and Configuration Manual
GFK-1566D
3
Shift Setup Screen
The following buttons are displayed on the Machine Cycle Time screen:
Button
Description
Function
Password
F7
Input
Allows entry to change Start Time, End Time,
Target Part Count, and Time Block Description
System
F10
Previous Screen
Returns to MACHINE CYCLE COUNT screen
N/A
The following data values are displayed on the Machine Cycle Time screen:
Data Title
Time Block x
(see NOTE 1)
Variable
Origin
Definition
Start Time
CIMPLICITY
point
Value entered in this location is for start of
Time Block x. (See Notes 2 and 3 below.)
End Time
CIMPLICITY
point
Value entered in this location is for end of
Time block x. (See Notes 2, 3, and 4 below.)
Target Part Count
CIMPLICITY
point
Value entered in this location is for Target
Cycle Count for Time Block x. The value
entered here will also appear on MACHINE
CYCLE COUNT screen when Time Block x is
active. Click on register, enter value, and
select (F7) INPUT.
Time Block
Definition
CIMPLICITY
point
Description for Time Block x. This
description appears on MACHINE CYCLE
COUNT screen for TOTAL TARGET FOR
current shift. Enter desired description and
select (F7) INPUT.
Notes:
Note 1:
There are four time blocks: Time Block 1, Time Block 2, Time Block 3, and
Time Block 4. The description provided in this table corresponds to each
individual time block.
Note 2:
For Start Time and End Time settings in this table, the following description
explains how to set time.
Enter a value in the following format:
where xx = hour (1 to 12)
yy = minute (00 – 59)
zz = AM or PM
xx.yy zz
Click on xx.yy, and enter the proper time. For example, for 2:30, enter 0 2 3
0 and press F7 (INPUT).
Click on zz, and use Tab to change between AM or PM. For example, for 2:30
PM, use Tab to select PM. Then, press F7 (INPUT).
Note 3:
GFK-1566D
For Start Time, all calculations and data gathering which are based off of this
Chapter 3 Configuration
3 - 21
3
time will begin at this hour and minute AND 00 seconds. In other words, if
the Start Time is set for 06:00AM, and calculations and data gathering will
start at 06:00 AND 00 seconds AM. By using this specification, the End Time
of the previous shift and the Start Time of the current shift can be set to the
same time without having to consciously adjust the times one minute or one
second apart from each other.
For End Time, all calculations and data gathering which are based off of this
time will end 1 second before this time setting. In other words, if the End
Time is set for 02:30PM, all calculations and data gathering will end at 02:29
and 59 seconds PM. By using this specification, the End Time of the previous
shift and the Start Time of the current shift can be set to the same time without
having to consciously adjust the times one minute or one second apart from
each other.
3 - 22
CNC Machining Interface Installation and Configuration Manual
GFK-1566D
A
Automatic Launch of CNC Machining
Interface Project at Display Station Boot-Up
This appendix explains how to set up an NT-based PC so that the CNC Machining Interface
CIMPLICITY application will be launched at PC boot time. This will insure that, when the PC
boot is complete, the main CNC Machining Interface screen will be displayed at FULLSCREEN
mode. This appendix also suggests how to set up Windows NT so that the START KEY bar can be
hidden without using a system password.
1.
GFK-1566D
Select the Start Menu, then Programs, CIMPLICITY, HMI, and then CIMPLICITY
Options. The following CIMPLICITY Options window will be displayed:
A-1
A
2.
Select the Startup Options tab.
3.
Verify that the Network Options are ACCEPT CONNECTIONS.
4.
Select System Boot Options equal START PROJECTS.
5.
Press the ADD pushbutton, and cursor down to C:\GEFSOI\GEFSOI.GEF.
6.
Press APPLY and then OK.
Note
This completes the first of three setup functions.
A-2
CNC Machining Interface Installation and Configuration Manual
GFK-1566D
A
7.
GFK-1566D
Select Start menu, then Settings, and then the Taskbar Properties page. Verify that "Always
on top" is not checked and "Auto Hide" is checked.
Appendix A Automatic Launch of CNC Machining Interface Project at Display Station Boot-Up
A-3
A
A-4
8.
Select the Start Menu>Programs>Administration Tools>User Manager. Edit the
Administrator account. Specify the password as 'ge'. Select the profile and enter "CMIStart.bat'
for the Logon Script name.
9.
Execute the cmi_setup.bat file in the c:\gefsoi\options\autocfg to setup the CMI environment.
CNC Machining Interface Installation and Configuration Manual
GFK-1566D
A
Disabling the Windows NT Task Manager
If you want to prevent your operator’s from accessing the Windows NT Task manager and having
the ability to shutdown system processes, please do the following:
1.
Rename taskmgr.exe in your Windows directory to taskmgr.save.
2.
Run regedt32.exe and open
HKEY_LOCAL_MACHINE\SOFTWARE\Microsoft\Windows NT\CurrentVersion\Winlogon.
3.
GFK-1566D
For the AutoRestartShell value, change the Data value to 0 (zero).
Appendix A Automatic Launch of CNC Machining Interface Project at Display Station Boot-Up
A-5
GE Fanuc Automation North America, Inc., Charlottesville Virginia