1
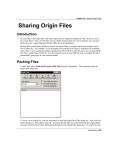
User guide for connection of
access control components
OPJ DS-01/ETH
OPJ BES-01/ETH
convertor ETH/RS-485
to Ethernet network
The functions and hardware described
in this user guide can be used only with
BBIQ software designed for access
control systems.
User guide for Ethernet devices
This manual describes only the connection of RYS® products to LAN network. It
does not explain the operation of LAN network itself or the connection and
identification of the devices within the network (setting and assigning IP addresses).
But these information is necessary for installation of Ethernet devices. The detail
description how to set up the LAN network is available in other commercial
publications or at the internet. It is necessary to contact network administrator
before connecting any device into existing LAN network.
More detail technical information about Network Enabler Administrator software update
can be found at the www.moxa.com/product/ne-4000t-st.htm. User manual for software
BBIQ as well as the technical parameters of the access control DEK SIET and BES
components can be found at www.rys.sk, or you can contact our technical support by
email.
Warning:
Before installing the BBIQ software make sure that your computer meets the
minimum hardware requirements to run the application.
The devices and the software requires PC with network interface card, CD ROM drive and operating
system Windows 98SE and higher. Hardware requirements for BBIQ software are described in the
relevant manual.
The instructions and pictures in this manual are based on the device settings in Windows XP
operating system. They might be slightly different if the settings are done on another version of
Windows operating system.
Issued: 26.8.2009
Network Enabler Administrator : version 2.7
2
User guide for Ethernet devices
Content
Content
Ethernet device applications .............................................................................................. 4
List of accessories .............................................................................................................
4
Connection to LAN network ..............................................................................................
5
Methods of Ethernet device settings ................................................................................. 6
Settings via web browser interface ...................................................................................
7
Installation of Network Enabler Administrator software ....................................................
7
Control features in Network Enabler Administrator ..........................................................
9
Searching devices .............................................................................................................
10
Changing IP addresses .....................................................................................................
11
Device configuration ........................................................................................................
12
Import and export of settings .............................................................................................
16
Testing network communication ........................................................................................
17
Assigning Ethernet devices in BBIQ software ...................................................................
17
User guide for Ethernet devices
3
Ethernet device applications
1. Ethernet device applications
The Ethernet devices can be used in those application where higher technical standard of
building management is required. Their installation is suitable in premises with built
Ethernet-based Local Area Network (LAN). It is possible to connect devices within such
a network in 100m distance without necessity to connect a repeating device.
The building with an access control system with Ethernet connection can be connected to Remote
management system. Remote management RYS is a system designed to manage buildings’ access
control from a distant point situated off the premises, the same way as it is done if the manager is
located in the building. The existing server-client internet connection is used. The data processing
and data back-up from single access-control units is centralized in BBIQ server operated by RYS IT.
The client (building) connects to server. The VPN router is connected on both sides (server and
client side), and enables the encrypted Virtual Private Network (VPN) connection. Using VPN it is
possible to make virtual connection of two LAN networks as it was one. The complete building
management can be done within this virtual network.
Example of Remote management use
Each apartment building and its residents use certain services (e.g. cleaning services, electricians,
mail man, lift services, etc.). The people providing these services need to access the secured
building, but their access must controlled to avoid any unauthorised entries. So, the services
providing companies also have the identifiers (tag, card, iButtons) in order to have monitored and
registered access to the premises. If the building residents can not manage the access control by
themselves, the management can be provided by a supplier of the access control system or by RYS
IT.
These RYS products can be used for connection of access control system to Ethernet
network: Operating-memory unit DS-01/ETH, BES-01/ETH and programmer-converter
Ethernet-RS485. The converter Ethernet-RS485 is used for connection of standard
operating-memory units of third generation with RS485 interface. The use of the
converter is recommended.
2. List of accessories
Installation and use of Ethernet devices requires these accessories:
▪ Ethernet cable with a RJ-45 connector (not included in the packing), direct or
cross-over based on the connection to LAN.
▪ PC with network interface card, CD ROM drive and operating system Windows 98
SE or higher.
4
User guide for Ethernet devices
Connection to LAN
3. Connection to LAN
Connect the Ethernet device to your PC (or to other active network component like hub,
switch, router) via the Ethernet cable. Based on the type of Ethernet connection, use
direct or cross Ethernet cable.
Direct connection of operating memory units DS-01/ETH, BES-01/ETH to PC. Use
the Cross-over Ethernet Cable for this connection.
Connection of operating memory units DS-01/ETH, BES-01/ETH to PC via
connecting device (hub, switch, router). Use the direct Ethernet cable for this
connection.
Connection of a converter Ethernet–RS485 directly to PC. Use Cross-over Ethernet
Cable for this connection. The converter has 9 PIN connector for connection to operatingmemory unit.
Connection of a converter Ethernet–RS485 to PC via connecting device (switch,
hub router). Use Direct Ethernet Cable for this connection. The operating-memory unit is
connected to the converter with cable with a 9PIN connector. The converter has a 9 PIN
connector CANNON.
User guide for Ethernet devices
5
Methods of Ethernet device settings
Setting the network addresses using DIP switches on the operatingmemory units DS-01/ETH and BES-01/ETH:
▪ the network address must be set to value 0, do the setting according to the
table placed on a side of the unit’s cover (the number of units in the system is
only limited by the range of IP addresses in the LAN).
Setting the network addresses using DIP switches on the standard
operating-memory units connected to converter Ethernet-RS485:
▪ the network address is set according to the table placed on side of the unit’s
cover, no two devices within one network can have the same network address
(the maximum number of network addresses and devices is 32).
Other technical parameters and setting options are the same as for the
devices with RS485 or RS232 interface and can be found in the manual
relevant to these devices. The manuals for RYS products are available at
www.rys.sk or contact our technical support by email.
6
User guide for Ethernet devices
Connection to LAN
4. Methods of Ethernet device settings
The settings of RYS Ethernet products can be easily done using the internet browser
(for correct setting we recommend the Internet Explorer 6 or higher version of this
browser) or the settings can be done using the Network Enabler Administrator. To
install this application to your PC use the CD enclosed with the purchased Ethernet
device.
5. Settings via web browser interface
▪ connect operating-memory unit to PC according to Chapter 5
▪ run internet browser on your PC
▪ enter IP address of the Ethernet device into the Address bar of the browser (the preset
IP address is 192.168.1.100). Click Enter
▪ a login window with current network settings of Ethernet devices will display
▪ the current settings can be change after the login password is entered (if you are setting
the devices for the first time the password is not yet defined and so there is no need to
enter the password), click Submit
▪ entering the page with settings, it is possible to configure the device the same way as in
the application Network Enabler Administration.
User guide for Ethernet devices
7
Installing BBIQ software
6. Installation of Network Enabler Administrator software
To install the Network Enabler Administrator software you must be logged in
the Windows as the administrator (in Windows 2000 and higher). Before
installing the application check if your PC meets the minimum hardware
requirements mentioned on page 2.
▪ Insert distribution CD with installation files into CD drive of your PC.
▪ Run the installation file NetworkEnablerAdministrator_setup.exe, file under directory
NETWORK_ENABLER_ADMIN.
▪ Click Next to confirm the start of installation.
▪ Select the destination location—where the application will be installed and confirm Next.
▪ Select if you wish to Create a desktop icon, confirm Next.
▪ In the last Setup window check your settings and click Install to proceed with the installation.
▪ There is an option to run the application after the installation is finished (Launch Network
Enabler Administrator), click Finish to complete the installation.
▪ You can start the application by clicking the shortcut desktop icon .
This is possible only if you set this option during the installation.
▪ The application can be also started from Start > All programs > Network Enabler program
2.7 > Network Enabler Administrator 2.7.
8
User guide for Ethernet devices
Installing BBIQ software
7. Control features in Network Enabler Administrator
The main aplication window is devided into five section:
1. Menu Bar
2. Property Bar
3. Function Panel
4. Configuration Panel
5. Message Log
You can customize how the main aplication window will display. Click View in menu bar
and select from the options.
Menu Bar
Property Bar
Funtion Panel
Configuration Panel
Message Log
Property bar options:
1. Broadcast - searching available Ethernet devices in the network
2. Specify by IP Address - searching the device based on the specific IP address
3. Unlock - unblocking the device locked by a password
4. Web Console - running the web interface for device settings
5. Help
6. Exit - closing the application
User guide for Ethernet devices
9
Searching devices
Information in the configuration panel:
1. No - the number of a device in the list
2. Model - type of the Ethernet device (set NE4000T for RYS® Ethernet devices)
3. MAC Address - physical device address
4. IP Address - Internet protocol device address
5. Status - device status
8. Searching devices
Ethernet devices available in your network can be searched in Network Enabler
Administrator application using the Broadcast function or Specify by IP address function
based on the particular IP address.
Searching all Ethernet devices in the network
▪ click Configuration from the menu bar, and then select Broadcast Search from the
drop-down menu or select Broadcast in the property bar.
▪ the application will automatically search available Ethernet devices in your network
▪ the search can be stopped at any time by clicking Stop.
▪ available devices are displayed in the configuration panel.
10
User guide for Ethernet devices
Changing the IP address
Searching the Ethernet device based on the IP address
▪ click Configuration from menu bar (or in the property bar) and then select Specify IP
Address
▪ enter IP address of the Ethernet device you want to find and confirm OK.
▪ the application will search the particular device and displays its characteristics in the
configuration panel
When you try to identify the Ethernet devices in your network for the first time and
your PC has Windows XP installed, a warning message might display. This
message will ask you to unblock or block TCP/IP port used for communication with
the Ethernet devices. To run the Network Enabler Administrator correctly, this
communication must be permanently enabled.
9. Changing the IP address
▪ to change the IP address, first select the device from the list in configuration panel (to
select several devices at the same time, press and hold the Ctrl key or Shift and click
the devices with left mouse button)
▪ click Configuration from the menu bar and then select the Assign IP Address function
from the drop-down menu.
▪ click on the IP address in the displayed list and enter the new address
▪ click the Assign IP Sequentially button to assign subsequent values of the IP
addresses to every other added device. The IP address of the added device will have
the value increased by 1 compared to the previous device address.
User guide for Ethernet devices
11
Device configuration
▪ confirm the changes by clicking Ok or cancel them by clicking Cancel.
The detail specification of the device settings can be done using the function
Configure, see chapter 10.
10. Device configuration
▪ select the device in the configuration panel
▪ click Configuration from the menu bar and then select Configure from drop-down
menu or double click the selected device with left mouse button. The current
configuration of the device is uploaded and the Configuration window is displayed. The
detail device settings can be done in this window.
12
User guide for Ethernet devices
Device configuration
Before making any changes in any of the configuration window folders, the option Modify
must be enabled (tick the check box). New settings are saved by clicking OK in
configuration window.
Basic
The definition of the name and enable/disable configuration via web interface can be done
in Basic folder.
Network
The folder Network is used to set the IP address of the device, the network mask and the
gate. The IP address can be assigned manually (Static) or automatically if the DHCP
server is used in the network.
Serial
The settings of serial communication link with a device can be done in the Serial folder.
When using RYS® Ethernet devices with BBIQ software, no change of settings is required
in this section, keep the factory settings.
User guide for Ethernet devices
13
Device configuration
Operating mode
If the RYS® Ethernet devices with BBIQ software are used, no changes are required in
this section.
Accessible IPs
If this function is enabled (the check box Enable is marked), the operating-memory unit
or the converter unit will communicate only with devices (PC, server, router) which have
the same IP address as one of the addresses listed in the table. The values of accessible
IP can be defined by double clicking one of the four rows of the table. To activate the
accessible IP addresses tick the check box in the particular row of the table.
The IP address can be defined as the specific IP address or in the range of IP addresses:
▪ Only one IP address is accessible
Enter the specific IP address (e.g. 192.168.1.1) and the Netmask 255.255.255.255
▪ All IP addresses are accessible from a selected subnet
Input 0 value for subnet IP address (e.g. 192.168.1.0) and 255.255.255.0 as a netmask.
▪ Only specific range of IP addresses is accessible in one subnet.
Insert 0 value for subnet IP address (e.g. 192.168.1.0) and the range of accessible IP
addresses in the subnet is defined by netmask 255.255.255.xxx, where the xxx is the
number from 1 to 254, representing the result of subnet calculation - subtracting the
number of accessible IP addresses from the number 254.
(Example: The network with zero (0) IP 192.168.1.0 has a range of accessible
addresses that can communicate with Ethernet devices defined from 192.168.1.1 to
192.168.1.126. That means the number of accessible IP addresses is 126. The number
xxx at the end of the netmask will be 254 -126 = 128. So the value of netmask is
255.255.255.128.)
14
User guide for Ethernet devices
Device configuration
Examples of assigning IP addresses:
The rage of accessible IP addresses
IP Address
Netmask
Any IP address
not defined
not defined
192.168.1.120
192.168.1.120
255.255.255.255
192.168.1.1 to 192.168.1.254
192.168.1.0
255.255.255.0
192.168.0.1 to 192.168.255.254
192.168.0.0
255.255.0.0
192.168.1.1 to 192.168.1.126
192.168.1.0
255.255.255.128
Password
The password for changing the settings of Ethernet device connection can be defined in
Password folder. Enter new set of characters into text box New Password and then
confirm the password in Confirm Password text box. Once the password is set, the
device configuration can be changed only after unlocking the device using the password.
When setting the password, make sure you use the expression (set of characters) that
can not be easily figured out or cracked. The minimum recommended level of security
can be achieved using the combination of letters and numbers.
Remember the password!!!
Once the password is set, the device setting can be changed only when the correct
password is used. Security settings can not be changed without entering the old
password first. In case you forgot the password and it is necessary to unlock the
device, please contact our technical support at [email protected].
User guide for Ethernet devices
15
Import and export of settings
11. Import and export of settings
Export functions enables the system administrator to save the settings of Ethernet device
into the text file in PC or onto some recordable medium (disk, USB, CD etc.) and then
import these settings into another Ethernet device, or restore the configuration from the
created backup.
Export of device settings
▪ select the device in the configuration panel
▪ click on Configuration in the menu panel and then select Export Configuration from
drop-down menu.
▪ click the Browse option and select the name and location of the configuration file
▪ click OK to save the file
Import of device settings
▪ select the device in the configuration panel
▪ click on Configuration in the menu panel and then select Export Configuration from
drop-down menu.
▪ click the Browse option and select the name and location of the configuration file
▪ click OK to import the settings into the device
16
User guide for Ethernet devices
Testing network communication / Adding Ethernet devices in BBIQ software
12. Testing the network communication
To verify the communication between the Ethernet device and your PC use PING
command, which can be run directly from the Windows system.
▪ hold down your [Windows key + R] to use the run command shortcut or go to your Start
menu and click on Run (or Start > Programs > Accessories > RUN).
▪ write CMD (or COMMAND in OS Windows 98SE) and confirm Enter. the CMD.exe
program will open
▪ in CMD. exe type ping xxx.xxx.xxx.xxx where xxx.xxx.xxx.xxx is the Ethernet device
IP address , press Enter
▪ to view the HELP write ping/? and confirm Enter
▪ if the network setting of the device and PC are correct, the Ping statistic with time
response of the tested device will display
▪ if one of the error warnings Request timed out., Destination unreachable., or
Destination specified is invalid., appears 4 times in sequence, the communication
between the PC and device was not successful. Check the communication setting of the
device or check the correct hardware operation.
13. Adding Ethernet devices in BBIQ software
Adding an operating memory unit OPJ DS-01/ETH and OPJ BES-01/ETH
▪
▪
▪
▪
▪
in main application window click Devices
a new window List of devices will display
click New device
the window Device will display
select the type of device „DEK (iButton) / BES (RFID) - operating unit“ from drop-down
menu
▪ set TCPIP in Definition of communication link text box
▪ enter the IP address of the operating-memory unit into the Network address for
communication link text box (the network address on the unit itself must be set to
position 0 using the DIP switches, according to the setting table placed on the unit’s
cover.)
User guide for Ethernet devices
17
Adding Ethernet devices in BBIQ software
▪ to set other device properties, follow the instructions in the BBIQ User manual.
▪ the status of the communication link will display in the bottom status box of the main
application window
Adding operating-memory unit using the converter ETH/RS-485
▪
▪
▪
▪
▪
click Devices in the main window of BBIQ application
the List of devices will display
click New device
the window Device will display
select the type of device „DEK (iButton) / BES (RFID) - operating unit“ from drop-down
menu
▪ set TCPIP in Definition of communication link text box
18
User guide for Ethernet devices
Adding Ethernet devices in BBIQ software
▪ enter xxx.xxx.xxx.xxx~Y the Network address for communication link text box,
where xxx.xxx.xxx.xxx is the IP address of the operating-memory unit connected via
converter and Y is network address of the device (the same network address must be
set on the unit using the DIP switches, according to the setting table placed on the
unit’s cover.), e.g. 192.168.3.3~4 (IP address is 192.168.3.3 and the network
address of the device is 4)
▪ to set other device properties follow instructions in the BBIQ User manual
▪ the status of the communication link will display in the bottom status box of the main
application window
User guide for Ethernet devices
19
Martinčekova 3, 82109 Bratislava 2
tel.: +421 2 53412923, fax.: +421 2 53417096
e-mail: [email protected]
www.bezpecnebyvanie.sk
dokument: ethdek_prirucka_ENG -28082009
www.rys.sk
20
User guide for Ethernet devices