1
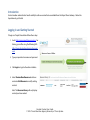
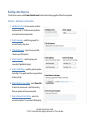
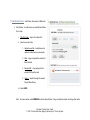
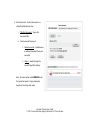
User Guide:
Content Creator
Texas Education Agency
©2012 Texas Education Agency
Table of Contents
Introduction .............................................................................................................................................................................................3
Building a New Resource ...................................................................................................................................................................4
Step One: Add Resource Information ..............................................................................................................................4
Step Two: Create Content Pages ......................................................................................................................................9
Step Three: Preview and Save .........................................................................................................................................12
Manage Existing Resources ...........................................................................................................................................................13
Edit Resources ...............................................................................................................................................................13
Delete Resources ...........................................................................................................................................................13
Additional Help ....................................................................................................................................................................................13
Appendix A: WYSIWIG Editor ..........................................................................................................................................................14
Appendix B: Add an image ..............................................................................................................................................................15
Open Image Properties Dialogue Box .............................................................................................................................15
Appendix C: Add a Mathematical Expression or Formula.................................................................................................18
Open WIRIS Editor ..........................................................................................................................................................18
Appendix D: Add a Video ................................................................................................................................................................19
Content Creator User Guide
© 2012 Texas Education Agency/University of Texas System
Introduction
Content creation administrators have the ability to add new content to be searchable from the Project Share Gateway. Follow the
steps below to get started.
Logging in and Getting Started
To login as a Project Share Admin follow these steps:
1. Go to: http://www.projectshare.com/user . For
training, you will be using the following URL:
http://cboyerdev.devcloud.acquia-sites.com/
user/
2. Type your provided username and password.
3. Click Login to log into the admin interface.
4. Select Create a New Resource to add new
content or Edit Resource to modify existing
content.
Note: The Resource Library will only display
content you have created.
Content Creator User Guide
© 2012 Texas Education Agency/University of Texas System
Building a New Resource
To build a new resource select Create a New Resource from the admin-landing page then follow the steps below.
Step One: Add Resource Information
1. Add Resource Key – the resource key should be
alphanumerical. TIP: The Resource Key should be
consistent for each content provider.
2. Select Language – select the language of the
resource from the drop-down.
3. Title this Resource – type in the resource title.
Cannot exceed 70 characters.
4. Select Subject(s) – select the primary and
secondary (if applicable) subjects.
5. Select Grade Range – select the grade range from
low to high. If one grade select the same grade level
for low and high.
6. Attach Resource Icon Image – select Choose File
to browse for resource icon. Select from existing
library or upload new from your computer.
7. Enter a Resource Description – enter in the
resource description. Do not exceed 140 characters.
Content Creator User Guide
© 2012 Texas Education Agency/University of Texas System
8. Enter Keywords & Tags – enter in keywords and
tags. Separate each keyword with a comma.
9. Align to Standard – Select the standard subject
from the drop-down then start typing the
standard name or ID. Separate each aligned
standard with a comma.
10. Select Licensing Type – choose appropriate
license type from the list.
Content Creator User Guide
© 2012 Texas Education Agency/University of Texas System
11. Add Related Items – Add Videos, Documents & Web Links
a. Add a Video – to add a video as a related item follow
these steps
i. Title this Video – Type in the video title
ii. Select source of video
1. Upload a new file – Select browse to
upload a video from your computer
2. Web – Copy and paste the embed url
from the web
3. Remote URL – Copy and paste the
remote URL from the web
4. Library – Search through the current
Project Share library
iii. Select SAVE
Note: To remove videos select REMOVE under the Saved Videos. Drag and drop the videos to change their order.
Content Creator User Guide
© 2012 Texas Education Agency/University of Texas System
b. Add a Document – to add a document as a
related item follow these steps
i. Title this Document – Type in the
document title
ii. Select source of Document
1. Upload a new file – Select browse
to upload a document from your
computer
2. Library – Search through the
current Project Share library
Note: To remove videos select REMOVE under
the Saved Documents. Drag and drop the
documents to change their order.
Content Creator User Guide
© 2012 Texas Education Agency/University of Texas System
c. Add a Weblink – to add a link as a related
item follow these steps
i. Enter this Web Link – the url of the
link being added
ii. Title this Web Link – type in the title
of the link
iii. Select Save
Note: To remove links select REMOVE under
the Saved Web Links. Drag and drop the
links to change their order.
12. Select Save & Advance to Next Step
Content Creator User Guide
© 2012 Texas Education Agency/University of Texas System
Step Two: Create Content Pages
1. Add Content Details
a. Content Title: This will be the title of the
content page.
b. Language: Users can customize each
content page for various languages.
Example: A resource may have different
content when Spanish is selected as a
language.
c. Audience: Users can customize content
specific to each audience type. Example:
A resource may have different content
pages for a teacher (teacher guide) than
a student (activity).
d. Group Visibility: Determines whether
content page can be seen by various
audiences.
Content Creator User Guide
© 2012 Texas Education Agency/University of Texas System
2. Add Content – HTML, Video, & Audio
a. Click Insert and select type of content to add
(HTML, Video, or Audio). In this example, select
HTML.
b. Content Editor: Users are presented a WYSIWIG
editor that allows you to input content. See
Appendix A for breakdown of WYSIWIG editor.
c. Format Type: Users can select the following format
types; Filtered HTML, Full HTML, and Plain Text. Full
HTML is the simplest version to work with and
provides cleaner code than Filtered HTML. You also
have the option to select the Source Button to
input or edit HTML yourself.
d. Cite Source: Users have the option of providing a
source citation for each piece of content provided.
e. Add Image: To add an image, select the add image
button. See Appendix B for How to Add Images.
f.
Add Math Expression or Formula: To add a Math
expression of formula, click on the WIRIS editor.
See Appendix C for How to Add Math Formulas and
Expressions.
g. Add Video: A user can insert a video by clicking on
Insert and selecting Video from the dropdown options. See Appendix for How to Add Video to a Content Page.
3. Select Save & Create Another Content Page to save your work and add an additional content page.
Content Creator User Guide
© 2012 Texas Education Agency/University of Texas System
a. The user is directed to a new content page.
4. To edit content pages click on the Content Title from the Content
Page(s) Navigation section.
a. To open a Content Page for Editing, click on the Content
Page title.
b. To change order of the Content Pages, just drag the Content
Title using the crosshairs icon. Once you’ve arranged the
Content Pages as you’d like, click on Save Order.
c. To delete a content page click on Delete and confirm
deletion
5. Once finished adding content and satisfied with the order of the
Content Pages, select Save & Advance to Next Step.
Content Creator User Guide
© 2012 Texas Education Agency/University of Texas System
Step Three: Preview and Save
1. User can preview the page just as it will look on
the live site.
2. Confirm the resource and content information is
accurate then select Save This Resource to save.
3. If further edits need to be made, select Back to
Step Two to make changes to the resource and
content.
Content Creator User Guide
© 2012 Texas Education Agency/University of Texas System
Manage Existing Resources
Edit Resources
To make changes to an existing resource
select Edit Resource next to the resource
title from the admin-landing page.
Delete Resources
To delete an existing resource select
Delete Resource next to the resource title
from the admin-landing page then confirm
deletion.
Note: once a resource is deleted it cannot
be recovered.
Additional Help
For additional help contact: [email protected]
Content Creator User Guide
© 2012 Texas Education Agency/University of Texas System
Appendix A: WYSIWIG Editor
1. List option: Numbered and bulleted
2. Link: Create a hyperlink
3. Add Image: Opens the Add Image dialog box
4. Block Quote: Adds a block quote to selected text
5. Source: Allows user to view the HTML source code
for direct editing or content creation. This is a useful
tool for those who know HTML.
6. Special Characters: Insert special characters
7. Font size: Change the size of selected font
8. Styles: Allows content creators to select specially
formatted styles without the need for additional
coding
9. Table: Insert a table
10. Flash Content: Insert Flash Content
11. iFrame: Insert an iFrame.
12. WIRIS Math Editor: Insert Math expression or equation
13. Columns: Creates two identical columns for additional layout options.
Note: Double-clicking an inserted item, such as a Flash file, image, iFrame or WIRIS Math expression will open the appropriate
dialogue window for further editing.
Content Creator User Guide
© 2012 Texas Education Agency/University of Texas System
Appendix B: Add an image
Open Image Properties Dialogue Box
1. Click on the Add Image button to open the Image
Properties dialogue box.
2. Link to an existing image: User can link to an
existing image by clicking on the Link tab and
providing the image URL.
3. Browse Server: User can also upload a new image or
insert an existing image from the server by clicking
on Browse Server.
Content Creator User Guide
© 2012 Texas Education Agency/University of Texas System
Insert an Existing File
1. Select an existing image from your
preferred file directory.
2. Preview the image in the preview area
3. Click on Insert File to insert image.
Content Creator User Guide
© 2012 Texas Education Agency/University of Texas System
Modify Image Properties
1. Once back to the Image Properties dialogue box, a
user can modify the Image before inserting into body
content.
2. Alternative text: Provide alternative text so that
screen readers can read text.
3. Width and Height: Modify the width and height values
of an image. If the small lock icon is closed, it will
preserve aspect ratio, meaning that the image’s
height or width will adjust according to changes in
size.
4. HSpace: Adds horizontal space to an image.
5. VSpace: Adds vertical space to an image.
6. Alignment: Setting alignment does the following:
a. aligns the image to either the lest or right of a
page, and
b. allows for text wrap
Content Creator User Guide
© 2012 Texas Education Agency/University of Texas System
Appendix C: Add a Mathematical Expression or Formula
Open WIRIS Editor
1. Click on WIRIS Editor.
2. Use the WIRIS functions to add complex math
symbols, equations and expressions.
3. For Help, click on the ? button. The following
URLs are particularly helpful:
a. WIRIS User Manual: http://www.wiris.com/
en/editor/docs/manual
b. How to typeset symbols: http://
www.wiris.com/editor3/docs/manual
4. Once satisfied with the formula, click on Accept
to insert the formula into the body content.
Content Creator User Guide
© 2012 Texas Education Agency/University of Texas System
Appendix D: Add a Video
1. Click on Insert and select VIDEO.
2. Click on Select Media.
Content Creator User Guide
© 2012 Texas Education Agency/University of Texas System
3. From here, a user can insert a video in the
following ways:
a. Upload a video to server
b. Embed a video from YouTube, Vimeo
or other providers.
c. Link to a Remote URL
d. Insert a video that already exists in
the Library.
4. In this example, the user has provided the
embed code from a YouTube video and then
clicked Submit.
Content Creator User Guide
© 2012 Texas Education Agency/University of Texas System
Texas Education Agency
©2012 Texas Education Agency
Content Creator User Guide
© 2012 Texas Education Agency/University of Texas System