1
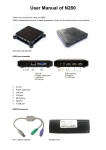
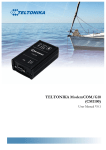
1._KIT INCLUDES
NO.
DESCRIPTION
Q’TY
1
XBi2-H Unit
1
2
AC Home Charger
1
3
Open Face Headset
1
4
Pre-Installed Lithium-Polymer Battery
1
5
Phillip Screw
1
6
Sticky Back Velcro Discs
2
7
Microphone Clips
2
8
User Manual
1
2._XBi2-H DESCRIPTION
Volume Up
Power
Charge Port
Intercom
Release Tabs
Mode
Volume Down
LED
2 DESIGN DESCRIPTION
2.1 POWER BUTTON
Power ON/OFF main unit
BLUETOOTH® pairing Mode
When the BLUETOOTH® phone is connected, use hands-free mode (Answer/Hang up
hone call)
GROUP INTERCOM pairing mode (with MODE button)
2.2 MODE BUTTON
GROUP INTERCOM pairing mode (with POWER button)
2.3 VOLUME UP BUTTON
Audio volume increase
2.4 VOLUME DOWN BUTTON
Audio volume decrease
2.5 INTERCOM BUTTON
Switch from intercom mode to audio mode
2.6 CHARGE PORT
Charge cord port
2.7 LED
RED = Primary Function = XBi2 unit On/Off Status
Secondary Function = GROUP INTERCOM pairing status
BLUE = Primary Function = BLUETOOTH® status
Secondary Function = Charging status
2.8 RELEASE TABS
Remove the XBi2-H off the helmet
3. GENERAL INSTALLATION
1.
Open the chin bar and remove the left cheek pad
2.
On the left side of the helmet remove the protective plastic plate. Unscrew the
Phillips screw to remove the pre installed cradle behind the recess hole.
3.
Grab cradle from the main kit and install it behind the recess hole.
Inside the helmet
Outside the helmet
4.
Put the helmet aside and grab the left cheek pad and the two microphone clips
5.
On the back side of the left cheek pad there will be four identical pre cut holes
6.
Grab one microphone clip and insert the longer end into hole #2 and the shorter en
into hole #1. Grab the second microphone clip and insert the longer end into hole
#4 and shorter end in hole #3
HOLE #2
HOLE #1
HOLE #4
HOLE #3
7.
Grab the microphone and snap in the boom mic into the microphone clips
8.
Before reinstalling the left cheek pad connect the 4 pin connectors together. (Crad
and the headset). After connecting the connectors reinstall the left cheek pad. Now
install the speakers behind the cheek pad pockets. Hide the wires behind the helme
lining. (Short cord is the left speaker and the longer cord is the right speaker.)
4. BASIC UNIT OPERATION
1 CHARGING XBi2-H UNIT
1.
XBi2-H unit must be turned off
2.
Plug charger into household power supply, then plug charge cord into the charge por
of the XBi2-H
3.
LED display on the XBi2-H / charger
- XBi2-H unit
BLUE LED will remain on until XBi2-H is fully charged
- Charger
RED LED- XBI2-H is charging
4.
For a complete charge it will take approximately 1-1 hours
2 TURNING XBi2-H UNIT ON / OFF
2.1 TURNING ON
1.
Press and hold the Power button until LED lights remain steady RED
2.
Release the Power button
3.
LED will now alternate flashing BLUE & RED continuously
2.2 TURNING OFF
1.
Press and hold the Power button until LED lights remain steady RED
2.
A two-tone sound will be heard
3.
Release Power button
4.
LED will now be off
3
BATTERY LEVEL STATUS DISPLAY
1.
Press the Power Button around 1 second, RED LED will stay “ON” then release
the Power button.
2.
Please refer to the table below for BATTERY LEVEL STATUS
NO.
LEVEL
STATUS
VOLTAGE [V]
BLUE LED
1
3/3
BATTERY Full
Over 3.86V
3 times ON/OFF
2
2/3
BATTERY 2/3
3.54V~3.86V
2 times ON/OFF
3
1/3
BATTERY 1/3
3.34V~3.54V
1 time ON/OFF
4
0/3
Low BATTERY ALERT
Below 3.34V
1 time ON/OFF
4 LOW BATTERY ALERT
1.
If the voltage of the main unit is entering +3.2 V + 0.1 V, you will hear 1 alarm
beep sound from the speaker.
2.
After the first beep, if the voltage is entering +3.1V + 0.1V, the power will turn
OFF automatically
5 ADJUSTING UNIT VOLUME
1.
XBi2-H unit will be at middle volume level whenever unit is turned on
2.
Momentarily press (approximately 1 second) and release the volume button
3.
A single tone sound will be heard for each level
4.
At maximum volume level a two tone sound will be heard
5. BLUETOOTH PAIRING OPERATION
1 PUTTING XBI2-H INTO BLUETOOTH® PAIRING MODE
1.
Start with XBi2-H unit off
2.
Press and hold Power button until LED light is steady RED then after approximately
6 seconds LED will start to flash BLUE
3.
Release Power button and the XBi2-H is now in Bluetooth® pairing mode
2 PAIRING XBi2-H UNITS TOGETHER
*** MAIN UNIT MUST BE ON AT ALL TIMES TO COMMUNICATE BIKE-TO-BIKE***
2.1 PAIRING 3 XBi2-H UNITS TOGETHER – RIDER 1: (MAIN) RIDER 2:
ATELLITE1) RIDER 3: (SATELLITE 2)
1.
Turn on Main, Satellite (1), and Satellite (2) units on
2.
Get the Main unit. Press & hold the Power button and Mode button simultaneousl
(3 seconds)
3.
LED will start to flash RED and occasional BLUE after 3 seconds
4.
Release both Power button and Mode button
5.
Now get the Satellite (1) unit. Quickly Press & release the Power button and Mod
button simultaneously (less than 1 second) *
6.
LED will quickly flash and turn off in approximately 1 second
7.
Immediately get the Satellite (2) unit. Quickly Press & release the Power button
and Mode button simultaneously (less than 1 second)*
8.
LED will quickly flash and turn off in approximately 1 second
9.
The Main unit will turn itself off 8-10 seconds after both Satellite (1) and Satellite
(2) units are off
10. If pairing sequence was done correctly all three units will turn themselves off
First: Satellite (1)
Second: Satellite (2)
Third: Main
11. Pairing is now complete, XBi2-H units are now paired and will connect to each
other automatically when units are on and within range of each other
2.2 PAIRING 2 XBi2-H UNITS TOGETHER – RIDER 1: (MAIN) RIDER 2: (SATELLITE 1)
1.
Turn both Main and Satellite unit on
2.
Get the Main unit. Press & hold the Power button and Mode button simultaneousl
(3 seconds)
3.
LED will start to flash RED and occasional BLUE after 3 seconds
4.
Release both Power button and Mode button
5.
Now get the Satellite unit. Quickly press & release the Power button and Mode
button simultaneously (less than 1 second) *
6.
LED will quickly flash and turn off in approximately 1 second
7.
The main unit will turn itself off 8-10 seconds after the Satellite unit is off
8.
If pairing sequence was done correctly all three units will turn themselves off
First: Satellite
Second: Main
9.
Pairing is now complete, XBi2-H units are now paired and will connect to each
other automatically when units are on and within range of each other
* Do not delay the process or the XBi2-H units will go on timeout mode and need to sta
pairing process over
6. FUNCTION OPERATION
1 BLUETOOTH® AUDIO OPERATION
1.1 PAIRING A STEREO BLUETOOTH® ADAPTOR
1.
Put XBi2-H unit in Bluetooth® pairing mode (turn to 5.1)
2.
Turn on audio source and connect Bluetooth® adaptor for pairing
3.
Audio source will automatically start playing through XBi2-H unit when pairing
is complete
4.
XBi2-H unit is now paired with Bluetooth® adaptor. (Pairing process will no long
be needed to connect)
1.2 SWITCHING FROM INTERCOM MODE TO AUDIO MODE
1.
Press the Intercom button around 1 second; it will switch from Audio mode to
Intercom Mode. A 2 tone sound will be heard
2.
Press the Intercom button around 2 second; it will switch from Intercom mode to
Audio mode. A 4 tone sound will be heard
2 BLUETOOTH® PHONE OPERATION
** INTERCOM COMMUNICATION IS NOT AVAILABLE DURING PHONE USE**
2.1 PAIRING A BLUETOOTH® COMPATIBLE PHONE
1.
Put XBi2-H unit in Bluetooth® pairing mode (turn to 5.1)
2.
Press search for Bluetooth® devices button on phone
3.
Select “XBi2-H” from phone device list
4.
Enter pass code in phone (pass code will be “0000”)
5.
Press connect to “XBi2-H” on phone
6.
XBi2-H unit is now paired to the phone. (Pairing process will no longer be
needed to connect)
2.2 ANSWERING A PHONE CALL
1.
When a phone call is received a 3 tone sound will be heard
2.
Momentarily press (approximately 1 second) and release the Power button
3.
Stereo audio source and/or intercom communication will be muted
4.
Conduct phone call
5.
To end call, momentarily press (approximately 1 second) and release the
Power button
6.
Stereo audio source and/or intercom communication will be restored
* We do not recommend placing a phone call while riding
2.3 PLACING A PHONE CALL *
1.
Dial desired number and press talk or connect on phone keypad
2.
Stereo audio source and/or intercom communication will be muted
3.
Conduct phone call
4.
To end call, momentarily press (approximately 1 second) and release the
Power button
5.
Stereo audio source and/or intercom communication will be restored
2.4 PLACING A LAST NUMBER DAILED CALL
1.
Momentarily press (approximately 1 second) and release the Power button
2.
Stereo audio source and/or intercom communication will be muted
3.
Conduct phone call
4.
To end call, momentarily press (approximately 1 second) and release the Power
5.
Stereo audio source and/or intercom communication will be restored
7. BLUETOOTH® CONNECTING OPERATION
1 CONNECTING A PAIRED STEREO BLUETOOTH® ADAPTOR
1.
Turn XBi2-H unit on
2.
Turn on audio source and turn on or plug in stereo Bluetooth® adaptor
3.
Audio source will automatically start playing through the XBi2-H unit when
connection is complete
2 CONNECTING A PAIRED BLUETOOTH® PHONE
1.
1.Turn XBi2-H unit on
2.
Momentarily press (approximately 1 second) and release the Power button *
3.
Bluetooth® symbol will light up on phone display
4.
Press end call button on phone
3 CONNECTING A PAIRED STEREO BLUETOOTH® ADAPTOR AND PAIRED
LUETOOTH® PHONE AT THE SAME TIME
1.
Turn XBi2-H unit on
2.
Turn on audio source and turn on or plug in stereo Bluetooth® adaptor
3.
Audio source will automatically start playing through the XBi2-H unit when
connection is complete
4.
Momentarily press (approximately 1 second) and release the Power button*
5.
Bluetooth® symbol will light up on phone display
6.
Press end call button on the phone
*When doing this procedure some phones will try to dial the last number dialed.
Once connected be prepared to press the end call button on your phone
8. SPECIFICATION
1 ELECTRICAL SPECIFICATION
NO
1
2
3
4
5
6
7
8
FUNCTION
Bluetooth®
Within 10 m
[Class 2]
B-CDMA
Within 500 m
[Class 1]
Bluetooth®
2402 MHz ~ 2480 MHz
B-CDMA
2402 MHz ~ 2480 MHz
Bluetooth®
+ 3 dBm [Max 2.5mW]
B-CDMA
+14 dBm
[Max 20dBm = 100mW]
Service Area
Frequency Range
Output Power
REMARK
-
-
Connection
Sensitivity Level
-82 dBm ~ -83 dBm
0.1% BER
Operation Voltage
+3.34V ~ +4.2 V
-
Low Battery
Detection
+3.34V ±0.1V Under
-
Current Consumption
Audio Power
Operating Time
9
Operating Temp
10
Battery
11
SPECIFICATION
Headset
Stand by
70mA
-
Continuity
130 mA [Max-MP3 Play]
-
120 mW [Max Power]
@ 32
Stand by
around 7 hours
-
Continuity
around 4 hours
-
-10 ~ +55
Li-Poly [580mA – PCM PCB built in]
-
Mic
15 PI, Dynamic Mic applied
-
Speaker
Hi-Fi, 32 Load applied
-
2 BUTTON FUNCTION SUMMARY
NO
1
2
BUTTONS
DESCRIPTION
TIME
LED & BEEP
REMARK
Power On
Less Than
1 Second
Red + Blue
Red LED On
Power Off
More Than
5 Seconds
Red + Blue
Red LED On
Hands-Free
Less Than
1 Second
-
Make Call,
Answer Call
Bluetooth® Pairing
More Than
7 Seconds
Blue
Entering
Bluetooth® Pairing
Mode
Group Main
More Than
2 Seconds
Red [200ms]
Group Satellite
Less Than
1 Second
Red [100ms]
Power
Power &
Mode
Entering Group
Intercom Pairing
Mode [After
Finish Unit Will
Automatically
Power Off]
3
Mode
-
-
-
-
4
Volume Up
Volume Increase
Less Than
1 Second
1- Tone
Audio Output
Power Increase
[10 Levels]
5
Volume
Down
Volume Decrease
Less Than
1 Second
1- Tone
Audio Output
Power Decrease
[10 Levels]
Group Intercom
Select
Less Than
1 Second
2- Tone
-
Audio Mode Select
More Than
2 Seconds
4- Tone
Entering Audio
Mode
6
Intercom
9.LIMITED WARRANTY
1
LIMITED WARRANTY
ChatterBox! USA warrants that each new ChatterBox! will be free from defective
materials and workmanship for a period of one (1) year from the date of original
purchase. ChatterBox! USA will remedy any such defect by repair or replacement (at ou
discretion) of the product(s), provided they are delivered to the address listed below,
intact for examination, with all transportation charges prepaid and accompanied by a
copy of the original retail sales receipt. The provisions of this warranty shall not apply t
any unit, which has been subject to misuse, neglect, incorrect installation, unauthorized
modifications, accident or has been repaired or altered outside of our facilities. The
express warranty contained herein is in lieu of all other warranties, expressed, implied o
statutory, including without limitation any warranty of merchantability of fitness for a
particular use. In no event will ChatterBox! USA be liable to the buyer for any damages
including special, incidental, indirect, or consequential.
ChatterBox! USA
16918 Edwards Road
Cerritos, CA 90703
10.LICENSE INFORMATION
0.1 FCC ID# KA9HJC-XBi2-H
This device has been tested and found to comply with the limits for a class b digital device
ursuant to part 15 of the FCC rules
Operation is subject to the following two conditions
1.
This device may not cause harmful interference
2.
This device must accept any interference received including interference that may
cause undesired operation
Any changes or modifications not expressly approved by the parties responsible for
ompliance could void the users authority to operate this device
0.2 EUROPEAN CE NOTICE
This device is in conformity with the following essential requirements of council directive
999/5/ec articles 3.1a, 3.1b, and 3.2
This device is manufactured in accordance with annex ll of the above directive
0.3 DECLARATION OF CONFORMITY (DOC)
This device is compliant with and adopts the Bluetooth® specification 2.0 and has
ccessfully passed all interoperability tests that are specified in the Bluetooth® specification
Interoperability between this device and other Bluetooth® enabled products is not guarantee
0.4 WARNING
Please check all local laws and regulations regarding the use of in-helmet speakers while
perating motorized vehicles
11. FREQUENTLY ASKED QUESTIONS
NO
QUESTIONS
ANSWERS
1
How many XBi2-H can communicate
with each other?
You can have up to 3 XBi2-H units
paired together.
2
What is the maximum range on
the XBi2-H?
The XBi2-H can communicate up to
500 meters (1,640 Ft) in
optimum conditions.
3
What happens when my unit doesn’t
want to turn off or freezes on me?
Open the case and unplug the battery for a
couple of minutes for a hard reset.
4
Can I have multiple audio devices
connected at one time? (GPS, MP3
or Radar)
No, the XBi2-H only supports 1 audio
device via Bluetooth.
5
What has the highest priority?
Phone, Intercom and then Audio.
6
How do I know if my unit is taking
a charge?
The Bluetooth icon will light up blue when
it is charging and turn off when it is
fully charged.
7
Do I need to worry if my unit gets wet
while riding in the rain?
No, the XBi2-H is completely waterproof
and will continue working.
8
Is the XBi2-H compatible with any
other ChatterBox?
Yes, it is only backwards compatible with
the XBi2.
9
What Bluetooth profiles will the
XBi2-H support?
The XBi2-H supports the Headset Profile,
Hands Free Profile and Advance Audio
Distribution Profile.
For any questions not answered in frequently asked questions section. Call us at our to
free number 1-888-452-2269
Declaration of Conformity
We, ChatterBox, hereby declare that the product
YPE: Chatter Box
ODEL: XBi2-H
atisfies all the technical regulations applicable to the product within the scope of Council
irectives 2006/95/EC, 2004/108/EC, 2004/108/EC and 99/5/EC:
Radio: EN 300 328 v.1.7.1
EMC: EN 301 489-1 v.1.8.1 /-17 v1.3.2
Safety: EN 60065:2002+A1:2006
ll essential radio test suites have been carried out.
OTIFIED BODY: SGS Germany GmbH
Zertifizierungsstelle Munchen, Hoffman str. 50,
D-81379, Munchen, Germany
Identification Number: 2150
uthorized representative or manufacturer:
Hong Jin Cycle Corporation
19-6, YangJae-dong, Seocho-gu, Seoul, Korea
Tel. 82-2-571-6101 / Fax. 82-2-571-6060
his declaration is under the sole responsibility of the manufacturer and, if applicable, his
uthorized Representative, and is marked in accordance with the CE marking directives
3/68/EEC.
oint of contact:
Hong Jin Cycle Corporation
Seoul, Korea June 30, 2010
Tel. 82-2-571-6101 / Fax. 82-2-571-6060
(Signature)
Robert Shin
Executive Director
(Title)