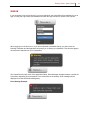
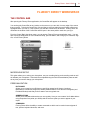
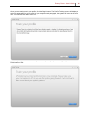
1
January 2014 Fluency Direct User's Guide Version 7.85 1710 Murray Avenue | Pittsburgh, PA | 412.422.2002 | [email protected] CONFIDENTIALITY DISCLAIMER All information methods and concepts contained in or disclosed by this document is confidential and proprietary to Multimodal Technologies Inc. By accepting this material, the recipient agrees that this material as well as the information and concepts contained therein will be held in confidence and will not be reproduced in whole or in part without express written permission from Multimodal Technologies, Inc. Client use of M*Modal tools or information (excluding any services or tools provided to the Client that are covered under a separate written agreement) is subject to the terms of a legal agreement between the Client and M*Modal. Inquiries regarding permission for use of material contained in this document should be addressed to: [email protected] CONTACT INFORMATION BUSINESS M*Modal Corporate 9009 Carothers Parkway, Ste C-2 Franklin, TN 37067 SUPPORT 888.290.2001 Monday – Friday 6:00am - 9:00pm EST Languages Supported: English Table of CONTENTS CONFIDENTIALITY DISCLAIMER .............................................................................................................. 2 CONTACT INFORMATION .......................................................................................................................... 2 WELCOME.................................................................................................................................................... 1 OVERVIEW ............................................................................................................................................... 1 BENEFITS ............................................................................................................................................. 1 REQUIREMENTS .................................................................................................................................. 1 ABOUT THIS GUIDE ............................................................................................................................. 2 GUIDE CONVENTIONS ........................................................................................................................ 2 GETTING STARTED .................................................................................................................................... 3 OPENING FLUENCY DIRECT .................................................................................................................. 3 SIGN IN ..................................................................................................................................................... 4 INITIAL EXPERIENCE .............................................................................................................................. 5 SPECIALTY ........................................................................................................................................... 5 MICROPHONE ...................................................................................................................................... 6 MICROPHONE................................................................................................................................... 6 RECORD BUTTON ............................................................................................................................ 6 RECORDING BEHAVIOR .................................................................................................................. 6 CALIBRATION ................................................................................................................................... 6 PROFILE TRAINING ............................................................................................................................. 7 COMPLETE ........................................................................................................................................... 7 FLUENCY DIRECT WORKSPACE .............................................................................................................. 8 THE CONTROL BAR ................................................................................................................................ 8 MICROPHONE SETUP ......................................................................................................................... 8 PERSONALIZATION ............................................................................................................................. 8 EDITOR ................................................................................................................................................. 9 DICTATION TARGET ............................................................................................................................ 9 HELP ...................................................................................................................................................... 9 CHANGE PASSWORD........................................................................................................................ 10 SIGN OUT ............................................................................................................................................ 11 QUIT..................................................................................................................................................... 11 EDITOR ............................................................................................................................................... 11 MICROPHONE STATUS ..................................................................................................................... 11 PREPARING TO DICTATE ........................................................................................................................ 12 MICROPHONE SETUP ........................................................................................................................... 12 PROFILE TRAINING ............................................................................................................................... 14 SUGGESTED DICTATION HABITS ....................................................................................................... 16 PERSONALIZATION .................................................................................................................................. 17 DICTIONARY .......................................................................................................................................... 18 FIRST TIME USE................................................................................................................................. 18 MANAGING YOUR DICTIONARY....................................................................................................... 19 ADDING A DICTIONARY ENTRY ................................................................................................... 19 EDIT DICTIONARY ENTRY ............................................................................................................. 20 MOVE DICTIONARY ENTRY .......................................................................................................... 20 DELETE DICTIONARY ENTRY ....................................................................................................... 21 PUBLISHED DICTIONARY ................................................................................................................. 21 SEARCH .............................................................................................................................................. 21 ABBREVIATIONS.................................................................................................................................... 22 FIRST TIME USE................................................................................................................................. 22 MANAGING YOUR ABBREVIATIONS ................................................................................................ 23 ADD ABREVIATION......................................................................................................................... 23 EDIT ABBREVIATION...................................................................................................................... 24 DELETE ABBREVIATION ................................................................................................................ 24 PUBLISHED ABBREVIATIONS .......................................................................................................... 24 SEARCH .............................................................................................................................................. 24 COMMANDS ........................................................................................................................................... 25 FIRST TIME USE................................................................................................................................. 25 MANAGING YOUR COMMANDS ....................................................................................................... 26 GROUPS ............................................................................................................................................. 26 ADD NEW GROUP .......................................................................................................................... 26 EDIT GROUP ................................................................................................................................... 27 DELETE GROUP ............................................................................................................................. 27 COMMANDS........................................................................................................................................ 28 ADD NEW COMMAND .................................................................................................................... 28 EDIT COMMAND ............................................................................................................................. 31 DELETE COMMAND ....................................................................................................................... 31 PUBLISHED GROUPS AND COMMANDS ......................................................................................... 31 SEARCH .............................................................................................................................................. 31 FORMATTING ......................................................................................................................................... 32 MEDICAL SPECIALTY ............................................................................................................................ 35 SEARCH .............................................................................................................................................. 35 DICTATION TARGET.............................................................................................................................. 36 ERROR CORRECTION .............................................................................................................................. 37 IN-LINE CORRECTION........................................................................................................................... 37 ERROR CORRECTION WINDOW ......................................................................................................... 38 SPEECH COMMANDS ............................................................................................................................... 40 STANDARD SPEECH COMMANDS ...................................................................................................... 40 ADDITIONAL SPEECH COMMANDS..................................................................................................... 40 PUNCTUATION & SYMBOLS SPEECH COMMANDS .......................................................................... 40 SPEECHBOX .............................................................................................................................................. 41 UNDERSTANDING SPEECH BOX......................................................................................................... 41 SPEECH BOX MODES ....................................................................................................................... 41 STANDARD........................................................................................Error! Bookmark not defined. FLOATING ....................................................................................................................................... 41 OPENING THE SPEECH BOX ............................................................................................................ 41 TRANSFER TEXT ............................................................................................................................... 42 EDITOR ....................................................................................................................................................... 43 EDITOR WORKSPACE........................................................................................................................... 43 CONTEXT MENU............................................................................................................................. 44 EDITOR SPELLCHECKER ..................................................................................................................... 45 SPELL CHECK CORRECTION ........................................................................................................... 45 AUTOCOMPLETE ............................................................................................................................... 45 LOOK UP ............................................................................................................................................. 46 EDITOR DICTATION COMMANDS ........................................................................................................ 47 HELP ................................................................................................................................................ 47 SELECTING AND CORRECTING ................................................................................................... 47 FOLLOW-UP SELECTION .............................................................................................................. 47 CLEAR SELECTION ........................................................................................................................ 48 LIST .................................................................................................................................................. 48 LINE AND PARAGRAPH ................................................................................................................. 48 UNDOING AND DELETING ............................................................................................................. 48 CAPITALIZING ................................................................................................................................. 48 EDITING AND FORMATTING TEXT ............................................................................................... 48 NAVIGATING THE DOCUMENT ..................................................................................................... 49 COPYING TEXT............................................................................................................................... 49 MICROPHONE BUTTON MAPPINGS ....................................................................................................... 50 INTRODUCTION ..................................................................................................................................... 50 WORKING WITH THE CONFIG FILE ................................................................................................. 50 TROUBLESHOOTING................................................................................................................................ 53 Fluency Direct – User’s Guide 1 WELCOME OVERVIEW Fluency Direct is a desktop solution for free-form dictations of medical reports into windows and web based Electronic Medical Records (EMRs). The core of Fluency Direct is the power of Speech Understanding. This unique, proprietary technology combines best in class speech recognition with a powerful Natural Language Understanding (“NLU”) capability for improved accuracy by pairing language models and the context of words. Speech Understanding allows clinicians to speak to clinical applications in conversational tones, a new paradigm M*Modal refers to as Conversational Documentation. The system continually learns based on previous dictation and can even benefit from historically dictated and transcribed reports to accelerate the system’s learning and adoption process. User and facility level customizations and trained author profiles are hosted over the Internet in M*Modal’s data centers making easy access to trained author profiles from the office, clinic, nursing unit and home. This server-based model for speech processing allows for the frequent and seamless upgrade of the technology. The system is not an “install once and upgrade every three years” type of system. The back-end speech-processing engine is updated and improved frequently. BENEFITS • Ready to use in minutes • Physicians can speak in conversational tones • Instant conversion of dictation into medical reports • Coverage across all specialties • Continuous Learning for Continuous improvement • Can be used with third-party software, such as MS Outlook, Word and EMRs • Ability to define voice enabled commands to automate frequent tasks and normal text • Ability to add new/custom vocabulary REQUIREMENTS Microsoft® Windows® XP or higher Windows OS Processor: Intel Core 2 CPU, 1.5 GHz, 2GB recommended for Local Recognition Processor: Intel Core 2 CPU, 1.5 GHz, 1GB recommended for Remote Recognition Microsoft® Internet Explorer Version 6 (SP1) or higher .Net Framework 4.0 For dictation support into Java based applications JRE 1.7 u6 (32 bit) or higher needs to be installed on the computer before Fluency Direct is installed. For Citrix XenApp support with the Fluency Connector, you must have already installed the Citrix Client 10, 11, 12 or the Citrix Receiver in advance of installing Fluency Direct as well as have the Connector configured on the Citrix Server. Fluency Direct – User’s Guide 2 ABOUT THIS GUIDE The Clinician’s Users Guide is written for the clinical users of Fluency Direct; physicians, physician’s assistants, radiologist & imaging specialists, and other clinical professionals that dictate patient information. This guide contains instructions regarding the use of Fluency Editor along with a complete list of dictation commands for supported applications. GUIDE CONVENTIONS File names This manual uses bold text to indicate file names. User input This manual uses bold text to indicate user input. Key names A specific key on the keyboard is indicated in ALL CAPS. For example: Press ENTER to submit your password. . Commands and Prompts Screen prompts, menu and window names, fields, buttons, boxes, etc. appear in bold type. Menus The syntax used to demonstrate accessing a palette or submenu is Menu > Submenu. Messages Messages in text are shown in italics as follows: No Information Found. This indicates that the words “No Information Found” are displayed in the application. Pressing keys simultaneously This manual uses the following format to indicate that you must press two keyboard keys simultaneously to perform the specified task: SHIFT+F5. This indicates that you must press and hold the SHIFT key, and then press the F5 key on the keyboard to perform the specified task. Ordered Procedures When you need to follow steps in a specific order, it will have numbers next to each step, as shown here: 1. Do this first… 2. Next, you have to do this… Information, Tips, and Notes Information, Tips, and Notes contain helpful advice and other information that makes the software easier and more enjoyable to use. Cautions & Warnings CAUTION! Cautions warn of potential problems that you will want to avoid. Fluency Direct – User’s Guide 3 GETTING STARTED OPENING FLUENCY DIRECT Once you have successfully installed Fluency Direct, you can open Fluency Direct by going to Windows Start > MModal > Fluency Direct. The Fluency Direct application will open; you will see the Splash screen appear while the application loads. Fluency Direct – User’s Guide 4 SIGN IN If you are signing in for the first time or if you have signed out, the Control Bar will be available for you to sign in. Enter your Login Name and Password and click the Sign In button to access Fluency Direct. When logging in for the first time, or if you have requested a password change, you will receive the following notification and the application will prompt you to change your password. This does not apply to all users and is dependent on your configuration. The Control Bar will notify users of the application status. Error Messages will appear above or below the Control Bar, depending upon the position of the Control Bar on the desktop. Error messages will be displayed for a short time before fading away. Error Message Example: Fluency Direct – User’s Guide 5 INITIAL EXPERIENCE When signing into Fluency Direct for the first time, users will be prompted to perform the Initial Experience process. To begin the Initial Experience, click the Begin button. Users can choose to return to the Initial Experience Wizard at a later time, if desired. The entire Initial Experience should take less than five minutes to complete. SPECIALTY At this point users will be prompted to select their medical specialty. Previously, users selected a domain which focused on the type of document being produced. Fluency Direct now focuses on the physician's medical specialty which offers improved recognition. Click Next to continue. Fluency Direct – User’s Guide 6 MICROPHONE Users will next be prompted to Set up their Microphone MICROPHONE If you have not installed a microphone at this time, you can connect it now. If you have a microphone installed, you can select it from the drop down menu. RECORD BUTTON Select the microphone button or keyboard key that you wish to use to start and stop recording. Click the X to remove the selection. RECORDING BEHAVIOR This option will define how the record button will work. Select Hold to Talk or Toggle to Talk as desired. CALIBRATION The calibration process is a single screen that will calibrate your microphone to your specific voice and surroundings. You will be prompted to read a paragraph to complete this process. Microphone calibration will control the volume level of the input source which has a direct effect on recognition quality. This is not the same as the volume slider, which controls the volume level of speakers. The calibration process will adjust automatically as you read the paragraph included on the wizard. It will require a minimum of 20 seconds of audio to adjust the gain properly Fluency Direct – User’s Guide PROFILE TRAINING COMPLETE Once you have finished your profile training, you will have completed the Initial Personalization Wizard and can begin using Fluency Direct. 7 Fluency Direct – User’s Guide 8 FLUENCY DIRECT WORKSPACE THE CONTROL BAR After opening the Fluency Direct application, the Control Bar will appear on the desktop. You can drag the Control Bar to any location on the screen or you can dock it on any edge of the screen that you prefer. To dock the Control Bar, click and drag to a screen edge (the screen edge will become highlighted when you near it). Drop it where you want the Control Bar to be docked. Fluency Direct will remember the location of the Control Bar and will open in the same position each time you log in. From the Control Bar’s drop down menu, you can access Fluency Direct personalization tools. You can also access the Help Menu for User Guides and Help, open the Editor, and Change your Password, Sign Out, or Quit Fluency Direct. Toolbar docked on the left side MICROPHONE SETUP This option allows you to select your microphone, set your recording hot key and recording mode as well as calibrate your microphone. This should be completed during the Initial Personalization phase as well as any time you need to change your microphone. PERSONALIZATION DICTIONARY Allows you to customize your Dictionary, specifying categories for Names, Locations, Medications, Procedures, Diagnoses, Others (words that don't fit into the other categories) and Excluded Words (words that you don't want to see recognized ever. ABBREVIATIONS Allows you to add abbreviations that you use regularly. Here you can create a list of abbreviations using the spoken form (what you dictate) and the outcome (what you want to appear in your report. COMMANDS Fluency Direct offers the ability to create commands to which can be used to insert snippets of text, perform keyboard shortcuts, and more. Fluency Direct – User’s Guide 9 FORMATTING Fluency Direct offers the ability to define formatting for measurements, dates, times, and more. MEDICAL SPECIALTY Fluency Direct uses vocabularies optimized for the physician's medical specialty. Selecting the specialty that best applies to you will ensure the best recognition possible. PROFILE TRAINING While Profile Training is not required to use Fluency Direct, it is highly reccomended. Fluency Direct learns your speech habits and nuances based on the amount of dictation that you present. Therefore, as you continually dictate, Fluency Direct will continually learn. Perofroming the Profile Training will give you a head start on recognition issues and ensure that Fluency Direct returns the most accurate results to you. EDITOR The Editor is an integrated application that allows you to dictate into, create text snippets, copy, paste, and edit. The benefit of Editor over the standard text/note pad is that Editor can also respond to a predefined set of voice commands. DICTATION TARGET Fluency Direct allows you to define the Dictation Target as the Active Window, Editor, or another window. HELP F1 Press F1 from any location in the Fluency Direct application to bring up Fluency Direct Help. In addition to instructions and images, the Fluency Direct Help also offers a variety of Video Tutorials for users to watch directly from the section that you are trying to learn more about. VIDEO TUTORIALS Fluency Direct Help also offers Video Tutorials directly from the help file menu. To access the video library click F1 from anywhere in the Fluency Direct application; from the Help menu click Help > Video Tutorials. USER MANUAL The Fluency Direct User Guide is a comprehensive Clinician Guide for using Fluency Direct. Note: To access the PDF files, you must have Adobe Reader installed. SUBMIT FEEDBACK This option will allow you to send an email to our Product Development Group offering specific feedback and comments regarding the applications features, functionalities, and overall use. This option is not to be used for support or service. ABOUT This option will display the Fluency Direct SplashScreen, which provides information regarding the current installation, and version number, which is required for support tickets. Fluency Direct – User’s Guide CHANGE PASSWORD The Change Password button will allow users to change their password, as desired. Enter your current password, then the new password. You will need to confirm the new password as well. Once the new password has been confirmed and the length is between the required 4 - 20 characters, the green checkmarks will appear and the Apply button will be highlighted. 10 Fluency Direct – User’s Guide 11 SIGN OUT Sign out from the Fluency Direct application using this option; this option will not exit the application, it will remain running on your desktop. QUIT To exit the application completely (the Control bar will no longer be available on your desktop), select Quit from the Control Bar menu. EDITOR The Editor is an integrated application that allows you to dictate into, create text snippets, copy, paste, and edit. The benefit of Editor over the standard text/note pad is that Editor can also respond to a predefined set of voice commands. MICROPHONE STATUS The Control Bar will display Red, Green, or Yellow depending on the microphone status. This is a quick visual cue for the user to know when to begin speaking or if there is an issue with the microphone. The Microphone Status will display RED when the user cannot dictate. This will occur when the user is not logged in, is signing in, or if a microphone is not detected. The Microphone Status will display YELLOW when there is a critical warning for the user. This will most likely be that the recognition quality is affected by low resources. Once you begin recording, you will see the microphone on the Control Bar light up GREEN. A green bar will show around the bottom of the Control Bar, moving left to right, to display an indication of the microphone volume. Fluency Direct – User’s Guide 12 PREPARING TO DICTATE Before you can start dictating, there are a few steps to perform. To begin with, you will need to configure your microphone. In addition, you will need to set your hotkeys for recording (if desired) as well as perform enrollment (optional). MICROPHONE SETUP Microphone setup should be performed during the Initial Personalization wizard. But a microphone can be setup at any time for any reason. If you are changing microphones, you will need to perform the Microphone Setup again. Select Microphone Setup from the Control Bar Menu. The Microphone Setup window will appear. Microphone If you have not installed a microphone at this time, you can connect it now. If you have a microphone installed, you can select it from the drop down menu. Record Button Select the microphone button or keyboard key that you wish to use to start and stop recording. Click the X to remove the selection. Recording Behavior This option will define how the record button will work. Select Hold to Talk or Toggle to Talk as desired. Hold to Talk Use this option when you will be using the microphone sporadically and you wish to use the push button to activate the microphone. Fluency Direct – User’s Guide 13 Toggle to Talk. This option allows you to select a key press, which will begin your recording session; used with Toggle to Talk mode and headsets. Calibration The calibration process is a single screen that will calibrate your microphone to your specific voice and surroundings. You will be prompted to read a paragraph to complete this process. Microphone calibration will control the volume level of the input source which has a direct effect on recognition quality. This is not the same as the volume slider, which controls the volume level of speakers. Microphone calibration will stay with your profile, regardless of what computer you are using as long as you are using the same type of microphone. New microphones will require a new calibration. The calibration process will adjust automatically as you read the paragraph included on the wizard. It will require a minimum of 20 seconds of audio to adjust the gain properly Once you have finished calibrating the microphone, you can click OK to close this window. Fluency Direct – User’s Guide PROFILE TRAINING Training your voice profile, or enrollment, is a simple process. Once you login as a new user, you have the option to complete the enrollment process after you have selected and calibrated your microphone, during the Initial Personalization Wizard. This is recommended for best recognition results, but is not required to run the program. Training your profile should take only a few minutes to complete. 14 Fluency Direct – User’s Guide 15 Once you are ready to train your profile, click the Begin button. The Profile Training screen will display a series of paragraphs for you to read. As you complete each paragraph, the system will move to the next one. You can also click OK to move on. Once complete, you will be notified that you have completed your profile training and you can click the Finish button to exit. Fluency Direct – User’s Guide 16 SUGGESTED DICTATION HABITS If using a handheld dictation device, place in the palm of your hand with the thumb on the 4-position switch and your index finger across the trigger underneath. When dictating, hold the device approximately 1 inch from your mouth. When turning your head, please remember to move keep the microphone near your mouth. When using the Push-To-Talk mode, pause slightly before speaking when starting your recorder and pause briefly before stopping recording. This prevents words from being “clipped.” For improved performance, review the Fluency Direct Best Practices. Fluency Direct – User’s Guide 17 PERSONALIZATION Fluency Direct offers a variety of tools to help you personalize your experience and daily use. DICTIONARY Create a custom dictionary of Names, Locations, Medications, Procedures, Diagnoses, and Excluded Words ABBREVIATIONS Create a collection of abbreviations. This is a list of words or phrases that you use repeatedly but abbreviate when speaking. COMMANDS Create commands to which can be used to insert snippets of text, perform keyboard shortcuts, and more. FORMATTING Define specific options related to the display and rendering of the dictation and draft text including dates, times, measurements, and spacing. MEDICAL SPECIALTY Fluency Direct focuses on the physician's medical specialty, select your specialty here to ensure improved recognition. PROFILE TRAINING Training your voice profile, or enrollment, is a simple process. Once you login as a new user, you have the option to complete the enrollment process after you have selected and calibrated your microphone. This is recommended for best recognition results, but is not required to run the program. Fluency Direct – User’s Guide 18 DICTIONARY The Fluency Direct Dictionary allows you to create a custom dictionary of Names, Locations, Medications, Procedures, Diagnoses, and Excluded Words that you use often to ensure recognition each time. To open the Dictionary, go to Personalization > Dictionary in the Control Bar drop-down menu. The Dictionary window will appear. FIRST TIME USE The first time you open the Dictionary dialog, the screen will appear like the one below. To begin using the dictionary, you will click the +Add button that the arrow is pointing at. This window will only appear the first time that you use the Dictionary. Fluency Direct – User’s Guide MANAGING YOUR DICTIONARY After you have populated your dictionary, when you open it, it will open to the screen below. From here you can select your category and add or edit your dictionary as needed. ADDING A DICTIONARY ENTRY To add a dictionary entry, you can select the category and click the Add button in the top right. The Add a New word window will appear. 19 Fluency Direct – User’s Guide 1. 2. 3. 4. 20 Enter the word to be added to the dictionary. Click the Record button in the dialog (not on your speechmike) to record the pronunciation. This button will activate your handheld microphone record button for you. If you selected the category before clicking Add, then the correct category will be chosen. If you want to assign it to a different category, select the category here. Click Save to finish. EXCLUDED WORDS The excluded words will not appear in the categories for Adding a New Word. Excluded Words are words that the user has specified to never appear in the dictation, for a variety of reasons. To add an excluded word, you MUST select the Excluded Words category and then click the Add button. Enter the word that you wish to exclude and click OK. EDIT DICTIONARY ENTRY Dictionary entries can be edited by double-clicking on the item to open it. Make your changes and click OK to save and close the dialog. MOVE DICTIONARY ENTRY If you have created a dictionary entry and discovered that it is in the wrong category, you can click the dictionary entry and drag it to the correct category. Fluency Direct – User’s Guide 21 DELETE DICTIONARY ENTRY To delete a dictionary entry, select the word and click the Delete icon to the far right. PUBLISHED DICTIONARY Published Dictionary terms are those words or terms that have been published by an administrator for use across a company or facility. These items will be available in the Dictionary dialog but will contain a lock symbol to the right of them. Published Dictionary terms CAN be recorded for pronunciation. Double click on the term and record the pronunciation by clicking the Record button in the dialog. The Name field and the Category buttons will be disabled for editing. When a dictionary term, word, etc. has been published, it is locked from both editing and deleting. Only an administrator can remove published items. SEARCH The search option is available for you to search through your dictionary terms (including categories). As you type in the search term, the dictionary will automatically filter out the terms that don't match. As the filter is applied, if your search term is not available in a category, that category is also filtered out. Fluency Direct – User’s Guide 22 ABBREVIATIONS Fluency Direct also allows users to create a collection of abbreviations. This is a list of words or phrases that you use repeatedly but abbreviate when speaking. FIRST TIME USE The first time you open the Abbreviations dialog, the screen will appear like the one below. To begin using the Abbreviations, you will click the +Add button that the arrow is pointing at. This window will only appear the first time that you use the Abbreviations. Fluency Direct – User’s Guide 23 MANAGING YOUR ABBREVIATIONS After you have populated your dictionary, when you open it, it will open to the screen below. From here you can select your category and add or edit your Abbreviations as needed. ADD ABREVIATION To add an abbreviation click on the ADD button towards the top right. The following screen will appear, enter the Spoken Form and the expected Outcome. click Save to save the abbreviation. To add additional abbreviations, just click the Add Button again. Fluency Direct – User’s Guide 24 EDIT ABBREVIATION Abbreviation entries can be edited by double-clicking on the item to open it. Make your changes and click OK to save and close the dialog. DELETE ABBREVIATION To delete an abbreviation entry, select the word and click the Delete icon to the far right. PUBLISHED ABBREVIATIONS Published Abbreviations are those abbreviations that have been published by an administrator for use across a company or facility. These items will be available in the Abbreviations dialog but will contain a lock symbol to the right of them. When an abbreviation has been published, it is locked from both editing and deleting. Only an adminstrator can remove published items. SEARCH The search option is available for you to search through your dictionary terms. As you type in the search term, the dictionary will automatically filter out the terms that don't match. Fluency Direct – User’s Guide COMMANDS Fluency Direct offers the ability to create commands to which can be used to insert snippets of text, perform keyboard shortcuts, and more. Commands are organized by Groups. Go to Personalization > Commands to bring up the Commands screen. FIRST TIME USE The first time you open the commands dialog, the screen will appear like the one below. To begin using the commands, you will click the +Add button that the arrow is pointing at. This window will only appear the first time that you use the commands. All users will have a default group available to them when they open the Commands dialog. This group will be called "User Name" Commands and can be populated with your custom commands. 25 Fluency Direct – User’s Guide 26 MANAGING YOUR COMMANDS After you have populated your commands, when you open it, it will open to the screen below. From here you can select your group and add or edit your commands as needed. GROUPS ADD NEW GROUP Click the Add button arrow to create a new Command Group. Fluency Direct – User’s Guide 27 The Add a Group dialog window will appear. 1. 2. Enter the Group Name. Select Availability a. Available Everywhere - This option means this group of commands will be available in any application that you use to dictate. b. Availability - Enter the window title to limit the availability to an active title window containing that title in its title bar. For example, Microsoft will work in any Microsoft application, while Microsoft Word will only work in the Microsoft Word application. EDIT GROUP To edit an existing group, select the group you want to edit and click the Edit Group icon to the right. DELETE GROUP To delete an existing group, select the group you want to delete and click the Delete Group icon to the far right. Fluency Direct – User’s Guide 28 COMMANDS ADD NEW COMMAND To add a new command, click on the Add button in the top right corner. The Add Commands window will appear. Name your command. The Command Name is an important step because this is the speech command that will activate the command details (inserted text, key presses, wait time, or scripts). Do not choose a name that is complicated to pronounce or too long to be recognized easily. Keep your names simple and relative to the command actions/results. In addition, try to follow these best practices: Capitalize the first letter of each word in the command name. Spell out numbers rather than using the numerals (i.e. "Four Two Five" instead of "425"). Use an "action verb" at the beginning of each command name (i.e. "Insert", "Print", etc.). Select the Group that you want the command to appear in. The Group will default to your custom commands group or to the selected group. Add Actions. Using the buttons, add Text, Keystroke, Wait time, or a Script to the command. See Actions below for more information. Save the Command. Click OK to save the command; clicking Apply will save the command and keep the Command Details window open. Fluency Direct – User’s Guide 29 COMMAND ACTIONS TEXT This option can be used to create text snippets or to create templates that offer field support. Text Snippet A text snippet is a piece of text that you insert into your document during dictation. There are two methods to creating a text snippet; from the Commands window or by dictation. To add a text snippet, select the Text action. In the text box provided, enter the desired text that you wish to use. Text Snippet from Selection If you have a selection of text available, you can use the command, “Save this Text” to create a new command. Alternate commands include “Create Text Snippet” or “Create Macro”. The Command window will appear with your selected text. You will then enter the Command Name, assign it to a Command Group and (if desired) add additional actions to the command. Click OK to save. NOTE: When inserting a text snippet, they are inserted using the current font attributes of the target text area. You cannot retain formatting from the original document used to create the Text Snippet. Template Fields Creating a command using template fields allows you to create a reusable template which can be inserted and quickly completed by navigating through the fields. When creating a template, you insert brackets [ ] to denote a field. Using the Next Field / Previous Field commands (which can be mapped to a SpeechMike button if desired) you can move through the fields in the template, dictating as you go along. The Next/Previous field commands will wrap around to beginning/end of text when the current cursor is beyond the last or first field in the text. For example, if you are at the end of the document, you can click Next to go to the first field in the document. It is also possible to set via a configuration setting to automatically remove brackets on a field when a user advances off a given field with "next field"\"previous field" or to retain the brackets. The default is to retain the brackets. This can be changed by the following config entry: <add key="FieldCommandsRemoveSelectedFieldBrackets" value="True"/> SIMULATE KEY PRESSES This option will capture your keystrokes and record them as the command. You can enter a single key press or a string of key presses, depicted below. Key Press, Single Fluency Direct – User’s Guide 30 Key Press, String To clear a keystroke, you can select the entire key press by double-clicking and then entering a new key press or you can click the Clear link at the end of the key press field to remove all key presses. If you wish to change a single key press in a string of key presses, you can highlight the specific key press that you wish to remove, and then enter a new key press or press the delete key to remove that key press. WAIT This option will cause the system to wait for a specified amount of time before proceeding to the next action. SCRIPT The script step in a command is for advanced functionality. it is possible to use a script as a command step in one of two ways. 1. Specify a Javascript method name. When interacting with an EHR hosted in Internet Explorer, M*Modal Fluency Direct can use javascript injection to call a javascript method available on the currently displayed web page. This allows M*Modal Fluency Direct to call methods exposed by the application for UI interaction. The javascript method runs in the context of the web browser. 2. It is possible to create scripts in a number of different programming languages to do complex actions such as interact with low level APIs and manipulate data from other sources. A script can be written in the VBScript, JavaScript, C# or VB.net languages and runs in the context of M*Modal Fluency Direct. Typically this type of scripting needs to be created by someone with extensive knowledge of computer programming languages. Before import, a script needs to be properly signed by a command line tool provided by M*Modal. Please contact M*Modal support for more information on scripting's practical limitations, how they can be used to automate certain tasks and information on how they can be signed for import. MOVING ACTIONS Actions can be reordered after they have been set. To reorder actions, simply click and drag the action up or down to the correct order. DELETE ACTION To remove an action from the Commands Details, click on the x in the specific action that you want to remove. Fluency Direct – User’s Guide 31 EDIT COMMAND To edit an existing command, double-click on the command and the Edit command windows will open. You can make changes and click OK or Apply to save your changes. DELETE COMMAND To delete an existing command, select the command you wish to delete and click the delete icon on the far right. PUBLISHED GROUPS AND COMMANDS Published Groups and/or Commands are those groups or commands that have been published by an administrator for use across a company or facility. These items will be available in the Commands dialog but will contain a lock symbol to the right of them. When a Group or Command has been published, it is locked from both editing and deleting. Only an administrator can remove published items. SEARCH The search option is available for you to search through your dictionary terms (including categories). As you type in the search term, the dictionary will automatically filter out the terms that don't match. As the filter is applied, if your search term is not available in a category, that category is also filtered out. Fluency Direct – User’s Guide 32 FORMATTING The Formatting option provides additional options related to the display and rendering of the dictation and draft text. More options may be added in the future. MEASUREMENTS Select Abbreviated (cm) or Expanded (centimeters) for how measurement abbreviations should be displayed. Example: Dictated phrase: 8 millimeters Abbreviated: 8 mm Spelled out: 8 millimeters Fluency Direct – User’s Guide 33 ORDINAL FORMAT Choose 1st, 2nd, 3rd or first, second, third. Note if used at the beginning of a sentence, it will be spelled out and capitalized. Example: Dictated phrase: A: "two hundred fifty thousand fifty five" B: "three thousand" Abbreviated: 1st, 2nd, 3rd Spelled Out: First, Second, Third NUMERICAL RANGE Select the display of numerical ranges: 1-10, 1 to 10, or one to ten Example: Dictated Phrase: She drank eight to ten cups of coffee per day. Symbolic: 8-10 Written Spelled Out: eight to ten Written Numeric: 8 to 10 DATE FORMAT Select the format that you wish to see dates appear in your dictation Example: Dictated Phrases: "January second two thousand nine" As Dictated January 2, 2009 Alphanumeric (Ordinal Day): January, 2nd, 2009 Alphanumeric (Long form, day comes before month): 2 January, 2009 Alphanumeric (Ordinal Day, No comma): January 2nd, 2009 Numeric (Separated by Slashes, 4-digit yrs): 01/02/2009 Numeric (Separated by Slashes, 2-digit yrs): 01/02/09 Alphanumeric (Short): Jan 2, 2009 Alphanumeric (Long): January 2, 2009 Alphanumeric (Short form, no comma): Jan 2 2009 Alphanumeric (Long form, no comma): January 2 2009 TIME FORMAT Select the format that you wish to see times appear in your dictation. You can choose 12hr or 24hr format. Example: As Dictated: ANY FORMAT Numeric 12h: HH:MM AM/PM (1:00 PM) Numeric 24h: HH:MM (13:00) Military time: HHMM hours (1300 hours) PERCENT Choose to display the percent symbol” %” or the text “percent” Example: Use Percentage Symbol: 30% Use Text Format: "30 percent" Fluency Direct – User’s Guide 34 TEMPERATURE Choose to display the degree symbol “ ”or the text “degree” Example: Dictated Phrases: A= temperature is ninety-six B= temperature is ninety-six degrees: Textual if dictated: A: temperature is 96 B: temperature is 96 degrees Symbolic if dictated: A: temperature is 96 B: temperature is 96° Textual (word 'degrees'): A: temperature is 96 degrees B: temperature is 96 degrees Symbolic (degree symbol): Always: Add degree symbol even if not dictated. A: temperature is 96° B: temperature is 96° PARAGRAPH SPACING Set the number of <Return> key presses that will be inserted when you say “New paragraph.” Default value is double (2 blank lines between paragraphs). Single will insert one blank line between paragraphs. Fluency Direct – User’s Guide 35 MEDICAL SPECIALTY Users can select their medical specialty to optimize the vocabulary for the types of documents you will be dictating. Select your specialty by scrolling through the options or searching in the search bar. Once selected, click OK to save and exit. SEARCH The search option is available for you to search through the available medical specialties. As you type in the search term, the list will automatically filter out the specialties that don't match. Fluency Direct – User’s Guide 36 DICTATION TARGET Fluency Direct allows you to select the dictation target from the Control Bar menu. Setting a dictation target allows you complete control over your screen. By utilizing this feature, you can keep your EMR, image viewer, etc. front and center, covering the actual report. This allows you to focus on detailed patient information without having to move the report on the screen. ACTIVE WINDOW (DEFAULT) Using the Active Window option will automatically make whatever window has the focus be your dictation target. EDITOR Selecting Editor allows you to only dictate in Editor while selecting other windows. When this option is selected, there will be a notification above the Control Bar. OTHER WINDOW Selecting Other allows you to choose a specific window as your dictation target. When using this option, available targets will become highlighted as you select them. Fluency Direct – User’s Guide 37 ERROR CORRECTION There are two ways to perform error correction with Fluency Direct: In-Line Correction using the phrase “Select <text>” or using the phrase “Correct <text>” to open the Error Correction Window. IN-LINE CORRECTION In-line correction only makes a change to the text in the current documentation. On occasion Fluency Direct might misrecognize a spoken word or phrase. This misrecognition is not necessarily, because a word or phrase is missing from the underlying vocabulary domain or user dictionary, but could be because of other factors such as background noise or spoken tone. To perform in-line error correction, you can select the text that you want to correct and then speak over the text. EXAMPLE: Dictate your text; see the error… Speak “Select Fibroma” or use the keyboard and mouse to highlight text… Speak “Fibromyalgia” and the text is replaced… Fluency Direct – User’s Guide 38 ERROR CORRECTION WINDOW Dictate your text; see the error… Speak “Select Fibroma” or use the keyboard and mouse to highlight text… Speak “Correct Selection” to trigger the error correction dialog. The Error Correction dialog will appear… Fluency Direct will display suggestions based on the word being corrected. From here, you can select a replacement option suggested by saying “Choose 1,” “Choose 2,” “Choose 3,” and so on. Fluency Direct – User’s Guide 39 The suggested replacements are derived from a list of words detected with a phonetic similarity and in a similar context. Over time, information is gathered regarding the specific speech patterns of the dictator as well the context of words previously spoken. In this way, the system learns not only from annunciations, but also learns from the historical context of words used by the document author. If none of the suggestions meet your needs you can type in the correction dialog using the keyboard. As you make changes to the word or phrase, and that word or phrase is not available in the current vocabulary domain, you will be given an option to record the pronunciation, to improve recognition. Selecting the category of the term will also improve future recognition. Say “Save” or click the Save button to finish. Fluency Direct – User’s Guide 40 SPEECH COMMANDS STANDARD SPEECH COMMANDS The following is the list of commands supported in Microsoft Word and Fluency Editor. SAY THIS… select <word sequence> Correct <that> Boldface <that> Copy <that> Paste <that> Delete <that> Undo <that> Uppercase <that> Lowercase <that> New Line / Paragraph Next Line / Paragraph Insert Line / Paragraph Insert Fluency Editor Insert Fluency Editor here Insert Scratch Pad Insert Scratch Pad here Show Speech Box TO DO THIS… Select a word or group of words; 5 word limit, including punctuation Correct a selected word or phrase Apply boldface formatting to a selected word or phrase Copy a selected word or phrase Paste a selected word or phrase Delete a selected word or phrase Undo the previous action Apply Uppercase formatting to a selected word or phrase Apply lowercase formatting to a selected word or phrase Start selected text on a new line/paragraph or create a new line/paragraph at the current cursor position Move to the next line/paragraph following the current line/paragraph. Insert a new line/paragraph from the cursor position. Inserts the text from the Editor (previously known as ScratchPad) into the current application. This command will open the Speech Box for dictation. ADDITIONAL SPEECH COMMANDS The following is a list of commands supported in Epic, Allscripts, McKesson, and Practice Partner. SAY THIS… select <word sequence> Correct <that> Correct selection Copy <that> Paste <that> Delete <that> Undo <that> Save This Text TO DO THIS… Select a word or group of words; 5 word limit, including punctuation Correct a selected word or phrase Correct a selected word or phrase Copy a selected word or phrase Paste a selected word or phrase Delete a selected word or phrase Undo the previous action Brings up a selection box that allows the user to add a new text snippet command. There is no limit to how many text snippets can be created. There is a large limit (32,766 characters) for a single text snippet. Larger text snippets may see a minor delay when pasting into the target application. PUNCTUATION & SYMBOLS SPEECH COMMANDS The following is the list of commands for dictating punctuation and symbols. SAY THIS… colon semi colon open parentheses Closed parentheses Opening quotation Closing quotation Period Slash TO DO THIS… Insert a colon : in the dictation Insert a semi-colon ; in the dictation Insert the open parentheses ( in the dictation Insert the closed parentheses ) in the dictation Insert the opening quotation marks “ in the dictation Insert the closing quotation marks ” in the dictation Insert a period . in the dictation Insert a slash \ in the dictation Fluency Direct – User’s Guide SAY THIS… Question mark Exclamation mark point 41 TO DO THIS… Insert a question mark ? in the dictation Insert an exclamation ! mark in the dictation Insert a period for temperatures (ex. 98.6, say ninety-eight point six) SPEECHBOX UNDERSTANDING SPEECH BOX SPEECH BOX MODES The Speech Box is an integrated application that allows you to dictate into and then transfer the text to any application. Speech Box provides a standard dictation environment with a pre-defined set of commands. There are two modes to the Speech Box; In-Line and Floating. Depending on how you dictate will determine the best method for you. IN-LINE In this mode, the Speech Box will capture dictated text and then transfer the dictated text into the application where the cursor was previously located. This mode prevents the user from moving the cursor focus to any other window including those from other applications. This ensures that dictated text in the Speech Box could safely be transferred into the text editor where it was launched from. FLOATING For some users, the ability to be able to access other applications or launch different windows in the existing one while the Speech Box is open is important. This is when you would use the Floating Speech Box. When using the Floating Speech Box, it will always be the topmost window and will be auto set as the dictation target. When the user transfers the dictated text, it will transfer to the text editor that has focus AT THAT TIME. This is important because if you are switching between multiple applications, you need to be sure you have focus on the correct application before transferring the text. FLOATING DICTATION TARGET While the Speech Box is Floating and set as the dictation target a message is shown stating that all text will be inserted into it regardless of focus. The Fluency Direct Control Bar > Dictation Target will also shows "Speech Box" as the current target of dictation. You can cancel the dictation target by clicking the 'X' on the control bar or clicking on the "cancel dictation target" link on the Speech Box. The dictation target will also be cleared after the Speech Box is closed and text has been transferred. OPENING THE SPEECH BOX There are several ways to access the Speech Box. These configurations can be used for defining how to open Speech Box in either mode as well. Fluency Direct – User’s Guide 42 CONFIG FILE You can define the Speech Box to auto launch when “record” is activated while the focus is on a defined text editor. For example, you can define it to activate whenever a user attempts to dictate into NotePad. SPEECHMIKE BUTTON You can map a specific button on your SpeechMike to open the Speech Box. The first button press will open Speech Box in Modal Mode. Double pressing will convert it to Floating Mode. NOTE: If you open the Speech Box in In-Line mode and dictate then press the Speech Box button again, the Floating mode will become active and the dictated text will still be available. SPEECH COMMAND You can say “Show Speech Box” to open the In-Line mode or say “Show Floating Speech Box” to open in Floating mode. This will most likely be used by headset users. TRANSFER TEXT The Transfer Text command will transfer the dictated text captured by the Speech Box into the target editor. When using In-Line Mode, the text is inserted in the last location of the cursor. When using Floating Mode, the text is inserted at the location you have selected. The Speech Box will close automatically after the text has been transferred. TO TRANSFER TEXT YOU CAN: Say “Transfer Text”. Click the Transfer Text button in the Speech Box. Map a SpeechMike button to the command “Transfer Text”. Fluency Direct – User’s Guide 43 EDITOR The Fluency Editor is an integrated application that allows you to dictate into, create text snippets, copy, paste, and edit. The benefit of Fluency Editor over the standard text/note pad is that Fluency Editor can also respond to a pre-defined set of voice commands. EDITOR WORKSPACE TOOLBAR The toolbar offers quick access through icons to the most commonly used functions in the Format menu. FUNCTION SHORTCUT Section List Bookmark Bold Italic Underline Decrease Indent Increase Indent CTRL + N CTRL + L CTRL + SHIFT + F5 CTRL + B CTRL + I CTRL + U CTRL + SHIFT + M CTRL + M DESCRIPTION This function will create a sectionfor the selected text or from where the cursor is placed. This function will create a list for the selected text or from where the cursor is placed. This function will insert a highlighted bookmark of the selected text for QA This bookmark can be typed freeform as opposed to the pre-defined bookmarks located under the Insert menu This function will make the selected text Bold This function will make the selected text Italicized This function will make the selected text Underlined This function will decrease the indent of a listed item This function will increase the indent of a listed item Fluency Direct – User’s Guide 44 CONTEXT MENU You can access the Context menu by right clicking on any text the Fluency Editor workspace. The Context menu will provide you with available spelling options (if the cursor is placed in a misspelled word. Additional spelling options allow you to Ignore, Ignore All, Correction (this will open the spelling Correction dialog), Undo, Cut, Copy, Paste, Delete, Select All, or Lookup. Lookup option will allow you to search the word online. Fluency Direct – User’s Guide 45 EDITOR SPELLCHECKER SPELL CHECK CORRECTION The Fluency Editor offers a built in spell check correction that; you can access spell check by right clicking on the word and selecting Correction. The following window will appear. From here you can select the correct word from the Suggestions box, choose to Ignore a single word or All instances of a word or you can enter a new spelling and click Change. AUTOCOMPLETE The Fluency Editor offers an auto-complete option when typing words. As you are typing the word, suggestions will appear. Click TAB to select the word shown or SHIFT+TAB to see a selection of available words. You can select a word using the arrow keys and pressing ENTER. Fluency Direct – User’s Guide LOOK UP The look-up option allows you to check medications, obtain a definition, or verify correct spelling from a list of online resources. Right click the word and select your online source from the Look up option. 46 Fluency Direct – User’s Guide 47 EDITOR DICTATION COMMANDS The following speech commands are supported in the M*Modal Fluency Editor. There is variable functionality within other word process editors and applications. HELP Click F1 from the Fluency Direct application to access the context sensitive help. SELECTING AND CORRECTING SAY THIS… TO DO THIS… select <word sequence> Select a word or group of words; 5 word limit, including punctuation correct <word sequence> select <word> through <word> Correct a word or group of words Select the text beginning with the first word spoken through to the last word spoken. Correct the text beginning with the first word spoken through to the last word spoken. Select all text in the entire document. correct <word> through <word> select all NOTE… CDS Live will find exact matches, as well as any related match. It will select the first available instance after the cursor. FOLLOW-UP SELECTION SAY THIS… select next select next one next one select previous select previous one previous one select next <n> words select previous <n> words save this text TO DO THIS… NOTE… Select the next instance of the currently selected text. Can be used with:Sentence, List Item, Paragraph, or Line.This command requires the use of “Select Current <x>” first. Select the previous instance of the currently selected Can be used with:Sentence, List Item, text. Paragraph, or LineThis command requires the use of “Select Current <x>” first. Select the number of words (between 2 and 9, including Cannot use the Next One commands punctuation) to the right of the cursor. in conjunction with this command. The cursor must be at the beginning or end of a word to use this command properly. Select the number of words (between 2 and 9, including Cannot use the Previous One punctuation) to the left of the cursor. commands in conjunction with this command. Brings up a selection box that allows the user to add a new text snippet command. The cursor must be at the beginning or end of a word to use this command properly. There is no limit to how many text snippets can be created. There is a large limit (32,766 characters) for a single text snippet. Larger text snippets may see a minor delay when pasting into the target application. Fluency Direct – User’s Guide 48 CLEAR SELECTION SAY THIS… TO DO THIS… clear selection Clear the selected text. unselect text unselect that Deselect the selected text. Deselect the selected text. NOTE… Cursor will be positioned at the end of the selection, once cleared. LIST SAY THIS… TO DO THIS… item <n> <word sequence> item number <n> <word sequence> <word sequence> next item <word sequence> NOTE… Begin a list at the current cursor position with the first list item. Begin a list at the current cursor position with the first list item. Begin a list at the current cursor position with the first list item. Continue with Item <n> until complete. Continue with Item Number <n> until complete. Next Item command continues the list. LINE AND PARAGRAPH SAY THIS… new line/paragraph next line/paragraph select current sentence/paragraph TO DO THIS… Start selected text on a new line/paragraph or create a new line/paragraph at the current cursor position Move to the next line/paragraph following the current line/paragraph. Select the current sentence/paragraph in which the cursor is currently positioned. UNDOING AND DELETING SAY THIS… delete selection delete current selection TO DO THIS… Delete the currently selected text. Deletes the entire sentence in which the cursor is currently positioned. delete next <n> words Delete a specified number (between 2 and 10 words, including punctuation) of words to the right of the cursor position. delete previous <n> words Delete a specified number (between 2 and 10 words, including punctuation) of words to the left of the cursor position. undo that Undoes the last utterance or command spoken. undo last undo last command NOTE… . All delete commands ensure proper spacing and case at the location of the deletion. delete current sentence If the cursor is positioned within a word, it will use that word as the first word. If the cursor is positioned within a word, it will use that word as the first word. It is important to note that not all commands can be undone, specifically commands concerning selection or navigation. CAPITALIZING SAY THIS… TO DO THIS… NOTE… lowercase/no caps selection lowercase/no caps next <n> words Turns current selection into lowercased text Lowercases the sequence of <n> tokens to the left Can select between 2 and 10 words, of the current cursor position including punctuation lowercase/no caps previous <n> words Lowercases the sequence of <n> tokens to the Can select between 2 and 10 words, right of the current cursor position including punctuation uppercase/all caps selection Turns current selection into uppercased text uppercase/all caps next <n> words Uppercases the sequence of <n> tokens to the left Can select between 2 and 10 words, of the current cursor position including punctuation uppercase/all caps previous <n> words Uppercases the sequence of <n> tokens to the Can select between 2 and 10 words, right of the current cursor position including punctuation all caps on Dictation following this command will be capitalized until turned off. all caps off This command will turn off the All Caps On command. EDITING AND FORMATTING TEXT SAY THIS… TO DO THIS… NOTE… Fluency Direct – User’s Guide SAY THIS… TO DO THIS… boldface selection boldface next <n> words boldface previous <n> words italicize selection italicize next <n> words 49 NOTE… Turns current selection into boldfaced text Boldfaces the sequence of <n> tokens to the left of the current cursor position Boldfaces the sequence of <n> tokens to the right of the current cursor position Turns current selection into italicized text Italicizes the sequence of <n> tokens to the right of the current cursor position italicize previous <n> Italicizes the sequence of <n> tokens to the left of the current words cursor position underline selection Turns current selection into underlined text underline next <n> Underlines the sequence of <n> tokens to the left of the words current cursor position underline previous <n> Underlines the sequence of <n> tokens to the right of the words current cursor position Can select between 2 and 10 words, including punctuation Can select between 2 and 10 words, including punctuation Can select between 2 and 10 words, including punctuation Can select between 2 and 10 words, including punctuation Can select between 2 and 10 words, including punctuation Can select between 2 and 10 words, including punctuation NAVIGATING THE DOCUMENT SAY THIS… scroll up scroll down insert after <word> insert after <word sequence> insert before <word> insert before <word sequence> go to <start/begin/beginning> of <sentence/paragraph> move to <start/begin/beginning> of <sentence/line/paragraph> go to <end/ending> of <sentence/line/paragraph> move to <end/ending> of <sentence/line/paragraph> next field previous field TO DO THIS… Scrolls up Scrolls down Places cursor after the given word in insert mode Places cursor after the given word sequence in insert mode Places cursor before the given word in insert mode Places cursor before the given word in insert mode Places cursor at the beginning of the current sentence, paragraph, or list Places cursor at the beginning of the current sentence, line, paragraph, or list Places cursor at the end of the current sentence, line, paragraph, or list Places cursor at the end of the current sentence, line, paragraph, or list Moves to the next field in the document. If at the end of the document, saying Next Field will loop around to the first field in the document. Moves to the previous field in the document. If at the beginning of the document, saying Previous Field will loop around to the last field in the document. COPYING TEXT SAY THIS… Insert Fluency Editor Insert Fluency Editor Here Insert Scratch Pad TO DO THIS… Inserts text from the Fluency Editor to the current application at the point of the cursor. Inserts text from the Fluency Editor to the current application at the point of the cursor. Inserts text from the Fluency Editor to the current application at the point of the cursor. Insert Scratch Pad Inserts text from the Fluency Editor to the current Here application at the point of the cursor. NOTE… Recommended use Previously known as Scratch Pad, the Scratch Pad command will still apply. Previously known as Scratch Pad, the Scratch Pad command will still apply. Fluency Direct – User’s Guide 50 MICROPHONE BUTTON MAPPINGS INTRODUCTION Customizing your Microphone buttons via mappings can be daunting but is an efficient tool for improving dictation practice. You can customize your SpeechMike button to work in specific applications (Fluency Editor), perform specific actions (such as opening the Speech Box), or to perform a series of multiple commands even (Removing all fields, Transferring Text). Please note that if you customize any microphone buttons you need to also define recording behavior. Users will no longer be able to customize the Record, Dictation Only and Command only buttons via the Microphone Setup dialog. It will still be possible to change recording attributes for headsets whenever SpeechMike buttons are mapped to recording through the config file. WORKING WITH THE CONFIG FILE To begin, make a copy of FluencyDirect.exe.config found in the client folder. This should be copied from a successfully working version of Fluency Direct that is already configured. Modify FluencyDirect.exe.config as necessary. The configuration settings below will support both Philips SpeechMikes and Olympus DirectRec Microphones. CommandShortcuts.SpeechMike keys support the mapping to existing commands. The KeyPressShortcuts.SpeechMIke keys support Simulated key presses. It is possible to sequence multiple commands with a single button press by delimiting them with a comma (,): <appSettings> ... <add key="CommandShortcuts.SpeechMike.Record" value="RECORD"/> <add key="CommandShortcuts.SpeechMike.EOL" value="SHOW_SPEECH_BOX"/> <add key="CommandShortcuts.SpeechMike.Overwrite" value="DELETE_CURRENT_SENTENCE"/> <add key="CommandShortcuts.SpeechMike.RwdStart" value="SELECT_PREVIOUS_FIELD"/> <add key="CommandShortcuts.SpeechMike.PlayStopToggle" value="SELECT_NEXT_FIELD"/> <add key="CommandShortcuts.SpeechMike.FwdStart" value=" REMOVE_ALL_FIELDS,TRANSFER_TEXT"/> <add key="CommandShortcuts.SpeechMike.F1" value="CORRECT_SELECTION"/> <add key="CommandShortcuts.SpeechMike.F2" value="SHOW_FLUENCY_EDITOR"/> <add key="CommandShortcuts.SpeechMike.F3" value=""/> <add key="KeyPressShortcuts.SpeechMike.F4" value="{TAB}"/> ... </appSettings> All CommandShortcuts options include: CORRECT_SELECTION - Displays the correction dialog for a currently highlighted word or phrase DELETE_CURRENT_SENTENCE - Deletes the previous sentence (to the left of the cursor) or the sentence surrounding the cursor Fluency Direct – User’s Guide 51 RECORD - User can Dictate and use Commands RECORD_COMMANDS_ONLY - User can only use commands. Dictation will not be recognized. RECORD_DICTATION_ONLY - User can only dictate. Commands only will be recognized REMOVE_ALL_FIELDS - Removes all [] from the current text. SELECT_NEXT - When used after a select XYZ command, will find the next XYZ instance in the text SELECT_PREV - When used after a select XYZ command, will find the previous XYZ instance in the text SELECT_NEXT_FIELD - Will find the next instance of a [bracketed field] in the text SELECT_PREVIOUS_FIELD - Will find the previous instance of a [bracketed field] in the text SELECT_FIRST_FIELD - Will find the first instance of a [bracketed field] in the text SELECT_LAST_FIELD - Will find the last instance of a [bracketed field] in the text SELECT_CURRENT_SENTENCE - Selects the sentence surrounding the cursor SELECT_NEXT_SENTENCE - Selects the next sentence (to the right of the cursor) SELECT_PREVIOUS_SENTENCE - Selects the previous sentence (to the left of the cursor) SELECT_CURRENT_PARAGRAPH - Selects the paragraph surrounding the cursor SELECT_NEXT_PARAGRAPH - Selects the next paragraph (to the right of the cursor) SELECT_PREVIOUS_PARAGRAPH - Selects the previous sentence (to the left of the cursor) SHOW_SPEECH_BOX - Shows the speech box as a modal window. When this value is set, A single press of the button places the dialog in a modal state. The second press of the button is the equivalent to using SHOW_FLOATING_SPEECH_BOX. This will allow the user to have a single button that can be used to cycle the Speech Box window to be either modal or non-modal. SHOW_FLOATING_SPEECH_BOX - Shows the speech box and a non-modal window SHOW_FLUENCY_EDITOR - Show the Fluency Direct Editor TRANSFER_TEXT - Transfer text from the Speech Box back into the text at the previous location of the cursor. Various Keyboard Shortcuts can be supported via KeyPressShortcuts using: {TAB} {ALT} {ENTER} {UP} {DOWN} {LEFT} {RIGHT} {HOME} {END} {PGUP} Fluency Direct – User’s Guide 52 {PGDN} {F1}-{F12} {TAB} !z = Alt + z +z = Shift +z ^z = Control + z !+z = Alt + Shift + z !{TAB} = Alt+ Tab Once the configuration file is tested, you can place it into the Client folder of the installer. When the application is installed, the FluencyDirect.exe.config file will automatically be copied as part of the install. If you are automating an install in another way, then you will need to automate this copy step after the MSI install is completed. Fluency Direct – User’s Guide 53 TROUBLESHOOTING What information do I need if I need to report an error? Timestamp of issue/error Error or warning message if applicable Unexpected/expected behavior Applications running such as EPIC, Word, etc. Description of issue/error Local session log How to obtain local session logs? Windows7 – the logs are located: C:\Users\Windows username \AppData\Local\MModal\DesktopDictationClient\logs XP – the logs are located: C:\Documents and Settings\Windows user name\Local Settings\Application Data\MModal\DesktopDictationClient\logs Sending my feedback to M*Modal and Help Desk If you want to know if there is a more efficient way to do something, have a question, or are experiencing a technical issue, there is a way to provide feedback directly to M*Modal. Click on the control bar (on your name)>Help>Feedback. This feature tracks the last several words and commands you have said and allows you to select where exactly you experienced the issue. One or multiple utterances can be selected by holding down the Ctrl key while clicking your selections. The text box below it lets you explain the issue and/or ask your question.