1
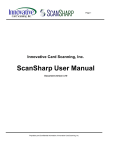
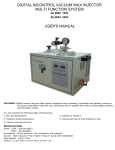
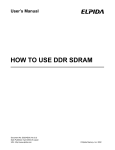
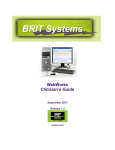
ScanSharp 7 by Inuvio
Contents
Introduction ............................................................................................................................................. 3
Home ............................................................................................................................................................ 3
Scanner Selection ....................................................................................................................................... 3
Scan Settings .............................................................................................................................................. 4
Rotate and Crop ......................................................................................................................................... 4
Saved Preset Configurations ...................................................................................................................... 5
Start/Manual Scan...................................................................................................................................... 5
Save Multipage Documents ....................................................................................................................... 6
Output .......................................................................................................................................................... 7
Save Options............................................................................................................................................... 7
Image Concatenation Options.................................................................................................................... 8
Automatic Printing ..................................................................................................................................... 8
Automatic Copy to Windows Clipboard ..................................................................................................... 9
Remote....................................................................................................................................................... 10
Automatic Upload to FTP Server .............................................................................................................. 10
Automatic E-Fax via Retarus (Requires Outlook) ..................................................................................... 10
Miscellaneous ........................................................................................................................................... 11
License/Product Key ................................................................................................................................. 11
Advanced Options ............................................................................................................................... 12
Home .......................................................................................................................................................... 12
Scan Settings ............................................................................................................................................ 12
Automatic Rotate and Crop...................................................................................................................... 13
Save Multipage Documents ..................................................................................................................... 14
Output ........................................................................................................................................................ 15
Save Options............................................................................................................................................. 15
Automatic Printing ................................................................................................................................... 16
Remote....................................................................................................................................................... 17
Automatic Upload to FTP Server .............................................................................................................. 17
2
ScanSharp 7 by Inuvio
Introduction
ScanSharp 7 is the premier scanning software from Inuvio. Scanning is simple and intuitive in this latest
generation product. We hope that you enjoy the ease of use that was engineered into ScanSharp from
the very beginning. Below we will go over the different options on the Home Screen as well as how to
change the various options.
Home
Scanner Selection
ScanSharp 7 supports a wide variety of TWAIN compliant scanners. Once the driver for the scanner is
installed you will see it in the scanner list. If your scanner does not appear in the list open the drop down
menu and select your scanner. If you still cannot find your scanner you may need to reinstall the driver.
You can also clean and calibrate your scanner if the image quality looks poor.
3
ScanSharp 7 by Inuvio
Scan Settings
If you need full color images, high quality scans, or to scan different types of documents you can edit the
Scan Settings. The Default Settings are Full color, 150 DPI, and Auto Detect Document Size.
Color mode: Allows you to scan in one of three modes: Full color, Grayscale, and Black and White.
DPI: Increases the scanned image quality or decreases it based on the option selected.
Document Size: May be changed to scan full page documents, photos, or business cards.
Duplex: Two-sided scanning. May be enabled or disabled if your scanner supports this function.
Auto Scan: May be enabled or disabled if your scanner supports this function.
The default Scan Settings work with most EMRs.
Rotate and Crop
If you notice that your scanned card/document images are skewed or over-cropped, then try unchecking
(disabling) the appropriate rotate and crop setting. If you would like to edit more settings please see the
Advanced Options section.
4
ScanSharp 7 by Inuvio
Preset Configurations
If you need to setup more than one configuration you can add/edit/delete them in the Configuration
Options tab. Once you have changed the settings (file type, print options, etc) select the “Save New”
option and name your configuration. You can then switch between configurations that you have created
by selecting them in the drop down menu.
Start/Manual Scan
When you turn off the automatic scan feature in Scan Settings (See page 4) you can use the “F5” key on
your keyboard or the “Start Scan” button on the home page to scan a document. If your scanner does
not support automatic scanning this feature is always on.
5
ScanSharp 7 by Inuvio
Save Multipage Documents
If you scanned cards/documents and wanted to create a duplicate PDF of the most recently scanned
images the Save Multipage feature allows for that. It will save a multipage PDF or TIFF file using the
images in the current active tab (either “Images in Folder” or “Scan Batch”). Please note that it will save
the document with the settings you have from the “Save Options” window (see next page).
In order to find which documents you want to save you can use the navigation window in the Bottom
Left corner to go the file location. Once you open the folder with the images you want to create a
document you can select the Save Multipage button and choose to save as PDF or TIFF. You can also edit
the order of the pages by using drag and drop before saving the document. For this and other options
please see the Advanced Options section.
6
ScanSharp 7 by Inuvio
Output
In the Output tab you can change more settings for scanned images such as file types, print options, or
image layouts.
Save Options
Here you can change the file type you want to save the image as and how the file will be named. If you
would like to change the save folder, file name, or PDF settings please see the Advanced Options
section.
7
ScanSharp 7 by Inuvio
Image Concatenation Options
ScanSharp 7 by default merges the front and back of a scanned card into a single image. You can edit
this option to add several cards to one image. Simply select the number of sequential images that you
would like to concatenate (up to 8) and the layout you would like the result to appear in.
Automatic Printing
Scans can automatically be sent to the printer of your choice. In order for scanned images to be printed
the “Send to Printer” option must be selected. For page layout options, please see our Advanced
Options section for more details.
8
ScanSharp 7 by Inuvio
Clipboard
The last scanned image can be automatically copied to the Windows Clipboard. This is just like the
“copy” portion of “copy and paste”. Alternatively, just the last saved image’s file name can be copied to
the Clipboard.
9
ScanSharp 7 by Inuvio
Remote
Automatic Upload to FTP Server
Saved documents can be automatically uploaded to the FTP server of your choice. For extensive
settings, see the Advanced Options section for more details.
Automatic E-Fax via Retarus (Requires Outlook)
Saved documents can be automatically sent as an E-Fax message via Retarus. If you would like to see
support for other E-Fax providers added to ScanSharp, then please contact Inuvio with the details of
your request.
10
ScanSharp 7 by Inuvio
Miscellaneous Options
You can start ScanSharp in “Minimized to System Tray” mode and toggle the option that makes clicking
the “X” in the top right minimize to the system tray instead of closing the application. When this option
is enabled, select “Exit” from the File Menu or the system tray context menu to close ScanSharp 7.
When ScanSharp is minimized and you scan a card or document a preview of the scan displays in the
bottom right corner of your screen. Show Preview Window edits the duration of the preview pop up.
License/Product Key
In ScanSharp 7 if you need to know the license key for support or other inquiries you can click on the File
option in the top left and then select “About” it will open up a window with your key displayed.
11
ScanSharp 7 by Inuvio
Advanced Options
The submenus of several sections are populated with advanced settings and can be opened by clicking
on the arrow in the bottom right corner of the Menu.
Scan Settings (Advanced)
Auto Scan Delay: You can adjust the wait time before auto scanning a document after inserting it in the
scanner.
Batch Timeout: Images scanned in sequence will appear as part of the same Scan Batch, and could be
automatically saved to the same PDF document. You can adjust the wait time before ScanSharp ends
the current Scan Batch and starts a new Batch.
Delay Between Reloads for Auto Scan: You can adjust the minimum amount of time required between
inserting documents to the scanner (this is only useful for a small handful of scanners, so you probably
don’t need it).
12
ScanSharp 7 by Inuvio
Rotate and Crop (Advanced)
If your images seem to have too much cropping or do not need to be cropped at all (full page scans) in
this menu you can edit the settings to match your needs. We recommend leaving Rotate and Crop on for
cards and off for full page document scans.
13
ScanSharp 7 by Inuvio
Save Multipage (Advanced)
If you have previously scanned images or documents and you would like to create a new PDF you can
navigate to the folder location on your PC and save them with the Save Multipage feature.
The red boxes indicate what folder you are currently looking in. The blue box shows what images are in
the folder and the green box shows the images in the order that they will appear once you save the PDF
or TIFF. If you would like to change the order of the images (in the green box) drag the images up and
down. Once you save the images the order will default back to the way they are listed in the folder.
14
ScanSharp 7 by Inuvio
Output
Save Options (Advanced)
The advanced menu allows you to edit the folder location as well as the file name for images you would
like to save. You can also change the file type and if you want the file to be saved as a fixed name, time
stamp, numbered, or unique id.
PDF settings can be edited for documents if you want to add a title, author, subject or keywords. Please
note that if you want a new title to be added then you have to come back to this window and manually
change the title before it is saved to the new document. If you want the scanned images to fit the center
of the page or a percentage of the page select the Scaling Type and then adjust the options accordingly.
These settings apply to the whole document before it is saved.
15
ScanSharp 7 by Inuvio
Automatic Printing (Advanced)
Automatic Printing settings can be edited further to resize the image scanned, the orientation, and
paper size. In order to edit the settings “Send to Printer” needs to be enabled.
16
ScanSharp 7 by Inuvio
Remote
Automatic Upload to FTP Server (Advanced)
Here you can change file save settings if you would like to upload the scanned images to a FTP server.
17