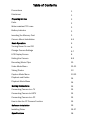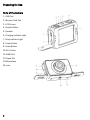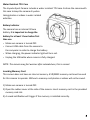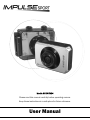
1
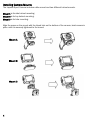
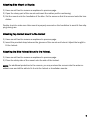
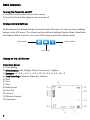
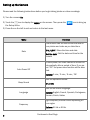
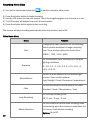
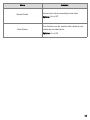
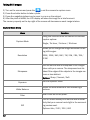
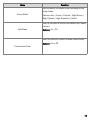
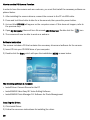
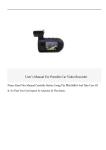
Model: SHDV-5004 Please read this manual carefully before operating camera. Keep these instructions in a safe place for future reference. User Manual Table of Contents Precautions 1 Disclaimer 1 Preparing for Use 2 Parts 2 Water resistant TPU case 3 Battery Indicator 3 Inserting the Memory Card 3 Camera Mount Installation 4-5 Basic Operation 6 Turning Power On and Off 6 Change Camera Settings 6-7 LCD Display Screen 8 Setting the Camera 8-9 Recording Movie Clips 10 Video Mode Menu 10-11 Taking Photos 12 Capture Mode Menu 12-13 Playback and Delete 14 Playback Mode Menu 14 Making Connections 15 Connecting Camera to a TV 15 Connecting Camera to HDTV 15 Connecting Camera to a PC 15 How to Use the PC Camera Function 15 Software Installation 16 Installing Driver 16-17 Specifications 18 Precautions Before using the Impulse Sport Camera, please make sure that you read and understand the safety precautions described below to ensure the camera is operates correctly. Do not point the camera directly into the sun or other intense light sources that could damage your eyesight. Do not try to open the case of the camera or attempt to modify the camera in any way. Maintenance and repairs should be done only by authorized service providers. Keep the camera and its accessories out of reach of children and pets to prevent accidents or damage to the camera. If you notice smoke or a strange odor coming from the camera, turn the power off immediately. Take the camera to the nearest authorized service center for repair. Do not attempt to repair the camera yourself. Use only the recommended power accessories. Use of power sources not expressly recommended for this camera may lead to overheating, distortion, fire, electrical shock or other hazards. Disclaimer We assume no responsibility for damages suffered by the user or third parties as a result of inappropriate handling of the product or its accessories. We reserve the right to make changes to this product and its accessories without prior notice. The photos included in this manual are only for reference. 1 Preparing for Use Parts of the Camera 1. USB Port 2. Memory Card Slot 3. LCD Screen 4. Shutter Button 5. Speaker 6. Charging Indicator Light 7. Busy Indicator Light 8. Power Button 9. Reset Button 10.AV Out Jack 11.HDMI Port 12.Tripod Slot 13.Microphone 14.Lens 2 Water Resistant TPU Case The Impulse Sport Camera includes a water resistant TPU case. Enclose the camera with this case to keep the camera dry when taking photos or videos in water related activities. Battery Indicator The camera has an internal lithium battery. It is important to charge the battery for at least 1 hour before first time use. Make sure camera is turned OFF. Connect USB cable from the camera to the computer in order to charge the battery. When charging, the power indicator light will turn red. Unplug the USB cable when camera is fully charged. NOTE: The camera may feel warmer after extended use; this is normal. Inserting Memory Card This camera does not have an internal memory. A SD/MMC memory card must be used for this camera to operate. Without a memory card photos or videos will not be saved. 1) Make sure camera is turned OFF. 2) Open the rubber cover at the side of the camera. Insert memory card in the provided memory card slot. 3) A sound notification will trigger if the memory is installed correctly. 3 Installing Camera Mounts The Impulse Sport Camera includes a bike mount and two different helmet mounts. Mount A is for side helmet mounting. Mount B is for top helmet mounting. Mount C is for bike mounting. Align the screw on the mount with the tripod hole on the bottom of the camera, twist camera in place until it is securely tightened to the mount. Mount A Mount B Mount C 4 Attaching Bike Mount to Bicycle: 1) Have mount fixed to camera as explained in previous page. 2) Open the clamp part of the mount and insert the rubber pad for cushioning. 3) Set the mount onto the handlebar of the bike. Fix the screw so that it is secured onto the handlebar. Double check to make sure bike mount is properly secured on the handlebar to avoid it from slipping during use. Attaching Top Helmet Mount to the Helmet 1) Have mount fixed to camera as explained in previous page. 2) Insert the provided strap between the grooves of the mount and helmet. Adjust the length to fit the helmet. Attaching the Side Helmet Mount to the Helmet. 1) Have mount fixed to camera as explained in previous page. 2) Place the sticky side of the mount onto the side of the helmet. NOTE: For additional protection to the camera, you may enclose the camera into the water resistant case and still be able to fix it onto the helmet or handlebar mounts. 5 Basic Operation Turning the Power On and Off 1) Press the Power button to turn on the camera. 2) Press the Power button again to turn the power off. Change Camera Settings Switch between the settings through the touchscreen LCD screen. The current camera settings appear on the LCD screen. The camera has three different settings: Capture Mode, Video Mode, and Playback Mode. Touch the icon on the LCD screen to select the desired setting. Capture Mode Playback Mode Video Mode Display on the LCD Screen Video Mode Screen 1) Video Setting 2) White Balance: Auto, Daylight, Cloudy, Fluorescent, Tungsten 3) Exposure: +2, +1.6, +1.3, +1, +0.6, +0.3, -0.3, -0.6, -1, -1.3, -1.6, --2 4) Loop Recording: 5 Minutes, 3 Minutes, 1 Minute 5) Start 6) Time 7) Date 8) Battery Level 9) Zoom Out 10) Zoom In 11) Memory Capacity 12) Resolution 6 Capture Mode Screen 1) Capture Setting 2) White Balance 3) Exposure 4) Start 5) Time 6) Date 7) Battery Level 8) Zoom Out 9) Zoom In 10) Memory Capacity 11) Continue Shot 12) Self Timer: 10s, 5s, 2s, Single 13) ISO: Auto, 100, 200, 400 14) Scene: Portrait, Night Scenery, Night Portrait, High Sensitivity, Beach, Auto, Scenery. 15) Quality: Normal, Fine, Super Fine 16) Resolution: 12M, 10M, 9M, 8M, 7M, 5M, 3M, 2M, 1.3M Playback Mode Screen 1) Playback Setting 9) Sequence of Current File/Total Number of Recorder Files 2) Video Mode 10) Resolution 3) Capture Mode 4) Menu 5) Start 6) Battery Level 7) Zoom In 8) Zoom Out 7 Setting up the Camera Please read the following instructions before you begin taking photos or video recordings. 1) Turn the camera On. 2) Touch the icon to display the MENU on the screen. Then press the the Setup menu. 3) Press the on the left to exit and return to the last menu. Menu icon to bring up Function This function can be used to add the date to your photos and video as you take them. Date (ON) / (OFF): Show the time and date (Set the date): Set the date and time for the camera Auto Power Off To save power, the video camera is turned off automatically after a period of time. If you select “Off” the power save function will be disabled. Options: 1 min / 3 min / 6 min / Off Sets the operation sound: Beep Sound (On / Off) Sets the on-screen language. Language Frequency Options: English, French, Spanish, Portuguese, German, Dutch, Italian Light frequency should be set depending on your region Options: 50 Hz or 60 Hz 8 Continues to Next Page Setting up the Camera Menu TV Mode Function You can review the photos on a television with the supplied AV cable. TV Out should be set to either NTSC or PAL depending on your region. NTSC: America, Japan, and others PAL: Europe, Oceania, and others Format your SD card, removing the SD card during formatting may damage the card. Format Options: Ok or Cancel Restores the camera to its default settings: Default Setting Options: Ok or Cancel 9 Recording Movie Clips 1) Turn on the camera and press the 2) 3) 4) 5) to set the camera to video mode. Press the shutter button to begin recording. Use the LCD screen to view your subject. Touch the magnifying glass icon to zoom in or out. The LCD screen will display how much it has recorded. Press the shutter button again to stop recording. The camera will stop recording automatically when the memory card is full. Video Mode Menu Menu Size Function Changing the video resolution for the recording. Select smaller resolution for longer recording time. There are four options to choose from: 1080P / 720P / VGA / QVGA Set the exposure value manually to fix unusual lighting conditions: Exposure White Balance -2, -1.6, -1.3, -1, -0.6, -0.3, 0, +0.3, +0.6, +1, +1.3, +1.6, +2 Adjust the white balance to suit different light sources. There are five options: Auto, Daylight, Cloudy, Fluorescent, Incandescent Set the color effect to a color tone to the video: Color Standard / Sepia / Monochrome / Vivid Set the loop recording time: Loop Recording Motion Detection Off / 1 min / 3 min / 5 min Set the camera to exit the video recording mode automatically when the camera is motionless, but if it moves, it will resume recording. Options: On or Off 10 Menu Record Audio Date Stamp Function Record voice when recording movie clips. Options: On or Off This function can be used to add a date to your photos as you take them. Options: On or Off 11 Taking Still Images 1) Turn on the camera and press the to set the camera to capture more. 2) Press the shutter button to take a photo. 3) Press the magnifying glass icon to zoom in or our on the subject. 4) After the photo is taken, the LCD display will show the image for a brief moment. The memory capacity on the top right of the screen will decrease as each image is taken. Capture Mode Menu Menu Capture Mode Function Using this function to set the camera to different capture options: Single / 2s timer / 5s timer / 10s timer Allows you to change the image resolution for taking still images: Resolution Sharpness 12M / 10M / 9M / 8M / 7M / 5M / 3M / 2M / 1.3M You can set the level of sharpness in the images taken with your camera. The sharpness level dictates if the edges of the objects in the images are more or less distinct. Options: Sharp / Normal / Soft Exposure White Balance Color ISO Set the exposure value Adjust the white balance to suit different light sources. Add a color ton to the photo. The ISO menu allows you to set the level of sensitivity that your camera has to light in the surrounding environment. Options: Auto / 100 / 200 / 400 12 Menu Function You can select the scene mode according to the photo taken. Scene Mode Options: Auto / Scene / Portrait / Night Scene / Night Portrait / High Sensitivity / Beach Use the function to reduce blur caused by a shaky camera. Anti-Shake Options: On / Off Use this function to take 6 photos consecutively. Options: On or Off Consecutive Shots 13 Playback and Delete 1) Turn on the camera and press the to set the camera to playback mode. 2) Swipe your finger right or left to view the photos and video files. 3) Press the shutter button or press the icon to start playing the video file. 4) Press the shutter button or the same icon in the previous step to pause the video. 5) You may press the icon to stop playing the video file. When viewing the photos, you can touch the magnifying glass icons to zoom in or out of the photos. When zooming in the image, you can swipe your finger across the screen to see the details of the images. You cannot use the menu when zoomed in until you go back to the original size. Menu Function Use this function to delete a single file or all files. Delete Options: Delete Current Image / Delete All Images / Cancel Use this function to rotate images. Rotate Options: 90°, 180°, 270°, Cancel Use this function to protect the files from being deleted by accident. Protect Picture Bridge Options: Lock Current / Unlock Current / Lock All / Unlock All Use this function to print a picture without a computer. Make sure you have a printer that supports picture bridge function and then connect it to the camera via USB cable. Options: Print / Cancel 14 Making Connections Connecting Camera to the TV 1. 2. 3. 4. Plug-in the provided cable to the TV-OUT outlet on the TV to the camera’s AV out jack. The LCD screen will turn black. Find the correct mode on your TV to view the images from the camera on the TV. When the camera is set to record mode, you can preview the subjects you want to record on the TV screen. 5. When the camera is set to playback mode, you can review all the photos and videos stored in the camera on the TV. Connecting Camera to a HDTV 1) Connect the camera to the HDTV using an HDMI cable (not included) 2) Turn on the TV and switch to the HDMI mode. 3) Turn on the camera and set it to playback mode. Connecting Camera to PC There are two ways to download files from the camera. 1) Insert the memory card into a card reader. 2) Connect camera via supplied USB cable. Using a Card Reader 1) Eject the memory card from the camera and insert it in the card reader connected to the PC. 2) Open My Computer, and double-click the removable disk icon that represents the memory card. 3) Copy images from the card into a directory of your choice on the computer’s hard disk. Connecting the Camera to a PC with the USB Cable 1) Connect the supplied USB cable to the computer’s USB port and turn on the camera. 2) When connected to the computer, a Mass Storage window will appear on the screen. 3) Navigate to My Computer, followed by Removable Disk. View the files stored in the camera in the folder titled DCIM. 4) Copy the photos or files to your computer. 15 How to use the PC Camera Function In order to have the camera work as a webcam, you must first install the necessary software explained below. 1. After installing the camera drivers, connect the camera to the PC via USB cable. 2. Press and hold the shutter button for a few seconds, then press the power button. 3. An icon titled PC CAM will appear on the computer screen. If this does not happen, refer to the previous step. 4. Open My Computer, there will be a file named USB Video Tool. Double click the icon 5. The camera will now be able to work as a webcam. Software Installation The camera includes a CD that contains the necessary drivers and software for the camera. 1) Insert CD into your CD-ROM drive of your computer. 2) Double-click the Start, which will open the installation MENU as seen below: The following software is included: Install Driver: Camera Drivers for the PC Install MAGIX Video Easy SE: Video Editing Software Install MAGIX Photo Manager 10: Software for Photo Management Installing the Driver: 1) Click Install Driver. 2) Follow the on-screen instructions for installing the driver. 16 Notes: When using MAGIX Video Easy SE or MAGIX Photo Manager 10, make sure you register the product first for complete access of the programs. Make sure you have QuickTime Player installed on your computer. MAGIX Video Easy SE and MAGIX Photo Manager 10 are only compatible with Windows XP, Windows Vista, and Windows 7 operating systems. 17 Specifications Sensor 5 MegaPixel CMOS LCD Display 2.0” TFT Touch Screen Lens F/3.2. f=7.5mm Shutter Electronic Shutter: 1/2 ~ 1/800 sec Angle of Lens 120° Resolution Still Image: 12M / 10M / 9M / 8M / 7M / 5M / 3M / 2M / 1.3M Video: 1080P / 720P / VGA / QVGA White Balance Auto / Daylight / Cloudy / Incandescent / Fluorescent Exposure -2.0 ~ +2.0EV Continual Shot 6 Frames per shot ISO ISO Auto / 100 / 200 / 400 Sharpness Sharp / Normal / Soft Storage External Memory: SC/MMC (Up to 32GB) HDMI OUT HDMI Power Li-ion Battery (2*350mAh) Ambient Temperature Operating: 0° to 104°F Storage: -4° to 140°F Microphone Built-in Speaker Built-in Dimension 71.8x6x31(mm) Weight About 75 g 18