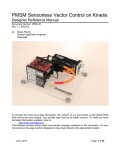
1
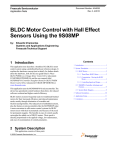
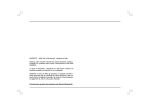
3-Phase BLDC Sensorless Control using MCF51AG128 Design Reference Manual Devices Supported: MCF51AG128 MCF51AG96 Document Number: DRM123 Rev. 0 05/2011 How to Reach Us: Home Page: www.freescale.com E-mail: [email protected] USA/Europe or Locations Not Listed: Freescale Semiconductor Technical Information Center, CH370 1300 N. Alma School Road Chandler, Arizona 85224 +1-800-521-6274 or +1-480-768-2130 [email protected] Europe, Middle East, and Africa: Freescale Halbleiter Deutschland GmbH Technical Information Center Schatzbogen 7 81829 Muenchen, Germany +44 1296 380 456 (English) +46 8 52200080 (English) +49 89 92103 559 (German) +33 1 69 35 48 48 (French) [email protected] Japan: Freescale Semiconductor Japan Ltd. Headquarters ARCO Tower 15F 1-8-1, Shimo-Meguro, Meguro-ku, Tokyo 153-0064, Japan 0120 191014 or +81 3 5437 9125 [email protected] Asia/Pacific: Freescale Semiconductor China Ltd. Exchange Building 23F No. 118 Jianguo Road Chaoyang District Beijing 100022 China +86 10 5879 8000 [email protected] For Literature Requests Only: Freescale Semiconductor Literature Distribution Center 1-800-441-2447 or 303-675-2140 Fax: 303-675-2150 [email protected] Information in this document is provided solely to enable system and software implementers to use Freescale Semiconductor products. There are no express or implied copyright licenses granted hereunder to design or fabricate any integrated circuits or integrated circuits based on the information in this document. Freescale Semiconductor reserves the right to make changes without further notice to any products herein. Freescale Semiconductor makes no warranty, representation or guarantee regarding the suitability of its products for any particular purpose, nor does Freescale Semiconductor assume any liability arising out of the application or use of any product or circuit, and specifically disclaims any and all liability, including without limitation consequential or incidental damages. “Typical” parameters that may be provided in Freescale Semiconductor data sheets and/or specifications can and do vary in different applications and actual performance may vary over time. All operating parameters, including “Typicals”, must be validated for each customer application by customer’s technical experts. Freescale Semiconductor does not convey any license under its patent rights nor the rights of others. Freescale Semiconductor products are not designed, intended, or authorized for use as components in systems intended for surgical implant into the body, or other applications intended to support or sustain life, or for any other application in which the failure of the Freescale Semiconductor product could create a situation where personal injury or death may occur. Should Buyer purchase or use Freescale Semiconductor products for any such unintended or unauthorized application, Buyer shall indemnify and hold Freescale Semiconductor and its officers, employees, subsidiaries, affiliates, and distributors harmless against all claims, costs, damages, and expenses, and reasonable attorney fees arising out of, directly or indirectly, any claim of personal injury or death associated with such unintended or unauthorized use, even if such claim alleges that Freescale Semiconductor was negligent regarding the design or manufacture of the part. Freescale™ and the Freescale logo are trademarks of Freescale Semiconductor, Inc. The ARM POWERED logo is a registered trademark of ARM Limited. ARM7TDMI-S is a trademark of ARM Limited. Java and all other Java-based marks are trademarks or registered trademarks of Sun Microsystems, Inc. in the U.S. and other countries. The PowerPC name is a trademark of IBM Corp. and is used under license.The described product contains a PowerPC processor core. The PowerPC name is a trademark of IBM Corp. and used under license. The described product is a PowerPC microprocessor. The PowerPC name is a trademark of IBM Corp. and is used under license. The described product is a PowerPC microprocessor core. The PowerPC name is a trademark of IBM Corp. and is used under license. All other product or service names are the property of their respective owners. © Freescale Semiconductor, Inc. 2011. All rights reserved. DRM123 Rev. 0 05/2011 Chapter 1 Introduction 1.1 1.2 1.3 1.4 1.5 Introduction . . . . . . . . . . . . . . . . . . . . . . . . . . . . . . . . . . . . . . . . . . . . . . . . . . . . . . . . . . Freescale MCF51AG128 Advantages and Features . . . . . . . . . . . . . . . . . . . . . . . . . . . Software Listing . . . . . . . . . . . . . . . . . . . . . . . . . . . . . . . . . . . . . . . . . . . . . . . . . . . . . . . Microcontroller Memory and Peripheral Usage . . . . . . . . . . . . . . . . . . . . . . . . . . . . . . . Bibliography . . . . . . . . . . . . . . . . . . . . . . . . . . . . . . . . . . . . . . . . . . . . . . . . . . . . . . . . . . 1.5.1 Acronyms and Abbreviations . . . . . . . . . . . . . . . . . . . . . . . . . . . . . . . . . . . . . . 1.5.2 Glossary of Symbols . . . . . . . . . . . . . . . . . . . . . . . . . . . . . . . . . . . . . . . . . . . . . 1-1 1-2 1-4 1-5 1-6 1-6 1-7 Chapter 2 Control Theory 2.1 2.2 Brushless DC Motor (BLDC Motor) . . . . . . . . . . . . . . . . . . . . . . . . . . . . . . . . . . . . . . . . Mathematical Description of a Brushless DC Motor . . . . . . . . . . . . . . . . . . . . . . . . . . . 2.2.1 Power Stage - Motor System Model . . . . . . . . . . . . . . . . . . . . . . . . . . . . . . . . . 2.2.2 Back-EMF Sensing . . . . . . . . . . . . . . . . . . . . . . . . . . . . . . . . . . . . . . . . . . . . . . 2-1 2-4 2-4 2-4 Chapter 3 System Concept 3.1 3.2 3.3 System Specification . . . . . . . . . . . . . . . . . . . . . . . . . . . . . . . . . . . . . . . . . . . . . . . . . . . Sensorless Drive Concept . . . . . . . . . . . . . . . . . . . . . . . . . . . . . . . . . . . . . . . . . . . . . . . System Blocks Concept . . . . . . . . . . . . . . . . . . . . . . . . . . . . . . . . . . . . . . . . . . . . . . . . . 3.3.1 PWM Voltage Generation for a Brushless DC Motor . . . . . . . . . . . . . . . . . . . . 3.3.2 ADC Sampling Mechanism . . . . . . . . . . . . . . . . . . . . . . . . . . . . . . . . . . . . . . . . 3.3.3 Back-EMF Zero-Crossing Sensing . . . . . . . . . . . . . . . . . . . . . . . . . . . . . . . . . . 3.3.4 Current (Torque) Sensing . . . . . . . . . . . . . . . . . . . . . . . . . . . . . . . . . . . . . . . . . 3.3.5 Sensorless Commutation Control . . . . . . . . . . . . . . . . . . . . . . . . . . . . . . . . . . . 3-1 3-2 3-3 3-3 3-6 3-8 3-9 3-9 Chapter 4 Hardware 4.1 4.2 Hardware Implementation . . . . . . . . . . . . . . . . . . . . . . . . . . . . . . . . . . . . . . . . . . . . . . . Component Descriptions . . . . . . . . . . . . . . . . . . . . . . . . . . . . . . . . . . . . . . . . . . . . . . . . 4.2.1 3-phase Motor Control Drive with MCF51AG128 Daughter Board . . . . . . . . . . 4.2.2 Motor LINIX 45ZWN24-40 . . . . . . . . . . . . . . . . . . . . . . . . . . . . . . . . . . . . . . . . 4-1 4-2 4-2 4-3 Chapter 5 Software Design 5.1 5.2 5.3 5.4 Introduction . . . . . . . . . . . . . . . . . . . . . . . . . . . . . . . . . . . . . . . . . . . . . . . . . . . . . . . . . . Main Software Flow Chart . . . . . . . . . . . . . . . . . . . . . . . . . . . . . . . . . . . . . . . . . . . . . . . Data Flow . . . . . . . . . . . . . . . . . . . . . . . . . . . . . . . . . . . . . . . . . . . . . . . . . . . . . . . . . . . . Processes description . . . . . . . . . . . . . . . . . . . . . . . . . . . . . . . . . . . . . . . . . . . . . . . . . . 5.4.1 Process Zero-Crossing detection . . . . . . . . . . . . . . . . . . . . . . . . . . . . . . . . . . . 5.4.2 Process Torque and Speed Calculation . . . . . . . . . . . . . . . . . . . . . . . . . . . . . . 5-1 5-1 5-2 5-3 5-4 5-4 3-Phase BLDC Sensorless Control using MCF51AG128, Rev. 0 Freescale Semiconductor 3 5.4.3 Process Standstill Detection . . . . . . . . . . . . . . . . . . . . . . . . . . . . . . . . . . . . . . . 5-4 5.4.4 Process Commutation . . . . . . . . . . . . . . . . . . . . . . . . . . . . . . . . . . . . . . . . . . . 5-4 5.4.5 Process Manual Interface . . . . . . . . . . . . . . . . . . . . . . . . . . . . . . . . . . . . . . . . . 5-4 5.4.6 Process Application State Machine . . . . . . . . . . . . . . . . . . . . . . . . . . . . . . . . . 5-4 5.4.7 Process Speed and Torque PI Controller . . . . . . . . . . . . . . . . . . . . . . . . . . . . . 5-5 5.4.8 Process Ramp . . . . . . . . . . . . . . . . . . . . . . . . . . . . . . . . . . . . . . . . . . . . . . . . . 5-6 5.4.9 Process FreeMASTER . . . . . . . . . . . . . . . . . . . . . . . . . . . . . . . . . . . . . . . . . . . 5-6 5.4.10 Process PWM Update . . . . . . . . . . . . . . . . . . . . . . . . . . . . . . . . . . . . . . . . . . . 5-7 5.4.11 BLDC motor parameters (BLDCparameters.h) . . . . . . . . . . . . . . . . . . . . . . . . . 5-9 5.4.12 Power stage parameters (LVpowerStage.h) . . . . . . . . . . . . . . . . . . . . . . . . . . 5-12 Chapter 6 Sensorless BLDC Demo Operation 6.1 6.2 6.3 Application Control . . . . . . . . . . . . . . . . . . . . . . . . . . . . . . . . . . . . . . . . . . . . . . . . . . . . BLDC drive operational modes . . . . . . . . . . . . . . . . . . . . . . . . . . . . . . . . . . . . . . . . . . . 6.2.1 Speed operational mode . . . . . . . . . . . . . . . . . . . . . . . . . . . . . . . . . . . . . . . . . . 6.2.2 Torque operational mode . . . . . . . . . . . . . . . . . . . . . . . . . . . . . . . . . . . . . . . . . Manual/Remote Operation . . . . . . . . . . . . . . . . . . . . . . . . . . . . . . . . . . . . . . . . . . . . . . . 6.3.1 Manual Operation . . . . . . . . . . . . . . . . . . . . . . . . . . . . . . . . . . . . . . . . . . . . . . . 6-1 6-1 6-1 6-1 6-2 6-2 3-Phase BLDC Sensorless Control using MCF51AG128, Rev. 0 4 Freescale Semiconductor Chapter 1 Introduction 1.1 Introduction This design reference manual describes the design of a sensorless 3-phase Brushless DC (BLDC) motor drive based on Freescale’s 32-bit MCF51AG128 control device. BLDC motors are very popular in a wide application area. The BLDC motor lacks a commutator and is therefore more reliable than the DC motor. The BLDC motor also has advantages when compared to an AC induction motor. Because it achieves a higher efficiency by generating the rotor magnetic flux with rotor magnets, a BLDC motor is used in high-end white goods (such as refrigerators, washing machines, dishwashers), high-end pumps, fans and in other appliances which require a high reliability and efficiency. The concept of the application is a speed and torque closed-loop BLDC drive using a sensorless BEMF zero crossing technique. It serves as an example of a BLDC motor control design using a Freescale ColdFire V1 Family MCU. This reference design includes basic motor theory, system design concept, hardware implementation, and software design, including the FreeMASTER software visualization tool. 3-Phase BLDC Sensorless Control using MCF51AG128, Rev. 0 Freescale Semiconductor 1 Figure 1-1. Sensorless 3-phase BLDC Motor Demo using an MCF51AG128 1.2 Freescale MCF51AG128 Advantages and Features The MCF51AG family expands the 32-bit ColdFire microcontroller portfolio by offering products with DMA and iEvent modules to handle data transaction and interrupt management, thereby off-loading CPU overhead and increasing overall performance. It also includes functionality important for system safety and integrity, such as an advanced independently clocked COP, external Watchdog monitor and a cyclic redundancy check (CRC) engine providing CLK failure protection and memory content validation for applications covered by regulations such as IEC60730.The MCF51AGx family is designed to be very robust in a variety of environment with very good EMC performance. This family is suitable for smart Appliance (white goods) and Industrial applications, with a peripheral set which is aligned to the needs of advanced 3-phase motor control to improve the overall energy efficiency of the application. For detailed information, follow the MCF51AG128 Reference Manual, by Freescale Semiconductor, Inc., 2010. available from www.freescale.com. The MCF51AG128 incorporates the following specific features: • ColdFire V1 core delivering a 50 MHz core speed and 25 MHz bus speed • 128 KB of on-chip in-circuit programmable flash memory with block protection and security options • 16 KB of on-chip RAM • 4 channel DMA with selectable peripheral sources • iEvent module for peripheral to peripheral triggering with no CPU intervention 3-Phase BLDC Sensorless Control using MCF51AG128, Rev. 0 2 Freescale Semiconductor • • • • • • • • • • • • • • 28-channel,12-bit ADC and PWM Hardware Triggering Two 6-channel, 16-bit flexible timer/PWM modules (FTM) with DMA request option, dead time insertion is available for each complementary channel pair, channels operate as pairs with equal outputs, pairs with complimentary outputs or independent channels (with independent outputs) One 2-channel 16-bit timer/pulse-width modulator (TPM) modules — Selectable input capture, output compare, and edge-aligned PWM capability on each channel — Each timer module may be configured for buffered, centred PWM (CPWM) on all channels Two serial communications interface (SCI) modules, two serial peripheral interfaces (SPI) and one (I2C) module 2 High Speed Analog Comparators (HSCMP) with integrated DAC External voltage monitor (EVM) allowing input level monitoring with selectable trigger point and interrupt generation ICS providing accurate low cost internal clock source Advanced Independently Clocked Watchdog for System Safety Software selectable pull-ups on ports when used as input (selection is on an individual port bit basis; during output mode, pull-ups are disengaged) Software selectable slew rate control on ports when used as inputs Master reset pin and power-on reset (POR) Internal pull-up on RESET and IRQ pins to reduce customer system cost up to 69 general-purpose input/output (I/O) pins 48, 64 and 80-pin low-profile quad flat package (LQFP) and 64-pin quad flat package (QFP) The key peripherals for 3-phase BLDC motor control are the FTM/PWM module, sample synchronization PDB module and an A/D converter. The MCF51AG128 includes two 6-channel FTMs. The 6-channel FTM1 module allows the generation of any PWM pattern for any 3-phase motor control. The FTM main module features include: • FTM has a 16-bit counter — It can be a free-running counter or a counter with an initial and final value — The counting can be up or up-down • A total of six channels: — Each channel may be input capture, output compare, or buffered edge/centre-aligned PWM — Rising-edge, falling-edge, or any-edge input capture trigger — Set, clear, or toggle output compare action — Selectable polarity on PWM outputs — Dead time insertion is available for each complementary pair • Clock source to the prescaler for each FTM is independently selectable as the bus clock, fixed system clock, or an external pin: — Prescaler divide-by 1, 2, 4, 8, 16, 32, 64, or 128 • Generation of triggers (match trigger) 3-Phase BLDC Sensorless Control using MCF51AG128, Rev. 0 Freescale Semiconductor 3 • • • • • Software control of PWM outputs - MASK function Synchronized loading of write buffered FTM registers Up to 4 fault inputs for global fault control One interrupt per channel, plus a terminal count interrupt for each TPM module Testing of input captures for a stuck at zero and one conditions The A/D converter has the following features: • Linear successive approximation algorithm with the maximum 12 bits resolution • Output format in 12-, 10- or 8-bit right-justified format • Selectable asynchronous hardware conversion trigger (PDB, RTC or iEvent0 output) • Can be configured to take two samples (with no software reconfiguration required) based on hardware triggers during ping-pong mode • Single, back-to-back, or continuous conversion (automatic return to idle after single conversion) • Conversion complete flag and interrupt or DMA request • Input voltage values may range from VSSA to VDDA • Up to 28 analog inputs • Configurable sample time and conversion speed/power • Input clock selectable from up to four sources • Operation in wait or stop modes for lower noise operation • Asynchronous clock source for lower noise operation • Temperature sensor The A/D converter is used for evaluation of Back-EMF zero-crossing detection without any external comparators, and for sensing other analogue quantities, which are necessary for BLDC motor control. 1.3 Software Listing The code is written in C (Freescale CodeWarrior for HCS08 and ColdFire V1 family). The software consists of these application source code main.c, LVpowerStage.c, MCUinit.c and application header files BLDCparameters.h, LVpowerStage.h a MCUinit.h. The application source file main.c includes the following software routines: • main() - This is the entry point following a Reset. It calls the initialization routines and contains the application state machine. The application source file MCUinit.c includes the following software routines: • ZCdetectBemf_A/B/C_Rising/Falling() - The functions detect the BEMF zero-crossing and set the appropriate commutation time. • App...() The functions which start with App...() are the application state machine functions. • isrVftm1fault_ovf() - This is the over current fault ISR. • isrVtpm3ch0() - This ISR serves the commutation event. • isrVtpm3ch1() - This calculates the speed/torque control loop and updates the PWM duty cycle. 3-Phase BLDC Sensorless Control using MCF51AG128, Rev. 0 4 Freescale Semiconductor • isrVadc() - This serves the ADC end of conversion ISR. After a new BEMF sample it calls the BEMF detection functions. The application source file LVpowerStage.c includes the following software routines: • DelayCPU() - This generates delay for the bootstraps charge. • MC33927Config() - This configures the MC33927 pre-driver. • MC33927ChargeBootstraps() - This function serves the bootstrap capacitors charge. The application header file BLDCparameters.h includes the following application constants (See BLDC motor parameters (BLDCparameters.h)): • main MCU peripherals settings • BLDC motor parameters • alignment state • start state • run state The application header file LVpowerStage.h includes the following application constants (See Power stage parameters (LVpowerStage.h)): • AG128 daughter board pinout • current scale • voltage scale The application header file MCUinit.h includes the following application constants: • application state machine constants • user types definitions 1.4 Microcontroller Memory and Peripheral Usage Table 1-1 shows how much memory is needed to run the 3-phase BLDC sensorless drive (without FreeMASTER) using the MCF51AG128 microcontroller. A significant part of the microcontroller memory is still available for other tasks. Table 1-1. Memory Usage Memory Available (MCF51AG128) Used Flash 128 KB 8.3 KB RAM 16 KB 4000 The MCF51AG128 microcontroller offers many features that simplifies the drive design. Table 1-2 describes the individual available blocks and its usage for the introduced system. 3-Phase BLDC Sensorless Control using MCF51AG128, Rev. 0 Freescale Semiconductor 5 Table 1-2. Modules Usage 1.5 Module available on the MCF51AG128 Purpose Timer FTM1 (6-channel) PWM generation Timer TPM3 (2 channel) Commutation timer (CH0) Control loop timer (CH1) SCI1 FreeMASTER interface SPI1 MC33927 interface ADC DCB voltage/current and BEMF measurement PDB PWM/FTM1 to ADC synchronization Bibliography 1. 3-Phase BLDC/PMSM Low-Voltage Motor Control Drive User’s Manual, LVMCDBLDCPMSMUG, Initial version, by Freescale Semiconductor, Inc., 2009. 2. MCF51AG128 Reference Manual, by Freescale Semiconductor, Inc., 2010. 3. Code Warrior Development Studio for Freescale Microcontrollers V6.2, by Freescale Semiconductor, Inc., 2008. 4. MCF51 General Functions Library User’s Manual, MCF51_GFLIB, Initial version, by Freescale Semiconductor, Inc., 2009. 5. MCF51 Motor Control Library User’s Manual, MCF51_MCLIB, Initial version, by Freescale Semiconductor, Inc., 2009. 6. 3-Phase BLDC Motor Sensorless Control using MC9S08AW60, DRM086, by Freescale Semiconductor, Inc., 2005. 7. 3-Phase BLDC Motor Sensorless Control using MC9S08MP16, DRM117, by Freescale Semiconductor, Inc., 2009. For a current list of documentation, refer to www.freescale.com. 1.5.1 Acronyms and Abbreviations Table 1-3 contains sample acronyms and abbreviations used in this document. Table 1-3. Acronyms and Abbreviated Terms Term Meaning AC Alternating current ADC Analog-to-digital converter ASM Application state machine BDM Background debug mode BEMF Back-electromotive force BLDC Brushless DC motor 3-Phase BLDC Sensorless Control using MCF51AG128, Rev. 0 6 Freescale Semiconductor Table 1-3. Acronyms and Abbreviated Terms (Continued) Term Meaning CCW_DIR Counter-clockwise direction CDC driver USB communications device class COP Computer operating properly (watchdog timer) CW_DIR Clockwise direction DAC Digital-to-analog converter DC Direct current DMA Direct memory access module DRM Design reference manual DT Dead time: a short time that must be inserted between the turning off of one transistor in the inverter half bridge and turning on of the complementary transistor, due to the limited switching speed of the transistors FTM Flextimer module GPIO General-purpose input/output HSCMP High speed comparators module I/O Input/output interfaces between a computer system and the external world — a CPU reads an input to sense the level of an external signal and writes to an output to change the level of an external signal ISR Interrupt Service Routine LED Light-emitting diode MCF51AG128 Freescale 32-bit ColdFire V1 family microcontroller MCU Microcontroller PDB Programmable delay block module PLL Phase-locked loop: a clock generator circuit in which a voltage-controlled oscillator produces an oscillation that is synchronized to a reference signal PWM Pulse-width modulation RPM Revolutions per minute SCI Serial communication interface module: a module that supports asynchronous communication SPI Serial peripheral interface module 1.5.2 Glossary of Symbols Table 1-4 shows a glossary of symbols used in this document. Table 1-4. Glossary of Symbols Term Definition e back EMF voltage i current 3-Phase BLDC Sensorless Control using MCF51AG128, Rev. 0 Freescale Semiconductor 7 Table 1-4. Glossary (Continued)of Symbols Term Definition n speed s switch u/v voltage angular velocity 3-Phase BLDC Sensorless Control using MCF51AG128, Rev. 0 8 Freescale Semiconductor Chapter 2 Control Theory 2.1 Brushless DC Motor (BLDC Motor) The Brushless DC Motor (BLDC Motor) is a rotating electric machine with a 3-phase wound stator; the rotor has surface-mounted permanent magnets. It is also referred to as an electronically commuted motor. There are no brushes on the rotor and the commutation is performed electronically at certain rotor positions. The stator is usually made from magnetic steel sheets. A typical cross section of a BLDC Motor is shown in Figure 2-1. The stator phase windings are inserted in the slots (distributed winding) or it can be wound as one coil onto the magnetic pole. Because the air gap magnetic field is produced by permanent magnets, the rotor magnetic field is constant. The magnetization of the permanent magnets and their displacement on the rotor is chosen so that the Back-EMF (the voltage induced into the stator winding due to rotor movement) shape is trapezoidal. This allows the DC voltage (see Figure 2-2), with a rectangular shape, to be used to create a rotational field with low torque ripples. Stator Stator winding (in slots) Shaft Rotor Air gap Permanent magnets Figure 2-1. BLDC Motor / Cross Section The motor can have more than just one pole-pair per phase. The pole-pair per phase defines the ratio between the electrical revolution and the mechanical revolution. For example, the shown BLDC motor has three pole-pairs per phase, which represents the three electrical revolutions per one mechanical revolution. The rectangular, easy to create, shape of the applied voltage ensures the simplicity of control and drive. However, the rotor position must be known at certain angles in order to align the applied voltage with the 3-Phase BLDC Sensorless Control using MCF51AG128, Rev. 0 Freescale Semiconductor 1 Back-EMF. The alignment between Back-EMF and commutation events is very important. Under this condition the motor behaves as a DC motor and runs at the best working point. Thus, simplicity of control and performance makes the BLDC motor the best choice for low-cost and high-efficiency applications. Voltage 120 120 Phase A Phase B Phase C Electrical angle 30 60 90 120 150 180 210 240 270 300 330 0 30 Figure 2-2. Three Phase Voltage System for BLDC Motor Figure 2-3 shows the number of waveforms, the magnetic flux linkage, the phase Back-EMF voltage and the phase-to-phase Back-EMF voltage. The magnetic flux linkage was measured by calculating the integration phase Back-EMF voltage, which was measured on the non-fed motor terminals of the BLDC motor. As can be seen, the shape of the Back-EMF is approximately trapezoidal and the amplitude is a function of the actual speed. During speed reversal the amplitude is changed and its sign and the phase sequence change too. The filled areas in the tops of the phase Back-EMF voltage waveforms indicate the intervals where the particular phase power stage commutations are conducted. As can be seen, the power switches are cyclically commutated through the six steps. The crossing points of the phase Back-EMF voltages represent the natural commutation points. In a normal operation, the commutation is performed here. Some control techniques lead the commutation by a defined angle in order to control the drive above the PWM voltage control. 3-Phase BLDC Sensorless Control using MCF51AG128, Rev. 0 2 Freescale Semiconductor Phase Magnetic Flux Linkage Psi_A Psi_B Psi_C Ph. A Ph. B Ph. A Atop Btop Ctop Cbot Abot Ph. C Phase Back-EMF Ph. B Ui_A Ui_B Ui_C Ph. C Speed reversal Bbot Acting power switch in the power stage A-A Phase-Phase Back-EMF Ui_AB Ui_BC Ui_CA B-B C-C Figure 2-3. BLDC Motor / Back-EMF and Magnetic Flux 3-Phase BLDC Sensorless Control using MCF51AG128, Rev. 0 Freescale Semiconductor 3 2.2 2.2.1 Mathematical Description of a Brushless DC Motor Power Stage - Motor System Model In order to explain the idea of Back-EMF sensing technique, the basic circuit topology (see Figure 2-4), is provided. 6$W 6%W 6&W 6$E 6%E 6&E 9'&% 5VKXQW % 5V YE /V HE HD YQ HF /V /V 5V YD YE $ 5V & Figure 2-4. Power Stage and Motor Topology The motor-drive model consists of a 3-phase power stage plus a Brushless DC motor. The power for the system is provided by a voltage source (VDCB). Six semiconductor switches (SA/B/C t/b), controlled elsewhere, allow the rectangular voltage waveforms (see Figure 2-2) to be applied. The semiconductor switches and diodes are considered as ideal switches. 2.2.2 Back-EMF Sensing The Back-EMF sensing technique is based on the fact that only two phases of a Brushless DC motor are energized at a time (see Figure 2-5). The third phase is a non-fed phase that can be used to sense the Back-EMF voltage. Let us assume the situation when: • The phase A bottom switch and the phase B top switch are switched on 3-Phase BLDC Sensorless Control using MCF51AG128, Rev. 0 4 Freescale Semiconductor • The phase C is non-fed. No current passes through this phase 6$W 6%W $ 9'&% 5V % 5V /V 6$E /V HD HE L 6%E YQ HF 5VKXQW /V YF 5V & Figure 2-5. Power Stage and Motor Topology for BEMF Sensing From the phase B we can derive the neutral voltage vn: Eqn. 2-1 di v n = R S i + L ----- – e a dt From the phase A we can derive the neutral voltage vn as well: di v n = V DCB – R S i – L ----- – e b dt Eqn. 2-2 When we combine equations Eqn. 2-1 and Eqn. 2-2, the neutral voltage vn is equal: Eqn. 2-3 V DCB e a + e b v n = -------------- – ---------------2 2 The sum of the back EMF voltages is equal to zero in a balanced three phase system: Eqn. 2-4 ea + eb + ec = 0 3-Phase BLDC Sensorless Control using MCF51AG128, Rev. 0 Freescale Semiconductor 5 Incorporating equation into yields: Eqn. 2-5 V DCB e c v n = -------------- + ---2 2 The branch voltage vc can be calculated: Eqn. 2-6 vc = vn + ec The branch voltage vc can be calculated when considering the above equations and : Eqn. 2-7 V DCB e c V DCB 3 v c = -------------- + ---- + e c = -------------- + --- e c 2 2 2 2 At the phase C BEMF zero-crossing, the branch voltage vc is equal to the half of DC bus voltage: Eqn. 2-8 v c_ZC V DCB = -------------2 The Figure 2-6 shows branch and motor phase winding voltages during a 0-360°electrical interval. Shaded rectangles determine the time when the Back-EMF voltage can be sensed during designated intervals. Thus the Back-EMF voltage is obtained and the zero-crossing can be recognized. Figure 2-6. Phase Voltage Waveforms For more detailed information about BEMF sensing see Section 1.5. 3-Phase BLDC Sensorless Control using MCF51AG128, Rev. 0 6 Freescale Semiconductor Chapter 3 System Concept 3.1 System Specification The motor control system is designed to drive a 3-phase Brushless DC Motor (BLDC Motor) in a combined speed/torque closed-loop. The application meets the following performance specifications: • Sensorless Brushless DC Motor Control by Back-EMF zero-crossing sensing • Targeted at the MCF51AGx platform • Running on a low voltage (24 V) 3-phase Motor Control Drive board • Control technique incorporates: — Sensorless control with the combined speed/torque closed-loop — Using an ADC for zero-crossing sensing — Rotation in both directions — Full 4-quadrant operation — Start from any motor position with rotor alignment — Manual interface (Direction switch, Up/Down push button control) — FreeMASTER software control interface (motor run/stop, speed/torque set-up) — FreeMASTER software remote monitor — MCU initialization is done by Device Initialization tool (part of Processor Expert) 3-Phase BLDC Sensorless Control using MCF51AG128, Rev. 0 Freescale Semiconductor 1 3.2 Sensorless Drive Concept The chosen system concept is shown below (Figure 3-1). Figure 3-1. Drive Concept The basic state machine operation of the system is as follows: The background loop executes the application state machine (ASM), consisting of init, stop, alignment, start-up, run and error states. After an MCU reset, the ASM goes through the init state to the stop state. The direction switch and Up/Down buttons are continuously monitored over the GPIO interface. As soon as the user turns the direction switch to the desired direction position, the ASM goes into the alignment state, where the motor is aligned to a known position. After a predefined time the ASM continues to the start-up state. At the start-up state the six commutations are performed without any feedback. The timings among the commutations are defined by START_PERIOD and START_ACCELERATION start-up constants. After the start-up state, the ASM goes into the run state, where zero-crossing is employed and the control loop is closed. During the run state, requests for new speeds and torques are accepted and maintained by the PI controllers. If a standstill of the rotor is detected, the ASM goes again into the alignment state and tries to execute a new start-up sequence. In the case of any fault, the ASM goes into the error state and then into the stop state. The ZC detection process compares the actual BEMF voltage (mf16Bemf_A/B/C) with half of the DC-bus voltage (mf16dcb_V_ZC). The appropriate phase voltage vector is chosen based on sector (ucSector). The ZC detection process defines the time difference between two consecutive BEMF zero-crossings (wActualPeriodZC). The commutation time is given by the compare value of TPM3 module and is calculated as follows: 3-Phase BLDC Sensorless Control using MCF51AG128, Rev. 0 2 Freescale Semiconductor Eqn. 3-1 TPM3C0V = wTimeZC + mf16AdvanceAngle wActualPeriod At every control period, all ZC rising and falling periods are averaged. The sum of these averaged rising and falling periods is given by mf16PeriodFiltered. The actual scaled speed mf16ActualVelocity is calculated as follows: Eqn. 3-2 VELOCITY_CONST_SCALED mf16ActualVelocity = -------------------------------------------------------------------------------------mf16PeriodFiltered For more details about speed constants and scaling see, Section 5.4.11.2. The actual current mf16TorqueFiltered is given by the average of the last six currents (mf16Torque_R/F_PhA/B/C) at the ZC events. Both values are input into the Speed and Current PI controllers as actual values. The required values of the speed and the limitation current thresholds (mf16DesiredVelocity, mf16TorqueRequired) are updated, based on commands from the user. The required speed slope is limited by a ramp to avoid exceeding the maximal motor current. The Speed and Current PI controllers outputs, together with the actual commutation sector, define the duty cycle (wDutyCycle) for the FTM/PWM module. The new duty cycle (wDutyCycle) is a lower output value from the Speed and Current PI controllers (mf16DutyCycleSpeed, mf16DutyCycleTorque). The integral term of the PI controller with the lower duty cycle is assigned to the integral term of the second PI controller. Once a fault condition occurs, the application switches to the Fault state, stops the motor, and waits for the fault reset over the Reset switch. Beyond this, the FreeMASTER interface enables monitoring and adjustment of all system variables. 3.3 3.3.1 System Blocks Concept PWM Voltage Generation for a Brushless DC Motor A 3-phase voltage system as described needs to be created to run the BLDC motor. This is provided by a 3-phase power stage with 6 power switches (IGBT’s or MOSFET’s) controlled by the MCF51AG128 on-chip FTM/PWM module. When generating PWM signals for the BLDC motor control application, the Bottom and Top power switches of the non-fed phase must be switched off. (See Figure 3-2 and Figure 3-3) For the BLDC motor control application, PWM signals can be created in two ways: Complementary PWM Mode and Independent PWM mode. Thanks to the flexible MCF51AG128 FTM/PWM module, both these modes are available. 3.3.1.1 Complementary PWM Mode In complementary PWM mode, the top and bottom switches of a phase are operated complimentarily. This mode has to be used if four quadrant drive operation is required. This mode needs dead time insertion 3-Phase BLDC Sensorless Control using MCF51AG128, Rev. 0 Freescale Semiconductor 3 between the top and bottom switches to avoid any phase short-circuit. The complementary switching can be implemented in both a bipolar or unipolar manner. The unipolar switching leads to lower switching losses and current ripple. However, from a Back-EMF point of view, the bipolar switching is a better choice since this allows having a duty cycle in the range of 50 to 100 %. This significantly simplifies the Back-EMF voltage and current sensing. commutation commutation commutation 120 commutation commutation commutation commutation commutation 60 o o SAt A- Off A - Off SAb A- Off A - Off SBt B- Off B- Off SBb B- Off B- Off SCt C - Off C - Off C- Off SCb C - Off C - Off C- Off Figure 3-2. Complementary Bipolar Switching Patterns for a BLDC Motor 3-Phase BLDC Sensorless Control using MCF51AG128, Rev. 0 4 Freescale Semiconductor commutation commutation commutation 120 commutation commutation commutation commutation commutation 60 o o SAt A - Off A- Off SAb A - Off A- Off SBt B - Off B- Off SBb B - Off B- Off SCt C- Off C- Off C- Off SCb C- Off C- Off C- Off Figure 3-3. Complementary Unipolar Switching Patterns for a BLDC Motor 3.3.1.2 Independent PWM Mode In Independent PWM mode, the top and bottom switches of a phase are operated independently over a commutation period. If a top switch performs a PWM, the bottom switch is off, and vice versa. In this mode, the drive can operate in two quadrants. Again, the bipolar and unipolar switching are available. The use of independent bipolar switching has significant drawbacks. The drive can work with discontinuous or continuos currents. During the transition from discontinuous to continuous current, the drive significantly changes its behavior. This means that the tuning of the speed controller is very difficult, and the drive exhibits low torque at a discontinuous current. Using unipolar switching is also not recommended due to problematic Back-EMF voltage and current sensing at narrow pulses. All of the figures Figure 3-2 - Figure 3-5 show detail of one PWM period for the BLDC motor. Phase A is connected to a positive DC bus voltage, phase B is connected to a negative DC bus voltage. Phase C is non-fed and is not shown. The duty cycle is 50%. 3.3.1.3 Conclusion The complementary bipolar switching is selected for the this sensorless BLDC drive, due to easy implementation of the Back-EMF voltage sensing method and the MCF51AG128 features point of view. The details of the Back-EMF voltage sensing method can be seen in the next chapter. 3-Phase BLDC Sensorless Control using MCF51AG128, Rev. 0 Freescale Semiconductor 5 21 3KDVH$ 3:0 2)) 21 3KDVH$ 3:0 2)) 21 3KDVH% 3:0 2)) 21 3KDVH% 3:0 2)) 3:0SHULRG Figure 3-4. Independent Bipolar Switching Patterns for a BLDC Motor 21 3KDVH$ 3:0 2)) 21 3KDVH$ 3:0 2)) 21 3KDVH% 3:0 2)) 21 3KDVH% 3:0 2)) 3:0SHULRG Figure 3-5. Independent Unipolar Switching Patterns for a BLDC Motor 3.3.2 ADC Sampling Mechanism The power stage PWM switching causes voltage spikes on the phase voltages. These voltage spikes are generated on the non-fed phase because of mutual inductances and mutual capacitor couplings between the motor windings. Non-fed phase “branch” voltage is then disturbed by PWM switching. Figure 3-6 shows the effect on the non-fed phase, because of the mutual inductance. 3-Phase BLDC Sensorless Control using MCF51AG128, Rev. 0 6 Freescale Semiconductor Figure 3-6. Effect of mutual inductance on Back-EMF The non-fed phase “branch” voltage is disturbed at the PWM switching edges. Therefore, the presented BLDC Motor Control application synchronizes the Back-EMF zero-crossing detection with the PWM. The A/D conversion of phase branch voltages is triggered at the end of a PWM pulse. Then the voltage for Back-EMF is sensed at those time moments when the non-fed phase branch voltage is already stabilized. The MCF51AGx is equipped with the Programmable Delay Block (PDB) synchronization of the FTM/PWM and ADC modules. Therefore, several assumptions have to be considered during the ADC sampling implementation. The first factor is the choice of PWM modulation. From this point of view, the complementary bipolar switching is the best choice. This PWM switching can be implemented in such a way that the duty cycle is in the range of 50 to 100 % at any time of motor operation. With unipolar switching, the duty cycle starts from 0 %. It means that there is limitation for ADC sampling at narrow pulses regardless of whether hardware synchronization is available or not. In this case, a different sensing method has to be chosen, where the Back-EMF voltage is compared to zero instead of half DC bus voltage. The right setting for the FTM/PWM module is shown in figure Figure 3-7. The FTM/PWM module is configured to run in complementary combined mode. The PDB module has two times a lower clock, so therefore PDBMOD is two times lower than FTMMOD. The PDB can generate two triggers: TriggerA and TriggerB. The TriggerA is used for DC bus current or voltage measurement in the middle of a PWM On pulse. The DC bus current measurement rotates every PWM period with DC bus voltage measurement. The TriggerB is used for Back-EMF sensing of the non-fed phase. The result of the conversions can be read on the Conversion Complete B interrupt. Since the A/D converter has two result registers, the conversion of more channels can be serviced in the same interrupt. The sampling process can seen in Figure 3-7. 3-Phase BLDC Sensorless Control using MCF51AG128, Rev. 0 Freescale Semiconductor 7 3KDVH$ 3:0 3KDVH$ 3:0 )7002' )703'% &RXQWHU )70&9 3'%02' 3'%'/<$ 3'%'/<% )70&17,1 )70&9 7ULJJHU$ L'&%Y'&% VDPSOH 7ULJJHU% %(0) VDPSOH 5HDG$'& UHVXOWV Figure 3-7. FTM/PWM to ADC Synchronization with PDB 3.3.3 Back-EMF Zero-Crossing Sensing The Back-EMF Zero-Crossing is detected by sensing the motors non-fed phase “branch“ voltage (uvi in Section 2.2.2) and DC-bus voltage ud utilizing the ADC. (Refer to Section 2). To get the right Back-EMF voltage, two assumptions have to be made: • Top and bottom switches (in diagonal) are driven by the same PWM signal • No current is going through the non-fed phase used to sense the Back-EMF The first assumption is achieved by the FTM/PWM module. The FTM/ADC synchronization at the end of PWM ON pulse is done by the PDB module. The second condition can be detected directly from the sensed Back-EMF voltage. As soon as the phase is disconnected from the DC bus, there is still current flowing through the freewheeling diode. The conduction time depends on the momentary load of the motor. In some circumstances, the conduction time is so long that it disallows the detection of Back-EMF voltage. The conduction freewheeling diode connects the released phase to either positive or negative DC bus voltage. The next two steps taken are done to detect current in the non-fed phase: 1. The first three samples after commutation are not considered for Back-EMF voltage detection due to transient event. The freewheeling delay can be changed in the reference design S/W in FREEWHEEL_DLY constant. 2. The Back-EMF samples within the range of 0 to 20 % and 80 to 100 % of the DC bus voltage are ignored. As soon as the Back-EMF voltage falls into the range of 20 to 80% of the DC bus voltage, evaluation of zero-crossing starts. The Back-EMF voltage samples are compared with half DC bus voltage in relation to 3-Phase BLDC Sensorless Control using MCF51AG128, Rev. 0 8 Freescale Semiconductor an expected positive or negative slope. If zero-crossing is recognized, the new period and commutation event is calculated. The zero-crossing detection process can be seen in Figure 3-8. 3:06ZLWFKLQJ ± RI'&%9ROWDJH 3KDVH9ROWDJH %(0)=HUR &URVVLQJ ± RI'&%9ROWDJH W )UHHZKHHOLQJ Figure 3-8. Zero-crossing detection process 3.3.4 Current (Torque) Sensing Besides the speed control, the drive can run in torque control mode. In this mode the torque is limited to the desired value. In BLDC motor theory, it can be seen that the torque is proportional to the motor current. In six step control, the current amplitude varies during the commutation period. To get a stable value as the actual motor torque, the current is sampled at a zero-crossing event. The resultant value is calculated as the average value from the last six commutation periods. So, the acquired value can be used as the actual motor torque for the torque control loop. This value can not be used for current control cycle by cycle. Overcurrent limitation is performed by the MC33927 driver. 3.3.5 Sensorless Commutation Control This section presents sensorless BLDC motor commutation with the Back-EMF Zero-Crossing technique. In order to start and run the BLDC motor, the control algorithm has to go through the following processes: • Alignment • Start-Up • Stabilization • Run Firstly, the rotor is aligned to a known position without the positional feedback. When the rotor moves, the Back-EMF is induced on the non-fed phase and sensorless position detection can be employed. As a result, the position is known and can be used to calculate the speed and process the commutation in the Run state. 3-Phase BLDC Sensorless Control using MCF51AG128, Rev. 0 Freescale Semiconductor 9 3.3.5.1 Alignment The main aim of Alignment is to align the rotor to a known position. This known position is necessary to start rotation in the proper direction and to generate maximal torque during Start-up. During alignment, all three phases are powered. Phase A is connected to the positive DCB voltage, and Phases B and C are connected to the negative DCB voltage. The resultant rotor position gives the same condition for Start up regardless of rotational direction (see Figure 3-9). The alignment time depends on the mechanical constant of the motor including load. The time has to ensure the rotor steady state at the end of the Alignment process. Figure 3-9. Rotor Alignment 3.3.5.2 Start-Up The Back-EMF technique can be used when the rotor is moving. The start-up process ensures the initial rotor movement, followed by Back-EMF evaluation. The start-up process starts immediately after the alignment process. The first flux vector applied on the motor is orthogonal to the alignment flux vector. The right flux vector is chosen based on the required direction of rotation (see Figure 3-9). The flux vector is applied for a period which is defined as a constant value during the drive tuning. The next five flux vectors follow in order to create a rotational field. The period timing of all six periods is given by the following equation: T NEW = START_ACCELERATION T PREVIOUS Eqn. 3-3 The constant START_ACCELERATION has to be less than 1, and a value within range 0.7 to 1 gives an approximately constant acceleration. The initial period START_PERIOD constant has to be tuned based on load inertia. Another way, is to define a start-up table with period timing. 3-Phase BLDC Sensorless Control using MCF51AG128, Rev. 0 10 Freescale Semiconductor The start-up tuning is the heaviest task in the Back-EMF sensorless technique. The tuning difficulty depends on the load type. On a passive load, where the load torque starts at 0 Nm and grows with the motor speed, it is quite easy. A more difficult situation can be observed on drives which have non-zero starting torque or a variable torque within one revolution, such as compressors. If load inertia is variable, the number of starting flux vectors can be changed. A number smaller than six brings about a more robust start-up at variable load inertia, however, a number less than three leads to an unreliable start-up. In other cases, the six starting flux vectors (one electrical revolution) seem to be the optimal value. Once the last flux vector has executed, Back-EMF voltage evaluation is enabled and the motor enters a sensorless mode. 3.3.5.3 Stabilization The stabilization process immediately follows the start-up sequence and is optional. The purpose of this process is to stabilize the measured values. As described in Section 3.3.4, the torque is calculated as the average value from the last six commutations. Also, the speed is calculated in the same manner. Since during the start-up sequence the periods are not too stable, the speed and torque values can be incorrect. Therefore, the stabilization process is executed. This process is for at least six additional periods, where the motor is kept in an open loop. During these additional periods, the speed and torque values are stabilized and the control loop can be closed. 3.3.5.4 Run As soon as the control loops are closed the motor enters the run state. Here, the motor keeps to the desired speed or torque, according to the selected operational mode and user commands. Besides controlling the desired quantity, the motor is checked for a locked rotor. This might happen when the motor is suddenly overloaded. Standstill detection is performed as a comparison of the actual period with the average period. If the difference is too high for a predefined time, a standstill or incorrect commutation is detected. Also, if the actual period does not correspond to the applied voltage on the motor, the error is indicated. In the case of a standstill or incorrect commutation, the motor is stopped and the start-up sequence is repeated. 3-Phase BLDC Sensorless Control using MCF51AG128, Rev. 0 Freescale Semiconductor 11 3-Phase BLDC Sensorless Control using MCF51AG128, Rev. 0 12 Freescale Semiconductor Chapter 4 Hardware 4.1 Hardware Implementation The BLDC sensorless application runs on Freescale’s MCF51AG128 daughter board, 3-phase BLDC/PMSM Low Voltage Motor Control Drive board and a LINIX 45ZWN24-40 motor. For more information, see Section 1.5. NOTE Please note that although this reference design demonstrates the application using low voltage power stages, it can be adapted to high voltage power stages and applications as well. 86% - - 9 5(6(7 %'0 3( 86% 08/7,/,1. - - 67$576723 0&)$* GDXJKWHU ERDUG %/'& 0RWRU /,1,;=:1 83 '2:1 SKDVH%/'&3060/RZ9ROWDJH 0RWRU&RQWURO'ULYHERDUG Figure 4-1. Hardware Diagram with 3-phase BLDC Motor Control Drive board 3-Phase BLDC Sensorless Control using MCF51AG128, Rev. 0 Freescale Semiconductor 1 4.2 4.2.1 Component Descriptions 3-phase Motor Control Drive with MCF51AG128 Daughter Board Freescale’s 3-phase BLDC/PMSM Low Voltage Motor Control Drive is a 12–24 V (50 V optional) DC, 4 A, power stage that, as a main board together with a daughter board, creates a single unit for developing BLDC/PMSM motor-control applications. With one of the available daughter boards, accommodating a selected microcontroller, it provides a ready-made, software-development platform for 3-phase motors. Feedback signals that allow a variety of algorithms to control 3-phase PMSM and BLDC motors are provided. A detailed description, including the hardware specification of the 3-phase BLDC/PMSM Low-Voltage Motor Control Drive board, is located in LVMCDBLDCPMSMUG available from Section 1.5. It contains the schematic of the board, description of individual function blocks, and bill of materials.The board does not need any hardware modification or jumper setting before first usage. Before first usage, the user should pay attention to the correct USB/SCI driver installation. All about the driver installation is also included in the board user’s manual. Figure 4-2. 3-phase Motor Control Drive with MCF51AG128 Daughter Board View 3-Phase BLDC Sensorless Control using MCF51AG128, Rev. 0 2 Freescale Semiconductor 4.2.2 Motor LINIX 45ZWN24-40 The following motor is used by the BLDC Sensorless application. Of course, other motors can also be adapted to the application, just by defining and changing the motor related parameters. A detailed motor specification is shown below. Table 4-1. Main Electrical Parameters of the LINIX 45ZWN24-40 Motor Characteristic Symbol Typ Units Rated Voltage Vt 24 V 4000 RPM Rated Speed @ Vt Rated torque T 0.0924 Nm Rated power P 40 W Terminal Resistance Rt 0.1 Continuous Current Ics 2.34 A Number of Pole Pairs PP 2 3-Phase BLDC Sensorless Control using MCF51AG128, Rev. 0 Freescale Semiconductor 3 3-Phase BLDC Sensorless Control using MCF51AG128, Rev. 0 4 Freescale Semiconductor Chapter 5 Software Design 5.1 Introduction This section describes the design of the drive’s software blocks. The software description comprises these topics: • Main Software Flow Chart • Data Flow 5.2 Main Software Flow Chart The main software flow chart incorporates the main routine (background loop) entered from reset, and the interrupt states. The Main routine includes the initialization of the microcontroller and the main loop. After initialization, the main routine enters an endless loop which executes the application state machine consisting of init, stop, alignment, start-up, run and error states. The transition between the states depends on state of the CCW_DIR/STOP/CW _DIR switch, UP/DOWN buttons and drive status. In the case of remote control, besides the motor speed/torque, the operational mode and the rotation direction can be set from FreeMASTER. The main software flow chart is given in Figure 5-1. Apart from the background loop, the software incorporates the following three periodic and two event interrupts: • FTM 1 Fault Interrupt — Execution period: event interrupt called in the case of overcurrent detection. The routine handles DC bus overcurrent event. • ADC End of Conversion Interrupt — Execution period: called once per 50 s. The routine saves new DC-bus voltage/current and specific BEMF sample, provides zero-crossing detection • TPM 3 Ch0 Compare Interrupt — Execution period: event interrupt called every commutation. The routine updates the commutation sector. • TPM 3 Ch1 Compare Interrupt — Execution period: 5 ms. The routine provides ramp generation, speed/torque PI controllers calculation, standstill detection and manual interface handling (UP/DOWN buttons, CCW_DIR/STOP/CW _DIR switch) 3-Phase BLDC Sensorless Control using MCF51AG128, Rev. 0 Freescale Semiconductor 1 Main (background) Loop INFINITE LOOP Initialize x Peripheral initialization x Application variable initialization Application State Machine - Init state - Stop state - Alignment state - Start-Up State - Stabilization state - Run state - Error state isrVtpm3ch1 isrVadc (TPM3 Ch1 Compare) (ADC End of Conversion) x x x x Ramp generation Speed calculation Torque calculation Torque PI controller calculation x Speed PI controller calculation x Standstill detection x Manual interface handling isrVtpm3ch0 (TPM3 Ch0 Compare) x Updates new commutation sector x Updates PWM x Saves first sample uDC/iDC x Saves second sample BEMF x Zero-crossing detection isrVftm1fault_ovf (FTM1 Fault interrupt) x Overcurrent handling Figure 5-1. Main Software Flow Chart 5.3 Data Flow The Brushless DC motor sensorless control drive control algorithm is described in the data flow charts shown in Figure 5-2. The variables mf16Bemf_A, mf16Bemf_B, mf16Bemf_C, mf16dcb_V and mf16dcb_I contain the results of A/D conversion. The Zero-Crossing Detection process compares the phase voltage with half of the DC bus voltage (mf16dcb_V_ZC). The appropriate phase voltage is chosen based on ucSector, containing the actual commutation sector. The result of the Zero-Crossing Detection process defines the time difference for the next commutation, saved in TPM3C0V. TPM3C0V is the compare value register of TPM3. In addition, individual commutation periods are stored for every commutation in variables wPeriodZC_F_PhA, wPeriodZC_R_PhA, wPeriodZC_F_PhB, wPeriodZC_R_PhB, wPeriodZC_F_PhC, wPeriodZC_R_PhC for further speed calculation. In a similar manner, in every zero-crossing event the value of mf16dcb_I is copied to variables mf16Torque_F_PhA, mf16Torque_R_PhA, mf16Torque_F_PhB, mf16Torque_R_PhB, mf16Torque_F_PhC, mf16Torque_R_PhC. The variable mf16Torque_Filtered is calculated as the average value of variables mf16Torque_F_PhA, mf16Torque_R_PhA, mf16Torque_F_PhB, mf16Torque_R_PhB, mf16Torque_F_PhC, mf16Torque_R_PhC. The commutation period is also filtered from variables wPeriodZC_F_PhA, wPeriodZC_R_PhA, wPeriodZC_F_PhB, wPeriodZC_R_PhB, wPeriodZC_F_PhC, wPeriodZC_R_PhC and recalculated as the motor speed mf16ActualVelocity. Both values input into the Speed and Torque PI Controllers as actual values. The required values mf16DesiredVelocity and mf16TorqueRequired are updated based on commands from the user. The required speed is sloped (mf16SlopedVelocity) by a ramp 3-Phase BLDC Sensorless Control using MCF51AG128, Rev. 0 2 Freescale Semiconductor to avoid exceeding the max. motor current. The resultant Speed and Torque PI Controllers wDutyCycle together with the actual commutation sector ucSector and the required direction of rotation ucDirection, define the duty cycle of every PWM channel. The Application State Machine sets its state appState based on inputs from the Manual Interface, Standstill detection, FreeMASTER interface, and another state variables not mentioned in the main data flow chart. mf16Bemf_A mf16Bemf_B mf16Bemf_C mf16dcb_V mf16dcb_I Zero-Crossing Detection TPM3C0V Commutation Process wPeriodZC_F_PhA wPeriodZC_R_PhA wPeriodZC_F_PhB wPeriodZC_R_PhB wPeriodZC_F_PhC wPeriodZC_R_PhC mf16Torque_F_PhA mf16Torque_R_PhA mf16Torque_F_PhB mf16Torque_R_PhB mf16Torque_F_PhC mf16Torque_R_PhC ucSector Standstill Detection Speed Calculation ucStallError mf16ActualVelocity Manual Interface Process Torque Calculation mf16TorqueFiltered ucDirection Application State Machine Speed and Torque PI Controller appState wDutyCycle mf16DesiredVelocity mf16TorqueRequired FreeMASTER ucControlMode Ramp Process mf16SlopedVelocity PWM Update Figure 5-2. Data Flow Chart 5.4 Processes description The main processes of the Brushless DC motor sensorless drive application can also seen in Figure 5-2. 3-Phase BLDC Sensorless Control using MCF51AG128, Rev. 0 Freescale Semiconductor 3 5.4.1 Process Zero-Crossing detection This process is called every 50 s in the isrVadc interrupt. The process is called after the second A/D conversion, when a new sample of phase voltage/BEMF is available. This new sample is checked for appropriate voltage level and compared to the midpoint of the DC bus voltage. Details of zero-crossing detection are described in Section 3.3.3. If zero-crossing is detected, the new commutation period is calculated and saved for speed calculation. Then the new commutation event is calculated and set to the timer TPM3 channel 0 as a new compare event. 5.4.2 Process Torque and Speed Calculation Both torque and commutation periods are filtered to get suitable input values to the Torque and Speed PI controllers. Both values are calculated as the averages from the last six commutation events. Then the averaged commutation period is recalculated as the motor speed. This process is executed every 5 ms in the isrVtpm3ch1 interrupt. 5.4.3 Process Standstill Detection This process compares all six commutation periods. If the difference between periods is higher than defined, a standstill is detected. It also detects incorrect commutation during start-up or loss of synchronization between commutation sector and sensed Back-EMF voltage. At any error, the motor is stopped and the start-up sequence is repeated. When the standstill detection is enabled, then this process is executed every 5 ms in the isrVtpm3ch1 interrupt. 5.4.4 Process Commutation This process updates the variable ucSector only. The PWM update based on the new commutation sector is performed in the PWM Update process. The commutation process is called on every new commutation event. So the execution period depends on the motor speed. 5.4.5 Process Manual Interface This process checks the state of the input pins where the CCW_DIR/STOP/CW _DIR switch and UP/DOWN buttons are connected. If a change is detected, the particular status bit is set. These status bits are evaluated in the Application State Machine. The process is executed every 5 ms in the isrVtpm3ch1 interrupt. 5.4.6 Process Application State Machine The application state machine (ASM), consists of init, stop, alignment, start-up, stabilization, run and error states (see Figure 5-3). After an MCU reset, the ASM goes through the init state to the stop state. As soon as the user turns the CCW_DIR/STOP/CW_DIR switch to the desired direction position, the ASM goes into the alignment state, where the motor is aligned to a known position. After a predefined time the ASM continues to the start-up state. At the start-up state the six commutations are performed without any feedback. The timings between the commutations are defined by START_PERIOD and START_ACCELERATION. After the start-up state, the ASM goes into the stabilization state, where the 3-Phase BLDC Sensorless Control using MCF51AG128, Rev. 0 4 Freescale Semiconductor measurements of the torque and speed are stabilized. The stabilization state is optional an by default this state is disabled.This state goes through the next six commutations, where zero crossing is already employed. After the stabilization state, the ASM goes into the run state, where the control loop is closed. During the run state, requests for new speeds and torques are accepted and maintained by the PI controllers. If a standstill of the rotor is detected, the ASM goes again into the alignment state and tries to execute a new start-up sequence. In the case of any fault, the ASM goes into the error state and then into the stop state. The ASM is executed in the background loop. Figure 5-3. Application State Machine 5.4.7 Process Speed and Torque PI Controller The general principle of the speed PI control loop is illustrated in Figure 5-4. 3-Phase BLDC Sensorless Control using MCF51AG128, Rev. 0 Freescale Semiconductor 5 $FWXDOVSHHG 'HVLUHGVSHHG 6SHHG 3,FRQWUROOHU 5DPS 'XW\F\FOH & 'HVLUHGFXUUHQW &RQWUROOHG 6\VWHP &XUUHQW 3,FRQWUROOHU $FWXDOFXUUHQW Figure 5-4. Closed-Loop Control System The speed and torque closed-loop control is characterized by the feedback of the actual motor speed and torque. This information is compared with the reference set point and the error signal is generated. The magnitude and polarity of the error signal corresponds to the difference between the actual and desired speed/torque. Based on the speed/torque error, the PI controller generates the corrected motor voltage in order to compensate for the error. The application allows operation in two operational modes: speed and torque mode. Independently of the operational mode, both the speed and torque PI controllers are calculated. The operational mode defines the required values of the speed and torque at start-up only. If the drive is running in the speed operational mode, the required speed is set to the minimal speed and torque to the maximal allowed limit during start-up. Vice versa, in the torque operational mode, the required torque is set to the minimal torque and the required speed is set to the maximal allowed speed. The lower value of the PI controllers is chosen as the duty cycle and is applied to the motor. To avoid the saturation of the integral parts of the PI controllers, these parts are limited. If the speed PI controller output is applied to the output, the torque PI controller integral part is limited by the speed PI controller integral part, and vice versa. This type of cross limitation allows running the drive under speed and torque limitations at the same time. The speed/torque PI controllers proportional and integral constants were set experimentally. The PI controllers are executed every 5 ms in the isrVtpm3ch1 interrupt. 5.4.8 Process Ramp The ramp process slopes some quantities to ensure a smooth motor rotation. The ramp process is used at run state to slope the required motor speed. The process is executed every 5 ms in the isrVtpm3ch1 interrupt. 5.4.9 Process FreeMASTER The FreeMASTER process is part of the application software. FreeMASTER communication is implemented fully by the SCI interface. FreeMASTER writes new values through the SCI interface into 3-Phase BLDC Sensorless Control using MCF51AG128, Rev. 0 6 Freescale Semiconductor data RAM, where particular variables are located. This operation is executed every time FreeMASTER FMSTR_Poll and FMSTR_Recorder functions are executed. 5.4.10 Process PWM Update This process generates the correct voltage pattern on the motor, based on the actual PWM sector, direction of rotation and required output voltage. The process is called every 50 s in isrVtpm3ch0. The commutation table is derived from Back-EMF voltage measured on the motor (see Figure 5-5.). Besides the proper commutation pattern, the Back-EMF sensing can be evaluated from Figure 5-5. For example, if phase C is connected to positive DC bus voltage and phase B is connected to negative DC bus voltage, the falling Back-EMF voltage of phase A has to be evaluated for zero-crossing. The resultant commutation table includes sensing of the Back-EMF voltage, as can be seen in Table 5-1 for counter-clockwise direction, and in Table 5-2 for clockwise direction. 3-Phase BLDC Sensorless Control using MCF51AG128, Rev. 0 Freescale Semiconductor 7 Figure 5-5. Motor Back-EMF Measurement and evaluation Table 5-1. Commutation table for counter-clockwise direction Phase Vector Number A B C Voltage Sensing 0 DCB+ DCB- NC Phase C rising 1 NC DCB- DCB+ Phase A falling 2 DCB- NC DCB+ Phase B rising 3 DCB- DCB+ NC Phase C falling 4 NC DCB+ DCB- Phase A rising 5 DCB+ NC DCB- Phase B falling 3-Phase BLDC Sensorless Control using MCF51AG128, Rev. 0 8 Freescale Semiconductor Table 5-2. Commutation table for clockwise direction Phase Vector Number A B C Voltage Sensing 5 DCB+ NC DCB- Phase B rising 4 NC DCB+ DCB- Phase A falling 3 DCB- DCB+ NC Phase C rising 2 DCB- NC DCB+ Phase B falling 1 NC DCB- DCB+ Phase A rising 0 DCB+ DCB- NC Phase C falling The application constants are split into BLDCparameters.h and LVpowerStage.h. File BLDCparameters.h deals with main motor parameters like: electrical and mechanical parameters of BLDC, speed scale and particular states parameters (alignment, start-up, run) and the main peripherals used for BLDC control. File LVpowerStage.h deals with the low voltage power stage pinout and fault threshold settings, voltage and current scales. As much as possible, all constants are recounted from the floating point into the fix point values. Throughout the whole code, the floating point constants contain _REAL in their name. 5.4.11 5.4.11.1 BLDC motor parameters (BLDCparameters.h) MCU settings parameters #define CPU_CLK (48000000) // Hz This constant defines the value of CPU clock frequency which is set in the Device Initialization tool. #define TPM3_PRESCALER (32) This constant defines the value of TPM3 prescaler which is set in the Device Initialization tool. #define TPM3CH1_CMP_TIME_REAL (5e-3) // sec This constant defines the TPM3 channel 1 compare period which is set in the Device Initialization tool. This period defines the combined speed/torque PI controller loop period as well. #define PWM_MODULO (2399) This constant defines the FTM1 timer modulo value for the PWM switching frequency 20kHz. This constant should be the same as FTM1MOD in the Device Initialization tool. Eqn. 5-1 6 FTM1_CLK 48 10 PWM_MODULO = ----------------------------------------------------------------------------------------------------------------- – 1 = ------------------------3- – 1 = 2399 FTM1_PRESCALER SWITCHING_FREQ 1 20 10 3-Phase BLDC Sensorless Control using MCF51AG128, Rev. 0 Freescale Semiconductor 9 5.4.11.2 Speed Constants and Scaling #define VELOCITY_SCALE (6000) // RPM This constant defines the minimal required motor speed. The motor speed scaling for motor LINIX 45ZWN24-40 can be calculated as: Eqn. 5-2 6 60 TPM3_CLK VELOCITY_CONST = ------------------------------------------------------------------------------------------------------------------- = 7.5 10 NUM_PHASES PP TPM3_PRESCALER Eqn. 5-3 2 VELOCITY_CONST VELOCITY_CONST_SCALED = ---------------------------------------------------------------- 32768 VELOCITY_SCALE Eqn. 5-4 VELOCITY_CONST Velocity RPM = --------------------------------------------------------mf16PeriodFiltered Eqn. 5-5 Velocity RPM VELOCITY_CONST_SCALED mf16ActualVelocity scaled = ----------------------------------------------------------------------- = -------------------------------------------------------------------------------------VELOCITY_SCALE RPM mf16PeriodFiltered where TPM3_PRESCALER = 32 TPM3_CLK = 24 MHz NUM_PHASES = number of stator phases (3 for motor LINIX 45ZWN24-40) PP = number of pole pairs (2 for motor LINIX 45ZWN24-40) #define MAX_SPEED_REAL 4000 // RPM This constant defines the maximal required motor speed. #define MIN_SPEED_REAL 400 // RPM This constant defines the minimal required motor speed. 5.4.11.3 Alignment constants #define ALIGNMENT_TIME_REAL (1.0) // sec This value gives the alignment time. 3-Phase BLDC Sensorless Control using MCF51AG128, Rev. 0 10 Freescale Semiconductor #define ALIGNMENT_CURRENT FRAC16(0.25) // 2 Amps This value defines the alignment current. The alignment current is controlled by the PI controller. 5.4.11.4 Start-Up Constants #define START_PERIOD (28610) This value defines the first commutation period during start-up. The value is tuned experimentally. The conversion to the time in seconds can be done as: Eqn. 5-6 TPM3_PRESCALER START_PERIOD sec = START_PERIOD ---------------------------------------------------TPM3_CLK where TPM3_PRESCALER = 32 TPM3_CLK = 24 MHz NOTE The first period is calculated as START_PERIOD/2. The constant START_PERIOD is used for calculating other periods during start-up. #define START_ACCELERATION FRAC16(0.8) This value defines other commutation periods during start-up (see Section 3.3.5.2). The value is calculated as a constant from the range (0;1). Example: If the start acceleration constant is set at 0.8, and START_PERIOD is set at 28610, then start-up periods will be calculated as: 14305 (see note at START_PERIOD), 22888, 18311, 14648, 11719 and 9375. #define START_SPEED_REAL (400) // RPM This constant defines the motor speed after the start-up sequence. #define START_TORQUE FRAC16(0.0625) // 0.5 Amp This constant defines the motor current (torque) during the start-up sequence and required current (torque) in Torque mode. For scaling see Section 5.4.12.2 #define RUN_TORQUE FRAC16(0.125) // 1 Amp This constant defines the maximum motor current (torque) at the zero-crossing BEMF during the run sequence in Speed mode. 3-Phase BLDC Sensorless Control using MCF51AG128, Rev. 0 Freescale Semiconductor 11 #define START_CMT_NUMBER 6 This constant defines the number of start-up commutation periods (see Section 3.3.5.2). #define STABILIZATION_CMT_NUMBER 6 This constant defines the number of stabilization commutation periods (see Section 3.3.5.3).\ 5.4.12 5.4.12.1 Power stage parameters (LVpowerStage.h) DC Bus Voltage Scaling The voltage scaling on the 3-phase Motor Control Drive stage can be calculated as: Eqn. 5-7 Voltage V 1000 0.09091V/V Voltage scaled = ------------------------------------------------------------------- = Voltage V -----------------------------VOLTAGE_SCALE_MV 3.3V (0-1) #define VOLTAGE_SCALE_MV (36300) //milliVolts This constant defines the power stage voltage scale in millivolts. For additional details about the voltage and current scale, see Section 1.5. 5.4.12.2 Current (Torque) Constants and Scaling The scaled fractional current range is (-0.5;0.5). The current scaling can be calculated as follows: Eqn. 5-8 I scaled I A 0.4125V/A = ------------------------------------------------------------------- = I A --------------------------CURRENT_SCALE_A A 3.3V #define CURRENT_HW_HALF_RANGE_MAX_A (4.0) //Amps This constant defines the maximal required motor current (torque) during the run state. .#define CURRENT_SCALE_A (2*CURRENT_HW_HALF_RANGE_MAX_A) This constant defines the current scaling during the run state. 5.4.12.3 Voltage Fault Threshold Constants #define FAULT_OVERVOLTAGE_THRESHOLD_MV (30000) //milliVolts 3-Phase BLDC Sensorless Control using MCF51AG128, Rev. 0 12 Freescale Semiconductor This constant defines the maximal DC bus voltage in mV. Over this DC bus voltage, and an overvoltage fault is generated. #define FAULT_UNDERVOLTAGE_THRESHOLD_MV (10000) // milliVolts This constant defines the minimal DC bus voltage in mV. Under this DC bus voltage, and an overvoltage fault is generated. 3-Phase BLDC Sensorless Control using MCF51AG128, Rev. 0 Freescale Semiconductor 13 3-Phase BLDC Sensorless Control using MCF51AG128, Rev. 0 14 Freescale Semiconductor Chapter 6 Sensorless BLDC Demo Operation 6.1 Application Control The BLDC motor control application can be controlled by the manual interface, consisting of the desired direction switch and Up/Down buttons (Figure 6-1) or remotely by a PC. The BLDC drive can operate in speed and torque operational modes. 6.2 6.2.1 BLDC drive operational modes Speed operational mode If the application is set to the speed operational mode, the user can set the required speed manually or by the PC. The DC bus current (torque) is automatically set to the value of 1 A. In this case, the BLDC drive maintains the required speed until the maximal DC bus current (torque) is exceeded. 6.2.2 Torque operational mode Similarly, in torque operational mode the user can set the DC bus current (torque) of the BLDC motor. The required value can be set by the UP/DOWN buttons or remotely by the PC. The speed limit is set to a maximal speed of 4000 rpm. In this case, the BLDC drive maintains the required DC bus current (torque) until the maximal BLDC motor speed is achieved. The operational mode can be changed only when the motor is stopped (direction CCW-STOP-CW switch is in the STOP position) only. The default setting is speed operational mode. 3-Phase BLDC Sensorless Control using MCF51AG128, Rev. 0 Freescale Semiconductor 1 6.3 Manual/Remote Operation Figure 6-1. Manual Interface 6.3.1 Manual Operation To run the BLDC motor, switch the direction switch to the desired direction position (STOP is the middle position). If the direction switch is in the CW or CCW position when applying the power supply, turn the switch to the STOP position before running the BLDC motor. Once the direction switch is in the desired CCW/CW position, the motor starts running with a minimal speed of 400 rpm or with a minimal DC bus current of 0.2A based on the operational mode. To increase/decrease the speed/DC bus current (torque), use the UP/DOWN buttons. The speed increments continuously up to the maximal motor speed of 4000 rpm. The DC bus current increments up to the maximal DC bus current of 2 A. The default operational mode is speed mode. The direction of rotation but not the operational mode can be changed only manually. To change the operational mode, use the FreeMASTER. 6.3.1.1 Remote operation Remote operation can be provided by FreeMASTER software via the SCI to USB interface. For correct FreeMASTER operation follow the given steps: 1. Go to Project/Options/Comm and set communication via the Direct RS232 (see Figure 6-2). 3-Phase BLDC Sensorless Control using MCF51AG128, Rev. 0 2 Freescale Semiconductor 2. Select the COM port where the MC9S08JMxx CDC driver is connected (see System Properties/Device Manager/Ports). The communication speed is 9600 Bd. 3. The next step is to toggle the communication button. After that in bottom right corner should be RS232;COMxx;9600, which means the communication is established. 4. If not, toggle (STOP) the communication and unplug/plug the FreeMASTER USB cable. Then toggle (START) the communication button. Figure 6-2. FreeMASTER Communication Settings The FreeMASTER’s control page offers a similar interface as the manual controls, although it offers some other features such as the change of operational mode settings, and displays some additional status information. To start a remote operation, run FreeMASTER and open the project file located at ...\Freemaster\AG128_BLDC_Sensorless.pmp. The remote operation is active when the START/STOP switch is in the START position. The motor speed can be set to any value within the range of 400 to 4000 rpm. The DC bus current (torque) can be set to any 3-Phase BLDC Sensorless Control using MCF51AG128, Rev. 0 Freescale Semiconductor 3 value within the range of 0.1 A to 2 A. The direction of rotation can only be changed by the manual direction switch. In addition to the remote control, the FreeMASTER displays some variables in the scope (see Figure 6-3). The FreeMASTER defines a speed stimulator for an automatic demonstration of the sensorless BLDC demo. To use the speed stimulator, switch the direction switch to the desired rotation and then start the speed stimulator. The speed will change according to a predefined ramp. Figure 6-3. Scope variables during enabled stimulator 3-Phase BLDC Sensorless Control using MCF51AG128, Rev. 0 4 Freescale Semiconductor