1
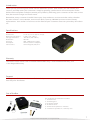
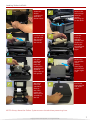
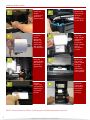
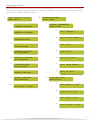
Striker Service Reminder System
User Manual
Version 3.5
Updated: 02/2015
Striker III
Striker Pro
Copyright © 2015 Cobra Systems, Inc. All rights reserved
TABLE OF CONTENTS
Introduction
1
Striker System Specifications
1
Warranty
1
Support
1
Out of the Box
1
Accessories
1
Striker Quick Start
2
Loading Ink Rolls
3
Loading Stickers
4
Connecting Striker Keypad
5
Powering Up the Striker System
5
Striker Label Formats
6
Striker Keypad Menu
7
Setting System Preferences
8
Questions & Remedies
9
Striker Calibration
9
Copyright © 2015 Cobra Systems, Inc. All rights reserved
Introduction
Thank you for purchasing the Striker Service Reminder System. With Striker, you will market your
services and help retain your customers simply by printing a professional service reminder sticker.
Utilize all the templates to help maximize your profits by informing your customers of the next service
due, the next oil change and much more!
Remember, every customer shouldn’t leave your shop without a service reminder sticker, whether
the next service is a tire rotation, transmission flush, tune up, 30K-90K service or even a battery
replacement. Your sticker is a business card in front of your customers face every time they drive their
car.
Specifications
Dimensions:
Operating Conditions:
Storage Conditions:
Resolution:
AC Input:
DC Output:
Connections:
11.34" (L) x 9.13" (W) x 6.14" (H)
5°-40° C (41°-104° F)
-40°-60° C (-40°-140° F)
203 DPI
100 - 240V Power Supply
24V 2A (external adaptor)
Striker Keypad, USB, LPT
Warranty
The Striker Printer comes with a Limited Lifetime Warranty, 1-Year Printhead Warranty, and
1-Year Keypad Warranty.
Support
For support, call the Striker Service & Technical department at 800.262.7298 or your
local oil/parts distributor.
Out of the Box
The Striker Kit out of the box includes:
1. Striker Printer
2. Striker Keypad
3. DC Power Supply
4. AC Power Cord
5. Striker Label Spindle w/ 2 Guides
6. 2 Striker Ink Spindles w/ 1 take-up core
Copyright © 2015 Cobra Systems, Inc. All rights reserved
1
Striker Quick Start
2
1. Load Striker Reminder Stickers
2. Load Striker Ink Rolls
3. Clamp down ink carriage as shown
4. Close the Striker cover
5. Connect the Striker Keypad to the printer
6. C
onnect power then turn on and print and make sure
to use a surge protector
NOTE: Always have the Striker System cover closed when powering it on.
Copyright © 2015 Cobra Systems, Inc. All rights reserved
Loading Striker Ink Rolls
1
TURN OFF
Striker
system and
open the
printer cover
2
3
Load rear ink
spindle with
the unused
portion of
the ink roll
4
Load the
take up
ink core
spindle and
make sure
the larger
circular ends
are on the
right
5
Ink goes
overhand
from the
back roll,
under print
element and
taped to
front take up
ink spindle
6
Make sure
ink spindles
are as
shown,
note larger
circular end
on the right
side
7
Wind the
front ink
spindle to
take up
the slack,
make sure
there are no
wrinkles in
the ink
8
End result,
close the ink
roll access
cover
Release the
ink carriage
lever by
gently
pressing up
on the lever
NOTE: Always have the Striker System cover closed when powering it on.
Copyright © 2015 Cobra Systems, Inc. All rights reserved
3
Loading Striker Labels
1
TURN OFF
Striker
system and
open the
printer cover
2
3
Load the
Striker
Reminder
Stickers as
shown left,
make sure
the guides
are centered
4
Place the
label spindle
with Striker
Stickers
inside the
label spindle
slots in
the printer
system
5
Push the
sticker below
the ink and
beneath a
green chip
6
Make sure
the green
chip is above
the label
and the
adjustable
green guides
are centered
7
Pull the
sticker so a
some of the
label hangs
out of the
printer
8
Close ink
clamp and
the printer
clam shell
and start
printing
NOTE: Always have the Striker System cover closed when powering it on.
4
Copyright © 2015 Cobra Systems, Inc. All rights reserved
Release the
ink carriage
lever by
gently
pressing up
on the lever
Behind the Striker Printer
Power On/Off
DC Input
Keypad Connection
Connecting Striker Keypad
Connect the Striker Keypad cord to the back
of the Striker Printer. The keypad cord is a
male RS232 and will connect to the keypad
connection as noted above and the right.
Powering On/Off
Connect the power DC cord to the back of the
Striker Printer. Make sure the AC connection
of the cord is connected to the DC convertor.
Always use a power strip to prevent any power
surge.
Power on and off with the switch located on
the rear of the Striker System’s bottom left hand
corner. Firmly flip the switch and make sure to
wait a second when turning off and back on.
Copyright © 2015 Cobra Systems, Inc. All rights reserved
5
Striker Service Label Formats
1)
Market Your Shop
1234 Smart Street
Your City, CA 12345
(800) 262-7298
Return Mileage: 100000
12/12/09
Return Date:
5W30
Grade:
We Thank You For Your Business
Please Be Sure To Drive Safely!
2)
Market Your Shop
1234 Smart Street
Your City, CA 12345
(800) 262-7298
Return Mileage: 100000
12/12/09
Return Date:
Grade:
SYN 5W30
We Thank You For Your Business
Please Be Sure To Drive Safely!
4)
Market Your Shop
1234 Smart Street
Your City, CA 12345
(800) 262-7298
OIL CHANGE DUE:
DATE: 1/14/14
MILEAGE: 9600
TIRE ROTATION DUE:
DATE: 2/21/14
MILEAGE: 10300
We Thank You For Your Business!
Please Be Sure To Drive Safely!
7)
Market Your Shop
1234 Smart Street
Your City, CA 12345
(800) 262-7298
Return Mileage: 100000
12/12/09
Return Date:
5W30
Grade:
8)
Market Your Shop
1234 Smart Street
Your City, CA 12345
(800) 262-7298
Service: Trans Flush
Return Mileage: 100000
Return Date:
12/12/09
We Thank You For Your Business
Please Be Sure To Drive Safely!
6
1) Standard Label
- Automatically adds the Standard Millage and Month
return interval for return service, includes optional
customer message, “Have a Nice Day!”.
2) Synthetic Label
- Automatically adds the Synthetic Millage and Month
return interval for return service, includes optional
customer message.
3) Custom Label
- Perfect for Diesel or custom intervals, create any
mileage interval and monthly interval.
4) Tire Rotation
- Automatically adds the desired Tire Rotation
mileage and month interval for tire rotation service,
includes optional customer message.
5) Standard Label with Discount Coupon
- Same as standard label but includes variable
discount coupon when returned within 500 miles
of return service mileage (does not include optional
customer message).
6) Synthetic Label with Discount Coupon
- Same as synthetic label but includes variable
discount coupon when returned within 500 miles
of return service mileage (does not include optional
customer message).
7) Custom Label with Discount Coupon
- Same as custom label but includes variable discount
coupon when returned within 500 miles of return
service mileage (does not include optional customer
message).
8) Service Label
- Customize your own service (ie.: Tune Up, Engine
Service, etc.), return mileage and date and your very
own greeting.
9) Service Label with Discount Coupon
- Same as service label but includes variable discount
coupon when returned within 500 miles of return
service mileage (does not include optional customer
message).
Copyright © 2015 Cobra Systems, Inc. All rights reserved
Striker Keypad Menu
When the Striker System is powered on the first Keypad prompt is Print a Label. Use the arrow keys on
the keypad to navigate through the menus. Below is a navigation tree of the keypad prompts to help
guide you through the Striker templates.
A.
PRINT REMINDER STICKER
PRESS ENTER
B.
STRIKER SETTINGS
PRESS ENTER
1.
1.
COMPANY INFORMATION
PRESS ENTER
STANDARD INTERVAL
2.
a.
Enter Company:
b.
Enter Street Address:
c.
Enter City:
d.
Enter State:
e.
Enter Zip Code:
SYNTHETIC INTERVAL
3.
CUSTOM INTERVAL
4.
TIRE ROTATION
5.
STANDARD INTERVAL
WITH DISCOUNT
6.
SYNTHETIC INTERVAL
WITH DISCOUNT
7.
f.
CUSTOM INTERVAL
Enter Phone Number:
WITH DISCOUNT
8.
g.
Enter QR Code:
SERVICE TEMPLATE
(QR works with Striker Pro only)
9.
SERVICE TEMPLATE
WITH DISCOUNT
2.
DATE/TIME SETUP
PRESS ENTER
a.
10.
Enter Month (1-12):
EXIT PRINT A LABEL?
b.
c.
d.
Copyright © 2015 Cobra Systems, Inc. All rights reserved
Enter Day (1-31):
Enter Hour (0-23):
Enter Minute (0-59):
7
Setting System Preferences
Your Striker System allows you to set your own custom intervals for each type of Reminder Striker as
well as customize the information printed on the sticker. Use the Set Preferences fields to customize
the Striker System to your preferences.
C.
SET PREFERENCES
PRESS ENTER
1.
Enter GRADE:
Enter the grade of oil that is most commonly used at your station. This value
will display automatically when printing a sticker unless overwritten.
2.
Enter MESSAGE 1:
The Message 1 field is the top line of a custom message that is displayed on a
sticker. It can be left blank or overwritten.
3.
Enter MESSAGE 2:
The Message 2 field is the bottom line of a custom message that is displayed
on a sticker. It can be left blank or overwritten.
4.
Enter DISCOUNT:
This discount will be printed as a promotion coupon on the reminder sticker.
It only will be printed on the “... w/ Discount” stickers.
5.
DISPLAY COMPANY? (Y/N)
Press N for No to disable the company name and contact info at the top of
the sticker. This is usually used only with special pre-printed stickers.
6.
Enter STAND Mileage:
Standard Date interval is used for the standard oil labels. It adds the interval
(number of miles) to the current mileage so the customer knows when to
come back for the next service.
7.
Enter STAND MONTH:
8.
Enter SYN Mileage:
Syn Date interval is used for the synthetic oil labels. It adds the interval
(number of miles) to the current mileage so the customer knows when to
come back for the next service.
9.
Enter SYN Month:
Syn Date interval is used for the synthetic oil labels. It adds the interval
(Number of months) to the current date so the customer knows when to
come back for the next service.
10.
Enter TIRE Mileage:
Tire Mileage interval is used for the tire rotation labels. It adds the interval
(number of miles) to the current mileage so the customer knows when to
come back for the next service.
11.
Enter TIRE MONTH:
12.
DISPLAY GRADE? (Y/N)
13.
DISPLAY DATE? (Y/N)
14.
SET UNIT:(1.US 2.METRIC)
Standard Date interval is used for the standard oil labels. It adds the interval
(Number of months) to the current date so the customer knows when to
come back for the next service.
Tire Mileage interval is used for the tire rotation labels. It adds the interval
(number of months) to the current date so the customer knows when to
come back for the next service.
Press N to hide the grade of oil on the reminder sticker.
Press N to hide the return date on the reminder sticker.
Enter US to display miles as the unit of measure on the reminder stickers or
Metric to display KM (Kilometers).
8
Copyright © 2015 Cobra Systems, Inc. All rights reserved
Questions & Remedies
Q: T he Ink Roll is sticking to the reminder
stickers and coming out the printer.
A: T he Striker Printer did not recognize that the
ink roll was loaded. Turn the unit off,
re-attached the ink roll to the take up core,
close your Striker Printer before turning it
back on.
Q: I just changed out the labels for the Striker
system and it was working fine but now it’s
not printing right and the red light is on,
what happened?
A: F irst turn off the Striker, open the printer,
release the ink carriage lever and make sure
the reminder stickers are centered on the
label spindle. Second, make sure the green
computer chip is above the label and the
green guides are snug with the label. fineally,
make sure the ink carriage is clicked in place
and latched down.
Q: I just changed out the ink for the Striker
system and it’s not printing, what happened?
A: F irst turn off the Striker, open the printer,
release the ink carriage lever and make sure
ink was loaded correctly. If the wrong side
of ink is loaded, nothing will print. Test the
ink roll to make sure the ink side is down by
testing it with a small piece of tape. Then
review the procedures for loading ink rolls.
Q: T he keypad is not working and the keypad
displays a series of letters and numbers
beginning with KU.
A: C
all your local oil distributor or call the
Striker Technical and Service department at
1.800.262.7298.
Striker Label Calibration
Calibrating Static Cling Sticker with Printer:
1. T urn printer OFF (located in back of printer)
2. P
ress and Hold on to the PAUSE button of printer (as shown in picture
on the left)
3. While still holding the PAUSE button, turn the printer ON
4. Release PAUSE button as soon as printer starts feeding labels
5. P
ress the FEED button once
Your system should now be calibrated with your Striker Reminder Label
System.
NOTE: DO NOT PRESS AND HOLD THE PAUSE AND FEED
BUTTONS TOGETHER WHILE POWERING ON OR YOU
WILL ERASE THE STRIKER FONTS AND SHIPPING &
REPROGRAMMING CHARGES WILL APPLY.
Copyright © 2015 Cobra Systems, Inc. All rights reserved
9
Copyright © 2015 Cobra Systems, Inc. All rights reserved