1
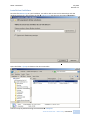
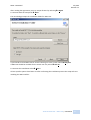
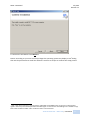
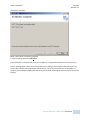
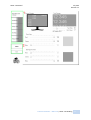
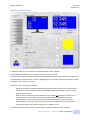
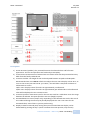
SMTT 2.0 Manual
July 2012
Revision 1.1
SMTT 2.0 User’s Manual
Table of Contents
Table of Contents .................................................................................................................................... 1
Preface..................................................................................................................................................... 4
Preamble ............................................................................................................................................. 4
Scope of Applications .......................................................................................................................... 5
Requirements ...................................................................................................................................... 6
Hardware Requirements ................................................................................................................. 6
Software Requirements................................................................................................................... 6
Installation ............................................................................................................................................... 7
Reference Notes .................................................................................................................................. 7
Extent of Installation Guidelines ..................................................................................................... 7
Special Requirements ...................................................................................................................... 7
Illustrations ...................................................................................................................................... 7
Installation Files ............................................................................................................................... 7
Installation Guidelines ......................................................................................................................... 8
License and License Key ........................................................................................................................ 13
Licensing ............................................................................................................................................ 13
Acquisition of a License ..................................................................................................................... 13
Validity ............................................................................................................................................... 13
License Key ........................................................................................................................................ 13
Delivery of a License Key ................................................................................................................... 14
Personalisation .................................................................................................................................. 14
Application......................................................................................................................................... 14
Notice ............................................................................................................................................ 14
Selecting the License.key File ........................................................................................................ 14
Alternative ..................................................................................................................................... 15
SMTT 2.0 Handling................................................................................................................................. 16
General .............................................................................................................................................. 16
Preamble ....................................................................................................................................... 16
General Handling ........................................................................................................................... 16
High Precision Counter ...................................................................................................................... 18
Thomas Thiemann – SMTT 2.0 | Table of Contents
1
SMTT 2.0 Manual
July 2012
Revision 1.1
Gradients ........................................................................................................................................... 21
Description .................................................................................................................................... 22
Deep Color ......................................................................................................................................... 23
Deep Color Map............................................................................................................................. 24
Deep Color Test ............................................................................................................................. 24
Scaling................................................................................................................................................ 25
Adding User Defined Resolutions .................................................................................................. 25
Native Resolutions ......................................................................................................................... 26
FullHD to Custom Resolutions ....................................................................................................... 26
About SMTT ....................................................................................................................................... 27
Evaluation Hints..................................................................................................................................... 28
High Precision Counter ...................................................................................................................... 28
Execution of the Test ..................................................................................................................... 28
Evaluation oft he Test.................................................................................................................... 29
Deep Color Test ................................................................................................................................. 31
Required Hardware ....................................................................................................................... 31
Required Software ......................................................................................................................... 31
Excecution of the Test ................................................................................................................... 31
Evaluation ...................................................................................................................................... 31
Scaling................................................................................................................................................ 33
Characteristics of Test Patterns .................................................................................................... 33
Details ............................................................................................................................................ 33
Known Limitations ................................................................................................................................. 36
Visual C++ Runtime Libraries (1) ....................................................................................................... 36
Symptom (old SMTT 2.0 versions up to v2.0.4) ............................................................................ 36
Description .................................................................................................................................... 36
Impact on SMTT 2.0....................................................................................................................... 36
Troubleshooting ............................................................................................................................ 36
Visual C++ Runtime Libraries (2) ....................................................................................................... 36
Symptom ....................................................................................................................................... 36
Description .................................................................................................................................... 37
Troubleshooting ............................................................................................................................ 37
Appendix................................................................................................................................................ 38
Adding a custom resolution (NVidia) ................................................................................................ 38
Thomas Thiemann – SMTT 2.0 | Table of Contents
2
SMTT 2.0 Manual
July 2012
Revision 1.1
Notice ............................................................................................................................................ 38
Procedure ...................................................................................................................................... 38
Extended Installation Guidelines (optional) ...................................................................................... 42
Dotnet Framework 4 and Visual C++ Runtime Libraries ............................................................... 42
DirectX (Jun 2010) ......................................................................................................................... 45
Service Packs (installation) ............................................................................................................ 51
Change Log ............................................................................................................................................ 52
Supplement ........................................................................................................................................... 52
Legal Restrictions............................................................................................................................... 52
Thomas Thiemann – SMTT 2.0 | Table of Contents
3
SMTT 2.0 Manual
July 2012
Revision 1.1
Preface
Preamble
SMTT 2.0 has been envolved from the desire to create the technically best possible solution for low
cost monitor tests that produce reliable results in an efficient manner.
The continuous optimization of the unique display lag1 test is a feature of particular importance.
SMTT 2.0 strictly avoids to collect, store or transfer any kind of personal data. Therefore there are no
such fuctions included. SMTT 2.0 is limited to its utterly testing functions: Preperation and display of
monitor tests.
Despite extensive testing on a wide base of computers, including own systems and computers from
beta testers, it is still impossible to guarantee that there will not be any unforeseen circumstances
that may result in system crashes or even data loss.
To prevent the user from these bad impacts and for maximum performance we recommend to install
SMTT 2.0 on a system that is used for testing purposes only without any other third party software
that may interfere with the 3D- and CPU-intense testing process or any other part of the software.
In addition to this we recommend to backup all of your data prior to installing SMTT 2.0 as a
precaution measurement to protect your data even in a worst case scenario.
The information in this User’s Manual has been carefully reviewed and is believed to be accurate.
The author assumes no responsibility for any inaccuracies that may be contained in this document,
makes no commitment to update or to keep current the information in this manual or to notify any
person or organization of the updates.
Please Note: For the most up-to-date version of this manual, please see our website at
http://smtt.thomasthiemann.com.
IN NO EVENT WILL THOMAS THIEMANN BE LIABLE FOR DIRECT, INDIRECT, INCIDENTAL,
SPECULATIVE, SPECIAL OR CONSEQUENTIAL DAMAGES ARISING FROM THE USE OR INABILITY TO USE
THIS DOCUMENTATION OR PRODUCT, EVEN IF ADVISED OF THE POSSIBILITY OF SUCH DAMAGES. IN
PARTICULAR, THOMAS THIEMANN SHALL NOT HAVE LIABILITY FOR ANY HARDWARE, SOFTWARE OR
DATA STORED OR USED WITH THE PRODUCT, INCLUDING THE COSTS OF INSTALLING, REPLACING,
REPAIRING, INTEGRATING OR RECOVERING SUCH HARDWARE, SOFTWARE OR DATA.
Thomas Thiemann reserves the right to make changes to the product described in this manual at any
time and without notice.
1
Display Lag or Display-Lag is also known as „Monitor Input Lag“ or „Input Lag“. This term is used to describe
the delay between video signal and screen output caused by video signal processing within the monitor.
Thomas Thiemann – SMTT 2.0 | Preface
4
SMTT 2.0 Manual
July 2012
Revision 1.1
Scope of Applications
SMTT 2.0 is meant for evaluating display quality of computer monitors and High Definition TV Sets.
The implied tests are optimized for this use by addressing wide spread problems of TFT Monitors.
Futhermore SMTT 2.0 can support real measurements with its SMTT 2.0 High Precision Counter test.
This tests utilises a unique display technique that is able to present high precision counters that are
updated in very short intervals (< 1ms). In combination with a second monitor (CRT) and an
appropriate camera SMTT 2.0 can be used to determine the display lag of the tested monitor with
much higher accurancy than it is possible with any other software solution available.
SMTT 2.0 Features:
-
Outstanding precision in cost-effective Display-Lag Measurements that can only be surpassed
with high end measurement equipment2.
Test for true 10 bit per color output in less than 10s
Scaling tests, optimized for FullHD content rendering and other common resolutions for TVand multimedia devices.
Adjustable gradients to test clipping, banding3 and differentiation of colours.
Best support for your work by providing easy to understand visuals and a comprehensive
manual.
SMTT 2.0 can not:
-
Take measurements without human interaction.
Display measurement results on button-click.
Prevent operating errors and errors in the evaluation process if instuctions have been
ignored.
Change the characteristics of monitors, neither positive nor negative.
Prevent the intentional misuse of SMTT 2.0 and intentional misuse of measurement results.
Therefore it is inevitable to read the instructions for each test carefully and follow the instructions
within this manual step by step to omit any errors and to produce reliable results that can be
reproduced.
2
appropriate equipment, consistent of a digital storage analyzer and probes for bit rates of 1.6 GBit/s and
above, costs more than 100000 Euro.
3
„Banding“ is a visual effect within color gradients. If the monitor is unable to differentiate between almost
identical colors within a linear gradient broad stripes or bands of the same colour are displayed. Within
gradients of neutral grey it is also possible to see color shifts because of banding issues within one or several
primary colours (red, green or blue) that are used within each pixel to create the desired color by additive
mixture of colour stimuli.
Thomas Thiemann – SMTT 2.0 | Preface
5
SMTT 2.0 Manual
July 2012
Revision 1.1
Requirements
Hardware Requirements
Hardware requirements to cover the full SMTT 2.0 feature set:
-
64 Bit (x64) capable CPU with adequate processing power4, to reach framerates of 1000 FPS
or more.
DirectX 10 capable grafics card with at least two display connectors that can be used at the
same time to run two monitors in Clone-Mode5.
CRT display (CRT: cathode ray tube) that supports adequate resolutions6 at 60 Hz.
Camera with manually adjustable shutter speeds of 1/160s or less. Cameras from
smartphones or mobile phones are not suitable!
SMTT 2.0 files require about 5 MB of free space of your HDD. During the installation you may
need up to 2 GB of free space if your system does not fulfill the software requirements (see
Software) so that this software has to be installed as well.
Software Requirements
To run the SMTT 2.0 setup and to start the software you need a DirectX 10 / DirectX 11 capable
environment. All dependencies of SMTT 2.0 will be resolved during the installation process. If your
system will not comply with the requirements all missing depencies will be automatically installed or
you will be asked to download and install them.
-
-
-
Windows Vista and Server 2008:
Service Pack 2 (SP2)
Windows 7 and Server 2008 r2:
Service Pack 1 (SP1)
Important DirectX files are only delivered as part of the service packs and can not be
obtained in any other way from Microsoft. Windows Vista has to be upgraded to SP2 to
fullfill the requirements for DirectX 11 support (see below).
Microsoft Platform Update for Windows Vista and Server 2008 (KB971644) or
Windows Graphics, Imaging and XPS Library (KB971512) (part of KB971644)
Integrates DirectX 11 to Windows Vista and Server 2008.
DirectX (Jun2010) or newer
Microsoft Dotnet 4 Framework (Full)
Microsoft VC++ 2010 runtime libraries
To improve your setup experience we recommend to install at least the required service packs and
DirectX (Jun2010) prior to SMTT 2.0. These requirements for SMTT 2.0 are large downloads and take
a considerable amount of time for their installation. (SP1 Windows 7: More than 900MB, DirectX: 96
MB)
4
SMTT 2.0 is CPU limited.
„Clone-Mode“ forces two (or more) monitors to display the same content.
6
The required resolution depends on the TFT that is tested. Ideal are high quality 21“ (or bigger) CRTs that can
display resolutions of 2048x1536@60Hz according to their specifications.
5
Thomas Thiemann – SMTT 2.0 | Preface
6
SMTT 2.0 Manual
July 2012
Revision 1.1
Installation
Reference Notes
Extent of Installation Guidelines
The following installation guidelines cover the case that your system meets the softare requirements
already. If your system will not meet the software requirements additional installations are
necessary. Except for the installation of Microsoft Service Packs you can find the additional
installation steps in the appendix to this manual.
Special Requirements
Please note that the setup will try to download missing software requirements from Microsoft. Make
sure that your system has a fully functional connection to the internet or that all software
requirements are already fulfilled before starting the setup process. If the setup need to download
additional components but cannot access the internet the setup will fail.
If you cannot connect to the internet we suggest to download all requirements to a external storage
device (external harddrive, usb stick, etc) and install them prior to the SMTT 2.0 setup.
Illustrations
During the following installation guidelines all folders and files will be highlited as they need special
attention: Examplefile.ext or x:\Folder\
Everything that should be clicked with the mouse will be marked with an arrow (arrow to the
right) and with a special text format. E.g.: To click an OK button this manual will read: OK
Installation Files
For the most up-to-date version of the software SMTT 2.0 visit our website
http://smtt.thomasthiemann.com.
The zip file available for download contains all program files as setup package. Missing components
will be downloaded.
Please note: Your license key, represented by the file License.key, is not included in this download
and will be sent to you by mail seperately.
Thomas Thiemann – SMTT 2.0 | Installation
7
SMTT 2.0 Manual
July 2012
Revision 1.1
Installation Guidelines
Save the file SMTT2.0.zip on your harddrive. You will be able to extract this ZIP-archive with the
Windows Explorer by right-clicking the file SMTT2.0.zip and selecting the Option Extract…
Please enter c:\temp as destination folder. To extract the archive click Extract
Open the folder c:\temp as shown in the next screenshot.
Start the setup by double clicking the executable setup.exe
Thomas Thiemann – SMTT 2.0 | Installation
8
SMTT 2.0 Manual
July 2012
Revision 1.1
The SMTT 2.0 Setup Wizard opens that guides through the rest of the setup.
To continue click Next >
The end user license agreement (EULA) will show up next. Please read this agreement carefully. By
accepting the terms of this agreement you accept the contract between you (the user) and the
author oft he software (Thomas Thiemann) to fulfill all parts of the agreement.
Thomas Thiemann – SMTT 2.0 | Installation
9
SMTT 2.0 Manual
July 2012
Revision 1.1
After reading the Agreement you may accept all terms by selecting I Agree
To continue with the setup click Next >
The next dialog prompts the installation folder for SMTT 2.0.
If you intend to install SMTT 2.0 for all users that log on to the system select Everyone
If SMTT 2.0 should be available for the actual user only select Just me
To continue the installation select Next >
All user-specific options have been set. After confirming the installation process the setup will start
installing the SMTT 2.0 files.
Thomas Thiemann – SMTT 2.0 | Installation
10
SMTT 2.0 Manual
July 2012
Revision 1.1
To confirm the installation click Next >
Notice: According to your user account privileges the operating system may display a UAC7 dialog
that asks for permissions to install the software. You have to accept to continue the setup process.
7
UAC = User Account Control, security feature of Windows Vista/2008 or later. Programs run with limited
rights in the user space until they demand extended rights. In this case the elevated rights are needed to copy
files to the installation folder and to create shortcuts in the startmenu.
Thomas Thiemann – SMTT 2.0 | Installation
11
SMTT 2.0 Manual
July 2012
Revision 1.1
Installation complete.
SMTT 2.0 has been successfully installed.
To end the Setup-Wizard click Close
The installation is complete and you may start SMTT 2.0 using the desktop icon or the start menu.
Notice: Starting SMTT 2.0 for the first time will cause a dialog to show up that tells that there is no
License key installed. The required file will be sent to you by mail and is not part of the SMTT 2.0
setup. If you need help installing the license key please read: Selecting the License.key File in the next
chapter.
Thomas Thiemann – SMTT 2.0 | Installation
12
SMTT 2.0 Manual
July 2012
Revision 1.1
License and License Key
Licensing
SMTT 2.0 offers several licensing options.
In the first instance these options differentiate between private (non-commercial) and commercial
use of the software. While the commercial licenses cover all kinds of commercial use, especially – but
not limited to – editorial hardware reviews and publishing, the private license is available at a
considerably reduced price and must not be used for the afore mentioned or any other kind of
commercial applications.
Other non-exclusive licensing options, up to source-code licensing, may be negotiated with the
author.
Acquisition of a License
Licenses can be acquired at http://smtt.thomasthiemann.com. Private licenses can be purchased by
PayPal. Commercial customers get the additional ability to pay by bank transfer.
Validity
SMTT 2.0 licences are valid for one year and will not be prolonged automatically. To prolong the
validity period of a license you have to contact the author of the software before the period ends. A
short mail containing your full name and the email-address used for the initial registration is needed
at least to qualify for the extension of the validity period.
Private SMTT licenses are limited to one person only and lose validity as soon as they are lent, rent,
shared or distributed. The licensee that is responsible for any illegal distribution of SMTT by sharing
(e.g. upload to file hosters, peer to peer sharing, file sharing networks, forums, etc), lending, copying,
renting or any other kind of distribution not mentioned here, has to compensate for every single
copy that has not been explicitly authorized by Thomas Thiemann and for all additional costs that
may arise from this illegal distribution, including legal costs and administrative charges.
Commercial SMTT license are valid for the number of users / workstations that has been selected
during the registration. As soon as these numbers are exceeded the licensee has to report the new
requirements to the author of the software and pay the difference between his license and the
license that covers the increased number of users. The license period will not be prolonged in this
case. The licensee that is responsible for any illegal distribution of SMTT by sharing (e.g. upload to file
hosters, peer to peer sharing, file sharing networks, forums, etc), lending, copying, renting or any
other kind of distribution not mentioned here, has to compensate for every single copy that has not
been explicitly authorized by Thomas Thiemann and for all additional costs that may arise from this
illegal distribution, including legal costs and administrative charges.
License Key
Subsequent to the order of SMTT a personal license key will be created and stored as a file. This file,
referenced as “license.key” or “license key”, is mandatory to use SMTT 2.0. SMTT 2.0 checks the
license key file during the program start and will report to the user if the file is unavailable, damaged,
invalid or expired.
Usually the file will show the format:
Date_Surname,Firstname_Licensetype – License.key
Example: 2012-09-28_Mustermann,Max_Commercial - License.key
Thomas Thiemann – SMTT 2.0 | License and License Key
13
SMTT 2.0 Manual
July 2012
Revision 1.1
Delivery of a License Key
Ususally the license key file will be sent to by mail within the next two business days after purchase.
Personalisation
The license key file is generated after purchase and contains detailed personal information for every
single customer. Part of the license key is the full name, the email-address and the license type.
Each key is attributed to its owner so that all keys can be directly identified.
Application
Notice
The SMTT 2.0 license key has been sent to you by mail. Please save the license key file at a secure
location and protect it from unauthorized access. We recommend to create a personal backup and
store the backup at a secure location that cannot be accessed by unauthorized persons.
The following chapter assumes that the license key file License.key has been saved in the folder
c:\temp.
Selecting the License.key File
On the first start SMTT detects that there is no license file installed yet.
To install your license key file click Select new License.key
Thomas Thiemann – SMTT 2.0 | License and License Key
14
SMTT 2.0 Manual
July 2012
Revision 1.1
This will bring up a file open dialog to select your license key file.
Open the folder where you stored the license key file and highlight the file.
To use the selected file click Öffnen / Open
SMTT 2.0 imports the license key file and restarts the application automatically.
In case of an invalid, damaged or expired file SMTT 2.0 will show a dialog with the problem and offer
a new file open dialog to select a new license key.
Alternative
The license key is stored within the user folder at
\AppData\Roaming\SMTT 2.0\License.key
In case of a loss of the original license key sent to you by mail you may still recover your key from this
location. Please note that the file is named “License.key”. The file name does not contain your Name,
the date, the license type or any additional characters.
Experienced users may exchange that file manually (e.g. receiving a new key after prolonging a SMTT
license)
Notice: Please do not change any system files. Do not apply any changes that you are not absolutely
sure of. Do not alter or delete the SMTT 2.0 license key file (license.key) as it will cause SMTT 2.0 to
stop working. All changes to files are at your own risk. Please contact an expert before altering
anything.
Thomas Thiemann – SMTT 2.0 | License and License Key
15
SMTT 2.0 Manual
July 2012
Revision 1.1
SMTT 2.0 Handling
General
Preamble
SMTT 2.0 is equipped with a modern and intuitional user interface. A combination of well known
standard interface components and modified user defined components is used to offer the highest
comfort at the given design.
By courtesy of Mick Doherty modified versions of „TabControlEX“ and „TrackBar“ are included to
SMTT 2.0. Mick Dohertys Webseite: http://www.Dotnetrix.co.uk
General Handling
The handling of SMTT 2.0 can be done by mouse or keyboard. Most controls of the user interface are
redundant to offer several different intuitive ways to change the given settings.
The user interface has been optimized to detect and correct any incorrect inputs as far as reasonable.
Incorrect inputs will cause a tooltip to show up at the corresponding textbox that will reveal the valid
range of values without disrupting your workflow.
Please note that some previews are just symbolic and that the displayed test will differ from these
symbolic previews.
The user interface contains tabs that are oriented to the left hand side (see next picture, green
marking 1) to select the class of test and two buttons Start and Exit (see next picture, green marking
2).
The Start button activates the selected test.
The Exit button closes SMTT 2.0.
These controls are available at all time and for all tests. The SMTT 2.0 window can be moved by
drag&drop on any “non-control” area of the window. So you may drag the window by clicking on
every single pixel that is not part of a track bar, button, tab, textbox, link or scrollbar.
Started tests, which run full screen, can be stopped immediately by mouse click or hitting the keys
ESC or SPACE on your keyboard.
Thomas Thiemann – SMTT 2.0 | SMTT 2.0 Handling
16
SMTT 2.0 Manual
July 2012
Revision 1.1
Thomas Thiemann – SMTT 2.0 | SMTT 2.0 Handling
17
SMTT 2.0 Manual
July 2012
Revision 1.1
High Precision Counter
This is the user interface of the High Precision Test that is displayed at every start of SMTT 2.0. The
screenshot shows the user interface with desktop theme “Aero” applied.
The predefined settings are not just pleasant they are also functional.
Please note that the colors blue and yellow are complementary colors of the RGB color scheme. The
complementary contrast causes a contrast exaggeration in the human organ of sight which increases
the ability to read values on screen.
But there is also a technical advantage:
-
-
White text on black background would also generate a high contrast but is much harder to
handle by the camera because of the dark background and the inability to select a proper
aperture automatically.
Black on white and white on black represent just activation or deactivation operations. In
contrast yellow on blue: When a new yellow value should be displayed on the blue
background the liquid crystals within two subpixels (red and green) switch from their
blocking position to the passing position while the third subpixel (blue) is switched from
passing to blocking stance. Both directions are handled at once.
Recommended alternatives: White on black, black on white and white on blue (limited).
Thomas Thiemann – SMTT 2.0 | SMTT 2.0 Handling
18
SMTT 2.0 Manual
July 2012
Revision 1.1
Description
1) Screen Preview (symbolic). This preview illustrates the selected colors and full screen
appearance. Text size and fps values are fixed and just exemplary.
2) Text Preview. Demonstration of selected text size. Please note that the previewed text may
differ from the finally rendered text.
3) Text Size track bar. The height of text can be adjusted between 10 pixels and 100 pixels.
Recommended text size at 60 Hz refresh rate: Adjust the text size to display at least 16 or 17
rows on the screen (see text box #5: „Est. Rows“). This will allow a temporal resolution of
milliseconds on screen.
16/17 rows = display interval for each row approximately 1 millisecond.
32/33 rows = display interval for each row approximately 0,5 milliseconds. Each millisecond
value will be displayed on two successive rows.
4) Text Size input box. Alternative input for the Text Size track bar. Valid values cover the range
between 10 and 100. The input equals the text size (height) in pixels.
5) Estimated Rows on screen (output only). Depending on the selected text size the last row of
text rendered during the text may be partially displayed. This row is not count for the
estimated value, even if there is just one pixel missing.
6) Display Frames Per Second (FPS). During the test an activated FPS rate display can be
deactivated by pressing the key F. (Does not affect the screen preview, only the test)
Thomas Thiemann – SMTT 2.0 | SMTT 2.0 Handling
19
SMTT 2.0 Manual
7)
8)
9)
10)
11)
12)
13)
14)
15)
16)
17)
18)
19)
20)
July 2012
Revision 1.1
Text Color, track bar red: Sets the intensity of the red component of the text color.
Text Color, track bar green: Sets the intensity of the green component of the text color.
Text Color, track bar blue: Sets the intensity of the blue component of the text color.
Text Color, input box red: Sets the intensity of the red component of the text color.
Redundant to track bar 7). Valid range of values: 0 to 255.
Text Color, input box green: Sets the intensity of the green component of the text color.
Redundant to track bar 7). Valid range of values: 0 to 255.
Text Color, input box blue: Sets the intensity of the blue component of the text color.
Redundant to track bar 7). Valid range of values: 0 to 255.
Text Color large-scale color preview.
Background, track bar red: Sets the intensity of the red component of the background color.
Background, track bar green: Sets the intensity of the green component of the background
color.
Background, track bar blue: Sets the intensity of the blue component of the background
color.
Background, input box red: Sets the intensity of the red component of the background color.
Redundant to track bar 14). Valid range of values: 0 to 255.
Background, input box green: Sets the intensity of the green component of the background
color. Redundant to track bar 15). Valid range of values: 0 to 255.
Background, input box blue: Sets the intensity of the blue component of the background
color. Redundant to track bar 16). Valid range of values: 0 to 255.
Background large-scale color preview.
Thomas Thiemann – SMTT 2.0 | SMTT 2.0 Handling
20
SMTT 2.0 Manual
July 2012
Revision 1.1
Gradients
The Gradients section of SMTT 2.0 offers almost endless opportunities to display linear gradients.
These color gradients can be used to distinguish the ability of the monitor for correct and
differentiated color reproduction.
SMTT 2.0 offers user controls to define custom gradients for your very special needs by selecting the
start and end color, the number of steps within the transition between these selected colors and the
number of gradients that should be displayed on the monitor. For fast access to common gradients
used for monitor reviews twelve predefined presets are available.
The default setting displays two linear gradients from black to white with 256 steps each. Due to the
opposite direction both sides of the monitor can be equally evaluated displaying light and dark color
shades at once.
The last Preset button is special: Alternating black and white lines will be displayed on your monitor
to cause Moiré patterns if the image is displayed with a non pixel aligned horizontal scaling. The line
adjustment shifts by 1 pixel to circumvent build in optimizations for plain Moiré tests with straight
lines.
Thomas Thiemann – SMTT 2.0 | SMTT 2.0 Handling
21
SMTT 2.0 Manual
July 2012
Revision 1.1
Description
A. Gradient full screen preview of selected gradient.
B. Manual Settings for your customized gradients.
1. Track bar to set the number of steps within a transition. Min. 2, max. 256.
2. Input box to set the number of steps within a transition. Min. 2, max. 256.
3. Track bar to set the number of gradients. Minimal 1, maximal 16.
4. Input box to set the number of gradients. Minimal 1, maximal 16.
5. Gradient start color selection button. A color dialog will open on click.
6. Gradient end color selection button. A color dialog will open on click.
7. Switch color button. This button switches start and end colors immediately.
8. Checkbox to enable double gradients. Double gradients show two transitions per
row: Start color to end color and end color back to start color.
9. CPU intense Live-Preview. Every change of track bar (1.) will force an update of the
Screen Preview (A.).
C. Presets, predefined standard gradients that may be selected with a simple mouse click.
Thomas Thiemann – SMTT 2.0 | SMTT 2.0 Handling
22
SMTT 2.0 Manual
July 2012
Revision 1.1
Deep Color
The Deep Color section is divided into two categories:
-
-
Deep Color Map renders a special transition between four user defined colors that will be
displayed with 10 bit per color IF your system supports 10 bit per color. If your system does
not support 10 bit (deep color) the output will be automatically reduced to 8 bit per color.
Deep Color Test renders easy accessible test screens. These test screens enables the user to
determine if his system is able to output true 10 bit per component or is limited to 8 bit color
reproduction. This process takes just a few seconds!
To select one of the tests just click on the corresponding monitor symbol. The actual selected test is
displayed as bold text in the middle of the user interface.
Notice: The Deep Color Map preview requires a lot of processing power that will cause a delay in
displaying the user interface. This delay is inevitable to provide the user with this 2D preview.
Thomas Thiemann – SMTT 2.0 | SMTT 2.0 Handling
23
SMTT 2.0 Manual
July 2012
Revision 1.1
Deep Color Map
The Deep Color Map (A) can be selected by clicking either the upper monitor (A-1) or any of the four
color selection buttons.
1.
2. bis 5.
Clickable preview area (8 Bit) for the four color transition.
Color selection buttons with integrated large-scale color preview.
All buttons are aligned with the corresponding edges of the monitor.
Deep Color Test
Previews of the Deep Color Tests (B) are highly exaggerated. The final test displays almost identical
shades of grey. While the previews illustrate 8 bit test screens only the final test screens will display
10 bit color depth test screens if supported.
1. Grey scale test. This is the reference test for 10 bit color depth as it is really easy to evaluate.
2. Primary Color test (Rot, Grün, Blau). Combines four stripes that are created analog to (1).
This test is meant to be an extension to the grey scale test that should be used first.
The selected test will be shown in the middle of the screen at position (C).
Thomas Thiemann – SMTT 2.0 | SMTT 2.0 Handling
24
SMTT 2.0 Manual
July 2012
Revision 1.1
Scaling
Adding User Defined Resolutions
The output of predefined resolutions has been optimized by the graphics card manufacturers to
guarantee the best possible end result under all circumstances. For this reason the drivers tend to
apply some adjustments to the video signal to match the monitor resolutions which omits any scaling
taking place in the monitor.
Example: To display 16:9 content like 1920 x 1080 (FullHD) on a 16:10 monitor with a resolution of
1920 x 1200 display drivers will usually add black borders (60 pixel height) to the upper and lower
edges of the transferred picture. The new signal contains the framed FullHD signal and matches the
native resolution of the monitor so no scaling will occur.
These adjustments are instrumental in usual desktop usage of any plain monitor but will not show
the scaling abilities of the monitor receiving signal inputs from external sources like blue ray players
or high definition receivers. These devices will not adjust the screen output but use true 1080p
signals.
Therefore you have to create custom resolutions to test the scaling abilities of a monitor.
Read the appendix to create a custom resolution: Adding a custom resolution (NVidia)
Thomas Thiemann – SMTT 2.0 | SMTT 2.0 Handling
25
SMTT 2.0 Manual
July 2012
Revision 1.1
(A) Symbolic Screen Preview (shrunk 1080p test screen). The finally rendered test screen is
related to the preview but may also show remarkable differences according to the selected
resolution and applied scaling.
Native Resolutions
(B) Select a resolution that your monitor supports. Each available selection will display a test
screen that has been optimized for the selected resolution.
The test screen for FullHD (1920x1080, 1080p) is special. This test generates a video signal
that displays the FullHD test screen with the FullHD resolution without consideration of the
supported resolutions of the monitor.
Notice: Please note that drivers of modern graphics cards often adjust video signals to match the
monitor capabilities without prior notice. Therefore it will be necessary to add a custom resolution
before starting any scaling tests. See Apendix: Adding a custom resolution (NVidia)
FullHD to Custom Resolutions
(C) Selecting any of the available resolutions will scale a FullHD testscreen to the selected
resolution and display it on the monitor. For some resolutions the aspect ratio is ignored on
purpose to test the internal scaling abilities of the monitor or TV-Set.
Thomas Thiemann – SMTT 2.0 | SMTT 2.0 Handling
26
SMTT 2.0 Manual
July 2012
Revision 1.1
Resolutions that are beyond the maximum supported resolutions of your monitor will be grayed out
to protect your hardware.
The FullHD resolution 1920x1080 (1080p) is excluded from this protection on purpose. Unsupported
resolutions will cause the graphics card driver to scale the output down to a smaller but supported
resolution.
There is no override implied in SMTT to circumvent this downscaling (protection). If your monitor
does not support FullHD (1920 x 1200) resolutions you should not add a custom resolution that will
force the output to an unsupported mode which may harm your hardware.
About SMTT
Information about SMTT and the current license (red circle). All information displayed with green
letters is part of your private license key. It shows your name, email the license type and the date
when the license expires (DD.MM.YYYY).
Thomas Thiemann – SMTT 2.0 | SMTT 2.0 Handling
27
SMTT 2.0 Manual
July 2012
Revision 1.1
Evaluation Hints
High Precision Counter
Please read the High Precision Counter section that is part of the Chapter SMTT 2.0 Handling first.
Besides the TFT monitor / TFT TV set that should be testes you need a CRT monitor that supports
high resolutions, a camera with a manual mode (M) or shutter speed mode (S = shutter speed,
sometimes known as Tv = Time value) to adjust the shutter speed to a fixed value of 1/160s or less.
Please note to deactivate the build in flash light and to omit any other reflections on the monitor that
could impair the readability of the displayed values.
Cameras without adjustable shutter speeds are inappropriate. If your camera does not take pictures
with sufficient brightness at shutter speeds of 1/160s (or less) please try to adjust the aperture (to
low f-stop numbers) and the iso speed (to higher numbers: ISO 800, ISO 1250 or ISO 1600). If you
already adjusted all of these values without sufficient results you may try to increase the monitor
brightness.
CRT monitors and TFT Monitors will be referenced as “CRT” and “TFT” from now on.
Execution of the Test
1. Arrange the TFT to test next to the reference CRT.
2. Connect both monitors to the same graphics card and run them in „Clone-Mode“ to display
the screen content of the primary screen on the secondary screen as well.
3. Select a screen resolution that can be displayed on the TFT without any scaling. The native
resolution of the TFT is the best choice. If your CRT cannot handle this resolution it may be
sufficient to create a custom resolution that has the same height as the native resolution.
E.g.: TFT’s native resolution = 1920x1200 => CRT = 1920x1200 or 1600x1200.
4. Assure that vertical sync (v-sync) is not forced by your graphics card driver. Please select
“Application Preference” (default setting) or “disabled”.
5. Disable any scaling of the screen content in the on screen menu (OSD) of the TFT.
If the influence of scaling modes should be measured each scaling mode has to be analyzed
separately and the selected scaling mode has to be noted.
6. Start SMTT 2.0, adjust the settings of the High Precision Counter Test (HPC) to display at least
16 lines of text. Recommended are 17 to 33 lines for best results. Too many lines will cause
the text to be tiny and hardly readable. Adjust it to a reasonable size.
7. Start the HPC test.
8. Place your kamera in sufficient distance to the monitors so that both will be part of the taken
picture. Adjust the aperture and iso speed to get pictures with readable results.
9. Take several series of pictures for the evaluation.
10. Follow the instructions for the evaluation of the test. A reasonable amount of 50 pictures will
ensure that outliers will not dominate the averaged end result.
Thomas Thiemann – SMTT 2.0 | Evaluation Hints
28
SMTT 2.0 Manual
July 2012
Revision 1.1
Evaluation oft he Test
Example: NEC2690WUXi (1920x1200@60Hz) vs. 21” CRT (1600x1200@90Hz):
Assessment, if the taken picture is qualified for the evaluation process:
1. There are new values displayed “line by line” on both monitors: OK. Contine with (2.)
If columns will show identical values the picture is useless as vertical sync has been forced
by the driver of the graphics card. Solution: Deactivate V-Sync and take new pictures!
2. The brightness of the pictures is acceptable to see the full brightness values as well as the
“vanishing” values.
3. The CRT shows bright and dark areas. If there is no dark area the shutter speed is set
completely wrong and the picture cannot be used. Reset the shutter speed and take new
pictures.
The actual distribution of bright and dark areas depends on the used phosphor (illuminating
material in the tube) and the refresh rate of the monitor and does not influence the results.
Excecution of Evaluation
1. Find the most up-to-date value of the CRT and write it down.
The most up-to-date value of the CRT is the bright one right above the darkest area. This
value will also be the highest value on screen.
2. Find the most up-to-date value of the TFT and write it down.
The most up-to-date value of the TFT can be found at the lower end of a column that fades
out from top to bottom. In the example above: Left Column, middle of the monitor.
3. Subtract the TFT value from the CRT value.
62.001 - 61.975 = 26. => The example shows a difference of 26 ms.
4. Repeat this procedure for about 50 photos and take the average of all values.
The result is a good approximation for the display lag of the tested TFT monitor.
Two examples will follow next. The first one is the example from above with annotations what is
actually displayed on screen. Inscribed to the picture are column switches as well as the oldest (red)
and newest (green) values on screen. For the evaluation process only the newest (green) values are
of interest.
Thomas Thiemann – SMTT 2.0 | Evaluation Hints
29
SMTT 2.0 Manual
July 2012
Revision 1.1
To follow chronological sequence the photo has to be read in this order:
-
-
-
Start at the oldest value marked by a red arrow.
Follow that column downwards (increasing values) until a column switch occurs. If you reach
the lower edge of the screen without a column switch continue to read the same column at
the top of the screen.
If you encounter a column switch in the first (left) column you will have to switch to the next
column (middle) at the same height and continue to read that column downwards as before.
If you encounter a column switch in the middle column switch to the next column on the
right.
If you encounter a column switch in the right column switch to the first column on the left.
As soon as the intensity of the text decreases you are approaching the most actual value on
screen.
The intensity decreases as the inertia of the liquid crystals cause each color shift to take
several milliseconds that is not yet finished or has just begun for the most actual values.
Note: The oldest values show decreasing intensity as well but in the opposite direction: The yellow
text is overwritten by blue background, the old text seems to fade in from top to bottom.
Example 1:
Example 2:
Thomas Thiemann – SMTT 2.0 | Evaluation Hints
30
SMTT 2.0 Manual
July 2012
Revision 1.1
Deep Color Test
This test reveals to the user if the combination of graphics card, drivers, cabling and monitor is
qualified for displaying deep color content with 10 bit per color.
Required Hardware
- A (workstation) graphics card that supports 10 bit per color output.
November 2011: Only the following models support 10 bit per color component: NVidia
Quadro FX x800, Quadro 3000/4000/5000 (or newer) and AMD FirePro Vx800 and Vx900.
NOT capable of 10 bit color reproduction are all predecessors and all available desktop
graphics cards.
- Display Port cabling
November 2011: With the exception of some medical displays all available displays that
support 10 bit color depth require Display Port cabling for 10 bit color signals.
- A monitor that supports 10 bit signal input, internal high precision color processing and a
10 bit panel for deep color reproduction.
Required Software
- Up-to-date graphics driver
- SMTT 2.0 (including SMTT 2.0 software requirements)
Excecution of the Test
- Connect the monitor with Display Port cabling to the graphics card.
Depending on the monitor model a brief warm up period has to be taken into account.
Please see the monitor manual for details.
- Assure that brightness and contrast are well adjusted.
- Start SMTT 2.0.
- Open the “Deep Color” tab.
- Select the grayscale test “Deep Color Test – Greyscale” and click Start.
Evaluation
Just take a look at the monitor. As soon as the eye has adjusted to the displayed content you will
notice several different shades of grey.
Displayed are two rows of gray color patches. The second one is a reversed version of the first row.
With 8 bit per color you will see four patches of slightly different brightness that are colored with
successive gray shades of the 8 bit color ramp. With 10 bit per color you will see the same shades of
gray as starting and ending color but divided up into 16 successive shades of the 10 bit color ramp.
So if the transition between start and end color of one row is divided into four (4) shades you will
have the usual 8 bit color reproduction.
As soon as you can see “more than four”, ideal would be 16, shades within a single row you will have
10 bit color reproduction on screen.
The previews below are highly exaggerated in terms of the contrast between the color patches.
These examples do not show the final result on screen as the differences between adjacent colors
are tiny. These examples are just used to explain the 16-shades result of 10 bit monitors even if a 8
bit monitor is used.
Thomas Thiemann – SMTT 2.0 | Evaluation Hints
31
SMTT 2.0 Manual
July 2012
Revision 1.1
Example for 8 bit color reproduction. Contrasts are highly exaggerated.
Example for 10 bit color reproduction. Contrasts are highly exaggerated.
Notice: Even at 8 bit it is hard to distinguish two adjacent colors from another. To train your eye start
at the cross at the centre of the screen and proceed with the outer “hard contrasts” between the
upper and the lower row patches. The contrast is three times (15 times) higher than the contrast
between two adjacent patches within the 8 bit (10 bit) grey scale ramp.
Some monitors may not even able to reproduce four shades per row at 8 bit color depth.
Thomas Thiemann – SMTT 2.0 | Evaluation Hints
32
SMTT 2.0 Manual
July 2012
Revision 1.1
Scaling
The scaling tests help to check for pixel-by-pixel reproduction and correct aspect ratio with and
without scaling. Special test screens for all resolutions listed at “Native Resolutions” are available.
Characteristics of Test Patterns
All scaling test screens in the range from FullHD (1920x1080) to 2560x1600 are part of a “all-in-one”
testscreen that combines key features for all these resolutions. Therefore it is usual and on purpose
to see areas for the lower resolutions when testing higher resolutions like 2560x1440.
The resolution 1280x720 (720p) is not part of the larger test screen. As this resolution is also used for
some HD TV content it requires special care and attention. To handle 1080p and 720p signals with a
comparable level of comfort and quality it was necessary to adjust some on screen elements.
Details
There are scales at the edges of the screen, divided into 5 pixel steps, that show the cutoff. The green
mark is the outmost pixel that should be visible if a 16:9 image is zoomed to full height on a 16:10
monitor while keeping the correct aspect ratio. These marks can be used to control the aspect ratio
as well as the alignment/centering.
Scale for 1280x720 (720p):
Scale for 1920x1080 (1080p):
There is an improved scale for the first 25 pixels. 1 pixel wide red lines show immediately of a pixel is
already cut off or still visible. A missing red line at the tip of an arrow signals that the next value
(visible red line) has to be used.
Left picture: The white border (outmost visible pixel of each testscreen) is visible as well the red mark
at the “0px” arrow. I.e.: 0px mark visible 0 pixel cut off.
Thomas Thiemann – SMTT 2.0 | Evaluation Hints
33
SMTT 2.0 Manual
July 2012
Revision 1.1
Right picture: The white boarder is gone as well as the red mark at 0px and 1px arrows. The red Line
at 2px is visible 2 pixel are cut off.
For cut offs between 0 and 5 pixels caused by scaling this scale offers pixel-by-pixel precision. From 5
to 25 pixels the scale offers a resolution of 5 pixels and is continued by the simple scale mentioned
before.
A gray square fills the center of all test screens that is surrounded by white circles and contains a
black circle.
Deformations to square and circles are noticed easily and reveal scaling that disregards the correct
aspect ratio. E.g.: Streched 16:9 signals to a 16:10 screen will cause the circles to be transformed to
ellipses.
Thomas Thiemann – SMTT 2.0 | Evaluation Hints
34
SMTT 2.0 Manual
July 2012
Revision 1.1
The square is colored medium gray to alleviate the selection of aperture and shutter speed when
taking photos of the test screen.
The two pixel wide pattern at the center assists the autofocus of the camera.
Outside of the circles there are four Moiré test patterns:
-
Upper left corner: 1x1 pixel chessboard pattern
Upper right corner: 2x2 pixel chessboard pattern
Lower left corner: 1 pixel line pattern horizontal and vertical
Lower right corner: 1 pixel wide diagonal white lines on black and black lines on white.
The quality of the used scaling can be rated based on the manifestation of the observed Moiré
patterns. Horizontal and vertical aligned lines (lower left hand corner) help to determine if the scaling
has just been applied to one dimension.
e.g.: A vertically stretched picture will only show Moiré patterns within the horizontal lines.
Thomas Thiemann – SMTT 2.0 | Evaluation Hints
35
SMTT 2.0 Manual
July 2012
Revision 1.1
Known Limitations
Visual C++ Runtime Libraries (1)
Symptom (old SMTT 2.0 versions up to v2.0.4)
SMTT 2.0 (up to v2.0.4) installs Visual C++ 2008 Runtime Libraries as well as Visual C++ 2010 Runtime
Libraries.
Description
SMTT 2.0 (up to version v2.0.4) uses SlimDX (September 2011). This version of SlimDX has a small
bug, see Bug 838. Caused by an incorrect manifest SlimDX pretends to need Visual C++ 2008 runtime
libraries which is not the case.
This error has been detected and reported by Thomas Thiemann during the development of SMTT.
Newer versions of SMTT 2.0 (v2.5.0) do not have this issue because SMTT 2.0 (v2.5.0) uses the
updated SlimDX (Januar 2012) version that does no longer pretend to require Visual C++ 2008
Runtime Libraries.
Impact on SMTT 2.0
There is no impact on the function of SMTT 2.0. The installation may take additional time as the
setup has to check for and install Visual C++ 2008 runtime libraries to omit SMTT 2.0 (to be more
precise: SlimDX) to throw an unhandled exception.
Troubleshooting
As soon as an updated version of SlimDX is available SMTT 2.0 will be updated.
Visual C++ Runtime Libraries (2)
Symptom
The user interface of SMTT 2.0 works well but as soon as you click the START-Button to start a test
the process of the test crashes because of an unhandled exception.
Thomas Thiemann – SMTT 2.0 | Known Limitations
36
SMTT 2.0 Manual
July 2012
Revision 1.1
Description
SMTT 2.0 (up to SMTT 2.0 version v2.0.4) uses SlimDX (September 2011). This version of SlimDX uses
the runtime libraries Visual C++ 2008 and Visual C++ 2010.
SMTT 2.0 (SMTT 2.0 version v2.5.0 and newer) uses SlimDX (Januar 2012). This version of SlimDX uses
Visual C++ 2010 runtime libraries only.
These prerequisites are resolved by the setup as needed.
In rare conditions one of the Visual C++ libraries is partially removed or incorrect installed but gets
detected by the SMTT setup as being installed correct.
Known exceptions that are related to this problem:
-
System.IO.FileLoadException
System.IO.FileNotFoundException
Troubleshooting
Reinstall Visual C++ 2008 SP1 runtime libraries (SMTT 2.0 up to version v2.0.4) and Visual C++ 2010
SP1 runtime libraries (all versions of SMTT 2.0) directly from Microsoft.
Download-Links 32 Bit:
Visual C++ 2008 SP1 (x86)
Visual C++ 2010 SP1 (x86)
Download-Links 64 Bit:
Visual C++ 2008 SP1 (x64)
Visual C++ 2010 SP1 (x64)
The downloads are about 6MB in size. Please note that 64 bit versions of SMTT 2.0 will need the 64
bit versions (x64) of the corresponding runtime library as well.
Note: Microsoft is responsible for the content of the Microsoft download website and the content of
the downloaded files. To find the most up-to-date download just enter the full description as given
above into the search field of your preferred search engine (e.g. Bing, Google, etc).
Thomas Thiemann – SMTT 2.0 | Known Limitations
37
SMTT 2.0 Manual
July 2012
Revision 1.1
Appendix
Adding a custom resolution (NVidia)
Notice
Note: Defining custom resolutions that your monitor does not support may cause irreparable
damage to your hardware. Please do not define any resolutions that are not supported by your
monitor. Please see the monitor manual for details. If you do not exactly know which resolutions are
supported it is recommended to ask a professional. All settings at your own risk! Neither SMTT 2.0
nor the author of SMTT 2.0 are responsible for your settings or the consequences of your custom
settings like direct or indirect damages to your hardware.
Procedure
Open the NVIDIA control panel, open the Display menu (Anzeige) and select Change resolution
( Auflösung ändern) (next screenshot, arrow 1)
To define a new custom resolution click the Add resolutions… ( Anpassen…) button on the
right (screenshot, arrow 2)
Thomas Thiemann – SMTT 2.0 | Appendix
38
SMTT 2.0 Manual
July 2012
Revision 1.1
The “Add Resolutions” window opens that shows all userdefined resolutions that are already
available.
To add a custom resolution click the large button (red arrow) Create Custom Resolution…
( Benutzerspezifische Auflösung erstellen…)
The upcommign dialog will ask for detailed technical information regarding the custom resolution.
Notice: Unsupported resolutions may harm your monitor. Do not define any resolutions that are
unsupported by your monitor. The author of this manual / the author of SMTT 2.0 is not responsible
for any damage that is (directly or indirectly) caused by the use of unsupported resolutions. Please
check every setting twice to be compatible with your monitor and ask a professional before applying
any custom resolution.
Notice: The following example applies to a monitor that can handle a resolution of 1920x1080
(FullHD, 1080p). This example may not apply to your monitor. Consult the manual of your monitor or
ask a professional for resolutions that are supported by your actual monitor.
Thomas Thiemann – SMTT 2.0 | Appendix
39
SMTT 2.0 Manual
July 2012
Revision 1.1
The “Create Custom Resolution” dialog is separated into two parts. The lower part with detailed
timing information will open as soon as you click on Timing
Example for 1920x1080 (FullHD, 1080p):
1.
2.
3.
4.
5.
Enter the horizontal resolution: 1920 Pixel
Enter the vertical resolution: 1080 Pixel
Check the refresh rate: 60 Hz
To show the detailed timing settings click on Timing
Click on the dropdown control to open the available options. “Automatic” is the default value
that has to be changed.
6. Select CVT – Reduced Blanking
7. Test and apply your settings by clicking the Test button.
Your new custom resolution will be tested for 15 seconds. To confirm that your setting is correct
(proper screen content without distortion or warning messages) click Yes.
The “Add Resolutions” window will be shown next. In contrast to the first time your new custom
resolution should be listed.
Thomas Thiemann – SMTT 2.0 | Appendix
40
SMTT 2.0 Manual
July 2012
Revision 1.1
Make sure that the checkbox infront of the custom resolution is checked. To close this dialog click
OK
After following all the afore mentioned steps the NVIDIA Control Panel will list your custom
resolution in the “Display - Change Resolution” menu in the “Resolution:” list under “Custom”
(Benutzerdefiniert). Example for 1920x1080:
You display driver is now aware of a new custom resolution that will not be “optimized” to fit your
monitor. As you can see in the example the predefined resolution 1920x1080 (listed under “PC”) was
already there and it forced the driver to add borders to the 16:9 1920x1080 content to match the
native resolution of 1920x1200.
It is not necessary to apply the custom resolution to your desktop to run the scaling test for the
resolution. SMTT 2.0 will automatically switch to this resolution when entering the hardware
accelerated Direct3D display mode.
Thomas Thiemann – SMTT 2.0 | Appendix
41
SMTT 2.0 Manual
July 2012
Revision 1.1
Extended Installation Guidelines (optional)
This sections handles additional installations that are needed if your system does not have Visual C++
runtime libraries, DirectX (Jun2010) or the Dotnet Framework 4.0 (full) installed.
Dotnet Framework 4 and Visual C++ Runtime Libraries
In case Dotnet Framework 4 (Full) is not installed the following dialog appears at the start of
Setup.exe:
Please read Microsofts EULA
ULA and continue the installation when you accept their terms by clicking
Accept
In case
ase of missing Visual C++ runtime libraries the next dialog will show up:
up
Thomas Thiemann – SMTT 2.0 | Appendix
42
SMTT 2.0 Manual
July 2012
Revision 1.1
Depending on the missing runtime(s) the dialog may contain just one of the listed entries.
To install the displayed Visual C++ runtimes to your system click Install
The setup starts to download the required files from Microsoft. Download size of the Visual C++
runtime libraries is about 5 MB. The Dotnet Framework 4 (Full) is about 50 MB in size. That sums up
to a total of 55 MB for downloading.
Depending on your internet connection this download may take several minutes or hours.
As soon as the last download is completed Visual C++ 2010 runtime libraries will be installed.
Please read the Microsoft license agreement, agree to the terms by activating the upper checkbox
(Arrow 1, “I have read the license agreement…”) and continue the installation by clicking on
Install / Installieren
Thomas Thiemann – SMTT 2.0 | Appendix
43
SMTT 2.0 Manual
July 2012
Revision 1.1
The installation ends with a brief confirmation dialog. End the VC++ 2010 runtime setup by clicking
Done / Fertig stellen
The Installation of the Dotnet Framework 4 (full) will be started automatically as well. Because of the
size of this software the installation will take considerable more time.
This is the end of the install process for the following SMTT 2.0 software requirements:
-
Visual C++ 2010 Runtime Libraries
Dotnet Framework 4 (Full)
If your system does not meet the software requirement “DirectX (Jun 2010)” please continue with
the next chapter.
Thomas Thiemann – SMTT 2.0 | Appendix
44
SMTT 2.0 Manual
July 2012
Revision 1.1
DirectX (Jun 2010)
DirectX is updated by Microsoft once in a while to support newest features and fix existing bugs.
SMTT 2.0 requires DirectX 11 but accesses DirectX 10 functionality as well. The required support for
the used functions is added to your system by installing DirectX version „Jun 2010“ (or later).
Downloadsize DirectX (Jun2010): 96 MB.
It is recommended to install DirectX in advance to SMTT 2.0 to reduce the installation time.
If DirectX Jun2010 is not installed to your system the setup will show the dialog:
The Setup will open a direct download from Microsoft as soon as you click Yes.
The security alert dialog offers options for starting the downloaded file immediately from a
temporary folder or to save it to a custom destination for later use. It is up to you if you prefer less
interaction ( Run) or if you want to keep the downloaded executable for future installations
Save as / Speichern.
Thomas Thiemann – SMTT 2.0 | Appendix
45
SMTT 2.0 Manual
July 2012
Revision 1.1
If you decide the latter it is recommended to store the downloaded file directx_Jun2010_redist.exe,
as the installation files of SMTT 2.0, in the folder c:\temp\
Browse to the folder c:\temp\ in the “Save as” dialog and save the file Save as / Speichern
The download starts automatically.
Thomas Thiemann – SMTT 2.0 | Appendix
46
SMTT 2.0 Manual
July 2012
Revision 1.1
Subsequent to the download a dialog is displayed:
To execute the downloaded file select Open / Ausführen
A security warning informs you about the risks of starting a downloaded file from the internet.
Proceed with Open / Ausführen
Thomas Thiemann – SMTT 2.0 | Appendix
47
SMTT 2.0 Manual
July 2012
Revision 1.1
The nect dialog will display the DirectX software license terms.
Agree these terms by clicking Yes
You have to select a temporary folder to extract the DirectX installation files. This folder will contain
the DirectX setup file.
Enter c:\dxtemp as location (temporary folder) and continue OK
A confirmation dialog will ask to create the folder if it does not exist already.
Confirm the creation of the temporary folder by clicking Yes
The installation files of DirectX will be extracted to the temporary folder.
Thomas Thiemann – SMTT 2.0 | Appendix
48
SMTT 2.0 Manual
July 2012
Revision 1.1
To start the Setup of DirectX open the folder c:\dxtemp (red arrow 1) and open the file
DXSETUP.exe (red arrow 2).
Thomas Thiemann – SMTT 2.0 | Appendix
49
SMTT 2.0 Manual
July 2012
Revision 1.1
At first the DirectX setup will present the DirectX license agreement.
To agree with the terms of the license select the first option „I agree…“ and continue the
installation with Next
Start the installation by clicking Next
Thomas Thiemann – SMTT 2.0 | Appendix
50
SMTT 2.0 Manual
July 2012
Revision 1.1
The setup installs DirectX components to your system.
As soon as the setup finished a brief confirmation dialog will be presented.
To end the installation of DirectX click Done
Service Packs (installation)
A detailed installation manual for Microsoft Service Packs would burst all limits. SMTT 2.0 setup will
open the Microsoft Service Pack Website for you to handle it yourself. Please contact a professional
for assistance if needed.
Thomas Thiemann – SMTT 2.0 | Appendix
51
SMTT 2.0 Manual
July 2012
Revision 1.1
Change Log
2012-06-03
Updated for the new version of SMTT 2.0 (v2.5.0).
- Software Requirements: Removed VC++ 2008 runtime libraries
- Extended Installation Guidelines (optional), subsection Dotnet Framework 4 and
Visual C++ Runtime Libraries: Removed VC++ 2008 runtime libraries
- Known Limitations Visual C++ Runtime Libraries (1) and Visual C++ Runtime
Libraries (2): Fixed for SMTT 2.0 v2.5.0
- Fixed translation and typo
- Added Change Log
Supplement
Legal Restrictions
The content of this manual is protected by copyright laws. Duplication of the manual is forbidden. If
you intend to make use of the manual or of parts of this manual for your work please contact the
author first: Thomas Thiemann.
All symbols, graphics and trade marks are property of their owners.
Microsoft, DirectX, Visual C++, Windows et al are registered trademarks from Microsoft.
SlimDX is an OpenSource project under MIT license. All symbols and trademarks corresponding
SlimDX belong to the SlimDX project.
SlimDX website: http://www.slimdx.org/
TabcontrolEX and TrackBars are customized versions for SMTT 2.0, with kind permission of Mick
Doherty who contributed to the customizations for SMTT 2.0 himself.
Mick Dohertys’ website: http://dotnetrix.co.uk
The products sold by Thomas Thiemann are not intended for and will not be used in life support
systems, medical equipment, nuclear facilities or systems, automobile, aircraft, automobile devices,
aircraft devices, automobile/aircraft/emergency communication devices or other critical systems
whose failure to perform be reasonably expected to result in significant injury or loss of life or
catastrophic property damage. Accordingly, Thomas Thiemann disclaims any and all liability, and
should buyer use or sell such products for use in such ultra-hazardous applications, it does so entirely
at its own risk. Furthermore, buyer agrees to fully indemnify, defend and hold Thomas Thiemann
harmless for and against any and all claims, demands, actions, litigation, and proceedings of any kind
arising out of or related to such ultra-hazardous use or sale.
©2011, Thomas Thiemann, all rights reserved.
Thomas Thiemann – SMTT 2.0 | Change Log
52