1
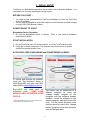
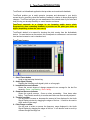
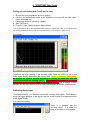
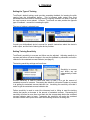
(audio-controlled version)
User’s Manual
version 1.3.0
(May, 2009)
Beyond VR, LLC
2709 SW 29th street
Suite 103
Topeka, Kansas 66614-2000
-1-
Table of Contents:
SECTIONS:
1. Initial Setup….............................................................................................................................3
Before you start..........................................................................................................................3
Almost ready to start ..................................................................................................................3
Start Installation .........................................................................................................................3
Activation Code (Purchasing and Transferring License) ...........................................................3
2. Biofeedback Introduction .........................................................................................................3
Our age of stress........................................................................................................................4
Body Language ..........................................................................................................................4
Biofeedback Explained...............................................................................................................4
Listen to you skin .......................................................................................................................4
3. ToneTrend Introduction ............................................................................................................5
ToneTrend screen......................................................................................................................5
Start / Pause button ...................................................................................................................5
Audio Signal Display ..................................................................................................................5
Immediate Success Indicator.....................................................................................................5
Sustained Success Indicator......................................................................................................5
Timeline scrollbar .......................................................................................................................5
Pitch Range scrollbar .................................................................................................................5
4. Starting ToneTrend ...................................................................................................................6
Getting up and running...............................................................................................................6
Calibrating Audio Input...............................................................................................................6
Re-calibrating .............................................................................................................................7
5. Training…… ...............................................................................................................................8
Setting up the Type of Training..................................................................................................8
Setting the Training Sensitivity...................................................................................................8
6. Feedback…… .............................................................................................................................9
Selecting the Type of Feedback. ...............................................................................................9
CD Feedback .............................................................................................................................9
Audio file Feedback....................................................................................................................9
Tactile Feedback........................................................................................................................9
7. Display Settings….. .................................................................................................................10
Auto-scroll ................................................................................................................................10
Showing the Incoming Signal’s Frequency ..............................................................................10
Saving the Display Trace .........................................................................................................10
8. Event Markers ….. ...................................................................................................................11
APPENDIX A: TROUBLE-SHOOTING.................................................................................................12
Audio Issues ...........................................................................................................................................12
-2-
1. INITIAL SETUP
ToneTrend is a biofeedback application that provides music and tactile feedback. It is
controlled by an incoming audio signal varying in pitch.
BEFORE YOU START…
9 You need to have downloaded the ToneTrend installation or have the ToneTrend
setup CD available.
9 You will need a biofeedback device that outputs a continual audio tone that changes
in pitch (GSR2, EDA Bioscan, others).
ALMOST READY TO START..
Biofeedback Device Preparation
9 Be sure the biofeedback device is working.
instructions for details.
Refer to your device’s installation
START INSTALLATION.
1. Put the ToneTrend setup CD in the computer, or run the ToneTrend download.
2. Follow the on-screen instructions. The computer may need to reboot to update
system files that are already in use.
ACTIVATION CODE (PURCHASING and TRANSFERRING LICENSE)
To unlock and activate the software,
press the “Get Activation” button to
send BeyondVR your site code, MID,
and serial# to [email protected]
BeyondVR will send back an
activation code.
KEEP YOUR
SERIAL# AND ACTIVATION CODE
ON FILE.
* GSR2 is a Registered Trademark of Thought Technology Ltd.
* EDA Bioscan Trademark of Mind Alive Inc.
The license can be transferred to a
different computer by using the
“change license” program on the
computer with the software already
installed. Install the software on the
desired computer and get the new site
code. Put the current activation code
and the new site code in the “change
license” program and a new activation
code will be generated.
-3-
2. BIOFEEDBACK INTRODUCTION
Our age of stress
It is ironic that today, when technology and science have provided our society with so
much, when so many of us eat better, live better, enjoy so much leisure and comfort
than any other people in history, we can still suffer from stress and tension.
Unless we live protected lives as virtual hermits on some island paradise, stress is with
us – unfortunately for many far too much. Fortunately, the ability to calm down and relax
deeply is a powerful antidote for the effects of stress. The problem is that although all of
us are born with this ability, it’s something we often have to re-learn.
Body Language
When you’re under extreme stress, your body copes in ways that are very noticeable.
Your heart pounds, your hands perspire, muscles tense up, extra adrenaline is released.
But not all stress is so extreme. Unfortunately, what can really wear us down are lower
levels of stress that occur constantly and that most of us accept as inevitable. Our
bodies respond to this type of stress with much lower signals that mostly go unheeded.
Biofeedback enables one to observe and modify these signals.
Biofeedback Explained
Biofeedback combines aspects of physiology, psychology, and technology. Biofeedback
techniques use electronics to detect and amplify internal body activities too subtle for
normal awareness.
Once you are able to observe these activities, you can then try to modify them. Because
you learn immediately whether you have succeeded or not, you can gradually teach
yourself to product the desired results.
Listen to your skin
Variations in your skin’s sweat gland activity and pore size are controlled by the
sympathetic nervous system. When you become aroused in any way (excited,
frightened, disturbed, etc.) the system activates chemical and physical changes all
through your body, and this is reflected in the skin’s sweat gland and pore activity.
The physical changes to sweat glands and pores alters the way electricity flows over
your skin. Galvanic skin response (GSR), electro-dermal response (EDR), and skin
conductance level (SCL), are methods of measuring the electrical resistance or
conductance of the skin. Your skin’s electrical resistance increases when you are calm
and relaxed. When you tense up (even slightly), your skin resistance decreases. Thus,
these electrical measurements can be used as indicator’s of one’s arousal level.
-4-
3. ToneTrend INTRODUCTION
ToneTrend is a biofeedback application that provides music and tactile feedback.
ToneTrend enables you to easily perceive increases and decreases in your body’s
arousal level by providing visual and auditory feedback in relation to those physiological
changes. ToneTrend can give you new awareness of the internal state of your mind and
body to help you develop the ability to control tension and stress.
ToneTrend responds to a change in an incoming audio tone’s pitch.
Progressively more rewarding feedback is provided as the pitch goes lower or
higher (depending on how the user sets it).
ToneTrend’s default is to reward for lowering the pitch coming from the biofeedback
device. For most devices on the market, this corresponds to a decrease in one’s arousal
level and an increase in one’s relaxation level.
ToneTrend screen:
1 – Start / Pause button
Used to start and stop the training.
2 – Audio Signal Display
Displays the incoming audio signal’s pitch on a line graph.
3 – Immediate Success Indicator
Shows the current degree of change compared to an average for the last five
seconds. Green = succeeding. Red = failing.
4 – Sustained Success Indicator
Shows the overall success. Goes up when succeeding. Goes down when
failing. ToneTrend’s sensitivity to success and failure can be manually adjusted.
5 – Timeline scrollbar
Can be used to increase or decrease the amount of time displayed in the Audio
Signal Display window by dragging the edges of the bar. It can also be used to
scroll around in the range.
6 – Pitch Range scrollbar
Can be used to widen or narrow the frequency range displayed in the Audio
Signal Display by dragging the edges of the bar. It can also be used to scroll up
or down through the range set.
-5-
4. STARTING ToneTrend
Getting up and running with ToneTrend is easy.
1. Be sure that your biofeedback device is working.
2. Connect your biofeedback device to the computer’s mic input with an audio cable*
(line-in supported too).
3. Connect the device to yourself (if needed).
4. Start ToneTrend.
5. Press the “Start Training” button to begin training.
* It is a good idea to use an optically-isolated cable instead of a regular audio cable, as it will eliminate the
very unlikely possibility of shock in case of a major malfunction in your computer or power source.
You will see:
ToneTrend will begin listening to the incoming audio signal and plotting a line on the
Audio Signal Display representing the signal’s pitch. Green = succeeding. Red = failing.
As long as the signal’s pitch is decreasing or staying the same, the user will
succeed at meeting the training criteria. If the signal’s pitch starts to go up, the
trainee will begin to fail at meeting the training criteria. The sustained success
indicator will rise when success criteria is met, and fall when the criteria is not being met.
Calibrating Audio Input
ToneTrend will notify you if there are issues with incoming audio signal. This includes if
there is no signal detected, or the signal is too low or high in pitch to be displayed on the
Audio Signal Display.
If you see the following:
There is a problem with the
incoming signal. It is either too
quiet, or the cable is disconnected.
-6-
If you see the following:
The audio signal’s pitch is too low to
be displayed.
If you see the following:
The audio signal’s pitch is too high
to be displayed.
These things may be frequently resolved by simply adjusting the biofeedback device, but
sometimes it may be important to define the biofeedback device’s audio output range in
ToneTrend itself. This is accomplished by the Signal | Re-Calibrate menu.
If the calibration process is not done, the default signal range that will be used and
displayed when training, is 500Hz to 15,000Hz, with the mic sensitivity ¼ of the
maximum level. If the biofeedback device emits a tone within this range by default, then
there is no need to define a new range.
How to recalibrate:
1) First, set the device to make its highest tone
and press the “Set High Tone” button.
2) Next, set the device to make its lowest tone and
press the “Set Low Tone” button.
3) Set the device so that its output is within the
range that was just defined.
4) Use the “Sensitivity” knob to set the input level
if the signal is too weak.
5) Press the “Ready” button.
-7-
5. TRAINING
Setting the Type of Training
ToneTrend’s default training mode provides rewarding feedback for lowering the pitch
coming from the biofeedback device. This is because audio output from most
biofeedback devices used for reducing stress or inducing relaxation will lower in pitch as
the user becomes more relaxed. However, ToneTrend can also provide the opposite
type of feedback – reward for increasing the pitch.
The type of training is selected here:
Consult your biofeedback device’s manual for specific instructions about the device’s
audio output, and the kind of training the device provides.
Setting Training Sensitivity
ToneTrend’s sensitivity to success and failure can be adjusted. Adjusting sensitivity to
success and failure will cause changes in the way the feedback is presented, and is also
reflected in the sustained success indicator (see page 5).
The training sensitivity settings are found here:
Sensitivity to success
and failure are set
independently of each
other.
Success sensitivity is used to control how easy or hard it is to get the amount of
sustained success to increase. Decreasing the sensitivity will make it harder to succeed
in at getting the sustained success indicator rise. Increasing the sensitivity will make it
easier to get the sustained success indicator rise.
Failure sensitivity is used to control the tolerance level to failing to meet the training
criteria that causes a decrease in the amount of sustained success. Decreasing the
sensitivity will allow for more time to get back into the success state before the sustained
success indicator starts to lower. Increasing the sensitivity will make the sustained
success indicator more quick lower itself when training criteria is not being met.
-8-
6. FEEDBACK
Selecting the Type of Feedback
ToneTrend can provide audio feedback by modulating the playback volume level of a
DVD, CD, or audio file in relation to the user’s level of sustained success.
CD/DVD Feedback
If you would like to use CD or DVD feedback, but put the disk in after ToneTrend started
and press play.
NOTE: A DVD codec supporting Windows Media Player needs to be installed for
ToneTrend to support DVD playback.
Audio file Feedback
ToneTrend can use MP3, WAV, MPEG, AVI, and WVM files for feedback.
Select a media file to use from this menu:
Tactile Feedback
ToneTrend can provide tactile feedback. A PC game controller or joystick supporting
tactile feedback is required for this feature. Simply connect the controller to the
computer, and start ToneTrend.
The tactile feedback will only be felt when the user is succeeding. The tactile effect’s
intensity will increase and decrease with the training’s sustained success level.
-9-
7. DISPLAY SETTINGS
Auto-scroll
By default, ToneTrend’s trace display will automatically scroll to the right when the data
being plotted goes off to the side of the visible area of the audio signal display.
Auto-scrolling can be turned on/off here:
Showing the Incoming Signal’s Frequency
Tone trend can display the frequency of the incoming audio along the left side of the
signal display area.
The displaying of the signal frequency can be turned on/off here:
Saving the Display Trace
A spreadsheet can be exported or screen shot saved of the audio signal by using the
following menu:
- 10 -
8. EVENT MARKERS
An event marker can be placed in the trace area. Be sure ToneTrend is the application
that is selected and has the focus and simply press a number key. Each number has its
own particular color.
- 11 -
APPENDIX A: TROUBLE-SHOOTING
Audio Issues
CD Playback and Control.
Windows defaults to automatically checking a CD when it’s inserted into the CD drive.
Normally this is a good thing. However, the CD auto-detection can be an annoyance if you wish
to use the CD feedback capabilities of ToneTrend. This is because the default CD player
software (Windows Media Player, Real Player, WinAmp, etc.) will automatically begin playing a
CD when it’s first inserted. Once training begins, ToneTrend may attempt to play the CD as well.
At this point, depending on how the default CD playing software is configured, one of two things
will happen:
1) ToneTrend will not play the CD because the default CD player application won’t share access
to the CD drive with ToneTrend.
2) ToneTrend will also begin playing the CD resulting in a cacophony of sound until the default
CD player is turned off.
One way to sidestep this is to put the CD in the drive before you launch a ToneTrend and close
the default CD player when it starts to play the CD, but that is cumbersome. The best way to
resolve this is to turn off the CD insertion auto-detection for music CDs. In WindowsXP, autodetection of an audio CD can be turned off independently from the detection of a software CD by
right-clicking on the CD drive and picking Properties.
I can’t hear the low tones.
The most common reason for this is because the speakers in use do a poor job reproducing low
tones (bass). A sound system with a sub woofer is recommended.
All the sounds are “fuzzy sounding”, distorted, and/or making “crackling sounds”.
Double-click on the
icon in the system tray. This will bring up the Windows sound
mixer. Note whether or not the slider for wave audio playback is set to 100%. Set the wave
audio slider between 40-75%. Set the master volume slider between 40-75%.
If changing the volume levels has no effect on sound fidelity, then the problem could be related to
the quality of the sound card or the drivers for the sound card. Be sure you are using the most
recent drivers for the sound card. If the problem persists after updating drivers, it is most likely
the quality of the sound card/chip itself.
- 12 -