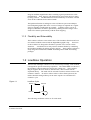
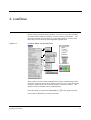
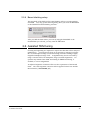
1
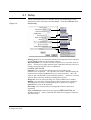
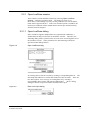
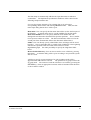
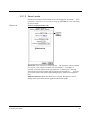
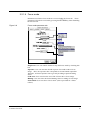
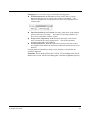
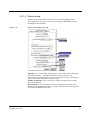
LowDose for JEOL
--Software LowDose and Advanced Data Acquisition—
Version 1.1
1. Introduction
This is the LowDose software for the user of JEOL electron microscopes.
The LowDose software is a Plug-In for use in Gatan’s DigitalMicrograph 3.4,
or later, for both MacOS and Windows platforms. The LowDose Plug-In
assists users to acquire images or diffraction patterns directly from Gatan
MultiScan (MSC)/BioScan cameras with minimum electron doses to the beamsensitive samples.
This LowDose User’s Guide is written to provide a procedure for installation of
the Plug-In, instructions to the basic functions of the LowDose software and
some general tips on operation and troubleshooting. This Guide assumes the
user is familiar with image acquisition and manipulation within
DigitalMicrograph and only addresses those features specific to the LowDose
software.
1.1 Features
1.1.1 Advanced software LowDose
The JEOL MDS (Minimum Dose System) has three modes, namely the Search,
Focus and Record modes. The LowDose software can emulate these three
modes and has one extra mode, we called it the Preview mode, at medium
magnification between the Search and Focus/Record modes. Furthermore,
contrary to the built-in/hardware MDS that simply memorizes one set of
conditions for the three low dose modes, the LowDose software can memorize
any numbers of condition sets in the computer memory. The most suitable set
of conditions for a specific specimen can be restored later from the data sets.
This feature is also feasible to take both images and diffraction patterns from
the same sample by quickly switching the microscope conditions by loading
the corresponding data sets stored in the computer memory.
1.1.2 Advanced data acquisition
The LowDose software makes possible to acquire high-quality images directly
on a Gatan CCD camera from positions specified on a Preview image by using
the SpotScan and RandomScan functions. Here, the user takes a Preview
LowDose for JEOL
2
image at medium magnification after searching a good specimen area at low
magnification. Then, the user will mark interest areas on the Preview image
by using a mouse. The RandomScan will automatically record these selected
areas on the conditions for the Record mode.
The SpotScan function is analogous to the well-known spot-scan technique
used with photographic film where a series of images is captured on a regular
array by stepping a small beam on a sample. Contrary to this, a series of
images is obtained in LowDose SpotScan by shifting back the images onto a
fixed CCD camera synchronously with the beam stepping.
1.1.3 Flexibility and Extensibility
The LowDose software comes with a suite of the LowDose functions and a set
of LowDose modules written with the DigitalMicrograph script.
Processes
of the LowDose are designed as flexible as possible to be used at various
situations.
An advanced user may want to automate further by combining
the LowDose modules for his/her specific purpose. The LowDose software is
easily integrated with Gatan’s HREM AutoTuing and/or TEM AutoTuning
packages.
1.2 LowDose Operation
The low-dose technique consists of a set of microscope settings, each of which
is designed for specific microscope operation. The JEOL MDS or a subset of
the LowDose software makes the microscope setting easy. The LowDose
Plug-In supports the four modes as shown below, each of which will be
explained shortly. The mode will be selected from the LowDose menu or the
LowDose window. In order to reduce adverse effects from hysteresis, the
modes should be changed always in the same sequence as called here the
LowDose cycle.
Figure 1-1
LowDose Cycle
Search
Record
Preview
Focus
The following conditions will be set for each mode:
LowDose for JEOL
3
Table 1-1
Microscope conditions
illumination
conditions:
imaging conditions:
diffraction conditions:
spot size, brightness (illumination size), beam shift,
[illumination stigmator]
magnification, image focus, image shift, projector
shift, objective stigmator (Record mode only)
camera length, diffraction focus, image shift,
projector shift, diffraction stigmator (Record mode
only)
1.2.1 Search mode
At this mode an operator will search a specimen at a low magnification by
moving the specimen with a specimen stage. A defocused diffraction image,
instead of an image in low-magnification (LM) mode, may be used for the
Search mode. This is advisable since the same objective current can be used
throughout all the modes.
Any kind of real-time image with a high contrast may be used for the Search
mode. The specimen image will be surveyed on a TV monitor or a computer
screen, if a suitable camera is available, or on a sensitive focus-screen. When
a promising area is found, an operator selects the Preview mode.
1.2.2 Preview mode
At this mode an image, called a Previre image, will be captured on a highquality CCD camera at a medium magnification. Since the user can check a
quality of the specimen area selected at a low magnification in the Search
mode, a yield to get good quality results at the final Record mode will be
significantly improved. Nevertheless, the electron dose required for taking
this image is made possible no greater than one tenth required for a final
recording, since the Preview magnification is lower than a magnification at the
final recording mode.
If the Preview image has interest areas, multiple positions and a single position
will be marked by using a mouse for the RandomScan and the SpotScan,
respectively. A position used for focusing may also be specified.
If the acquired Preview image shows no interest area, an operator can select the
Search mode to find a next area. Even in this case, the LowDose
automatically go through the Focus and/or Record modes in turn to reduce
hysteresis.
LowDose for JEOL
4
1.2.3 Focus mode
Focusing will be done on a position pre-defined for the Focus mode or the
specified position(s) marked on the Preview image. Focusing may be done
manually by an operator as usual by looking an image itself or its real-time
FFT (Assisted Focusing). An operator may launch Gatan TEM AutoTuning
or HREM AutoTuning, if available, to set a defocus to a specified value.
If only one point is specified in the Preview image for defocus measurement,
the same defocus will be applied to all the images taken from the same Preview
image.
(In a future release) For a tilted specimen a local defocus will be calculated
from a set of defocuses measured at the positions marked on the Preview
image. Here, we assume that the specimen area in the Preview image is flat.
If you know the tilt axis on the Preview image, two positions perpendicular to
the tilt axis may be specified in the Preview image for defocus determination.
1.2.4 Record mode
Images will be recorded at the final magnification by using the RandomScan or
the SpotScan function.
Multiple images may be captured from each point
with a short exposure time to reduce the effect from a specimen and/or image
drift. The user can specify an array size and an image gap for the SpotScan.
An image or diffraction may be recorded on a film instead of a CCD camera as
the regular MDS after surveying the specimen on the Search mode or selecting
an interest area on the Preview image.
(In a future release) A regular spot-scan image can be recorded on a film.
Here, we assume a film is parallel to the CCD camera (this is normally the
case). Then, the spot distance will be adjusted by an image gap parameter.
LowDose for JEOL
5
2. LowDose
Prior to image acquisition using LowDose, one needs to set up the conditions
for each LowDose mode and calibrate various microscope parameters. The
necessary functions for such tasks are accessed through the LowDose menu
that will be selected from the main DigitalMicrograph menu.
Figure 2-1
LowDose Menu and Window/Tools
The LowDose mode selection commands and Acquire commands that will be
used most frequently during the LowDose session can be accessed through the
LowDose window/Tools (see LowDose Window session for details). The
details of menu commands will be explained below.
In the following description the Command key ( ) in the Apple keyboard
corresponds to Control key in the PC keyboard.
LowDose for JEOL
6
2.1 Setup
Figure 2-2
Various control parameters for LowDose will be specified through a setup
window that will be opened by selecting Setup… under the LowDose menu.
Setup dialog
Message level: User can control the amount of messages that will be reported
into the Result window by the LowDose software.
Hysteresis limit: User can enter the limit of hysteresis (or a position error) in
pixels. If hysteresis is higher than this limit, calibration functions will post a
warning message during the course of calibration.
LowDose View Control
Exposure: User can enter the desired exposure in seconds for the
LowDoseView acquisition. The exposure time will be controlled during the
acquisition by using the up/down arrow keys on the keyboard. Here, the
exposure time corresponds to an un-binned acquisition. Therefore, an actual
exposure time is given by dividing a binning factor squared.
Image size: User can select the image size of the LowDoseView window.
Binning: User can select a binning factor of the LowDoseView acquisition.
The binning factor will be controlled during the acquisition by using the
right/left arrow keys on the keyboard.
Processing: User can select the processing mode of the LowDoseView
acquisition.
Use User Function: If the microscope support USER FUNCTION, this
should be checked. Please consult the user manual on Computer Control of
your microscope.
LowDose for JEOL
7
Beam blanking: User can select the beam blanking scheme. An electron
beam should be deflected from the specimen area to be recorded for a
LowDose experiment. “Special” means a special beam blanker controlled by
an output from “Blanker” of the Gatan CCD camera controller.
LowDose palette: User can select a LowDose palette size and layout. The
most frequently used LowDose commands will be activated from the LowDose
palette by a single mouse click.
Options: This button will open a small dialog through which Some optional
parameters will be accessed as shown below.
Figure 2-2 (a)
Options dialog
DAC Range: User can select a dynamic range of digital-to-analog converters
used to control lenses and deflectors of your microscope.
Unsharp mask size: User can change a size of an unsharp mask (as a radius in
pixels) that will be used for an image alignment by using the cross-correlation
technique.
Center false peak size: User can change a size of center area (as a radius in
pixels) to eliminate a false peak at the center that will appear on a crosscorrelation between the images of a low signal-to noise ration.
2.2 Mode selection
The commands in this group initiate and terminate a LowDose session and
control the LowDose cycle. Before starting the LowDose cycle for data
acquisition, the conditions for each LowDose mode should be established as
explained under Section 2.5, Setup Conditions.
Figure 2-3
LowDose for JEOL
Mode selection menu
8
2.2.1 Open LowDose session
The LowDose session should be initiated by selecting Open LowDose
session… under the LowDose menu. The dialog to select a Low
Dose data set, and a dialog to specify various parameters for each LowDose
mode will be appeared in turn. If the User Function option is available, the
microscope conditions will be loaded into the microscope internal memory
from the external computer.
2.2.1.1 Open LowDose dialog
Since LowDose supports multiple data sets (experimental conditions), a
suitable data set that you will work on should be selected. Therefore, the
following dialog will be opened, where user can select an existing data set for
the LowDose session. Some parameters for data archiving will also be
specified in this dialogs follows:
Figure 2-4
Open LowDose dialog
An existing data set will be selected by clicking a corresponding data set. The
data stamp that indicates a creation date follows the data set name. There are
two other options: User can copy an existing data set by selecting a
corresponding data set name and clicking Copy button.
Then, a dialog
asking for the use to input a new data set name will be open.
Figure 2-5
LowDose for JEOL
Data name input dialog
9
The data stamp is automatically added to the input data name to indicate a
creation date. The duplicated experimental conditions will be edited on the
following Setup Parameter tabs.
User can also change the name of an existing data set by selecting a
corresponding data set name and clicking Rename button. Then, the data
name input dialog shown above will be open.
Data name: User can specify the data name that will be used as the first part of
the filename. A sample name may be a good candidate for the data name.
Data Serial Number: User can specify the data serial number that will
distinguish each data taken from different specimen positions. This is similar
to an exposure number on a film. The data serial number will be used as the
second part of the filename that follows the data name defined above.
Folder: User can directly specify a data folder where all images will be saved
hereafter. Note a colon (Mac OS) or a back slash (Windows) at the beginning
indicates the specified folder is located in the same level of the
DigitalMicrograph. See other possibility to specify the image data folder
below.
Browse Folder Directory: User can choose and/or create a folder by pressing
this button. A common dialog will be open according to an operations system
and its version.
A dialog to specify various parameters for each LowDose mode will be
appeared when OK button is selected.
The parameters are grouped into a tab
for each mode. The content of each tab will also be accessible by pressing the
OPTION key, when an appropriate LowDose mode is launched from the menu
or the LowDose window.
LowDose for JEOL
10
2.2.1.2 Search mode
Figure 2-6
Parameters used in the Search mode are accessed under the Search tab. These
parameters will also be accessed by pressing the OPTION key when launching
the Search mode.
Search -mode parameter tab.
Search On: User can select a search scheme. The specimen will be searched
on a screen, a TV camera or a Multi-scan CCD (MSC). If an MSC is
selected, a selection palette for an exposure time, a camera area, a binning
factor and a processing scheme will be appeared as shown above.
You may
use a whole camera area with a high binning factor to shorten an acquisition
time.
Offset from Focus: When this check box is selected, the Objective Focus
change at the Focus mode will be applied to the Search mode.
LowDose for JEOL
11
2.2.1.3 Preview mode
Parameters used in the Preview mode are accessed under the Preview tab.
These parameters will also be accessed by pressing the OPTION key when
launching the Preview mode.
Figure 2-7
Preview-mode parameter tab
Skip Preview: User can control whether to skip the Preview mode by checking
this box.
Exposure: User can enter the desired exposure in second to take a Preview
image. Here, the exposure time corresponds to an un-binned acquisition.
Therefore, an actual exposure time is given by dividing a squared binning
factor.
CCD Area: User can select the area of the CCD to take a Preview image.
Binning: User can select the desired binning factor for taking a Preview image.
ImageShift ratio: This is an optional parameter for the microscope where an
image plane for the Preview mode differs from the one for the Record mode.
This parameter is normally 1 for a fixed image plane.
PreviewOn: Preview mode will use the CCD, but a screen or a TV will
be used during the LowDose alignment process.
Offset from Focus: When this check box is selected, the Objective Focus
change at the Focus mode will be applied to the Preview mode.
LowDose for JEOL
12
2.2.1.4 Focus mode
Parameters used in the Focus mode are accessed under the Focus tab. These
parameters will also be accessed by pressing the OPTION key when launching
the Focus mode.
Figure 2-8
Focus-mode parameter tab
Skip Focus: User can control whether to skip the Focus mode by checking this
box.
Exposure: User can enter the desired exposure in second to take a Focus
image. Here, the exposure time corresponds to an non-binned acquisition.
Therefore, an actual exposure time is given by dividing a squared binning
factor.
CCD Area: User can select the area of the CCD to take a Focus image.
Binning: User can select the desired binning factor for taking a Focus image.
Focus Mode: User can select a focus mode. (This is provided for a future
release.)
LowDose for JEOL
13
Focusing at: User can select a way to define the focusing point.
z Fixed displacement on Preview: Focusing will be done at a point
displaced from the Preview image center with a fixed amount. The
amount of displacement will be specified in terms of a magnitude and a
rotation angle.
z
Specified position(s) on Preview: Focusing will be done at the marked
point(s) on the Preview image. The number of focusing should be one
(this will be extended in a future release).
z Image center (alignment): With this option the image center will be
observed without any image displacement. This option should be
selected during ONLY the alignment.
z Fixed displacement: With this option the focusing will be done with a
fixed displacement defined by the Read Condition command for the Focus
Position. .
Focusing Position EXCEPT the Image Center should be selected after the
LowDose alignment.
FocusOn: Focus mode will use the CCD or TV according to the Focus
mode, but a screen will be used during the LowDose alignment process.
LowDose for JEOL
14
2.2.1.5 Record mode
Parameters used in the Record mode are accessed under the Record tab.
These parameters will also be accessed by pressing the OPTION key when
launching the Record mode.
Figure 2-9
Record-mode parameter tab
Exposure: User can enter the desired exposure in second to take a final image
on the Record mode. In the Record mode, the given exposure time
corresponds to an actual exposure, since an acquisition is always un-binned in
order to extract full information from the CCD.
Number of Exposure: User can specify a number of exposures for a multiexposure acquisition.
Record Mode: User can select the desired recording mode from No Scan,
Random Scan and Spot Scan mode. For data acquisition from a single point,
use No Scan or Random Scan mode.
LowDose for JEOL
15
Image matrix (Only accessible for the Spot Scan mode): User can specify the
size of image matrix, i.e., the numbers of images along the x (horizontal) and
the y (vertical) directions of the camera edge. A 2 x 3 matrix will produce a
total of six images. User can also specify the percentage gap between
adjacent images. A positive value will give a real separation between adjacent
images. A negative value will give an overlap between adjacent images.
These parameters are only accessible for the Spot Scan mode
Delay Control box
Before Exposure: User can enter the desired delay time (Blanking) in
seconds before starting image acquisition at the Record mode. This may
be used to allow the microscope to stabilize after switching the lenses and/or
manipulating the mechanical stage.
Between each Exposure: User can enter the desired delay time in seconds
between each exposure for the multi-exposure acquisition.
Between each Spot: User can enter the desired delay time in seconds
between acquisitions at successive specimen positions.
Save Image to Disk box
Multi-exposure: User can select the desired mode for saving the image.
The exposed images will be saved for each exposure or saved at once
after all exposures for the multi-exposure acquisition.
Scan image: User can select the desired mode for saving the image. The
scan images will be saved for each spot or saved at once after acquisition
for all spots.
Display Scan Images: User can control whether to display reduced images
after each acquisition.
Record on: User can select an imaging media from the CCD camera and
photographic film (this is prepared for a future extension). However, a screen
or TV may be used during the LowDose alignment.
Offset from Focus: When this check box is selected, a fixed offset from the
objective focus found at the Focus mode will be applied when recording the
image. This option may be used, when the Focus and Record modes belong
to different magnification ranges.
Mode after Record: User can select the mode after recording. When
'Manual' is selected, no mode transition will be occurred and user can
select the next mode manually after each recording.
LowDose for JEOL
16
2.2.2 Select Mode
After initiating the LowDose session by Open LowDose session, each
LowDose mode can be setup just by selecting the corresponding submenu
under Select Mode menu.
Figure 2-10
Select mode
Alternately, the user can select the LowDose mode by clicking the
corresponding radio button in the LowDose window.
Option Key As described before, the parameter setup dialog for each mode will be opened
by pressing the Option key when selecting the next mode.
Command Key As described before, the mode will be changed through the LowDose cycle in
the same direction from the Search mode to the Record mode to reduce
hysteresis. However, the user can go directly to the selected mode, if the
Command key (Mac) or Control key (PC) pressed when selecting the next
mode. Please note this shortcut should be employed, because it will introduce
hysteresis.
Shift Key The conditions of a current mode will be automatically updated before going to
the selected mode. This update can be by-passed by pressing the Shift key
when selecting the next mode.
2.2.3 Close LowDose
The LowDose session should be closed by clicking Close LowDose under the
LowDose menu. This will try to restore microscope conditions before
LowDose session as much as possible. If the User Function option is
available, the revised microscope conditions on the microscope internal
memory will be stored onto the external computer memory.
LowDose for JEOL
17
2.3 Acquire
A group of commands can be used to acquire the image(s) through a CCD
camera.
Figure 2-11
Acquire menu
2.3.1 LowDoseView
The LowDoseView is a handy function to acquire CCD images continuously.
The command LowDoseView under LowDose menu will open the
LowDoseView window and start continuous acquisition. This view will also
be activated automatically by the LowDose when a continuous image
acquisition on the CCD is required.
The acquisition will terminate by pressing the space bar. The image size, an
initial exposure time and an initial binning factor are selected through the Setup
dialog. The exposure time will increase or decrease by a factor of two by
up/down keys pressing the up/down arrow keys during the acquisition. The binning factor
right/left keys will increase or decrease by a factor of two by pressing the right/left arrow
keys. The binning factor, the exposure time and a mean intensity are
displayed in the Progress window as shown below:
Figure 2-12
LowDose for JEOL
Progress window
18
2.3.2 Acquire Preview
The command Preview of Acquire submenu under LowDose menu will
acquire a Preview image on the CCD under conditions specified for the
Preview mode. The recording conditions may be revised before acquisition
Option key through the dialog that will be opened by pressing the Option key when
selecting this menu. Please consult the Preview mode dialog (Figure 2-6).
2.3.3 Mark
Figure 2-13
By launching the Mark command under LowDose menu, a dialog similar to
the one shown below will be appeared prompting the user to select specimen
positions with mouse clicks.
Example of Mouse selection dialog
Interest specimen areas will be marked on the Preview image by clicking the
Mouse tool mouse. Please note that you have to choose a mouse tool on the Standard
Tools palette prior to using the mouse.
Figure 2-14
Standard Tools palette
A fat mouse
LowDose for JEOL
19
Any number of specimen positions will be marked for the RandomScan, while
a single specimen position should be marked for the SpotScan. If you change
your mind and want to delete a selected mark, click the mark again with the
After selecting the interest areas, press the
Shift key mouse by pressing the Shift key.
OK button of this dialog. You may select the Cancel button to nullify the
selections.
After selection the interest areas, specimen positions that will be used for focus
adjustment will also be marked using the mouse. The number of positions for
focus adjustment depends on the selection of Focusing at in the Focus mode
parameters.
The conditions from the Focus and Record modes that relates with the Mark
command may be revised through the diagram shown below, which will be
Option key opened by pressing the Option key when selecting the command.
Figure 2-15
Mark Parameters dualog
2.3.4 Record
The command Record under LowDose menu will activate the SpotScan or the
RandomScan function according to the Record mode selected in the Record
mode tab. The SpotScan will takes a matrix of images around a specified
position on the Preview, while the RandomScan will take a series of images
from the pre-marked positions on the Preview image.
The recording conditions may be revised before acquisition through the dialog
Option key that will be opened by pressing the Option key when selecting this menu.
Please consult the Record mode Dialog (Figure 2-8)
LowDose for JEOL
20
2.3.4 Display Control
The image(s) acquired will be displayed, if the Display control on the Record
mode dialog is ON. When the Record mode is either RandomScan or
SpotScan, a series of images with the same serial number will be displayed.
The above display controls are useful to Delete and Hide or Show the images
with the same serial number. As a default the current serial number is
assumed, but any serial number will be assigned with a dialog that will be
opened when selecting the command with the Option key down.
2.4 Setup Conditions
The imaging conditions for each LowDose modes should be established before
starting the LowDose cycle.
2.4.1 Select Data Set
Since LowDose supports multiple data sets (experimental conditions), a
suitable data set that you will work on should be selected through Select Data
Set… command. For refinement of an existing LowDose data set, the
corresponding data set will be selected by clicking its data name. When a new
set of LowDose conditions are collected, a new data set can be created through
this dialog by selecting New button.
Figure 2-16
LowDose for JEOL
Select Data Set
21
There are two other options: Copy and Rename.
section for the details.
See Parameter Setup
2.4.2 Read Conditions
The microscope conditions for each low-dose mode should be specified before
starting the LowDose cycle. The command of Read Conditions submenu
under LowDose menu will read the microscope conditions for the
corresponding LowDose mode through RS232 or Network, and stores them in
an external computer. When selecting this command a following dialog will
appear.
It is important to adjust image positions at the different magnifications, so that
the same sample position will appear at the camera center or the screen center
over the whole LowDose cycle. This alignment is especially important
between the Preview and the Record modes.
2.4.3 Set Conditions
The command of Set Conditions submenu under LowDose menu will set the
microscope to the corresponding LowDose conditions by transferring
registered data from an external computer to the microscope through RS232 or
Network. This may be used only when an operator wants to simply set a
microscope to a registered condition. During the LowDose cycle the
command under Select Mode below Open LowDose command or LowDose
Window or Tools should be used to set the microscope to the desired mode.
2.4.4 Delete Conditions
When a particular LowDose data set becomes unnecessary, it will be deleted
through Delete Data Set command.
LowDose for JEOL
22
Figure 2-17
Delete Data Set
Note For an operator who prefers to select a low-dose (MDS) mode using the
microscope keyboard (or the optional MDS controller), instead of using the
computer keyboard, the conditions of each mode of a selected data set will be
restored in turn from a computer memory to the microscope MDS memory.
Although an MDS mode can then be selected from the microscope keyboard
(or the MDS controller), some of the conditions controlled by the LowDose
software may not be handled by the built-in MDS. This depends on the MDS
design of your microscope.
2.5 Calibration
In order to control the beam position on the sample and the image displacement
on the CCD camera, the beam-shift and image-shift deflectors should be
calibrated beforehand. Here, calibration means a relationship between the
shift of image or beam position and the excitation of the deflector in digital-toanalog converter (DAC) unit. Since all positional information will be
characterized in terms of a camera coordinate, these calibrations may be
defined in term of the camera pixels vs. DAC count.
It may be noted that these calibrations are necessary for the magnification used
in the Preview mode. This is because the specimen positions to be recorded
in the Record mode are specified on the Preview image. For the SpotScan
acquisition the calibrations are also necessary for the magnification to be used
for acquisition, since the SpotScan matrix is defined in terms of the camera
size.
Note We assume here that the image of the objective is located at the same plane at
the magnifications for the Preview and the Record modes. If this is not the
case, an image-shift ratio between the magnification for the Preview mode and
that for the Record mode should be adjusted.
LowDose for JEOL
23
Note Similarly, an image-shift ratio between the magnification for the Preview mode
and that for the Focus mode should be adjusted, when the image planes are
located at different positions.
2.5.1 Beam-Shift
If a corresponding calibration is already present, a refinement will be done
based on the previous calibration. However, if you want to perform a new
Option key calibration, instead of revising the existing one, press Option key when
selecting the menu. For a new calibration a deflector excitation will be
automatically increased from a minimum step into the step that will deflect the
beam position by a specified amount.
The procedure is as follows:
z Setup the microscope for the desired LowDose mode.
User can use Set Conditions commands under LowDose menu.
z Select a small condenser aperture.
Using a small condenser aperture is required to avoid burning the scintillator
and/or over-flooding the CCD, since we will use a focused small probe.
z Adjust the beam size to about one-tenth of the camera size.
z Select Beam-Shift submenu of Calibration under LowDose menu.
The software will automatically perform the calibration. The x and y
deflectors are calibrated independent of each other.
It is recommended that the user refer to the Result window to ascertain the
progress of the calibration process. In the ideal case, the magnitudes of two
calibrations for x and y deflectors will be the same and their directions are
perpendicular to each other.
LowDose for JEOL
24
2.5.2 Image-Shift
If a corresponding calibration is already present, a refinement will be done
based on the previous calibration. However, if you want to perform a new
Option key calibration, instead of revising the existing one, press Option key when
selecting the menu. For a new calibration a deflector excitation will be
automatically increased from a minimum step into the step that will deflect the
beam position by a specified amount.
The procedure is as follows:
z Setup the microscope for the desired LowDose mode.
User can use Set Conditions commands under LowDose menu.
z Adjust the beam size to about twice of the camera size.
z Select Image-Shift submenu of Calibration under LowDose menu.
The software will automatically perform the calibration. The x and y
deflectors are calibrated independent of each other.
It is recommended that the user refer to the Result window to ascertain the
progress of the calibration process. In the ideal case, the magnitudes of two
calibrations for x and y deflectors will be the same and their directions are
perpendicular to each other.
2.5.3 Show Calibration list
Calibrated magnifications for the beam-shift and the image-shift will be listed
as shown below:
Calibration list
Any calibration becomes disused can be deleted by selecting and clicking the
Remove button. below each list
LowDose for JEOL
25
2.5.4 Beam blanking setup
The magnitude of the deflector for beam blanking will be set up through this
command. You may get the following dialog when you select the BeamShift
or the GunShift for Beam blanking selection:
After you shift the beam where you want by using the BeamShift or the
GunShift that you selected, you may click the OK button.
2.6 Assisted TEM tuning
Focusing and stigmating are important to acquire the data that will be analyzed
quantitatively. Focusing may be done by an operator by looking a real-time
FFT of an amorphous image (Assisted Focusing) instead of looking a highly
magnified amorphous image itself. Astigmatism may also be corrected by
using a real-time FFT of an amorphous image (Assisted Stigmation). An
operator may launch Gatan TEM AutoTuning or HREM AutoTuing, if
available, to correct astigmatism.
An adjusted stigmator excitation will be saved as a parameter of the Record
mode. The same stigmator correction will be applied for the Focus and the
Record modes. [Not installed yet]
LowDose for JEOL
26
2.7 Backup/Restore LowDose tags
All parameters and conditions for the LowDose are saved as Tags (under
General Information). These tags can be save to the file for a backup
purpose and restored from the file. This function is useful when a microscope
is used by many users, since the personal experimental conditions can be easily
recovered.
2.8 LowDose Window and Tools
The most frequently used functions during the LowDose session can be
accessed through the LowDose Window/Tools. The LowDose window is
selected from a vertical and horizontal windows.
Figure 2-xx
LowDose Window (Vertical)
LowDose Tools
LowDose Window (Horizontal)
The LowDose Window/Tools includes the LowDose-mode selection
commands and Acquire commands. These commands can be activated by a
single click on a radio button or a command button.
LowDose for JEOL
27
3. Installation
This chapter describes hardware and software requirements to perform the
LowDose experiment, and also describes installation procedure of the
LowDose software.
3.1 Requirements
The LowDose runs under DigitalMicrograph environment, and the software
and hardware requirements are similar to those for DigitalMicrograph except in
the memory requirement. For example, an image of 1k by 1k requires 2MB
of memory, and uses 3MB when displayed on the monitor. Therefore, one
needs to have sufficient RAM for acquiring a series of images. However, we
can choose an option for saving the data onto a hard disk according to the
installed memory.
3.1.1 Hardware requirement
The following is a list of the hardware requirements necessary to run the
LowDose:
z A RS232 serial communication or a network communication between
the microscope and a computer running the DigitalMicroscope.
z High-quality CCD camera: A possible choice may be a Gatan MultiScan
(MSC)/BioScan camera.
z TV-camera (Optional): Specimen search may be done on a focus screen.
z Power Macintosh or Windows machine with a minimum 17-inch
monitor.
z Modem cable shipped with Gatan Electron Microscope Control
software.
Please note that No hardware MDS option is required.
LowDose for JEOL
28
3.1.2 Software requirement
The following is a list of the software requirements necessary to run LowDose:
z DigitalMicrograph version 3.4 or later.
z Gatan Electron Microscope Control plug-in.
z Camera control plug-in shipped with an MSC/SSC camera.
z TrackerObject plug-in for MacOS (or TrackerObject.dll for Windows):
this plug-in may be included as a part of the LowDose software. This
plug-in will be found in the folder named OtherPackages.
3.2 Installation
The following plug-ins (packages) and a script folder should be placed in the
folder “Packeges” on the same level of the DigitalMicrograph:
z CAEMBasic
z CAEMDialog
z CAEMLibrary
z JEOLPlugIn (or J1230Plugin and JEOL JEM-12n0)
z LowDoseLibrary
z LowDoseMenu
z LowDoseScripts folder with script modules.
The Packages folder should exist under a normal installation of the
DigitalMicrograph and contain the MSC/SSC plug-in and the EM Control
plug-in if you have a Gatan camera and a Gatan HREM or TEM AutoTuing
extension. If you need to install the MSC/SSC plug-in and/or the EM Control
plug-in, please consult relevant documents.
There are two LowDose microscope control plug-ins: JEOLPlugIn for all the
JEOL microscopes except JEM-12n0 series, and J1230PlugIn especially for
JEM-12n0. Please choose a correct plug-in for your microscope. If your
microscope is one of a JEM-12n0 series, you have to install also JEOL JEM12n0 plug-in, which will be found in the folder named OtherPackages..
LowDose for JEOL
29
4. Getting Started…
This chapter explains the typical steps necessary to perform the LowDose
experiment.
Please install the LowDose software according to the section 3
(Installation) before following the steps in this section.
4.1 Setup General Parameters
At first, setup general parameters according to the section 2.1 (Setup).
Please check the Digital-to-Analog converter (DAC) depth of your microscope
and select an appropriate entry. If your microscope support User’s Function
(UFC), its use will speed up LowDose mode setting.
4.2 Setup LowDose Conditions
Each LowDose condition has to be setup according to the section 2.4 (Setup
Conditions) before starting the LowDose cycle for data acquisition. You
have to decide microscope conditions, especially a magnification, for each
LowDose mode. An illumination size should be adjusted for each mode
according to the magnification.
Search mode
z
Image magnification (a camera length and defocus setting in the case of
the diffraction mode))
Illumination conditions (Spot size and Brightness
z
Preview mode
z
Image magnification
z Illumination conditions (Spot size and Brightness)
Focus mode
z
z
z
Image magnification
Illumination conditions (Spot size and Brightness)
Focusing position offset (in the case of a fixed displacement. This may be
setup even after a LowDose cycle refinement.)
Record mode
z
z
LowDose for JEOL
Image magnification
Illumination conditions (Spot size and Brightness)
30
The following shows the steps to setup LowDose mode conditions:
1. Create/select a data set (see 2.4.1)
Launch Select Data Set… command and select a data set name that you want
to revise or create a new data set.
2. Setup the microscope for Search mode
3. Read microscope conditions (see 2.4.2)
Launch Read conditions command for Search mode after setting the
microscope to the conditions you want.
4. Repeat 2 and 3 for Preview, Focus and Record modes
Although it is important that the same specimen position is imaged at the
screen/camera center during the LowDose cycle, you may carry out this image
alignment later (see 4.5).
4.3 Beam Blanking Setup
The deflector to be used for the beam blanking will be selected through the
general setup dialog (see 2.1).
The magnitude of beam deflection will be
established through the command Beam blanking setup (see 2.5.3).
4.4 Calibration
The beam-shift and image-shift deflectors should be calibrated at the
magnification of Preview mode. In addition, both calibrations at Record
mode magnification are also required for the SpotScan recording.
If you will take final images using the SpotScan always around the center of a
Preview image, the calibrations only at the Record mode magnification are
required, i.e. the calibrations at the Preview mode magnification are not
necessary.
Since the beam-shift calibration does not require any specimen, it may be done
before the image-shift calibration. If the probe position is stable enough, the
probe displacement itself may be used for the image-shift calibration.
Consult the procedures described in section 2.5.1 for the beam-shift
calibration and in section 2.5.2 for the image-shift calibration.
4.5 Refine LowDose Cycle
For the LowDose experiment it is important that the same specimen position is
imaged at the center during the LowDose cycle. This means that image
position should be adjusted by using the image-shift. Although the projector
shift is normally used for adjustment of a diffraction pattern, it may also be
used for a small adjustment of image position. The beam position then should
LowDose for JEOL
31
be adjusted with the beam-shift after each image adjustment. The refinement
of the LowDose conditions is also necessary, because magnetic hysteresis is
not usually negligible. A few rounds around the LowDose cycle will reduce
the hysteresis effect.
For the refinement of conditions over a wide range of magnification, we need a
suitable sample on which we can recognize characteristic features over such a
magnification range. One of such samples may be a holy carbon film with
metal-shadowed latexes and dispersed nano-gold markers.
It may be noted that an image-shift deflector normally adjusts the image
position only about a few microns when measured on the sample. If we start
an image alignment from the lowest magnification, therefore, we easily use up
a full range of the image-shift at the highest magnification. Therefore, a
coarse image alignment among all modes is necessary before a fine adjustment
under the conditions used for the final LowDose conditions. The coarse
adjustment may be done in the following two ways as described below.
4.5.1 Open LowDose session
The LowDose cycle should be initiated by Open LowDose dialog (see 2.2.1,1),
where a data set to be refined is selected. Then, parameters for each LowDose
mode may be checked and modified.
4.5.2 Coarse alignment
Procedure 1:
The same image point will be find by looking a wider area of sample on the
screen, and the image center at each lower magnification is aligned to the one
at the highest magnification. If an illumination area is shifted much on the
screen, the illumination is shifted by using the beam shift. After the image
alignment, an illumination condition is adjusted for each mode. Since the
illumination conditions are changed after the coarse alignment, we may need
further fine adjustments as described in the next section to reduce hysteresis
effects.
Procedure 2:
This is an alignment of image position starting from a higher magnification to a
lower magnification. The mode of a lower magnification is immediately
selected by pressing the Command key (Mac) or Control key (PC) when
selecting the mode (see 2.2.2). The following alignment process will shorten
a required time for setting up the mode. The conditions obtained in this way
may require further fine adjustments as described in the next section to reduce
hysteresis effects.
The coarse alignment (Procedure 2) may be conducted as follows:
0. Select a data set (if not selected) (see 2.1.2)
1. Setup microscope for Record mode (see 2.2.2)
You may use Select mode command or the mode button in the LowDose
LowDose for JEOL
32
window.
2. Refine conditions for Record mode
Manually refine the conditions, if necessary.
3. Find a characteristic specimen position
This position should be easily recognized at the next lower magnification.
4. Center this specimen position
Use the stage for a large position adjustment and the Image-shift/Projector-shift
for a fine adjustment. The beam position may be readjusted using the Beamshift.
5. Setup microscope for Focus mode
Select the Focus mode by pressing the Command key (Mac) or Control key
(PC).
6. Refine conditions for Focus mode
Manually refine the conditions, if necessary.
7. Locate the same specimen position
8. Center this specimen position
Use the Image-shift/Projector-shift for a position adjustment. Don’t use the
stage for this adjustment. The beam position may be readjusted using the
Beam-shift.
9. Repeat 5 to 8 for Preview and Search modes
10. Repeat 1 to 9 until the same specimen position appears at the image center
If the Focus mode and/or the Preview mode will be skipped, the alignments for
these modes are not necessary (you can not set to these modes, even if you
select them). If you need an alignment between a pair of specific two modes,
you may select these modes by pressing the Command key (Mac) or Control
key (PC).
If you are patient enough to wait the LowDose system sets all the modes along
with the cycle, each mode may be selected without pressing the Command key
(Mac) or Control key (PC). Then, you may not need to follow the next fine
alignment to reduce a hysteresis effect.
Note If you used up a full range of the image-shift at the lowest magnification, it
means your microscope require a mechanical and/or electrical adjustment.
Please consult your microscope operation manual or call a service engineer.
4.5.3 Fine alignment
After the coarse alignment the same image feature may be observed close to the
image center over all the magnifications. Thus, an image adjustment can be
carried out from the lowest magnification to the highest magnification even
with a limited capability of the image-shift. The projector shift may also be
used for this alignment. This is a fine alignment of image displacement along
with the LowDose cycle in order to reduce hysteresis.
The fine alignment process may be conducted as follows (Please note the
coarse alignment should be done prior to this fine alignment):
0. Select a data set (if not selected) (see 2.1.2)
LowDose for JEOL
33
1. Setup microscope for Search mode (see 2.2.2)
2. Refine conditions for Search mode
3. Find a characteristic specimen position
This position should be easily recognized at the next higher magnification.
4. Center this specimen position
Use the stage for a large position adjustment and the Image-shift/Projector-shift
for a fine adjustment. The beam position may be readjusted with the Beamshift.
5. Setup microscope for Preview mode
Simply elect the Preview mode without pressing the Command key (Mac) or
Control key (PC).
6. Refine conditions for Preview mode
7. Locate the same specimen position
8. Center this specimen position
Use the Image-shift/Projector-shift for a position adjustment. Don’t use the
stage for this adjustment. The beam position may be readjusted with the
Beam-shift.
9. Repeat 5 to 8 for Focus and Record modes
10. Repeat 1 to 9 until the same specimen position appears at the image center
If you used up a full range of the image-shift at the highest magnification, it
means the coarse alignment was not accurate enough. Please carry out the
coarse alignment again.
4.5.4 Close LowDose session
After establishing the LowDose conditions for each mode, we recommend you
to close the LowDose session now, even when you are ready to investigate
your specimen. This will ensure the established LowDose conditions are safely
saved on the disk for a later use.
4.6 Data Acquisition
Now you are ready to investigate your sample and record an image/diffraction
under a low-dose condition.
4.6.1 Open LowDose session
The LowDose cycle should be initiated by Open LowDose dialog (see 2.2.1,1),
where a data set to be used for data acquisition is selected. Then, parameters
for each LowDose mode should be carefully checked and adjusted for your
sample.
4.6.2 Search specimen (Search mode)
1. Select Search mode
2. Search a good specimen position
A specimen search may be done on a screen, a high-sensitive TV camera or a
quasi-TV rate MSC.
LowDose for JEOL
34
4.6.3 Take Preview image (Preview mode)
1. Select Preview mode
You may change the Preview parameters prior to take the image on the dialog
that will appear by pressing the Option key when selecting the mode.
2. Launch Preview command (see 2,3,2)
A Preview image will be displayed on the computer monitor.
4.6.4 Appraise Preview image
1. Appraise the Preview Image
Examine the Preview image whether there are interest areas to be taken at the
final magnification. According to the result of examination, you may select
one of the following two options.
2a. Select Search mode
In this case the LowDose automatically goes through the LowDose cycle to
reduce hysteresis.
2b. Launch Mark command (see 2.3.3)
If there are suitable specimen areas on the Preview image, which will be
recorded later, you may select them with mouse clicks. You may change the
Focus and Record parameters relating the Mark command through the dialog
that will appear by pressing the Option key when selecting the command.
Mouse Tool You have to choose a mouse tool on the Standard Tools palette before
clicking the mouse on your image. If you select a wrong position, you may
delete it by clicking again the mouse at the same position with the Shift key
down. After selecting the all position, press OK button on the prompt dialog.
Then, a dialog prompting to select focus positions will be appear according to
the focusing parameter selected. You can select the positions for focusing in
the same way to select the interest areas.
4.6.5 Focus specimen (Focus mode)
1. Select Focus mode
The LowDose will bring the specimen position for the first focusing position to
an image center. You may change the Focus parameters through the dialog
that will appear by pressing the Option key when selecting the mode.
2. Adjust a focus for the first position
At the focus mode the user can use a variety of focusing method according to
the facility you can access. Namely, you can adjust a focus manually or using
an auto-tuning application.
3. (for a future extension) Repeat 1 and 2 for other focusing positions
If there are more than two focusing positions, you can tell the LowDose that
you are going to get a next focus, by selecting the Focus mode again. After
obtaining all the focuses, you may go to the Record mode.
LowDose for JEOL
35
NOTE The LowDose will read the adjusted lens current when re-entering the Focus
mode for other focus position or entering the Record mode.
4.6.6 Record image(s) (Record mode)
1. Select Record mode
You may change the Record parameters through the dialog that will appear by
pressing the Option key when selecting the mode. This is especially useful to
change an array size of the SpotScan recording.
2. Launch Record command
An image acquisition will be started according to the record mode selection
(No Scan, RandomScan or SpotScan).
4.6.7 Repeat LowDose cycle (Search to Record modes)
The LowDose cycle will be repeated at other specimen positions.
4.6.8 Close LowDose session
When finishing the LowDose acquisition, close the LowDose session. This
ensures that the updated LowDose conditions are saved on the disk for a later
use.
LowDose for JEOL
36
5. Troubleshooting
This chapter is intended to help the user ascertain the problem(s) and resolve
them easily. Common problems encountered in LowDose and their
resolutions are presented below.
LowDose for JEOL
37