1
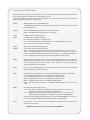
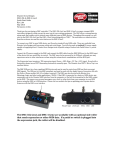
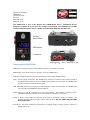
SMARTClock Disaster Area Designs SMARTClock QUICK START Quick Start Guide Rev 1.03 November 2014 Firmware v1.10 The SMARTClock is part of the Disaster Area SMARTPedal series – pedalboard devices designed to connect all of your gear into a single cohesive unit. The SMARTClock is a MIDI capable pedalboard tempo source, capable of synchronizing MIDI and non-‐MIDI gear. Encoder / Enter Button LED Display Multi Jack MIDI Input Footswitch Connecting the SMARTClock Tempo Outputs DC9V MIDI Output USB A B MIDI Input: Connect the output of your MIDI controller or computer to this input. MIDI Output: Connect this output to the input of your first MIDI device. Multi Jack: Multipurpose jack, functions as tap input, tempo output, or MIDI output. DC9V: Power supply connection. The SMARTClock requires an isolated power supply capable of providing at least 64mA of current, at 9VDC center negative. Do not connect the SMARTClock to power supplies rated at more than 9VDC. USB: USB MIDI connection to computer or iPad with Apple Camera Connection Kit. The SMARTClock can send and receive MIDI through the USB port. Tempo Outputs A and B: Connections to tap tempo devices. Each output is isolated, and is compatible with both normally open and normally closed (Boss) switch types. Encoder: Rotary control knob for selecting menu options, subdivisions, tempo, or presets. The encoder also functions as the Enter button when pressed. DO NOT PRESS THE ENCODER BUTTON BY FOOT. Footswitch: Soft-‐touch momentary footswitch for tapping tempo, selecting presets, starting or stopping the clock. Configuring the SMARTClock Hold the Enter button while the pedal boots to access the SMARTClock Setup Menu. Keep the Enter button pressed until the display scrolls SETUP, then release. Turn the encoder to scroll through the menu options. Press the Enter button to edit the selected menu, hold the Enter button to save and exit. CHAN: MIDI Channel used by the SMARTClock. The SMARTClock listens for incoming program changes on this channel to save and recall BPM presets. MODE: TAP – the SMARTClock will start up in Tap Tempo mode. PRST – the SMARTClock will start up in Preset mode. TAPA: Configuration for Tempo Output A. TAPB: Configuration for Tempo Output B. No – the selected output is “normally open.” Nc – the selected output is “normally closed.” Most BOSS devices require Nc. OFF – the selected output will be disabled. MODA: Tap Tempo setup for Tempo Output A. MODB: Tap Tempo setup for Tempo Output B. Auto – The selected output will send taps continuously when the clock is running. 4TAP – The selected output will send taps when the clock changes rate. If a new preset is loaded, the selected output will send four taps. If an external MIDI clock is input, both outputs will send taps continuously regardless of this setting. PMAX: Highest preset available in Preset mode. The SMARTClock can recall a maximum of 48 presets in Preset mode, or up to 128 if an external MIDI controller is connected. If an external MIDI controller is used to select presets, all 128 presets will be available regardless of this setting. PROG: If set to ON, the SMARTClock will send a program change message on its MIDI channel each time a preset is selected. JACK: Configuration of Multi Jack. Please consult the Multi Jack section for more details No – the Multi Jack functions as a “normally open” tempo output Nc – the Multi Jack functions as a “normally closed” tempo output INPT – the Multi Jack functions as an additional tap tempo input MIDI – the Multi Jack functions as an additional MIDI output nCLK – the Multi Jack functions as an additional MIDI output but does not send clock. RESO: Resolution for manual tempo entry. 0.5 – Tempo will be entered in half-‐BPM increments (120.0, 120.5, 121.0, etc.) Tapped tempos will display up to 0.1 BPM precision 1.0 – Tempo will be entered in whole-‐BPM increments (121.0, 122.0, 123.0, etc) Tapped tempos will display at 0.1 BPM precision below 100BPM only Note that in either mode, tapped tempos are stored with MAXIMUM precision at all times. Only the BPM display is rounded to the nearest whole number. FACT: Factory Reset. Turn the encoder until RSET is displayed, then press Enter to perform a factory reset. Hold the Enter button to save and exit the Setup Menu. Using the SMARTClock The SMARTClock operates in two modes: Tap Tempo and Preset. Tap Tempo Mode In Tap Tempo Mode, the encoder knob flashes blue while the clock is running. FOOTSWITCH: Tap the footswitch to set the clock rate. While tapping, the display shows TAP. Two seconds after the last tap, the display reverts to show the tempo in Beats Per Minute (BPM.) Hold the footswitch to save the current tempo to the last loaded preset. ENCODER: Turn the encoder to manually set the clock rate. Tap the encoder to select the subdivisions menu for Tempo Outputs A and B. Hold the encoder to enter Preset mode. Preset Mode In Preset Mode, the encoder knob flashes green while the clock is running. FOOTSWITCH: Tap the footswitch to select the next preset. If the clock is currently stopped, tapping the footswitch will restart the clock at the last tempo. Hold the footswitch to stop the clock. ENCODER: Turn the encoder to select a preset. If PROG is set to ON, selecting a preset either by foot or with the encoder will send the corresponding MIDI program change on the SMARTClock’s MIDI channel. Hold the encoder to enter Tap Tempo mode. If PROG is set to ON in the Setup Menu, the SMARTClock will send a MIDI program change message on its MIDI Channel each time a preset is selected. The program change is one lower than the indicated preset: P 01 sends Program Change 00; P04 sends Program Change 03, etc. Tempo Outputs and Subdivisions The SMARTClock has three Tempo Outputs that are capable of sending taps to non-‐MIDI devices. The Tempo Outputs are electrically isolated for low noise, and can act as “normally open” or “normally closed” switches. Most tap tempo capable devices use normally open switching, most Boss / Roland products use normally closed. Please consult the user manual of your tap tempo pedals to determine the correct switch type. The SMARTClock can easily send out different tap ratios, by subdividing the clock rate. Furthermore, each preset may be saved with different subdivisions for each Tempo Output, so that a variety of delay or modulation rates can be achieved. To set the subdivisions, enter Tap Tempo mode and tap the encoder. The display will show the currently selected Tempo Output and subdivision. Turn the encoder to set the subdivision, tap to move between tempo and subdivision menus. Setting an output’s subdivision to “OFF” will prevent the SMARTClock from sending any taps from that output. If your devices have their own subdivision selectors, set these to quarter note to make sure the SMARTClock subdivisions are accurate. Subdivision Reference Chart Wh Subdivision Whole Note HF Half Note HT Half Note Triplet Qu Quarter Note 8d Dotted Eighth Note Qt Quarter Note Triplet 8 Eighth Note 8t Eighth Note Triplet 16 Sixteenth Note Note w Clock Ratio 1 tap per 4 clock ticks h 1 tap per 2 clock ticks q 1 tap per clock tick Phhh 3 taps per 4 clock ticks e. 4 taps per 3 clock ticks Pqqq 3 taps per 2 clock ticks e 2 taps per clock tick rTy 3 taps per clock tick s 4 taps per clock tick Using the Tempo Outputs as selector switches The Tempo Outputs may also be used as selector switches. This may be used to toggle a favorite switch or expression pedal input on your devices, so that some presets have different sounds. To use the Tempo Outputs as selector switches, set TAPA or TAPB to OFF in the Setup menu. The clock will send no taps. To enable the output / close the Tempo Output switch, set the subdivision to any value other than Wh / Whole Note. Setting the subdivision to Wh / Whole Note will turn the output off. Saving the preset with the subdivisions set will save the Tempo Output state. When the preset is recalled the Tempo Output state will switch to the saved state. Using the Multi Jack The Multi Jack is located next to the MIDI Input, opposite the two main Tempo Outputs. The Multi Jack has three possible functions, which may be set in the Setup menu. No – the Multi Jack functions as a “normally open” tempo output Nc – the Multi Jack functions as a “normally closed” tempo output INPT – the Multi Jack functions as an additional tap tempo input MIDI – the Multi Jack functions as an additional MIDI output nCLK – The Multi Jack functions as an additional MIDI output but will not send MIDI Clock In order to use the Multi Jack as a tempo output, a Disaster Area PTP adaptor should be used. The PTP turns the 0-‐5V signal from the Multi Jack into a “dry contact” for use with tap tempo input devices. Connecting the Multi Jack directly may damage the SMARTClock or your tap tempo device. If the Multi Jack is set as a Tempo Output, an additional “C” option will be available in the Subdivision setting menu. If used as a tap tempo input, the Multi Jack should be connected to a normally open footswitch with a shielded TS cable. The Disaster Area DMT-‐1 is an excellent choice for this footswitch. The Multi Jack will function as a tap tempo switch regardless of the mode the SMARTClock is in, thus allowing a tap tempo switch even while in Preset mode. Finally, the Multi Jack may be used as a second MIDI output. Certain devices (such as the Empress Phaser and Tremolo 2, and the Chase Bliss Warped Vinyl and Wombtone) may connect directly to the Multi Jack using a ¼” cable. The Empress devices may use a standard TS-‐TS cable, while the Chase Bliss pedals require a TRS cable with the Tip and Ring reversed. Please contact Disaster Area or Chase Bliss to purchase the correct cable. If a standard MIDI output is desired, the Disaster Area DAD-‐05-‐TRS-‐1.5 adaptor cable should be used. The Multi Jack MIDI output will send all the same messages as the main MIDI output, including Clock, Start, Stop, and Program Change. MIDI Clock The SMARTClock also sends MIDI Beat Clock to synchronize your MIDI devices. MIDI clock is sent at a rate of 24 pulses per quarter note; at 120bpm the SMARTClock will send 2,880 pulses each minute. Most MIDI devices are designed to receive MIDI clock and will “chase” the clock signal, replacing their internal timing information. MIDI clock is sent to all devices at the same time, and is not addressed to a specific MIDI channel. Consult the user manual for your MIDI devices to determine whether they will accept MIDI clock. When the SMARTClock clock is running, MIDI clock is sent from both the MIDI output and the USB MIDI port. Starting the clock will send a MIDI START message, stopping the clock will send a MIDI STOP message. If an external MIDI device sends MIDI clock to the SMARTClock MIDI input or USB MIDI port, the SMARTClock is capable of converting this signal to taps through the Tempo Outputs. If the external MIDI device sends a MIDI START message, the SMARTClock will automatically disable its internal clock. If no MIDI START message is sent, disable the internal clock by holding the footswitch in Preset Mode. If the external MIDI clock signal is lost, the SMARTClock will stop sending messages and taps until the external signal is restored or the internal clock is restarted. If an external MIDI clock signal is present, the Tempo Outputs will send out taps continuously whether they are set to Auto or 4TAP. Additionally, the display may fluctuate to a small degree as the SMARTClock attempts to count the BPM from the external clock. MIDI Programs and BPM Presets The SMARTClock is designed to listen for incoming MIDI Program Change messages. Each time it receives a Program Change message, the controller will access the tempo and subdivision settings saved to that memory location and start its internal clock. If an external MIDI controller is used, the Tap Tempo mode may be used for editing and saving all presets. To edit a BPM preset on the SMARTClock, simply s To edit a BPM preset on the SMARTClock: Send a Program Change message from your external controller while in Tap Tempo mode. The SMARTClock display will show the preset number and then revert to the tempo. Tap the footswitch or turn the encoder to select the new tempo. Tap the encoder to edit the subdivisions for each Tempo Output. If the Tempo Outputs are set to OFF in the Setup Menu, they will be ON / closed if the subdivision is set to any value other than Wh / whole note. Hold the footswitch to save the current settings to the current preset. MIDI Channels The SMARTClock sends and receives by default on MIDI channel 16. This value may be edited in the Setup Menu if desired. MIDI Clock messages are sent on ALL MIDI channels, no channel assignment for clock signals. Many Disaster Area controllers have a special channel designed to work with the SMARTPedal and EZ series units. Setting the SMARTClock to this channel allows the other device to control the SMARTClock without using up one of the “mappable” MIDI channels. DPC-‐5 MIDI Channel 1 DMC-‐3XL Gen2 / DMC-‐4 Gen2 MIDI Channel 16 (v2.00 firmware and higher only.) DMC-‐6D MIDI Channel 4 DMC-‐8D MIDI Channel 5