1
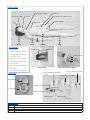
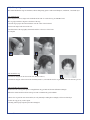
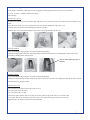
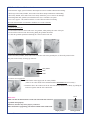
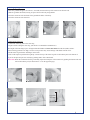
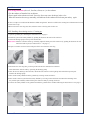
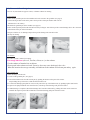
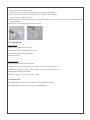
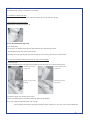
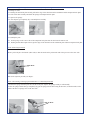
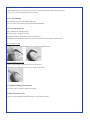
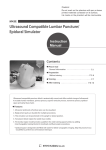
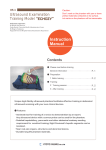
M75
Patient Care Simulator
"SAKURA"
Instruction Manual
Do not leave this manual in contact with manikin skin. Ink marks will be indelible, due to pigment infiltration.
1
M75 Patient Care Model “SAKURA.”
SAKURA is a MULTI-PURPOSE training model for teaching hospital and learning hospital and community care
procedures. The model can sit upright without support. Soft, Life-like materials and seamless limbs provide realistic
hands-on training.
Table of Contents
Features
3
Dos and Don'ts
3
Part names and functions
4
Specifications
5
Training items
5
Instruction for each training item
1. A) Changing position in bed and Patient handling,
5
B) Passive exercise
C) Bed-bathing
D) Clothe changing
2. E) Oral and denture care
5
3. F) Shampooing
6
4. G) Gastric lavage
5. H) Female urethral catheterization
7
8-10
6. I) Enema and rectal irrigation
11
7. J) Vaginal douche
12
8. K) Stoma care
12
9. L) Tracheotomy care
13
10. M) Intramuscular injection
13
11. N) Nasal canula, transnasal catheter
15
12. O) Foot-bathing
15
13. P) Postmortem care
15
14. Q) Tube feeding (Oral catheter)
15
15. R) Intravenous access
15
2
Features
Life-like model with full articulation.
The model can sit upright without support.
Realistic articulating jaw and removable dentures facilitate oral care training.
Easy set up and simple clean up for catheterization training.
Catheterization fluids are retained in built-in reservoirs and filled via ports in the hip.
Simulated stomach, held inside of the manikin and accessed via the chest wall, can be filled with fluids which can be
extracted, or for checking nasogastric tube placement.
A cleaning system is incorporated into the simulator for flushing urethra and rectum.
Removable basic intramuscular injection pads for upper arms, thighs and hips.
Durable wig allowing hair combing/brushing, shampooing and blow drying.
Seamless arms and legs making the model more life-like.
A male genitalia interchangeable with the female one is available as an option (not included in the basic set).
The simulator is designed for training in medical diagnosis education.
Do not use it for other purposes.
Read the instructions carefully before use.
Do not use the system in a way other than hereinafter prescribed. Manufacturer shall not be liable for
damages or problems caused by noncompliance with the written instructions.
Please note: Sometimes, you may find remaining water remain in the hose of the newly delivered SAKURA model.
This is because of a water leakage test at manufacturer's factory and not a defect of the product and packing.
Dos and Don'ts
Dos
• Handle the model carefully, like an actual patient. Excessive force or impact may damage the product or result in problems.
• Be careful of getting your fingers pinched, e.g., by hard joint parts of the model.
• Handle the fingers with at most care. Excessively frequent bending and stretching may cause breakage in the metal parts
inside of the fingers due to metal fatigue and may lead to damage of the skin.
• For cleaning, wipe the model with water or soup water. If stain persists, wipe with alcohol avoiding the colored parts like
the eyebrows, lips, etc., .
• Use lubricant (cooking oil can be used) for catheterization training.
• After use, place talcum powder on the skin surface of the model to keep model in good condition preventing stain
• Store the model away from high heat and direct sunlight.
Don'ts
• Don’t mark on the models with pen or leave any printed materials in contact with their surface.
Ink marks on the models will be indelible, due to pigment infiltration.
• Don't use actual medicines to model, including the iodine, etc.
• Do not force to open the mouth wider than intended. It may damage the skin.
3
Name of Parts
Tracheotomy opening
Eyes with eyelids
Colostomy
Dentures
Gluteal injection pads (both sides)
Female genitalia
Chest cover
Wig
Arms
Head
Chest
Lumbar
Legs
Set includes
1 Sakura manikin:
Esophagus
Stomach
with wig, dentures, female genitalia,
stomach, esophagus and a pair of
Urinary bladder
gluteal injection pads.
Uterus
Rectum
a pair of upper arm IM injection pads
a pair of femoral IM injection pads
1 water bag and tube
2 kinds of drain pumps and a drain tube.
1 pair of pajamas
Inside of chest
Side view of female genitalia
1 set of Strap-on Venipuncture Trainer
Accessories
Strap- on Venipuncture trainer
Upper arm IM injection pads
(1 set)
(a pair)
Femoral IM injection pads
(a pair)
Upper denture
Drainage pump for rectum
Lower denture
Drainage pump for urinary bladder
Drainage tube
Water bag tube
Water bag
Specifications
Manikin
Material
Height
Weight
Adult female life size
Head, limbs and chest:Special soft resin Lumbar: Rigid resin Internal frame: SUS, brass
158 cm
approx. 18 kg
4
Training items
A) Changing position in bed and Patient handling
M) Intramuscular injection
B) Passive exercise
N) Nasal canula, transnasal catheter
C) Bed-bathing
O) Foot-bathing
D) Clothe changing
P) Postmortem care
E) Oral and denture care
Q) Tube feeding (oral catheter)
F) Shampooing
R) Intravenous access
G) Gastric lavage
H) Female urethral catheterization
I) Enema
J) Vaginal douche
K) Stoma care
L) Tracheostomy care
1. A) Changing position in bed and Patient handling, B) Passive exercise, C) Bed-bathing, D) Clothe
changing
• Limbs, fingers and toes with full articulation allow various patient postures for nursing care training.
• SAKURA can be placed in a sitting position with no support.
• Seamless arms and legs provide true-to-life trainings in bed-bathing and foot-bathing training.
• Life-like manikin skin surface realize realistic smooth movement of dry towel in bed-bathing practice.
Dos and Don'ts
<Dos>
•Read general “Dos and Don'ts” on Page 3 before use.
•For foot bathing use water NO WARMER THAN 40 degrees C.
•For clothe changing, pajama size for 160cm (approx.5.2 feet) tall is recommended.
<Don'ts>
• Do not use pajamas with colorful dye or print. Colors may transfer to the manikin skin and could be indelible.
• Do not soak the manikin in a water filled bath.
2. E) Oral and denture care
2-I. Set-up and detach of the dentures
Both upper and lower dentures are fixed to the gums by two pins at the center and left side.
Detach the dentures
Hold dentures firmly and pull them out.
Insert the pins into the holes.
Upper dentures: pull downward
Lower dentures: pull upward.
Attach the dentures
Hold denture firmly.
Check the position of pins at the base of and holes on the gums.
Attach the dentures by inserting the pins into the holes.
Push the center and both ends of the dentures to the gum so that the dentures are held firmly.
5
3. F) Shampooing
The natural human hair wig for SAKURA, allows shampooing practice with actual shampoo, conditioner, brush and dryer.
3-I. Attach the wig
Three magnet fasteners (snaps) at the forehead and in front of ears fix the wig to SAKURA head.
The wig edge with three magnets is the front of the wig.
1. Put the wig in proper direction and fasten it at the center of the forehead.
2. Fasten the snaps at the front of the ears.
3. Pull the back of the wig lightly downward and fit it to the curve of the head.
4. Complete
2
1
3
3-II. Detach the wig
4
1. Detach the magnets at the front of the ears (Picture 2 above).
2. Detach the magnet at the center of the forehead (Picture 1). Lift and take out the wig backward when the fasteners get free.
3-III. SAKURA Wig maintenance
Do not leave the wet wig after practice. Tangled hairs may get hard and become difficult to untangle.
Follow the instruction below before storage in order to maintain the good condition.
1. Rinse the wig well in water and comb it; let it dry naturally avoiding direct sunlight, or blow it a hair dryer.
2. After the wig get dry, comb it again.
3. Putting silicon spray helps keep the hairs untangled.
6
4. G) Gastric Lavage
•The stomach is detachable; connecting it to the esophagus provides passage from the oral cavity to the stomach.
•Use a No. 11 (19 Fr.) or thinner catheter for training.
<After training>
Open thee Chest Cover
The chest cover is fixed by joints around the edge of the chest cover: one at the top, one each on the both sides and three at the
bottom.
1. Press the center of the chest cover and disconnect the side joints by pulling the edge of the cover.
2. Pull the chest cover downward, detaching the joint at the top edge.
3. Pull the chest cover upward detaching the joints at the bottom edge and take out the cover.
Detach the Stomach
1. Place the SAKURA chest upright to avoid the remaining fluid leaking.
2. Hold the on-touch joint between the esophagus and the stomach and disconnect it by pulling apart (See picture below).
3. Discharge remaining water from stomach.
The one-touch joint separates at
this line.
Attach the stomach.
1. Place the SAKURA chest upright to avoid the remaining fluid leaking.
2. Noting the direction of the stomach, hold the one-touch connection at the end of the esophagus and at the top of the stomach
and connect them by pushing together.
Attach the chest cover
1. Fit in the three joints at the bottom edge of the cover m
2. Fit in the joints at the side edges.
3. Fit in the joint at the top edge.
4. If the chest surface and the chest cover edge are uneven, push the edge of the chest cover to make it flat.
5. In case that there is gap around the edge of the chest cover, joints near the gap may not be set properly.
Adjust the tip of each tenon to the hole and insert it firmly.
7
5. H) Female Urethral Catheterization
• External water supply system facilitates uninterrupted session in urethral catheterization training.
• The design of the urinary bladder, uterus and rectum allows simple maintenance and handling.
• The urinary bladder, uterus and rectum can be easily detached by screw connecter for drainage.
• Interchangeable male genitalia (not included in basic set) is available as an option.
• Use a No.7 (approx. 13Fr) Nelaton catheter or a 16Fr. balloon catheter for training.
(For male catheterization recommended chatheter size is 16Fr.or thinner)
5-I. Setting up
1. Open the genitalia part
1-1. Detach the connectors at the both side of the genitalia, while pushing the center of the part.
1-2. Detach the connector at the front end by pulling the genitalia downward.
1-3. Slide the genitalia upward and detaching the connector at the back end.
2. Set-up the urinary bladder, uterus and rectum
Connect the urinary bladder, uterus and rectum on the inner side of the genitalia part, as shown the pictures below.
The parts can be fixed by screwing up clockwise.
urinary bladder
uterus
rectum
3. Connect water supply tube
1. Find a built-in water supply tube for urinary bladder.
(There are two tubes inside of the SAKURA lumber. The thinner one is for urinary.)
2. Attach the tube to the connector at the far end of the urinary bladder. Fix it firmly by pushing the
connector together until the click sound heard.
PUSH
Please note:
Make sure that the metal button of on the side wall of the tube connector
is pushed down properly.
Otherwise, the tube may not be propery connected.
When the button is popped-up, push it back until the click sound heard.
Right position
8
Wrong position
4. Setting up the genitalia
1. Place the genitalia at approx. 4cm above ( front side) and insert the tip of the connector at the back end.
2. Slide the genitalia downward, leaving no space between the body and genitalia
3. Insert the connector at the both side of the genitalia the holes of the body.
4. Insert the connector at the front end.
3
1
4
2
5. Setting up the water bag
1. Connect the water bag tube to the water bag
2. Prepare a hook to hang the water bag. (The hook is not included in SAKURA set).
*The height of the waterbag top is to be higher than the bladder and lower than 50cm from the bed (table) surface.
If the water bag position is too high, excessive water pressure may cause leakage of the fluid from the valve.
3. Fill the water bag with water and hang it on the hook.
4. Take out the injection pad from the right hip. Connect the tip of the water bag tube to the built-in joint at the bottom of
the pit for the injection pad . Fix it firmly by pushing until a click sound heard.
Please note: When the connection doesn't go smoothly, adjust the metal part of the connector by pushing the button at the side
wall of the built-in join (See instruction 5-1-3 on the opposite page.)
1
3
2
Less than
50cm height
4
5
9
5-II. While training
•Put enough lubricant (olive oil, Vaseline, silicon, etc.,) to the catheter.
• Use the catheter of intended size or thinner.
• Do not push in the catheter too hard. Excessive force may cause breakage in the valve.
When the insertion does not go smoothly, add lubricant to the catheter and relevant part and try again.
•It takes a couple of seconds until the bladder is filled enough water. Wait for a while before starting first catheterization for each
session after set-up.
•When water in the water bag runs short, add some water to the bag with a beaker etc.
5-III. Handling after training session : Cleaning up.
1. Open the genitalia part, following the instruction 5-I-1 on page 8.
2. Detach the joint of the urinary bladder by pushing the button on the wall of the connector.
3. Attach the drainage pump to the tip of the built-in tube.
Please note: When the connction doesn't go smoothly, adjust the metal part of the connector by pushing the button at the side
wall of the built-in join (See instruction 5-1-3 on page 8.)
4. Prepare a container such as a bucket and pour off the water from the water bag.
3
2
4
5. Disconnect the water bag tube; put the tip of the tube into the drained-water-container.
Then drain water from the tube by squeezing the drainage pump.
6. After all water is discharger from the tube, detach the tube connector at the right hip and reattach the injection pad.
Detache the drainage pump.
7. Take out the urinary bladder from the genitalia by screwing counter-clockwise.
8. Take out the connector joint from the urinary bladder by screwing counter-clockwise and drain the remaining water.
Dry well the parts naturally and attach the joint connector firmly by turning clockwise.
9. Connect the urinary bladder to the genitalia and then the genitalia to the manikin following the instruction 5-I-4 on page 9.
5
10
8
6. I) Enema and Rectal Irrigation
Use a No.14 (outer diameter approx.7.5mm) or thinner catheter for training.
6-I. Preparation
1. Take out the genitalia part from the manikin and set the rectum to the genitalia. (See page 8)
2. Attach the larger built-in tube to the joint at the tip of the rectum part. Push it until it clicks.
(Thinner tube is for urinary.)
3. Reattach the genitalia part to the manikin. (See page 9).
4. Take out the injection pad from the left buttock with your fingers. Attach the tip of the rectum drainage tube to the connector
at the bottom of the pit on the left buttock.
5. Prepare a bucket etc. for drainage and put the tip of the drainage tube into the bucket.
6. Ready for training.
6-II. Practice
•Use a No.14 (24Fr.) catheter for training.
•Put enough lubricant (olive oil, Vaseline, silicon, etc.,) to the catheter.
• Use the catheter of intended size or thinner.
• Do not push in the catheter too hard. Excessive force may cause breakage in the valve.
When the insertion does not go smoothly, add lubricant to the catheter and relevant part and try again.
6-III. Cleaning Up
1. Water drainage from the tube
1-1. Take out the genitalia part. (See page 8).
1-2. Detach the built-in tube from the rectum part by pushing the button on the joint of the rectum.
Keep holding the tip of the tube so that the fluid won't flow out.
1-3. Connect the drainage pump unit for rectum to the joint of the tip of the built-in tube, by pushing together until clicks.
1-4. Squeeze the pump and drain water from the tube, with the tip of the drainage tube put in the bucket.
1-5. When drainage is completed, detach the drainage tube from the left buttock by pushing the button on the connector.
Reattach the injection pad to the left buttocks. Detach the drainage pump unit form the rectum.
11
2. Drain water from the rectum container
2-1. Take off the rectum from the genitalia.
Screw the rectum part counterclockwise and take it out from the genitalia part.
2-2.Take out the joint connector from the rectum part by screwing counter-clockwise.
Drain the water from the rectum part.
2-3. Having dried the rectum part well naturally, reassembly the parts (the connector joint, rectum, the rectum part, genitalia part
and the manikin)
2-4. Ready for storage or other types of training sessions.
7. J)Vaginal Douche
7-I. Preparation
1. Take out the genitalia part. (See page 8)
2. Connect the uterus to the genitalia (See page 8)
3. Reattach the genitalia part to the manikin
4. Ready for training
7-II. Cleaning Up
1. Detach the genitalia part from the manikin.
2. Detach the uterus part, while keeping the genitalia upside to avoid water flowing out.
3. Drain water from the uterus, dry it well and reattach it to rear side of the genitalia part.
4. Reattach the genitalia to the manikin.
5. Ready for storage or other type of training sessions.
8. K) Stoma Care
The external appearance of the stoma (artificial anus) is shown on the abdomen.
Pouch replacement and other care procedures can be demonstrated.
12
9. L) Tracheosomy Care
•The tracheotomy opening is connected to the trachea.
9-I. Attach the Tracheotomy Plug
Hold the brim of the tracheotomy plug and insert it firmly into the tracheotomy opening.
9-II. Detach the Tracheotomy Plug
Hold the brim of the plug and pull it out.
10. M) Intramuscular injection
DOs and DON'Ts
• Do not leave the shoulder/thigh injection pads attached after each training sessions.
The attachment mark may remain on the surface.
• Discharge all water from the pads after each session. Do not store the pads with water remain inside.
10-I. Attach and detach the IM injection pads for upper arms and thighs.
1. Attach the pads
Open the attachment plate of an injection pad and fix it to the injection site as shown in the pictures.
Attach an injection pad
to upper arm.
Attach an injection pad
to thigh.
Upper-arm IM injection
pad position.
Femoral IM injection
pad position.
2. Detach the upper arm/ femoral injection pad
Open the attachment plate by hands and detach the pad from the manikin.
Please note: Open the attachment plate wide enough.
Do not pull the pads without opening the attachment plate. Otherwise, it may cause a tear in the manikin skin.
13
10-II. After training: Cleaning and maintenance of IM injection pads for upper arm and femoral
1. Drainage of water
1-1. Pushing the attachment plate inward, pull out the edge of the skin between the attachment and the transparent back plate.
1-2. Take off the skin carefully and detach the sponge and transparent back plate.
1-3. Squeeze the sponge.
1-4. After all parts get completely dry, reassembly them carefully.
2. Assembly the pads
2-1. Set the sponge on the convex side of the transparent back plate. Put the skin from the narrow side.
2-2. Pushing the attachment plate inward, put the edges of the skin between the attachment plate and the transparent back plate.
10-III. Gluteal Injection Pads
Insert a pad to the pit at the buttock (either side) so that the marks on the pad and the wall of the pit come to the same side.
Mark
2. Detach the pads
Pull out the injection pad with your fingers.
10-IV. After training :Cleaning up and maintenance of Gluteal Injection Pads
1. Pull out the sponge from the pit at the rear side of the pad. Squeeze the sponge and dry it well naturally.
2. After the sponge and the skin get completely dry, put the sponge into the skin noting the direction, so that the marks on the
walls of the skin a d sponge come to the same side.
Mark
14
11. N) Nasal canula, transnasal catheter
• The nasal passages are connected to the oral cavity, allowing transnasal catheter placing practices.
• Use a No. 6 (12 Fr.) or thinner catheter for training.
12. O) Foot-bathing
•The seamless legs allow foot-bathing with water.
•The toes can be flexed and stretched with internal metal fittings.
13. P) Postmortem Care
•The eyelids can be closed by fingers.
•The fingers allow designated position.
•Stuffing the auditory canals with cotton can be practiced.
•Stuffing the nostrils and anus with cotton can be also practiced. Do not stuff too much cotton.
13-I. Close the eyelids
Hold the edge of an upper lid with the tip of your fingers and pull it down.
13-II. Return the eyes to open
1. Take out the eyeball with lids from the cavity on the face.
2. Reattach the eyeball-lid unit to the cavity noting the direction.
14. Q)Tube Feeding (Oral catheter)
•Use a No. 4 (9Fr.) or thinner catheter for training.
15. R) Intravenous access
• See the separate instruction manual for Strap-on Venipuncture Trainer.
15
11251-100
11251-010
M75 SAKURA Parts and product codes
Male genitalia
11251-040
Femoral IM injection pads (a pair)
Wig
11251-050
Gluteal IM injection pads (a pair)
11251-020
Dentures (a set)
11251-030
Upper arm IM injection
11251-060
Female genitalia
pads (a pair)
KYOTO KAGAKU CONTACT & ORDERING INFORMATION
Inquiries & Ordering:
Telephone +81-75-605-2510
Facsimile: +81-75-605-2519
URL: http://www.kyotokagaku.com/
Email: [email protected]
Head Office:
Kyoto Kagaku Co. Ltd.
15 Kitanekoya-cho, Fushimi-ku
Kyoto, Japan 612-8388
16
USA & North America:
Kyoto Kagaku Co., Ltd. US Office
3109 Lomita Boulvard, Torrance, CA 90505
Telephone +1-310-325-8860
Facsimile +1-310-325-8867
Do not leave this manual in contact with manikin skin. Ink marks will be indelible, due to pigment infiltration.