1
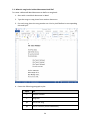
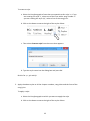
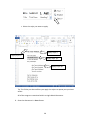
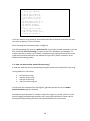
Scripture App Builder Building Apps Last updated: 17 November 2015 Contents 1. How to build your first app ................................................................................... 4 2. App Creation Basics .............................................................................................. 7 2.1. Which format book files does Scripture App Builder recognize? .......................... 7 2.2. How should I choose the app package name? ..................................................... 7 2.3. Where do the default book names and abbreviations come from? ..................... 8 2.4. Do I have to create a new keystore for each app, or can I reuse the same keystore for several of my apps? ......................................................................... 8 2.5. How can I include pictures in my apps? ................................................................ 8 2.6. How can I add a horizontal line to separate certain paragraphs in text? ............ 9 2.7. I don’t like the name “Scripture App”. Have you thought of calling the app something else? ................................................................................................... 9 2.8. Can I build apps when I do not have internet access? .......................................... 9 2.9. How do the glossary entry popups work? ............................................................ 9 2.10. Can I get the app to display non-Scripture books? ............................................. 10 2.11. Can I build an app from the command line? ....................................................... 10 3. Fonts .................................................................................................................. 12 3.1. What is 'Grandroid', referred to on the Fonts setup page? ................................ 12 3.2. When do I need to include the Grandroid libraries? ........................................... 12 4. Audio ................................................................................................................. 13 4.1. How can I associate audio files with the text?.................................................... 13 4.2. How do I create the audio timing files for audio-text synchronization? ............ 14 4.3. How do I distribute the audio MP3 files with the app? ...................................... 14 4.4. How are the timing files distributed for the app?............................................... 18 5. Analytics............................................................................................................. 18 6. Picture Story Books ............................................................................................. 19 6.1. How do I define a picture story book? ................................................................ 19 6.2. What do picture story books in Word documents look like? .............................. 19 6.3. What do picture story books in SFM format text files look like? ........................ 21 6.4. Where do the pictures go? .................................................................................. 22 6.5. What about font and font size? .......................................................................... 23 2 6.6. What audio timing labels are used? ................................................................... 23 6.7. Where can I get sample story book text and pictures? ...................................... 23 6.8. What about recording audio? ............................................................................. 23 7. Song Books ......................................................................................................... 23 7.1. How do I define a song book? ............................................................................. 23 7.2. What do song books in Word documents look like? ........................................... 24 7.3. What do song books in SFM format text files look like? ..................................... 27 7.4. How can we associate audio with each song? ................................................... 28 8. EPUB .................................................................................................................. 29 9. Distribution ........................................................................................................ 31 3 1. How to build your first app To build your first app with Scripture App Builder: 1. Launch Scripture App Builder from its icon on the desktop. 2. Click New App on the toolbar. The New App wizard will appear. 3. On the first page of the wizard, specify: the App Name, such as “Dogon Bible”, “Livre de Luc”, “Supyiré NT”, etc. This is the main title of your app and will be seen by the user. Do not include underscores or hard to understand abbreviations. Click Next to move to the next page. 4. On the second page of the wizard, specify: the Package Name, a dot-separated string which uniquely identifies your app. For testing, try something like: com.example.myapp1 com.example.myapp2, etc. (More details about choosing a good package name can be found in section 2.1. How should I choose the package name?) Click Next to move to the next page. 5. On the page of the wizard entitled Books, click Add Books… and select the Scripture books you want to see in the app. These can be USFM (Paratext) format, USX format, Digital Bible Library text release bundles, Word documents (docx) or a zipped file of USFM or USX files. Click Next to move to the next page. 6. On the page of the wizard entitled Fonts, choose the font. You can either select from the given list of fonts or specify a different TrueType font file. Click Next to move to the next page. 7. On the page of the wizard entitled Grandroid, choose whether or not to enable Grandroid font rendering. In general, you will need Grandroid if you have a non-Roman script (e.g. Arabic, Thai, Hindi, etc.), or if you use a Roman script with combining diacritics. For more details, please refer to section 3 of this manual. Click Next to move to the next page. 4 8. On the page of the wizard entitled Colors and Features, choose the color scheme, book selector type and numeral system. Click Next to move to the next page. 9. On the page of the wizard entitled Icon, choose the application launcher icon. You can select one of the images in the table or if you have your own PNG image files for the icon, click Browse and select them. Click Next to move to the next page. 10. On the page of the wizard entitled Copyright and Licensing, specify the copyright and licensing information that you would like to appear on the About box in the app. This includes the copyright owner for the text. Use the dropdown list to select from a list of common rights holders or type in a different one. If you will have audio in your app, also specify the rights holder to the audio recording, especially if they are different from the text rights holder. You can also specify details the license, such as Creative Commons. If you don’t know what to put in these fields, please ask the publishing department of your organisation for advice. They will want to make sure you get this right and do not simply make a guess as to what to include. Click Next to move to the next page. 11. On the page of the wizard entitled Signing, you need to specify the keystore and alias to use to sign the app. An app must be signed in this way so that it can installed on an Android device. If you do not already have a keystore file (which you are unlikely to have if this is your first time using the program): i. Click Create New KeyStore Wizard. ii. Enter a new filename for the keystore, such as “test” or something like that. Specify a password. iii. Click Next to continue. iv. Enter an alias name for a key to create within your new keystore, such as “testkey”. Specify a password and enter at least one piece of information in the fields below. v. Click Next to continue. 5 vi. A new keystore will be created for you. Click Close. 12. Back on the Signing page of the New App wizard, you need to specify the keystore password, select the alias and enter the alias password (just as you entered them in the step above). Click Next to continue. 13. On the page of the wizard entitled Project, you can enter modify the project name and add an optional description of the app project. Neither of these will be visible to the user of your app. They are just for your own use and might help you distinguish between multiple app projects. Click Next to continue. The New App wizard will close and the app definition will be added to the tree view on the left of the screen. 14. Take a look at each of the app configuration pages by selecting them in the tree view on the left. Look in each of the tabs on each page to verify that you have the settings you want. You can always go back to them later to change them if you find you need to make modifications to fonts, colors, styles, etc. 15. When you have finished configuring the app, click on Build App. If something isn’t configured correctly for the build to work, you will be notified of this. 16. A black command box will appear. Wait about a minute while the app is compiled. The first time the build process is run, the compiler needs to connect to the internet to download some files. After this, subsequent app builds will not require internet access. See Tools Settings… Build Settings to turn on offline mode after the first app build. 17. If the build succeeds, you will have a new apk file – the installation file for an app. Copy this .apk file onto your phone or tablet and click on it to install it. This can be done automatically. See Tools Settings… Build Settings to install and launch the app on the attached device when the build finishes. 6 2. App Creation Basics 2.1. Which format book files does Scripture App Builder recognize? Scripture App Builder can handle three main types of book file: 1. USFM Scripture files, as found in ParaTExt In USFM (Unified Standard Format Markers), the chapters, verses and paragraphs are marked by standard format markers such as \c, \v and \p. You can find the latest USFM definition here: http://paratext.org/about/usfm 2. USX Scripture files, as found in Digital Bible Library text release bundles USX is an XML representation of USFM, used by Scriptures in the Digital Bible Library, http://www.thedigitalbiblelibrary.org. 3. Word documents (.docx) Scripture App Builder can import text and images from docx documents. Some, but not all, of the formatting will be preserved. See sections 6 and 7 on Picture Story books and Song books on how to use define these books in Word documents. 2.2. How should I choose the app package name? The standard for an app package name is to begin with the reversed web address of the publishing organisation, e.g. if it is Wycliffe Bible Translators, the package name could begin with: org.wycliffe and will be followed by something identifying the language and type of publication (New Testament, Bible, etc.), e.g. org.wycliffe.xyz.bible where xyz is the language code. If you work for a Bible translation or publishing organisation, you might have standards to follow for package names, so please contact your digital publications coordinator for advice on this. Once you publish your app on an app store, you cannot change its package name later if you want users to continue to receive updates. The package name uniquely identifies the app in the Android world. Those who install the app will be able to find its package name on their device. It will also appear in the web address for your app if you make it available on Google Play. 7 If you are building apps for test purposes on your devices, you can use a package name beginning with com.example, e.g. com.example.test.app123 But remember to change it before you publish the app. 2.3. Where do the default book names and abbreviations come from? The USFM standard is to use \toc2 for the book name and \toc3 for abbreviations: e.g. \toc1 The Gospel according to Matthew \toc2 Matthew \toc3 Mat (long book name) (short book name) (abbreviation) If Scripture App Builder does not find \toc2 or \toc3 it tries to guess the book name and abbreviation from \mt (main title) and \h (heading), but it is best to provide them in the toc fields. For the Digital Bible Library text release bundles, the book names come from the metadata.xml file within the bundle. You can change the book names and abbreviations on the book page for each book. 2.4. Do I have to create a new keystore for each app, or can I reuse the same keystore for several of my apps? You can use the same keystore and key alias for all or several of your apps. See here for more details: http://developer.android.com/tools/publishing/app-signing.html 2.5. How can I include pictures in my apps? You can include JPG or PNG image files in the text of the app. The app recognises the USFM illustrations markers \fig…. \fig*: \fig DESC|FILE|SIZE|LOC|COPY|CAP|REF\fig* i.e. 7 parameters, separated by six vertical line characters. The only required parameter is FILE – the filename. If the file extension is .tif, the app will look for a file with the same name but with a .png or .jpg extension instead. You can optionally include captions (CAP) and chapter/verse references (REF). Examples: 8 \fig |picture1.jpg||||This is a picture|5:3\fig* \fig |picture2.tif||||This is another picture|\fig* \fig |picture3.jpg|||||\fig* Include the image files in the app via the Images Illustrations page of Scripture App Builder. They will be included in the app assets and compiled into the final apk, so try to keep them as small as possible. 2.6. How can I add a horizontal line to separate certain paragraphs in text? Use the marker \zhr to add a horizontal line. This will add a <hr> element in the HTML. Please note that this is non-standard USFM, so this marker should not be used if you are submitting this same file to the Digital Bible Library. 2.7. I don’t like the name “Scripture App”. Have you thought of calling the app something else? The program that allows you to define and build apps is called “Scripture App Builder” but the app itself doesn’t have a name. It is up to you to choose the names for the apps you build. You won't see 'Scripture App' anywhere in the apps you create, so feel free to use an appropriate name in an international, national or local language. App names that work well in certain contexts will be less helpful in other contexts, which is why SAB allows you to contextualise it. 2.8. Can I build apps when I do not have internet access? The first time you build an app, you will need to be connected to the internet otherwise the compiler will fail. After that you can set the 'offline' version in Settings so you can work offline. 2.9. How do the glossary entry popups work? To get glossary links working, do the following: 1.1. Add a glossary file as a book. This should have an id of GLO and keywords should be marked with \k ….. \k* 1.2. Mark words in the main text with \w ….. \w*. If the glossary form is different from the form of the word in the text, use the | character to specify the glossary form. e.g. where ‘angel’ is in the glossary file: \v 5 You have made them a little lower than the \w angels|angel\w* and crowned them with glory and honour. 9 2.10. Can I get the app to display non-Scripture books? Yes, you just need to use standard format markers, like \c for chapter, \p for paragraphs and \s for sub-headings. The first marker in the file must be \id XYZ, where XYZ is a 3letter code you choose (but don't choose a code already reserved for a Scripture book, e.g. GEN). The book files must be plain text files. If you have Unicode characters, the text files should use UTF-8 encoding. To create a text file in Windows, use Notepad. To create a text file on a Mac, use TextEdit, remembering to choose Plain text files in the preferences because otherwise the default file type is RTF (which contains a lot of additional formatting codes). 2.11. Can I build an app from the command line? Yes, Scripture App Builder has a command line interface which allows you to create a new app and build it, or load an existing app and build it. The command line tool is named sab and can be found in the Program Files folder, usually c:\Program Files (x86)\SIL\Scripture App Builder. sab takes the following parameters: Option Description -new Create a new app project -load <project> Load an existing app project -build Build app project (use with either -new or -load) -no-save Do not save changes to app (use with -load) -? Show command line help -n <app-name> Set app name. Enclose the name in "double quotes" if it contains spaces. -p <package-name> Set package name, e.g. com.myorg.language.appname -b <filename> Add book or bundle file. This could be a USFM file or a zipped set of USFM files. It could also be a Digital Bible Library text release bundle. -i <filename> Include additional parameters file. Use the full path of the file and enclose it in "double quotes" if there is a space in the path. -a <filename> Set about box text, contained in text file. Use the full path of the file and enclose it in "double quotes" if there is a space in the path. 10 -f <fontname> Set font name or filename, e.g. "Charis SIL Compact", "c:\fonts\myfont.ttf" The font name must be one of the items in the list of fonts in the New App wizard. For other fonts, specify the full path to the font filename. -g Use Grandroid -ic <filename> Add launcher icon (one or more .png files). Use the full path of the files and enclose them in "double quotes" if there is a space in the path. -l <lang-code> Set language for menu items and settings, e.g. en, fr, es -ft <feature=value> Set a feature, e.g. book-select=grid -vc <integer> Set version code, e.g. 1, 2, 3, or +1 to increment the current version code by 1. -vn <string> Set version name, e.g. 1.0, 2.1.4, or use +1, +0.1, +0.0.1 to increment the current value. -ks <filename> Set keystore filename. Use the full path of the file and enclose it in "double quotes" if there is a space in the path. -ksp <password> Set keystore password -ka <alias> Set key alias -kap <password> Set key alias password -fp <folder=path> Set a folder path, e.g. "app.builder=c:\Scripture App Builder". -ta <target-api> Set Target API, e.g. 21 for Android 5.0, 22 for Android 5.1. Examples: sab -new -n \"My App\" -p com.example.myapp -b MyBookBundle.zip -f \"Charis SIL Compact\" -i keys.txt –build sab -load \"My App\" -build 11 3. Fonts 3.1. What is 'Grandroid', referred to on the Fonts setup page? Grandroid (Graphite for Android) is a collection of native libraries from SIL Non-Roman Script Initiative (NRSI). They can be packaged within the app, enabling Android devices to make use of Graphite font rendering features. Grandroid is not only about Graphite. It also fixes a few of the font display problems in recent versions of Android. You can find more information about Graphite here: http://scripts.sil.org/cms/scripts/page.php?site_id=projects&item_id=graphite_home You can find more information about Grandroid here: https://github.com/silnrsi/grandroid 3.2. When do I need to include the Grandroid libraries? This will depend on the font and special characters you need to display. The more complex your script, the more likely you are to need Grandroid support. Please note that if a font displays correctly on your own phone without Grandroid, it does not mean it will display correctly on all phones and Android versions. As well as testing your app on the latest version of Android, it would be a good idea to test it on a phone running Android 4.2 or 4.3 (which have known font display problems) and the older 2.3 (which has limited built-in complex font support). You will almost certainly need to include the Grandroid libraries: If you have a non-Roman script, e.g. Greek, Cyrillic, Armenian, Hebrew, Arabic, Syriac, Thaana, Devanagari, Grumukhi, Oriya, Tamil, Telugu, Kannada, Malayalam, Sinhala, Thai, Lao, Tibetan, Myanmar, Georgian, Hangul, Ogham, Runic, Khmer, Ethiopic or NKo. If you have a Roman script which makes use of combining diacritics, such as separate acute accents or tone marks (e.g. ɔ́, which is composed of two characters, but not é which is a single character). You are unlikely to need to use Grandroid: If you have a simple Roman script which does not make use of combining diacritics. So that means a-z, plus other IPA characters such as ɛ, ɔ, ɲ, ŋ, etc. as long as they are not being combined with tone marks or accents. If you try and display a complex script without Grandroid, you might find the following problems: 12 Lack of Right-to-Left support - on Android 2.3 (Gingerbread). The system font being used rather than the font you specify - on Android 4.2 and 4.3 (Jelly Bean). Lines with combining diacritics being displayed in the system font, while other lines are being displayed correctly - on Android 4.2 and 4.3 (Jelly Bean). A blank screen where there should be text - on Android 4.2 and 4.3 (Jelly Bean). If you want to display complex fonts, including Right-to-Left scripts, on Android 2.3 (Gingerbread), it helps if the font is Graphite-enabled since Android 2.3 has limited handling of OpenType for font rendering. 4. Audio 4.1. How can I associate audio files with the text? To associate audio with the text in your app, you will need: one MP3 audio file per chapter, or one MP3 audio file per picture story book. For example, if you have a book ‘Matthew’ with 28 chapters, you will need 28 audio files, one for each chapter. If you have a picture story book with 8 pages, you need a single audio file which covers all 8 pages rather than 8 separate files. Note: If you have several audio files per chapter or several chapters in one audio file, you will need to concatenate or split your files to create files of one chapter each before SAB can use them. This could be done in Audacity. To add audio files: 1. Go to the Audio Files tab for the book, or the Audio Files tab for the book collection. 2. Click the Add Audio Files… button. 3. Select the MP3 audio files to add. SAB will try to match the audio files to the chapters in the book(s), so you should use audio filenames that will make it obvious which file corresponds to which book and chapter. The optional timing files can be added on the same page: one timing file per audio file. 13 4.2. How do I create the audio timing files for audio-text synchronization? There are three possibilities: 1. Create the timing files manually using the Audacity audio editing program. For instructions, please refer to the document Using Audacity for Audio-Text Synchronization. 2. Automate the creation of the timing files using aeneas. For instructions, please refer to the document Using aeneas for Audio-Text Synchronization. 3. Use HearThis to record the audio. When you export the MP3 files, there is an option to export a set of timing files at the same time. For instructions, please refer to the document Using HearThis for Audio Recording. 4.3. How do I distribute the audio MP3 files with the app? There are 4 ways of including audio files in your app: assets, external folder, internet download or FCBH download. You can use a single audio source for all of the files in an app or you can combine two or more audio sources in an app. To specify the audio source(s) in Scripture App Builder, you need to visit the following two pages: 1. The Audio page, which defines the available audio sources. This page can be found in the apps tree view just under Analytics on the top level of app pages. You can modify, add and remove audio sources here. 2. The Audio Files tab for a book or book collection, which lists the audio files with their corresponding audio source. To change the audio source for a file or files, select the rows you want to change and select Change Audio Source. The follow sections describe the different audio source types. 1. Assets The mp3 files will be packaged inside the apk file for the app. This is the easiest method for a few files (e.g. one book) and requires no permissions. But be beware that the apk will get very large if you have several books of audio. The maximum size of an apk that can be uploaded to the Google Play store is 100 MB. 14 2. External Folder No audio files are packaged within the app, so the apk is small. The app will look in a specified SD card folder to find the audio mp3 files it needs. If you are distributing the app via SD card, you include the folder of audio files on the SD card together with the apk. This method requires the 'Read external storage' permission but not internet access. You can place the mp3 files inside sub-folders and sub-sub-folders in the specified SD card folder, using any folder names you choose. For example, here are some possible folder names: \Bible Files \1 Old Testament \01 Genesis \02 Exodus \2 New Testament \01 Matthew \02 Mark or \NT Mamara \01 Macoo \02 Marika \03 Luka \04 Yohana There is no need to use 01, 02, etc. in the folder names, but these can be useful if folders are listed in alphabetical order Alternatively, you can place all the audio files in a single folder without using any sub folders. If the app does not find audio files in the specified folder or its sub-folders, it will also search the other folders on the device to see if it can find them there. For example, if the specified folder name is ‘Audio 123’ but the files are located in the ‘Audio 456’ folder instead, the app should find them. Once it has found a folder with a needed audio file, it will keep a note of it so it knows where to look next time. 3. Internet Download Like method 2, no audio files are packaged within the app, so the apk is small. The app will look in a specified SD card folder to find the mp3 files it needs. If it doesn't find them there, it will look in all the other folders on the device. If it still cannot find them, the app can download the files one by one when it needs them from a website of your choice. This method requires the 'Read external storage', 'Write external storage', 15 'Connection state' and 'Internet' permissions. Audio filenames The internet download works best if your audio filenames do not include any spaces. A filename of the form “LNG-MAT-01.mp3” is better than “LNG MAT 01.mp3”. Http or https The download manager in Android 2.3 (Gingerbread) cannot handle downloads from secure https addresses, so if you want to support these phones, use an http:// address instead of https://. Audio file hosting Recommended storage locations for the files on the internet include: 1. A language-specific website If you have a language-specific website for making resources available for download, you could place the audio files in a folder on the website. For example, if your website is called ‘www.ourlanguage.org’, you could upload the audio files to a folder called ‘audio’. The http address for your audio files would then be: http://www.ourlanguage.org/audio Your website administrator should be able to help you do this. 2. Internet Archive Archive.org (http://www.archive.org) is a non-profit library where you can create a free account and upload your audio files. As well as being accessible to your app, the files will be freely available on the archive.org website for users to view and download. 3. Cloud Storage Services Amazon S3 (Simple Storage Service): http://aws.amazon.com/s3/ Google Cloud Storage: https://cloud.google.com/storage/ These cloud storage services are designed for fast, reliable and secure online storage. Once you have created an account, you create a 'bucket' in which to place your mp3 files. When you add the files, you need to make them public and make a note of the web address link to use to access them, e.g. http://s3.amazonaws.com/yourbucketname You will get some months of free storage before there is a charge according to the bandwidth used, i.e. how many MB of audio users download. It might be easiest to organise this kind of cloud storage at an organisational level rather than creating a new account for each language. 16 4. FCBH Digital Bible Platform If the audio files your app uses come from Faith Comes By Hearing (FCBH), there is no need to upload them to the internet. They are already there and can be accessed via the Digital Bible Platform (DBP). This is the server used by the Bible.is website and mobile apps. Take a look at the Bible.is website to see if the language you are interested in is already available. If you have any non-FCBH Scripture recordings, those you have recorded in-house with the help of your own organisation’s technicians, FCBH is willing to consider hosting these files as well in the DBP. This applies, for example, to good quality recordings of complete Bible books – but not Bible story portions or teaching materials. To investigate this option, please contact your area FCBH representative. For your app to be able to download files from the DBP, you will need to register with FCBH and provide your app with the DBT (Digital Bible Toolkit) key, received on registration, and volume id of the set of audio files. This method requires the 'Read external storage', 'Write external storage', 'Connection state' and 'Internet' permissions. Getting a DBT key The DBT key (the API Key) is a 32-character alpha-numeric string. To get a key, you need to register with FCBH: 1. Go to http://www.digitalbibleplatform.com 2. Click Sign Up on the top right of the screen. 3. Click Sign Up for Developer Access. 4. Fill in your details, mentioning that you are building apps with Scripture App Builder and hit Submit. Getting the DAM ID When you get your DBT key from FCBH, you'll be able to search the library of volumes to get the DAM ID for the language audio you need. The DAM ID is a 10-character string which uniquely identifies the set of audio files for a language, e.g. “MYKWBTN2DA” (for the Minyanka NT), “TPIPNGN2DA” (for the Tok Pisin NT). 1. Go to the Digital Bible Platform Developer Docs website. http://www.digitalbibleplatform.com/docs 2. Go to the Volume Listing page. You can find this in the menu on the left of the screen, under API Reference Library Catalog. 3. Scroll down the page to the API Explorer. 4. Type your DBT key into key (required): 5. Type the language code into language_code. 6. Click the Test button. 17 7. In the list of volume results, look for the DAM ID of the volume which has audio content (rather than text content): "media": "audio" 4.4. How are the timing files distributed for the app? If you have timing files for audio-text synchronisation, they are always packaged in the app assets whatever the audio source setting chosen in 4.3 above. They are not downloaded from anywhere. If timing files are not available when the app is compiled and are subsequently created by someone who isn't building the app (such as a volunteer), they can be placed in the external folder for testing. For more details, please see section 6.7 in the document Using Audacity for Audio-Text Synchronization, which answers the question “I’d like to give someone else the task of creating timing files. Is there any way of them testing these without needing to know how to build the app?” 5. Analytics If you enable Analytics, the app will connect to the internet from time to time to send app usage information to a given Google Analytics account. This will give you an idea of the extent to which people are interacting with the app. The information sent will include the model of the device (such as ‘Google Nexus 7’, ‘Samsung Galaxy S4’), the Android version (such as ‘4.2’), the mobile network provider and an approximate location (city/country). No personal information is included. To sign up for Google Analytics, ensure you have a Google account, and go to: https://www.google.com/analytics You will need to: 1. Create an analytics account 2. Create a ‘Mobile App’ property for this account. You will be given a tracking id, of the form UA-1234567-1 which you should copy into the Tracking ID field in Scripture App Builder. 18 6. Picture Story Books A picture story book is a book with a picture at the top of each page and a few sentences of text underneath. In the app, the picture will stay at the top of the screen and the text will scroll. You can associate a single audio file with the whole picture story book rather than an audio file per page. Audio-text highlighting works as for Scripture, and when the audio reaches the end of a page the app will scroll across slowly to start the next page of the story. 6.1. How do I define a picture story book? Picture story books can be defined in one of two formats: Microsoft Word (.docx) documents, or Text files using standard format markers (SFM). See 6.2 and 6.3 for a description of these formats. 6.2. What do picture story books in Word documents look like? To create a Microsoft Word document to define a picture story book: 1. Start with a new blank document in Word. 2. Insert a picture at the top of the first page. 3. Add the story text for this page below the image. 19 4. Insert a page break after the text using CTRL+Enter, or Insert Page Break. 5. Insert a picture at the top of the second page and place the story text under it. 6. Insert a page break after the text using CTRL+Enter, or Insert Page Break. 7. Continue adding additional pages in this way. 8. Save the document in .docx format. You can add images to the document in .jpeg, .jpg, .png, .tif or .gif formats and Microsoft Word will convert them automatically to the format recognised by Scripture App Builder. Pictures are not compressed within the app at present, so if you have large image files it is best to resize them. You can do this either before adding them to the document or within Word itself: 1. Select one of the images in Word. 2. Click Compress Pictures on the picture format ribbon or toolbar. 3. Select All Pictures in document. 4. Select the resolution as Web/Screen. 20 5. Click OK. 6. Save the document. 6.3. What do picture story books in SFM format text files look like? They start with an id of your choice: \id STO29 and a title: \toc2 The Story of the Unmerciful Servant Each page begins with the \page marker: \page 1 followed by an image filename: \img obs-29-01.jpg and then the text for that page, using USFM markers like \p for paragraphs: \p One day, Peter asked Jesus, “Master, how many times should I forgive my brother when he sins against me? Up to seven times?” \p Jesus said, “Not seven times, but seventy times seven!” \p By this, Jesus meant that we should always forgive. Then Jesus told this story. Here is an example: 21 -----------------------------------\id STO29 \toc2 The Story of the Unmerciful Servant \page 1 \img obs-29-01.jpg \p One day, Peter asked Jesus, “Master, how many times should I forgive my brother when he sins against me? Up to seven times?” \p Jesus said, “Not seven times, but seventy times seven!” \p By this, Jesus meant that we should always forgive. Then Jesus told this story. \page 2 \img obs-29-02.jpg \p Jesus said, “The kingdom of God is like a king who wanted to settle accounts with his servants. One of his servants owed a huge debt worth 200,000 years' wages.” \page 3 \img obs-29-03.jpg \p “Since the servant could not pay the debt, the king said, 'Sell this man and his family as slaves to make payment on his debt.'” \page 4 \img obs-29-04.jpg \p “The servant fell on his knees before the king and said, 'Please be patient with me, and I will pay the full amount that I owe you.' The king felt pity for the servant, so he canceled all of his debt and let him go.” etc. The book files must be plain text files. If you have Unicode characters, the text files should use UTF-8 encoding. To create a text file in Windows, use Notepad. To create a text file on a Mac, use TextEdit, remembering to choose Plain text files in the preferences because otherwise the default file type is RTF (which contains a lot of additional formatting codes). 6.4. Where do the pictures go? If you have defined the picture story book as a Word document, the images in the document will be added automatically to the app illustrations collection when you add the book. You should see them on the Images Illustrations page. If you have defined the picture story book as an SFM text file, you need to add the images to Scripture App Builder separately. Do this on the Images Illustrations page. You can use either PNG or JPG files. Try and make them as small as possible without compromising image quality. This will keep your app size small and reduce page load time. 22 6.5. What about font and font size? A popular font designed for those learning to read is Andika or Andika Compact. If you have a small amount of text per picture, it is best to use a larger font size by default. You can change this within Scripture App Builder on the Styles Text Styles page by modifying the font-size property of the body style. 6.6. What audio timing labels are used? Timing labels are of the form: 1a - 1st phrase on page 1 1b - 2nd phrase on page 1 1c - 3rd phrase on page 1 2a - 1st phrase on page 2 2b - 2nd phrase on page 2, etc. To help with the creation of the timing files, generate phrase lists on the Audio Synchronization page for the book, or use aeneas to automate the synchronization process. 6.7. Where can I get sample story book text and pictures? Have a look at Open Bible Stories here: https://door43.org/en/obs 6.8. What about recording audio? Use your favourite sound recording software, such as Audacity. You'll need to decide how fast or slow you want the reader to read. In some contexts, it might be good for picture story books to be read fairly slowly. 7. Song Books 7.1. How do I define a song book? You can build a song book app, with one song per 'chapter'. Song books are defined in one of two formats: Microsoft Word (.docx) documents, or Text files using standard format markers (SFM). See 7.2 and 7.3 for a description of these formats. Audio can be added with audio-text synchronization so that each line of the song is highlighted as it is sung. 23 7.2. What do song books in Word documents look like? To create a Microsoft Word document to define a song book: 1. Start with a new blank document in Word. 2. Type the songs or copy them from another document. 3. For each song, place the song number on a line by itself before its corresponding title and lyrics. 4. Create the following paragraph styles: Style Use c Chapter number s Song title q1 Line of the song q2 Line of a chorus (more indentation) 24 To create a style: a. Select the line/paragraph of text that corresponds to this style, i.e. if you are creating the style ‘c’, select one of the lines with a song number. If you are creating the style ‘q1’, select a line of the song lyrics. b. Click on the down arrow to the right of the styles ribbon. c. Then select Create a style from the menu that appears. d. Type the style name into the dialog box and press OK. Do this for c, s, q1 and q2. 5. Apply the above styles to all the chapter numbers, song titles and the lines of the song lyrics. To apply a style: a. Select the line/paragraph to which you want to apply the style. b. Click on the down arrow to the right of the styles ribbon. 25 c. Select the style you want to apply. Apply style ‘s’ Apply style ‘c’ Apply style ‘q1’ Apply style ‘q2’ Tip: The F4 key can be useful as you apply the styles to repeat your previous action. All of the songs are contained within a single Word document. 6. Save the document in .docx format. 26 7.3. What do song books in SFM format text files look like? They start with an id of your choice: \id SONGS and a title: \toc2 Our Song Book Each song begins with the \c marker and the number of the song: \c 1 The marker \q (or \q1) is used for line of the song lyrics and \q2 for indented lines, such as for a chorus. Use \b for blank lines between verses. \id BAT \toc2 Batoli Betiw \c 1 \s Ala Tanu! Aleluya! \q An k'Ala tanu \q Ala Denkɛ ko la, \q O sara ka kunun \q Ka ɲɛnamaya. \b \q2 Ala Tanu! Aleluya! \q2 Ala Tanu! Amiina! \q2 Ala Tanu! Aleluya! \q2 Yesu bɛ na tun. \b \q An bɛɛ tununna \q Dibi Fanga dɛ la, \q Bari Matigi nana, \q A ye an bɛɛ tila. \b \q A y'an kunmabɔ \q A y'an bɛɛ hɔrɔnya, \q A y'a ni to an kɔnɔ \q K'an dusu jɛya. \b \q Yesu mana na, \q A na kɛ Masa ye, \q A na diɲɛ bɛɛ mara, \q Ka Sitanɛ tiɲɛ. 27 \c 2 \s An Fa Ala, Dubatigi \q An Fa Ala, Dubatigi, \q An bɛ barika da i ye, \q Ka i tanu, ka i bato, \q I ka kan ni bonya ye. \b \q2 Kuma duman kɛ ne da la, \q2 Ka ne Kisibaa ko fɔ. \q2 Aleluya! Aleluya! \q2 Yesu ye ne kunmabɔ. \b \q Ne bɛ Ala sira taama, \q An Matigi barika la. \q Ne y’a dɔn ko Ala sɔnna \q Ne ka taa sankolo la If you are used to using Paratext, these SFM codes will be familiar since they are how you mark up poetry in such as Psalms. All of the songs are contained within a single file. The SFM songbook file must be a plain text file. If you have Unicode characters, the text files should use UTF-8 encoding. To create a text file in Windows, use Notepad. To create a text file on a Mac, use TextEdit, remembering to choose Plain text files in the preferences because otherwise the default file type is RTF (which contains a lot of additional formatting codes). 7.4. How can we associate audio with each song? A separate audio file and corresponding timing file needs to be created for each song. Timing labels are of the form: a b c d - 1st line of the song - 2nd line of the song - 3rd line of the song - 4th line of the song, etc. To help with the creation of the timing files, generate phrase lists on the Audio Synchronization page for the book. Automated synchronization is unlikely to work for songs, so you will need to use the manual tagging method using Audacity and Timing Labels Assistant. Please see the document Using Audacity for Audio Text Synchronization for instructions. 28 8. EPUB As well as building a smartphone app, you can create e-books in EPUB format. EPUB documents are readable by a number of e-book readers on Windows, Mac, iOS and Android platforms. If you have timing files for your audio, the e-books can contain ‘Read Aloud’ text-audio synchronization. These are readable by a few EPUB 3 readers, such as the Readium extension for Chrome (http://readium.org) and the Gitden Reader apps for Android and iOS (http://gitden.com). To create an EPUB e-book: 1. Choose whether to create a single e-book containing all the books or whether you want to create a separate e-book for each book. The latter is the best option if you will have audio in the book, since otherwise a whole NT with audio would be a very large e-book. 2. Choose a cover design. See the Cover tab. If you are creating separate e-books for each book, a different cover image can be specified for each book on the Cover tab of each individual Book page. 3. Click the button Create EPUB Document(s). The generated EPUB documents will be saved in the default EPUB output folder. See Tools Settings… Default Folders. 4. Open the EPUB documents in your chosen e-book reader. Scripture App Builder generates EPUB 3 documents which should be backwardly compatible to be able to be read using EPUB 2 readers. EPUB 3-only features such as the text-audio synchronization will only be seen on compatible readers. 29 Viewing an EPUB Read Aloud document in the Gitden Reader app Viewing an EPUB Read Aloud document in the Readium Chrome extension 30 9. Distribution Apps built with Scripture App Builder can be published on the Google Play store, distributed by memory card, shared by Bluetooth or Wi-Fi transfer, uploaded to websites, or sent out by email. For more information, please see the user manual: Distributing Apps. 31