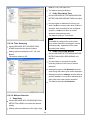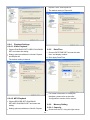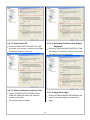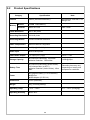
1
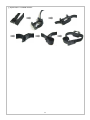
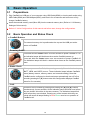
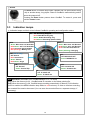
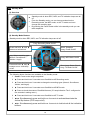
World’s Smallest Camcorder CamBall SG-30/SG-31 User Manual REV 00 – 20090709 Notice [Legal Disclaimer] y Use of this product for illicit purposes, including invasion of personal privacy, is punishable by law and Starnex disclaims any and all responsibilities resulting thereof. [EMC Registration] y This device is a B grade EMC-registered device that’s safe for residential use in all regions. Safety Precautions [Handling] y CamBall is a precision hardware that is vulnerable to excessive impact. Please study and comply with the safety precautions below. y Your warranty does not cover any damage resulting from mishandling or negligence by the user. Using excessive force to clean the lens surface can damage the lens itself or cause CamBall to malfunction. Dust and buildup on the lens can cause poor recording quality. Use a dust remover or lens cleaning cloth to clean the lens. Do not drop your CamBall or subject it to strong impact. Remember that CamBall can easily fall out of your pocket and on to the ground. When carrying CamBall in a bag, make sure the device is not vulnerable to excessive force and impact. Keep CamBall and its parts and accessories away from reach of children. If swallowed, immediately seek medical attention. Leaving your CamBall under direct sunlight or in the vicinity of a fireplace and other sources of heat can cause it to malfunction. Protect your CamBall from fluids and moisture. 2 Do not attempt to disassemble or repair the device yourself. If you experience a problem with the product, contact a Starnex retailer or an authorized service center for repair. Do not use your CamBall near bodies of water without the waterproof case or allow it to get wet. Moisture and water cause malfunctions and can even lead to electrocution. If you need to use your CamBall outdoors in rain/snow or at a beach/swimming pool, please use the waterproof case. [Copyright] y Unauthorized reproduction and distribution of copyrighted material is direct violation of copyright laws and international treaties. Furthermore, distribution of unauthorized content to third parties via Internet is also violation of international treaties, regardless of whether or not the distribution is free or paid. [Important Notice] The content of this manual is subject to change without prior notice. Starnex shall not be held responsible for disputes or issues resulting from the use of this manual. Starnex shall not be held responsible for third party disputes or issues concerning CamBall use. Starnex shall not be held responsible for any loss or damage incurred due to product malfunction or data loss. Please keep a backup of all your important data. y Examples used in this manual may differ from actual product recordings and images. y Buttons and functionalities not described herein exist for future product improvement purposes. y Starnex reserves the right to make design and/or functional changes to the product for performance improvement purposes without prior notice. y y y y 3 Table of Content 1. 1.1 1.2 1.2.1 1.2.2 1.2.3 1.2.4 1.3 1.4 1.5 Product Overview ...................................... 5 Standard Pack of CamBall(SG30/31) ......... 5 Optional Accessories ......................................... 6 Surveillance Pack (SG-SVP)............................. 6 Vehicle Pack (SG-VHP) ..................................... 6 Sport Pack (SG-SPP) .......................................... 6 LCD Monitor Pack (SG-LMP) ......................... 7 Feature Comparison .......................................... 7 Front ......................................................................... 8 Rear .......................................................................... 8 2. 2.1 2.2 2.3 2.4 2.5 Connecting Your CamBall ........................ 9 Charging the Battery .......................................... 9 Inserting a Micro SD Card ............................... 9 Connecting to an External Display Device 9 Earphone Connection ...................................... 10 Using Accssories ............................................... 10 3. 3.1 3.2 3.3 Basic Operation........................................ 12 Preparations ........................................................ 12 Basic Operation and Status Check ............ 12 Indication Lamps ............................................... 13 6.1 Configurations using an External Display Device ................................................................................ 36 6.1.1 Language ............................................................. 36 6.1.2 Camera Settings................................................ 36 6.1.3 Recording Settings .......................................... 38 6.1.4 Playback Settings ............................................. 40 6.1.5 Date/Time ............................................................ 41 6.1.6 Memory Settings .............................................. 41 6.1.7 Other ...................................................................... 42 6.2 From CamBall Manager ................................. 45 6.2.1 Language ............................................................. 45 6.2.2 Camera Settings................................................ 45 6.2.3 Recording Settings .......................................... 46 6.2.4 Playback Settings ............................................. 49 6.2.5 Date/Time ............................................................ 49 6.2.6 Memory Setting ................................................ 49 6.2.7 Other ...................................................................... 50 4. CamBall Operation by Mode ................ 14 4.1 Taking Snapshots (Standby Mode)............ 14 4.1.1 Snapshots without an External Display Device ................................................................................. 14 4.1.2 Snapshots utilizing an External Display Device ................................................................................. 16 4.1.3 Viewing and Editing Photos ........................ 16 4.2 Recording Video (Recording Mode) .......... 19 4.2.1 Recording without an External Display Device ................................................................................. 19 4.2.2 Recording utilizing an External Display Device ................................................................................. 19 4.2.3 Video Playback and Edit ................................ 20 4.3 Special Video Recording Types with CamBall SG-31 ............................................................... 24 4.3.1 Selection of Recording Type ....................... 24 4.3.2 Instructions by Recording Type ................. 24 4.3.3 Motion Detection Recording in Detail (SG31 Only) ...................................................................... 27 4.4 MP3 Mode ............................................................ 28 4.4.1 Enabling/Disabling MP3 Mode................... 28 4.4.2 Editing MP3 Files .............................................. 29 5. 5.1 5.1.1 5.1.2 5.1.3 5.1.4 5.2 5.2.1 5.2.2 5.3 5.3.1 5.3.2 5.3.3 5.3.4 Initial Configurations .............................. 31 Overview ............................................................... 31 What are Initial Configurations? ................ 31 What is Upgrading? ......................................... 31 What are Basic Configurations? ................. 31 Initial Configuration Guide ........................... 31 Upgrading ............................................................. 31 CamBall Manager ............................................. 31 CamBall Firmware ............................................. 32 Basic Configurations ........................................ 33 CamBall Manager Configurations ............. 33 Language Selection ......................................... 33 Monitor Type Selection.................................. 33 Date/Time Settings .......................................... 34 6. CamBall Configurations ......................... 36 7. Video Playback using CamBall (PMP) . 53 8. 8.1 8.2 YouTube .................................................... 54 Upload ................................................................... 54 Multiple Uploads ................................................ 54 9. 9.1 9.2 Reference Information ........................... 55 Default Settings ................................................. 55 Product Specifications .................................... 56 10. Tips on Use............................................... 57 10.1 Safe Hardware Removal................................ 57 10.2 Using CamBall in a Vehicle .......................... 57 4 1. Product Overview 1.1 Standard Pack of CamBall(SG30/31) y CamBall is a miniature electronic device and therefore needs to be unboxed with care. y Check to make sure all of the following items are included in the standard package of CamBall. Contact your retailer if any of these items are missing. y Application Generation of User Contents, Conference Recording, Vehicle Drive Recording, Travel Recording, Class Recording, Baby Diary Recording, Hands-Free Recording of Outdoor Activities (Bicycle Riding, Motorcycling, Hang Gliding, Skate Boarding, Scuba Diving, Wind Surfing, Water Surfing, Water skiing, Snorkeling, Mountain Climbing, Remote-Controlling of Model Plane/Car) CamBall (SG-30/31) CamBall Holder (SG-93) Neck Strap (SG-71) Sport Band (SG-70) USB Cable (SG-99) Earphones (SG-82) Earphone Gender (SG-83) CD-ROM Quick Start Guide USB Adapter Gender (SG-73) Micro SD Card (2GB) 5 1.2 Optional Accessories 1.2.1 Surveillance Pack (SG-SVP) y When you use CamBall for the surveillance of home, office or small business, this pack(SG-SVP) will be helpful in supplying CamBall with continuous electric power and placing it where you want to. USB Adapter (SG-95x) 1.2.2 USB Extension Cable (SG-74) Box Mount (SG-97) Vehicle Pack (SG-VHP) y When you use CamBall for vehicle drive recording (like kind of a vehicle black box) or vehicle security, this pack(SG-VHP) will enable you to continuously supply CamBall with the electric power from vehicle battery and help you in mounting it easily on the dashboard. Car Adapter (SG-87) 1.2.3 Car Adapter Cable (SG-88) Car Mount (SG-80) Sport Pack (SG-SPP) y With the help of this pack(SG-SPP), your CamBall will record how you enjoy bicycle riding, motorcycling, or any kinds of water sports. Waterproof Case(SG-91) stands 40M(136ft) water pressure. Handle Mount (SG-84) Waterproof Case (SG-91) 6 1.2.4 LCD Monitor Pack (SG-LMP) y With CamBall LCD Monitor, you can view CamBall’s field of frame when you take a snapshot or record a moving picture, and it is also used for playing back and editing of them. y You can use it as an external monitor screen when you change the configuration of your CamBall and also as an external battery(3.7V-700Ma) for supplying electric power for your CamBall. CamBall/LCD Connection Cable (SG-72) LCD Monitor (SG-94) 1.3 Feature Comparison Feature Model SG-30 SG-31 Video Recording √ √ Audio Recording √ √ Monitor Display √ √ Snapshot √ √ USB √ √ MP3 √ √ Motion Detection Surveillance Recording Vehicle Recording Angel Recording √ √ √ 7 Note 1.4 Front Microphone Line of Sight Camera Reset Button 1.5 Rear External Memory Slot Center Button Direction Buttons (4) LED Lamps (8) USB Port 8 2. Connecting Your CamBall 2.1 Charging the Battery y Connecting your CamBall to a computer (USB port) using the USB cable(SG-99) will activate CamBall’s REC, MP3, TV, and TYPE lamps in a cross shape and automatically start charging the device’s battery. It takes approximately 2 hours and 30 minutes to completely charge the battery. y Once CamBall is connected to a computer via the USB cable, CamBall will start charging but will not be able to record video. To record while charging the battery, use the USB Adapter Gender (SG-73). y It’s also possible to charge the battery and record at the same time by using the USB Adaptor(SG95) in the Surveillance Pack (SG-SVP, sold separately). 2.2 Inserting a Micro SD Card y CamBall supports Micro SD cards (up to 16GB). y Insert the Micro SD card completely into the external memory slot (see picture on the left – not completely inserted). y Push the card in until it’s flush with the slot.( Please refer to 6.1.6 Memory Settings). 2.3 Connecting to an External Display Device y You can display the recorded videos on a TV monitor, a PC monitor, a satellite navigation screen or CamBall LCD monitor(SG94) by connecting CamBall directly to one of those. y You can also monitor what is being recorded through TV monitor LCD Monitor(SG94) or a satellite navigation screen if you connect one of them to CamBall while you record video. 9 2.4 Earphone Connection y When the MP3 mode enabled, connect the earphones to CamBall’s USB port using the earphone gender(SG-83), as shown below: 2.5 Using Accssories y CamBall Holder: Push CamBall in until you hear a click. CamBall Holder allows you to fixate CamBall’s camera angle and position. It also allows you to mount CamBall on the table or even on the wall using double-side adhesive tape. y Necklace: Necklace connects to both sides of CamBall Holder and the length can be adjusted to the chest level, which reduces shaking and wobbling. y Sport Band: Rubber lining inside the band prevents the band from slipping off helmets and other objects with smooth surfaces. 10 y Sport Band + CamBall Holder: 11 3. Basic Operation 3.1 Preparations - Plug CamBall into USB port of your computer using USB Cable(SG99) or into the wall socket using USB Cable(SG99) and USB Adapter(SG95), and leave it for at least two and half hours to fully charge CamBall’s battery - Insert the external memory card (Micro SD) into the external memory slot. (Refer to 6.1.6 Memory Settings of this manual) - Refer to 5. Initial Configurations of this manual and before start, change the configurations. 3.2 Basic Operation and Status Check y CamBall Buttons The external memory slot is positioned at the top and the USB port at the bottom of CamBall. y Powering On/Off Press and hold the Center button over two seconds to power CamBall on. All the indication lamps will blink three times as the CamBall powers up. Press and hold the Center button over two seconds to power CamBall off. The indication lamps will blink in rotation three times as the CamBall powers down. y Status Check When you power on CamBall, it is operating normally if three indication lamps (BATT, MEM, and OVER) turn on. These indication lamps indicate CamBall’s status (battery reserve, memory status, and overwrite setting). Note that CamBall can be configured so that these lamps automatically turn off in five seconds (pressing the [▼] button under this configuration displays CamBall status for five seconds). y Lock All buttons can be locked by pressing and holding the [◀] and [▶] buttons simultaneously for two seconds. All the indication lamps will blink once before they are locked. Unlock the in the same manner. The indication lamps blink twice before they are unlocked. Pressing any of the buttons while they are locked will cause all lamps blinking in Red+Green once but no operation of CamBall at all. 12 y Reset The Reset button is located deep inside CamBall and can be accessed using a clip or another sharp, long object. Reset if CamBall is malfunctioning and/or cannot be powered off. Pressing the Reset button powers down CamBall. To restart it, press and hold the Center button. 3.3 Indication Lamps y Indication lamps and their colors indicate CamBall’s operating and configuration status. REC: Off: Recording Stopped Red: Video Recording only Green: Audio Recording only Red+Green: Recording (Audio+Video) BATT: Green: More than 70% Reserve Red+Green: 30%~70% Reserve Red: Less than 30% Reserve MEM: Green: More than 70% Available Red+Green: 30%~70% Available Red: Less than 30% Available Red (blinking): Memory Full Green (blinking): Charging TYPE: (SG-31 only) Off: Normal Red: Surveillance Green: Vehicle Red+Green: Angel MP3: Off: MP3 Mode Off Green: MP3Mode On FLIP: Off: Normal Green: Vertical Flip OVER: Off: Overwrite Off Green: Overwrite On TV: Off: TV Mode Off Green: TV Mode On Note Overwrite (selectable from CamBall Manager or in TV mode) [On]: When the memory is full , CamBall starts to overwrite on the oldest existing file. [Off]: When the memory is full, CamBall stops recording automatically (If Memory Full Indication option is enabled, the MEM indication lamp blinks in red five times). In order to continue recording, the recorded flies need to be erased (You can save the recorded files on a separate storage, if necessary). 13 4. CamBall Operation by Mode Indication lamps change colors depending on the selected modes. (1) Standby Mode (REC, MP3, and TV Indication Lamps: Off): Standby or taking snapshot. (2) Recording Mode (REC Indication Lamp: Red + Green): Recording video. (3) MP3 Mode (MP3 Indication Lamp: Green): Playing MP3. (4) TV Mode (TV Indication Lamp: Green): Recording/Playing/Setting with connection of monitor. 4.1 Taking Snapshots (Standby Mode) - With CamBall, you can take snapshots. You can utilize an external display device like TV monitor or CamBall LCD monitor(SG94). Note Before taking Snapshots… Read carefully 5. Initial Configurations and 6. CamBall Configurations of this manual and configure the date/time, monitor, and memory settings before taking snapshots. 4.1.1 Snapshots without an External Display Device (1) Setting CamBall on Standby Mode - Press and hold the Center button to power CamBall on. If all the indication lamps of REC, MP3, and TV are off, CamBall is in standby mode. - If any of the three indication lamps are on(CamBall is not in the standby mode), turn them off by pressing and holding the related direction buttons over 2 seconds. (2) Taking Snapshots - When CamBall is in the Standby Mode, press the Center button to take a snapshot . Each press of the Center Button will take a single snapshot. All the indication lamps on CamBall will blink in rotation when every snapshot is taken. 14 Note Standby Mode (1) Overview - - Standby mode is when REC, MP3, and TV indication lamps are all off. From the Standby mode, you can change modes into the Recording mode, the MP3 mode, or the TV mode and even change the recording type. By pressing the Center button while in the standby mode you can take snapshots. (2) Standby Mode Buttons - Standby mode is when REC, MP3, and TV indication lamps are all off. Long: Recording Mode On/Off Press and hold ◀ and ▶ buttons to lock/unlock. Short: Snapshot Long: Power On/Off Long: Select recording type (Normal / Surveillance / Vehicle / Angel) Long: MP3 Mode On/Off Press and hold ▲ and ▼ buttons to turn vertical flip on/off. Short: Lamp Status Check Long: TV Mode On/Off - The following button functions are available in the Standby mode: 1. Center: Press to take single snapshots. 2. ▲: Press and hold over 2 seconds to set CamBall on/off Recording mode. 3. ◀: Press and hold over 2 seconds to change the recording types (Normal, Surveillance, Vehicle, and Angel). 4. ▶: Press and hold over 2 seconds to set CamBall on/off MP3 mode. 5. ▼: Press to check the status of CamBall features (if “Lamp Indication Time” configured to five seconds in setting menu.). 6. ▼: Press and hold over 2 seconds to set CamBall on/off TV mode. 7. ▲+▼: Simultaneously press and hold over 2 seconds to activate/deactivate the vertical flip feature (FLIP lamp on/off). 8. ◀+▶: Simultaneously press and hold over 2 seconds to lock/unlock all the indication buttons. 15 4.1.2 Snapshots utilizing an External Display Device - It’s possible to connect your CamBall to a TV monitor a CamBall LCD monitor (SG-LMP, sold separately) and take pictures while viewing CamBall’s field of vision on the screen. (computer may not be used as external display devices). 1 Connect CamBall to an external display device using the USB cable. Please note that the video ○ plug is yellow and the audio plug red. 2 Make sure CamBall is in standby mode (Refer to 4.1.1 Setting CamBall on Standby Mode). ○ 3 From standby mode, press and hold the [▼] button for over 2 seconds to turn on. The TV ○ indication lamp green , which means CamBall mode has been changed to TV mode with the display of the following four menu options on the external display device: 4 Select Preview/Snapshot and then press the Center button to view CamBall’s field of vision on ○ the screen of the external display device. 5 Press the Center button to take a picture. A status message will appear on screen as CamBall ○ takes the picture. To return to the previous menu, press the [◀] button. Note Taking Pictures when Memory is Full You will not be able to take additional pictures any more when the memory is full.CamBall reaches full memory capacity and if you have the overwrite feature turned off. If you try to taking picture, the MEM indication lamp will blink in red five times when you attempt to take a snapshot, indicating that there is not enough storage space available and that you need to delete some files to free up space. 4.1.3 - Viewing and Editing Photos Snapshots can be viewed and edited either by connecting CamBall to a computer or an external display device. 4.1.3.1. Viewing and Editing Photos on a computer 1 Connect CamBall to your compuer using the USB cable. ○ 2 CamBall’s REC, MP3, TV, and TYPE indication lamps will turn on in a cross shape, which ○ means your PC has recognized CamBall. 3 Click the icon of My Computer on your PC to find the two new disk drives generated by CamBall. ○ The new disk drive from, CamBall’s built-in memory is generally named “CamBall” and that from the Micro SD Card “CamBall_SD” or “Removable Disk Drive”, depending on the computer’s configuration. 4 The new disk drive from built-in memory is differentiated from that from the external memory in ○ 16 that it contains a CONFIG folder, as shown below. 5 Snapshot files are saved in the PHOTO folders in both disk drives ○ 6 Open the PHOTO folder and select photo files to view or edit the pictures using StarEncoder ○ (included in the CD-ROM). Built-in Memory External Memory Note Disk Naming of Micro SD card Formatting the Micro SD card from CamBall renames the disk name on the PC to ‘CamBall_SD’. Otherwise, the disk name will display as ‘Removable Disk Drive’. 4.1.3.2. Viewing and Editing Photos from on an External Display Device (TV or CamBall LCD) (1) Viewing Photos 1 Set CamBall on TV mode and connect it to an external display device (refer to section ○ 4.1.2.). Then place the curser on Playback/Edit in the menu and then press the Center button. 2 Select Built-in Memory or Micro SD Card and press the Center button. ○ 3 Place the curser on Photo and press the Center button. ○ 17 4 Place the curser on the file you wish to view and press the Center button. ○ 5 While a photo is being displayed, press the [◀] button to view the previous file and the [▶] ○ button to view the next file. 6 To end photo viewing and return to the file selection menu, press and hold over two seconds ○ the [◀] button. 7 To return to the previous menu, press the [◀] button. ○ (2) Editing of Photos 1 From the file selection menu, press the [▶] button to access the edit options at the bottom of ○ the menu. 2 Place the cusor on the desired edit option and press the Center button to edit. ○ Previous/Next: Opens the previous/next page (if there are multiple pages of files). Delete/Delete All: Delete selected file or files. Copy/Copy All: Copy selected file or files from the built-in memory to the external memory or vice versa. 3 After you’ve finished editing, press the [▲] button to exit the edit menu. To return to the ○ previous menu, press the [◀] button. 18 4.2 Recording Video (Recording Mode) - With CamBall, you can record video and audio. You can also utilize an external display device like TV monitor or CamBall LCD monitor(SG94) when you record with CamBall. Note Before recording Video… Carefully read 5. Initial Configurations and 6. CamBall Configurations of this manual and configure the date/time, monitor, and memory settings before recording video and audio. 4.2.1 Recording without an External Display Device (1) Setting CamBall on Standby Mode - Press and hold the Center button to power CamBall on. If all the indication lamps of REC, MP3, and TV are off, CamBall is in standby mode. - If any of the three indication lamps are on(CamBall is not in standby mode), turn them off by pressing and holding the related direction buttons over 2 seconds. (2) Start Recording - When CamBall is in standby mode, press and hold the [▲] button over 2 seconds. This turns on the REC indication lamp and gets CamBall to start recording. If the REC indication lamp is turned on in both green and red, this indicates that both video and audio are being recorded. To record video or audio only, you have to change the configurations (Refer to section 6. CamBall Configurations.) (3) End Recording - To stop recording, press and hold the [▲] button over 2 seconds. The REC indication lamp will turn off and CamBall will stop recording. 4.2.2 Recording utilizing an External Display Device - It is possible to connect your CamBall to a TV monitor or CamBall LCD monitor(SG-LMP, sold separately) and record video while viewing CamBall’s field of vision on the screen. (computer may not be used as external display devices). 1 Connect CamBall to an external display device using the USB cable. Please note that the video ○ plug is yellow and the audio plug red. 2 Make sure CamBall is in standby mode (Refer to 4.1.1 Setting CamBall on Standby Mode). ○ 3 From standby mode, press and hold the [▼] button for over 2 seconds to turn on. The TV ○ indication lamp green, which means CamBall mode has been changed to TV mode with the display of the following four menu options on the external display device: 19 4 From the menu displayed on screen, select Record and then press the Center button. This turns ○ on the REC indication lamp, and CamBall starts displaying its field of vision on the screen, and commences to record video. 6 Press the [◀] button or press and hold the [▲] button over 2 seconds to stop recording. ○ Note Recording Video when Memory is Full You will not be able to record additional footage when CamBall reaches full memory capacity and if you have the overwrite feature turned off. If you try to record video, the MEM indication lamp will blink in red five times to indicate that there’s not enough storage space available and that you need to delete some files to free up space. 4.2.3 Video Playback and Edit 4.2.3.1. Playback and Edit on a PC 1 Refer to section 4.1.3.1 for connecting CamBall to your computer. ○ 2 Recored video files are saved in the VIDEO folders. ○ 3 Open the VIDEO folder and select video files to playback or edit. ○ Note To Playback Video on a PC - Video files created by CamBall can be played back from Windows Media Player, DivX Player and other media player. However, the MPEG4 codec must be installed on the PC. - StarEncoder (included in the CD-ROM) makes it unnecessary to install additional codecs on to your system in order to view CamBall video files. With StarEncoder you can convert non-CamBall format video files into those viewable on a PC with CamBall and vice versa. - Starnex’s web site(www.starnexinternational.com) provides free download of the latest version of StarEncoder. - If you are unable to playback video using Windows Media Player or DivX Player, use StarEncoder. Note Connecting CamBall to a PC while Recording and Playing Back Recorded Files - If you connect CamBall to a PC while recording is in progress, CamBall stops recording. The recorded files can then be played back or edited on the PC. Disconnecting CamBall from the PC resumes the recording. 20 Note Size of Recorded File and Disk Drive Naming of Micro SD card on a PC - CamBall generates and saves recorded files in the built-in storage in 1 hour long or 20MB sized segment units, whichever comes first. For the external storage CamBall generates and saves recorded files in 1 hour long or 300MB sized segment units. - Formatting the Micro SD card from CamBall renames the disk drive into ‘CamBall_SD’. Otherwise, the external storage disk drive will be displayed as “Removable Disk Drive”. Note Names and Extensions of Recorded Files - Recorded files are named in the format of YYYY/MM/DD-HH/MM/SS-Recording Sequence. Here, the time refers to the point when the recording started. In addition, file names carry either a B or an M prefix. B is for files recorded to built-in memory, whereas M is for files recorded to external memory (Micro SD). - B20090430-141523-00.avi : A file that was recorded to built-in memory starting at 14:15:23 on April 30, 2009. - M20090530-141523-00.avi : A file that was recorded to external memory starting at 14:15:23 on May 30, 2009. - File Extensions avi: Video+Audio wma: Audio jpg: Image 4.2.3.2. Playback and Edit of Video Files on an External Display Device (TV or CamBall LCD) (1) Video Playback 1 Set CamBall on TV mode and, connect it to an external display device (refer to section ○ 4.1.2.). Then place the curser on Playback/Edit in the menu and then press the Center button. 2 Select Built-in Memory or Micro SD Card and press the Center button. ○ 3 Place the curser on Video and then press the Center button. ○ 21 4 Place the curser on the file you wish to view and press the Center button to view the file. ○ 5 While a video file is being played, press the [◀] button to play the previous file and the [▶] ○ button to play the next file. 6 To end video playback and return to the file selection menu, press and hold the [◀] button. ○ 7 To return to the previous menu, press the [◀] button. ○ (2) Editing of Videos 1 From the file selection menu, press the [▶] button to move the cursor at the bottom of the ○ menu. Then you can access the edit options. 2 Place the curser on the edit option you have chosen. ○ Previous/Next: Opens the previous/next page (if there are multiple pages of files). Delete/Delete All: Delete selected file or files. Copy/Copy All: Copy selected file or files from the built-in memory to the external memory or vice versa. 3 When finished, press the [▲] button to exit from the edit options. To return to the previous ○ menu, press the [◀] button. 22 Playback/Edit Buttons Short: Volume Up Short: Pause/Play Long: Power On/Off Short: Previous Long: Exit Short: Next Long: Fast Forward TV Lamp Green: TV Mode Short: Volume Down Long: TV Mode On/Off 23 4.3 Special Video Recording Types with CamBall SG-31 - These types do not apply to CamBall SG-30. - On top of normal video recording, CamBall SG-31 supports the Types of Surveillance Recording, Vehicle Recording, and Angel Recording. 4.3.1 Selection of Recording Type - Recording type can be selected and changed when CamBall is in Standby Mode. - Change the recording type by pressing and holding over 2 seconds the [◀] button related to the TYPE indication lamp. With each press, the recording type will change in order of Normal Recording(Lamp Off)> Surveillance Recording(Red)> Vehicle Recording(Green)>Angel Recording (Red+Green). Four Recording Types of CamBall Normal Surveillance Recording Recording (SG30&SG31) (SG31) TYPE Lamp Off Recording Type Continuous Application Examples Sport Camcorder (Hands free) 4.3.2 Red Motion Detection Motion Activated Surveillance Device Vehicle Recording (SG31) Angel Recording (SG31) Green Red + Green When ignition is turned on. Continuous When ignition is turned off Motion Detection Vehicle Black Box and Vehicle Security Time-controlled repetition of recording and standby, regardless of motion Children Monitoring and Extended Duration Recording Instructions by Recording Type Note Before performing special recordings with CamBall SG-31… Carefully read 5. Initial Configurations and 6. CamBall Configurations of this manual and configure the date/time, monitor, and memory settings before performing special recordings. In particular, Surveillance Recording and Vehicle Recording both rely on motion detection, (Refer to section 6.1.3.9. or 6.2.3.9.) (1) Normal Recording (TYPE Lamp: Off) – SG30 and SG31 - Overview: Use this option for normal video recording, like using your CamBall as a camcorder.. - Recording: When your CamBall is in Standby Mode (make sure TYPE lamp turned off), press and hold the [▲] button over 2 seconds to start recording. If powered by the onboard battery only, normal recording will continue until the battery is completely used up. If 24 powered by USB Cable(SG99)/USB Adapter Gender(SG73) or the USB Adapter(SG95), recording will continue until manually stopped. - Charging: No matter the level of remaining battery reserve, CamBall will charge the battery if plugged into a power source. (2) Surveillance Recording (TYPE Lamp: Red) – SG31 Only - Overview: Select this recording type to use your CamBall as a surveillance recording device. With this recording type enabled and with CamBall connected to a power source via the USB Adapter, CamBall automatically resumes recording when power is restored after an interruption (The automatic resumption is not applicable in Normal Recording). - Recording: Press and hold the [◀] button over 2 seconds from Standby Mode to select the Surveillance Recording (TYPE Lamp Red) and then press and hold the [▲] button over 2 seconds. This will turn on the REC lamp and start Surveillance Recording. - Charging: No matter the level of remaining battery reserve, CamBall will immediately start charging the battery when plugged into a power source. (3) Vehicle Recording (TYPE Indication Lamp: Green) – SG31 Only - Overview: Select this recording type to use CamBall as a vehicle security device. - Recording: From Standby Mode, press and hold the [◀] button over 2 seconds to select Vehicle Recording (TYPE Lamp: Green). - Connect CamBall to Car Mount(SG80), Car Adapter(SG87), and Car Adapter Cable(SG88) (sold separately). - Ignite the engine and CamBall will automatically start Vehicle Recording You don’t need to press the [▲] button. (Some models of vehicle may not power CamBall by ignition of the engine. After ignition of the engine, always check to make sure CamBall is powered on). As CamBall will be continuously supplied with power as long as the engine is running, you can record continuously while you are driving, regardless of the driving time, only if OVERWRITE function activated(No worry about battery time memory capacity). - When the vehicle's ignition switch is turned off, CamBall responds differently depending on Recording Duration After Engine Shutoff Settings (Refer to section 6.1.7.4.). Setting Power off Immediately 1-120mins Continuous - CamBall’s Response After Engine Shutoff CamBall powers off immediately , suspending recording. CamBall uses its internal battery power to perform motion detection recording for the specified duration (max. 120mins). CamBall continues to recording motion activated video until its internal battery power runs out. Charging: Charging CamBall's battery every time the engine is ignited may cause the battery life of CamBall to be shortened. In order to delay the shrink of the battery life, CamBall is programmed to start charging its battery only when the battery reserve falls below 70%. 25 Note Configuring Recording Duration After Engine Shutoff Run CamBall Manager.exe file on your PC or set your CamBall on TV Mode with an external display device, and then click the menu, Settings>Other>Recording Duration After Engine Shutoff. Note Powering CamBall with the Center Button under Vehicle Recording Mode Powering CamBall when it is in Vehicle Recording mode does not require you to press and hold the Center button over 2 seconds. A simple short press of the Center button is sufficient. (4) Angel Recording (TYPE Lamp: Red+Green) – SG31 Only - CamBall being in Standby Mode, press and hold the [◀] button over 2 seconds to select Angel Recording (TYPE Lamp: Red + Green) and then press and hold the [▲] button over 2 seconds to start recording. - In Angel Recording mode, CamBall repeats between user-defined recording (5~30secs) and standby (1~9mins). At emergencies, press the Center button to immediately record breaking up the standby (The duration time of emergency recording can be set beforehand among 1 to 9 minutes). Note Time Settings Run CamballManager3.exe file on your PC or set CamBall on TV Mode with an external display device and then click the menu, Settings>Others>Angel Recording Settings. Angel Recording (1-9mins) (1-9mins) Standby (Sleep Mode) Standby (Sleep Mode) Press the Center button. REC REC Emergency (5-30secs) (5-30secs) (1-9mins) - Charging: No matter the level of remaining battery reserve, CamBall will charge the battery if plugged into a power source. - Stopping of Angel Recording: While CamBall is in the standby phase of Angel Recording, none of the buttons but the Center button is functional. Therefore, in order to stop Angel Recording, you will need to press the Center button to wake up your CamBall and then press and hold the [▲] button over 2 seconds. This sequence of actions, however, must be completed within one minute. 26 Note Resumption of Recording when Power Restored Under surveillance or vehicle recording types or when recording in TV mode, restoring power back to CamBall after due to depletion of its internal power supply or manual interruption (by pressing the Center button while recording) will automatically reinitiate recording. This advanced feature eliminates the need for the user to physically restart recording in case of CamBall’s remote location. (not applicable to normal recording). 4.3.3 Motion Detection Recording in Detail (SG31 Only) - Motion detection minimizes memory and battery use by only recording when motion is detected. - Motion Detection is available for Surveillance and Vehicle Recording only. In vehicle Recording, CamBall starts motion detection recording using built-in battery power once the engine is shutoff. - With this option enabled, CamBall scans for motion every three seconds and, if motion is detected, starts recording for the configured duration of time (10 seconds by default - if recording video only (i.e. no audio), CamBall records for five seconds only). - You have two configurable options of audio recording in motion detection recording..Such configurations can be set by clicking the setting menus, OPTION>RECORD SET>MOTION DETECT>AUDIO RECORDING METHOD. ON DETECTION: When motion is detected, CamBall records video and audio only for the configured duration (Both power and memory saved, but audio interrupted during playback). ALWAYS: When motion is detected, CamBall records video only for the configured duration and audio continuously; audio recording is not motion activated. (no power but memory saved , no audio interruptions during playback). Note Entering Sleep Mode and Audio Interruptions under Motion Detection - OPTION>RECORD SET>MOTION DETECT>AUDIO RECORDING METHOD = ON DETECTION: When you playback a motion detection recording that was made under this setting, you may experience sudden interruptions in audio. This is not caused by production malfunction. In this setting, CamBall enters into sleep mode if there is no motion detected even if there is sound or voice, which result in audio interruptions in segments where there was no motion detected. - OPTION>RECORD SET>MOTION DETECT>AUDIO RECORDING METHOD = ALWAYS: In this setting, CamBall does not enter into sleep mode when there is no motion detected and instead does continue recording audio only. This setting does not offer any power savings, but does reduce the amount of memory use. Note Time Stamp - Surveillance and vehicle recordings with Motion Detection enabled often contain skipped frame. Using the time stamp feature helps the user identify recording times with greater ease. - Enable this option from OPTION>RECORD SET>TIMESTAMP to insert time stamps throughout Surveillance and vehicle recordings. 27 4.4 MP3 Mode MP3 Mode Buttons and Indication Lamps Short: Volume Up Long: Change Folder Short: Prev. Track Long: Play Type Short: Next Track Long: MP3 Mode On/Off TYPE Indication Lamp Off: Shuffle Red: Repeat Track Green: Repeat Folder Red+Green: Repeat All MP3 Indication Lamp Green: MP3 Mode Short: Pause/Play Long: Power On/Off Short: Volume Down 4.4.1 Enabling/Disabling MP3 Mode y Enabling MP3 Mode - Connect CamBall to the PC (refer to section 4.1.3.1.). Built-in Memory - External Memory Copy MP3 files from the computer by dragging them to one of the MP3 folders of the internal or external disk drive of CamBall . - Connect the earphones and the earphone gender to CamBall. - CamBall being in Standby Mode, press and hold the [▶] button over 2 seconds to enable MP3 Mode. CamBall will automatically start playing your MP3 files. 28 Note If There is No MP3 Files in the MP3 Folder Each of CamBall’s internal and external disk drive contains three MP3 folders. If you set your CamBall on MP3 mode when all the MP3 files are vacant, all the indication lamps will blink five times and CamBall will revert back to Standby Mode. Note MP3 File Playback Type and Folder Changeover Change the MP3 playback type using the [◀] button. The playback type will change in the order of ShuffleÆRepeat TrackÆRepeat FolderÆRepeat All. Pressing and holding of the [▲] button over 2 seconds to access the next folder is applicable only in the Repeat Folder playback type. 4.4.2 Editing MP3 Files 4.4.2.1. Editing from a PC Refer to 4.4.1 Enabling/Disabling MP3 Mode. 4.4.2.2. Editing from an External Display Device Connect CamBall to an external display device (refer to section 4.1.2.) and then edit directly from the screen as follows: 1 Place the curser on Playback/Edit and press the Center button. ○ 2 Select Internal Memory or Micro SD Card and press the Center button. ○ 3 Select the MP3 folder you wish to open and press the Center button. ○ 4 Select the MP3 file you wish to play and press the Center button. ○ 29 5 To end MP3 playback and return to the previous menu, press and hold the [◀] button over 2 ○ seconds. 30 5. Initial Configurations 5.1 Overview 5.1.1 What are Initial Configurations? and you will be guided by the following steps: 1. CamBall Manager Version Check: CamBall checks the version of CamBall y Initial Configurations refers to the process of Manager and upgrades it with a newer upgrading your CamBall’s software to the version, if any. latest version and then making some basic 2. CamBall Firmware Version Check: If configurations that are essential to the CamBall Firmware is up to date, you will device’s functionality. 5.1.2 be prompted to make a language What is Upgrading? selection. If a newer version is available, - In addition to the hardware components, firmware will be upgraded after you make CamBall also comes with the three software the language selection. components: CamBall Firmware, CamBall 3. Once version checks have been Manager and StarEncoder. completed, CamBall Manager will direct CamBall Firmware comes embedded in you to Basic Configurations. CamBall, CamBall Manager comes in the CD-ROM enclosed in the standard pack and should be installed to your computer and run 5.2 Upgrading when you change the setting of CamBall. 5.2.1 CamBall Manager StarEncoder also comes in the CD-ROM - When run, CamBall Manager checks for itself enclosed in the standard pack, and ,installed whether its version is up to date. to your comouter, can be used to view and edit video files recorded with CamBall. - Upgrading means replacing CamBall Firmware, CamBall Manager, and StarEncoder by their latest versions to ensure - If CamBall Manager is up to date, CamBall optimal device performance. Manager will proceed to check the version of - Whenever a program is upgraded, all settings CamBall Firmware. get restored back to their default values. 5.1.3 - If a later version is available, you will be What are Basic Configurations? prompted as shown in the diagrams below. Click Yes to upgrade CamBall Manager. - Basic Configurations include language setting, monitor type selection, and date/time settings 5.1.4 Initial Configuration Guide - Initial Configurations is performed using CamBall Manager (CamballManager3.exe). - Make sure your PC is connected to the internet and then connect your CamBall to the PC using the USB cable(SG99) - From the enclosed CD-ROM, copy the CamballManager3.exe file to your PC. - Run the CamballManager3.exe file on the PC 31 - When the following dialog prompts, click Safely Remove Hardware. - In the next dialog, select USB Mass Storage Device and then click Stop. 5.2.2 CamBall Firmware - After checking the version of CamBall Firmware, CamBall Manager will prompt you to make a language selection if CamBall Firmware is up to date. - Clicking OK will finalize the upgrading process. - Then, select USB Mass Storage Device again in when the next dialog prompts and click OK. - If a newer version of CamBall Firmware is available, CamBall Manager will automatically commence the upgrade process after you make your language selection. - When the following message prompts, disconnect your CamBall from the computer. 32 - Once your CamBall powers down, reconnect it to the PC. 5.3.2 Language Selection - Since you’ve already made your language selection during the upgrading process, you - When you see the dialog below, click Upgrade can skip this step. Done. - However, if you wish to change your language selection, select the desired language from the Language Set menu and then click Apply. - You’ve now completed upgrading your CamBall. CamBall Manager will automatically take you to the Basic Configurations process. 5.3 Basic Configurations 5.3.1 CamBall Manager Configurations - After completing the upgrading process, 5.3.3 CamBall Manager’s Configurations menu will Monitor Type Selection - In order to connect your CamBall to a TV or be displayed. an LCD monitor (in TV mode), you will first need to identify the type of display device you intend to use. There are two formats: NTSC and PAL. The default monitor type setting is 33 NTSC. - Select the device you wish to remove from the PC and click Stop. 5.3.4 Date/Time Settings - From the Date/Time Set menu, set the current date and time and then the desired display format. Click Apply Date/Time when finished. - When you see the following dialog, click OK. - Disconnect your CamBall from the PC once you see the following message: - A message will display, prompting you to disconnect your CamBall from the PC. Before disconnecting, however, make sure to click Safely Remove Hardware first. - CamBall will automatically update its date and time. When the following dialog appears, reconnect your CamBall to the PC. 34 - After a few moments, you will see Update Done dialog. Click Apply Date/Time to complete your Initial Configurations. 35 6. CamBall Configurations 6.1 Configurations using an External Display Device 6.1.2 Camera Settings 6.1.2.1. Brightness - Choose OPTION>CAMERA SET, place the y Activating/Deactivating TV Mode: cursor on BRIGHTNESS and then press the - Connect CamBall to an external display Center button. device (refer to section 4.1.2.). Activation: From Standby Mode (refer to section 4.1.1.), press and hold the ▼ button over 2 seconds. This will turn on the TV indication lamp and display the menu on the external display device. Deactivation: Press and hold the ▼ button over 2 seconds. This will turn off the TV indication lamp and end signal output to the external display device. - A reference image will be displayed with a y Activating TV Mode displays the following brightness level indication. Adjust the menu: brightness level using the ▲ and ▼ buttons. - Configurable range is between 1 and 20, and the default setting is 9. y Place the curser on SETUP and press the Center button. 6.1.1 Language BRIGHTNESS: 09 - Choose OPTION>LANGUAGE SET and select the desired language by pressing Center button. 6.1.2.2. Contrast - Choose OPTION>CAMERA SET and place the cursor on CONTRAST and then press the Center button. 36 - Enabling this option allows clearer recording under low light level conditions. The frame rate will decrease, however. - The default setting is On. - A reference image will display with a contrast level indication. Adjust the contrast level using NIGHT MODE: ON the ▲ and ▼ buttons. - Configurable range is between 1 and 20, and the default setting is 15. 6.1.2.4. Flip Vertical - Choose OPTION>CAMERA SET , place the cursor on FLIP VERTICAL and then press the Center button. CONTRAST: 15 6.1.2.3. Night Mode - Choose OPTION>CAMERA SET, place the curser on NIGHT MODE and then press the - A reference image will be displayed with flip Center button. vertical status indication. Enable/disable using the ▲ and ▼ buttons. - Enabling this option vertically flips the imaging orientation. - The default setting is Off. - A reference image will be displayed with night mode status indication. - Enable/disable using the ▲ and ▼ buttons. 37 FLIP VERTICAL:OFF 6.1.3 Recording Settings 6.1.3.3. Overwrite Setting 6.1.3.1. Video Recording - Enabling this option will overwrite oldest - Use this option to enable/disable video recording data with new recording data. recording. Setting this option to Off disables Please backup all important files. video recording and enables audio recording - Choose OPTION>RECORD SET, place the only. cursor on OVERWRITE and then press the - Choose OPTION>RECORD SET, place the Center button to enable/disable the option. cursor on VIDEO and then press the Center - The default setting is On. button to enable/disable the option. - The default setting is On. 6.1.3.4. Frame Rate (FPS) - Choose OPTION>RECORD SET, place the cursor on SPEED (FPS) and then press the 6.1.3.2. Audio Recording Center button to select the frame rate. - Use this option to enable/disable audio - Available settings are 1, 3, 7, 15, and 25 recording. Setting this option to Off disables frames per second. audio recording and enables video recording - The default setting is 25 FPS. only. - Choose OPTION>RECORD SET and place the cursor on AUDIO and then press the Center button to enable/disable the option. - The default setting is On. 38 6.1.3.5. Video Quality 6.1.3.7. Zoom-In - Choose OPTION>RECORD SET, place the - Choose OPTION>RECORD, place the cursor cursor on QUALITY and press the Center on ZOOM IN and then enable/disable the button to select the quality level. setting using the Center button. - Available settings are Ultra High, High, - The default setting is Off. Medium, and Low. - Setting QUALITY to Ultra High will offer the best picture quality, but at the expense of larger file size. - With High as the reference point, the following describes the relative increase/decrease in file size under different settings of video quality: 9 Ultra High: 70% larger than High 9 High: Reference Size 9 Medium: 40% smaller than High 9 Low: 45% smaller than High 6.1.3.8. Time Stamping - The default setting is High. - Time stamp is a feature that displays the date and time on video recordings. - Choose OPTION>RECORD SET, place the cursor on TIMESTAMP and then use the Center button to select the setting. - Setting options available are Off, Top, and Bottom. - The default setting is Off. 6.1.3.6. Resolution - This option is set to 320X240. 39 Note With Audio Recording disabled If CamBall is configured to record video only, motion detection will trigger 5-second recordings only, regardless of the video recording time setting. 6.1.3.9. Motion Detection 1. Sensitivity - Use this option to define the level of motion detection sensitivity. - Ultra High makes motion detection highly sensitive, where as Ultra Low makes motion 3. Audio Recording Method detection respond only to big movements. - Use this option to configure the audio recording method in the event of motion - Choose OPTION>RECORD SET, place the detection. cursor on MOTION DETECT and then press - Setting this option to On Detection records the Center button to select the setting. audio along with video upon motion detection. - Setting options available are Ultra High, High, - Setting this option to Always records audio Medium, Low, and Ultra Low. only at all time (whether or not motion - The default setting is Medium. detected) and along with video upon motion detection. - The default setting is On Detection. 2. Video Recording Time - Use this option to determine how long you wish CamBall to record video when motion is detected. After recording for the configured 6.1.4 Playback Settings duration, CamBall will return to motion 6.1.4.1. Video Playback - Choose OPTION>PLAYBACK SET , place detection status (sleep mode). the cursor on VIDEO PLAYBACK SET and - The default setting is 10 seconds. then press the Center button. 40 - Setting options available are Normal, Repeat, and Repeat All. - The default setting is Normal. 6.1.6 Memory Settings 6.1.6.1. Capacity - Choose OPTION>MEMORY SET, place the 6.1.4.2. MP3 Playback cursor on CAPACITY and then press the Center button. - Choose OPTION>PLAYBACK SET, place the cursor on MP3 PLAYBACK SET and then press the Center button. - Setting options available are Shuffle, Repeat, Repeat Folder, and Repeat All. - The default setting is Repeat All. - Current memory usage status will display as shown below: 6.1.5 Date/Time - Choose OPTION and place the cursor on DATE/TIME SET and then press the Center button. - Use the ◀/▶ buttons to move the cursor and ▲/▼ buttons to change the setting. 6.1.6.2. Built-in Memory - Press the Center button to apply the changes. - CamBall features 128MB of internal memory and supports up to external Micro SD Cards up to 16GB. - If you wish to record and save only to the 41 6.1.6.4. Memory Format Micro SD card, please disable this option. - Even with this option disabled, it will be - Choose OPTION>MEMORY SET, place the possible for you to use the internal memory cursor on FORMAT and then press the for your MP3 files. Center button. - Choose OPTION>MEMORY SET, place the - The FORMAT menu will display, as shown cursor on BUILT-IN MEMORY and then press below: the Center button to enable/disable. - The default setting is On. - The menu gives you the option to format either the built-in memory or the Micro SD card. 6.1.6.3. Memory Full Notification - Make your selection and press the Center - Choose OPTION>MEMORY SET, place the button and you will be prompted with a cursor on FULL STATUS and then press the confirmation message. Select Yes and press Center button to enable/disable. the Center button to format the selected memory. - Even though, with Overwrite enabled, new files will be overwritten on the existing files Note Memory Format and Default Set Memory Format erases all recorded data from the selected memory and should not be confused with Default Set, which restores all settings to factory default settings. (starting with oldest first) when the memory reaches full capacity, recording, with Overwrite disabled, will automatically suspend when the memory reaches full capacity. If the Memory Full Notification enabled, the MEM indication lamp will blink in red five times to 6.1.7 notify you that memory reaches full capacity. 6.1.7.1. Monitor Type - The default setting is Off. Other - Choose OPTION>OTHERS, place the cursor on MONITOR TYPE and then press the Center button to select between NTSC and PAL. - The default setting is NTSC. 42 - The default setting is ‘Always On’. 6.1.7.2. Auto Power Off - Auto Power Off is an option that automatically 6.1.7.4. Recording Duration After Engine Shutoff turns off the power of CamBall if no action is taken for the configured amount of time - This option applies to Vehicle Recording (1~9mins). option. Specifically, this option allows you to - Choose OPTION>OTHERS, place the cursor define the duration of recording after the on AUTO POWER OFF and then use the engine is shut off. If set to On, CamBall will Center button to make your selection. continue recording until its battery is completely depleted even after the engine is - Set to Off or configure between 1 and 9 shut off. minutes. - Choose OPTION>OTHERS, place the cursor - The default setting is 5 minutes. on VEHICLE BATTERY TIME and then press the Center button. - Setting options available are Off, On, 1~9mins, and 10~120mins. - The default setting is 30 minutes. 6.1.7.3. Status Indication Lamp-On Time - Choose OPTION>OTHERS, place the cursor on STATUS INDICATION LAMP ON TIME and then press the Center button to make your selection. - Setting options available are Always On and 5 6.1.7.5. Angel Recording Seconds. - This option is used to enable/disable the - Selecting Always On means the indication Angle Recording option and to configure the lamps are on at all times, which consumes the recording time, standby time, and emergency battery power fast. recording time for Angel Recording. 43 - With Angel Recording option enabled, CamBall will record for the defined recording time, stop recording for the defined standby time, and repeat the process. - Pressing the Center button in an emergency situation triggers CamBall to start recording for the defined emergency record duration. - Choose OPTION>OTHERS, place the cursor on ANGEL RECORD SETUP and then press the Center button. - Setting options are as follows: - RECORD TIME: 5~30secs - STANDBY TIME: 1~9mins - EMERGENCY RECORD: 1~9mins - Default settings are 10 seconds, 2 minutes, and 1 minute, respectively. 6.1.7.6. CamBall Reset - This option resets all CamBall settings to their default values, overriding all user-defined configurations and restoring factory default settings. - However, Language, Monitor Type, and Date/Time configurations are excluded from being reset to default settings. - Choose OPTION>OTHERS, place the cursor on DEFAULT RESET and then press the Center button. - You will be prompted with a confirmation message. Select Yes and then press the Center button to reset your CamBall. 44 6.2 From CamBall Manager y Connect CamBall to your PC using the USB cable. The top, bottom, left, and right indication lamps will turn on Red + Green to indicate that CamBall has been recognized and is being charged. y From the PC, run CamballManager3.exe (inside the CD-ROM) and CamBall Manager’s main menu will pop up. y Changes made from CamBall Manager will only take effect after pressing Apply or OK button. 6.2.1 Language 6.2.2.2. Contrast - Select the desired language from Language - Choose Camera Set>Contrast and adjust the Set and then click Apply. contrast level using the sliding bar. Click Apply. - Configurable range is between 1 and 20, and the default setting is 15. 6.2.2 Camera Settings 6.2.2.1. Brightness - Choose Camera Set>Brightness and adjust the brightness level using the sliding bar. Click 6.2.2.3. Night Mode Apply. - Choose Camera Set>Night Mode and check - Configurable range is between 1 and 20, and the box and then click Apply to enable. The the default setting is 9. default setting is On. 45 6.2.3.2. Audio Recording 6.2.2.4. Flip Vertical - Choose RECORD SET>AUDIO SET and - Choose CAMERA SET>FLIP VERTICAL and check the box, and then click Apply to enable. check the box, and then click Apply to enable. - The default setting is On (checked). - The default setting is Off (unchecked). 6.2.3 6.2.3.3. Overwrite Setting Recording Settings - Choose RECORD SET>OVERWRITE and 6.2.3.1. Video Recording check the box, and then click Apply to enable. - Choose RECORD SET>VIDEO SET and - The default setting is On (checked). check the box, and then click Apply to enable. - The default setting is On (checked). 46 6.2.3.6. RESOLUTION 6.2.3.4. Frame Rate (FPS) - Choose RECORD SET>IMAGE - Choose RECORD SET>QUALITY RESOLUTION and select the desired size SET>RECORDING SPEED and select the and then click Apply. FPS, and then click Apply. - This option is set to 320X240. - The default setting is 25 FPS. 6.2.3.7. Zoom-In 6.2.3.5. Video Quality - Choose RECORD SET>OTHERS>ZOOM IN - Choose RECORDING SET>QUALITY SET and check the box and then click Apply to and select the desired quality, and click Apply. enable. - The default setting is High. - The default setting is off (unchecked). 47 Medium, Low, and Ultra Low. - The default setting is Medium. 2. Video Recording Time - Choose RECORD SET>OTHERS>MOTION DETECTION>RECORDING TIME and adjust it. - Use this option to determine how long you wish CamBall to record video when motion is detected. After recording for the configured duration, CamBall will return to motion detection status(sleep mode). - The default setting is 10 seconds. Note With Audio Recording disabled If CamBall is configured to record video only, motion detection will trigger 5-second recordings only, regardless of the video recording time setting. 6.2.3.8. Time Stamping - Choose RECORD SET>OTHERS>TIME STAMP and select the desired setting. 3. Audio Recording Method - Setting options available are Off, Top, and - Choose RECORD SET>OTHERS>MOTION Bottom. DETECTION>AUDIO RECORDING and - The default setting is Off. adjust it. - Use this option to configure the audio recording method in the event of motion detection. - Setting this option to On Detection records audio along with video upon motion detection. - Setting this option to Always records audio at all time (whether or not motion detected) and along with video upon motion detection. - The default setting is On Detection. 6.2.3.9. Motion Detection 1. Sensitivity - Choose RECORD SET>OTHERS>MOTION DETECTION LEVEL and select the desired setting. - Setting options available are Ultra High, High, 48 Repeat Folder, and Repeat All. - The default setting is Repeat All. 6.2.4 Playback Settings 6.2.4.1. Video Playback 6.2.5 - Choose PLAYBACK SET>VIDEO PLAYBACK SET and select the setting. Date/Time - Choose DATE/TIME SET and set the date, - Setting options available are Normal, Repeat, time, and display method. and Repeat All. - Click Apply Date/Time. - The default setting is Normal. - For further information on setting the time/date, please refer to the Initial 6.2.4.2. MP3 Playback Configurations section of this manual. - Choose RECORD SET>PLAYBACK SET>MP3 PLAYBACK SET and select the 6.2.6 setting. Memory Setting 6.2.6.1. Capacity - Setting options available are Shuffle, Repeat, - Check from the PC, using the right mouse 49 button. 6.2.6.2. Built-in Memory - Choose MEMORY SET>BUILT-IN MEMORY 6.2.6.4. Memory Format and check the box, and then click Apply to Note Memory Format and Default Set Memory Format erases all recorded data from the selected memory and should not be confused with Default Set, which restores all settings to factory default settings. enable. - The default setting is On (checked). - From the PC, use the right mouse button to format. 6.2.6.3. Memory Full Notification - Check the box under Memory Set>Memory 6.2.7 Full Status Indicator and then click Apply to Other 6.2.7.1. Monitor Type enable. - Choose OTHERS>EXTERNAL MONITOR - The default setting is Off (unchecked). TYPE and select the type, and then click Apply. - The default setting is NTSC. 50 6.2.7.2. Auto Power Off 6.2.7.4. Recording Duration After Engine Shutdown - Choose OTHER>AUTO POWER OFF TIME and make your selection, and then click Apply. - Choose OTHERS>VEHICLE BATTERY TIME and make your selection, and then click Apply. - The default setting is 5 minutes. - The default setting is 30 minutes. 6.2.7.3. Status Indication Lamp-On Time 6.2.7.5. Angel Recording - Choose OTHERS>STATUS INDICATION LAMP-ON TIME and make your selection, - Choose OTHERS>ANGEL RECORDING and and then click Apply. make all relevant settings, and then click Apply. - The default setting is Always. 51 6.2.7.6. CamBall Reset - Click Set Default under Default Set. A confirmation message will then prompt. Click Yes to reset all settings to default. 52 7. Video Playback using CamBall (PMP) - CamBall allows you to view video files that were created with a different device. - Copy the video file on to CamBall and play it back with CamBall as if it had been created by CamBall. - In order for video files to be played in CamBall, however, the video codec must be MPEG-4 and the audio codec MP3. - If the codecs do not match or if you wish to view video files along with subtitles, use Starnex’s StarEncoder (comes in the enclosed CD-ROM) to make the conversions so that the files can be viewed on CamBall. StarEncoder 53 8. YouTube - YouTube is a global video hosting service by Google. Upload video files you generate using CamBall and share them with the world. 8.1 Upload - After entering all the information, click Upload. - Video uploads are limited by YouTube to 10 - From CamBall Manager, minutes in length and 1024MB in size. choose YouTube> Upload. This will prompt the following screen: 8.2 Multiple Uploads - After making all the necessary entries under YouTube>Upload, click Add to Multi-upload List. This will prompt the following screen: - Before filling out the upload form, make sure you already have an account with YouTube (http://www.youtube.com). - Input Fields - *User Name: Enter your YouTube account ID. - *Password: Enter your YouTube password. - Sign in with your Google Account: Check if - - This menu is used to upload multiple video files. needed. *Video File: The file you want to upload. *Title: Enter a title for your video. *Description: Enter a description for your video. *Video Category: Select the applicable category. *Tags: Enter tags for your video. Broadcast Option: Select whether you want your video to be open to the public or not. Date Recorded: Enter the recorded date. Note Fields marked with * are mandatory and will need to be filled in order for you to upload your video. 54 9. Reference Information 9.1 Default Settings - The following default settings can be restored using the Default Set option. Menu Camera Settings Recording Settings Playback Settings Memory Settings Misc. Settings Angel Recording Settings Submenu Default Setting Brightness 9 Contrast 15 Night Mode On Flip Vertical Off Video On Audio On Overwrite On Speed (FPS) 25 Quality Note High Size 320 x 240 Zoom In Timestamp Motion Detect Sensitivity Motion Detect Recording Motion Detect Audio Video Playback Fixed. Off Off Medium 10 seconds On Detection Normal MP3 Playback Repeat All Built-in Memory On Memory Full Status Indication Off Auto Power Off Status Indication Lamp On Time Vehicle Battery Time 5 minutes 60 minutes Record Time 10 seconds Standby Time 2 minutes Emergency Record 1 minute Always - Once configured by the user, the following three settings will not be affected by the Default Set option. If you need to adjust these settings, please do so directly from the configuration menu. Language Setting Date/Time Setting Monitor Type Setting 55 9.2 Product Specifications Category Specification CMOS (640x480 Resolution) Camera Built-In 128MB Flash Memory External Micro SD Card Note Luminance: less than 1 lux Angle: 60° Memory Max. 16GB Photo Resolution 640 x 480 pixels Recording Resolution 320x240 pixels Recording Method Continuous/Motion detection Video Compression MPEG4+Starnex’s Algorithm Frame Rate 1~25fps @ 320x240 pixels Audio Input Built-in Microphone Video/Audio Output TV output port (1Vpp) NTSC / PAL Storage Capacity Continuous Recording: 72hrs Max. Motion Detection: 720hrs Max. 16GB @25fps Battery Time Continuous Recording (Audio+Video): 100 minutes Max. (at 25°C) Motion Detection (Audio+Video): 10hrs Max. Recording time may vary depending on battery and temperature conditions. Power Li-polymer battery (3.7V DC/340mA) USB Port USB Adapter (5V DC/1A) Dimensions 37mm (Diameter) Weight 28g (Including battery) Operating Temp. -10°C ~ +60°C Operating Humidity Below 80% 0°C ~ +45°C (Charging) 56 10. Tips on Use 10.1 Safe Hardware Removal - Whenever you disconnect CamBall from the PC, use the Safely Remove Hardware option. Otherwise, you might experience critical damage of your PC and/or the product. - CamBall Manager features a direct Safely - Safe Hardware Removal: Remove Hardware button for greater user 1. Click on the Safely Remove Hardware icon, located in System Tray. convenience. 10.2 Using CamBall in a Vehicle - When using CamBall in your vehicle, connect 2. Following dialog will prompt. Select the device you wish to disconnect and click Stop. power to your CamBall after starting the engine to protect against overloading. 3. Select the device you wish to disconnect once more and then click OK. 4. When you see the following message, disconnect CamBall from your PC. 57 Warranty This product is warranted against issues resulting from manufacturing or parts defect for twelve months (six months for the battery) from date of purchase. - Upon purchase of the product, fill out the following warranty information right away. - If you encounter any problem with product, contact the retailer or distributor right away. - Product repair, exchange, and refund will be provided to you in accordance with their respective policies. Product M o d e l Serial No. Sales Rep Purchase Date W a rr a n t y Pe r io d Retailer For 12 months from date of purchase. Name of Purchaser Address ◆ Warranty Policy Any malfunction during the warranty period and under normal use will be repaired at free of charge. However, following are not covered by the warranty: 1. Malfunctions caused by user negligence; 2. Malfunctions and damages caused by a natural disaster; 3. Malfunctions caused as the result of improper voltage and/or frequency use; 4. Malfunctions caused by modification by a third party; and 5. Product damages and malfunctions resulting after expiration of the warranty period. However, out-of-warranty repair services are available at the owner’s expense. 58