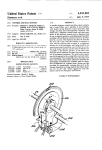
1
Geographic Coordinate Data Base
Geographic Measurement Management
For Windows®
WinGMM
Version 1.00 - 10262001
WinGMM Technical Reference Manual
L&RPO#: GCDB-WG-TRM-V1.00-10262001
October 26, 2001
United States Department of the Interior
Bureau of Land Management
Land & Resources Project Office
Denver Federal Center
Denver, Colorado 80225-0047
GCDB-WG-TRN-V1.00-10262001
WinGMM TECHNICAL REFERENCE MANUAL
TABLE OF CONTENTS
GCDB BACKGROUND AND HISTORY................................................................................................................. 1-1
GCDB COMPUTATIONS USING WINGMM'S LEAST SQUARE ANALYSIS................................................. 1-2
CONTROL COORDINATES...................................................................................................................................... 1-2
COMBINING SOURCE DATA.................................................................................................................................. 1-3
WINGMM USES THE TECHNIQUE OF LEAST SQUARES ANALYSIS.......................................................... 1-3
EASE OF MAINTENANCE........................................................................................................................................ 1-4
COORDINATE GEOMETRY IS USED TO FURTHER DIVIDE THE MEASUREMENT NETWORK .......... 1-4
ABSTRACTION........................................................................................................................................................... 2-1
CHAPTER INTRODUCTION .................................................................................................................................... 2-1
Control ....................................................................................................................................................................... 2-1
Plat Data..................................................................................................................................................................... 2-1
ABSTRACTING A STANDARD RECTANGULAR TOWNSHIP ........................................................................ 2-1
ABSTRACTING SPECIAL SURVEYS..................................................................................................................... 2-2
ABSTRACTING MEANDERS................................................................................................................................... 2-2
PREPARING THE COMPUTER FOR A NEW TOWNSHIP.................................................................................. 2-3
GCONW and GCONHPW - NAD Datum Conversions ............................................................................................ 2-4
DATA ENTRY AND EDITING ................................................................................................................................. 3-1
INRAWW...................................................................................................................................................................... 3-1
CHAPTER INTRODUCTION................................................................................................................................. 3-1
BEGIN THE INPUT OF RECTANGULAR PLAT DATA, - NO .RAW EXISTS ............................................. 3-1
IMPORTING DATA FROM ADJACENT TOWNSHIPS........................................................................................ 3-2
IMPORTING PLAT DATA..................................................................................................................................... 3-2
IMPORTING COORDINATE DATA .................................................................................................................... 3-2
AUTO-IMPORTING SELECTED COORDINATES DATA - MERGE CONTROL ........................................ 3-2
IMPORTING KNOWN CONTROL COORDINATES FROM THE .CON FILE .............................................. 3-4
LISTING DATA ON THE SCREEN TO REVIEW AND VERIFY YOUR WORK ......................................... 3-4
INRAWW EDITING .................................................................................................................................................... 3-4
ii
GCDB-WG-TRN-V1.00-10262001
EDITING OR DELETING RECORD DATA ........................................................................................................ 3-4
ADDING TO, CHANGING OR DELETING CONTROL DATA ....................................................................... 3-5
ADDING TO OR CHANGING SID DATA........................................................................................................... 3-5
QUITTING THE PROGRAM: CREATION OF THE NEWEST .RAW, .SD AND .LSA FILES .................... 3-5
ADJUSTMENT AND ANALYSIS OF GEOMETRIC DATA................................................................................. 4-1
CHAPTER INTRODUCTION .................................................................................................................................... 4-1
THE ADJUSTMENT/ANALYSIS PROCESS........................................................................................................... 4-1
BLUNDER DETECTION TOOLS AND STRATEGY ............................................................................................ 5-1
CHAPTER INTRODUCTION .................................................................................................................................... 5-1
GEN............................................................................................................................................................................ 5-1
PROJECW ................................................................................................................................................................. 5-2
INRAWW .................................................................................................................................................................. 5-3
CKW .......................................................................................................................................................................... 5-4
LSGMMW ................................................................................................................................................................. 5-5
RAWW ...................................................................................................................................................................... 5-7
DXFW........................................................................................................................................................................ 5-7
LSMINW ................................................................................................................................................................... 5-7
SNOOPER ................................................................................................................................................................. 5-8
STRATEGIES ........................................................................................................................................................... 5-8
REFINING ERROR ESTIMATES.............................................................................................................................. 6-1
CHAPTER INTRODUCTION .................................................................................................................................... 6-1
LSGMMW ................................................................................................................................................................. 6-3
SNOOPER ................................................................................................................................................................. 6-4
INRAWW .................................................................................................................................................................. 6-4
SUBDIVISION OF SECTIONS - APROPW ............................................................................................................. 7-1
CHAPTER INTRODUCTION................................................................................................................................. 7-1
SUBDIVIDING NORMAL TOWNSHIPS............................................................................................................. 7-1
SUBDIVIDING NON-NORMAL TOWNSHIPS, .IRR AND .ADD FILES ....................................................... 7-1
INTERPRETING THE .SUB FILE ......................................................................................................................... 7-5
AUTO INTERSECTION AND POPULATING THE .NOT FILE....................................................................... 7-6
USING AUTOIRR, AUTO-AUTOIRR, AND AUTO-ELONGATION .............................................................. 7-6
SUBDIVISION STRATEGIES ............................................................................................................................... 7-7
REGIONAL ADJUSTMENT OF DATA ................................................................................................................... 8-1
FORMLSA .................................................................................................................................................................... 8-1
FORMREL .................................................................................................................................................................... 8-5
WINGMM UTILITIES ................................................................................................................................................ 9-1
Using WinGMM utility programs............................................................................................................................ 9-1
SORTLSAW.............................................................................................................................................................. 9-1
COMPARW............................................................................................................................................................... 9-1
UTMW ....................................................................................................................................................................... 9-1
TOLXNW .................................................................................................................................................................. 9-1
iii
GCDB-WG-TRN-V1.00-10262001
GETLXW................................................................................................................................................................... 9-2
NODUP...................................................................................................................................................................... 9-2
CHGIDS..................................................................................................................................................................... 9-2
CHZONEW ............................................................................................................................................................... 9-3
CMM2GMM ............................................................................................................................................................. 9-3
GCONW .................................................................................................................................................................... 9-4
GCONHPW ............................................................................................................................................................... 9-5
CSTUF ....................................................................................................................................................................... 9-6
QCMAT ..................................................................................................................................................................... 9-6
LINKING GCDB TO THE LLD ............................................................................................................................... 10-1
LINKING THEORY............................................................................................................................................... 10-1
UNDERSTANDING THE PORTION OF LLD NECESSARY FOR LINKING.............................................. 10-1
COMBINING GCDB AND LLD WITH THE .AN FILE ................................................................................... 10-2
LINKING PROGRAM ORDER............................................................................................................................ 10-3
GETLLD .............................................................................................................................................................. 10-3
RPLOY................................................................................................................................................................. 10-3
LLD ...................................................................................................................................................................... 10-3
VERIID ................................................................................................................................................................ 10-4
DXFW .................................................................................................................................................................. 10-4
AN2IID ................................................................................................................................................................ 10-4
AN2GLD.............................................................................................................................................................. 10-4
APPENDIX A - GCDB NAMING CONVENTIONS ...............................................................................................A-1
TOWNSHIP NAMING CONVENTION, Eight-Characters..................................................................................A-1
SUMMARY...............................................................................................................................................................A-6
APPENDIX B - FILE FORMATS of WinGMM FILES ...........................................................................................B-1
TEMP.JOB.................................................................................................................................................................B-1
.DEF ...........................................................................................................................................................................B-1
.SID ............................................................................................................................................................................B-1
.CON ..........................................................................................................................................................................B-2
.RAW .........................................................................................................................................................................B-3
.LSA ...........................................................................................................................................................................B-3
.SD..............................................................................................................................................................................B-4
.ADD ..........................................................................................................................................................................B-4
.NOT ..........................................................................................................................................................................B-5
.LX .............................................................................................................................................................................B-6
.AN .............................................................................................................................................................................B-6
.DXF...........................................................................................................................................................................B-6
APPENDIX C - WinGMM Glossary...........................................................................................................................C-1
iv
GCDB-WG-TRN-V1.00-10262001
INTRODUCTION TO GEOGRAPHIC MEASUREMENT MANAGEMENT FOR WINDOWS®
USER GUIDE
Geographic Measurement Management for Windows® (WinGMM) is a suite of programs designed for data entry,
computation and analysis of survey information necessary to support the Geographic Coordinate Data Base (GCDB).
These programs are capable of translating data entered from graphic sources into a configuration usable by
numerous processes in an electronic automated environment.
The Public Land Survey System (PLSS) grid is not always correctly displayed on some maps that are commonly
digitized to obtain coordinates for corners. In addition, some features of the PLSS grid, particularly corners of some
special surveys such as river meanders and Tracts are not usually shown on maps and therefore the coordinates of
these PLSS corners are not available.
WinGMM was initially developed to (1) compute the geographic coordinates for corners of the PLSS using official
survey record data; (2) provide an estimate of the positional dependability of the computed corner coordinates; (3)
preserve the survey measurement data and resulting computed coordinates in an easily accessed data base while
providing for data flexibility to facilitate integration of data between various systems.
PURPOSE AND SCOPE OF THE WinGMM USER GUIDE
This WinGMM Reference manual highlights case studies of actual township computations using WinGMM. The
manual illustrates the analytical and decision-making processes you will be involved in as you work through the
computations.
This WinGMM Technical Reference Manual assumes that the user has read and become familiar with the WinGMM
Program Reference. It also assumes that the user has a competent understanding of various survey methods and a
working knowledge of the Windows® interface.
Think of this WinGMM User Guide as a manual to facilitate data organizing, entry, analysis and management. The
manual illustrates aspects of what the job requires and what tools you will need to accomplish that task. Refer to the
WinGMM Software User Guide to find out exactly how to use the tools.
Please do not hesitate to contact the Service Center Lands & Resources (303-236-0188) if you have any questions or
problems concerning this document.
GCDB BACKGROUND AND HISTORY
The GCDB project originated as a means to provide a common frame of reference for resource data, which relies on
geographic coordinates and land parcel information based on the PLSS. WinGMM assigns geographic coordinate
values to PLSS corners, allowing resource data and land parcel data to be graphically portrayed.
The locations of resources (e.g., wildlife habitat, archeological sites, etc.) can be determined with sufficient accuracy
by using a variety of techniques. Many resources can be photographed and mapped reasonably accurately; these
mapped areas can then be digitized from United States Geological Survey (USGS) maps to obtain geographic
coordinates.
Unfortunately digitizing does not work well with survey data. This grid cannot be photographed and mapped as
easily as the more visible resource boundaries. It is possible and in many areas necessary to map the PLSS to higher
accuracy than can be portrayed on standard maps. This can be accomplished by combining the best geometric
information available and, through analysis, resolve the inconsistencies inherent in the data from various sources and
INTRODUCTION
WinGMM Technical Reference Manual.doc
1-1
GCDB-WG-TRN-V1.00-10262001
time periods. The nature of the collected data allows for ease of maintaining and updating the information contained
within GCDB. Other GCDB data specifically needed to link legacy BLM lands data with resource data can be
collected efficiently through WinGMM.
GCDB COMPUTATIONS USING WinGMM'S LEAST SQUARE ANALYSIS
The Bureau of Land Management (BLM) recognizes that for a Land Record Information System to work and remain
useful into the future GCDB must be updateable. The GCDB data model reflects this understanding by maintaining
all features of the data. The type of information stored within the database will remain stable; what will improve
over time are coordinate values of established corner positions.
WinGMM users can in one process combine two well-defined types of geometric data. The first is control point data
derived from various sources. This data consists of coordinate pairs that may be digitized from USGS quadrangle
sheets, derived by traditional methods (terrestrial traverses) or collected using Global Positioning System (GPS).
The second type of data is derived from survey records. This survey data consists of bearing and distance
information entered from the official plats. Both types of data contain a wide range of quality and must be resolved
and analyzed to ascertain reliability. We have only a nebulous idea of the merit of any given piece of data and only
mathematical analysis will reveal the true quality of how each point and line statistically fit the combined data set.
By identification of reliable data it is possible to make low precision data less influential in its effect on the overall
scheme.
CONTROL COORDINATES
- information about monumented points.
Visiting a specific monument and collecting survey measurements to determine latitude/longitude (Lat/Long) is a
special and expensive process, one that was not often done before the advent of some of the newer measuring
methods, i.e., GPS. Surveyors are comfortable with the concept that no true or exact values are ever known for any
measurement and that a published coordinate value is simply a snapshot in time. A coordinate measurement is
meaningless outside the context of its reliability.
Lat/Long coordinates must also be tied to statistical results. The coordinate by itself is not static, coordinate values
change as better data becomes available. Every survey can and frequently does acquire dissimilar coordinates for the
same described location. There are many cases where surveyors have determined differing coordinates for a given
monument. We can expect this by the very nature of survey work. The question then becomes which coordinate has
more reliability? Some additional apprehensions then emerge. Does this information refer to the same monument?
Was the correct monument incorrectly measured? Is there a typographic error? Is there exaggeration in the quality
of work? Pondering even the simplest of situations results in no conclusive answer, yet seamless parcel data is based
on a complex network of individual elements that must be interpreted in context.
PLAT DATA - information about the lines between adjacent monument points
Overall, there is very little usable Lat/Long data on survey plats, as coordinates are not intended to define legal
rights. What plats do contain are the bearing and distance measurements between adjacent monuments. These line
segments can be combined into a continuous interconnected network.
Since there are imperfections in measurements from normal inherent errors associated with surveying and from
measurements derived at various points in time, the network doesn't fit geometrically with itself. Take any two
monuments derived from plat data; numerous, slightly different bearings and distances can be computed between
them, conditional on what combination of connecting lines is used in the computations. If the two monuments are
held as control coordinates, we can also apply a certain geometry to the latitudes/longitudes to determine yet another
bearing and distance.
INTRODUCTION
WinGMM Technical Reference Manual.doc
1-2
GCDB-WG-TRN-V1.00-10262001
It is this uncertainty that makes bearing and distance information difficult to interpret.
COMBINING SOURCE DATA
- control coordinates and plat bearings/distances
The result of adjusting the control coordinates with plat bearings and distances is that latitudes/longitudes of all the
intermediate monuments will be computed. This is the only clue we have as to the position of monuments that may
not have been visited since they were set. How good these computed Lat/Long coordinates are depends ultimately on
the reliability of the source data. It is imperative to discern the quality of our source data before we can arrive at an
optimal solution of Lat/Long values.
The quality of plat bearings and distances range from precise to nearly worthless and the quality of control
coordinates differ just as dramatically. The determination of whether weaknesses exist in the control data or in the
plat data perhaps requires extensive research and analysis. The data of the PLSS must be examined using various
reliability values for the data to determine quality results. This may involve knowledge of the work quality of the
surveyors by comparing the original work with more recent surveys. This comparison can result in quite accurate
estimates of the quality of the original work. In most cases, the final determination is that credence should be given
to all the measurements, but in different degrees. Who or what has the time to do an extensive mathematical analysis
of every possible combination of data? The process of comparing multiple error estimates with multiple line
segments is a daunting task and these computations can only be accomplished effectively with computers.
WinGMM USES THE TECHNIQUE OF LEAST SQUARES ANALYSIS
The technique of least squares analysis is used by the scientific community to analyze complex data sets. Many
students were exposed to the concept when they were attending college, but its application was not needed on the
linear data sets that surveyors normally encounter. Least squares analysis is well suited to the task of data
comparisons from a variety of survey sources.
Every bearing, distance and control coordinate is considered by WinGMM to be a measurement, and is assumed to
have some error associated with that measurement. Each piece of data is tagged with the users first estimations
concerning the amount of error inherent in the data. Users want to resolve all the geometric discrepancies in this
data, but protect the integrity of the better data. Least squares analysis combines all this data, ascertains the
ambiguity and figures out how deviations with each coordinate and bearing and distance affect the entire project. It
then reconciles the network conducting multiple iterations, adjusting the suspect data more than it adjusts the trusted
data (to the degree specified by the user's assumptions), until the complete project is resolved to its "best fit".
Each time this analysis program is run, it provides a Lat/Long for every point in the adjusted area and an item-byitem report of how much each measurement was adjusted. This is where the user begins interacting with the process
to refine the final answer. The report includes a numeric value (residual) for each bearing, distance and control
coordinate that compares the user's expectations with the amount of adjustment each point or bearing received to
achieve the best solution. A second number called a snoop number, determined by the amount of error estimated and
the amount actually incorporated in the adjustment, is also reported. A snoop number of 7.0 translates to: "You
thought this spot had good data, but in order to make everything fit together, I had to bend the measurement seven
times as much as you asked me to." In this way, all the problem areas are brought into focus. This is how data entry
mistakes are easily detected, what WinGMM literature refers to as "automatic blunder detection".
Once data entry mistakes are corrected, it is up to the user to determine why certain areas do not achieve satisfactory
results. A conceptualization of the network adjustment process, blended with a sense of cadastral history and data
analysis is used to focus on the reason an area doesn't "fit". Users can easily revise assumptions about the quality of
certain surveys or control points, and then rerun the adjustment. The result is successively better final results and
more importantly, a much clearer idea of how reliable the source data is and consequently how reliable the computed
INTRODUCTION
WinGMM Technical Reference Manual.doc
1-3
GCDB-WG-TRN-V1.00-10262001
coordinate values are.
Not only will WinGMM present a definite idea of the reliability of the data processed, but also the results will be
expressed in standard statistical convention. The GCDB data model has been designed to accommodate the crucial
data provided by WinGMM and any other true least squares adjustment. Refer to GCDB's draft Baseline Data
Collection Model, Version 1.3 03/27/90, Attribute Numbers 9044, 9048, 9150 and 9152.
EASE OF MAINTENANCE
WinGMM remembers the interaction the previous user had with the data. This data makes upgrading GCDB very
simple. Any new data that enters the database is tagged with assumptions as to how good it is. This new data
replaces the data that resided there previously. There is little more interaction - WinGMM readjusts the geometry of
the plat data, and then re-subdivides the sections automatically.
Once data for a contiguous set of townships has been collected, blunders removed from RAW data, and error
estimates refined, they can be combined into a regional set of data. This provides a means of maintaining a seamless
data set. The boundaries of adjacent townships will have exact coordinate matches for every corner. After the region
is adjusted, each individual township data set is updated using regional coordinates. Then they are re-subdivided by
using the instructions recorded during the data collection.
Using WinGMM, the individual land parcels can then be linked to the BLM’s Legacy inventory of legal land
descriptions (LLD). This process attributes each polygon, created by WinGMM, with the legal land description, as
collected from the BLM’s Master Title Plats and survey plats.
COORDINATE GEOMETRY IS USED TO FURTHER DIVIDE THE MEASUREMENT NETWORK
The survey lines and points that comprise the survey plat do not always completely describe land parcels. Another
process, using coordinate geometry, is used to break land units into smaller pieces as prescribed by deed descriptions
or normal subdivision rules. In PLSS this is known as section subdivision. Other survey systems have concepts such
as an offset line, i.e., “a 25 foot strip along the western lot line”. Section subdivision occurs mostly with understood
rules of construction. In some cases WinGMM-customized coordinate geometry (COGO) instructions must be
specified to achieve desired results. This is commonly referred to as manual subdivision. WinGMM stores these
instructions for reuse after each adjustment of the network of survey measurements.
INTRODUCTION
WinGMM Technical Reference Manual.doc
1-4
GCDB-WG-TRN-V1.00-10262001
ABSTRACTION
CHAPTER INTRODUCTION
The process to extract the best and most recent information on the surveyed lines that comprise a
township is abstraction.
Information, including bearing, distance, elevation, control, type of survey line, and SID label is
compiled from survey plats, field notes, topographic maps, protraction diagrams, Master Title Plats,
other source documents and data already in the database. The SID label is a source identifier that GCDB
assigns to each survey. Data is entered/edited-using INRAWW.
Control
Abstraction is a two-fold process. The first step is to determine the control available. A data table
should be maintained with all control values. The latitudes/longitudes values are referenced either to the
1927 North American Datum (NAD27) or the 1983 North American Datum (NAD83).
NOTE:
See GCONW, below, for information on converting between NAD27
and NAD83.
Plat Data
The second abstraction step consists of extracting information from the surveyed lines that make up a
township (section lines and township boundaries). This information includes bearing, quadrant, distance,
and SID label (source). This information is annotated on township diagrams, enlargements of survey
plats, or detailed drawing, listed on abstraction forms, entered directly into the .RAW file, or any
combination of these methods depending on the complexity.
Point identifiers, called GCDB IDs, are assigned to each corner. Values of these point identifiers are
rule-based, when possible, to help make subdivision and parcel identification more automatic. The
remainder of the naming rules provide for a consistent system to help people more quickly recognize
corner types and help visualize the basic spatial relationships among the corners. Appendix A describes
the conventions of numbering GCDB IDS.
ABSTRACTING A STANDARD RECTANGULAR TOWNSHIP
The steps necessary to abstract information for a standard rectangular township are as follows:
1. Obtain copies of all pertinent plats for the township so that the best and latest record is used.
Include copies of the plats for the townships to the north, south, east, and west plus the corner
townships if an overlap exists.
2. If necessary, check the field notes to see how lotting and subdivision were done where irregular
lotting exists.
3. It helps to create a sketch of the area encompassed by your data set, like a township. Color-code
the different surveys. Make a legend cross-referencing each color with the SID number.
4. If necessary, make use of detailed drawings and/or abstract sheets for complicated areas of
survey, such as meanders, small holding claims, surveyed lines with two or more sets of
corners, etc.
ABSTRACTION
2-1
GCDB-WG-TRN-V1.00-10262001
5. Assign GCDB IDS to each corner. Refer to Appendix A. GCDB Naming Conventions,
including figure A-1 for an example of ID coding for a standard township and figure A-2 for
an example of labeling a standard section.
6. If applicable, transfer abstracted information to appropriate abstract sheets. See Appendix B for
descriptions of example abstraction sheets.
ABSTRACTING SPECIAL SURVEYS
The following steps are performed in abstracting special surveys:
1. Obtain copies of all pertinent special survey plats. Enlarge or draw detailed areas for clarity.
2. Check for resurveys.
3. Assign Point Identifiers. Refer to Appendix A. GCDB Naming Conventions.
4. Annotate each special survey boundary line with the corresponding distance and bearing on the
plat copy, enlargement, drawing, or abstraction sheet being used.
5. In cases of overlapping surveys from various sources, digitize the plats to form one picture that
shows the interrelation of all the surveys. Hard copies of the overall picture and of enlarged
details will provide a useful worksheet that will greatly organize your efforts.
ABSTRACTING MEANDERS
Check the meander line field notes for:
!
!
!
!
!
!
Original meanders
Adjusted record meanders
New meanders
Duplicates (handwritten, typed)
Fixed and limiting boundary
Informative traverse
Evaluate meanders (see example in Figure A-8). Determine which meander lines continue to control
property rights.
1. Ascertain whether meanders have been superseded by new meanders.
2. Where duplicate meanders exist, note that the rectangular meander line will normally control.
3. Determine whether record meanders have been adjusted.
4. Determine which informative traverse must be abstracted.
a.
Traverses must be abstracted if they form the boundary of an accreted area, which is
divided, by division of accretion lines based on the informative traverse.
b.
If the traverse is only for area determination or for
shown.
locating a certain feature, it is not
ABSTRACTION
2-2
GCDB-WG-TRN-V1.00-10262001
Identify rivers that have meanders on only one bank. Determine the best method for identifying banks
without meanders.
1.
Digitize the plat.
2.
Use the width of the river.
Assign the segment identifier. Refer to Appendix A.
PREPARING THE COMPUTER FOR A NEW TOWNSHIP
1) Name the project according to GCDB Township naming convention.
Use the GCDB Township naming convention to create a name of your next project. See Appendix A,
pg. A-1. If your township is T 34 N, R 07 W, then your project name will be T34NR07W. Although
WinGMM Version 1.00 will work entirely with any project name, use of the standard naming
conventions in such processes as getting boundary data from adjacent townships must be considered. In
addition it facilitates WinGMM’s ability to automatically combine and adjust data from several
townships in a region. See WinGMM Users Manual, Regional Adjustment of Data.
2) Preparing the data files; .DEF .SID .CON and TEMP.JOB
WinGMM can create any file that it needs, using data that is manually input by you. However, where
this data already exists in data tables, a great deal of trouble can be avoided by converting the existing
data into WinGMM files. The three files .DEF, .SID, and .CON are required files that can be created
with SQL queries. TEMP.JOB can be created by a batch file instead of running PROJECW. A printout
should be made of the .SID and .CON files to inspect them for completeness and correctness.
.DEF and TEMP.JOB - required before running INRAWW
The .DEF file can be created from within PROJECW. Refer to Appendix B - File Formats for
WinGMM Data Files.
TEMP.JOB has no more than eight characters of data inside it, the name of your current project. In MSDOS, the contents of TEMP.JOB will change each time you change to another township.
.SID - required before entering plat data (INRAWW)
The .SID file can be created and edited from within INRAWW or created through an external
process customized to your existing database. Refer to Appendix B - File Formats for more indepth information.
.CON - required before processing coordinates (GEN)
The .CON file can be created and edited from within INRAWW or an external process
customized to your existing control database. Sometimes there are two sources (different
coordinate values) for the same corner and one of the lines should be "commented out" so
WinGMM will not use it in the adjustment. Refer to WinGMM Program Reference,
INRAWW - (7) Control Station Maintenance - (3) Import Control from a .CON file. In short,
if you put a non-space character in the first column of a line in the .CON file, then WinGMM
interprets that line to be a comment to the user, not a piece of valid data to use in the
adjustment. Merge control, where coordinates from adjacent townships are used to assist in
the merging of townships during regional processing, may also be coded in the .CON on a
ABSTRACTION
2-3
GCDB-WG-TRN-V1.00-10262001
comment line. See Regional Adjustment of Data.
RUN PROJECW TO STORE DEFAULTS if there is no .DEF file or TEMP.JOB file.
The .DEF file and TEMP.JOB must exist in the township subdirectory. Running PROJECW
to define the project name will result in the creation of those files.
GCONW and GCONHPW - NAD Datum Conversions
GCONW uses National Geodetic Survey (NGS's) NADCON (NAD27 to NAD83 and NAD83
to NAD27 geodetic program), which has been adapted to WinGMM. GCONW requires NGS
files CONUS.LAS and CONUS.LOS, which provide data for the NAD27 to NAD83 and
NAD83 to NAD27 conversion. GCONHPW is for conversions to HARN from NAD83 or
NAD83 to HARN. Operation for GCONHPW is the same as for GCONW, except it can only
use NAD83 coordinates and conversion can only be done in one direction during a run.
GCONW looks in the .CON file for NAD27 coordinates without NAD83 coordinates and
computes the NAD83 values and writes the data on the next line. It also looks for NAD83
coordinates without NAD27 coordinates and computes them. The computed values are placed
into the .CON and coded 27 or 83, in columns 56 & 57. All comment lines are preserved
(lines with non-space character in column 1). GCONHPW does the same thing for HARN, but
codes it HP in.
INRAWW looks for a datum in columns 56-57 of the .CON file. Anything but 83 or HP in
those columns means NAD27. The project datum is defined in the .DEF file, and control
coordinates are imported in that datum. If “Update .con file” option is used, and NAD27 is
defined, all NAD83 coordinates are simply written back to the .CON and are not made
comments. Same for NAD27 coordinates if in NAD83 is defined. NOTE: Delete the .LSA and
.SD files before running INRAWW.
All other WinGMM program’s computations will be based on whichever datum was set by
PROJECW and is defined in the .DEF file.
A .CON file, after GCONW has ran, will have a 1:1 match of NAD27 and NAD83
coordinates. After GCONHPW the .CON file will have a 1:1:1 match of NAD27, NAD83 and
HARN coordinates. GCONW and GCONHPW will ignore any lines that have been
commented out with an asterisk.
This is a .con file before GCONW:
TEST.CON
ORIGIN 451019.2345 683125.6772 140.000 0 0 2000.0000 5000.0000
* EXAMPLE OF COMMENT
100100 451019.2345 683125.6772 140.000 8 3 27
100200 451029.3457 683126.1267 140.000 3 100 83
* EXAMPLE OF COMMENT #2
100300 451129.5671 683127.1234 140.000 9 52 27
* EXAMPLE OF COMMENT #3
* EXAMPLE OF COMMENT #4
This is the same .con file after GCONW:
TEST.CON
ABSTRACTION
2-4
GCDB-WG-TRN-V1.00-10262001
ORIGIN 451019.2345 683125.6772 140.000 0 0 27
ORIGIN 451019.4482 683123.7636 140.000 0 0 83
* EXAMPLE OF COMMENT
100100 451019.2345 683125.6772 140.000 8 3 27
100100 451019.4482 683123.7636 140.000 8 3 83
100200 451029.3457 683126.1267 140.000 3 100 83
100200 451029.1324 683128.0404 140.000 3 100 27
* EXAMPLE OF COMMENT #2
100300 451129.5671 683127.1234 140.000 9 52 27
100300 451129.7780 683125.2088 140.000 9 52 83
* EXAMPLE OF COMMENT #3
* EXAMPLE OF COMMENT #4
Note columns 56-57 are reserved for a NAD27, NAD83 or HARN. If it is blank, or something
besides NAD83 or HARN is there, a NAD27 is assumed. Thus present .CON files (all NAD27) will
work fine without the NAD27 in the file.
ABSTRACTION
2-5
GCDB-WG-TRN-V1.00-10262001
DATA ENTRY AND EDITING
INRAWW
CHAPTER INTRODUCTION
This chapter deals with getting information from the survey plats or abstraction sheets into the computer.
In WinGMM this task is done by INRAWW. Please, refer to INRAWW Program Reference for
additional details. Data entry also refers to control data and the error estimates in the .SID and .CON
file. INRAWW has many features that are appropriate during data entry. Those features, in the order we
will explore them, are:
- Adding plat data for rectangular surveys: beginning, continuing
- Switching SIDs to indicate another survey is being input
- Importing plat data from boundaries of adjacent townships
- Importing coordinates from boundaries of adjacent townships (optional)
- Adding plat data from special surveys and complex rectangular surveys
- Importing known control coordinates from the .CON file
- Listing data on the screen to review and verify file content of: .RAW, .CON, .SID.
- Editing or deleting record data
- Adding to, changing or deleting control data
- Adding to or changing SID data
- Creating approximate coordinates of each point
- Provide a traverse closure report
- Updating .CON, .RAW, .SD, and, .LSA files.
We will start with just getting rectangular plat data into the computer, then focus on the other INRAWW
features you will need to know about.
We assume that files .SID and .DEF already contain data values that are correct to our best knowledge.
Files such as .CON .LSA .SD and .RAW need not exist at this point.
If .DEF does not exist, run PROJECW and answer the prompts. If .SID does not exist, run INRAWW (5) SID Maintenance - (2) Add SIDs. Refer to the WinGMM Program Reference, INRAWW.
BEGIN THE INPUT OF RECTANGULAR PLAT DATA, - NO .RAW EXISTS
Refer to WinGMM Program Reference, INRAWW
Chose “Edit/Input/Edit Record data (INRAWW).
If no .RAW file has been established, then INRAWW will place you at point 100100 and prompt you for the
distance of the line going Northerly along the W boundary of your township. It is at this time that you
should key [S] to get the prompting for defining the default SID number. The purpose of the default SID is to
save you from having to type the SID number after each line of data. Another choice you have in this
prompting cycle is to type [Q], which will quit the prompting cycle and return you to the main INRAWW
menu.
If you didn't quit, then you will answer the prompt for distance, then the prompt for bearing, then the
prompt for the "NEXT" ID, and the one at the other end of the line. Remember, if you answer the
prompt with 640, then INRAWW will apply the values of line 100100-100140 to each half-mile leg up
to 100640 and you will then put in the data for 100640-100660.
CONTINUING THE INPUT OF RECTANGULAR PLAT DATA, - .RAW EXISTS
RAW DATA ENTRY
3-1
GCDB-WG-TRN-V1.00-10262001
If the .RAW file exists when you start up INRAWW, then you will be brought to the main menu.
Choose (2) RETURN TO INPUT OF CARDINAL LINES to input more section line data. You must
then indicate your starting corner (GCDB ID).
PUTTING IN DATA FROM A DIFFERENT SURVEY - TIME TO SWITCH SIDS
Often, townships are comprised of data from different surveys. Each survey line entered into GCDB
must be tagged with a reference to the source of the data (SID): surveyor, survey type, field note number
and date. The SID number serves as that reference. The SID number is placed at the end of every line of
the .RAW file. The database will use the SID number to match line/bearing/dist with the source.
WinGMM puts that number on automatically, but you must tell WinGMM what survey you are working
on. This is the "current" SID. Whenever you change from one survey to another, then you must
"switch" SIDs and the new "current" SID will be appended to each line. This new current SID is a
reference to the survey that you are just about to begin entering. There are two ways to switch SIDs.
The easiest is to hit the [S] key when you are being prompted for the distance, bearing or GCDB ID.
Another way is through INRAWW's main menu (5) SID MAINTENANCE - (4) SWITCH SIDS.
IMPORTING DATA FROM ADJACENT TOWNSHIPS
IMPORTING PLAT DATA
If any townships adjacent to your current township have been entered, you have the option of
transferring the pertinent plat data from those township boundaries and adding it to your .RAW file. The
.RAW files for these adjacent townships must be in your current directory. You will be prompted for the
offset to be applied to the IDS to convert them into your townships numbering scheme, i.e. an offset of 3 will cause a 203100 in the township to the north to become 200700 in your township. Also, you can
bring in a portion of a township. This is handy where township boundaries are offset or a portion of the
boundary is offset.
IMPORTING COORDINATE DATA
If any townships adjacent to your current township have been adjusted, you have the option of
transferring the computed coordinates from the adjacent township's .PGC file. These points become
listed as fixed control in the current .LSA and .SD files. This option would be used to put control into a
township that has no true control.
While importing plat data from an adjacent township, see above, the .PGC file for the adjacent township
must be in the same directory as its .RAW file. If the .PGC file is present, the coordinates and plat data
are imported, otherwise only the plat data is imported.
The error estimates for these points have to be set at .001, .001, in the project .DEF file, which prevents
the Lat/Long values from changing (fixed boundary). The error estimates for the survey lines must be
artificially raised by the user to allow all the adjustment to occur on the bearings and distances. Holding
the error estimates impossibly low on the control and artificially high on the bearings and distances
prevents WinGMM from computing realistic error ellipses.
AUTO-IMPORTING SELECTED COORDINATES DATA - MERGE CONTROL
The purpose is to help automate importing of merge control, which is used to merge townships during
FORMLSA. And it allows for importing merge control from adjacent townships without importing the
entire boundary. This lessens the effects of having to set artificial error estimates on the survey lines,
RAW DATA ENTRY
3-2
GCDB-WG-TRN-V1.00-10262001
caused by importing the entire boundary. It is most importantly, a tool for allowing the merging of
townships during FORMLSA.
Setup:
1) The value of the error estimates of the imported control are based on the values set by
PROJECW in the .DEF file. It is recommended, if control is to be held fixed, that they be set
to .001 before running INRAWW.
2) Append a comment line, with a text editor, to the .CON file of the form:
*MtxxXRxxX ffffff tttttt
Where:
*M
= comment line coded for merge control .
TxxXRxxX =the adjacent township that coordinates are to be imported from.
ffffff =the point id of the station coordinates are to be imported from.
tttttt =the point id of the station coordinates are to be imported to.
CAUTION:
DO NOT import actual control. It should already exist in both townships. FORMLSA throws out
control that exists in only one township. If the adjacent townships .PGC file is not in the same
directory, no control can be imported. If there are changes in the adjacent township, the township
with merge control should be reprocessed after it.
3)
Before starting INRAWW delete the existing .LSA and .SD files, then start INRAWW:
Select (4) CONTROL STATION MAINTENANCE
Select (5) IMPORT CONTROL FROM A .CON FILE
and then select <1> READ ALL CONTROL IN .CON FILE.
INRAWW reads in the coordinates of the station specified on the comment line in the .CON file.
When quitting INRAWW, it is saved as a control point to .LSA and .SD files, at the specified
station. Unless (4) CONTROL STATION MAINTENANCE - (6) UPDATE .CON FILE, is selected
before quitting, the .CON file is not updated.
Every time control is imported using INRAWW, it will read the comment line and import the control
as specified. During each subsequent adjustment, coordinates will always be imported. Therefore
the values of the coordinates may change when the adjacent township has changed. This gives
FORMLSA a better chance to merge data between the two townships, with the least effect on the
reliabilities.
ADDING PLAT DATA FROM SPECIAL SURVEYS AND COMPLEX RECTANGULAR SURVEYS
Refer to WinGMM Software User Guide INRAWW
When the GCDB scheme deviates far from the standard township, it is possible to enter data in a more
freeform style. In INRAWW's (1) RECORD DATA MAINTENANCE - (2) ADD RECORD
INFORMATION, the "next" ID and other defaults are automatically generated using a different set of
rules than in (2) RETURN TO INPUT OF CARDINAL LINES. How these defaults act depend on
RAW DATA ENTRY
3-3
GCDB-WG-TRN-V1.00-10262001
whether you are entering rectangular survey data, GCDB IDS between 100100 and 710710 or special
survey data, below 100100 or above 710710.
IMPORTING KNOWN CONTROL COORDINATES FROM THE .CON FILE
This feature controls what points are to be included in the least squares adjustment. Control points are
"imported" from the .CON file into the .SD and .LSA files. LSGMMW does not read the .CON file.
Strategy: Although you must eventually choose #1, option #2 is provided to allow you to initially use
GEN/LSGMMW adjustment analysis to test the data in the .RAW file. After importing just one control
point (into .SD and .LSA), you run the data through GEN, LSGMMW and CHECKER. All three
programs give you reports on where the most adjustment occurred. These are spots to look for possible
data entry errors. Once the data errors are corrected, the same adjustment reports are used to refine your
error estimates. Refer to the discussions on interpreting the .GEN file, .ADJ file and the .CHK file,
below.
Once satisfied that the .RAW file is correct, you run:
INRAWW (4) CONTROL STATION MAINTENANCE - (5) IMPORT CONTROL FROM A .CON
FILE - (1) READ ALL CONTROL IN .CON FILE.
LISTING DATA ON THE SCREEN TO REVIEW AND VERIFY YOUR WORK
Refer to WinGMM Software User Guide INRAWW
There will be many times that you will want to see the data that you have input:
- To find out where you left off
- To check for completeness
- To check for correctness
- To find the RECORD # of a particular piece of data
- To see your distances displayed in a different unit of measure
To list plat data, choose (1) LIST RECORD INFORMATION from INRAWW's main menu. You will
also be presented with an opportunity to LIST plat data from within INRAWW's (1) (3) EDIT RECORD
INFORMATION and (1) (4) DELETE RECORD INFORMATION features.
To list control data, choose (4) CONTROL STATION MAINTENANCE - (1) LIST CONTROL from
INRAWW's menu. You will also be presented with an opportunity to LIST control data from within
INRAWW's (4) CONTROL STATION MAINTENANCE - (3) EDIT (CHANGE) CONTROL DATA
and from within INRAWW's (4) CONTROL STATION MAINTENANCE - (4) DELETE DATA.
To list SID data, choose (5) SID MAINTENANCE - (1) LIST SIDS from INRAWW's menu. You will
also be presented with an opportunity to LIST control data from within INRAWW's (5) SID
MAINTENANCE - (3) EDIT SIDS and from within INRAWW's (5) SID MAINTENANCE - (4)
SWITCH SIDS, although SWITCH SIDS does not show error estimates.
INRAWW EDITING
EDITING OR DELETING RECORD DATA
Although INRAWW will prevent you from making a wide range of data entry blunders, there are just
some things that get entered wrong. Using INRAWW's (1) (3) EDIT RECORD INFORMATION
feature and INRAWW's (1) (4) DELETE RECORD INFORMATION feature ensures that the changes
you make are reflected properly in all the appropriate files; .RAW, .SD and .LSA. Both features allow
you to perform these operations individually or by a block.
RAW DATA ENTRY
3-4
GCDB-WG-TRN-V1.00-10262001
The appropriate files are updated after you choose to quit INRAWW.
ADDING TO, CHANGING OR DELETING CONTROL DATA
Refer to WinGMM Software User Guide INRAWW
The same reasons that INRAWW should be used to EDIT or DELETE plat data also applies to ADDING
TO, CHANGING and DELETING control data. Inside INRAWW's (4) CONTROL STATION
MAINTENANCE feature are: (2) ADD CONTROL, (3) EDIT (CHANGE) CONTROL DATA and (4)
DELETE CONTROL. The delete feature allows you to delete data individually or by a block (RECORD
# to RECORD #). Error estimates can be edited by a range of line numbers or by groups of identical
error estimate, by (7) BLOCK EDIT CONTROL ERROR ESTIMATES.
The .CON file will be updated only upon your request. This is accomplished by choosing INRAWW's
(4) CONTROL STATION MAINTENANCE - (6) UPDATE .CON FILE.
ADDING TO OR CHANGING SID DATA
Refer to WinGMM Software User Guide INRAWW
The same reasons that INRAWW should be used to EDIT plat data and control data also apply to
ADDING and EDITING SIDs. Inside INRAWW's (5) SID MAINTENANCE feature are: (2) ADD
SIDS and (3) EDIT SIDS. Your changes will be automatically written to the .SID file and the .SD file.
QUITTING THE PROGRAM: CREATION OF THE NEWEST .RAW, .SD AND .LSA FILES
When you choose INRAWW's (8) QUIT feature, all new and changed data in the INRAWW session will
be written out to the appropriate files. Also, as mentioned in the WinGMM Program Reference,
INRAWW strips out many midpoint 1/4 section corners and combines those affected lines into one-mile
lengths.
As noted above, functions within INRAWW can be used to edit the .SID file and the .CON file. These
files will be updated only while you exit from the respective functions and only upon your command.
IF YOU NEED TO:
THEN USE INRAWW FEATURE:
Add plat data
Change plat data
Delete plat data
(1)
(2) ADD RECORD INFORMATION
(1)
(3) EDIT RECORD INFORMATION
(1) (4) DELETE RECORD INFORMATION
Add control data
Change control data
Change estimates
Delete control data
(4)
(4)
(4)
(4)
Add SID data
Change SID data
Delete SID data
(5)
(2) ADD SIDS
(5)
(3) EDIT SIDS
(5) (4) DELETE SIDS
(2) ADD CONTROL
(3) EDIT CONTROL DATA
(7) BLOCK EDIT ... ESTIMATES
(4) DELETE CONTRL
RAW DATA ENTRY
3-5
GCDB-WG-TRN-V1.00-10262001
ADJUSTMENT AND ANALYSIS OF GEOMETRIC DATA
CHAPTER INTRODUCTION
As mentioned in the introduction to this User Manual, WinGMM is designed to merge two kinds of data that
sometimes conflict. Both the control and survey data are given error estimates for this purpose and these
error estimates play a very important role in the adjustment and analysis of the two data types.
The program GEN prepares the data for Least Mean Square Adjustment. LSGMMW is a term we use to
describe the adjustment via a variety of Least Mean Square programs. LSGMMW also provides an analysis
of the adjustment. The process is a repetitive cycle of adjustment and analysis of the data until adjustments
become so small as to become insignificant.
Normally, LSGMMW runs without any user input, the exception being when robusting is turned on. The
robusting process is described in more detail in this User Manual, BLUNDER DETECTION TOOLS AND
STRATEGY, and the WinGMM Program Reference, LSMINW and LSGMMW.
THE ADJUSTMENT/ANALYSIS PROCESS
There are three major programs/processes used to adjust and analyze the merging of the survey and control
data. A more comprehensive explanation of these programs can be found in the WinGMM Program
Reference.
GEN generates approximate coordinates by running traverses between control points and performing
compass rule adjustments where possible. It produces two files: 1) The .GEN file which is an ASCII file
showing you misclosures of survey data by section and; 2) A new .LSA, which appends approximate
coordinates to the bottom of the .LSA file produced by INRAWW.
LSMINW performs a least square adjustment of the survey data using only one control point. Because
a single control point is used, it must be assumed to be without error. LSMINW reads the .SD file
created by INRAWW to determine how much relative adjustment to apply to each survey measurement
entered in the RAW file. LSMINW produces a .MIN file that is similar to an .ADJ file (see LSGMMW
below). It lists how much each measurement was adjusted and compares it to how much you estimated
it would adjust. This file is very useful in tracking down any data entry blunders and to help gauge the
quality of the survey data.
LSGMMW refers to a process where a least square adjustment and analysis of the survey data and all
control points that have been imported from the .CON file is performed. As with LSMINW, LSGMMW
reads the .SD file to determine how much relative adjustment to apply to survey measurements. In
addition, it also reads the .CON file to determine how much relative adjustment to apply to control
points. There are several versions of the least squares programs that differ depending on the Operating
System used and how much computer memory (RAM) is available. A description of these various
versions is contained in the WinGMM Program Manual, LSGMMW. LSGMMW produces an .ADJ file
that, among other information about the adjustment, lists how much each measurement was adjusted
(residual) and compares that value against the input estimate of how much it should adjust (snoop
number). When a measurement adjusts excessively (more than 3 times the estimate), data is marked
with asterisks to indicate a higher probability of a blunder. This file is extremely useful in identifying
potential blunders in, and help gauge the quality of, survey and control data.
ADJUSTMENT
4-1
GCDB-WG-TRN-V1.00-10262001
BLUNDER DETECTION TOOLS AND STRATEGY
CHAPTER INTRODUCTION
WinGMM utilizes a least squares adjustment to merge survey and control data. Due to a combination of the
laws of physics and human nature, there are errors in every measurement used in the WinGMM process. For
the purposes of WinGMM processing, a blunder is defined as an error in an individual measurement (survey
data or control) that is large enough in magnitude so as to cause significant effect on the adjustment of the
overall data set.
These significant errors, or blunders, can be introduced to the WinGMM process a number of ways. We
might have transposed or otherwise incorrectly entered record survey information from the plat. We may
have assigned an incorrect Point Identifier to an otherwise valid control coordinate. These types of errors
can be corrected if identified by editing the incorrect data. However, not all blunders are so easily addressed.
In some cases, we may have entered the data correctly from the survey plat but that data is inconsistent
geometrically with other measurements. Most of the WinGMM programs offer clues to finding data that was
keyed in wrong or was bad in the first place. This chapter lists the programs you can run and some strategies
you will find useful in finding and dealing with blunders.
In most cases, there will be several sources of survey and control data in a township data set. These
situations are the most complex data sets to analyze and there is an advantage to analyzing the survey data
alone. The procedure to accomplish this is to import only one control point from .CON, forcing GEN and
LSGMMW to perform an adjustment based only on plat data. The .GEN and .ADJ files can then be reviewed
for analysis of this plat only processing.
The plat data can also be checked for data entry blunders and general quality with the programs LSMINW,
RAWW and CKW, as well as the graphics programs. For tracking down the not-so-obvious errors, you can
use "robusting" to localize the adjustments into the areas where data isn't fitting. Once blunders have been
removed from the .RAW file, robusting should be abandoned. LSMINW is run to make a permanent copy
(.MIN) of the adjustment of the plat data. Then the remainder of the .CON file is imported and the network
is readjusted via GEN and LSGMMW. It is at this time that bad control (or bad point identifiers for good
control) can be found and fixed.
GEN
Technique: Interpreting the .GEN file.
The .GEN file is your first opportunity to review how the data fits together geometrically. There are three
kinds of information contained in the .GEN file that are useful in finding blunders. The first part consists of
loop closures around all sections possible based on the survey data contained in .RAW and looks like this:
********************
LOOP TRAVERSE REPORT FOR SECTION 17
CLOSURES
NORTHING (Y) EASTING (X)
LINEAR PRECISION
TRAVERSE DIST.
5.8 FT.
-.9 FT.
5.8 FT. 1/ 3641.
4.0 MI.
STATIONS IN TRAVERSE
200400-200500-240500-300500-300440-300400-240400-200400********************
These sections are very useful in tracking down blunders as we expect the plats to close within the limits
BLUNDER DETECTION
5-1
GCDB-WG-TRN-V1.00-10262001
required at the time of survey. The obvious exception to this would be is when the data for a section is
comprised of different sources such as an original 1891 survey and a resurvey performed in 1981 on a
portion of the section boundaries where significant distortion in the original survey was identified. When
data for sections are from the same source and there are misclosures reported for adjoining sections that are
similar but opposite in direction, there is a higher probability of blunder on the line common to those
sections. Most of the time, these blunders will be in data entry and are corrected by editing the .RAW file to
reflect the correct information. Sometimes, they are measurement or platting errors that can be dealt with by
assigning a separate error estimate to the individual line(s) of data in the .RAW file.
Users must be aware of how many sections can be closed based on their input .RAW data and ensure a
closure was calculated for all possible sections.
At the end of the section in .GEN that performs these loop closures around sections, there is a summation of
the loop closures including an overall average precision of closures for all sections evaluated.
Following the section of the .GEN file on LOOP closures is information regarding LINK traverses. LINK
traverses are traverses of the .RAW information to generate approximate coordinates of all unknowns (noncontrol points) for LSGMMW. These traverses will also include non-rectangular data traverses if they exist
in the .RAW file and will sometimes be closed traverses of this type of data. As with closure around
sections, these types of information can be extremely useful in identifying blunders in data entry. Because
the purpose of these traverses is to calculate approximate coordinates once and only once for all unknown
stations, the user may not see all closures they wish to evaluate contained in the .GEN file. The program
CKW (covered later in this chapter) allows users to input specific traverses for evaluation.
The third type of information contained in the .GEN file is a listing of all points for which approximate
coordinates were developed but for which a compass rule adjustment can not be performed. These types of
information are listed in the format "STATION XXXXXX LOCATED BY DISTANCE-BEARING FROM
STATION YYYYYY" and can be found by performing a search for the word LOCATE. While this type of
data is most often legitimate, this can be useful in identifying blunders like incorrect data entry of point IDS
in the .RAW file. This is especially true in data sets where the data is so good, two points that were meant to
have the same point ID are created at coordinates so close that it is extremely difficult to catch such errors by
graphical methods.
PROJECW
Technique:
ROBUSTING
Refer to WinGMM Program Reference, LSGMMW
PROJECW must be run to specify that you want to robust by setting option (15) READJUST WITH
ROBUSTED ERROR ESTIMATES to YES. This causes an additional prompt to occur just before the
normal exit from LSGMMW that asks "DO YOU WANT TO READJUST WITH NEW WEIGHTS (Y/N)?".
When you answer YES, LSGMMW will ask you which measurements you want to robust.
So what is robusting? Here is an example: Say a bad E-W distance was entered. This could be a data entry
error or correct entry of a bad measurement, but otherwise the survey data was good. During LSGMMW, the
least squares adjustment will find the bad geometry, but will not know if it is the E-W distances or the
bearings coming into the end points from the N and S. Your error estimates may tell LSGMMW not to
adjust any of this data very much because you believe the source data is accurate. LSGMMW will spread the
error over a wide area to make it fit, but the measurements closest to the bad data will be adjusted more.
If robusting is turned on, LSGMMW gives you the option to "re-weight" control, distances, angles, or
BLUNDER DETECTION
5-2
GCDB-WG-TRN-V1.00-10262001
bearings after performing a least squares adjustment. You may choose to re-weight one or all of these
measurements and you may robust repeatedly on any individual measurement type(s). When you quit this
prompting cycle, LSGMMW will run through the adjustment again reweighing the selected measurements
based on actual adjustments observed as opposed to error estimates from the original least squares
adjustment. As noted in the previous paragraph, the measurements closest to a blunder will be adjusted the
most in a standard (no robusting) LSGMMW run. So in robusting the example above, the error estimate for
a bad distance would change the most, followed by the error estimate for the nearby angles. This tends to
localize the adjustments into the area where the blunder occurred. Repeated robusting localizes the
adjustment even more.
Robusting distances twice and angles twice normally localizes blunders sufficiently to make them easily
recognizable in the output .ADJ file. Robusting distances first is not a random decision but based on the fact
it is generally easier to measure distances than bearings and if an error in an individual distance is made, it
tends to be relatively severe and thus more easy to isolate with a least squares adjustment. Once blunders
have been identified and addressed, by editing errors in the .RAW file or using an individual SID, the user
can import all control points and use robusting to analyze control problems if they exist.
Robusting is particularly useful in identifying control points with incorrect Point Identifiers. If a control
point was erroneously given an identifier that indicated it was located 2 miles away from where it actually
was, this control point would be "moved" the most in a least squares adjustment. However, as with distances
and bearings, other data would also be affected including bearings and distances. This can result in an .ADJ
file that is confusing and very difficult to interpret correctly. By robusting a few times on control, the
erroneous control point may be localized and become much easier to identify.
Note the output .ADJ file is appended to, not overwritten when robusting is performed. This allows the user
to see what steps were taken in robusting a data set and analyze the effect of each action.
Finally, robusting is meant to serve as a blunder detection tool, is not an acceptable process for least squares
adjustments, and must be turned off for the final LSGMMW of a data set.
INRAWW
Technique: Viewing distances in different units of measure
The .RAW file stores all distances in chains. If the plat has distances in feet, then the distances have to be
converted to a common unit in order to check them. Fortunately, INRAWW is capable of displaying .RAW
data in chains, feet or meters.
Example: a mineral lode line is 612.15 feet across the end line, according to the plat. INRAWW will
normally list this line in chains, and you read 9.275 chains. You can change the distance units to feet through
INRAWW's (7) CHANGE DISTANCE UNITS - (2) FEET, then listing the same mineral lode line will
produce the distance in feet: 621.15 feet instead of 9.275 chains. Here is where you can detect the mistake;
the actual plat distance should be 612.15 feet, not 621.15.
In areas where feet were used on the plat, you can print out the .RAW in the correct units, using INRAWW's
(1) LIST RECORD INFORMATION in conjunction with your operating system's facility for printing out
scrolled data. You can press Ctrl P to print whatever scrolls through your monitor.
An added benefit in using INRAWW to list your .RAW file data is that bearings are displayed more like a
plat, see immediately below in feet:
REC # FROM TO DIST. (FT) ERR. (FT) BEARING ERR. SID
495 100140 940020 86.592 1.043 S 49-16- 0 E 0- 0-20 33752
496 940020 939020 1499.982 1.750 S 79-40- 0 E 0- 0-20 33752
BLUNDER DETECTION
5-3
GCDB-WG-TRN-V1.00-10262001
497 940010 939010 1499.982 1.750 S 79-40- 0 E 0- 0-20 33752
498 939020 938010 1496.022 1.748 S 79-40- 0 E 0- 0-20 33752
Then back to chains:
REC # FROM TO DIST. (CH) ERR. (FT) BEARING ERR. SID
495 100140 940020 1.312 1.043 S 49-16- 0 E 0- 0-20 33752
496 940020 939020 22.727 1.750 S 79-40- 0 E 0- 0-20 33752
497 940010 939010 22.727 1.750 S 79-40- 0 E 0- 0-20 33752
498 939020 938010 22.667 1.748 S 79-40- 0 E 0- 0-20 33752
CKW
Technique: User defined traverses.
The program CKW is similar to the program GEN in that it automatically performs RAW data traverses
around any sections possible writing this information to the .CHK file. The format of this section closure
data in the .CHK file is different from .GEN as follows:
********************
TRAVERSE CLOSURE REPORT FOR SECTION 31
SUM OF DISTANCES ALONG TRAVERSE IS
4.00 MILES
CLOSURE IN NORTHING (Y) =
-5.9 FT.
CLOSURE IN EASTING (X) =
.8 FT.
LINEAR ERROR OF CLOSURE IS
6.0 FT.
STANDARD PRECISION IS 1/
3549.
STATIONS IN TRAVERSE
100100-100140-100200-120200-140200-200200-200140-200100-163100-140100
123100-100100********************
CKW differs from GEN in that after running all possible RAW closures around sections, it does not
automatically calculate LINK traverses, but rather asks the user if they wish to perform any additional
traverses. If the user answers yes, CKW prompts for the point of beginning for the desired traverse. It then
checks the .RAW file for all possible lines of data into and out of this point and gives the user a menu of all
possible directions the traverse could be in. It continues in this manner until the user enters a zero to signify
the end point of the desired traverse has been reached.
When a user defined traverse in CKW closes back on the point of beginning, CKW recognizes this and
performs a traverse based on RAW survey data alone. If a traverse does not close against the point of
beginning, CKW compares a geodetic traverse of the lines from .RAW against coordinates in the .COR file.
Therefore, as the .COR file is produced by LSGMMW, CKW can only be run after LSGMMW has been
completed. The information regarding user-defined traverses is written to the .CHK in the format:
********************
TRAVERSE CLOSURE REPORT
SUM OF DISTANCES ALONG TRAVERSE IS
CLOSURE IN NORTHING (Y) =
.2 FT.
CLOSURE IN EASTING (X) = -12.6 FT.
1.87 MILES
BLUNDER DETECTION
5-4
GCDB-WG-TRN-V1.00-10262001
LINEAR ERROR OF CLOSURE IS
12.6 FT.
LINEAR ERROR OF CLOSURE (AFTER ROTATION) IS
.6 FT.
STANDARD PRECISION IS 1/
781.
AFTER ROTATION PRECISION IS 1/
16702.
STATIONS IN TRAVERSE
500546-940070-940080-940090-940100-940110-940120-940130-940140-940150
940160-940170-940180-940190-940200-500504-
********************
In this manner, the user can perform specific traverses that may not be included in the .GEN file. This is
particularly useful in complex data sets where a problem has been localized, but could be due to any of a
number of individual surveys that are tied to each other such as mineral surveys. Generally, it is advisable to
perform closed traverses of such types of surveys any time WinGMM processes indicate they may the source
of problems.
LSGMMW
Technique: Viewing .ADJ for analysis of the least squares adjustment.
LSGMMW produces an .ADJ file. The .ADJ file is the most valuable file for analyzing the data set. It lists
input measurements in the same order as the .LSA file, how much it adjusted (residual), how much you
expected it to adjust (error estimate) and most importantly for you right now, the "snoop" number. The
snoop number is the residual number divided by your error estimate. Assuming error estimates are
reasonable, when a measurement adjusts more than three times as much as you expected, there is a high
probability this measurement is a blunder and LSGMMW will put asterisks to either side of the snoop
number in the .ADJ file. The higher the snoop number, the higher the probability of blunder but, to maintain
consistent format of the .ADJ file, snoop numbers can never be higher than 9.9. Low snoop numbers can be
an indication of poor error estimates and can result in statistically invalid data adjustment. Optimal snoop
numbers are between 0.5 and 1.0 but generally, snoop numbers up to 3.0 are not considered cause for undue
concern.
The .ADJ file starts by listing some very important information regarding the least squares adjustment of the
data set:
HEADER INFORMATION - Information regarding the overall data set including the datum the data was
processed in, coordinate units, projection, network (average) elevation used, number of relevant
measurements input and generated, and a multiplier needed to derive a 95% positional confidence of the final
coordinates error values.
RESULTS OF ADJUSTMENT - A listing of all point identifiers, their adjusted coordinates, and
information regarding the statistical quality of each point based on the least squares adjustment.
Following this section of overall information, the .ADJ file contains very important information regarding
individual measurements in the data set:
CONTROL POINT COORDINATES - The control portion of .ADJ lists point identifiers, how much the
control point was adjusted (residual), the input estimated quality (error estimate), and a snoop value in
northing and easting for each control point used and looks like this:
CONTROL POINT COORDINATES
BLUNDER DETECTION
5-5
GCDB-WG-TRN-V1.00-10262001
STATION
NORTHING (Y) NORTHING (Y) EASTING (X) EASTING (X)
RESIDUAL
EST. ERROR
RESIDUAL EST. ERROR
100100
-7.309 ( .2) 30.000
43.951 (1.5) 30.000
100200
-5.818 ( .2) 30.000
25.101 ( .8) 30.000
100500
40.152 (1.3) 30.000
-10.616 ( .4) 30.000
(repeat for every control point used in the adjustment)
At the bottom of the control section of the .ADJ file, a listing of the average adjustment, average snoop
value, and maximum adjustment in northing and easting is listed and looks like this:
NORTHING CONTROL RMS = 25.257 SNOOP RMS = 1.1
MAX. NORTHING RESIDUAL AT 600100
OF 64.569
EASTING CONTROL RMS = 32.390 SNOOP RMS = .8
MAX. EASTING RESIDUAL AT 500300
OF 69.382
DISTANCES - The next section of the .ADJ lists information regarding every distance input consisting of
From point identifier, To point identifier, input distance, how much that distance was adjusted (residual), a
snoop value, and the input error estimate and looks like this:
MINIMUM DISTANCE RESIDUAL PRINTOUT =
.000
DISTANCES
OCCUPIED
STATION
SIGHTED
STATION
700100
700200
700200
700300
700300
700400
(repeat for every distance)
DISTANCE
5280.000
5280.000
5280.000
RESIDUAL
.012 ( .0)
-1.538 ( .2)
-.011 ( .0)
EST. ERROR
6.224
6.224
6.224
At the bottom of the distance section of the .ADJ file, there is a listing of the average adjustment, average
snoop value, and maximum adjustment of the entire data set that looks like this:
DISTANCE RMS ERROR =
2.335 SNOOP RMS = .7
MAX. DISTANCE RESIDUAL 700600
- 700640
OF
10.621
The overall snoop value listed here is a very important value. In the vast majority of data sets, it is desirable
to have a snoop value between 0.5 and 1.0 here. This would indicate confidence that, on an overall basis, the
user has input valid error estimates for the distances in the data set.
BEARINGS - The next section of the .ADJ lists information regarding every bearing input consisting of
From point identifier, To point identifier, input bearing, how much that bearing was adjusted (residual), a
snoop value, and the input error estimate and looks like this:
MINIMUM BEARING RESIDUAL PRINTOUT =
.0 SECONDS
BEARINGS
OCCUPIED
STATION
700100
SIGHTED
STATION
700200
MEASUREMENT
( D-M-S )
N 0- 0- 0E - 0- 0-11 ( .2)
RESIDUAL
( D-M-S )
ERROR EST.
0- 1- 0
BLUNDER DETECTION
5-6
GCDB-WG-TRN-V1.00-10262001
700200
700300
700300
700400
(repeat for every distance)
N 0- 0- 0E
N 0- 0- 0E
0- 0- 2 ( .0)
0- 0-13 ( .2)
0- 1- 0
0- 1- 0
At the bottom of the bearing section of the .ADJ file, there is a listing of the average adjustment, average
snoop value, and maximum adjustment of the entire data set that looks like this:
BEARING RESIDUAL RMS = 0- 0-12 (D-M-S) SNOOP RMS = .3
MAX. BEARING RESIDUAL 700700
-600700
= 0- 0-55 (D-M-S)
As with distances, in the vast majority of data sets, it is desirable to have a snoop value between 0.5 and 1.0
here. This would indicate confidence that, on an overall basis, the user has input valid error estimates for the
bearings in the data set.
RAWW
Technique: Prepares unadjusted .RAW data for graphical viewing on your screen. It also writes data
inconsistencies into the .CLS file.
Despite the best efforts, human nature is such that sometimes relatively minor errors are made in data entry
that will result in an adjustment that cannot be analyzed using normal WinGMM processes. When problems
like lines missing from your .RAW file, mis-numbered point IDS, wrong quadrants, transposed numbers and
other hard to find mistakes in your textual files exist, you may use RAWW to get a graphical representation
of what your .RAW and .CON files look like. The WinGMM program RAWW produces the RAW.LSA file
that can be used to actually get the picture, and a .CLS (closure) file, which is an ASCII report of common
data entry errors.
DXFW
Technique: Store data in a graphic file so it can be displayed or plotted.
DXFW will give you more flexibility because you can import the picture into any software capable of
reading a .DXF file. There are many ways to view, print, plot or even edit the picture from these graphic
programs. A printout of a .DXF file can even be made through Word Perfect.
DXFW has several options to select from in creating a .DXF file. When looking for a blunder during
abstraction of the raw data it is best to use coordinates and lines from the .LSA file. For a view of the final
WinGMM product, it is best to use coordinates from the .COR file and lines from the .LXN file. DXFW is
an invaluable tool for determining if APROPW correctly created all polygons in a township, by using
coordinates from the .COR file and lines from the .LXN file. After a region has been merged with
FORMLSA, DXFW can be used to create a .DXF file using coordinates and lines from the .LSA file. Then
the region can be graphically inspected for a proper merge of township boundaries.
LSMINW
Technique: Track down blunders in plat data.
The program LSMINW performs a least squares adjustment using a single control point. This allows
statistical analysis based solely on information in the .RAW file. As most surveys are required to close
within certain limits, use of low error estimates can identify extremely minor errors in data entry. LSMINW
is also useful in identifying and handling platting blunders where required closures were not met or there
were discrepancies between the plat and the notes. Finally, introduction of multiple control coordinates in
BLUNDER DETECTION
5-7
GCDB-WG-TRN-V1.00-10262001
LSGMMW, allows us to identify errors in the survey not reflected by the plat resulting in the ability to
generate truly useful error estimates of the survey data and the geographical positions generated from that
data. For the purpose of this analysis, LSMINW outputs the .MIN file containing identical information as in
the .ADJ file with the exception of the sections on RESULTS OF ADJUSTMENT and CONTROL POINT
COORDINATES.
SNOOPER
All of the blunder detection tools discussed so far were designed to do overall analysis of a complete data set
on a township basis. In the vast majority of situations, these overall data sets are comprised of data from
several different sources. Using a vastly over-simplified example, it is conceivable a data set containing 50
measurements with a Root Mean Square (RMS) value of 5.0 and 200 measurements with a RMS of 0.0 could
yield an overall RMS of 1.0 leading to a false statistical validation.
SNOOPER is a program developed in FORTRAN by California GCDB staff whose purpose is to provide
analysis of individual sources of data based on the Source Identifier (SID) field of the .RAW file. Data from
the .ADJ file is gathered for each separate source and a mean actual adjustment by source is computed. This
is an extremely powerful tool for refining errors.
After computing the mean actual adjustment for each source in an overall data set, SNOOPER compares
each individual measurement of that source data and calculates a RMS by dividing the actual adjustment of
individual measurements by the mean adjustment it just calculated. Individual measurements which are
adjusted more than twice the mean are written to a .JNK file that looks like this:
B100300
B100340
B236400
B220400
D200300
100340 R03120363 N 5- 3- 0W
3-12-13 (1.6
100400 R03120363 N 5- 3- 0W
3-12- 4 (1.6
220400 R03120363 N 83-18- 0W
3-47-41 (1.9
200400 R03120363 N 83-18- 0W ** 6- 6- 1 (3.1
200400 R03120363 5280.000 *** -33.122 (3.1
Note each line starts with a "B" or "D" indicating whether the measurement is a bearing or distance, followed
by the "from" and "to" point IDS, The SID, the input data value from the .RAW file, the actual adjustment
from LSGMMW, and the snoop value from the .ADJ file. Each measurement listed in the .JNK file should
be checked against the original source data for data entry errors.
STRATEGIES
Following is a routine using all of the processes above. Because there are so many processes that allow the
user to identify errors, it is left to the user to decide which ones work best for them.
STRATEGY: TRACKING DOWN BLUNDERS IN RAWW DATA
1) Run INRAWW using a single point of control, GEN, LSGMMW and SNOOPER. If the CHI Squared
value at the bottom of the .ADJ file is very high or LSGMMW fails to run, you will probably want to
run RAWW and input the resulting RAW.LSA file to check the .RAW and .CON data.
2) Check any measurements listed in .JNK against the original source data and correct any data entry errors
found. If errors are found, return to step #1.
3) Run DXFW with coordinates read from the .COR file and lines from the .LSA file. Import the resultant
BLUNDER DETECTION
5-8
GCDB-WG-TRN-V1.00-10262001
.DXF file into any program capable of reading a DXF. Note the above options cause lines to be
drawn in separate colors by the source ID in the .RAW and .SID files.
4) Copy the project .SID file to ORIGINAL.SID and then copy the .SNO file created by SNOOPER to the
project .SID file.
5) Run INRAWW using a single point of control, GEN, LSMINW, LSGMMW and SNOOPER.
6) Check any measurements listed in .JNK against the original source data and correct any data entry errors
found. If errors are found, return to step #5.
7) Review the .GEN file for section closures and obvious LINK traverse problems.
8) Review the .ADJ file and look for asterisks. Check RMS and maximum values for distances and
bearings. With a single point of control and error estimates based on step 4, these values should be
between 0.5 and 1.0 and the CHI Squared test will probably pass.
9) If there are asterisks or RMS values and CHI Squared do not fall within the limits above, use PROJECW
to turn robusting on. Run LSGMMW and robust twice on distances and twice on bearings to
localize problems.
10) If there is an indication of problems in areas involving complex non-rectangular data, use CKW to
perform specific traverses in those areas. Review the .CHK file to identify misclosures and check
that data against the original source correcting any errors found. If errors are found, return to step
#5.
STRATEGY: TRACKING DOWN BLUNDERS IN CONTROL DATA
When you are satisfied data entry blunders have been eliminated, you are ready to introduce an independent
check of the plat information in the form of all available control. As with the steps above to eliminate errors
in the plat data, it will be left to the individual user to determine which steps in the process below should be
run on a regular basis.
1) Copy the ORIGINAL.SID created in step 4 above to the project .SID file.
2) Run INRAWW using all available control, GEN, LSGMMW and SNOOPER. If LSGMMW won't run
or the solution diverges, you have bad control data of some kind. Run RAWW to find the error. If
there are no apparent errors, set robusting on in PROJECW and robust twice on control to localize
the problem keeping in mind robusting must not be used in deriving a final LSGMMW adjustment.
3) Review the .ADJ file to analyze how much each control point was moved, RMS values for control,
distances and bearings, and the CHI Squared test. Also look for asterisks.
4) Review the .REP and .JNK files created by SNOOPER. Note that each run of SNOOPER appends the
results to the end of this file and so contains a history of what has been done and the effects on the
data.
5) As errors in control are found and addressed, return to step 2. Any errors in RAW data that weren't
found in the previous strategy for tracking down those blunders, will rarely (not never) justify
rerunning that process.
In many cases, the survey and control data support each other. When this happens, no control point will
move more than it's estimated error, all RMS values will be acceptable and the CHI Squared test will pass.
BLUNDER DETECTION
5-9
GCDB-WG-TRN-V1.00-10262001
When survey and control data do not support each other, some professional judgment is required to
determine where the errors are. Properly interpreting results in these cases requires knowledge about plat
data and control data. The more you know about both types of data, the easier your judgment will be. The
question is, where is the corner? In many cases, you can't be sure unless someone goes to the field and
verifies the true location of the corner.
If a single digitized control point is "way off" and a recent survey has to bend a great deal to fit it in, you
might conclude the control coordinates are in error and you can comment out that piece of control. Be aware
that eliminating control coordinates is tantamount to saying the plat data is correct. Again, unless you have
intimate knowledge of the survey or control data, it is difficult to make such a statement. Furthermore, by
eliminating the control point, there is no longer anything to indicate there may be uncertainty and error
estimates on the coordinates generated by LSGMMW will not reflect this.
In a similar situation where you have reason to doubt the accuracy of the survey, such as a survey performed
prior to 1900, you may choose to loosen the survey data error estimates to stop excessive movement of the
control point. The most difficult decision in these cases is determining where the errors in the survey data
might be. In the case of a section corner, are there errors in all lines into and out of the control point or is
there an error in only one of those measurements? Robusting distances and bearings can be extremely useful
in resolving this dilemma. While lack of sufficient knowledge carries similar risks as elimination of control
in the previous paragraph, you have not eliminated the survey data so uncertainty you have associated to the
survey data is reflected in the error estimates on coordinates generated by LSGMMW.
The above discussion is not meant to confuse the reader but merely to outline the options and potential
pitfalls for handling these types of problems when they are encountered. These situations, while not
necessarily common, are also not rare. The most difficult decisions that must be made are when there is a
high degree of confidence in both survey and control data. Take for example the following real life data set:
An original survey of a township was executed in 1945 by an individual with a reputation of excellent survey
work. The 1945 brass caps were found by USGS and placed on a 7.5 minute quad dated in the late 1970's.
Our analysis of the survey data alone supports our knowledge of the excellent reputation of the surveyor, but
when combined with the digitized control, several of the digitized control points are moving in excess of our
estimated accuracy with the largest movement of 110 ft. at the NE corner of the township. We re-mount the
quad sheet and verify the coordinates of the control point. While we know even the best surveyors make
occasional mistakes, there is no reason to suspect this level of error by the surveyor. On the other hand, we
also know that USGS location of found corner symbols is generally of a much higher accuracy than indicated
in this data set.
Following the process above, after introducing the control data, we robust twice on control in LSGMMW
and, predictably, the error is localized to the control point at the NE corner of the township and the other
control points that were moving excessively are now consistent with the observed average quality of control
in the .ADJ file. In this particular case, as the corner in question is common to 3 other townships originally
surveyed in the same era, we defer final decision until those townships are completed. WinGMM processing
of those data sets supports the uncertainty of the control at the township corner but may not be considered to
be conclusive as there is no indication the adjoining original surveys visited the corner in question.
However, based on the preponderance of evidence the decision is made the control point is bad and it is
eliminated in the processing of all four townships, resulting in small error estimates on the corner in question.
So we made a decision, but is it the right one? Is that corner really in a significantly different position as we
are showing in GCDB? Have we done the user of GCDB any favors by eliminating the control and thus
"hiding" the uncertainty that exists. On the other hand, if we had kept the control position and let it affect
many dependent corners, would we be introducing uncertainty where none may exist? This is the dilemma
you will face in processing data through WinGMM. To finish this story, we did what is really necessary to
be sure and had the corner location verified by GPS. In this case, we made the correct decision as GPS
showed the corner to be actually located almost exactly the shift from the digitized coordinates.
BLUNDER DETECTION
5-10
GCDB-WG-TRN-V1.00-10262001
REFINING ERROR ESTIMATES
CHAPTER INTRODUCTION
Finding blunders in data sets as described in Chapter 5 is a very important part of the analysis process, but
we must also detect where our error estimates may need to be refined. You will notice that many of the same
tools are used for both detecting blunders and refining error estimates. This chapter describes the tools for
detecting and refining error estimates.
Examples requiring error estimate refinement:
Scenario 1: With initial survey data error estimates in a township and running through the LSGMMW
process you see 3 digitized control points have residuals of 240 feet or more in the .ADJ file. You
suspect the survey data.
Scenario 2: After robusting a data set, you find several E-W section lines have taken most of the error,
perhaps 500 feet or more.
Scenario 3: After importing a boundary from an adjacent township, the residual values on the boundary
become very high.
Scenario 4: After importing a boundary from an adjacent township, residual values get excessively high
on the lines running into that boundary.
When you have large error values showing up in either residuals or standard error of unit weight, this can be
due to 3 basic classes of problems.
1) Error estimates not truly reflective of quality
This is the situation where the WinGMM user has made estimates that are not consistent with the
actual data quality. A good example would be placing bearing error estimates of 10 seconds and 1
link on 1858 plat data when the survey was actually performed to 20 links per mile and 4 minutes.
Another example might be holding digitized control fixed if such control is closely spaced, etc.
Users should recognize that the original surveys of the public lands are known to contain many
errors due to many conditions among them hazardous terrain, low cost and low land values. In
difficult terrain it is not uncommon to find that the original surveyor did not run all the lines
reported, and since closures were not thus obtained they may not have detected other blunders,
usually in chaining, that affected the work. In some areas local magnetic attraction or steep side
slopes bias bearings.
2) Correctable blunders
WinGMM is extremely good at identifying problems with data, while it takes some experience to
ferret out some of the less obvious errors or blunders in the data, there are a number of methods and
tools provided in WinGMM to assist in this process. Examples of this class of problem are:
incorrect or bad control coordinates, incorrect entry of plat data, and incorrect or inconsistent point
naming. In all of these cases the blunder can and should be found and corrected.
3) Unresolvable blunders
REFINING ERROR ESTIMATES
6-1
GCDB-WG-TRN-V1.00-10262001
Sometimes, errors or blunders in data exist where it is very difficult or even impossible to determine
the exact location or nature of. These can fall into several classes:
Control: You digitized several found corner symbols off of a 7.5 minute quad and analysis indicates
that one of these points does not agree with the survey. You do not know if the USGS identified the
wrong point, misplaced a correct point on the quad, or the actual corner on the ground is where they
say and it is the survey that has a blunder in it. If you cannot go to the field to verify the location,
you may not be able to do much to find out what USGS did. Lacking any concrete knowledge of the
survey data, you must make a judgment call based on preponderance of WinGMM information.
Keep in mind that when the contract method of surveys was abandoned in favor of a civil service
approach, very rigorous quality control measures were put in place and, in the vast majority of cases,
adhered to. On the other hand, USGS places a 90% confidence on the placement of found corner
symbols on 7.5 minute quads and our analysis of hundreds of thousands of digitized found corner
symbols combined with survey data indicates a much better confidence level than that. By using the
procedure outlined in the chapter on Blunder Detection, WinGMM programs will almost always
provide a preponderance of evidence to help you make a decision. If not, you should presume the
control is good and proceed accordingly.
Surveys: Many older surveys and occasionally more recent surveys contain field blunders. In
addition, there are periods in history in which fraudulent surveys are known to have been performed
under the contracting system throughout the western United States. In fact, the unacceptably high
incidence of poor quality surveys was the main impetus behind abandoning the contracting system of
performing PLSS surveys in 1910. Some examples of blunders which you may encounter are
discrepancies between the notes and the plat, individual measurement blunders, fictitious closings,
invalid basis of bearing, ties and lines not actually run in the field, or reported random and true lines
that were in fact stubbed out.
These types of errors can be quite large and are often in areas where, for obvious reason, little or no
control has been identified. Without adequate control or significant additional information, it is very
hard to identify all these blunders. Again, you may not be able to justify going to the field to verify
suspected blunders in the survey. Where control is available, WinGMM's LSGMMW analysis
process will usually assist you in determining the most likely place such blunders are located. When
faced with a data set where there is little or no control, the user should be very wary of assigning
good error estimates to survey data especially on contracted GLO surveys. Lack of control, in and
of itself, is normally sufficient evidence to suspect the quality of those surveys. Fortunately, because
error estimates are dependent on error estimates and not just adjustments, your uncertainty will be
reflected.
Boundary transfers: The current GCDB data collection process allows individual township
computation with rigid coordinates from adjacent completed townships transferred in as control.
This leads to points of varying accuracy and uncertainty assigned no error as fixed control. Thus
1885 survey data and two digitized control points, used to compute the first township and known to
only be reliable to 100 feet, are held as perfect in the adjoining township. This violates the concept
of the least squares analysis being performed in the current township and almost always requires
placing more flexible error estimates on the boundary and lines closing into the transferred boundary
than are appropriate for those lines under normal circumstances.
This is an unfortunate byproduct of a rigid township boundary approach, it must be recognized and
dealt with, but basically you have to live with this as a necessary evil in the boundary transfer
regime.
Scenario 1: After making initial data estimates in a township and running through the LSGMMW process
you notice that 3 of your digitized control points have residuals of 240 feet or more in the .ADJ file. What
REFINING ERROR ESTIMATES
6-2
GCDB-WG-TRN-V1.00-10262001
should you do?
Scenario 2: After robusting a data set, you find several E-W section lines have taken most of the error,
perhaps 500 feet or more.
Unless you have reason to suspect your control, the problem is probably in the survey. Survey error
estimates are normally rigid relative to the weighting on digitized control. Thus a blunder in the survey
will `push' the control around. The proper solution is not to `tighten' the control error estimates, but to
loosen the overall survey error estimates or try to determine what lines the blunder most likely occurred
and assign those individual lines a lower error estimate `junk' SID.
One tool to do this is to use PROJECW to set robusting on and then robust your survey data in
LSGMMW twice on distances and evaluate the .ADJ file to see if the error becomes isolated to some
particular line(s). Robusting distances first is not a random decision but based on the fact that it is
generally easier to measure distances than bearings and if an error in an individual distance is made, it
tends to be relatively severe and thus more easy to isolate with a least squares adjustment. If no obvious
blunders in distances are found, robust twice on bearings. If you identify data that looks bad, create a
`junk' SID or sub-SID (see INRAWW below) with error estimates based on the actual adjustment in
.ADJ and edit the suspect lines in the .RAW file to that SID. If no obvious errors are found in bearings,
robust twice on control to see if the error becomes isolates in a particular control point. If all these steps
still fail to identify the error, you must assume the control is good and proceed accordingly. The goal is
to keep the residuals on any control used in an adjustment to within a reasonable proximity of your
original error values.
Scenario 3: After importing a boundary from an adjacent township, the residual values on the boundary
become very high.
Scenario 4: After importing a boundary from an adjacent township, residual values are excessively high on
the lines running into that boundary.
Both of these problems are by-products of holding transferred boundaries fixed. This logically requires
movement of survey measurements along or into the fixed corners. It must be recognized and dealt with
as an un-avoidable evil in the boundary transfer regime. One solution is to create a boundary transfer
SID or sub-SID (INRAWW) with a lower weight to place these lines into.
A more efficient and preferred approach to these scenarios is the regional adjustment as outlined in this
WinGMM User Guide - REGION.
As discussed, changing original error estimates on control should be avoided. While we attempt to put
legitimate error estimates on survey data to begin with, when the data conflicts, it is survey error estimates
that need to be refined. The following is a discussion of some of the specific WinGMM programs that can be
used to refine survey data error estimates.
LSGMMW
The summary at the bottom of the .ADJ file produced by LSGMMW looks like:
STANDARD ERROR OF UNIT WEIGHT IS
WITH 140 DEGREES OF FREEDOM
.933
CHI SQUARED TEST ON ANALYSIS
REFINING ERROR ESTIMATES
6-3
GCDB-WG-TRN-V1.00-10262001
.748 < .933 < 1.208
(LOW)
(HIGH)
PASSES AT THE 5 % SIGNIFICANCE LEVEL
The STANDARD ERROR OF UNIT WEIGHT (SEUW) is a special number. If your network adjusted
exactly as much as you estimated this number would be equal to 1.000. If the network adjusted more than
you estimated then this number will be greater than 1. On the other hand, if the data adjusted less than you
expected, this value will be less than 1. A general rule of thumb is if the SEUW is a less than 0.7, your error
estimates are probably too loose and if it is greater than 2.5, your estimates are probably too tight or there
may be blunders in your data. A large value can be a good indicator of the presence of large blunders
somewhere in the data. Only after any blunders have been removed is SEUW a valid indicator of your
overall error estimation.
The CHI Squared test is dependent on the Root Mean Squared (RMS) values of control, distances and
bearings contained in the .ADJ file. In addition, a SNOOP number for all three types of measurements that
shows the relative quality of error estimates on these data types is given. As with CHI Squared, a SNOOP
value of 1.0 is optimal with a range of 0.7 - 2.5 being consider acceptable. Unacceptable RMS and SNOOP
numbers may be indicative of blunders in data, but if the plat checks with the data in the .RAW file and the
residuals and snoop numbers are still too high or low, the associated error estimates for those measurements
should be refined.
The CHI SQUARED TEST ON ANALYSIS tests the standard error of unit weight at .05 (95 %) two-tailed
confidence level for the overall data set. If all individual RMS values are acceptable and CHI Squared passes
you probably have no large blunders and you did a very good job at error estimation. This is a very rigid
statistical test. For a further discussion of a Chi-Squared test refer to a statistics text.
If you are sure all blunders have been handled, RMS values for distances, bearings and control are
acceptable, and your data set fails CHI squared but is within the 0.7 - 2.5 range, do not spend time trying to
refine error estimates. Spending a lot of time tweaking error estimates to make the chi squared test pass is
unnecessary as it will make little difference in the final coordinates computed.
SNOOPER
The LSGMMW discussion above relates to the overall data set analysis. In most cases, WinGMM processing
involves data from several different sources. The program SNOOPER was developed by the BLM
California GCDB staff to read information from the .ADJ file produced by LSGMMW and analyze data for
each source within the overall data set. Analysis of each source along with critical information discussed in
LSGMMW above is written to the .REP file. This allows the user to analyze and refine error estimates for
each individual source. The .REP file is appended to in multiple runs of SNOOPER providing the user a
history of the processing and refinement of error estimates for a township. SNOOPER also provides some
blunder detection capabilities. For a more complete discussion of SNOOPER, refer to the WinGMM
Software User Guide SNOOPER AND REGSNOOP.
NOTE: While WinGMM programs allow for SID values up to 16 characters, SNOOPER only allows for 10
characters in the SID value. If you choose to use SNOOPER, this must be accounted for and
dealt with appropriately.
INRAWW
The error estimate refinement process consists of a cycle of INRAWW, GEN, LSGMMW, analysis of
results, blunder detection, and error estimate refinement if necessary. This cycle of events may need to be
REFINING ERROR ESTIMATES
6-4
GCDB-WG-TRN-V1.00-10262001
repeated several times. If analysis indicates a need to edit error estimates for a data source, the SID
MAINTENANCE option within INRAWW is selected followed by selection of the EDIT SIDS option. A
list of SIDs from the .SID file is offered and the user chooses the SID to be edited whereupon INRAWW
enters into a prompting cycle for each component of that SID. If no change is desired for a particular
component of the SID, the user accepts the existing value by simply pressing return. Upon exit from
INRAWW, the user is ready to complete the cycle by running GEN and LSGMMW and then perform
analysis of the results again.
To change error estimates for a single individual measurement (blunder), it will be necessary to place a
unique error estimate on that individual measurement. This is a two-step process of editing the SID value in
the .RAW file and creating a corresponding error estimate in the .SID file. To edit the SID value in .RAW,
choose the RECORD DATA MAINTENANCE and EDIT RECORD INFORMATION options in
INRAWW. Locate the target record(s) by using the listing function and edit their SID value. Next, use the
SID MAINTENANCE and EDIT SIDS options to create a new SID. Many users choose to use the original
SID value to indicate the original source. So a record that originally had a SID of 1893 might be given a SID
value of 1893J. If an error is made in this process and a corresponding SID from .RAW is not found in the
.SID file, error estimates are assigned based on default error estimates set in PROJECW and a SID is
appended to the bottom of the existing .SID file indicating this happened. Any SID value from the .SID file
that is not found in the .RAW file has no effect on the adjustment nor is this situation identified in any output
file.
REFINING ERROR ESTIMATES
6-5
GCDB-WG-TRN-V1.00-10262001
SUBDIVISION OF SECTIONS - APROPW
CHAPTER INTRODUCTION
After the adjustment process is complete it is time to subdivide the sections. The goal in subdivision with
PCCS was to produce coordinates of the subdivision points. In WinGMM the main goal is to record the
procedures used in subdividing each section and save the procedures as a future template for subsequent
rerunning of the subdivision program (APROPW). The coordinates are temporary byproducts that change
with each readjustment of the network. The lines file, .LXN, is another byproduct of APROPW. The .NOT
file is a list created by the user of lines and points that are not to be included in the lines file.
When APROPW is run, it calculates the parentheticals and subdivides the sections with standard rules,
utilizing normal GCDB IDS. Sometimes WinGMM will not recognize unusual situations and will compute
incorrect procedures for creating some points, but you can anticipate these situations. If WinGMM
recognizes that an unusual situation exists, it will decide that it cannot or should not compute coordinates for
the affected corner points.
APROPW expects you to tell it how to treat unusual situations. Interpreting some plats can be complex, but
once you have determined what rules are used to subdivide any section, then it is a simple matter of
communicating those rules through APROPW's interactive prompts. APROPW stores the results of your
interaction in three data files; .IRR, .ADD and .NOT. APROPW (and other yet unwritten programs in the
upcoming NILS) will automatically subdivide sections of finished townships using the information in .IRR
and .ADD. There are no more prompts for future users.
SUBDIVIDING NORMAL TOWNSHIPS
A normal section has no lotting against interior lines, no subdivision lines closing onto special surveys and
no offset lines (exterior or interior). The normal section is neither foreshortened nor elongated.
To subdivide a normal section you will run APROPW, then when the main menu appears, choose <6>
PROPORTION AND QUIT - <3> UPDATE .COR, .GEO, & .PGC FILES WITH GENERATED
STATIONS. Refer to WinGMM Program Reference, APROPW for step-by-step instructions. Review the
.SUB file to verify that everything happened correctly. Refer below to the topic INTERPRETING THE
.SUB FILE. That is all there is to it.
SUBDIVIDING NON-NORMAL TOWNSHIPS, .IRR AND .ADD FILES
The .IRR file is populated with rules you specify using APROPW's (1) EDIT/INPUT NON-STANDARD
SECTION BREAKDOWN INFORMATION. The .ADD file is populated with rules you specify in
APROPW's (2) ADD EXTRA COMPUTATIONS.
REFINING ERROR ESTIMATES
7- 1
GCDB-WG-TRN-V1.00-10262001
Figure 7-1
Figure 7-2
Figure 7-3WHAT .IRR IS USED FOR: The situations that pertain to the .IRR file:
Normal rules are used for subdivisions involving aliquot corners that have non-normal GCDB IDS. Section
corners on offset lines and triple section corner situations apply here. See Figure 7-1, above.
REFINING ERROR ESTIMATES
7- 2
GCDB-WG-TRN-V1.00-10262001
Normal GCDB IDS that should not be computed using normal rules. Corners that do not exist
(foreshortened sections) and corners that should be computed using a specific method are the two main
examples. See Sections 5 and 17 in Figure 7-2, above. Remember, APROPW will not compute coordinates
for a point that already has coordinates.
Normal rules are used for corners that have normal GCDB IDS, but must be put in at proportions that are not
discernable from the .RAW file. Examples: Sections that are lotted against an offset interior line.
Parenthetical distances where section centerlines are not at geometric midpoint are computed correctly by
Version 1.00 of WinGMM. See Figure 7-3, above.
WHAT .ADD IS USED FOR: All remaining situations.
The .ADD file stores the results of a GCDB-customized coordinate geometry (COGO). It can compute
corners at a specified or proportioned distance and along a specified or computed bearing, such as parallel or
weighted mean bearing. It can compute intersections. It can compute either geodetically or it can treat the
data as if it is on a plane.
If you assign a point ID like 620640 or 440440 to a corner, then that point will be used to control subsequent
subdivision processes.
Non-computables: Sometimes corners exist that would be computed wrong if the section was subdivided
using "normal" rules. First you tell the .IRR file that these corners are "non-computable", and then you put
the correct solutions in the .ADD file. Otherwise APROPW might generate wrong coordinates for these
corners, and then will ignore your instructions on how to compute them correctly. Reason: APROPW will
not compute a corner whose coordinates already exist.
An example non-computable corner is the N 1/4 corner of sec 2, corner 540700 from Figure 7-2 above. In a
case like this you want to define 540700 to be at intersection of the N boundary line (543700-503700) with
the weighted mean bearing from 540600. APROPW would normally compute 540700 at midpoint easting
between 500700 and 600700 and on the N boundary line, which is not exactly right with such a large bearing
of the N line. You would define 540700 to be non-computable. Then, after computing 540640 at
intersection (weighted mean bearing from 540600)(500640-600640), 540700 can be computed as an
intersection of the N boundary with the N-S centerline through 540640.
What happens in this example. When you leave APROPW with the <8> PROPORTION AND QUIT - <3>
UPDATE .COR, .GEO.... option, the .ADD file is read and all corners in it will be computed if possible.
Corner 540700 will not be one of those corners since 540640 has not been computed. APROPW then reads
the .IRR file and computes all the subdivision corners including 540640 (only the .IRR file can specify
weighted mean bearing or parallel) and all corners dependent on it. Now the .ADD file is read again and it
can compute 540700 by extending a line through 540640 (only the .ADD file can do intersections with nonaliquot lines such as the N boundary. What happens if you reenter APROPW with readjusted section corner
coordinates? GEN and LSGMMW will flush out all the old subdivision coordinates. You resubdivide by
running APROPW. It will either subdivide the township automatically through <8> PROPORTION AND
QUIT or it will await any more entries to the .IRR and/or .ADD. Your previous work is intact until you
choose to edit it.
WHAT APROPW DOES The order in which calculations takes place is important.
COMPUTES CORNERS SPECIFIED IN .ADD, IF POSSIBLE:
APROPW reads the .ADD file to see if there are any corners that it can generate using what information is
available. Many corners you put in the .ADD file depend on corners that will later be generated through
information from the .IRR file. There may not be enough information at this point to perform all the
REFINING ERROR ESTIMATES
7- 3
GCDB-WG-TRN-V1.00-10262001
processes in the .ADD file. The order in which the processes are entered in the .ADD file is not significant.
COMPUTES PARENTHETICALS:
When you start APROPW, it reads both the .COR file and the .RAW file. It will look for irregular distances
on lines closing into the township lines i.e. the existence of xxx120 xxx660 120yyy 660yyy IDS in the .RAW
file. APROPW will then use these parenthetical distances to compute the proportion of the 1/16ths on the
section centerline going into the boundary.
READS .IRR FILE:
The .IRR, if it exists, contains the data where you specified which corners not to compute, which corners to
use to control the subdivision and where to put proportioned corners.
COMPUTES REMAINING CENTER 1/4s
All center 1/4s that were not in the .RAW file or the .ADD file and not specifically excluded by you through
the .IRR file, will get computed at intersection of center of section lines.
COMPUTES REMAINING EXTERIOR 1/16ths
All 1/16ths along section lines that were not in the .RAW file or the .ADD file or not specifically excluded
by you through the .IRR file will get computed at midpoint.
COMPUTES REMAINING CENTERLINE OF SECTION 1/16ths
All 1/16ths along the centerline of sections that were not in the .RAW file or the .ADD file and not
specifically excluded by you through the .IRR file will get computed at midpoint or at the proportion that
was computed from the parenthetical distances.
COMPUTES REMAINING 1/16ths.
All NE, SE, SW, and NW 1/16ths that were not in the .RAW file or the .ADD file or not specifically
excluded by you through the .IRR file will get computed at intersection of lines between the appropriate
1/16th corners.
COMPUTES REMAINING CORNERS SPECIFIED IN .ADD.
APROPW reads the .ADD file again to see if there are instructions on how to compute any more corners. At
this point APROPW is ignoring the functionality of the corners and ignoring rules of subdivision; it just
computes corners as you have specified.
WHAT YOU DO
AUTO-AUTOIRR option:
(4) AUTOMATIC PRELIMINARY NON-STANDARD BREAKDOWN OF ALL SECTIONS
First. We have the option of using the AUTO-AUTOIRR to give us a quick, automatic creation of the entries
in the .IRR file. This is just APROPW's first guess, yet it is a very good guess and will suffice for almost all
situations. See Table 1 below and WinGMM Program Reference, APROPW.
1) Examine plat for any unusual situations. Tell APROPW how to do it.
Table 1 Plat Unusual Situations
REFINING ERROR ESTIMATES
7- 4
GCDB-WG-TRN-V1.00-10262001
UNUSUAL SITUATION:
WHERE IN APROPW TO REMEDY THE SITUATION:
a)Offset lines.
(1) EDIT/INPUT NON-STANDARD SECTION
Non-Normal
(2) STATION NAME SUBSTITUTIONS
IDS act as full sec. corners.
Refer to Fig 7-1, S23.
You tell APROPW the IDS to use.
b)Offset lines.
Junior corners need offset to line.
(1) EDIT/INPUT NON-STANDARD SECTION
Refer to Fig 7-1, S4.
(9) DEFINE PROPORTIONED STATIONS
c) Triple sec corners. 2 corners each control 1
direction.
You list the IDS of corners to move.
Refer to Fig 7-1, S33.
(1) EDIT/INPUT NON-STANDARD SECTION.
d) Quarter corner does not exist for a 1-mile
(3) DEFINE DOUBLE SECTION CORNERS
line.
Refer to Fig 7-2, S17.
List IDS, which direction they control.
e) Foreshortened section or Special Survey
cuts thru sec. Some corners do not exist.
Refer to Fig 7-2, S5
NOTE: Once a corner is
non-computable, the
corners whose positions
IT controls will not be
computed.
f) Exterior parentheticals are not normal.
Refer to Figure 7-3.
g) Elongated section
Refer to Figure A-6, Appendix A.
(1) EDIT/INPUT NON-STANDARD SECTION
(4) QUARTER CORNER EDIT
List the ID of the non-computable corner
(1) EDIT/INPUT NON-STANDARD SECTION
(5) CENTER OF SECTION EDIT
or (6) EXTERIOR SIXTEENTH EDIT
or (7) INTERIOR SIXTEENTH EDIT
or (8) CENTER OF QUARTER SECTION EDIT
List the corners that should not be computed
(non-computables).
(1) EDIT/INPUT NON-STANDARD SECTION
(7) INTERIOR SIXTEENTH EDIT.
You must determine the parenthetical distances of the
section centerline and specify them here.
There are two choices:
-manually as follows
(2) ADD EXTRA COMPUTATIONS
(3) INPUT ADDITIONS
(1) TRAVERSE/PROPORTION
(2) GENERAL INTERSECTIONS
You must input computations to compute the necessary
proportions and intersections.
-automatically as follows
(2) ADD EXTRA COMPUTATIONS
(3) INPUT ADDITIONS
(5)AUTOMATIC ELONGATED SECTION
COMPUTATIONS
You follow the necessary prompts.
INTERPRETING THE .SUB FILE
This file contains valuable information for QA/QC. The .SUB file is a report file that can be viewed or
REFINING ERROR ESTIMATES
7- 5
GCDB-WG-TRN-V1.00-10262001
printed for inspection/verification that the proper procedures were performed in APROPW. The .SUB file
contains a report of each irregular calculation, add calculation and calculated parentheticals.
When errors are found in the .SUB file the user will return to APROPW and edit the section(s) containing
errors.
Using a text editor to view the .ADD file will also point out data entry blunders that might otherwise be hard
to detect.
AUTO INTERSECTION AND POPULATING THE .NOT FILE
The WinGMM software incorporates the AUTO INTERSECTION program as an automatic subroutine of
the APROPW program. This subroutine identifies and computes the point of intersection of all lines, which
haven’t previously been created in the .add file. The .LXN file is utilized and updated during AUTOI. It
also creates an .INT file which list the newly computed intersections and the point id string of every polygon
in the township. This subroutine allows the user to realize significant time savings with respect to computing
intersections, especially if a township contains multiple special surveys. AUTO INTERSECTION utilizes a
unique point id naming convention with point IDs starting at 950100, 950101, 950102,...etc. The user may
edit the point id numbers in the .ADD file in order to satisfy point id standards for their GCDB database.
AUTO INTERSECTION is to be utilized as a QC step for the collection process, as there should be zero
intersections identified at the end of the subroutine when the creation of the subdivision template is complete.
The intersections generated by AUTO INTERSECTION must be inspected to assure their desirability, as
undesired intersections are indicators of problems with the template.
Points and lines used in the adjustment or subdivision are not always parcel lines. Examples of unwanted
points and lines are 1) ties to special surveys, 2) ties to control, and ties between non-sequential corners.
Including these lines in the .LXN file causes two annoyances:
1) The unwanted points and lines are distracting when viewing the file in a graphic environment
(AutoCAD, AutoSketch) - these lines are not on the survey plats.
2) AUTO INTERSECTION treats these unwanted lines as parcel boundaries, creating intersection points
and breaking parcels into too many polygons, where it is inappropriate to do so. A user, during the
QLINK process, would just have to recombine the polygons into the proper parcels.
Refer to (5) INPUT/DELETE "NOT" FUNCTIONS in WinGMM Program Reference; APROPW for an
explanation of how to populate the .NOT file with a list of unwanted points and lines.
USING AUTOIRR, AUTO-AUTOIRR, AND AUTO-ELONGATION
APROPW can derive a great deal of intelligence out of the .RAW file by studying the point IDS and the
connectivity of the lines. It is possible to avoid a great deal of data entry by letting APROPW outguess what
your interaction would be to nonstandard sections.
AUTOIRR, listed in APROPW's (1) EDIT/INPUT NON-STANDARD SECTION BREAKDOWN
INFORMATION menu as (11) PRELIMINARY IRREGULAR IDENTIFICATION, will make an entry in
the .IRR file for the section that you are currently in. AUTO-AUTOIRR, listed on the main APROPW menu
as "AUTOMATIC PRELIMINARY NON-STANDARD BREAKDOWN OF ALL SECTIONS", will make
entries for all nonstandard sections including calculating and storing parentheticals for all sections lotted
against the exterior. It does not take out 1/4 corners and 1/16th corners on foreshortened sections. (Strategy:
Once AUTO-AUTOIRR has stored the parentheticals, you may remove the nonexistent corners without
having to calculate and force them into .IRR.) Note there are very unusual situations that AUTOIRR
REFINING ERROR ESTIMATES
7- 6
GCDB-WG-TRN-V1.00-10262001
functions are not able to treat properly - it is your responsibility to inspect the .SUB file for correctness and
to make appropriate changes through APROPW.
AUTO-ELONGATION, listed under (2) ADD COMPUTATIONS as (5) AUTOMATIC ELONGATED
SECTION COMPUTATIONS, makes entries into your .ADD file for all elongated 1/16ths for the prompted
section. There are certain conditions that must be met in order for AUTO-ELONGATION to generate
acceptable results: 1) All 1/16ths between the 1/4 corner and the township exterior must be left out of the
.RAW file, so the distance is the overall distance from the 1/4 corner to the township exterior. Or if the do
exist they must have point ID’s in multiples of 5; for example if the 1/4 corner is 140400 and the W 1/16th is
120400, the W 1/16 - 80 must be 115400. 2) The point IDS generated by AUTO-ELONGATION deviate
from the standard point ID scheme - they are all multiples of 5, for example a W 1/16 usually called 120400
might be given an ID of 130400. Refer to WinGMM Program Reference, APROPW.
SUBDIVISION STRATEGIES
As stated earlier, the WinGMM software has been designed to create a template for the subdivision of each
township. The template is the combination of .IRR , .ADD, and .NOT files, and once created will
automatically subdivide the township on subsequent runs of the program APROPW. It is important to keep
in mind a few collection concepts when creating the initial template. For while the perceived goal is to
recreate digitally the official survey record, integration into LR2000 is equally important, and sometimes
these goals are conflicting. For example,(refer to attribution examples) when the official record identifies
lotting against mineral surveys, the polygons created by WinGMM should match the record. LR2000 always
deals in the concept of nominal parcels and polygons are either all or parts of nominal parcels. Nominal lines
are the lines that segregate the aliquot parts of any section (1/16th, 1/4, and section lines). For the survey
record, those aliquot lines do not exist within mineral surveys. So in the example described, the strategy for
creating the subdivision template would be to identify the lots, the mineral survey, and the nominal lines.
Currently, the WinGMM software has limited functionality that respect to recreating the correct template for
all intersection situations. The options for general intersections include either bearing input or bearing
defined by two point ids, excepting the subroutines for editing center of section and center of quarter
sections. Those subroutines have the options of projecting lines, which are parallel to a line defined by point
ids, or weighted mean of two lines defines by point ids. With general intersection, parallel or weighted mean
bearings methods are accomplished either by using CSTUF to determine the post adjustment bearing (which
must be recalculated subsequent to each adjustment)or by using the record bearing from the plat(which is not
correct, due to adjustment.
Creating the template for elongated sections has become automated (wizard) in. It was formerly a manual
process of inputting additional computations. Often each user kept a generic .add for the most frequently
occurring elongated situations, and edited to get the correct distances in the file. With the automated function
the prompting cycle leads the user through the necessary parameters, but the user is forced to follow the point
id naming convention of the wizard. If the user requirements demand a different point id naming convention
for the elongated 1/16ths, then the process must be accomplished manually.
REFINING ERROR ESTIMATES
7- 7
GCDB-WG-TRN-V1.00-10262001
REGIONAL ADJUSTMENT OF DATA
FORMLSA
Data collection in a township by township (piece by piece) approach, complete with township boundary
transfers is a convenient way to collect data. It does however lead to buildup of systematic error in results.
In order to eliminate that systematic error and to define a more meaningful reliability, a larger data set should
be analyzed. The ideal situation is to readjust all data each time changes are made to the data set, but this
may end up with some management problems due to the size of the generated data sets. Someday, we may
have computers powerful enough to allow all of a principle meridian to be run at once. FORMLSA allows
one to merge .LSA township files into one correctly merged data set for simultaneous analysis.
The purpose of merging the data from the individual townships, into a region, is to obtain edge match and get
the best possible coordinate values from the least squares adjustment. By merging townships it increases the
amount of redundancy on township exterior boundaries.
Edge match between regions is obtained by including townships from a previously processed region in the
new region. These are called FIXED townships. The boundaries of the fixed townships are held as FIXED
CONTROL. This means the edges of these townships will not adjust in the new region and will retain the
regionally adjusted coordinate values from their adjustment in the previously adjusted/processed region.
When determining what townships should be held fixed, it is important to look at the number of control
points and their array in a region. Quality of survey data may also be a determining factor. Just remember
that the township files being used for the fixed boundary must be from the previously adjusted region and
contain regional coordinate values. The TARGET townships should be from either the individual township
adjustment or the previous region’s results. The fixed and target townships, that are from a previous regional
adjustment target area have previously been merged and should merge with no problems. The most common
reason for an incorrect merge between them, is that single adjustment townships are being used for the
FIXED townships. Once all the data is merged correctly with FORMLSA the data set is adjusted with
LSGMMW. FORMCOR is then run to parse the newly computed coordinate data back to the individual
township .PGC, .COR and .GEO files. The .LSA file’s coordinates (bottom of the .LSA) are also updated by
FORMCOR. The reliabilities in the .PGC files are those generated during the adjustment of the individual
townships. To obtain reliabilities that are common to adjacent townships FORMREL has to be run.
FORMREL calculates the reliabilities using all of the data surrounding a township, based on user input
search area and Standard Error of Unit Weight (SEUW).
PREPARING THE INDIVIDUAL TOWNSHIP DATA FOR MERGING
The first time that townships are merged into a region, the coordinates used are from the adjustments of the
individual townships. Because FORMLSA uses coordinates for a search area, the coordinates of adjacent
township boundaries have to be close in value to each other. When these values are too great the merge
tolerance, which determines the search area, has to be so large that it causes merge problems in other areas of
the region. Therefore, an individual township’s data must meet certain requirements. These requirements
are easily met when each township has been correctly analyzed and has the appropriate error estimates.
The most important requirement is that the RAW data of a township’s exterior boundaries is exactly the same
data as the adjacent township’s exterior boundaries. This includes that the direction of lines are identical.
The value of error estimates of one township should be similar to the adjacent township’s error estimates,
especially if surveyed by the same surveyor or within the same time frame using similar survey methods and
instruments. Small discrepancies in error estimates within a township for the interior subdivision lines have
a minimal influence on the adjustment of exterior boundaries. If there is a large discrepancy, the interior will
have too much influence on the exterior boundaries and the townships will not merge properly with
FORMLSA and/or the adjustment may fall outside of acceptable limits. Large differences in error estimates
can also cause difficulties in the order that townships are merged.
REGIONAL ADJUSTMENT
8-1
GCDB-WG-TRN-V1.00-10262001
- No Buffer
Originally, the concept of regional adjustments was one of adjusting and merging the coordinates of a set of
townships within a given geographic location to get the best possible coordinate values from the least squares
adjustment. This is still the goal, but often the results tend to be that the townships with the least control
and/or least accurate control tend to adjust the most within the region. This is especially true for the
peripheral townships of any given region. Buffer townships around the periphery are used to lessen this
effect and provide better coordinate values within the target region. Sometimes this is not possible, as along
a state boundary or a boundary of unsurveyed lands. Regions with no adjoining fixed boundaries and no
buffers are still produced as necessary and are still the best possible coordinate value results from the least
squares adjustment of the region.
- With Buffer
Buffer townships should merge correctly with the other buffer and fixed townships with no problems, and
their boundaries with the new region’s townships should be checked for RAW data and error estimate
problems. In other words, the buffer townships are treated exactly the same as any of the townships within
the target region. The buffer townships serve to provide redundancy for the target townships exterior
boundaries. One difference is that the final coordinate results for buffer townships are not retained, but will
be recomputed at a later date when these townships are included in another, adjoining regional adjustment.
Note: See the description and figure under, “MERGING THE INDIVIDUAL TOWNSHIP DATA,
FORMLSA”, for an explanation of FIXED, TARGET and BUFFER townships.
MERGING THE INDIVIDUAL TOWNSHIP DATA, FORMLSA
FORMLSA uses a command file called .HOW, instead of .HW, which controls the merging of the .LSA
files. The .HOW file is created with a text editor and should consist of a list of the townships, one township
per line, to be included in the region. Buffer townships should also be included, along with the townships
that their boundaries are to be fixed against. Those fixed townships are placed below the word FIXED.
Using the below diagram, an example of the .HOW would look like this (Italics are comments):
T05SR91E
T05SR92E
T05SR93E
T05SR94E
T06SR91E
T06SR92E
T06SR93E
T06SR94E
NOREL
T05SR95E
T06SR95E
T07SR91E
T07SR92E
T07SR93E
T07SR94E
T07SR95E
FIXED
T04SR90E
T04SR91E
T04SR92E
T04SR93E
T04SR94E
Target Tp.
Target TP.
Target TP.
Target TP
Target TP.
Target TP.
Target TP.
Target TP.
Buffer Tp.
Buffer Tp.
Buffer Tp.
Buffer Tp.
Buffer Tp.
Buffer Tp.
Buffer Tp.
REGIONAL ADJUSTMENT
8-2
GCDB-WG-TRN-V1.00-10262001
T04SR95E
T05SR90E
T06SR90E
T07SR90E
FORMLSA DIAGRAM
If all the townships have the correct RAW data and error estimates, then the order of the .HOW file is not
usually important. However, some unusual offsets between townships may dictate the order. Trial and error
is the only way to find the best order in these circumstances. The order of FIXED townships has not been
found to be a problem.
NOTE: Townships that each contain only a single point from the other will NOT merge at that point. From
the above example diagram, if the townships were ordered in the .HOW file, like below, the 700100 point of
T06SR92E will NOT merge with the 100700 point of T07SR93E.
T06SR92E
T07SR93E
T06SR93E
T07SR92E
The result being 2 coordinate pairs for the same point in the regional files. Even the merging of the other 2
townships does not fix the problem. So townships should NEVER be listed in the .HOW file in an order that
will try to merge them at only a single point, they must also include RAW data that is the same. In some
cases this requires including additional RAW data from adjacent townships in the RAW data of each. This
problem occurs even with control on the point.
REGIONAL ADJUSTMENT
8-3
GCDB-WG-TRN-V1.00-10262001
Adjusting a Region
1) A project name for the combined project must be defined and set to be the current job.
2) Create the .HOW file.
3) Run the program FORMLSA
FORMLSA identifies the common lines by coordinates and assumes all boundary checks have been
completed. FORMLSA merges data from the individual .LSA and .SD files. Using CMM's COMBIN
concept of if it is control in one and unknown in another, it becomes an unknown because it was only held to
keep coordinates consistent with some previous work. This is especially true with coordinates imported from
an adjacent township, which is done to give coordinates to a township that may not have control at all.
FORMLSA will properly recognize these imported points as NOT control; the regional adjustment will be
performed with only true control.
Since the error estimates for each township are similar, the order of the merge, defined in the .HOW file, is
not restricted. FORMLSA can then use either townships error estimates, in the .SD files, and the adjustment
will give satisfactory results.
FORMLSA also creates a file called region.MAT that is read by FORMCOR for creating the individual
township .COR files. region.MAT tells, as an example, what 700142 are in the combined .COR file.
FORMCOR thus also does not worry about offsets, etc. as everything is defined by region.MAT.
4) Run QCMAT to determine if the merge was successful. The lines shown in the display are those that
have merged.
NOTE – It is possible to make a DXF file from QC.LSA and view it in AutoCAD.
5) Run LSGMMW -- because of the size of these multi-township adjustments, the larger versions of
LSGMMW should be used on the PC. The version may also be dependent on the configuration of
the PC.
6) Run FORMCOR to parse out the individual township .COR files. FORMCOR will create .COR, .GEO,
and .PGC files for each individual township. FORMCOR uses the region.MAT file created by
FORMLSA to associate a township ID with a big adjustment ID. If you computed error analysis in
the big adjustment these are transferred to the proper .PGC file. The individual township .LSA file’s
coordinates are updated.
7) Follow the steps below to setup and run FORMREL. Run FORMREL when error analysis is turned off
or fixed boundaries were used. FORMREL calculates reliabilities for each township above the
NOREL line in the .HOW file and updates the reliabilities in their .PGC files. If properly setup
FORMREL will use the data from ALL townships in the region, including the townships used for
the FIXED boundaries, to calculate reliabilities for the target townships.
A)
Backup your .COR, .HOW, .LSA, .MAT, and .SD files by renaming them, i.e. .1CO,
.1HO, .1LS, .1MA and .1SD for future use.
B)
Reformat your .HOW file to include all townships, by deleting the “FIXED” line from it.
C)
Run FORMLSA to create a region that includes all townships being used. Insure that all
townships merged correctly, see 4 above.
D)
Copy your backup copy of .HOW to .HOW, i.e. copy .1HW to .HOW
REGIONAL ADJUSTMENT
8-4
GCDB-WG-TRN-V1.00-10262001
E)
Run FORMREL.
F)
Copy your backup files to their original names.
NOTE: A batch or script routine could be used to backup and restore files.
8) Run APROPW on the target townships to update township subdivisions.
SOLUTIONS TO COMMON MERGE PROBLEMS
Merge Tolerances
For FORMLSA to work correctly it is necessary to determine what would be the best merge tolerance to use.
A too small or large of a merge tolerance and the townships will merge with undesirable results. There are
several ways that this can be handled. One is to test, which is the best tolerance by running FORMLSA at
different merge tolerances, until it merges correctly. Another, is to always use a merge tolerance of 1500 feet
and when necessary use merge control to get correct merges. Any method that will get the data to merge will
work. FORMLSA is for creating a regional data set from the single township data and as long as the data is
merged correctly it is unimportant how it is accomplished.
Merge Control
Sometimes the quality of the RAW survey data is so poor it is almost impossible to merge townships. In
these cases it may become necessary to use MERGE control. MERGE control is temporary control that is
used to facilitate merging of townships. See Data Entry and Editing, AUTO-IMPORTING SELECTED
COORDINATES DATA FROM THE BOUNDARIES OF ADJACENT TOWNSHIPS - MERGE CONTROL,
for an explanation and WinGMM Program Reference, USING INRAWW TO ADD MERGE CONTROL FOR
FORMLSA MERGES, for instructions on it’s use. Merge control is a tool of last resort and should only be
used in those rare instances where error estimates could not be adjusted enough to take in account the poor
quality of survey data. It should never be used in areas of good quality survey data. If it is not merging in
those areas there is some other problem.
Crossing State Plane Zone edges
One problem that may be encountered is the use of files from townships that were processed in
a State Plane Zone that is different than the region being worked on. Use the program CHZONEW to change
the files of these townships to the appropriate zone. Refer to this document Chapter 9, “CHZONEW”, and
the WinGMM Software User Guide document.
FORMREL
The formrelw.exe program allows the User the ability to calculate the reliabilities of individual townships in
a region, where rigid control along regional boundaries was used, and to then replace a reliability of zero
with the actual reliability calculated in the regional adjustment. The results of the adjusted values are then
entered into the coordinate files for the individual townships after a regional adjustment is completed.
REGIONAL ADJUSTMENT
8-5
GCDB-WG-TRN-V1.00-10262001
WinGMM UTILITIES
Using WinGMM utility programs
WinGMM utility programs are described in this chapter. Each of these program's input and output
requirements are described below with a statement of the purpose of the program. To START: Select the
desired operation from the main Windows® pull down menu.
SORTLSAW
Input files: .SD, .LSA
Output files: .LSA, .LSB, .SD, .SDB
Batch mode program that will backup your existing .SD and .LSA files to .SDB and .LSB, then restructures
the .SD and .LSA files to the structured format required by LSGMMW. This program need only be run if
GEN reports that your file has been corrupted. If such a condition exists, you will be instructed to run setup.
COMPARW
Input files: .COR, .PGC (optional)
Output file: user - defined name, often called .OUT
During the computation process, one is provided with many choices that will result in different coordinate
values. This program will allow the user to quickly see the difference in coordinate values from two input
.COR files. For example, one may choose a certain adjustment tactic, compute a .COR file with LSGMMW,
then desire to play a 'what if?' strategy to try different weighting, different control, etc. COMPARW would
then be invoked to report the effect of the new strategy. Another example could be when 'what if?' strategies
are used in the subdivision process. This program reports the coordinate difference for each point found in
both files.
When different adjustment strategies are being tried, be sure to rename your .COR file to some convenient
filename because rerunning LSGMMW or APROPW will overwrite your project .COR file automatically.
Another option in COMPARW is to compare coordinates from a .PGC file. Any combination can be used, 2
.COR files, 2 .PGC files, or one of each.
UTMW
Input files: .DEF, .COR
Output file: .UTM
UTMW reads the zone number from the .DEF file, point id's and coordinates from a .COR file. It produces
an .UTM file that is equivalent to a PCCS U-file. This is a batch process requiring no user input.
TOLXNW
Input files: .LX, identical to the "L" file of PCCS
Output file: .LXN
UTILITIES
9-1
GCDB-WG-TRN-V1.00-10262001
TOLXNW reads the .LX file and generates an .LXN file. The .LXN file is about 8% of the size of the .LX
file and will be used in WinGMM.
GETLXW
Input files: .LXN
Output file: .LX, identical to the "L" file of PCCS
GETLXW reads the .LXN file and generates an .LX file. The BETA version of DXFW.LSA required the
.LX format for making graphics of subdivision lines. Version 3.00.000 DXFW require the .LXN instead.
NODUP
Input files: .RAW PCCS 'R' file
.PGC PCCS 'P' file
TEMP.JOB for project name
Output files: .RA2 The original RAW file, backed up
.RAW The WinGMM format RAW file, no duplicates
.DUP The report file of NODUP's activities
The purpose of NODUP is to find identical coordinates in a coordinate file and assign them all one GCDB
ID. This automates the conversion of PCCS data into WinGMM standards.
CHGIDS
Input files:
All project files defined by CHGIDS.CFG
Output files: All project files defined by CHGIDS.CFG
This is a simple program to allow you to globally change GCDB IDs on the default project's files. It uses a
file called CHGIDS.CFG to define valid file extensions to check. It would be wasteful, if not
destructive, to change things in binary files. When you first invoke
CHGIDS, without a CHGIDS.CFG in the current directory, it will return a file error, but then will create a
default file. In most cases this file will be adequate, however you may edit it to add any special files you
may generate or delete ones you do not want to change.
WARNING: This program changes PIDs with no test for existing or incorrect PIDs, therefore be sure to
backup your job before using it, and check it afterward.
The program is mouse driven but you can also navigate with the tab and
enter keys.
CHGIDS will skip files whose extensions are not in the CHGIDS.CFG file.
The program will only change PIDS that are:
* at the beginning of a line, or
* at the end of a line, or
* have a leading or trailing space, or
* in an LXN file are located at proper multiples of 6 characters along the line of IDs.
UTILITIES
9-2
GCDB-WG-TRN-V1.00-10262001
CAUTION:
NEVER use CHGIDS on regional files. Change them at the single township level, the next time that
township is included in a regional adjustment it will use the new PID. The single township will also now
use the new PID.
CHZONEW
Input files
.DEF, .PGC
Output files: .LSA, .COR, .DEF
The purpose of CHZONEW is to allow regional adjustment edge match across State Plane Zones.
CHZONEW works the same as PROJECW and any changes made will change the .DEF files definitions.
When a menu item is selected to change, CHZONEW first goes to the zone selection menus. If only
changing the zone select (4). When existing CHZONEW, DO NOT change the project. When CHZONEW
is exited, the plane coordinates of the selected zone are calculated. The .LSA and .COR files are updated
with those plane coordinates. This allows FORMLSA to be used across zone boundaries. Some townships
may have to be converted back to their original zones after regional adjustment.
CMM2GMM
Input files:
CMM project.COR
CMM project.DEF
Optional files:
CMM project.LEV
CMM project.CHN
Output files:
WinGMM project.RAW
WinGMM project.CMM
WinGMM project.LSA If coordinates imported as control.
WinGMM project.SD If coordinates imported as control.
user filename If chain file did not exist.
When CMM2GMM is invoked, it uses a chain file or user input to determine which PID’s are the end points
of each survey line. It then uses the CMM project.COR file to inverse between these points, and determine
Bearing and Distances to create a project.RAW file.
A chain file is an ASCII text file that is a list of PID’s to be read from the CMM .COR file for inversing
between. The order of the chain file determines the inverse. Each chain must end in a 0 (zero)line.
Example Chain file:
100100
100140
100200
.
.
and intervening stations with WinGMM PIDs
UTILITIES
9-3
GCDB-WG-TRN-V1.00-10262001
.
.
100640
100700
0
200100
200140
.
.
and intervening stations with WinGMM PIDs
.
.
200640
200700
0
etc., thru all stations with WinGMM PIDs
GCONW
Input files:
.COR
.DEF
.CON
CONUS.LAS
CONUS.LOS
NAD27.CON NGS file
NAD83.CON
Optional files:
NGS file
NGS file
NGS file
.GEO
If .GEO is missing, it will be built from .CON
.LSA
.SD
.SID
.PGC
.AN
.IID
.LX
ASCII list of townships
Output files: The existing WinGMM Input and Optional files are updated based on the new datum.
When GCONW is invoked, the coordinates in the existing WinGMM Input and Optional files are converted
either from NAD 27 to NAD 83, or from NAD 83 to NAD 27. GCONW reads the .DEF file to determine
which way to go. GCONW input is either form the keyboard or from the optional ASCII list of townships.
The .CON file will get both NAD27 and NAD 83 coordinates, which are labeled as such. Projects can go
from NAD 27 to NAD 83, and others can go from NAD 83 to NAD 27 in the same run.
Note: The existing project files are wiped out as the transferred data replaces it.
An Example of ASCII township list:
T03NR17E
T03NR18E
T03NR19E
T03NR20E
UTILITIES
9-4
GCDB-WG-TRN-V1.00-10262001
T03NR21E
T04NR17E
T04NR18E
T04NR19E
T04NR20E
T04NR21E
GCONW will run thru the list reading the .DEF file of each project to determine which DATUM to convert
to. As it does a conversion it changes the .DEF file DATUM to the proper DATUM. If a project is in the list
twice, it will first convert it to one DATUM and then back to the original DATUM.
GCONHPW
Input files:
.COR
All files created from GCONW
.DEF
.CON
.GEO
.LSA
.SD
.SID
.PGC
.AN
.IID
.LX
(state or region).LAS
NGS file
(State or region).LOS
NGS file
NAD27.CON NGS file
NAD83.CON
NGS file
Output files: The existing GCONW produced files are updated based on the new datum.
When GCONHPW is invoked, the coordinates in the existing GCONW produced files are converted either
from NAD 83 to HARN, or from HARN to NAD 83. When converting from NAD 27 to HARN, GCONW
must be run first, then GCONHPW. The .CON file will get HARN coordinates, which are labeled as such,
as well as NAD27 and NAD 83 coordinates produced with GCONW. Unlike GCONW, GCONHPW can
only convert from NAD 83 to HARN or vice versa in one run.
In order to convert WinGMM data to HARN, GCOMHP requires specific state or region HARN .las and .los
files. These files can be downloaded from the NGS web site. While running GCONHPW these files have to
be defined (see first PROMPT below). They are then saved in a file HARN.INF, until you elect to use a
different one.
Note: The existing project files are wiped out as the transferred data replaces it.
An Example of ASCII township list:
T03NR17E
T03NR18E
T03NR19E
T03NR20E
T03NR21E
T04NR17E
T04NR18E
UTILITIES
9-5
GCDB-WG-TRN-V1.00-10262001
T04NR19E
T04NR20E
T04NR21E
GCONHPW will run thru the list reading the .DEF file of each project to determine which DATUM to
convert to. As it does a conversion it changes the .DEF file DATUM to the proper DATUM. All projects in
NAD 27 must first be converted to NAD 83 with GCONW before they can be converted to the HARN
datum. Therefore all projects in the list must be in NAD 83.
CSTUF
The cstuff.exe program is a utility that performs coordinate geometry calculations on coordinates that exist
within the .cor file for any given project. Cstuff.exe requires a .def, and .cor file in order to operate.
QCMAT
The qcmatw.exe program creates QC.LSA, QC.COR, and QC.INF (Report) from Region .LSA and .MAT
files. This is a similar quality control tool as used by formlsaw.exe that can be used to view matches and
mismatches between exterior project boundaries.
UTILITIES
9-6
GCDB-WG-TRN-V1.00-10262001
LINKING GCDB TO THE LLD
LINKING THEORY
The purpose of the WinGMM Linking process is to support the BLM=s Legacy Rehost 2000 (LR2000)
system. It is not within the scope of this chapter to explain LR2000. This chapter will explain the linking
process and only include information regarding LR2000 that pertains to linking. For a more in depth
dissertation of LR2000 contact the BLM office of your choice.
One component of LR2000 is a product called Legal Land Description (LLD). The LLD file contains basic
land information regarding the polygons found in a given township. The BLM has other title information
tied to the LLD, such as information regarding mining claims, status of the land and so on. All of this
information, including LLD, will be used to populate LR2000. GCDB is the PLSS spatial component of
LR2000, basically the geographic coordinates of corners, and how the lines between the geographic
coordinates should be connected. Note that some of the GCDB data is attribute information that, like LLD,
is not of a spatial nature. The PLSS coordinates and lines from GCDB are used to define polygons for the
PLSS. The correlation between the LLD and GCDB will give LR2000 the >link= to a spatial product needed
to determine where the LR2000 attribute information is located in the United States, and enable graphical
depiction of this data, hence the term linking.
UNDERSTANDING THE PORTION OF LLD NECESSARY FOR LINKING
It is not necessary to have a complete understanding of LR2000 and subsequently LLD to complete the
linking process. It is only necessary to know the parts of LLD that need to be correlated to GCDB polygons
to support LR2000, i.e. LLD polygon data. Below is a sample of a portion of LLD, followed by an attempt
at explaining it.
000000 08 0030E 0520N 010 A ,,,,, ,, XXXXXXXXXXXXXXXX 00640000 , ID 079 01 06 48 00
10010600/////
000000 08 0030E 0520N 011 A ,,,,, ,, XXXXXXXXXXXXXXXX 00640000 , ID 079 01 06 48 00
10010600/////
000000 08 0030E 0520N 006 A ,,,,, ,, ,,XX,,,XX,,XXXXX 00360000 , ID 079 01 06 48 00 10010600/////
000000 08 0030E 0520N 006 L 1,,,, ,, X,,,,,,,,,,,,,,, 00025350 , ID 079 01 06 48 00 10010600/////
000000 08 0030E 0520N 006 L 2,,,, ,, ,X,,,,,,,,,,,,,, 00025300 , ID 079 01 06 48 00 10010600/////
000000 08 0030E 0520N 006 L 3,,,, ,, ,,,,X,,,,,,,,,,, 00025250 , ID 079 01 06 48 00 10010600/////
000000 08 0030E 0520N 006 L 4,,,, ,, ,,,,,X,,,,,,,,,, 00021670 , ID 079 01 06 48 00 10010600/////
000000 08 0030E 0520N 006 L 5,,,, ,, ,,,,,,X,,,,,,,,, 00034560 , ID 079 01 06 48 00 10010600/////
000000 08 0030E 0520N 006 L 6,,,, ,, ,,,,,,,,,X,,,,,, 00034790 , ID 079 01 06 48 00 10010600/////
000000 08 0030E 0520N 006 L 7,,,, ,, ,,,,,,,,,,X,,,,, 00035020 , ID 079 01 06 48 00 10010600/////
000000 08 0030E 0520N 006 H 804,, ,, ,,,,,,XXXX,,,,,, 00070930 D ID 079 01 06 48 00 10010600/////
The first two lines contain a portion of LLD for two sections that are all aliquot with no special surveys or
lots in them. This represents an example of LLD for a section in its simplest form. Notice the sixteen X=s,
they represent the sixteen portions of a normal section broken down to the one-sixteenth or forty-acre parcel
level. The rest of the lines represent a section that contains some forty-acre aliquot parcels, some lots, and a
special survey (HES 804.) To understand where the sixteen meaningless X=s fall in a section, and to
facilitate their use in the linking process, it is necessary to decipher them with the sixteen letters A-P, A for
the first X and P for the last. The following diagram (Figure 10-1) depicts which aliquot part of a section the
X=s fall in, this is referred to as a nominal location.
LINKING
10-1
GCDB-WG-TRN-V1.00-10262001
F
E
B
A
G
H
C
D
J
I
N
M
K
L
O
P
FIGURE 10-1
COMBINING GCDB AND LLD WITH THE .AN FILE
The final product of the linking process is the .AN file. This file contains a centroid, or area point, for
GCDB generated polygons, along with part of the information found in LLD. A centroid is a point (node)
that is located within a polygon. It is not necessary for the centroid to be centrally located within a polygon,
it is only necessary for the centroid to fall somewhere completely in the polygon. Below is an example of an
.AN file for section 6 of the same township as the previous example of LLD above.
Sec_006 A T_L 1
25.350; M08T0520NR0030E 475322.3578 1160703.3912
Sec_006 B T_L 2
25.300; M08T0520NR0030E 475322.3573 1160722.8508
Sec_006 C T_A
40.000; M08T0520NR0030E 475311.7160 1160722.8250
Sec_006 D T_A
40.000; M08T0520NR0030E 475311.7212 1160703.3765
Sec_006 E T_L 3
25.250; M08T0520NR0030E 475322.3723 1160742.3046
Sec_006 F T_L 4
21.670; M08T0520NR0030E 475322.3739 1160800.4082
Sec_006 G T_H 804 N_D 70.930; M08T0520NR0030E 475311.6426 1160800.3922
Sec_006 G T_L 5
34.560; M08T0520NR0030E 475311.6426 1160800.3922
Sec_006 H T_A
40.000; M08T0520NR0030E 475310.7549 1160745.4111
Sec_006 H T_A
40.000; M08T0520NR0030E 475311.6993 1160742.2464
Sec_006 H T_H 804 N_D 70.930; M08T0520NR0030E 475310.7549 1160745.4111
Sec_006 G T_L 5
34.560; M08T0520NR0030E 475317.2489 1160800.3780
Sec_006 I T_A
40.000; M08T0520NR0030E 475258.6644 1160742.2087
Sec_006 I T_A
40.000; M08T0520NR0030E 475304.5981 1160750.9985
Sec_006 J T_H 804 N_D 70.930; M08T0520NR0030E 475302.0830 1160800.3897
Sec_006 J T_L 6
34.790; M08T0520NR0030E 475258.8009 1160800.3698
Sec_006 J T_L 6
34.790; M08T0520NR0030E 475302.0830 1160800.3897
Sec_006 K T_L 7
35.020; M08T0520NR0030E 475245.6312 1160800.3637
Sec_006 L T_A
40.000; M08T0520NR0030E 475245.6460 1160742.1613
Sec_006 M T_A
40.000; M08T0520NR0030E 475258.6949 1160703.3712
Sec_006 N T_A
40.000; M08T0520NR0030E 475258.6817 1160722.7948
Sec_006 O T_A
40.000; M08T0520NR0030E 475245.6621 1160722.7720
Sec_006 P T_A
40.000; M08T0520NR0030E 475245.6768 1160703.3788
LINKING
10-2
GCDB-WG-TRN-V1.00-10262001
The .AN file contains a single line for each GCDB PLSS polygon, as opposed to the LLD format where
multiple polygon=s are represented on one line. The .AN file contains section number, the nominal A-P
letter, survey type, survey number, survey note if it exists, acreage, principle meridian code, township, range,
and lastly the SPC=s of the centroid.
The .AN file is the >link= between the GCDB and the LDD. This is what linking is all about, allowing
alphanumeric parcel data to be associated with spatial data from GCDB to support LR2000. The theory
behind all of this is to start with GCDB lines and points of the PLSS, convert the lines and points to
polygon=s, determine a centroid for the polygon, and define which line and nominal location it is associated
with in LLD.
LINKING PROGRAM ORDER
The linking programs must be executed in proper sequence as one program creates files that the next
program reads. The order in which these programs are run is: GETLLD, ROPLY, LLD. An explanation of
each of the linking programs can be found below.
Before the linking programs are run an .LLD file containing LLD for the project township must be created
from the >master= LLD, which is a file that contains LLD for the entire state. The township.LLD file must
be in the directory containing the rest of the GCDB township files for the township to be linked.
GETLLD
Input file: township.LLD
Output file: .LOT
GETLLD prompts for the extent and direction (N. ,S. , E. , W.) of elongation for each lot, by section number,
in townships that contain elongated sections. GETLLD runs in batch mode if the elongated section scenario
does not exist in a township. GETLLD reads the .LLD file and makes a lot file. The .LOT file contains
section number, the numbers 1-16 for the A-P nominal locations, identifies elongation and how it is
elongated, the lot number if it exists, the acreage, survey type, and survey number.
RPLOY
Input file: .COR, .DEF, .NOT, .RAW
Output file: .RPO
RPLOY runs in batch mode, there are no interactive prompts. RPLOY reads the .RAW file and creates
polygon=s from the abstracted survey measurements, and annotates the polygons as S (standard), I (inny), or
O (outy). A standard RPO polygon is a section or fractional section with no special surveys in it. An inny
RPO polygon is a polygon which encloses a special survey of some type (HES, Tract, Mineral Survey, etc.),
abstracted lots in normal sections are not inny=s. An outy RPO polygon is a remainder polygon created
when a special survey invades or extends into another section and does not enclose the entire special survey.
LLD
Input files: .COR, .DEF, .INT, .LOT, .RAW, .RPO, .SID
Output files: .IID, .AN
LLD runs in batch mode, there are no interactive prompts. LLD is the most important and complicated of
the suite of linking programs. The .IID file LLD creates is large and cumbersome to edit manually. LLD
reads the files indicated above and for each polygon computes a centroid and post adjustment area. LLD
LINKING
10-3
GCDB-WG-TRN-V1.00-10262001
then utilizes the area and PID=s for the polygon to match them with the appropriate corresponding data in the
other files it reads. All of the matched data is parsed out to the .IID file to create a parcel report of each
polygon with information that is needed for that polygon. LLD also includes a statistical type of report at the
end of the .IID file regarding each section and the entire township. The last thing LLD does is to make an
.AN file.
VERIID
Input files: .INT, .IID
Output file: .VER
VERIID checks to see if a previously linked township has to be linked again after the township is readjusted.
VERIID prompts for a centroid distance tolerance. VERIID reads an old .IID file and compares the new
polygon PID’s with the old polygon PID’s to see if they still match, differences are reported in the .VER file.
VERIID checks to see if the old centroid still falls in the new polygon, and compares the distance between
the old and new centroid for a polygon to see if it exceeds the centroid distance tolerance. If the centroid
distance tolerance is exceeded VERIID reports this in the .VER file. VERIID updates all the new centroids’
in the .AN and .IID file for all polygons that have the same PID’s and have an old centroid that still falls in
the new polygon. VERIID can also be utilized to create an .AN file from an existing .IID file.
DXFW
The dxfw.exe program, which creates Drawing Interchange Format (dxf) files, has evolved from individual
creation programs (one for Least Square Analysis, one for Raw Polygons, one for all polygons, and one for
LX file conversion) to a pull-down, menu-driven program allowing the user different options for final
drawing output. In addition to the new menu items, the ability to change text height, add raw data, and draw
error ellipses continue to be menu driven.
AN2IID
Input files: .DEF, .COR, .INT, .AN
Output files:.IID
The an2iidw.exe program converts PCCS attribute (.AN) files to .IID file format. Since GMM is now the
official collection software for GCDB, and because WinGMM requires an .iid file for maintenance of the
attribution of legal land descriptions within a given project, this program performs a conversion that will
allow maintenance of attributes in the future. The program reads .DEF, .COR, .INT, and .AN files.
If there is mismatch between the .INT and .AN files, the program stops and warns the User and is then
prompted to press the ENTER button to continue. The offending parcels are then labeled with the word
“ERROR” in the .IID file. Searching with a text editor to find the word “error”, within the .IID file will
inform the User of possible conflicts. If AN2IID does not stop it is assumed that no conflicts exist between
the .AN and .INT files.
AN2GLD
Input files: .AN
Output files: .GLD
The an2gld.exe program converts a previously created .AN file to the newly identified GCDB Legal Land
Description (GLD) file. The .GLD file contains a number of new entity fields, such as discrepancy, acreage
source, conflict, and validation codes, which are populated with null values when this program is run. These
LINKING
10-4
GCDB-WG-TRN-V1.00-10262001
new entity fields will be populated with actual data once the National Integrated System is deployed.
LINKING
10-5
GCDB-WG-TRN-V1.00-10262001
APPENDIX CONTENTS
Appendix A - GCDB Naming Conventions………………………………………………..A-1
Appendix B - File Formats for WinGMM Data Files………………………………………B-1
Appendix C – Glossary…………………………………………………………………….C- 1
APPENDIX
GCDB-WG-TRN-V1.00-10262001
APPENDIX A - GCDB NAMING CONVENTIONS
TOWNSHIP NAMING CONVENTION, Eight-Characters
A normal township would be called T23NR07W. If a township or range has a fraction, has a value over 100
or a combination of the above, the T or R is replaced with a letter code. If there is a duplicate or triplicate
township, the R is replaced with a letter code.
Some townships have a duplicate or even triplicate. The township that has its SE township corner closest to
first the baseline, then the principal meridian (if necessary to further differentiate), will get a normal letter
code. The next closest gets a duplicate letter code and the next closest after that gets the triplicate letter code.
The following quick reference chart and cross reference chart shows the letter codes to use and crossreferenced examples.
Quick Reference Chart: What character replaces the T or R:
No frac
<100:
1/4
2
3/4
Duplicates
Triplicates
Q
H
L
A
B
>100<200
C
D
E
F
G
I
>200<300
J
K
M
N
O
P
Cross-Reference Chart for various BLM Township Naming Conventions:
Survey Plats/
Notes:
=
WinGMM:
= LR2000 DED: = PCCS R file:
T 22 N, R 1 W = T22NRO1W = 0220N0010W = R22N01W
T 22 N, R 1 E = T22NRO1E = 0220N0010E = R22N01E
T 14 N, R 4 W = T14NRO4W = 0140N0040W = R14N04W
T 112 S, R 6 W = H11SRO6W = 0112S0060W = R112S06W
T 152 S, R 223 W = H15SQ22W = 0152S0221W = R152S221W(too big)
T 109 N, R 13 E = C09NR13E = 1090N0130E = R109N13E
T 1092 N, R 13 E = E09NR13E = 1092N0130E = R1092N13E(too big)
T 106 N, R 224 W = C06NJ24W = 1060N2240W = R106N224W(too big)
T 1013 N, R 226 E = D01NJ66W = 1011N2660E = R1011N266W(too big)
T 1002 N, R 1002 E = E00SE00E = 1002S1002E =R1002S1002E(too
Big)
Some townships defy standard rules, like "Sec. 17 of T. 11 N., R. 2
E. above the river" and "Sec. 17 of T. 11 N., R. 2 E. below the river". In cases like this, define a letter code
that has not been used.
STANDARD TOWNSHIP, includes townships with offset boundary lines
APPENDIX A
A-1
GCDB-WG-TRN-V1.00-10262001
GCDB uses a point identification scheme that assigns a six-digit point identifier to each corner of a
township relative to its position in the township. Each point identifier has two halves: the first three digits
are an x-coordinate and the second three are a y-coordinate (XxxYyy).
The point identifiers for the section corners are incremented up in the x and y directions (west to east and
south to north) by the number of whole miles they are away from the southwest corner of the township. This
affects the hundreds-place, i.e. the first of the three digits of each point id pair (XxxYyy). As an example,
100200 is the southwest corner of section 30, one mile north (y-direction) of 100100. Refer to Figure A-1 Township showing ID numbering for full section corners.
Corners that are not full section corners are incremented by the number of whole chains they are away from
the southwest corner of the section. This affects the tens-place or second digit of each pair (XxxYyy). For
example, 120600 is the west sixteenth corner of the section line between Sections 6 and 7 and is 20 chains
away from the
section corner, 100600. Refer to Figure A-2 - Section 8 with GCDB IDs down to the 1/16th level.
The third digit (XxxYyy) or ones-place in the x or y coordinate has special functionality in the postprocessing functions. The recommended values for these are:
0 a rectangular corner point. Example: 160660 is the NE 1/16 corner of Section 6. The standard point
identifier for a section corner indicates that the corner is a maximum interior control section corner common
to four sections. Refer to Figures A-1 and A-2.
1,2,8 or 9 (i.e.,1 or2 from a rectangular corner)
is used for offset corners no matter what the actual distance of the offset, usually on the interior of the
township. The database will default to the value for interior offset section corners. See Figure A-4 - GCDB
IDs for offset corners in township interior.
3 or 7 (i.e.,3 from a rectangular corner)
is used for offset corners no matter what the actual distance is of the offset, usually on the boundaries of a
township. APROPW will determine that these are corners, angle points, etc. from adjacent townships. See
Figure A-3 - GCDB IDs for offset corners along township exteriors.
3, 4, 6 or 7 (i.e.,3 or4 from a rectangular corner)
A 3, 4, 6 or 7 may also be used when assigning point identifiers to elongated section subdivision corners and
to corners at the intersection of special survey lines with rectangular lines. See Figure A-6 and Figure A-8.
5
is used for 1/256th corners.
Currently, provisions for subdivision below 1/256th corners are not part of the GCDB ID rules. If such
parcels are surveyed, the corners should be assigned IDs similar to intersections with special survey
APPENDIX A
A-2
GCDB-WG-TRN-V1.00-10262001
Figure A-1 – Township With GCDB ID Number For Full Section Corners
Figure A-2 – Section 8 With GCDB ID’s to the 1/16th Level
APPENDIX A
A-3
GCDB-WG-TRN-V1.00-10262001
Figure A-3 – GCDB IDs For Offset Corners Along Township Exteriors = +/- 3
Figure A-4 – GCDB IDs For Offset Corners in Township Interior = +/- 2
Figure A-5 – GCDB IDs For Triple Section Corners
APPENDIX A
A-4
GCDB-WG-TRN-V1.00-10262001
Figure A-6 – GCDB IDs For Elongated Sections
Figure A-7 – GCDB IDs For Shortened Or Missing Sections And Milepost Surveys
APPENDIX A
A-5
GCDB-WG-TRN-V1.00-10262001
Figure A-8 – GCDB IDs For Special Surveys = +/-3 or +/-4
Each XxxYyy has a prefix, Xxx, and a suffix, Yyy.
X and Y start at 1 and increase by miles east or north.
xx and yy increase by tens of chains within each mile.
The one's place (Xxx or Yyy) is reserved for:
0 a rectangular corner point.
1,2,8 or 9 1,
2)
( offset corners in Tp interior.
3 or 7 3)
(
offset corners on Tp boundaries,
3,4,6 or 7 3,
4)
( intersection with special surveys.
5 for 1/256th corners.
SUMMARY
Point Identifier Standards
In summary, location-based numbering is used along lines of the rectangular system. The point identifier, a
six-digit number, is constructed of two three-digit sets. The first three digits pertain to the East and West
direction only and should progress from the West boundary of the township in increasing values to the East
boundary of the township. The second three digits of the point identifier pertain to the North and South
direction only and should progress from the South boundary of the township in increasing values to the North
boundary of the township.
NONSTANDARD TOWNSHIPS, includes offset interior lines, Triple Section Corners, elongated sections,
shortened sections.
To develop the point identifier for triple section corners and any other odd situations, keep in mind the dual
purpose of the ID system:
1) To define the corner's function. WinGMM anticipates that you will follow the rules for naming GCDB
IDs. This speeds up data entry (INRAWW) and automatic subdivision (APROPW).
2) To define the corner's general position along a line. This helps us quickly differentiate among several
angle points; the software is not reliant on the numbering system.
If you must use a non-standard ID for a corner that plays a part in subdivision, then you must later tell the
software what the corner's function is. Refer to the Subdivision chapter. The only thing you have lost is that
APPENDIX A
A-6
GCDB-WG-TRN-V1.00-10262001
the software couldn't AUTOMATICALLY figure out what it needs to know.
Offset Interior Lines, see figure A-4
A great deal of time, confusion and some disk space can be minimized with a new variation on the point ID
scheme for offset interior corners. There is no longer any need to place1 or2 values on both the prefix and
suffix, nor is they’re a need to make both IDs non-nominal. You may now choose one side to be the
"normal" section with nominal IDs and put the offset IDs on corners for the adjacent section to indicate the
relative position from the "normal" corner. There is no need to indicate which side the corner controls,
AUTOIRR can determine that from connectivity.
Triple Section Corners, see figure A-5
Triple section corners are common for completion surveys. There is one corner that is a full section corner
for the "senior" section. One of the other two corners is a full section corner to the section to the side of the
"senior" section, but is only a partial section corner for the section corner on the diagonal from the "senior"
section; it controls proportions only along the line that closes into the "senior" section.
In Section 20 of figure A-5, corner IDs 200300, 200302 and 202300 are perceived by us and by the software
to be of section corner status. WinGMM's AUTOIRR function deduces the proper relationship of each of
these: 200300 only to the SW, 200302 a full corner to the NW, but only controlling to the North on Sec 20,
and so on. Using 200300 as the NE corner of Sec 30 means that there will not necessarily need to be an
entry in the .IRR file for Sec 30.
Elongated Sections, see figure A-6
Elongated sections are special cases of rectangular surveys. The corners should generally follow the
recommended rules listed above, but when the obvious values are exhausted it does no harm to use other
values. Preferred values are 103, 104, 107, 108 on the W and S elongations and 664, 666, 668, 672 on the N
and E elongations. Other possibilities are 105, 109, 111 and 662, 676, 678. See figure A-6 for examples.
Note that these 1/16ths can be left out if AUTO-ELONGATION is used.
Shortened Sections and Missing Sections, see figure A-7
Assign point identifiers to short sections using the standard section point IDs. See figure A-7 for an
example.
The standard point identifiers are also used for townships missing sections. See figure A-7. If a township is
only 5 miles high, then use the point identifiers usual for that section.
SPECIAL SURVEYS, includes Tracts, Milepost Surveys and Mineral Surveys
You are advised to use the "rectangular" ID number where a special survey intersects or bounds the section
lines as described earlier 3( or4). See figure A
-8.
For the remaining survey corners, assign a six-digit GCDB "segment identifier" that is used for special
survey corners; there is no relation as to the corner’s position within the rectangular scheme. Instead the
segment identifier describes a particular survey type. The segment identifier is made up of two parts:
- The first three digits of the segment identifier (prefix) are assigned according to survey type and each
survey has at least one unique prefix that is used for each corner of the survey.
- The second three digits (suffix) are numbered sequentially from 000-999 and may be incremented by 2,
5, or 10 to leave room for subsequent additions, if needed, around the survey.
APPENDIX A
A-7
GCDB-WG-TRN-V1.00-10262001
Note that WinGMM will work with totally random numbers for special surveys as long as they are unique.
These rules are made to help you and those in the future make sense out of complex data sets. Also some
post-processing software depends on the prefixes to speed automatic cataloging of the data for BLM’s
LR2000.
Tracts, see figure A-8
The segment identifiers for tracts have a prefix of 8 plus the tract number. These values can range from 837
to 899. The second three digits (suffix) range from 000-999, as described above, for each tract corner.
Figure A-8 illustrates the numbering convention for Tract 38
Boundary/Milepost Surveys
Number milepost corners and all the corners along the boundary (reservation or grant boundary) with a
segment identifier whose prefix ranges from 711-799. The second three digits may increment up the line or
reflect the milepost number.
Mineral Surveys, see figure A-8
The prefix of the mineral surveys "segment identifier" can range from 900-999. The second three digits are
assigned the same as all special surveys, i.e., incrementing around the survey (figure A-8).
Meander Lines, see figure A-8
The prefix will be a number between 800-836. The entire meander line will have this prefix through the
whole township. For rivers, right bank meanders will be prefixed by even numbers (for example, 806), while
left bank meanders will be prefixed by odd numbers (for example, 807). Right and left banks are determined
as you look downstream. Lakes will have only one segment identifier prefix. Each meander line should
have a segment identifier, i.e., right bank meanders, informative traverse, lakes, islands, and fixed boundary.
The last three digits (suffix) of the segment identifier for each angle point on the meander line will begin 000
after the meander intersects the township or section line and be numbered sequentially downstream (002,
004, etc.).
Non-boundary points
Monuments of known position and not part of the land net, such as triangulation stations and U.S. Mineral
Monuments, are sometimes given PIDs that start with A99".
For each XxxYyy, Xxx =
100 – 710
711 – 799
800 – 836
837 – 899
900 – 999
Rectangular
Boundaries with Mileposts
Meanders
Tracts
Mineral Surveys, Homestead Entries, etc.
Yyy increments by tens, sequentially along the survey.
Groups of similar surveys may have one segment identifier prefix
SUMMARY
Segment Identifiers
APPENDIX A
A-8
GCDB-WG-TRN-V1.00-10262001
SID SUFFIX NAMING CONVENTIONS
SID (Survey Identifier) is a reference to a particular survey (dates, surveyor, volume/page, etc). Each line in
the .RAW file must have a SID as part of GCDB's data base requirements. WinGMM also uses the SID to
more fully automate the assignment of error estimates. Experience has shown that the SID can be
embellished to accomplish more, so WinGMM is built to recognize suffixes to the SID. Suffixes are used to:
- isolate areas of a survey that need a different error estimate
- identify lines that are ties, not boundary lines
- identify lines that are long chords
SID values 4588, 4588a, 4588-TIE, 4588-LCS all point to the same survey 4588. The suffixes are used for
various purposes as described below.
-
ISOLATE AREAS OF A SURVEY THAT NEED A DIFFERENT ERROR ESTIMATE
Initially error estimates are based on values that are tied to a SID in the .SID file. All surveys, however, are
not of the same quality. Upon discovering that certain areas need higher or lower error estimate you are
expected to assign the error estimates accordingly. Prior to SID suffixes, the .SD file was edited, via SD.EXE
or a text editor. Because these estimates were not tied to a SID, they were hard to recreate if the .SD file was
deleted. Also, the lines that were custom edited were very difficult to identify from those tied to SIDs. The
suffixes were implemented to allow all error estimates to be tied to a SID in the .SID file. Alphabetic
characters are appended to the base SID to create a new SID. The new SID and its values are placed in the
.SID file and the .RAW file is edited accordingly.
-
IDENTIFY LINES THAT ARE TIES, NOT BOUNDARY LINES
In preparing the data for merging with LLD, APROP will identify all the polygons. These minimal polygons
will later be combined to form parcels as listed in LLD. Normally a tie between rectangular and a special
survey would divide any parcel it crosses into two polygons, forcing more work to the user who must then
combine them. To prevent this extra work, AUTOI will not include lines that have been identified in the
.RAW file with a suffix of TIE.
-
IDENTIFY LINES THAT ARE LONG CHORDS
The long chord of curves are entered into the .RAW file just as any surveyed line, except that the .SID value
must contain a suffix of LC
APPENDIX A
A-9
GCDB-WG-TRN-V1.00-10262001
APPENDIX B - FILE FORMATS of WinGMM FILES
TEMP.JOB
The first 1-8 characters of the file are the project name, usually just township/range. There is no other data in
this file.
.DEF
A sample .DEF file is on the left, descriptive comments on the right: (comments in parenthesis are not userdefinable in PROJEC)
Y
not applicable to WinGMM
5 ARIZONA WEST MERCATOR
state plane zone
1
2
5000.000
N
Y
.100 1000.0
4.0
120.0
40.000
40.000
Y
.000
.0
.0
N
N
N
Y
T05NR14W
14
AZ
12
1
NAD27=1 NAD83=2
(Survey ft=2 meters=1 Int. ft=3)
default elevation
read elevations from .LEV file
read error estimates from .SD
default for distance error estimate
default for angle error estimate
default for bearing error estimate
default for control N error estimate
default for control E error estimate
(mean geodetic brgs=Y, grid brgs=N)
(Distance residual printout limit)
(Angle residual printout limit)
(Azimuth residual printout limit)
error ellipses computed
readjust w/ robusted error estimates
(print adjusted grid brgs/dists)
(update .COR file)
Project name
Meridian
State designation
UTM zone number
not applicable to WinGMM
not applicable to WinGMM
.SID
Below is a shortened example of a .SID file created by an Oracle query:
S5071
1.000 9999.0 1800.0 30.000 30.000
C GLO 11-DEC-1872 O FOREMAN
S5905
1.000 9000.0 1600.0 30.000 30.000
C GLO 04-APR-1880 O VULTURE CITY
C ----------------------------------------MINERALS:
S22151
1.000 7000.0 1200.0 30.000 30.000
C GLO 05-JUL-1908 O MS2511 m2400
APPENDIX B
B-1
GCDB-WG-TRN-V1.00-10262001
For the lines starting with “S”:
The 1st field in Column 1 identifies SID data(S).
The 2nd field is the SID number and must start in the +2nd column.
The 3rd field is the Distance Error Estimate Constant, ft units.
The 4th field is the Distance Error Estimate PPM, no units.
The 5th field is the Bearing Error Estimate Constant, second units.
The 6th and 7th fields are obsolete.
Lines following the SID data are comment lines and start with the letter C. In the BLM, the standard for the
first comment line after each “S" line is:
The 1st field in Column 1 identifies line as a Comment line(C).
The 2nd field is Source Agency, 3-4 character abbreviation, i.e. BLM, USFS.
The 3rd field is the Survey Type, O = original, D = dependant resurvey, etc
The 4th field is the Surveyor’s name or MS number and Volume number.
Next is an entry in a .SID file specifying “non-Cadastral” units
S36970BT
0.100 5000.0 900.0 0.001 0.001
C BDY TR FROM T33NR30E
C DT:P
<dist type grid>
C DC:-1 +50
<correct dist by -1 ft. and + 50 ppm>
C BT:GA 0.0530 <bearings are grid, convert to angles error est. 5'30">
C BC:-2.1040 <rotate bearings counter-clockwise 2-10-40>
The 2 unit types are:
(1) DT: distance type, value consists of 1 character value
Allowable values: G (ground), E (ellipsoid), or P (plane/grid)
(2) BT: bearing type, value consists of 1 char value or 2 char value followed by a numeric value.
Allowable values: M (mean), F (forward), G (grid), C (compass/magnetic), or L (local/assumed). Column 7
can be blank or an A (convert bearings to angles). If an A exists in column 7 it must be followed by an error
estimate for the angles in DD.MMSS (HP) format. The error estimate can immediately follow the A or have
leading spaces
The 2 corrections are:
(1) DC: distance correction (two numeric values)
The two numbers are the constant correction and the ppm correction. A negative value means the distance
will get shorter. The constant correction is in the units of the desired linear units in .L.A. (ft. or meters). The
constant correction can immediately follow the : or any number of spaces can exist. Any number of spaces
must exist between the constant correction and the ppm. You can have a zero constant and a non-zero ppm,
and vice versa.
(2) BC: bearing correction (one numeric value)
DMZ “HP” format with positive being clockwise and negative being a counter-clockwise correction.
.CON
Below is a shortened example of a .CON file after GMMCON has been run.
TWP 0070N RNG 0260E PM GilaSalt R
Arizona(AZ) DATE 93/12/15
ORIGIN 337976.0000 1093540.0000 5000.000 0 0 2000.0000 5000.0000
700140 335733.0015 1093232.0338 9600.000 23 23 27
700140 335733.1745 1093234.3656 9600.000 23 23 83
*700700 340220.2080 1093232.0520 9200.000 15 15 27
APPENDIX B
B-2
GCDB-WG-TRN-V1.00-10262001
*700700
340220.3764 1093234.3880 9200.000 15 15 83
The control data fields are:
First column, if non-space, is a comment line, data will not be used.
Point ID 6-digit format,
Latitude in DDMMSS.SSSS format,
Latitude in DDDMMSS.SSSS format,
Elevation in feet units,
Estimated Northing error in whole feet units,
Estimated Easting error in whole feet units,
North American Datum, either 27 or 83. The top of each pair is the native unit. Above example, source data
is NAD27, NAD83 is calculated from NAD27.
WinGMM does not use everything to the right of column 58 at this time.
Optional: “Merge control” data.
*MT08NR26E 200100 200700
*M is a special comment line code for merging control.
T08NR26E is the adjacent township that is the source of coordinate data.
200100 is the point ID in the adjacent township
200700 is the point ID to be used in the current township, T07NR26E.
.RAW
T09NR13E
14
999999
AZ
11111
0.000
0.000 5000.000 1 1
100100 100140 40.070 1
500.0 11340
100140 100200 40.000 1
0.0 11340
100200 100240 40.110 1
100.0 11340
...
120700 100700 20.02 3 895900.0 6010
999998
The data between the 999999 and 999998 lines represent data from survey plats. The fields are:
The 1st field is the Point Identifier for the beginning of the line.
The 2nd field is the Point Identifier for the ending of the line.
The 3rd field is distance, in chain units.
The 4th field is the quadrant of the bearing; 1 = NE, 2 = SE.
The 5th field is the value of the bearing, DDMMSS.S format.
The 6th field is the Survey Identifier number (SID), more about the survey is listed in the .SID file.
.LSA
The .LSA. has 5 segments. Below is a shortened list:
700100
700200
700300
700700
700100
700200
700300
0
0
653137.527
653126.637
653100.770
653010.374
700200
700300
700400
0
1055152.756 0
1060413.534 0
1065747.464 0
1086873.400 1
5280.000
5280.000
5280.000
0 0 .00 1
0
0
1
APPENDIX B
B-3
GCDB-WG-TRN-V1.00-10262001
700100
700200
700300
700600
600660
700640
700660
700200
700300
700400
653059.258
647756.151
653046.086
653039.534
0 0 .00 0
0 0 .00 0
0 0 .00 1
1081552.147
1085478.873
1084201.999
1085526.250
0
0
0
1
The first segment is a list of known control imported from .CON.
The second segment is the distance. The third segment is the angle.
The fourth segment is the azimuth.
The fifth segment is the approximate coordinates that GENER computed for points that are not control.
Each line is ended with a 0 or 1. The 1 signifies the end of the segment.
.SD
The .SD has 4 segments. Below is a shortened list:
700503
700600
700603
700700
100100
100200
100300
600200
600300
0
100100
100200
100300
600200
600300
33.000
33.000
33.000
33.000
100200
100300
100400
910010
920010
0
0
100200
100300
100400
910010
920010
33.000 0
33.000 0
33.000 0
33.000 1
32.680 0
32.680 0
32.680 0
3.430 0
2.585 1
4.00 1
600.00 0
600.00 0
600.00 0
240.00 0
400.00 1
The first segment is a list of known control imported from .CON.
The second segment is the distances
The third segment is the angles.
The final segment is the azimuths.
.ADD
1 107140 100140 140140 .00000 1 15.310 55.310
2 107120 100120 140120 .00000 1
.000
.000
2
0 107100 107140 .00000 1
.000
.000
2 107160 100160 140160 .00000 1
.000
.000
2
0 107140 107200 .00000 1
.000
.000
1 910040 910030
1 89.59380 1 22.720 0.000
1 910050 910040
1 89.59380 1 9.090 0.000
2 908025 910050
3 0.01170 1 0.000 0.000
2
0 908030 908020 0.00000 2 0.000 0.000
3 910040 901004
0
0 0.000 0.000
The first 5 lines show how elongated 1/16ths (107xxx) of sec 31 are stored.
APPENDIX B
B-4
GCDB-WG-TRN-V1.00-10262001
107140 is put in at proportion between two point IDs and the other 1/16ths are put in at intersection of two
lines, whose endpoint IDs are stored.
The 1st field describes the type of action. 1 = traverse/proportion, 2 = intersection, 3 = add a line.
Intersections require 2 lines of data.
The 2nd field is the point being generated. Value is 0 if not applicable.
The 3rd field is the known point starting the procedure. Intersections have two such points.
The 4th field is either the endpoint ID defining the bearing from the base point or the quadrant of a userentered bearing. Not applicable = 0.
The 5th field is the bearing value of a user-entered bearing. Not applicable value is 0. The 6th field is a digit
describing whether the computation is based on a geodetic line (1) or plane line (2).
The 7th field is the record distance to the new corner.
The 8th field, if nonzero, is the record distance to the endpoint, in which case the record distances will be
used as a proportion to apply to the adjusted overall distance.
In add a line –
2nd field is point from
3rd field is point to
all other fields are not applicable so = 0
.NOT
2
991534
990003
4
100565 813020
100568 813020
240132 260126
260126 300123
The first line describes how many “NOT points” will follow.
The next segment is the listing of NOT points. NOT points are non-boundary points whose lines must be
removed for post-subdivision display. The points will be removed from the COR file. This feature will
become obsolete, so all lines touching this kind of point should be entered into the “lines” segment.
The number after the “NOT” points describes how many “NOT lines” will follow.
The last segment is the listing of lines to be removed for post-subdivision display. These must be entered in
the same order as they exist in the .RAW file. Points (950xxx) generated through automatic intersections in
APROP can be entered in this file, however subsequent changes in the base files may result in a different
numbering scheme for 950xxx points. All lines in .RAW file W/-TIE must be in the .NOT file.
APROP has a limit of 500 lines for the .NOT file.
APPENDIX B
B-5
GCDB-WG-TRN-V1.00-10262001
.LX
The .LX file is a PCCS-compatible file that is used to support the BLM’s LR2000 environment. It is
produced by WinGMM, but not used by it. The format is described on the GCDB website,
http://www.blm.gov/gcdb/.
.AN
The .AN file is a PCCS-compatible file that is used to support the BLM’s LR2000 environment. It is
produced by WinGMM, but not used by it. The format is described on the GCDB website,
http://www.blm.gov/gcdb/.
.DXF
The .DXF file is an AutoCAD-compatible file that is used to export GCDB data into AutoCAD and other
graphic environments. It is produced by WinGMM, but not used by it. The format is described in
documentation about AutoCAD.
APPENDIX B
B-6
GCDB-WG-TRN-V1.00-10262001
APPENDIX C - WinGMM Glossary
Bandwidth Optimization - There are many ways to speed up the solution of a system of equations and reduce
the number of terms in the equations. Some methods other than bandwidth optimization include column
profile minimization, Helmert blocking, and recursive partitioning. If a computer program does not use one
of these methods the results will be produced very slowly. LSAQ uses a bandwidth optimization routine that
has been extensively modified for better performance. For most survey networks the bandwidth will
probably range from 5-30% of the total number of stations. This process enables more efficient solution of
least squares problems, and especially allows "big" problems to be solved on a personal computer.
Degrees of freedom - number of measurements minus number of unknowns; or the number of measurements
beyond what is necessary to uniquely define coordinates for each station.
Error ellipses - It should be apparent that the reliability of a traverse point's position will not usually be the
same in all directions. The position is generally stronger in the traverse direction, and weakest away from
the traverse directions. The error region is an ellipse, defined by a radius (semi-major axis) of maximum
error (SU), radius (semi-minor axis) of minimum error (SV), and the angle from north (positive clockwise)
of the direction of maximum error (T). Since an error ellipse is two-dimensional, the one-sigma error ellipse
only denotes 35% confidence (roughly 68.3% squared). The same statistical significance reasoning for
coordinate standard errors applies to error ellipses - it is an internal evaluation of your data and does not
relate to external information such as other surveys or existing coordinates.
Error estimate - A surveyor's error estimates of measurements assigns appropriate weighting of
measurements in a least square adjustment. An angle with an error estimate of 2 seconds will be treated as
more weighted (stronger, less chance of adjustment) than an angle with an error estimate of 10 seconds. This
does not mean the angle with the smaller error estimate will always get a smaller adjustment since geometric
constraints (such as sum of angles in a closed figure) also play a major role in dictating amount of
adjustment. A distance error estimate is usually modeled by a constant plus a ppm addition to account for
larger errors generally occurring in longer lines. An angle or azimuth error estimate is a function of the
instrument's least count, the number of repetitions, the instrument operator's abilities, and the prevailing
environmental conditions. Experience with instrumentation and the least squares adjustment will allow the
surveyor to develop confidence in error estimation. Error estimating allows the simultaneous analysis of
different measurement types
(distances, angles, azimuths, control coordinates).
NAD 83 - North American Datum of 1983 - a datum based on the GRS 80 Ellipsoid, and fixed position and
orientation at the center of the earth. The measurements used in NAD 27, and additional measurements
made by the National Geodetic Survey subsequent to 1927, were subjected to a least squares adjustment this time using a computer. This results in a different latitude and longitude for a station when compared to
its NAD 27 values, with the difference often amounting to hundreds of feet.
NAD 27 state plane coordinates - These are based on zone constants that include false northings and eastings
so that negative coordinates do not result. The published units are U.S. Survey Feet.
NAD 83 state plane coordinates - These are based on different zone constants than NAD 27. The most
notable change is that different values were assigned for false northings and eastings, and the coordinates
published by NGS are in meters instead of U.S. Survey Feet. Even when converted to feet, NAD 83
coordinates look dramatically different than the NAD 27 coordinates for the same point because the false
northings and eastings are different.
NAD 27 - North American Datum of 1927 - a datum based on the Clarke Ellipsoid of 1866, and fixed
position and orientation at Meade's Ranch in Kansas. Based upon this information, latitudes and longitudes
APPENDIX C
C-1
GCDB-WG-TRN-V1.00-10262001
were calculated for all National Geodetic Survey control points based primarily on triangulation. The
calculation involved a least squares adjustment by hand calculations!
Number of measurements - equals # of distances + number of angles + number of azimuths + number of
control coordinates.
Observation - a fancy word for measurement.
Residual - the difference between a measurement and its computed quantity based on coordinates; it is how
much the measurement adjusted.
Residual vs. error estimate - These quantities should be of approximately the same magnitude. Since
measurements contain random error a plot of residuals should look like the "bell-shaped" curve from
statistics that centers about zero. If residuals tend to be predominantly of one sign this means systematic
error may exist. This would occur if your survey tied into two precise control coordinates and your EDM
was measuring systematically long. All adjusted distances would be shorter than their measured values. It
could also occur if horizontal angles were only measured in the direct position and a large horizontal
collimation error existed. Residuals which are larger than three times their respective error estimate are
generally considered suspect.
RMS error - root mean square error - it is the average of a series of residuals in which the sign of the residual
is eliminated through summing squared residuals, dividing by the number of that type of measurement, then
computed that value's square root.
Robustness - This is a method of using least squares as a filtering mechanism for detection of blunders.
Robustness averages the absolute value of a measurement's residual with its error estimate, and that average
becomes the new error estimate in a readjustment. The measurements with large residuals get reassigned
larger error estimates, and vice-versa. This enables the adjustment to be filtered to the suspect measurement.
The success of robustness in blunder detection is a function of size of the blunder, number of blunders, and
the geometry and redundancy of the traverse network.
Simultaneous Solution - This means all coordinates are being solved for in one solution; in the compass rule
process you must adjust one traverse into another traverse which is held as "fixed". This is not correct since
the fixed traverse contains error.
Solution Convergence - the last iteration has insignificant updates and thus the solution terminates.
Solution Divergence - blunders or poor initial approximations will cause updates to grow as iterations
proceed; This indicates something is wrong with the data, and it needs to be corrected.
Standard error of unit weight - This is a number which tells you how well it appears that you are estimating
your measurement errors. It is generated by the summing the squares of all residuals divided by their error
estimates. That quantity is divided by the degrees of freedom and the square root is taken. If a residual and
error estimate are of the same magnitude note that the residual divided by the error estimate will generally
produce a number close to one. The standard error of unit weight is a number that evaluates all residuals and
corresponding error estimates. If the standard error of unit weight is near one (0.7-2.5) you are estimating
your errors well. Uncorrected systematic errors, blunders, or generally poor measurements will result in
larger residuals and thus a large standard error of unit weight. If you are pessimistic in
estimation or you have very few redundant measurements a very small standard error of unit weight will
result.
Standard error of adjusted coordinates - these are the least squares error estimates of adjusting N,E
coordinates. They are a function of proximity to existing control points. The statistical significance of these
quantities is that if you went and made the same measurements with the same instrument using the same
APPENDIX C
C-2
GCDB-WG-TRN-V1.00-10262001
procedures, you would have a one sigma (68.3% confidence) chance of being within plus or minus the
standard error of the first solution's coordinate. It has nothing to do with additional traverse legs and
readjustment, comparing to someone else's coordinates, or evaluating retracement evidence.
State Plane Coordinates - projections which uniquely relates a geodetic position (latitude, longitude) to a
plane coordinate pair (N,E). The relation is truly a one-to-one correspondence; for a unique state plane
coordinate pair there is only one latitude, longitude pair, and vice-versa. The two types of projections that
exist are Lambert - a conic projection for states elongated east-west, and Mercator - a cylindrical projection
for states elongated north-south. The size of a zone was limited by defining a state plane distance will not
differ from its geodetic counterpart by 1/10000 of the distance. Thus larger states are covered by more than
zone.
System of Equations - in a least squares adjustment you solve an "n x n" system of equations each iteration
where n equals the number of unknown quantities. In a 20-station traverse there are 40 unknowns (20 N, 20
E coordinates). This means a 40 equations, 40 unknowns system of equations must be solved. Even for a
computer this is a slow process.
APPENDIX C
C-3