1
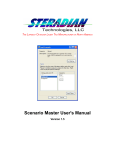
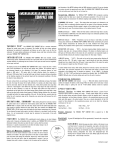
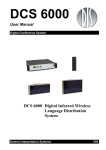
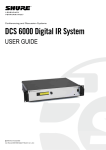
Classic Series
User Guide
Rev. D
Steradian Technologies
643 Ferry St. Lafayette, IN 47901
T 765-420-9201 F 765 535-5040
[email protected]
www.golasertag.com
Classic Series
User Guide
Table of Contents
1. Illustrations
1
2. Getting Started
5
3. Classic Series Game Suggestions
6
4. Running Your Own Game
7
5. Factory Reset
8
6. Game Controller
9
7. Programming Settings
14
8. Maintenance and Care
15
9. Infra-Red Safety
17
10. Steradian Technologies, LLC Warranty Policy
18
11. Communication Regulation Information
19
12. Contact Information
20
Steradian Technologies, LLC
1. Illustrations
Eclipse 400
Reload Button & Speaker
Power Key
(on Back)
Muzzle Flash &
Gun Sensor
Display
Sunband and
Trigger
Cord
Handle
S-7 TE
Reload Slider
Display
Gun Sensor
(on Back)
Lens Assembly
Speaker
Safety
Handle
Power Key
Sunband Cord
Trigger
Classic Series User Guide
1
Steradian Technologies, LLC
Sunband
Rear Sensor & Hit Light
Cord
Front Sensor & Hit Light
Front Sensor & Hit Light
Sunband Cover
Snaps allow for easy removal
Available in Blue, Red,
Green and Yellow
Classic Series User Guide
2
Steradian Technologies, LLC
Game Controller
Display
On/Off Switch
Programming Buttons
Compartment for 9 Volt Battery
(Door on Back)
Scorpion Grenade
Lights & Sound
On/Off Pull Chain
Classic Series User Guide
3
Steradian Technologies, LLC
Target
LED Lights
On/Off Button
Classic Series User Guide
4
Steradian Technologies, LLC
2. Getting Started
Thank you for purchasing Classic Series equipment, designed and manufactured by
Steradian Laser Tag!
Open up the guns from their packaging. Snap the Sunband covers around the Sunbands. Place a
Sunband on your head (don’t wear the Sunband around the neck or torso), adjusting the elastic for a
proper fit. Allow the cord to drape down your neck/back, then adjust the zip-tie on the cord for
proper cord length.
If you are playing indoors, locate the orange rubber lens reducers. Gently push the lens reducer into
the barrel of each gun. This will reduce the IR signal, allowing for indoor play. Remove them with any
small tool if playing outdoors.
Pull the power key out and start shooting at each other...it's that easy!
The guns arrive programmed with factory default settings of unlimited ammunition and 6 hits. The
display on the side of the gun will show how many hits you have remaining. When all 6 hits have
been taken, the sensors stay lit red, the gun will play the power down sound effect, and the gun will
become inoperable.
To play again, insert the power key and pull it out again for a quick reset. The Game Controller is the
best way to restart your equipment, though! Refer to the Game Controller section in this manual.
The guns arrive fully charged, and will last for a full day of play. To charge the guns at the end of the
day, open up a battery charger. Plug the AC power cord into a 120v/220v wall outlet. The charger’s
green light will come on. Plug the other cord into the power jack/power key hole in the gun. If the
green light turns red, the gun's battery is charging. When the battery charger light turns green, the
gun is fully charged.
Please call or email us with any questions regarding any of your equipment! We're available Monday
through Friday, 9-5 EST at 765/420-9201 and [email protected].
Thank you!
Staff of Steradian Lasertag,
Tom, Alex, Tamar, Aaron, Kevin, Amy, Patrick, and Jenny
Classic Series User Guide
5
Steradian Technologies, LLC
3. Classic Series Game Suggestions
Team Elimination - The objective of this game is to eliminate all the players on the other team.
Which ever team survives, wins. Team Mode 1 (can’t hit your teammates) recommended.
Shot Power
1
Shot Time
0.3
Burst
0
Clip Size
30
Number of Clips
0 (unlimited)
Reload
Number of
Time
Hits
3
20
Cycle Time
Stun Time
0.1
0
Adults vs. Kids – A great party game. Beware, you never know who’s going to win this game! Team
Mode 1 (can’t hit your teammates) recommended.
Shot Power
1
Shot Time
0.3
Burst
0
Clip Size
30
Number of Clips
0 (unlimited)
Reload
Number of
Time
Hits
3
20
Cycle Time
Stun Time
0.1
0
Free for all - Every player is on his/her own. Players should start spread out across the playing field.
Last player alive wins. Team Mode 2 (can hit anyone) required, team assignment does not matter.
Shot Power
1
Shot Time
0.5
Burst
0
Clip Size
30
Number of Clips
0 (unlimited)
Reload
Number of
Time
Hits
3
10
Cycle Time
Stun Time
1
0
Capture the Flag – The objective of this game is to capture your opponent’s flag and bring it back
to your base. If you are tagged out while carrying the flag, you must drop it, and leave the game.
Team Mode 1 (can’t hit your teammates) recommended. A variation allows the use of a medic box at
base to come back into the game!
Shot Power
1
Shot Time
0.3
Classic Series User Guide
Burst
0
Clip Size
12
Number of Clips
0 (unlimited)
Reload
Number of
Time
Hits
3
10
Cycle Time
Stun Time
0.1
0
6
Steradian Technologies, LLC
4. Running Your Own Game
A Game with Multiple Players
There are many aspects to running a successful lasertag game! Here are just a few basics to be
done before the players arrive, to ensure the game runs smoothly:
• Check that the guns are fully charged. Attach them to a battery charger to see if the charger
light is green or red. Green is charged, red is charging.
• If playing indoors, make sure each gun has a lens reducer.
• Check that each Sunband has a sunband cover.
• If using red dot sights, turn them on to be sure they are working. If not, change their batteries.
• Check the battery in your Game Controller. If low, it will not send data to the guns.
• If using new settings, program the guns with the Game Controller before the players arrive.
Refer to the Game Controller section in this guide.
Now you are ready for everyone to arrive.
• If playing with teams, divide players
• Give all the rules to the players, focusing on safety as the first rule!
• Remove (and keep) the power keys, then pass out a gun to each player.
• Ensure that all players are wearing their sunband around their head only, not around their neck
or waist.
• As all the guns have been pre-programmed, start all the guns by pressing Referee > Reset on
the Game Controller as you aim it at all of the guns.
• Allow the players to enter the field and tell them to have fun!
• HAVE A GAME REFEREE PRESENT AT ALL TIMES as this will maintain order in the game. A
chaotic game causes danger to the players and equipment! View the Referee DVD for
examples for proper game management.
Again, safety is the most important rule! Make sure all of the players know the field boundaries,
how to play the game, and your game rules. In addition to your own rules, the most common
laser tag rules are:
1. No Climbing Trees (Injury hazard)
Classic Series User Guide
7
Steradian Technologies, LLC
2. Players Must Respect the Equipment (Keep repair costs low)
3. Wear the Sunband on the head, never around the neck (Injury hazard)
4. Opponents cannot be close than 5 feet from one another (Injury hazard)
5. Players must stay within the playing field boundaries (Avoid cheating)
6. Dead players must return to base (Avoids confusion as to who is still alive)
In addition, inform all players of any accessories that will be used during the game. Inform them who
can use them and how to use them. These can be a Medic Box, an Ammo Box, a Scorpion
Grenade, or a Target. Please refer to the individual User Guides for more information.
The game will come to an end when either the time ends or the players used all of their hit points.
When all hit points are lost, the red sensors will stay lit and the gun will become inoperable. Have
players put their hands in the air and walk back to homebase The winning team is the team who has
the most players alive.
When the game day is complete, have players politely hand back their equipment to the Game
Referee. Inspect all the equipment for damage, charge the guns, then properly store them, being
careful not to wrap the sunband w/cord around the gun.
Pro Tip: If you are having trouble with the equipment, don’t panic. Most problems are attributed to
incorrect programming of equipment. Test this by performing a Factory Reset on your problem guns.
Default settings work great for most games!
5. Factory Reset
To return to the Factory Default Settings at any time, perform a Factory Reset:
Eclipse
• Insert power key
• Push the red reload button and pull the trigger
• Remove the power key
• Release the reload and trigger
• Display will read 06 or 6 if performed correctly
S-7TE
• Insert power key
• Hold down both buttons on either side of the display
• Remove the power key
• Release the buttons
• Display will read 06 or 6 if performed correctly
Classic Series User Guide
8
Steradian Technologies, LLC
6. Game Controller
The Game Controller's purpose is to send one-way infra red configuration data to the guns, so they
operate in a particular way. This includes all settings necessary to run a successful game.
• “Next” refers to the # key
• “Back” refers to the * key
• “You” refers to the person operating the Game Controller
• “Player” refers to the player's gun you are configuring
Turn on the Game Controller, viewing first the version number, then the Main Menu:
[Main Menu]
1 Setup Slots
2 Start Game
3 Referee
Your guns arrive programmed with factory default settings. You may want to change these settings
for many reasons: different game scenarios, skill level of players, or to make your weapon simulate a
semi or automatic weapon. If you want to change from these factory default settings, program the
Game Controller with your desired settings:
1. Setup Slots
The four slots are empty and named “Default”, until configured by you as your favorite game styles.
After selecting Setup Slots from the Main Menu, the slot selection screen will appear:
A Colt 45
B M1 Rifle
C Bazooka
D Default
Press the letter on the keypad of the slot that you wish to configure. In our example we've already
setup slots A, B, and C to simulate WWII-era weapons. We will be setting up Slot D to simulate a
Browning automatic rifle, so we press D on the keypad.
Classic Series User Guide
9
Steradian Technologies, LLC
As you program each letter, the following screens will appear, ready to be configured. Refer to the
Programming Settings chart for choice of numbers within in each range.
[Shot]
Shot Power: 1
Shot Time: 0.1
Burst Size: 0
Shot Power: How much damage each shot does to an opponent. Values range from 1 to 30. A
shot power of 0 enables compatibility mode for use with other equipment.
Shot Time: The rate of fire of the weapon, in terms of how many seconds it takes the weapon to fire
each shot. Values range from 0.1 (One shot every 0.1 seconds) to 9.9 (one shot every 9.9 seconds).
Burst Size: How many shots can be fired with each pull of the trigger. A value of zero allows
unlimited shots per trigger pull to simulate fully automatic weapons. A value of one would simulate a
semi-automatic weapon.
[Clip]
Clip Size: 20
Clips: 9
Reload Time: 3
Clip Size: The amount of ammo each clip holds. A value of zero indicates ammunition is unlimited.
Clips: How many clips the weapon has available on power up or reset. Clips can be added during
the game by the Ammo Box.
Reload Time: How many seconds it takes to load a new clip.
[Sensor]
Hits: 3
Cycle Time: 0.3
Stun Time: 0.0
Hits: How many hits the weapon can take before it is killed. This number is shown on the gun
display. Hits can be added during a game with an Ammo Box.
Cycle Time: The number of seconds for which the weapon is invulnerable after taking a hit.
Stun Time: The number of seconds for which the weapon cannot shoot after taking a hit.
Classic Series User Guide
10
Steradian Technologies, LLC
[Slot Name]
Name this Slot:
_0000000
(# for space)
Name this Slot: Enter the name using the keys on the keypad, similar to how you enter words on a
mobile phone. Press a key on the keypad multiple times to cycle through the letters and number on
that key. Press # to go to the next character position or * to go to the previous character position.
For example, if we want to name this slot “BAR” for Browning Automatic Rifle, we would press 2-2#-2-#-7-7. When the name is what you want, press # to move past any remaining character
positions. The slot will then be saved and you will be returned to the Main Menu.
Slot memory is held indefinitely, even with a dead battery.
2. Start Game
Now that you have set up at least one slot, select 2. Start Game in the Main Menu. This selection
will allow you to program each of your guns with their settings. It is very important to follow the
Proper Configuration section for the correct way to program your guns!
[Start Game]
Team Mode: 1
Time: 0:00
Team Mode: Determines whether or not hits from your own teammates are allowed.Team Mode 1
means you cannot hit other guns on the same team. Team Mode 2 means you can hit any gun.
Time: The time limit for the game in hours and minutes. Times may be specified from one minute up
to 1:59 (one hour, fifty-nine minutes). A time of 0:00 indicates that no time limit is to be used for the
game.
[Init Weapon]
Team: _
Slot:
(* when done)
Team: Press the number of the team you want the player to be assigned to- 1, 2, 3 or 4. If playing
with Team Mode 2 (anybody can hit anybody), team numbers aren’t important. Simply use Team 1 for
everybody.
Classic Series User Guide
11
Steradian Technologies, LLC
Slot: Aim the Game Controller at the player, then press the letter to select the slot with which to
program the player's weapon.
[Initializing]
Team: 1
Player: 1
(# to resend)
The Game Controller will now program the gun, as it sends an IR signal to the player's weapon. The
player's weapon should make a series of beeps and then the gun will start, playing the startup
sound. If the player's weapon does not program correctly, press # on this screen to resend the
programming data. Once the player's weapon has programmed, press * to return to the Initializing
Weapon screen to set the parameters for the next player's weapon. Continue until all players are
initialized.
Pro Tip: For proper configuration of your lasertag guns,
• Have Player stand approximately 6' (1m) in front of you.
• Have all other players stand more than 6' (1m) to one side (not behind) of the Player.
• Point Game Controller at Player and send programming. You must hear consistent beeps from
gun until the gun starts. If the beeps are interrupted, the Player did not receive a full
configuration, and you must press the “#” key to resend the configuration.
• Have Player move to the side and bring in the next player.
• If you follow these instructions, the process will be quick and efficient, helping to ensure a
trouble-free game.
• If you configure two or more guns at the same time, each may appear like it is ready to go, but
the configuration is likely corrupted.
• Make sure the Game Controller has a fresh, name-brand alkaline 9v battery. Symptoms of a
weak battery include the Game Controller returning to the Main Menu while failing to program
guns. Referee > Reset may still work with a weak battery, while full programming fails.
• If playing in the winter, store the Game Controller and battery in a warm place. A cold battery
doesn’t provide the power needed to power the Game Controller.
Classic Series User Guide
12
Steradian Technologies, LLC
3. Referee
The last choice on the Main Menu screen is the Referee mode. This allows the Game Referee to
control the game as it is being played. By pointing the Game Controller at a player, the Referee can
take a problematic player out of the game, restore hits, or add ammunition. The Referee menu can
also be used to reset player's weapons when not changing teams or configurations.
[Referee]
1 Kill 2 Heal
3 Reset 4 Ammo
5 Resurrect
Each function of the Referee Menu is used by pressing its corresponding keypad button while
pointing the Game Controller at the player. The referee functions are:
Kill: Instantly kills the player.
Heal: Restores one hit to the player, if they are not dead.
Reset: Fully resets the player, restoring hits and ammunition to their initial values.
Ammo: Adds one clip of ammunition to the player, up to a maximum of nine.
Resurrect: Brings a killed player back up to one hit. Does not affect ammunition left.
Pro Tip: To return to the Factory Default Settings at any time, perform a Factory Reset:
Eclipse
• Insert power key
• Push the red reload button and pull the trigger
• Remove the power key
• Release the reload and trigger
• Display will read 06 or 6 if performed correctly
S-7TE
• Insert power key
• Hold down both buttons on either side of the display
• Remove the power key
• Release the buttons
• Display will read 06 or 6 if performed correctly
Classic Series User Guide
13
Steradian Technologies, LLC
7. Programming Settings
Setting
Default
Description
Range
Shot Power
1
Hit points taken from opponent when hit
1 - 30 hit
points
Shot time
0.3
Time before your gun will fire again
seconds
Burst Size
Clip Size
0.1 - 9.9
seconds
0
Maximum number of shots the gun will fire at one 0 - 9
(unlimited)
time
0
Amount of ammo in each clip
0 - 99
Number of clips available
0-9
Amount of time it takes to load a new clip
1 - 28
(unlimited)
Clips
0
(unlimited)
Reload Time
1 second
seconds
Hits
6
Amount of hits a player can take before the
0 - 99
player is out (0=unlimited)
Cycle Time
1 second
Amount of time between hits
0.1 - 9.9
seconds
Stun Time
0.0
Amount of collection time after a player has been
0.0 - 9.9
seconds
hit
seconds
Classic Series User Guide
14
Steradian Technologies, LLC
8. Maintenance and Care
Here are some basic, yet very important guidelines to extend the life of your equipment, and lower
your repair and maintenance costs:
• Be kind to your Sunband and cord by not wrapping them around the gun during storage!
• Be kind to your Sunband and cord by not using them to hang the gun on a wall!
• Be kind to your Sunband and cord by only allowing the players to wear them on their heads!
• Be kind to your Sunband and don’t let players carry or drag the gun by the Sunband or cord!
• Following the 4 Sunband maintenance rules will help prevent internal wire damage, which
extends the life of the Sunband and cord, which keeps repair and maintenance costs low!
• To minimize damage and extend the life of your equipment, it is always recommended to have a
Game Referee at all times to maintain order during the game. A chaotic game causes danger
to the players and equipment!
• Moisture condensation can occur inside of the guns from rain, snow or high humidity. Place the
guns in a cool vented area to dry. Excess moisture may require the addition of a fan. In
extreme cases, call Steradian for further instruction.
• Typically, gun batteries will maintain 70% of battery capacity after 2 years. Battery health will
vary depending on many factors.
• The equipment is manufactured to be durable and able to take heavy use. If players follow
basic rules and Game Referees are watchful, the equipment will operate for many years with
low repair and maintenance costs.
• If the gun is plugged into the charger, but the charger is not plugged into wall power, the gun
will slowly discharge over a few days. Make sure to plug the chargers into wall power whenever
possible to keep the guns charged and ready to play.
Classic Series User Guide
15
Steradian Technologies, LLC
Error Codes
Display Error Code
Problem
Solution
E1
Sunband disconnected from circuit Verify the Sunband is
board or a button is held down
attached to both the gun
when the gun is powered on
circuit board and head band
circuit board. Verify the
trigger or reload button is
not being depressed when
powering on the gun.
R#
A button is held down when the
Verify the trigger or reload
#=1-9
gun is powered on
button is not being
depressed when powering
on the gun.
E3
Gun sensor malfunction
The gun sensor is
malfunctioning. Please call
Steradian Technologies for
repair.
--
Gun has been configured with 0 for Perform a factory reset
number of hit points
If your gun is experiencing problems, place gun on charge for 1 hour and perform a Factory Reset
(see Chapter 5). If problems still occur, please email [email protected] or call 765-420-9201.
Battery Charger Safety
The device does not operate when charging.
USE ONLY THE CHARGER PROVIDED. Use of any other charger could cause the batteries to
explode, causing serious injury.
Do not expose the charger to moisture and water.
To reduce the risk of damage to the charger and cord, pull the charger by the plug, rather than the
cord, when disconnecting the charger.
Classic Series User Guide
16
Steradian Technologies, LLC
9. Infra-Red Safety
Steradian Technologies designs and manufactures “Lasertag” equipment and accessories. Note that
the term “Lasertag” is the name of the sport only, not the driving technology.
Definition of “laser”
Despite the name, Steradian Technologies does not manufacture any product which contains a real
laser, which is an acronym for Light Amplification by Stimulated Emission of Radiation.
A laser is defined by emitting a high-intensity, narrow-spectral-width, highly directional beam of
coherent light. A high-power laser is capable of causing damage if used incorrectly, which is why
Steradian Technologies does not use them. Steradian Technologies instead uses an IRLED.
Definition of “IRLED”
IRLED is an acronym for Infra-red Light Emitting Diode.
An IRLED is defined by emitting a low-intensity, wide-spectral-width, low-directionality beam of noncoherent light. An IRLED is what is used in a typical television remote.
Lensing
Steradian Technologies uses lenses to focus the Infra-red beam into a useable pattern. Because
LED’s are not a point-source, and due to the nature of optical lensing, the lens does not focus the
beam to a level capable of causing any harm.
Straight from the source:
Vishay Telefunken makes the most powerful IRLED we use, the TSAL6100. Vishay supplies
regulatory information here:
• http://www.vishay.com/docs/81934/eyesafe.pdf
• http://www.vishay.com/docs/81935/eyesafe.pdf
Quoted from the above document: “With that none of the currently available (July/2008) Vishay IREDs
violate the class 1 limit. In case of IEC 62471 and in the European Directive 2006/25/EC all Vishay
IREDs are inside the exempt conditions. Only with arrays care must be taken not to violate the
cornea/lens limits.”
By the above text the single TSAL 6100 LED used in Steradian Lasertag guns does not exceed Class
1 (eye- safe) limits.
Classic Series User Guide
17
Steradian Technologies, LLC
10. Steradian Technologies, LLC Warranty Policy
Steradian Technologies LLC products carry a limited 2 year parts and labor warranty against defects
in materials or workmanship. We will repair or replace (at our discretion) the defective unit without
charge for the parts or labor if the unit is returned to Steradian Technologies LLC within the warranty
period. This warranty does not cover damages caused by improper care, handling or use. Shipping
costs are not covered by this warranty.
This limited warranty covers all defects encountered in normal use of the Product and does not apply
in the following cases:
A) Loss of or damage to the Product due to abuse, neglect, mishandling, improper handing by you,
alteration, accident, electrical current fluctuations, improper use, failure to follow operating or
maintenance instructions in or environmental conditions prescribed in, Steradian Technologies
LLC User Manual or other documentation, or services performed by someone other than a
Steradian Technologies LLC repair facility. Without limiting the foregoing, dropping the Product,
scratches, and abrasions will be presumed to have resulted from misuse, abuse or failure to
operate the Product as set forth in the User Manual or other documentation for the Product.
B) Use or parts or supplies (other than those sold by Steradian Technologies LLC) that cause
damage to the Product or cause abnormally frequent service calls or service problems.
C) If the Product has had its serial number or dating defaced, altered or removed.
Steradian Technologies LLC shall not be liable for loss of revenues or profits, inconvenience, expense
for substitute equipment or service, storage charges, loss, or any other special, incidental or
consequential damages caused by the use, misuse, or inability to use the product regardless of the
legal theory on which the claim is based, and even if Steradian Technologies LLC has been advised
of the possibility of such damages. Nor shall recovery of any kind against Steradian Technologies LLC
be greater in amount than the purchase price of the product causing the alleged damage. Without
limiting the foregoing, you assume all risk and liability for loss, damage or injury to you and your
property and to others and their property arising out of the possession, use, misuse or inability to use
the product sold by Steradian Technologies LLC not caused solely and directly by the negligence of
Steradian Technologies LLC. This limited warranty shall not extend to anyone other than the original
purchaser of the product, and states your exclusive remedy.
Classic Series User Guide
18
Steradian Technologies, LLC
11. Communication Regulation Information
FCC compliance Statement
NOTE: This equipment has been tested and found to comply with the limits for a Class B digital
device, pursuant to part 15 of the FCC Rules. These limits are designed to provide reasonable
protection against harmful interference in a residential installation. This equipment generates, uses
and can radiate radio frequency energy and, if not installed and used in accordance with the
instructions, may cause harmful interference to radio communications. However, there is no
guarantee that interference will not occur in a particular installation. If this equipment does cause
harmful interference to radio or television reception, which can be determined by turning the
equipment off and on, the user is encouraged to try to correct the interference by one or more of the
following measures:
—Reorient or relocate the receiving antenna.
—Increase the separation between the equipment and receiver.
—Connect the equipment into an outlet on a circuit different from that to which the receiver is
connected.
—Consult the dealer or an experienced radio/ TV technician for help
European Community
Complies with European Directives:
Safety:
IEC 60950:2005/A1:2009 / EN 60950-1:2006 / A11:2009 /A1:2010
following the provision of the Low-voltage Directive 2006/95/EC.
EMC:
EN 61000-6-3:2007
EN 61000-6-1:2007
following the provision of the EMC directive 2004/108/EC.
Classic Series User Guide
19
Steradian Technologies, LLC
12. Contact Information
www.steradiantech.com
Phone: 765-420-9201
Fax: 765-535-5040
Steradian Technologies, LLC
643 Ferry Street
Lafayette, IN 47901
USA
Purchasing, Rental, or Repair:
[email protected]
Phone : 765-420-9201
Classic Series User Guide
20