1
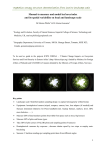
Manual to measure and model leaf area index and its spatial variability on local and landscape scale Dr Marion Pfeifer1 & Dr Alemu Gonsamo2 February 7th, 2014 1 Ecology and Evolution, Faculty of Natural Sciences, Imperial College of Science, Technology and Medicine, UK, [email protected] 1 Geography Department, University of Toronto, 100 St. George Street, Toronto, M5S 3G3, Canada, [email protected] To be used as guide in the projects ICIPE CHIESA – ‘Climate Change Impacts on Ecosystem Services and Food Security in Eastern Africa’ (http://chiesa.icipe.org/; funded by Ministry for Foreign Affairs of Finland) and TZ-REDD in Tanzania (funded by the Ministry of Foreign Affairs, Norway). Key points Landscape scale: Stratified random sampling design to capture heterogeneity within biomesFriday, 07 February 2014Friday, 07 February 2014 Equipment: hemispherical camera (tripod, compass, camera, lens, lens adapter (if needed)) and Sunscan instrument (batteries for Psion handheld (incl. backup battery), markers, level, GPS, more batteries……) Measure GPS of land markers (points observable from space such as trees, big houses) Measure GPS of plots and biome types Take GPS of plot corners (VALERI plots) and sampling points (Transects) Hemispherical: measure sky exposure , decrease shutter speed by two stops or employ autobracketing Sunscan: 3 SunScan readings per sampling point taken from different angles 1 Contents 1 Sampling Design on landscape scale Sampling follows a stratified sampling protocol with random point selection within strata (disproportionate stratification). Pre-selection of strata takes place according to following criteria: Rainfall classes (e.g.: < 500; 500 - 800; 800 -1100; 1100 – 1500, 1500-1800, > 1800 mm). Disturbance levels: no – low intensity – moderate – high intensity (optional: disturbance categories: fire – logging – charcoal) Plant functional types: Bushland – Woodland – Forest – Plantation - Cropland WDPA (World Database on Protected Areas; http://www.wdpa.org/) categories: forest reserves, national parks, nature reserves, unprotected, game management parks Age classes (e.g. forests: depending on previous disturbances – if known) Crop types: Corn, Rice, Sisal (Woody) savannah vegetation and croplands are highly seasonal in tropical East Africa, driven by fire, rainfall and human land use. Thus, ideally, measurements will be repeated within the season to measure intra-annual variability of vegetation canopy structure as a base for correlations with environmental parameters later on. Field plots should be placed in uniform vegetation of a specific biome (e.g. forest) at a distance of ≥ 100 m from the edge (to allow for coarse pixel validation in subsequent satellite image analyses). This will apply mostly to forests, woodlands and woody (savannah) systems, since many croplands in Tanzania are more heterogeneous. Otherwise it would be very good to have as many plots randomly distributed in forest stratified patches so that one may be able to use them to validate global LAI or other biophysical products. The more variable the biome, the more sampling plots or the larger the plot size. 2 2 Sampling Design on local scale To capture heterogeneity of vegetation canopy structure and biomass within a stratum (e.g. Vegetation plot as specified for RAINFOR carbon measurement protocols), five subplots (SP) should be sampled. The subplots are distributed randomly within the plot (e.g. red: SP1 to SP5 or grey: SP1 to SP5). Subplot size may vary with plant functional type sampled, but ideally is 20 m x 20 m unless sampling follows a linear transect. Mark plot corners with red/yellow tape and record the coordinates of the plot corners. Transect plots are very good to save time on field data collection. For example you can run four transects for 1 km2. To avoid sampling bias, chose a starting point and then follow the linear transect running through the stratum along the south – north line with measurements every 10 m to 20 m. Ideally, there is a land marker at the or close to the starting point, which is obvious to detect from space for locating the transect on the satellite image. Take a GPS reading at each measurement point. It is essential to record GPS coordinates and elevation (in WGS 1984 or UTM) of large field markers (like road crossing, tall single trees, tall buildings) to provide data for satellite image ortho-rectification. Measurement checklist: Plot picture showing biome in its beauty GPS of plot corners and in the case of transect of sampling points 3 hemispherical images, upward facing, per sampling point ( ≥ 12 per subplot following ‘Zhang method’) Optional: hemispherical images that are facing downward 3 Sunscan readings per sampling point: 36 readings per subplot Slope, Elevation of plot Estimated size of forest patch, distance to road Notes on soil, undergrowth cover (density, height), and leaf cover on ground 3 3 Hemispherical Images – camera, settings 3.1 Camera and lens Different camera systems can be used, but each camera needs to be calibrated to define optical centre and projection function. Calibration may be done following steps outlined in the CANEYE image analysis software (Weiss & Baret, 2010: download software and manuals from https://www4.paca.inra.fr/can-eye/). Suggestions for camera systems: 8 mega pixels Nikon Coolpix 8800 VR digital camera equipped with a fish-eye Nikon FC-E9 lens adapter; full-frame sensor 12.3 megapixels Nikon D5000 SLR digital camera equipped with a Sigma 4.5mm F2.8 fisheye lens adapter; full-frame sensor 12.2 megapixels Canon EOS 450D equipped with a Sigma 4.5mm F2.8 fisheye lens adapter; not a full-frame sensor resulting in images being cropped at the top and at the bottom Personal favourite: 21.1 megapixels Canon EOS 5D Mark II Digital SLR camera body equipped with SIGMA 8mm f/3.5 EX DG Circular Fisheye, using a VANGUARD Aluminium Alloy Tripod Alta 263AGH – GPR System (Grip, Position, Release). 3.2 Camera settings: ‘exposure’ and resolution Make sure the camera is in fine mode (Jpeg) or Hi mode (Tiff), with the highest resolution. The camera needs to be set to “manual” and “fisheye1” modes, if applicable. Check your camera manual. Exposure settings: The correct exposure is to make the sky appear white. Using automated exposure may result in unreliable LAI estimates (Zhang et al., 2005). Thus, use the hereafter called ‘Zhang method’ ('Two stops of overexposure relative to the sky reference'. This sky reference reading should be made in a large opening outside the forest stand, which provides an unobstructed sky view in all azimuthal directions. With experience in angular variations of sky radiance, this reference reading can also be made in small openings. When the camera’s aperture size is fixed to ensure a consistent field of view, a decrease of the camera’s shutter speed by 2–3 stops will provide the desired exposure. Meaning: if the sky reference exposure time were determined to be 1/1000 s (F5.3), a series of photographs would be taken with the aperture fixed at F5.3 and the shutter speed decreasing to 1/250. 4 Example of a digital hemispherical photograph. Saturation should only be found near the zenith, far from the foliage. Alternative exposure settings (exposure setting based on the sky reference is not possible): If you have time at hand and want to be as accurate as possible and can read out data on a large memory capacity laptop every other evening: Take 2-4 photos per sampling point and evaluate visually right in the field and at night of each field work. The photographs with the highest foliage to sky contrast are the best, thus you may want to delete all others keeping only one photograph per sampling point. Unless you want to evaluate the uncertainty in LAI estimation per sampling point accounting for exposure errors. Fix the F-stop to constant (best at 5.3). Then take picture at -1, -2, -3 and +2 exposure relative to the automatic. For example if the automatic exposure is 1/125, then the four exposures would respectably be 1/250 (-1), 1/500, 1/1000 and 1/30 (+2) Set-up used for Canon EOS 5D Mark II wit Sigma 8mm f/3.5 EX DG Circular Fisheye at SAFE Experimental Forest Site (Sabah, Malaysia: http://www.safeproject.net/): At each sampling point, three images have been taken in auto bracketing mode (the camera automatically takes all three at each go) set via the camera menu. The aperture has been set to F = 9, which can be adjusted if needed. The three images are from left: 0 standard exposure, -1 underexposure, +1 overexposure. AF (Autofocus): On (Switch on side of lens) Av mode In Menu- settings: One Shot File Numbering: Continuous Quality: Raw + Large JPEG Picture Style Standard C.Fn I: Exposure: 4 - Bracketing Autocancel: OFF Expo.comp./AEB: enter and mark the bracketing points to 0, -1 (Underexposure), +1 (Overexposure) Set F to 9.0: Start switch to On and check F. Then start switch to line. Little wheel on top of camera body (behind photo button) – turn to change F to desired one. Then change start switch back to On. 5 Resolution: The image resolution and the compressing rate (if there is) will have a significant impact on the image analysis. Results will be better with a high resolution and a low compressing rate. For example, when the leaves are small (coniferous forest), it is recommended to increase the resolution of the image so that less mixed pixels are present in the image. 3.3 Tips and tricks in different vegetation structure Very Short Canopy (< 30 cm height): For very short canopies such as young crops, the digital camera must be placed looking downward, not too close from the foliage, so that one leaf does not cover the whole field-of-view. On the other hand, the camera should not be placed too high so that the user does not observe a sky ring in the image. Therefore, an average height of 60 to 80 cm above the last leaf appears reasonable. Note that the advantage of downward looking photographs is the possibility to get a better spatial representation by increasing the distance between the camera and the canopy while keeping it not too far away to be able to get a clear image of vegetation elements, minimizing the mixed pixels problem. Short canopy (between 30 and 70 cm): The digital camera can be placed looking downward with the same recommendations as for very short canopies. It can also be placed horizontally on the ground, looking upward. In this case, be sure that the presence of the camera on the ground does not change the canopy structure. Tall canopy without understorey (> 70 cm): The camera should be placed at ground level, looking upward. It is necessary also to take care of not modifying the canopy structure when positioning the camera on the ground. Tall canopy with understorey: Two series of hemispherical images can be acquired, one looking downward to characterize understorey, the other looking upward to estimate tree characteristics. The two kind of images must be processed as two separate series. The resulting characteristics can then be recombined to represent the whole canopy. 3.4 Measurements in the plot Sky conditions: All images sampled in a subplot/plot must be acquired in similar illumination conditions, so that the colour dynamics does not vary a lot between all the images that are processed together. Ideally measurements should be performed under overcast conditions to minimize anisotropy of the sky radiance (Jonckheere et al., 2004). The aim is to avoid sun glares or sunflecks when taking upward hemispherical images to avoid very over-exposed parts in the image 6 which may make the class allocation more difficult in subsequent image processing. If there are some, it is still possible to mask then during the post-processing. Be sure that the camera is the most horizontal (camera body levelled – best done with a level) as possible when acquiring a hemispherical image. If the image is taken in the upward direction (tall canopy), use a tripod. The upper picture margin should be facing exactly northward at each image (take a compass), at 1m above ground (or another height as long as you always use the same). Ideally, you got a full-frame sensor camera body and a nice fisheye lens on it. Don’t forget to take the adapter linking camera body and tripod into the field with you. Slope: Slope affects LAI estimation using hemispherical images (Gonsamo & Pellika, 2009). Take take pictures on the flat ground so that the point spread/contribution of the surrounding landscape to remote sensing pixel is minimal if the field is large and uniform. When working on slopes, always take picture levelled to horizontal ground (Gonsamo & Pellikka, 2008) and measure the slope and its orientation. And again the forest patch should at least be more than 1 pixel (1 km2) on uniform slope (for upscaling to moderate spatial resolution sensors such as MODIS and SPOT VEGETATION). If there is slope, then upscaling using high resolution satellite to coarse resolution may not work. To fasten the image processing step, the user should always keep the same position when acquiring the image. This will allow the operator to apply the same mask to all the images at once. However, this should only become relevant when taking downward looking pictures. In the upward looking images, best use remote control to set off camera or use automatic countdown function. Shadows in the image will make the class allocation more difficult. A fish-eye field of view is large. Therefore, make sure that there is no one or anything else (bag, instrument, etc.) present on the image. 3.5 Image extraction, processing and analysis After downloading from the camera system, each image has to be pre-processed. The pixel brightness values for the blue band are extracted from each RGB image to achieve maximum contrast between leaf and sky, because absorption of leafy materials is maximal and sky scattering tends to be highest in that band (Jacquemoud & Baret, 1990; Jonckheere et al., 2005 b). 7 Thresholding procedures have been developed in order to avoid subjective decisions by the user and to identify the optimal brightness threshold to distinguish vegetation from sky (Jonckheere et al., 2005 b). We use the global Ridler method (Ridler & Calvard, 1978) for image thresholding (see Pfeifer et al., 2012), because of reliable results in hemispherical photography studies (Jonckheere et al., 2005 a; Gonsamo & Pellikka, 2008). The resulting binary images are analysed using the canopy analysis software CAN-EYE (Weiss & Baret 2010; http://www.paca.inra.fr/can_eye) limiting the field of view of the lens to values between 0 and 60° to avoid mixed pixels and thus misclassifications. Certain sky conditions can complicate classification of image pixels into vegetation and non-vegetation, e.g. sunflecks and dark clouds. Images can be edited in processing software to mask such areas. CAN-EYE estimates mean effective LAI for each plot, LAIEFF (LAI assuming randomly located foliage) based on a series of (at least 8) images from measured gap fraction (Weiss & Baret, 2010). LAIEFF is derived by inversion of the Poisson model using look-up tables and assuming an ellipsoidal distribution of leaf inclination (Weiss et al., 2000). A clumping index is computed using the Lang & Yueqin (1986) logarithm gap fraction averaging method and used in a modified Poisson model, which is then inverted to estimate LAITRUE, the LAI taking into account canopy clumping. Note that estimated LAITRUE includes not foliage materials such as stems, trunks, branches, twigs and plant reproductive parts and is more accurately called plant area index (Breda et al., 2003). 8 Datasheet –LAI using hemispherical images in SAFE vegetation monitoring plots Nama [Name]: Hari Bulan [Date]/Time: Sky (e.g. cloudy, sunny): Block, Plot (e.g. Fragment C, Plot 621): Pictures: 3 each (e.g. when reading 432 from camera: 430, 431, 432) LAI Point 1 Pictures 2 3 4 5 6 7 8 GPS coordinates LAI Point 1 GPS 4 Lat Long 7 Lat Long 10 Lat Long 9 10 11 Lat Long 12 13 9 4 Sunscan Instrument – Measuring in the field Fieldwork step by step: 1) Switch the Psion on after connecting the probe (the thing with the 1 m long probe) to the psion with the accompanying cable: Hold both symbols: and set remote link to off (when finished with measuring in field set remote link on for later readout into PC) Note: pressing both will exit from any application that is running. 2) Highlight Sunscan icon and enter the program. Continue by pressing enter. 3) Done once when doing fieldwork in a specific region: Go to Menu: use the arrow tab to change to Settings. Highlight Time and Date: e.g. Tanzania: e.g. GMT + 3 (depending on time in year) – Enter; Back to Settings and Highlight Display: LAI as display (check for that!). Leave sample and plot names unchanged. When finished go back to Settings and highlight Constants: set Absorption to 0.85, EAADP (Ellipsoidal leaf Angle Distribution Parameter) = 1 4) Done only once for specific fieldwork person: Menu: use the arrow tab to the right to change in Menu with arrow tab to File - Data Storage - Enter - Your name (e.g. Samuel) - Disk: internal (no memory cards inserted, thus no A,B,C existing in this Psion - Type: comma separated In Menu – File: you can save your configuration. 5) Menu: use the arrow tab to the right to change to Settings: Highlight Site and press enter - Enter new name and with arrows pointing downwards enter new geographic coordinates 6) Then at plot go to site far from forest edge or big opening in canopy or hold Sunscan probe levelled above the canopy (e.g. low vegetation such as short grass) – there should be no shadow of vegetation on Sunscan!! Ideally, there is no direct sunlight or interspaced white clouds but slightly overcast sky conditions. - Measure beam fraction: Highlight BFrac on screen of Psion. Hold a white sheet of paper up so that ca. 1/3 or the 1m long probe is covered by its shade and then Press the button on the Sunscan. Don't hold the shade too close to the probe - otherwise it will cut out some of the diffuse light as well. SunData looks at the readings from the photodiodes and uses the lowest value to calculate the Diffuse component of the incident light. It uses the highest photodiode values to 10 calculate the Total incident, and uses these two values to calculate and display the Beam Fraction. Thus: if the background light changes strongly (e.g. sudden clouds in front of sun causing different light) – measure beam fraction again. Sometimes you may encounter errors and you will have to re-measure the beam fraction anyway. This may happen more often when you think so don’t lose your spirit. 7) Go QUICKLY to S1 of plot (see plot setup above): at each sampling point take three Sunscan readings from three different directions at about 80 to 100 cm above the ground. Make sure your shadow does not appear on the 1 m probe. Hold the Probe levelled (no tilting or fancy movements). All readings get appended one after the other. Go to S2 and take another three readings from three different directions holding the Probe levelled, go to S3, etc. - Check in between: finishing at sample 6 you should have taken 18 readings and be ready for reading LAI number 19. - If you went wrong: best start from beginning setting up new plot name. You will get very confused otherwise, believe me. - At the end, in case you have 12 sampling points, you should have done 36 LAI readings. If you are interested in getting the ground vegetation LAI you may want to run again through the plot taking - at each Sample point – 3 readings from three different directions but holding the probe levelled just at ground level into the vegetation. Compute difference between LAI 80cm per plot and LAI ground level to get LAI of low vegetation. 5 References Baret, Morissette, T. J., Fernandes, R. A., Champeaus, J. L., Myneni, R. B., Chen, J., Plummer, S., et al. (2006) Evaluation of the representativeness of network of sites for the global validation and intercomparison of land biophysical products: Proposition of the CEOS-BELMANIP. IEEE Transactions on Geoscience and Remote Sensing, 44, 1794-1803. Breda, N, J., J. (2003). Ground-based measurements of leaf area index: a review of methods, instruments and current controversies. Journal of Experimental Botany, 54, 2403-2417. Garrigues, S., Allard, D., Weiss, M., & Baret, F. (2002). Comparing VALERI sampling schemes to better represent high spatial resolution satellite pixel from ground measurements: How to characterize an ESU. Available for download at http://w3.avignon.inra.fr/valeri/methodology/ samplingschemes.pdf (accessed 17/08/2011). 11 Garrigues, S., Lacaze, R., Baret, F., Morisette, J. T., Weiss, M., Nickeson, J. E., Fernandes, R., Plummer, S., Shabanov, N. V., Myneni, R. B., Knyazikhin, Y., & Yang, W. (2008). Validation and intercomparison of global Leaf Area Index products derived from remote sensing data. Journal of Geophysical Research, 113, doi:10.1029/2007JG000635. Gonsamo, A. (2009). Remote sensing of leaf area index: enhanced retrieval from close-range and remotely sensed optical observations. Academic dissertation. Publicationes Instituti Geographici Universitatis Helsingiensis p. A147. Gonsamo, A., & Pellikka, P. (2008). Methodology comparison for slope correction in canopy leaf area index estimation using hemispherical photography. Forest Ecology and Management, 256, 749-759. Gonsamo, A., & Pellikka, P. (2009). The computation of foliage clumping index using hemispherical photography, Agricultural and Forest Meteorology, 149, 1781-1787. Jacquemoud, S., & Baret, F. (1990). Prospect - A model of leaf-optical properties spectra. Remote Sensing of Environment, 34, 75-91. Jonckheere, B., Muys, B., & Coppin, P. (2005 a). Allometry and optical in-situ LAI determination: A case-study in Belgium. Tree Physiology, 25, 723-732. Jonckheere, I. G. C., Muys, B., & Coppin, P. R. (2005 b). Derivative Analysis for In Situ High Dynamic Range Hemispherical Photography and Its Application in Forest Stands. IEEE Geoscience and Remote Sensing Letters, 2, 296-300. Jonckheere, I. G. C., Fleck, S., Nackaerts, K., Muys, B., Coppin, P., Weiss, M., & Baret, F. (2004). Review of methods for in situ leaf area index determination – part I. Theories, sensors and hemispherical photography. Agricultural and Forest Meteorology, 121, 19-35. Lang, A. R. G., & Yueqin, X. (1986). Estimation of leaf area index from transmission of direct sunlight in discontinuous canopies. Agricultural and Forest Meteorology, 37, 229-243. Pfeifer, M., Gonsamo, A., Disney, M., Pellikka, P., Marchant, R. 2012. Leaf area index for biomes of the Eastern Arc Mountains: Landsat and SPOTobservations along precipitation and altitude gradients. Remote Sensing of Environment, 118, 103-115. Ridler, W., & Calvard, S. (1978). Picture thresholding using an iterative selection method. IEEE Transactions on Systems, Man, and Cybernetics, 8, 260-263. Weiss, M., & Baret, F. (2010). CAN-EYE V6.1 User Manual. EMMAH laboratory (Mediterranean environment and agro-hydro system modelisation). French National Institute of Agricultural Research (INRA). Weiss, M., Baret, F., Myneni, R. B., Pragnère, A., & Knyazikhin, Y. (2000). Investigation of a model inversion technique to estimate canopy biophysical variables from spectral and directional reflectance data. Agronomie, 20, 3-22. Zhang, Y., Chen, J.M., & Miller, J.R. (2005). Determining digital hemispherical photograph exposure for leaf area index estimation. Agricultural and Forest Meteorology, 133, 166-181. 12