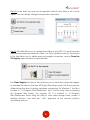
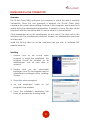
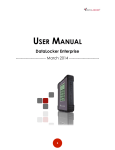
1
 USER MANUAL
DL-Link
------------------------ February 2014 ------------------------
1 Contents
At a Glance
3
4
About the DL-Link
DL-Link program
Getting Started
5
6
7
9
Initial setup
Installing DL-Adminstrator
Quick start
Installing DL-Link Connector
Getting Started
12 Contact us
2 At a Glance
ABOUT THE DL-LINK
DL-Link is a lightweight management application to help IT administrator gain
control over DL3 encrypted storage solutions across their workforce. Using the
DL3 DL-Link software is easy, fast, and will ensure information and drive security
across your systems.
3 DL-LINK PROGRAM
DL-Link is separated into two components:
DL-Link Administrator Program
DL-Link Connector
The Administrator Program allows the
device administrator to set the link
parameters for the drive & computer,
set an expiration date, and access
advanced user options.
DL-Link Connector is a program that
runs in the background of the host
computer to allow the linked DL3
access to an authorized computer.
Note: The administrator
should not be distributed.
password
Note: The DL3 cannot be accessed,
even on an authorized computer,
without the DL-Link Connector.
4 Getting Started
INITIAL SETUP
Enable the user password on your DL3 drives:
1. Connect your drive
2. Enter your administrator password (default is “000000”)
3. Navigate to the device setup page before the device automatically
connects
4. Enter the user password screen
5. At the prompt, hit create
6. The system will notify you the user password has been created, and
defaulted to “000000”
Change the administrator password (forced if still on default):
1. Enter Change Password
2. Enter your current password
3. Enter your new password
5 INSTALLING DL-ADMINISTRATOR
Overview
The DL-Link Administrator utility allows the device administrators the ability to
configure each drive for use on the host system(s).
WARNING: The utility should be carefully distributed, as changing any features
within the program could render a drive temporarily inoperable.
1. To start the Administrator utility, double click on the Icon. If running
Windows Vista or 7, User Account Control may prompt you for action.
2. Once the interface loads, you will be presented with multiple options.
Figure 1 shows the Administrator interface layout.
Figure 1
6 QUICK START
Once the utility has been started, you will be presented with multiple parameters
to link and maintain your drives.
Field 1: This field shows the current S/N of the connected DL3. You will be
prompted to enter the administrator password.
Field 2: This field includes all options to link your DL3 drive to the host system. You
may select multiple items including:
• PC Name
• CPU ID
• OS Key
• Internal Hard drive
• Network Adapter (VPN not recommended)
7 Field 3: In this field, you may set an expiration date for the drive or let it never
expire. You can always change the expiration date later.
Field 4: This field allows you to update the setting to your DL3. You must have the
administrator password entered in Field 1 for this to update correctly. The options
in this field allow you to delete previously register computers, and/or Clean the
OS Registry when the drive is disconnected.
The Clean Registry function in field 4 allows you to clean the computers registry
to minimize the chance that the USB Plug & Play drivers crash. This should only be
utilized when the drive is having a problem connecting. For Windows 7, the file is
located in “C:\Program Files\Datalocker” (let C be the local drive containing
the Program Files folder). For windows XP, it is located in “C:\Program
Files\Datalocker. When using this utility to solve mass storage issues, create a
desktop shortcut, and add the “\ALL” argument to the shortcut (without
quotations) and run.
8 INSTALLING DL-LINK CONNECTOR
Overview
The DL-Link Client Utility authorizes the computer to which the drive is currently
connected. When the user password is entered, the DL-Link Client utility
compares the current drives settings to those of the computer, and checks for a
match set by the administrative parameters. If a match is found, the drive will be
unlocked, and the user will be able to use the drive in a normal fashion.
If the parameters set by the administrator do not match, the drive will not be
unlocked with the user-defined password. Instead, an administrative password
must be used.
Install the DL-Link client on all the machines that you wish to authorize DL3
external drives to.
Installing
1. Double Click on the DL-Link client
program to begin the installation. This
program should be installed as an
administrator, with all users able to
access it.
2. Double click on the executable
package. If the DL Link program asks for
administrative privileges when installing,
accept.
3. Press Next when prompted.
4. Set the destination folder
program to be installed.
for
the
5. Once the installation destination has
been set, proceed by clocking Install.
9 6. The installation status screen will appear,
notifying you of the current installation
actions being taken.
7. The next screen that will appear is the
Installation completion dialogue.
8. Click Finish.
Once the installation has completed, you should have the DL-Link icon in status
bar. Right clicking on this icon brings up the client command list.
The device window lists currently connected DL3
drives.
The reconnect command will force a reconnect
for all listed devices.
This completes the client side setup of the DL3 drive’s DL-Link feature. If
authorized, the computer will now be able to connect to the DL3 drive that is
DL-Link enabled. You may link up to 10 computers to use this DL3 drive. Each
computer will require the DL-Link Connector software to be installed and
running. In addition, the computer’s identification credentials will also need to
be uploaded to the DL3 drive.
10 Miscellaneous
Contact Us
If you have any unresolved issues with our software after referring to this manual,
give us a call or go to our website to chat with a DataLocker representative.
Phone: (913) 310-9088
Web:
datalocker.com
If you would like to contact us outside of our business hours (8:30AM – 5:30PM
CST), visit our support page to post your question, and we will get back to you as
soon as possible.
Support Site: support.datalocker.com/
11