1
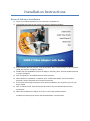
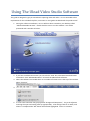
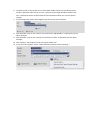
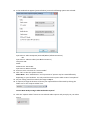
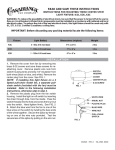
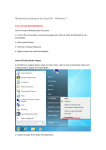
USB Video Capture Device IMPORTANT NOTE: Please read this guide fully. Many different aspects of the Ulead software are covered, common issues explained & frequent questions answered. Overview Thank you for purchasing our USB Video capture device. This unique device can capture and record high quality video and audio from any compatible video source without the need for a sound card. Installing this device is simple and no external power source is needed. To make this a complete solution for all your video capturing needs it also comes with the professional grade ‘Ulead Video Studio SE” software which allows even a novice user to capture, edit and finalise stylish movies in only three simple steps! You can then share your finished projects by saving them in a number of different formats for use in a DVD player, on the web or even mobile devices. High speed rendering and real-time performance mean less time waiting and more time creating. It even includes a number of special effects and video clip files to keep you going hour after hour! Key Features 1) 2) 3) 4) 5) 6) Includes professional and easy to learn & use video editing software Simple USB 2.0 device – no external power required Capture video and audio through the USB 2.0 device Includes brightness, contrast, hue and saturation control via the included software Does not require a sound card to function (even when recording audio) Plug & Play compatibility – no lengthy installation process, just install/run the software, plug in the device and start capturing! Specifications 1) 2) 3) 4) 5) 6) 7) Complient with USB 2.0 specifications rev 2.0 Supports NTSC & PAL video formats for input Video Input: 1 RCA composite connector & 1 S-Video connector Audio Input: Stereo Audio, 1 White & 1 Red RCA composite connectors Dimensions (L)88mm x (W)28mm x (H)18mm Powered by the USB port Supports high quality video resolutions a) NTSC: 720x480 @ 30FPS b) PAL: 720x576 @ 25 FPS System Requirements 1) 1 x USB 2.0 (or above ) port 2) Windows 2000 / XP / Vista / Windows 7 3) Pentium 4 or above (Minimum Core2Duo recommended) 4) 600MB of available hard drive space for Ulead software installation 5) We recommend you keep AT LEAST 4GB of free hard drive space for video capturing and editing 6) At least 1GB of RAM 7) Windows compatible display adaptor capable of at least 1024x768 video resolution 8) Windows compatible sound card (not required for audio capture but required for audio playback) Package Contents 1) 2) 3) 4) 1 x USB Video Capture Device 1 x USB Extension Cable 1 x CDRom with Ulead Installation software This User Manual! Important Notice – Please Read 1) The License Key for the included software is printed on the front of the disc itself 2) This product is not supplied with any adaptor cables. Some devices may require the use of extra cables to be successfully connected to your Easycap device. Installation Instructions Driver & Software Installation 1) Insert the included CD/DVD into your computers CD/DVD drive. 2) The CD/DVD will autorun and present you with the following window: 3) If the software does not autorun, click the windows “Start” button and go to “My Computer” (2000, XP, Vista) or “Computer” (Win7) 4) Double click the CD/DVD drive icon that displays “EasyCAP_2021” and the window pictured in step.2 will appear 5) Click “Install Driver” and follow the onscreen instuctions. 6) When the driver installation is complete, click “Install Video Studio” from the window pictured in step.2 and follow the onscreen instructions 7) If you know you already have Direct X9 or above installed on your computer you can now skip to step.9 8) Click “Install Directx 9” from the window pictured in step.2 and follow the onscreen instructions. 9) When the installation is finished, click “Exit” to close the installer window. Installation of the EasyCap drivers and ULead Software is now finished. Using The Ulead Video Studio Software This guide is designed to get you started with capturing video and audio. It is not intended to be a replacement for the included help files, instructions or user guides included with the product itself. 1. During the software installation, an icon will have been created on your desktop called “Ulead VideoStudio SE DVD”. Double click this icon to run the software. You will be presented with a window as below: 2. If you have a widescreen monitor you can tick the “16:9” box, otherwise leave both boxes unchecked. Click “VideoStudio Editor” to launch the Video Studio software. 3. When the software has loaded there are a number of buttons across the top of the window. Select “Capture” 4. Click “Capture Video” 5. In some cases a window may pop up titled “Change Field Properties”. This is the software scanning the input and setting itself up appropriately. A bar will go from 0% to 100%, and when it is completed the “OK” button will become highlighted. Click it to continue. 6. The video screen in the top left corner of the Video Studio software is the video preview window. Whatever video source you use, a preview of the image should be visible in this area. The bottom section of the window shows information about your current capture settings. 7. A few settings now need to be changed as per the section pictured below: 8. Click the down arrow on the “Source” line, and ensure “SMI Grabber” is selected as per the above example. 9. Click the down arrow on the “Format” line and ensure “DVD” is selected as per the above example. 10. Click “Options” which appears under the capture folder box. 11. In the menu that appears, select “Video and Audio Capture Property Settings…” 12. In the window that appears (pictured below), ensure the following options are selected: 13. 14. 15. 16. Video: Input Source: Video Composite (Uses Red/White/Yellow Connectors) OR Input Source : Video S-Video (Uses Black Connector) TV System: PAL Audio: Audio Device: Stereo Mix Input Source: Master Volume Ensure a tick is in the box for “Use PCI Audio” Click “OK” to close the options window. Please Note: Your “Audio device” and “Input Source” options may be named differently depending on your hardware. You only need choose the option which is NOT “microphone”. All your setting should now match the image in Step 7. If required, change the location of where your captured files will be saved by clicking the folder icon on the “Capture Folder” line. You Are Now Ready To Begin Video And Audio Capture! 17. Click the “Capture Video” button to start video & audio capture and press play on your video source. 18. When you reach the end of what you want to capture, click “Stop Capture”. 19. The captured video and audio will be saved into the folder you specified in Step 16. 20. You can now go back to the start and capture more video and audio, or move onto the editing process to edit and finalise your video. Good luck, have fun & thank you for shopping at a Gadget Express™ Store! Troubleshooting In some cases your computers setup and previously installed software can cause issues or conflicts with the Ulead software. In the immortal words of Douglas Adams, Don’t Panic! This is a normal by product of using multiple video and audio editing tools and can usually be resolved without any drastic measures. Below is a brief list/FAQ of the most commonly seen issues. If these do not help, please contact us via email or telephone, the details can be found at the end of the FAQ. Many thanks! Q: A: My CD doesn’t work! We also provide the software as a download from the following location: http://www.mobilesandeverything.co.uk/image_server/VideoCap.zip Q: A: The packaging says the CDKey is on the packaging but I cannot find it! You can find the CDKey on the front of the CD Itself, or here! 783A2-8A000-05520256 Q: A: How do I run the Video Studio Software? I can’t find a shortcut! During installation it should automatically create a shortcut on your desktop. If you cannot find it you can run the software manually by press the Windows Key + R and typing the line below and then pressing the Enter key: C:\Program Files\Ulead Systems\Ulead VideoStudio SE DVD\vstudio.exe Q: A: My system locks up during the “Change Field Properties” operation, what can I do? Give it some time to complete. Depending on your system, analysis of the incoming video feed can take up to 5 minutes or more. If your system does not recover and the bar does not reach 100% after 5 to 10 minutes, you may need to restart the program. If the problem persists, the drivers may not have installed properly. Uninstall all the Ulead software and drivers and reinstall following the instructions provided in this document. If the problem still continues, please get in touch via the contact details at the end of this FAQ. Q: A: I don’t see the audio options as described in Step 12 of this guide, help! Depending on what hardware you have in your system, you may find these options are different for you. The important thing is to choose an option which is NOT a microphone , a Line-in, or a Bluetooth device. The remaining option/options should allow you to tick the box marked “Use PCI Audio”. Q: I don’t have any audio coming through my computer when I press play on my video source. what could be wrong? First of all, make sure you have the cables connected up properly. The yellow connector is A: video, whilst the red and white are right and left audio respectively. The black connector is S-Video and has all 3 components in the one single connector. Secondly, check you have “Use PCI Audio” selected in the options referred to in Step 12. Finally, ensure the video source has the audio enabled and volume turned up. If none of this helps, please get in touch via the contact details at the end of this FAQ. Q: A: Im getting the error “Sample end time is before sample start time”, what should I do! If this happens change the “Format” to “DVD” in the options pictured in step 7 and try again. Q: I tick the “Use PCI Audio” box but it won’t stay ticked! Whenever I go back into the options it is unticked! Run the Ulead software in Compatibility mode for XP Service Pack 2 or 3. To do this, first of all shut down any running copies of the Ulead Video Studio Software. Next, right click on the “Ulead VideoStudio SE DVD” shortcut and select “Properties”. Choose the “Compatibility” tab and tick the box that says “Run this program in compatibility mode for:” and then select “Windows XP Service Pack 2” or “Windows XP Service Pack 3” from the drop down list. When you next run the Ulead software, go through Step 12 again and the box should now stay ticked. A: Still Struggling? Contact us! Thanks for reading through our FAQ and hopefully it helped you with the problem you were having but if you require further assistance just get in touch by sending us a message through Ebay/Amazon (depending on where you made your purchase), contacting us by phone on 01159899516 or if you prefer you can write to us at: Gadget Express Unit 5 Manvers Business Park High Hazles Road Hollygate Lane Cotgrave NG123GZ Thank you for purchasing from a Gadget™ Express store!