1
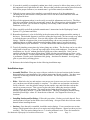
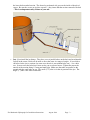
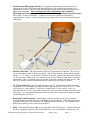
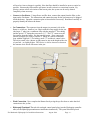
Connecting the Gas Heating System
to your hot tub
Getting Started - General Installation Considerations:
This document and the attached diagrams provide a general picture of how the system is set up. Your
site considerations may dictate some adjustment or changes. The placement of the components is
somewhat flexible, however there are a few important rules to follow. Read the following points
carefully before starting your installation.
1.
Your system is quite simple. The water in the tub is circulated by means of a pump
through a filter and then through the gas heater and returned to the tub. Your pump has either
one or two speeds depending on your system. A single speed pump is for tubs without jets – its
only job is to circulate the tub water for heating and filtration cycles. A two-speed pump
circulates for heating and filtration at low speed and has a higher speed for adding pressure to the
jets when the time comes. The control and pump system (Hydroquip) manages the temperature,
filter cycles, and pump. The user interface is through the remote touchpad that can be installed
next to the tub.
2. Important: National Electric Code requires that electronic spa equipment be at least 5 feet
away from the tub and/or behind a physical barrier that prevents a bather from reaching it. This
is an important safety requirement! Be certain that your heating system components
(Hydroquip and Gas heater) are 5 feet away from the tub or behind a physical barrier!
For example: If your tub and heater are over 5 feet apart then your installation meets code. If
your tub and heater are less than 5 feet apart, you must separate them with a barrier that prevents
anyone in the tub from touching the heater. This can be accomplished by using the stainless steel
cabinet we offer, by locating the equipment under a surrounding deck or by other means built on
site.
3. VERY IMPORTANT: Electrical devices used with hot tubs need to be wired into a ground
fault circuit interrupt (GFCI) protected circuit. The Hydroquip Control System must be wired
to a GFCI circuit breaker – have your electrician provide and install this type of breaker.
4. Qualified professionals familiar with local code must do electrical and gas connections. They
should review the manufacturers installation instructions included with the heater equipment.
5. We provide flexible spa hose for connecting the heater to your tub. If you place the equipment
more than ten feet away you may need additional spa hose to complete the installation. If more
length is needed, you can also use rigid pvc pipe that should be available locally.
6. The Hydroquip pump is self-priming. However, it should be installed at a maximum height of
18” below the normal high water level of the tub and not more than 4 feet below the floor of the
tub. Any installations outside of these parameters will require the use of a check valve (not
included) and possible adjustments to the pressure sensor. Improper installation may cause the
heating system to malfunction.
7. The Hydroquip controller and the gas heater are weatherproof, but they must be protected from
standing water or deep snow. Place equipment where it is not exposed to flooding, pooling of
water, or snow accumulation.
Zen Bathworks Hydroquip Gas Installation Instructions
August 2014
Page - 1 -
8. If your tub is partially or completely sunken into a deck, you may be able to keep most or all of
the equipment out of sight below the deck. However the gas heater must not be placed below the
deck unless proper clearances (see manufacturer’s gas heater manual) are adhered to.
9. If the tub is more exposed (free-standing), you can hide most or all of the equipment by
clustering the jets and suctions so that you don’t have to run hose around the front of the tub.
See diagram for ideas.
10. Place all the equipment where it can be easily accessed for adjustments and service. The filter,
ball valves and heater should be conveniently located. By placing unions or drain fittings at low
points in the system, you can drain it completely if necessary (winter vacation, extended
shutdown, service, etc.)
11. Please carefully read all the included manufacturer’s instructions for the Hydroquip Control
System, UV, gas heater and filter.
12. Remember that there is a lot of flexibility in the placement of the equipment and the routing of
the hoses. The included diagram is useful for getting the big picture. We have made every effort
to include the parts you will need. Your site may require some modifications or additional
fittings. With the exception of the jet and suction fittings, the rest are standard sized PVC
plumbing fittings available at hardware and plumbing supply stores if you find you need
additional parts for your installation. You can contact us for additional parts if necessary.
13. Test fit all plumbing connections dry before gluing any of them. The flex hose can be cut with a
utility knife or hack saw. Clean off any rough edges or fuzz with sandpaper. Complete the
installation as a “dry fit” without glue before gluing any of the connections. Once you are
satisfied with the whole system, begin gluing. Make sure the pipe and fittings are clean – wipe
off any dirt or debris. Use the primer first on both surfaces, then glue on both surfaces. The glue
is permanent. Provide good ventilation while gluing – the fumes are harmful. Avoid getting
glue on your skin by wearing gloves.
14. Reference the included diagrams for the following installation steps.
Installation steps:
•
Assemble Tub First. Place any staves with pre-cut holes for jets and suctions in the locations
that work best for your installation. See separate instructions for tub assembly. You have some
flexibility in choosing locations for the jets and suctions. See the diagrams for ideas and
suggestions.
•
Holes. If the holes for jets and suctions were not pre-cut (in most cases we have cut them for
you), cut them once the tub assembly is complete. Use a hole saw and start the cut from the
inside of the tub – once the pilot bit emerges on the outside, stop, and finish the cut from the
outside to prevent tear out. Take care not to place the holes where they interfere with the
exterior hoops or bench supports. The round suction fitting should be placed low (under
benches if possible) about 6 – 18 inches from the floor. The large rectangular skimmer fitting
should be placed high – about 10” from the rim of the tub. See diagram for ideas for jet
locations.
•
Installing Suction and Jet fittings. Follow this procedure: Gasket goes inside the tub. Put a
small amount of silicone on the inside rim of each fitting. Also put a little bit of silicone on the
threads before installing the nut.
•
Suctions. Once the tub is assembled, install the suction fittings. Your system has two suction
fittings (The diagram below shows a low suction and a high skimmer - instead you have two low
suctions). The low suction fittings have a 4” circular perforated cover. These are installed in
Zen Bathworks Hydroquip Gas Installation Instructions
August 2014
Page - 2 -
the lower holes marked suction. The slotted or perforated side goes on the inside of the tub of
course. Be sure the covers are in place on each – they insure that the suction cannot be blocked
– This is an important safety feature of your tub.
•
Jets. Next install the jet fittings. They have a set of parallel tubes on the back and an adjustable
eyeball in the center, which can be used to direct the water in a range of angles. If you need to
cut holes for the jets or suctions (in some cases the tub is sent without holes cut) – use a hole
saw. In most cases the holes have been cut for you on selected staves. Tighten the nut on the
outside of the suction fitting 1/2 turn past hand tight. Make sure the tubes are parallel to the
ground with the small tube on top. The small (1/2”) tube is for the air portion of the jets. The
larger (1”) tube is the water connection.
Zen Bathworks Hydroquip Gas Installation Instructions
August 2014
Page - 3 -
•
Assembling the Jets:
1 Insert jet body and large ridged gasket from the inside of the
tub. Put a small amount of silicone on the threads and between
the gasket and the wood.
2 Thread the air jet back body in place from the exterior of the
tub. Hand tighten firmly and align the so smaller diameter air
pipe is parallel to the ground and on the top.
3 Complete the jet assembly by inserting the o-ring, eyeball, flat
plastic gasket and brown escutcheon – in that order. See the
photos below for guidance.
Jet Parts List
1 Air jet back body
#2 stave
• 23 Stave
Large ridged gasket
• 4 Jet body
• 5 O-ring
6 Eyeball
7 Flat plastic gasket
8 Brown escutcheon
#4 jet body
Insert jet
#8 Escutcheon
body with
#6 eyeball
gasket on
inside, blue
jet back body
on outside –
#7 Flat
tighten.
plastic
#5 O-ring
gasket
#3 ridged gasket
#1 jet back body
Insert o-ring
then eyeball
then flat
plastic gasket
thread on the
escutcheon
Position Gas Heater. Place the gas heater unit in its approximate location. Considerations are:
ease of connection to gas source, ease of connection the Hydroquip control unit, proper clearance
on sides, front, and above from any walls, shrubs, or combustible materials. Refer to the
manufacturers installation instructions that came with the Gas heater for required clearances.
Zen Bathworks Hydroquip Gas Installation Instructions
August 2014
Page - 4 -
•
Positioning the Hydroquip controller. Now position the Hydroquip controller unit in its
approximate location. Remember that National Electric Code requires that electronic spa
equipment be at least 5 feet away from the tub and/or behind a physical barrier that prevents a
bather from reaching it. This is an important safety requirement! Be certain that
Hydroquip and Gas heater system is 5 feet away from the tub or behind a physical barrier!
Once again – do not overlook this. Consult local code and a qualified electrician for
requirements in your area. Other considerations are relative ease of access for installation and
adjustments.
•
Suction Connections. The diagram above shows one suction and one skimmer. We now use
two suctions that are both in the lower position. The suctions from the tub are joined together
using a 1.5” “T” fitting. Use flex hose and elbows as needed. Between the suction line and the
UV water purifier, install a ball valve that allows you to close off the system at this location for
maintenance. This is so that the water can be shut off for filter cleaning and other service. The
ball valve includes a union fitting that allows for a hassle-free disconnect if needed.
•
UV Water purifer next. For tubs with gas heaters, the UV Water purifier should be the next
component. Use two bushings (included) to reduce the ports on the UV from 2” to 1.5”. Then
you can use two “street elbows” or flex line to connect the UV device inline. Note: it is
important that the UV device be on the suction side of the Gas heater (in other words the cooler
water side) – to avoid potential problems with overly hot water coming out of the heater which
could damage the UV device.
•
Hydroquip Controller/pump: Using fittings as needed, and the spa flex hose, make dry
connections that join to the inlet side of the pump on the Hydroquip. Utilize the fittings in the
way that works best for your situation. Use additional unions as needed. The output from the
Hydroquip assembly is now connected to the filter…
•
Filter. Next install the filter taking care to align the IN and OUT properly. Double check that
the flow is going the right way. Be sure that the filter is in a convenient location because you
Zen Bathworks Hydroquip Gas Installation Instructions
August 2014
Page - 5 -
will need to clean or change it regularly. Note the filter should be installed as near to vertical as
possible. Between the filter and the gas heater, install a union in a convenient location. By
placing a union or ball valve/union at the lowest point, the system can be easily drained
completely when necessary.
•
Connect to Gas Heater. Using elbows and flex hose, connect the output from the filter, to the
input on the Gas heater. The instructions and connection parts for the gas heater may be shipped
inside the heater. Open the connection plate to locate them if necessary. Read these carefully to
properly identify the inlet to the heater.
•
Jet Connections. The sequence from the output (or pressure) side of the
heater is as follows: heater to jets. Begin with the water supply for the jets
(the larger 1” tubes) in a continuous loop with the supplied 1” flex tubing
and the special “T” fitting that converts to 1.5”. This “T” connects to the
line coming from the heater. See the attach diagram. Next connect the
smaller air supply for each jet (smaller ½”tubes) in a similar continuous
loop with the supplied ½” flex tubing, small “T” and the air control valve.
The airjet control valve (shown at right) must be just at the height of the rim
of your tub – or slightly higher. This device is used to increase or decrease
the amount of air mixed with water in the jets.
•
•
•
Final Connection. Now complete the Return line by using the spa flex hose to make the final
connection to the jet line.
•
Hydroquip Touchpad. The tub-side touchpad control panel plugs into the Hydroquip controller
unit (see the Hydroquip manufacturers installation instructions). This panel should be placed
Zen Bathworks Hydroquip Gas Installation Instructions
August 2014
Page - 6 -
close to the tub so you can adjust the temperature or turn on jets from within the tub. Use the
included tub shelf touchpad mount to attach it to the side of the tub.
•
Electrical connections to the heater unit. Contact a qualified professional electrician for these
connections. The Hydroquip must be wired to a GFCI circuit breaker – have your electrician
provide and install this type of breaker. Do not try to make these connections on your own.
Refer to the Hydroquip installation instructions.
•
Gas Connection to the gas heater unit. Contact a qualified gas appliance installer to make the
actual gas connection to the heater.
Operation
o Make sure the tub is holding water before starting the system. Check your glue joints and
threaded connections and correct any leaks at this time.
o Refer to the Hydroquip user manual to learn how to set the temperature, time of day, filtration
schedule and other heater functions.
o Turn the temperature on the gas heater all the way up to the highest setting. The actual
temperature setting will be done on the Hydroquip control touchpad. The gas heater must be
plugged into a 120 volt electrical source.
o Be sure that all ball valves are in the open position. (handle is parallel to the hose).
o Begin by setting the temperature to about 100 degrees on the Hydroquip.
o To operate the jets, press the jet button icon on your touchpad. This will set the pump on high
speed.
o Adjust the eyeballs in the jets as needed to get the jet action you prefer. Open or close the air
control valve to adjust the jet air mixture. More air makes the jets more aggressive.
Regular Tub Maintenance
o Set filtration cycles for 2 hours twice per day. Adjust as necessary. Clean the filter every two
weeks or as needed.
o Maintain the pH to proper level (7.2 – 7.6 range).
o Maintain clean water. Warm water can grow bacteria quickly.
o Change the water and clean the tub at least every 4 to 6 weeks.
o Replace the filter once per year.
o Oil the exterior of the tub once per year.
Maintaining Clean Hot Tub Water
It is important to carefully monitor the quality of the water in your tub. Bacteria can grow in warm
water so you must take steps to sanitize the water. We have a simple and safe approach that will keep
your tub water clean and safe.
Zen Bathworks Hydroquip Gas Installation Instructions
August 2014
Page - 7 -
We recommend the use of Granulated DiChlor for water sanitation. A small supply of this chemical has
been included with your new tub. We recommend that you use Leisure Time Spa 56 DiChlor only –
other products can damage your wood tub.
Test water and get pH in the 7.2 to 7.6 range (7.4 or 7.5 is ideal.)
1. Whenever the pump is running the UV Delta water purifier is working to kill bacteria in the
water. You can confirm that it is working if you see a bluish glow at the clear end of the
cylindar.
2. When you fill the tub with fresh water, add two tablespoons of DiChlor. Turn on filter for 30
minutes to mix the water.
3. After each tub use add tablespoons of DiChlor (or three times per week). Do this AFTER tub
use, not before. (Or at least 6 hours prior to tub use).
4. Set the filter to come on 2 - 4 times per day for a total time of about 4 hours per day.
5. Clean filter every 2 weeks. (see instructions below on filter cleaning)
6. Check pH level every two weeks. Balance pH between 7.2 – 7.6. Lower with sodium bisulfate
- or use Spa Down*. Raise with baking soda or soda ash – or use Spa Up*.
these items available on our website – woodentubs.com
We recommend draining and cleaning and refilling the tub with fresh water every 4-6 weeks or as
needed. Frequent water changes allow you to clean the surfaces of the tub as well.
Your new cedar tub will leach a reddish color into the water for the first several fillings, and with some
water conditions, a small amount of foam may form on the surface. The natural tannin oils in the wood
cause this. It is what gives the wood and water the wonderful cedar smell – it is harmless and the color
will diminish with time. You can speed up the process by more frequent water changes.
Filter Cleaning
You should clean your filter every 2 weeks. Here’s how:
1. To remove the filter, turn off the system, then close the two ball valves. Remove the top of the
filter housing. Clean the filter every 2 to 4 weeks or as needed. You can simply wash it in a
dishwasher if it fits or use a high-pressure garden hose. We can supply you with replacement
filters. The filter should be replaced annually, or when it shows signs of wear or reduced flow.
2. Spray the filter with a garden hose equipped with a straight flow nozzle. Work from top down
and wash the pleats – especially between the pleats where the most dirt builds up. Smaller filters
may fit in your dishwasher.
3. Rinse until all the dirt and debris is washed off.
4. Filters that are exposed to heavy bather loads may clog with oils that can be soaked out with a
cup of dishwasher detergent in 5 gallons of warm water.
5. Rinse again to remove oil and detergent. If the filter is coated with algae or minerals, soak it in a
solution of 1 part muriatic acid to 20 parts water until the solution stops bubbling. Rinse
thoroughly and reassemble.
6. Replace the filter once per year. You can order a replacement through our website:
woodentubs.com.
7. Tip: Order a second filter and swap the filters each time you clean them. Allowing the filter to
dry out completely between improves performance. Order tub supplies from woodentubs.com.
Trouble Shooting Guide.
For heater related errors, refer to the trouble shooting guide provided by the Hydroquip or Gas
heater manufacturer.
Weak water flow. Clean filter. Check that all valves are fully open. Check that there is nothing
blocking suction fittings.
Zen Bathworks Hydroquip Gas Installation Instructions
August 2014
Page - 8 -