1
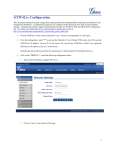
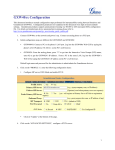
UCM61xx Configuration Grandstream UCM61xx IPPBX firmware version 1.0.4.7 has passed SIP Trunk interoperability testing with Broadvox on February 12th, 2014. This document introduces major configuration steps performed for interoperability testing between Broadvox and Grandstream UCM61xx IP PBX. For detailed information to configure SIP Extensions, PSTN lines, SIP trunks and all the other system settings via web GUI, please download the UCM61xx user manual from Grandstream web site: http://www.grandstream.com/products/ucm_series/ucm61xx/documents/ucm61xx_usermanual_english.pd f. Connecting a UCM 1. Connect one end of an RJ-45 Ethernet cable into: WAN port of UCM6102 LAN1 port of UCM6104 LAN port of UCM6108 and UCM6116 2. Connect the other end of the Ethernet cable into the uplink port of an Ethernet switch/hub. 3. Connect the 12V DC power adapter into the 12V DC power jack on the back of the UCM61xx. Insert the main plug of the power adapter into a surge-protected power outlet. 4. Wait for UCM61xx to boot up. The LCD in the front will show its hardware information when the system boots up. 5. Once the UCM61xx is successfully connected to network, the LCD will display its IP address. 6. Open a web browser on the PC and enter the web GUI URL in the format: http(s)://IP-Address:Port The default protocol is HTTPS and the default port number is 8089. 7. The web GUI login page will be displayed. Default username and password for administrator are admin/admin. 1 Create a UCM Extension After Logging into UCM61xx web GUI, click on PBX Basic/Call Routes Extensions, click on “Create New User” to create a UCM extension. This extension is used in UCM SIP trunk test. 2 Configure a VoIP Trunk Click on PBX Basic/Call Routes VoIP Trunks, click on “Create New SIP/IAX Trunk”, enter the SIP trunk account information: Click on Save, a register SIP trunk is created. Click on “Apply Changes” to make the change take effect. 3 To create s static SIP trunk, enter the following information: 4 Configure an Outbound Route Click on PBX Basic/Call Routes Outbound Routes, click on “Create New Outbound Rule”, enter the Calling Rule Name, Pattern etc. for an outbound route using the Broadvox SIP trunk: An Outbound Rule “broadvox” is created. 5 Configure an Inbound Route Click on PBX Basic/Call Routes Inbound Routes, click on “Create New Inbound Rule”, select the Broadvox VoIP trunk just created, enter the DID Pattern, Default Destination for an inbound route using the Broadvox SIP trunk. With extension 6001 as the default destination, calls coming in from the Brodvox trunk will ring extension 6001 directly. An Inbound Rule “Trunks-Broadvox” is created. 6