1
Grandstream Networks, Inc.
UCM6102/UCM6104/UCM6108/UCM6116
All-in-one Hybrid IPPBX Appliance
User Manual
Grandstream Networks, Inc.
www.grandstream.com
UCM6102/UCM6104/UCM6108/UCM6116 User Manual
Index
CHANGE LOG ............................................................................................... 9
FIRMWARE VERSION 1.0.0.32 .......................................................................................................... 9
WELCOME .................................................................................................. 10
PRODUCT OVERVIEW................................................................................11
FEATURE HIGHTLIGHTS ..................................................................................................................11
TECHNICAL SPECIFICATIONS .........................................................................................................11
INSTALLATION ........................................................................................... 14
EQUIPMENT PACKAGING................................................................................................................ 14
CONNECTING YOUR UCM6102/UCM6104/UCM6108/UCM6116 ................................................... 14
CONNECTING THE UCM6102 .................................................................................................. 14
CONNECTING THE UCM6104 .................................................................................................. 15
CONNECTING THE UCM6108 .................................................................................................. 16
CONNECTING THE UCM6116................................................................................................... 17
SAFETY COMPLIANCES .................................................................................................................. 18
WARRANTY ...................................................................................................................................... 18
GETTING STARTED ................................................................................... 19
USING THE LCD MENU .................................................................................................................... 19
USING THE LED INDICATORS ......................................................................................................... 20
USING THE WEB GUI ....................................................................................................................... 20
ACCESSING WEB GUI .............................................................................................................. 20
WEB GUI CONFIGURATIONS ................................................................................................... 21
SAVING AND APPLYING CHANGES ......................................................................................... 22
MAKING YOUR FIRST CALL ............................................................................................................ 22
SYSTEM SETTINGS ................................................................................... 23
NETWORK SETTINGS...................................................................................................................... 23
LAN/WAN/802.1X SETTINGS .................................................................................................... 23
NETWORK SECURITY SETTINGS ........................................................................................... 25
CHANGE PASSWORD ...................................................................................................................... 27
LDAP SERVER .................................................................................................................................. 27
LDAP SERVER CONFIGURATIONS .......................................................................................... 28
LDAP PHONEBOOK .................................................................................................................. 28
Firmware Version 1.0.0.32
UCM6102/6104/6108/6116 USER MANUAL
Page 1 of 108
LDAP CLIENT CONFIGURATIONS ............................................................................................ 29
HTTP SERVER .................................................................................................................................. 30
EMAIL SETTINGS ............................................................................................................................. 31
TIME SETTINGS ............................................................................................................................... 31
PROVISIONING........................................................................................... 33
OVERVIEW ....................................................................................................................................... 33
AUTO PROVISIONING ...................................................................................................................... 33
MANUAL PROVISIONING ................................................................................................................. 35
DISCOVERY ............................................................................................................................... 35
ASSIGNMENT ............................................................................................................................ 36
PROVISIONING ......................................................................................................................... 37
EXAMPLES ....................................................................................................................................... 37
EXTENSIONS .............................................................................................. 40
CREATE NEW USER ........................................................................................................................ 40
BATCH ADD EXTENSIONS .............................................................................................................. 42
EDIT EXTENSION ............................................................................................................................. 44
TRUNKS ...................................................................................................... 45
ANALOG TRUNKS ............................................................................................................................ 45
VOIP TRUNKS ................................................................................................................................... 47
CALL ROUTES ........................................................................................... 49
OUTBOUND ROUTES ...................................................................................................................... 49
INBOUND ROUTES .......................................................................................................................... 50
CONFERENCE BRIDGE ............................................................................ 53
IVR ............................................................................................................... 55
CONFIGURING IVR .......................................................................................................................... 55
CREATING IVR PROMPT ................................................................................................................. 56
RECORD NEW IVR PROMPT.................................................................................................... 56
UPLOAD IVR PROMPT .............................................................................................................. 57
VOICE PROMPT ......................................................................................... 58
VOICEMAIL ................................................................................................. 59
CONFIGURING VOICEMAIL ............................................................................................................. 59
CONFIGURING VOICEMAIL GROUP ............................................................................................... 60
Firmware Version 1.0.0.32
UCM6102/6104/6108/6116 USER MANUAL
Page 2 of 108
RING GROUP .............................................................................................. 62
CONFIGURING RING GROUP ......................................................................................................... 62
RING GROUP PARAMETERS .......................................................................................................... 62
PAGING AND INTERCOM GROUP ........................................................... 64
CALL QUEUE .............................................................................................. 66
CONFIGURING CALL QUEUE .......................................................................................................... 66
CALL QUEUE PARAMETERS ........................................................................................................... 66
MUSIC ON HOLD ........................................................................................ 68
FAX/T.38 ...................................................................................................... 69
CONFIGURING FAX/T.38 .................................................................................................................. 69
INTERNAL OPTIONS ................................................................................. 70
INTERNAL OPTIONS/GENERAL ...................................................................................................... 70
INTERNAL OPTIONS/FEATURE CODES ......................................................................................... 71
INTERNAL OPTIONS/RTP SETTINGS ............................................................................................. 73
INTERNAL OPTIONS/HARDWARE CONFIG.................................................................................... 73
INTERNAL OPTIONS/STUN MONITOR............................................................................................ 75
PBX SETTINGS........................................................................................... 76
IAX SETTINGS .................................................................................................................................. 76
IAX SETTINGS/GENERAL ......................................................................................................... 76
IAX SETTINGS/CODECS ........................................................................................................... 76
IAX SETTINGS/JITTER BUFFER............................................................................................... 77
IAX SETTINGS/REGISTRATION ............................................................................................... 77
IAX SETTINGS/SECURITY ........................................................................................................ 78
SIP SETTINGS .................................................................................................................................. 78
SIP SETTINGS/GENERAL ......................................................................................................... 78
SIP SETTINGS/CODECX ........................................................................................................... 79
SIP SETTINGS/JITTER BUFFER ............................................................................................... 79
SIP SETTINGS/MISCELLANEOUS ............................................................................................ 80
SIP SETTINGS/SESSTION TIMER ............................................................................................ 80
SIP SETTINGS/TLS AND TCP ................................................................................................... 81
SIP SETTINGS/NAT ................................................................................................................... 81
SIP SETTINGS/ToS .................................................................................................................... 83
SIP SETTINGS/DEBUG ............................................................................................................. 84
Firmware Version 1.0.0.32
UCM6102/6104/6108/6116 USER MANUAL
Page 3 of 108
STATUS AND REPORTING........................................................................ 85
PBX STATUS ..................................................................................................................................... 85
TRUNKS ..................................................................................................................................... 85
EXTENSIONS............................................................................................................................. 86
QUEUES .................................................................................................................................... 88
CONFERENCE ROOMS ............................................................................................................ 89
INTERFACES STATUS ............................................................................................................... 89
PARKING LOT ............................................................................................................................ 91
SYSTEM STATUS ............................................................................................................................. 91
GENERAL .................................................................................................................................. 92
NETWORK ................................................................................................................................. 92
STORAGE USAGE ..................................................................................................................... 93
RESOURCE USAGE .................................................................................................................. 93
CDR (Call Detail Report).................................................................................................................... 94
UPGRADING AND MAINTENANCE .......................................................... 98
UPGRADING ..................................................................................................................................... 98
UPGRADING VIA NETWORK .................................................................................................... 98
UPGRADING VIA LOCAL UPLOAD ........................................................................................... 99
NO LOCAL FIRMWARE SERVERS ......................................................................................... 100
BACKUP .......................................................................................................................................... 100
LOCAL BACKUP ...................................................................................................................... 100
NETWORK BACKUP ................................................................................................................ 101
CLEANER ........................................................................................................................................ 102
RESET AND REBOOT .................................................................................................................... 103
SYSLOG .......................................................................................................................................... 104
TROUBLESHOOTING ..................................................................................................................... 104
ETHERNET CAPTURE ............................................................................................................ 104
PING ......................................................................................................................................... 105
TRACEROUTE ......................................................................................................................... 106
EXPERIENCING THE UCM6102/UCM6104/UCM6108/UCM6116 ......... 107
Firmware Version 1.0.0.32
UCM6102/6104/6108/6116 USER MANUAL
Page 4 of 108
Table of Tables
UCM6102/UCM6104/UCM6108/UCM6116 User Manual
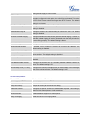
Table 1: TECHNICAL SPECIFICATIONS ...................................................................................................11
Table 2: UCM6102/UCM6104 EQUIPMENT PACKAGING ....................................................................... 14
Table 3: UCM6108/UCM6116 EQUIPMENT PACKAGING ....................................................................... 14
Table 4: LCD MENU OPTIONS................................................................................................................. 19
Table 5: UCM6102/UCM6104 LED INDICATORS..................................................................................... 20
Table 6: UCM6108/UCM6116 LED INDICATORS ..................................................................................... 20
Table 7: NETWORK SETTINGS ............................................................................................................... 23
Table 8: UCM6102 NETWORK SETTINGS .............................................................................................. 24
Table 9: Firewall Rule Settings .................................................................................................................. 26
Table 10: HTTP Server Settings................................................................................................................ 30
Table 11: Email Settings ............................................................................................................................ 31
Table 12: Time Settings............................................................................................................................. 31
Table 13: Auto Provision Setting ............................................................................................................... 35
Table 14: Extension Configuration Parameters ......................................................................................... 40
Table 15: Batch Add Extension Parameters .............................................................................................. 42
Table 16: Analog Trunk Configuration Parameters .................................................................................... 45
Table 17: VoIP Trunk Configuration Parameters ....................................................................................... 47
Table 18: Outbound Route Configuration Parameters .............................................................................. 49
Table 19: Inbound Route Configuration Parameters ................................................................................. 51
Table 20: Conference Bridge Configuration Parameters ........................................................................... 53
Table 21: IVR Configuration Parameters ................................................................................................... 55
Table 22: Email Settings For Voicemails ................................................................................................... 59
Table 23: Voicemail Settings ..................................................................................................................... 59
Table 24: Ring Group Parameters............................................................................................................. 62
Table 25: Page/Intercom Group Parameters ............................................................................................. 64
Table 26: Call Queue Parameters ............................................................................................................. 66
Table 27: FAX/T.38 Settings ...................................................................................................................... 69
Table 28: Trunk Status............................................................................................................................... 85
Table 29: Extension Status ........................................................................................................................ 87
Table 30: Agent Status .............................................................................................................................. 88
Table 31: Interface Status Indicators ......................................................................................................... 90
Table 32: Parking Lot Status ..................................................................................................................... 91
Table 33: System Status->General............................................................................................................ 92
Table 34: System Status->Network ........................................................................................................... 92
Table 35: CDR Filter Criteria ..................................................................................................................... 95
Table 36: CDR Statistics Filter Criteria ...................................................................................................... 97
Table 37: Network Upgrade Configuration ................................................................................................ 98
Table 38: Network Backup Configuration ................................................................................................ 102
Firmware Version 1.0.0.32
UCM6102/6104/6108/6116 USER MANUAL
Page 5 of 108
Table 39: Cleaner Configuration.............................................................................................................. 103
Firmware Version 1.0.0.32
UCM6102/6104/6108/6116 USER MANUAL
Page 6 of 108
Table of Figures
UCM6102/UCM6104/UCM6108/UCM6116 User manual
Figure 1: UCM6102 Front View................................................................................................................. 14
Figure 2: UCM6102 Back View ................................................................................................................. 15
Figure 3: UCM6104 Front View................................................................................................................. 15
Figure 4: UCM6104 Back View ................................................................................................................. 16
Figure 5: UCM6108 Front View................................................................................................................. 16
Figure 6: UCM6108 Back View ................................................................................................................. 16
Figure 7: UCM6116 Front View ................................................................................................................. 17
Figure 8: UCM6116 Back View ................................................................................................................. 17
Figure 9: UCM6116 Web GUI Login Page ................................................................................................ 21
Figure 10: Current Service ........................................................................................................................ 25
Figure 11: Create New Firewall Rule......................................................................................................... 26
Figure 12: LDAP Server Configurations .................................................................................................... 28
Figure 13: Add New LDAP Phonebook ..................................................................................................... 29
Figure 14: GXP2200 LDAP Phonebook Configuration.............................................................................. 30
Figure 15: Auto Provision Setting .............................................................................................................. 34
Figure 16: Auto Discover ........................................................................................................................... 36
Figure 17: Discovered Devices ................................................................................................................. 36
Figure 18: Assign Extension To Device ..................................................................................................... 36
Figure 19: Create New Device .................................................................................................................. 37
Figure 20: Provisioning Example 1 ........................................................................................................... 38
Figure 21: Provisioning Example 2 ........................................................................................................... 39
Figure 22: Click On Prompt To Create IVR Prompt ................................................................................... 56
Figure 23: Record New IVR Prompt .......................................................................................................... 57
Figure 24: Language Settings For Voice Prompt ...................................................................................... 58
Figure 25: Default Email Template ............................................................................................................ 59
Figure 26: Voicemail Group....................................................................................................................... 60
Figure 27: Ring Group .............................................................................................................................. 62
Figure 28: Ring Group Configuration ........................................................................................................ 63
Figure 29: Page/Intercom Group............................................................................................................... 64
Figure 30: Page/Intercom Group Settings................................................................................................. 65
Figure 31: Call Queue ............................................................................................................................... 66
Figure 32: Music On Hold Default Class ................................................................................................... 68
Figure 33: Status->PBX Status.................................................................................................................. 85
Figure 34: Trunk Status ............................................................................................................................. 85
Figure 35: Extension Status ...................................................................................................................... 87
Figure 36: Queue Status ........................................................................................................................... 88
Figure 37: Conference Room Status ......................................................................................................... 89
Figure 38: UCM6116 Interfaces Status ..................................................................................................... 90
Figure 39: Parking Lot Status .................................................................................................................... 91
Firmware Version 1.0.0.32
UCM6102/6104/6108/6116 USER MANUAL
Page 7 of 108
Figure 40: System Status->Storage Usage ............................................................................................... 93
Figure 41: System Status->Resource Usage ............................................................................................ 94
Figure 42: CDR Filter ................................................................................................................................ 95
Figure 43: Call Report ............................................................................................................................... 95
Figure 44: Call Report Entry With Audio Recording File ........................................................................... 96
Figure 45: CDR Statistics .......................................................................................................................... 96
Figure 46: Network Upgrade ..................................................................................................................... 98
Figure 47: Local Upgrade.......................................................................................................................... 99
Figure 48: Local Backup ......................................................................................................................... 101
Figure 49: Network Backup ..................................................................................................................... 102
Figure 50: Cleaner .................................................................................................................................. 103
Figure 51: Reset and Reboot .................................................................................................................. 104
Figure 52: Ethernet Capture.................................................................................................................... 105
Figure 53: PING ...................................................................................................................................... 105
Figure 54: Traceroute.............................................................................................................................. 106
Firmware Version 1.0.0.32
UCM6102/6104/6108/6116 USER MANUAL
Page 8 of 108
CHANGE LOG
This
section
documents
significant
changes
from
previous
versions
of
the
UCM6102/UCM6104/UCM6108/UCM6116 user manuals. Only major new features or major document
updates are listed here. Minor updates for corrections or editing are not documented here.
FIRMWARE VERSION 1.0.0.32
•
This is the initial version.
Firmware Version 1.0.0.32
UCM6102/6104/6108/6116 USER MANUAL
Page 9 of 108
WELCOME
Thank
you
for
purchasing
Grandstream
UCM6102/UCM6104/UCM6108/UCM6116.
UCM6102/UCM6104/UCM6108/UCM6116 is an innovative, all-in-one hybrid IP PBX appliance designed
for small to medium business. Powered by an advanced hardware platform with robust system resources,
the
UCM6102/UCM6104/UCM6108/UCM6116
offers
a
highly
versatile
state-of-the-art
Unified
Communication (UC) solution for converged voice, video, data, fax and video surveillance application
needs.
Incorporating
industry-leading
features
and
performance,
the
UCM6102/UCM6104/UCM6108/UCM6116 offers quick setup, deployment with ease and unrivaled
reliability all at an unprecedented price point.
Caution:
Changes or modifications to this product not expressly approved by Grandstream, or operation of this
product in any way other than as detailed by this User Manual, could void your manufacturer warranty.
Warning:
Please do not use a different power adaptor with the UCM6102/UCM6104/UCM6108/UCM6116 as it may
cause damage to the products and void the manufacturer warranty.
This document is subject to change without notice. The latest electronic version of this user manual is
available for download here:
http://www.grandstream.com/support
Reproduction or transmittal of the entire or any part, in any form or by any means, electronic or print, for
any purpose without the express written permission of Grandstream Networks, Inc. is not permitted.
Firmware Version 1.0.0.32
UCM6102/6104/6108/6116 USER MANUAL
Page 10 of 108
PRODUCT OVERVIEW
FEATURE HIGHTLIGHTS
•
1GHz ARM Cortex A8 application processor, large memory (512MB DDR RAM, 4GB NAND Flash),
and dedicated high performance multi-core DSP array for advanced voice processing.
•
Integrated 2/4/8/16 PSTN trunk FXO ports, 2 analog telephone FXS ports, and up to 50 SIP trunk
options.
•
Gigabit network port with integrated PoE, USB, SD; integrated NAT router with advanced QoS support
(UCM6102 only).
•
Supports a wide range of popular voice codes (including G.711 A-law/U-law, G.722, G.723, G.726,
G.729A/B, iLBC, GSM), video codec (including H.264, H.263, H.263+), and Fax (T.38).
•
Hardware DSP based 128ms-tail-length carrier-grade line echo cancellation (LEC).
•
Supports up to 60 concurrent calls and up to 32 conference attendees.
•
Flexible dial plan, call routing, site peering, call recording.
•
Automated detection and provisioning of IP phones, video phones, ATA and other endpoints for easy
deployment.
•
Hardware encryption accelerator to ensure strongest security protection using SRTP, TLS, and
HTTPS.
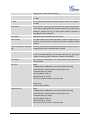
TECHNICAL SPECIFICATIONS
Table 1: TECHNICAL SPECIFICATIONS
Interfaces
Analog Telephone FXS Ports
2 ports
PSTN Line FXO Ports
•
UCM6102: 2 ports
•
UCM6104: 4 ports
•
UCM6108: 8 ports
•
UCM6116: 16 ports
•
UCM6108/UCM6116: Single 10M/100M/1000M RJ45 Ethernet port
Network Interfaces
with integrated PoE Plug (IEEE 802.3at-2009)
•
UCM6102/UCM6104: Dual 10M/100M/1000M RJ45 Ethernet ports
with integrated PoE Plug (IEEE 802.3at-2009)
NAT Router
Yes, UCM6102 only
Peripheral Ports
USB, SD
LED Indicators
Power/Ready, Network, PSTN Line, USB, SD
Firmware Version 1.0.0.32
UCM6102/6104/6108/6116 USER MANUAL
Page 11 of 108
LCD Display
128x32 graphic LCD with DOWN and OK button
Reset Switch
Yes
Voice/Video Capabilities
Voice-over-Packet
LEC with NLP Packetized Voice Protocol Unit, 128ms-tail-length carrier
Capabilities
grade Line Echo Cancellation, Dynamic Jitter Buffer, Modem detection &
auto-switch to G.711
Voice and Fax Codecs
G.711 A-law/U-law, G.722, G.723.1 5.3K/6.3K, G.726, G.729A/B, iLBC,
GSM; T.38
Video Codecs
H.264, H.263, H.263+
QoS
Layer 3 QoS
Signaling and Control
DTMF Methods
In Audio, RFC2833, and SIP INFO
Provisioning Protocol and
TFTP/HTTP/HTTPS,
Plug-and-Play
Grandstream IP endpoints
Network Protocols
TCP/UDP/IP, RTP/RTCP, ICMP, ARP, DNS, DDNS, DHCP, NTP, TFTP,
auto-discovery
and
auto-provisioning
of
SSH, HTTP/HTTPS, PPPoE, SIP (RFC3261), STUN, SRTP, TLS/SIP
Disconnect Methods
Call Progress Tone, Polarity Reversal, Hook Flash Timing, Loop Current
Disconnect, Busy Tone
Security
Media
SRTP, TLS, HTTPS, SSH
Physical
Universal Power Supply
Environmental
Dimensions
Mounting
•
Output: 12VDC, 1.5A
•
Input: 100-240VAC, 50-60Hz
•
Operating: 32 - 104oF / 0 - 40oC, 10-90% (non-condensing)
•
Storage: 14 - 140oF / -10 - 60oC
•
UCM6102/UCM6104: 226mm (L) x 155mm (W) x 34.5mm (H)
•
UCM6108/UCM6116: 440mm (L) x 185mm (W) x 44mm (H)
Wall mount and Desktop
Additional Features
Caller ID
Bellcore/Telcordia, ETSI-FSK, ETSI-DTMF, SIN 227 - BT, NTT Japan
(pending)
Polarity Reversal/ Wink
Yes, with enable/disable option upon call establishment and termination
Call Center
Multiple configurable call queues, automatic call distribution (ACD)
Firmware Version 1.0.0.32
UCM6102/6104/6108/6116 USER MANUAL
Page 12 of 108
based on agent skills/availability busy level, in-queue announcement
Customizable
Auto
Up to 5 layers of IVR (Interactive Voice Response)
Attendant
Concurrent Calls
Conference Bridges
•
UCM6102: Up to 30 simultaneous calls
•
UCM6104: Up to 45 simultaneous calls
•
UCM6108/UCM6116: Up to 60 simultaneous calls
•
UCM6102/UCM6104: Up to 3 password-protected conference
bridges allowing up to 25 simultaneous PSTN or IP participants
•
UCM6108/UCM6116: Up to 6 password-protected conference
bridges allowing up to 32 simultaneous PSTN or IP participants
Call Features
Call
park,
call
forward,
call
transfer,
DND,
ring/hunt
group,
paging/intercom and etc
Compliance
•
FCC: Part 15 (CFR 47) Class B, Part 68
•
CE: EN55022 Class B, EN55024, EN61000-3-2, EN61000-3-3,
EN60950-1, TBR21, RoHS
•
TICK: AS/NZS CISPR 22 Class B, AS/NZS CISPR 24, AS/NZS
60950, AS/ACIF S002
•
Firmware Version 1.0.0.32
ITU-T K.21 (Basic Level); UL 60950 (power adapter)
UCM6102/6104/6108/6116 USER MANUAL
Page 13 of 108
INSTALLATION
This section describes detailed information on installation, connection and warranty policy of the
UCM6102/UCM6104/UCM6108/UCM6116.
EQUIPMENT PACKAGING
Table 2: UCM6102/UCM6104 EQUIPMENT PACKAGING
Main Case
Yes (1)
Power Adaptor
Yes (1)
Ethernet Cable
Yes (1)
Quick Installation Guide
Yes (1)
Table 3: UCM6108/UCM6116 EQUIPMENT PACKAGING
Main Case
Yes (1)
Power Adaptor
Yes (1)
Ethernet Cable
Yes (1)
Quick Installation Guide
Yes (1)
Wall Mount
Yes (2)
Screws
Yes (6)
CONNECTING YOUR UCM6102/UCM6104/UCM6108/UCM6116
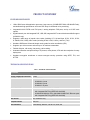
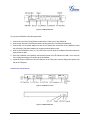
CONNECTING THE UCM6102
Figure 1: UCM6102 Front View
Firmware Version 1.0.0.32
UCM6102/6104/6108/6116 USER MANUAL
Page 14 of 108
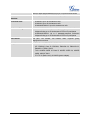
Figure 2: UCM6102 Back View
To set up the UCM6102, follow the steps below:
1. Connect one end of an RJ-45 Ethernet cable into the WAN port of the UCM6102;
2. Connect the other end of the Ethernet cable into the uplink port of an Ethernet switch/hub;
3. Connect the 12V DC power adapter into the 12V DC power jack on the back of the UCM6102. Insert
the main plug of the power adapter into a surge-protected power outlet;
4. Wait for the UCM6102 to boot up. The LCD in the front will show its hardware information when the
boot process is done;
5. Once the UCM6102 is successfully connected to network, the LED indicator for WAN in the front will
be in solid green and the LCD shows up the IP address;
6. (Optional) Connect PSTN lines from the wall jack to the FXO ports; connect analog lines (phone and
fax) to the FXS ports.
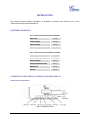
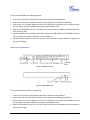
CONNECTING THE UCM6104
Figure 3: UCM6104 Front View
Firmware Version 1.0.0.32
UCM6102/6104/6108/6116 USER MANUAL
Page 15 of 108
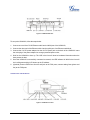
Figure 4: UCM6104 Back View
To set up the UCM6104, follow the steps below:
1. Connect one end of an RJ-45 Ethernet cable into the LAN 1 port of the UCM6104;
2. Connect the other end of the Ethernet cable into the uplink port of an Ethernet switch/hub;
3. Connect the 12V DC power adapter into the 12V DC power jack on the back of the UCM6104. Insert
the main plug of the power adapter into a surge-protected power outlet;
4. Wait for the UCM6104 to boot up. The LCD in the front will show its hardware information when the
boot process is done;
5. Once the UCM6104 is successfully connected to network, the LED indicator for LAN 1 in the front will
be in solid green and the LCD shows up the IP address;
6. (Optional) Connect PSTN lines from the wall jack to the FXO ports; connect analog lines (phone and
fax) to the FXS ports.
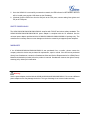
CONNECTING THE UCM6108
Figure 5: UCM6108 Front View
Figure 6: UCM6108 Back View
Firmware Version 1.0.0.32
UCM6102/6104/6108/6116 USER MANUAL
Page 16 of 108
To set up the UCM6108, follow the steps below:
1. Connect one end of an RJ-45 Ethernet cable into the LAN port of the UCM6108;
2. Connect the other end of the Ethernet cable into the uplink port of an Ethernet switch/hub;
3. Connect the 12V DC power adapter into the 12V DC power jack on the back of the UCM6108. Insert
the main plug of the power adapter into a surge-protected power outlet;
4. Wait for the UCM6108 to boot up. The LCD in the front will show its hardware information when the
boot process is done;
5. Once the UCM6108 is successfully connected to network, the LED indicator for NETWORK in the front
will be in solid green and the LCD shows up the IP address;
6. (Optional) Connect PSTN lines from the wall jack to the FXO ports; connect analog lines (phone and
fax) to the FXS ports.
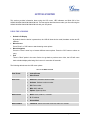
CONNECTING THE UCM6116
Figure 7: UCM6116 Front View
Figure 8: UCM6116 Back View
To set up the UCM6116, follow the steps below:
1. Connect one end of an RJ-45 Ethernet cable into the LAN port of the UCM6116;
2. Connect the other end of the Ethernet cable into the uplink port of an Ethernet switch/hub;
3. Connect the 12V DC power adapter into the 12V DC power jack on the back of the UCM6116. Insert
the main plug of the power adapter into a surge-protected power outlet;
4. Wait for the UCM6116 to boot up. The LCD in the front will show its hardware information when the
boot process is done;
Firmware Version 1.0.0.32
UCM6102/6104/6108/6116 USER MANUAL
Page 17 of 108
5. Once the UCM6116 is successfully connected to network, the LED indicator for NETWORK in the front
will be in solid green and the LCD shows up the IP address;
6. (Optional) Connect PSTN lines from the wall jack to the FXO ports; connect analog lines (phone and
fax) to the FXS ports.
SAFETY COMPLIANCES
The UCM6102/UCM6104/UCM6108/UCM6116 complies with FCC/CE and various safety standards. The
UCM6102/UCM6104/UCM6108/UCM6116 power adapter is compliant with the UL standard. Use the
universal power adapter provided with the UCM6102/UCM6104/UCM6108/UCM6116 package only. The
manufacturer’s warranty does not cover damages to the device caused by unsupported power adapters.
WARRANTY
If the UCM6102/UCM6104/UCM6108/UCM6116 was purchased from a reseller, please contact the
company where the device was purchased for replacement, repair or refund. If the device was purchased
directly from Grandstream, contact the Grandstream Sales and Service Representative for a RMA (Return
Materials Authorization) number before the product is returned. Grandstream reserves the right to remedy
warranty policy without prior notification.
Warning:
Use the power adapter provided with the UCM6102/UCM6104/UCM6108/UCM6116. Do not use a different
power adapter as this may damage the device. This type of damage is not covered under warranty.
Firmware Version 1.0.0.32
UCM6102/6104/6108/6116 USER MANUAL
Page 18 of 108
GETTING STARTED
This section provides information about using the LCD menu, LED indicators and Web GUI of the
UCM6102/UCM6104/UCM6108/UCM6116. The last section describes how to make your first call using the
UCM6102/UCM6104/UCM6108/UCM6116 with your SIP phone.
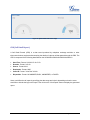
USING THE LCD MENU
•
Default LCD Display
By default, when the device is powered on, the LCD will show device model, hardware version and IP
address.
•
Menu Access
Press "Down" or "OK" button to start browsing menu options.
•
Menu Navigation
Press the "Down" arrow key to browser different menu options. Press the "OK" button to select an
entry.
•
Exit
There is "Back" option in the menu. Select it to go back to previous menu. Also, the LCD will come
back to default display after being idle in menu for more than 20 seconds.
The following table shows the LCD menu options.
Table 4: LCD MENU OPTIONS
View Events
Device Info
Network Info
Network Menu
Firmware Version 1.0.0.32
•
Critical Events
•
Other Events
•
Hardware: Hardware version number
•
Software: Software version number
•
P/N: Part number
•
MAC: MAC address
•
Uptime: System up time
•
Mode: DHCP, Static IP, or PPPoE
•
IP: IP address
•
Subnet Mask
•
LAN Mode: Select LAN mode as DHCP, Static IP or PPPoE
UCM6102/6104/6108/6116 USER MANUAL
Page 19 of 108
Factory Menu
•
LCD Test Patterns: Press "Down" button to test different LCD patterns
•
Fan Mode: Auto or On
USING THE LED INDICATORS
The UCM6102/UCM6104/UCM6108/UCM6116 has LED indicators in the front and the following table
shows the status definitions.
Table 5: UCM6102/UCM6104 LED INDICATORS
LED
LED Status
LAN / WAN / FXS / FXO / USB / SD Card
Solid: Connected
Flashing: Data Transferring
OFF: Not Connected
Table 6: UCM6108/UCM6116 LED INDICATORS
LED
LED Status
NETWORK
Solid: Connected
OFF: Not Connected
ACT / Line (FXO) /Phone (FXS) / USB / SD Card
Solid: Connected
Flashing: Data Transferring
OFF: Not Connected
USING THE WEB GUI
ACCESSING WEB GUI
The UCM6102/UCM6104/UCM6108/UCM6116 embedded Web server responds to HTTP/HTTPS
GET/POST requests. Embedded HTML pages allow users to configure the device through a Web browser
such as Microsoft’s IE, Mozilla Firefox, Google Chrome and etc.
Firmware Version 1.0.0.32
UCM6102/6104/6108/6116 USER MANUAL
Page 20 of 108
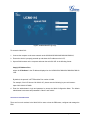
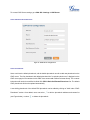
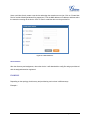
Figure 9: UCM6116 Web GUI Login Page
To access the Web GUI:
1. Connect the computer to the same network as the UCM6102/UCM6104/UCM6108/UCM6116;
2. Ensure the device is properly powered up and shows its IP address on the LCD;
3. Open a Web browser on the computer and enter the web GUI URL in the following format:
http(s)://IP-Address:Port
where the IP-Address is the IP address displayed on the UCM6102/UCM6104/UCM6108/UCM6116
LCD.
By default, the protocol is HTTPS and the Port number is 8089.
For example, if the LCD shows 192.168.40.167, please enter the following in your web browser:
https://192.168.40.167:8089
4. Enter the administrator’s login and password to access the Web Configuration Menu. The default
administrator's username and password is "admin" and "admin".
WEB GUI CONFIGURATIONS
There are four main sections in the Web GUI for users to view the PBX status, configure and manage the
PBX.
Firmware Version 1.0.0.32
UCM6102/6104/6108/6116 USER MANUAL
Page 21 of 108
•
Status: Displays PBX status, System Status and CDR.
•
PBX: To configure extensions, call routes, call features, internal options, IAX settings and SIP
settings.
•
Settings: To configure network settings, change password, LDAP Server, HTTP Server, Email
Settings and Time Settings.
•
Maintenance: To perform firmware upgrade, backup configurations, cleaner setup, reset/reboot,
syslog setup and troubleshooting.
SAVING AND APPLYING CHANGES
After configuring the web GUI options in one page, click on the "Save" button on the bottom of the page (if
displayed). After saving all the changes, make sure click on "Apply Changes" button on the top right corner
to submit all the changes. Follow the prompted message to reboot the device if it's required.
MAKING YOUR FIRST CALL
Power up the UCM6102/UCM6104/UCM6108/UCM6116 and your phone with network connected. Then
follow the steps below to make your first call.
1. Log
in
the
UCM6102/UCM6104/UCM6108/UCM6116
web
GUI,
go
to
PBX->Basic/Call
Routes->Extensions;
2. Click on "Create New User" to create a new extension. You might need User ID, Password and
Voicemail Password information to register and use the extension later;
3. Register the extension on your phone with the User ID, Password information;
4. When your phone is registered with the extension and ready, dial *97 to access the voicemail box. Enter
the Voicemail Password and you will be prompted with the Voice Mail Main menu.
5. You are successfully connected to the PBX system now.
Firmware Version 1.0.0.32
UCM6102/6104/6108/6116 USER MANUAL
Page 22 of 108
SYSTEM SETTINGS
This
section
explains
configurations
for
system-wide
parameters
on
the
UCM6102/UCM6104/UCM6108/UCM6116. Those parameters include Network Settings, Change
Password, LDAP server, HTTP server, Email settings and Time Settings.
NETWORK SETTINGS
LAN/WAN/802.1X SETTINGS
After successfully connecting the UCM6102/UCM6104/UCM6108/UCM6116 to the network for the first time,
users could login the Web GUI and go to Settings->Network Settings to configure the network parameters
for
the
device
depending
on
the
network
environment.
The
settings
are
similar
for
UCM6104/UCM6108/UCM6116. The UCM6102 supports both WAN port and LAN port, with Router or
Switch mode function configurable on the LAN port. Select each tab in the Network Settings page to
configure LAN settings, WAN settings (UCM6102 only) and 802.1X.
Please
refer
to
the
following
tables
for
the
network
configuration
parameters
on
UCM6104/UCM6108/UCM6116 and UCM6102 respectively.
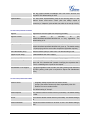
Table 7: NETWORK SETTINGS
Settings -> Network Settings -> LAN
IP Method
Select DHCP, Static IP, or PPPoE. The default setting is DHCP.
IP Address
Enter the IP address for static IP settings.
Gateway IP
Enter the gateway IP address for static IP settings.
Subnet Mask
Enter the subnet mask address for static IP settings.
DNS Server 1
Enter the DNS server 1 address for static IP settings.
DNS Server 2
Enter the DNS server 2 address for static IP settings.
User Name
Enter the user name to connect via PPPoE.
Password
Enter the password to connect via PPPoE.
Preferred DNS Server
Enter the preferred DNS server address.
Settings -> Network Settings -> 802.1X
802.1X Mode
Select 802.1X mode. The default setting is "Disable". The supported 802.1X
mode are:
•
Firmware Version 1.0.0.32
EAP-MD5
UCM6102/6104/6108/6116 USER MANUAL
Page 23 of 108
•
EAP-TLS
•
EAP-PEAPv0/MSCHAPv2
Identity
Enter 802.1X mode identity information.
MD5 Password
Enter 802.1X mode MD5 password information.
802.1X Certificate
Select 802.1X certificate from local PC and then upload.
802.1X
Client
Certificate
Select 802.1X client certificate from local PC and then upload.
Table 8: UCM6102 NETWORK SETTINGS
Settings -> Network Settings -> WAN
IP Method
Select DHCP, Static IP, or PPPoE. The default setting is DHCP.
IP Address
Enter the IP address for static IP settings.
Gateway IP
Enter the gateway IP address for static IP settings.
Subnet Mask
Enter the subnet mask address for static IP settings.
DNS Server 1
Enter the DNS server 1 address for static IP settings.
DNS Server 2
Enter the DNS server 2 address for static IP settings.
User Name
Enter the user name to connect via PPPoE.
Password
Enter the password to connect via PPPoE.
Preferred DNS Server
Enter the preferred DNS server address.
Settings -> Network Settings -> LAN
Mode
Select LAN port mode as Router or Switch.
IP Address
Enter the IP address assigned to the LAN port.
Subnet Mask
Enter the subnet mask.
DHCP Server Enable
Enable or disable DHCP server capability.
DNS Server 1
Enter DNS server address 1.
DNS Server 2
Enter DNS server address 2.
Allow
IP
Address
From
Enter the IP Pool starting address.
Allow IP Address To
Enter the IP Pool ending address.
Default IP Lease Time
Enter the IP lease time (in seconds).
Settings -> Network Settings -> 802.1X
802.1X Mode
Select 802.1X mode. The default setting is "Disable". The supported 802.1X
mode are:
•
Firmware Version 1.0.0.32
EAP-MD5
UCM6102/6104/6108/6116 USER MANUAL
Page 24 of 108
•
EAP-TLS
•
EAP-PEAPv0/MSCHAPv2
Identity
Enter 802.1X mode identity information.
MD5 Password
Enter 802.1X mode MD5 password information.
802.1X Certificate
Select 802.1X certificate from local PC and then upload.
802.1X
Client
Certificate
Select 802.1X client certificate from local PC and then upload.
Settings -> Network Settings -> Port Forwarding
WAN Port
Specify the WAN port number. Up to 8 ports can be configured.
LAN IP
Specify the LAN IP address. Up to 8 IP address can be configured.
LAN Port
Specify the LAN port number. Up to 8 ports can be configured.
Protocol Style
Select protocol type for the forwarding in the selected port.
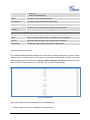
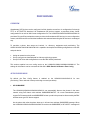
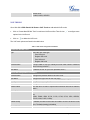
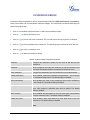
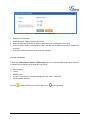
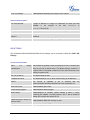
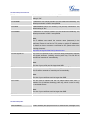
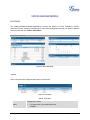
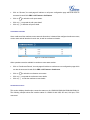
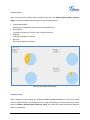
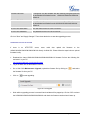
NETWORK SECURITY SETTINGS
The UCM6102/UCM6104/UCM6108/UCM6116 provides users Firewall configurations to prevent certain
malicious attack to the device system, allow, restrict or reject specific traffic through the device for security
and bandwidth purpose. Go to Web GUI->Settings->Network Settings->Security page, users will see the
current service information with Port, Process and Type, as well as Firewall settings.
Figure 10: Current Service
Users could configure the following options for the Firewall settings.
•
Interface. Select the interface (LAN/WAN) For firewall settings.
Firmware Version 1.0.0.32
UCM6102/6104/6108/6116 USER MANUAL
Page 25 of 108
•
Ping Enable. Enable or disable ICMP response for Ping request. The default setting is Yes.
•
SYN Flood. Enable to prevent SYN Flood denial-of-service attack to the device.
•
Death-of-Ping. Enable to prevent Death-of-Ping attack to the device.
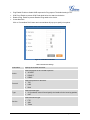
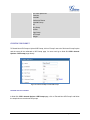
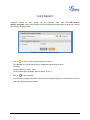
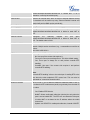
•
Create New Rule.
Click on "Create New Rule" button and a new window will pop up to specify rule options.
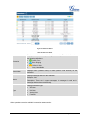
Figure 11: Create New Firewall Rule
Table 9: Firewall Rule Settings
Rule Name
Specify the Firewall rule name.
Select the action for the Firewall to perform.
Action
•
ACCEPT
•
REJECT
•
DROP
Select the protocol for the traffic.
Protocol
•
TCP
•
UDP
•
Both
Select the traffic type.
Type
•
IN. If selected, users will need specify the interface for the incoming packets.
•
OUT
Select the service type.
Service
•
FTP
•
SSH
•
Telnet
Firmware Version 1.0.0.32
UCM6102/6104/6108/6116 USER MANUAL
Page 26 of 108
•
TFTP
•
HTTP
•
LDAP
Check the box to display advanced options.
•
Advance
Source
Enter the source IP address and port.
•
Destination
Enter the destination IP address and port.
Click on "Apply" button to save the change and then submit by clicking on "Apply Changes". The new rule
will then display at the bottom of the page. Users can select
to edit the rule, or select
to delete the
rule.
CHANGE PASSWORD
After login the Web GUI for the first time, it is highly recommended for users to change the default password
"admin" to more complicated password for security purpose. Follow the steps below to change the Web
GUI access password.
•
Go to Web GUI->Settings->Change Password page;
•
Enter the old password first;
•
Enter the new password and retype the new password to confirm. The new password field has to be at
least 5 characters;
•
Click on "Save" and the user will be logged out;
•
Once the web page comes back to the login page again, enter the username "admin" and the new
password to login.
LDAP SERVER
The UCM6102/UCM6104/UCM6108/UCM6116 has an embedded LDAP server for users to manage
corporate phonebook in a centralized way. By default, the LDAP server has generated the phonebook
based on the created extensions already. If users have the Grandstream phone provisioned by the
UCM6102/UCM6104/UCM6108/UCM6116, the LDAP directory has been set up on the phone and can be
used right away. Or users could manually configure the LDAP client settings accordingly to manipulate the
built-in LDAP server on the PBX.
Firmware Version 1.0.0.32
UCM6102/6104/6108/6116 USER MANUAL
Page 27 of 108
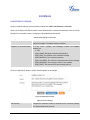
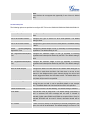
To access LDAP Server settings, go to Web GUI->Settings->LDAP Server.
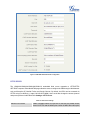
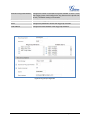
LDAP SERVER CONFIGURATIONS
Figure 12: LDAP Server Configurations
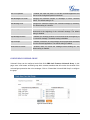
LDAP PHONEBOOK
Users could use the default phonebook, edit the default phonebook as well as add new phonebook on the
LDAP server. The first phonebook with default phonebook dn "ou=pbx,dc=pbx,dc=com" displayed on the
LDAP server page is for extensions in this PBX. Users cannot add or delete contacts directly. The contacts
information will need to be modified via Web GUI->PBX->Basic/Call Routes/Extensions first. The default
LDAP phonebook will then be updated automatically.
A new sibling phonebook of the default PBX phonebook can be added by clicking on "Add" under "LDAP
Phonebook" section. Once added, users can select
(see Figure below), or select
Firmware Version 1.0.0.32
to edit the phonebook attributes and contact list
to delete the phonebook.
UCM6102/6104/6108/6116 USER MANUAL
Page 28 of 108
Figure 13: Add New LDAP Phonebook
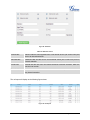
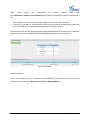
LDAP CLIENT CONFIGURATIONS
To configure the LDAP client so the default PBX phonebook can be used, follow the instructions in the
LDAP Client Configuration section.
Suppose your server Base DN is "dc=Grandstream", your extension number is 1000 and your LDAP entry
password is "1000", configure your LDAP client as follows (case insensitive):
Base DN: dc=Grandstream
Root DN: AccountName=1000,dc=Grandstream
Password: 1000
Filter: (&(CallerIDName=*)(AccountName=*))
Port: 389
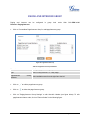
The following figure shows the configuration information on a GXP2200 to successfully use the LDAP
server as configured in Figure 12: LDAP Server Configurations.
Firmware Version 1.0.0.32
UCM6102/6104/6108/6116 USER MANUAL
Page 29 of 108
Figure 14: GXP2200 LDAP Phonebook Configuration
HTTP SERVER
The UCM6102/UCM6104/UCM6108/UCM6116 embedded Web server responds to HTTP/HTTPS
GET/POST requests. Embedded HTML pages allow the users to configure the PBX through a Web browser
such as Microsoft’s IE, Mozilla Firefox and Google Chrome. By default, the PBX can be accessed via
HTTPS using Port 8089 (e.g., https://192.168.40.50:8089). Users could also change the access protocol
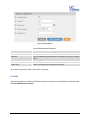
and port as preferred under Web GUI->Settings->HTTP Server.
Table 10: HTTP Server Settings
Redirect From Port 80
Enable or disable redirect from port 80. On the PBX, the default access
protocol is HTTPS and the default port number is 8089. When this option
Firmware Version 1.0.0.32
UCM6102/6104/6108/6116 USER MANUAL
Page 30 of 108
is enabled, the access using HTTP with Port 80 will be redirected to
HTTPS with Port 8089. The default setting is "Enable".
Protocol Type
Select HTTP or HTTPS. The default setting is "HTTPS".
Port
Specify port number to access the HTTP server.
Once the change is saved, the web page will be redirected to the login page using the new URL. Enter the
username and password to login again.
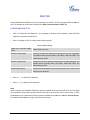
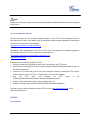
EMAIL SETTINGS
The Email application on the UCM6102/UCM6104/UCM6108/UCM6116 can be used to send out Emails to
users with Fax (e.g., Fax-To-Email), Voicemail (Voicemail-To-Email) and other information as attachment.
The configuration parameters can be accessed via Web GUI->Settings->Email Settings.
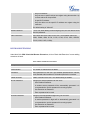
Table 11: Email Settings
TLS Enable
Enable or disable TLS during transferring/submitting your Email to other
SMTP server. The default setting is "Yes".
Type
Select Email type.
•
MTA: Mail Transfer Agent. The Email will be sent from the
configured domain. When MTA is selected, there is no need to set
up SMTP server for it or no user login is required. However, the
Emails sent from MTA might be considered as spam by the target
SMTP server.
•
Client: Submit Emails to the SMTP server. A SMTP server is
required and users need login with correct credentials.
Domain
Specify the domain name to be used in the Email.
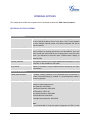
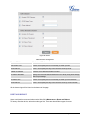
TIME SETTINGS
The current system time on UCM6102/UCM6104/UCM6108/UCM6116 can be checked under Web
GUI->Status->System Status. To change the time settings, go to Web GUI->Settings->Time Settings.
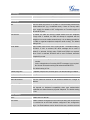
Table 12: Time Settings
NTP Server
Specify the URL or IP address of the NTP server for the PBX to
synchronize
the
date
and
time.
The
default
NTP
server is
ntp.ipvideotalk.com.
Enable DHCP Option 2
Firmware Version 1.0.0.32
If set to "Yes", the device is allowed to get provisioned for Time Zone
UCM6102/6104/6108/6116 USER MANUAL
Page 31 of 108
from DHCP Option 2 in the local server automatically. The default
setting is "Yes".
Enable DHCP Option 42
If set to "Yes", the device is allowed to get provisioned for NTP Server
from DHCP Option 42 in the local server automatically. This will then
override the NTP Server manually configured on the PBX. The default
setting is "Yes".
Time Zone
Select the proper time zone option so the PBX can display correct date
and time accordingly. If "Automatic" is selected, the PBX will obtain the
time zone information according to the detected IP location.
Self-Defined Time Zone
If "Self-Defined Time Zone" is selected in "Time Zone" option, users will
need define their own time zone following the format below.
The syntax is: std offset dst [offset], start [/time], end [/time]
Default is set to: MTZ+6MDT+5,M4.1.0,M11.1.0
MTZ+6MDT+5
This indicates a time zone with 6 hours offset with 1 hour ahead which is
U.S central time. If it is positive (+) if the local time zone is west of the
Prime Meridian (A.K.A: International or Greenwich Meridian) and
negative (-) if it is east.
M4.1.0,M11.1.0
The 1st number indicates Month: 1,2,3.., 12 (for Jan, Feb, .., Dec)
The 2nd number indicates the nth iteration of the weekday: (1st Sunday,
3rd Tuesday…)
The 3rd number indicates weekday: 0,1,2,..,6 ( for Sun, Mon,
Tues, ... ,Sat)
Therefore, this example is the DST which starts from the First Sunday of
April to the 1st Sunday of November.
Firmware Version 1.0.0.32
UCM6102/6104/6108/6116 USER MANUAL
Page 32 of 108
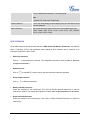
PROVISIONING
OVERVIEW
Grandstream SIP Devices can be configured via Web interface as well as via configuration file through
TFTP or HTTP/HTTPS download. All Grandstream SIP devices support a proprietary binary format
configuration file as well as XML format configuration file. The UCM6102/UCM6104/UCM6108/UCM6116
provides a Plug and Play mechanism to auto-provision the Grandstream SIP devices in a zero configuration
manner, which allows users to finish the installation with ease and start using the SIP devices in a managed
way.
To provision a phone, three steps are involved, i.e., discovery, assignment and provisioning. The
UCM6102/UCM6104/UCM6108/UCM6116 is capable to accomplish the following configurations on the SIP
end point device.
•
Assign an extension to the phone.
•
Set up config server download path for further provisioning purpose.
•
Set up LDAP client side configurations to use the PBX default phonebook.
This section explains how zero config works on the UCM6102/UCM6104/UCM6108/UCM6116. The
settings for this feature can be accessed via Web GUI->PBX->Basic/Call Routes->Zero Config.
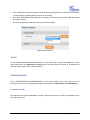
AUTO PROVISIONING
By default, the Zero Config feature is enabled on the UCM6102/6104/6108/6116 for auto
provisioning. Three methods of auto provisioning are used (see below).
•
SIP SUBSCRIBE
The UCM6102/UCM6104/UCM6108/UCM6116 can automatically discover the phones in the same
network using PnP feature with multicast SUBSCRIBE/NOTIFY. All current Grandstream phones
support PnP feature and will send SUBSCRIBE at boot up and in the process be discovered by the PBX
with the same type PnP feature support.
On the phone side, after the phone boots up, it will send out multicast SUBSCRIBE message. When
the UCM6102/UCM6104/UCM6108/UCM6116 receives the SUBSCRIBE, a SIP NOTIFY message will
Firmware Version 1.0.0.32
UCM6102/6104/6108/6116 USER MANUAL
Page 33 of 108
be sent to the phone with config server path URL in the NOTIFY message body. The phone will then
use the path to download the config file generated in the UCM6102/UCM6104/UCM6108/UCM6116.
•
DHCP OPTION 66
This method should be used on the UCM6102 because only the UCM6102 has WAN and LAN port
with LAN port supporting the router function. When the phone restarts (by default DHCP Option 66 is
turned on), it will send out a DHCP DISCOVER request. The UCM6102 receives it and returns DHCP
OFFER with the config server path URL in Option 66. The phone will then use the path to download the
config file generated in the UCM6102/UCM6104/UCM6108/UCM6116.
•
mDNS
The mDNS process is similar to the SIP SUBSCRIBE.
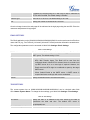
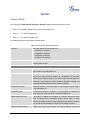
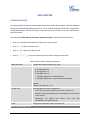
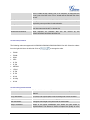
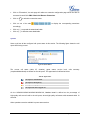
To start the auto provisioning process, under Web GUI->PBX->Basic/Call Routes->Zero Config, click on
"Auto Provision Setting" and fill in the auto provision information.
Figure 15: Auto Provision Setting
Firmware Version 1.0.0.32
UCM6102/6104/6108/6116 USER MANUAL
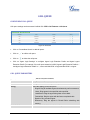
Page 34 of 108
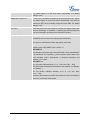
Table 13: Auto Provision Setting
Enable Zero Config
Enable or disable the zero config feature on the PBX. The default setting
is Yes.
Automatically Assign Extension
If enabled, when the device is discovered, the PBX will automatically
assign an extension to the device. The default setting is disabled.
Starting Extension
Specify the starting extension to be created/assigned. If the extension is
assigned to existing device already, this extension will be skipped and
the next available extension will be used. The default setting is 6000.
Generate Random Password
If enabled, random password will be generated for the extension when
it's created. Otherwise, default password will be used.
Default Password
Specify default password for the extension if no random password is
generated. The default setting is "admin".
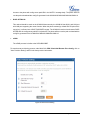
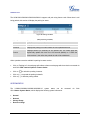
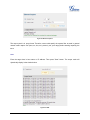
Click on "Save" to start the discovery and provisioning process. Reboot the device and the assigned
extension will be registered after booting up.
MANUAL PROVISIONING
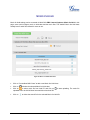
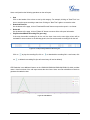
DISCOVERY
Users could manually discover the device by specifying the IP address or scanning the entire network.
Three methods are supported to scan the devices.
•
PING
•
ARP
•
SIP MESSAGE (OPTIONS)
Click on "Auto Discover", fill in the scan method and scan IP. Then click on "Save" to start discovering the
devices within the same network.
Firmware Version 1.0.0.32
UCM6102/6104/6108/6116 USER MANUAL
Page 35 of 108
Figure 16: Auto Discover
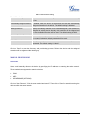
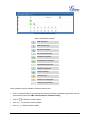
The following figure shows a list of discovered phones. The MAC address, IP Address, Extension (if
assigned), Version, Vendor, Model, Connect Status, Create Config, Options (Edit/Delete) are displayed in
the list.
Figure 17: Discovered Devices
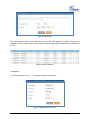
ASSIGNMENT
In the discovered list, click on
to assign an extension to the device.
Figure 18: Assign Extension To Device
Firmware Version 1.0.0.32
UCM6102/6104/6108/6116 USER MANUAL
Page 36 of 108
Users could also directly create a new device and assign the extension at one time. Click on "Create New
Device" and the following window will be popped out. Fill in the MAC address or IP address, and then select
the extension to assign to the device. Click on "Save" to add the device to the provision list.
Figure 19: Create New Device
PROVISIONING
After the discovery and assignment, reboot the device. It will download the config file and get provisioned
with the assigned extension registered.
EXAMPLES
Depending on the topology, the discovery and provisioning can be done in different ways.
Example 1:
Firmware Version 1.0.0.32
UCM6102/6104/6108/6116 USER MANUAL
Page 37 of 108
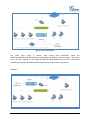
Figure 20: Provisioning Example 1
The
above
figure
shows
a
common
setup
among
small
businesses,
where
the
UCM6102/UCM6104/UCM6108/UCM6116 is placed behind a company’s router or firewall. The phones
are in the same network as the UCM6102/UCM6104/UCM6108/UCM6116 and can be discovered
automatically by UCM6102/UCM6104/UCM6108/UCM6116 using the Zero Config feature.
Example 2:
Firmware Version 1.0.0.32
UCM6102/6104/6108/6116 USER MANUAL
Page 38 of 108
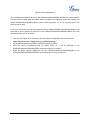
Figure 21: Provisioning Example 2
This is another typical setup. In this setup, the UCM6102/UCM6104/UCM6108/UCM6116 is placed directly
over the internet (outside from the network where the phones are deployed). Under this topology, the
UCM6102/UCM6104/UCM6108/UCM6116 cannot reach the phones on its own and the typical auto
discovery will not work.
In this case, the phones can still be provisioned. But the UCM6102/UCM6104/UCM6108/UCM6116 will
need help to get the phones to point itself to the UCM6102/UCM6104/UCM6108/UCM6116 first. One
possible solution could be as follows.
•
Turn on DHCP Option 66 in the network where the phones are deployed and set the value as:
option tftp-server-name "http(s)://ucm_ip_address:port/zccgi".
•
All Grandstream phones have DHCP Option 66 turned on by default.
•
Once the phone is provisioned with the DHCP Option 66, it will be redirected to the
UCM6102/UCM6104/UCM6108/UCM6116 and send request for config file.
•
When the phone requests cfgMAC.xml from the UCM6102/UCM6104/UCM6108/UCM6116, the
UCM6102/UCM6104/UCM6108/UCM6116 will add the phone to the provision list.
Firmware Version 1.0.0.32
UCM6102/6104/6108/6116 USER MANUAL
Page 39 of 108
EXTENSIONS
CREATE NEW USER
To manually create new user, go to Web GUI->PBX->Basic/Call Routes->Extensions. Click on "Create
New User" and a new window will show to fill in the details. The configuration parameters are as follows.
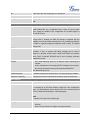
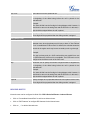
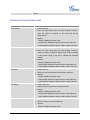
Table 14: Extension Configuration Parameters
General
Extension
The extension number associated with the user.
CallerID Name
Configure the CallerID Name associated with the user. Number, letter,
or space are allowed.
CallerID Number
Configure the CallerID Number that would be applied for outbound calls
from this user.
Note:
The ability to manipulate your outbound Caller ID may be limited by your
VoIP provider.
Permission
Select permission for the user. The available permissions are Internal,
Local, National and International. The default permission is Internal.
SIP/IAX Password
Configure the password for the user. A random secure password will be
automatically generated. It is recommended to use this password for
security purpose.
Enable Voicemail
Enable Voicemail for the user. The default setting is enabled.
Voicemail Password
Configure Voicemail password (digits only). A random numeric
password is automatically generated.
Email Address
Fill in the Email address for the user.
Call Forward Unconditional
Configure the Call Forward Unconditional target number. If not
configured, the Call Forward Unconditional feature is deactivated.
Call Forward No Answer
Configure the Call Forward No Answer target number. If not configured,
the Call Forward No Answer feature is deactivated.
Call Forward Busy
Configure the Call Forward Busy target number. If not configured, the
Call Forward Busy feature is deactivated.
Ring Timeout
Configure the number of seconds to ring the user before sending to the
user's voicemail (if enabled) or hangup. The default setting is 60
seconds.
Technology
Firmware Version 1.0.0.32
UCM6102/6104/6108/6116 USER MANUAL
Page 40 of 108
SIP
Check SIP if the user is using SIP or a SIP device.
IAX
Check IAX if the user is using IAX or a IAX device.
Analog Station
Select the port number if the user is attached on the analog port of the
PBX.
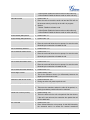
SIP Settings
NAT
Use NAT when the PBX is on a public IP communicating with devices
hidden behind NAT (e.g., broadband router). If there is one-way audio
issue, usually it's related to NAT configuration or Firewall's support of
SIP and RTP ports.
Call Reinvite
By default, the PBX will route the media steams from SIP endpoints
through itself. If enabled, the PBX will attempt to negotiate with the
endpoints to route the media stream directly. It is not always possible for
the PBX to negotiate endpoint-to-endpoint media routing. The default
setting is No.
DTMF Mode
Select DTMF mode for the user to send DTMF. The default setting is
RFC2833. If "Info" is selected, SIP INFO message will be used. If
"Inband" is selected, 64-kbit codec PCMU and PCMA are required.
When "Auto" is selected, RFC2833 will be used if offered, otherwise
Inband will be used.
Insecure
•
Port: Allow matching peers by IP address without matching port
number.
•
Invite: Authentication of incoming INVITE messages is not required.
•
No: Normal IP-based matching and authenticated INVITES.
The default setting is Port.
Enable Keep-alive
If enabled, keep the NAT session open. The default setting is enabled.
Keep-alive Frequency
Configure the number of seconds for the host to be up for Keep-alive.
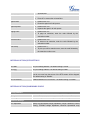
Other Settings
SRTP
Enable SRTP for the call.
FAX Detect
Enable to detect fax signal from the user/trunk during the call and send
the received fax to the Email address configured in this configuration
page. If no Email address can be found for the user, send the received
fax to the default Email address in FAX setting page.
Note:
If enabled, FAX cannot use Passthrough.
Strategy
This option controls how the extension can be used on the device.
•
Allow all
Device in any network can register using the extension.
Firmware Version 1.0.0.32
UCM6102/6104/6108/6116 USER MANUAL
Page 41 of 108
•
Only local subnets
Only the user in specific subnet can register using the extension. Up
to three subnet can be specified.
•
A specific IP Address.
Only the device on the specific IP address can register using the
extension.
The default setting is "Allow all".
Disable Password
If set to Yes, when dialing out with outgoing rules, the user doesn't need
enter the password.
Codec Preference
Select audio and video codec for the user. The available codecs are:
PCMU, PCMA, GSM, G.726, G.722, G.729, G.723, ILBC, ADPCM,
LPC10, H.264, H.263, H.263p.
BATCH ADD EXTENSIONS
Under Web GUI->PBX->Basic/Call Routes->Extensions, click on "Batch Add Extensions" to start adding
extensions in batch.
Table 15: Batch Add Extension Parameters
General
Start Extension
The starting extension number.
Create Number
The number of extensions to be added.
Permission
Select permission for the user. The available permissions are Internal,
Local, National and International. The default permission is Internal.
Enable Voicemail
Enable Voicemail for the user. The default setting is enabled.
SIP/IAX Password
Configure the SIP/IAX password for the users.
•
User Random Password.
A random secure password will be automatically generated. It is
recommended to use this password for security purpose.
Voicemail Password
•
Use Extension as Password.
•
Enter a password to be used.
Configure Voicemail password (digits only) for the users.
•
User Random Password.
A random password in digits will be automatically generated. It is
recommended to use this password for security purpose.
Firmware Version 1.0.0.32
•
Use Extension as Password.
•
Enter a password to be used.
UCM6102/6104/6108/6116 USER MANUAL
Page 42 of 108
Technology
SIP
Check SIP if the users are using SIP or a SIP device.
IAX
Check IAX if the users are using IAX or a IAX device.
SIP Settings
NAT
Use NAT when the PBX is on a public IP communicating with devices
hidden behind NAT (e.g., broadband router). If there is one-way audio
issue, usually it's related to NAT configuration or Firewall's support of
SIP and RTP ports.
Call Reinvite
By default, the PBX will route the media steams from SIP endpoints
through itself. If enabled, the PBX will attempt to negotiate with the
endpoints to route the media stream directly. It is not always possible for
the PBX to negotiate endpoint-to-endpoint media routing. The default
setting is No.
DTMF Mode
Select DTMF mode for the user to send DTMF. The default setting is
RFC2833. If "Info" is selected, SIP INFO message will be used. If
"Inband" is selected, 64-kbit codec PCMU and PCMA are required.
When "Auto" is selected, RFC2833 will be used if offered, otherwise
Inband will be used.
Insecure
•
Port: Allow matching peers by IP address without matching port
number.
•
Invite: Authentication of incoming INVITE messages is not required.
•
No: Normal IP-based matching and authenticated INVITES.
The default setting is Port.
Enable Keep-alive
If enabled, keep the NAT session open. The default setting is enabled.
Keep-alive Frequency
Configure the number of seconds for the host to be up for Keep-alive.
IAX Settings
Max Call Numbers
Limit the maximum amount of call numbers allowed for a single IP
address.
Require Call Token
If set to Yes, call token is required. If set to "Auto", it may lock out users
who depend on backward compatibility when peer authentication
credentials are shared between physical endpoints. The default setting
is Yes.
Other Settings
SRTP
Enable SRTP for the call.
FAX Detect
Enable to detect fax signal from the user/trunk during the call and send
the received fax to the Email address configured in this configuration
page. If no Email address can be found for the user, send the received
Firmware Version 1.0.0.32
UCM6102/6104/6108/6116 USER MANUAL
Page 43 of 108
fax to the default Email address in FAX setting page.
Note:
If enabled, FAX cannot use Passthrough.
Disable Password
If set to Yes, when dialing out with outgoing rules, the user doesn't need
enter the password.
Codec Preference
Select audio and video codec for the user. The available codecs are:
PCMU, PCMA, GSM, G.726, G.722, G.729, G.723, ILBC, ADPCM,
LPC10, H.264, H.263, H.263p.
EDIT EXTENSION
All the PBX extensions are listed under Web GUI->PBX->Basic/Call Routes->Extensions, with CallerID
Name, Technology, IP/Port and registration status displayed. Each extension has a checkbox to be
selected and options for users to edit.
•
Edit single extension
Click on
to start editing the extension. The configuration options are listed in Table 14: Extension
Configuration Parameters.
•
Reboot the user
Click on
•
Delete single extension
Click on
•
to send NOTIFY reboot event to the device with the extension registered.
to delete the extension.
Modify selected extensions
Select the checkbox for the extension(s). Then click on "Modify Selected Extensions" to edit the
extensions in a batch. The configuration options are listed in Table 15: Batch Add Extension Parameters.
•
Delete selected extensions
Select the checkbox for the extension(s). Then click on "Delete Selected Extensions" to delete the
extension(s).
Firmware Version 1.0.0.32
UCM6102/6104/6108/6116 USER MANUAL
Page 44 of 108
TRUNKS
ANALOG TRUNKS
Go to Web GUI->PBX->Basic/Call Routes->Analog Trunks to add and edit analog trunks.
•
Click on "Create New Analog Trunk" to add a new analog trunk.
•
Click on
to edit the analog trunk.
•
Click on
to delete the analog trunk.
The analog trunk options are listed in the table below.
Table 16: Analog Trunk Configuration Parameters
Channels
Trunk Name
Select the channel for the analog trunk.
•
UCM6102: 2 channels
•
UCM6104: 4 channels
•
UCM6108: 8 channels
•
UCM6116: 16 channels
A unique label to identify the trunk when listed in outbound rules,
incoming rules, and etc.
Advanced Options
Busy Detection
Busy Detection is used to detect far end hangup or for detecting busy
signal. Enable to turn this feature on
Busy Count
If Busy Detection is enabled, it is also possible to specify how many
busy tones to wait for before hanging up. The default is 4, but better
results can be achieved if set to 6 or even 8. Mind that the higher the
number, the more time that will be needed to hangup a channel, but
lowers the probability that you will get random hangups.",
Congestion Detection
Congestion detection is used to detect far end congestion signal. Enable
to turn this feature on.
Congestion Count
If congestion detection is enabled, it is also possible to specify how
many congestion tones to wait for. The default setting is 2.
Enable Polarity Reversal
If this option is enabled, the reception of a polarity reversal will mark
when a outgoing call is answered by the remote party. in some
countries, a polarity reversal is used to signal the disconnect of a phone
line, the call will be considered \"hung up\" on a polarity reversal.",
Polarity On Answer Delay
Firmware Version 1.0.0.32
minimal time period (ms) between the answer polarity switch and
UCM6102/6104/6108/6116 USER MANUAL
Page 45 of 108
hangup polarity switch. (default: 600ms)",
RX Gain
Gain for the receive channel of analog FXO port. Range: -13.5 (dB) to +
12.0 (dB).
TX Gain
Gain for the transmit channel of analog FXO port. Range: -13.5 (dB) to +
12.0 (dB).
Ring Timeout
unit: milisecond . Trunk (FXO) devices must have a timeout to determine
if there was a hangup before the line was answered. This value can be
tweaked to shorten how long it takes before asterisk considers a
non-ringing line to have hungup.",
Use CallerID
Enabling this option enabled Caller ID detection
Caller ID Start
This options allows one to define the start of a Caller ID signal: Ring, to
start when a ring is received, or Polarity, to start when a polarity reversal
is started
Current Disconnect Threshold
This is the periodic time in milliseconds that the PBX will use to check on
(ms)
a voltage drop in the line. Default setting is 200ms.
CID Signalling
This option defines the type of Caller ID signalling to use: bell (bell202
as used in the United States), v23 (as used in the UK), v23_jp (as used
in Japan), or dtmf (as used in Denmark, Sweden, and Holland)."
Tone Country
Select country for tone settings. You can also select Custom and set the
values manually.
Busy Tone
Syntax:
f1=val[@level][,f2=val[@level]],c=on1/off1[-on2/off2[-on3/off3]];
Frequencies are in Hz and cadence on and off are in ms.
Frequencies Range: [0, 4000)
Busy Level Range: (-300, 0)
Cadence Range: [0, 16383].
Select Tone Country "Custom" to edit manually.
Default value:
f1=480,f2=620,c=250/250
Congestion Tone
Syntax:
f1=val[@level][,f2=val[@level]],c=on1/off1[-on2/off2[-on3/off3]];
Frequencies are in Hz and cadence on and off are in ms.
Frequencies Range: [0, 4000)
Busy Level Range: (-300, 0)
Cadence Range: [0, 16383].
Select Tone Country "Custom" to edit manually.
Firmware Version 1.0.0.32
UCM6102/6104/6108/6116 USER MANUAL
Page 46 of 108
Default value:
f1=480,f2=620,c=250/250
VOIP TRUNKS
Go to Web GUI->PBX->Basic/Call Routes->VoIP Trunks to add and edit VoIP trunks.
•
Click on "Create New SIP/IAX Trunk" to add a new VoIP trunk first. Then click on
to configure more
options for the VoIP trunk.
•
Click on
to delete the VoIP trunk.
The VoIP trunk options are listed in the table below.
Table 17: VoIP Trunk Configuration Parameters
Create New SIP/IAX Trunk
Type
Provider Name
Select the VoIP trunk type.
•
Peer SIP trunk
•
Register SIP trunk
•
Peer IAX trunk
•
Register IAX trunk
A unique label to help you identify this trunk when listed in outbound
rules, incoming rules etc.",
Host Name
IP address or URL for your VoIP providers server.",
VoIP Trunk Configuration Parameters
Provider Name
Configure the provider name for the VoIP trunk.
Host Name
Configure the host name for the VoIP trunk.
Transport
Configure the SIP transport protocol "UDP", "TCP" or "TLS".
Caller ID
Configure the Caller ID.
CallerID Name
The new name of caller to replace when extension was not set CallerID
Name.",
Codec Preference
Select audio and video codec for the VoIP trunk. The available codecs
are:
PCMU, PCMA, GSM, G.726, G.722, G.729, G.723, ILBC, ADPCM,
LPC10, H.264, H.263, H.263p.
Enable Qualify
If enabled, the PBX will send SIP OPTIONS to check if the device is still
alive. The default setting is disabled.
Enable FAX Detect
Firmware Version 1.0.0.32
Enable both CNG and T.38 detect. The default setting is disabled.
UCM6102/6104/6108/6116 USER MANUAL
Page 47 of 108
SRTP
Firmware Version 1.0.0.32
Enable SRTP for the VoIP trunk. The default setting is disabled.
UCM6102/6104/6108/6116 USER MANUAL
Page 48 of 108
CALL ROUTES
OUTBOUND ROUTES
An outgoing calling rule pairs an extension pattern with a trunk used to dial the pattern. This allows different
patterns to be dialed through different trunks (e.g., "Local" 7-digit dials through a FXO while "Long distance"
10-digit dials through a low-cost SIP trunk). Users can also set up a failover trunk to be used when the
primary trunk fails.
Go to Web GUI->PBX->Basic/Call Routes->Outbound Routes to add and edit outbound rules.
•
Click on "Create New Outbound Rule" to add a new outbound route.
•
Click on
to edit the outbound route.
•
Click on
to delete the outbound route.
•
Click on
to move the outbound route up/down to arrange the sequence.
Table 18: Outbound Route Configuration Parameters
Calling Rule Name
Configure the calling rule name (e.g., local).
Pattern
•
All patterns are prefixed with the "_".
•
X: Any Digit from 0-9.
•
Z: Any Digit from 1-9.
•
N: Any Digit from 2-9.
•
".": Wildcard. Match one or more characters.
•
"!": Wildcard. Match zero or more characters immediately.
Example:
[12345-9]: Any digit from 1 to 9.
Privilege Level
Select privilege level for the outbound rule.
•
Local: The lowest level required. All users can use this rule.
•
National: Users with National level or International level are allowed
to use this rule.
•
International:
The
highest
level
required.
Only
users
international level can use this rule.
Pin Set
Configure the password for users to use this rule.
Send This Call Trough Trunk
Firmware Version 1.0.0.32
UCM6102/6104/6108/6116 USER MANUAL
Page 49 of 108
with
Use Trunk
Select the trunk for this outbound rule.
Strip
Allows the user to specify the number of digits that will be stripped from
the beginning of the dialed string before the call is placed via the
selected trunk.
Example:
The users will dial 9 as the first digit of a long distance calls. However, 9
should not be sent out via analog lines and the PSTN line. In this case, 1
digit should be stripped before the call is placed.
Prepend
Specify the digits to be prepended before the call is placed via the trunk.
Those digits will be prepended after the dialing number is stripped.
Use Failover Trunk
Failover Trunk
Failover trunks can be used to make sure that a call goes through an
alternate route, when the primary trunk is busy or down. If "Use Failover
Trunk" is enabled and "Failover trunk" is defined, the calls that cannot be
placed via the regular trunk may have a secondary trunk to go through.
Example:
The user's primary trunk is a VoIP trunk and the user would like to use
the PSTN when the VoIP trunk is not available. The PSTN trunk can be
configured as the failover trunk of the VoIP trunk.
Strip
Allows the user to specify the number of digits that will be stripped from
the beginning of the dialed string before the call is placed via the
selected trunk.
Example:
The users will dial 9 as the first digit of a long distance calls. However, 9
should not be sent out via analog lines and the PSTN line. In this case, 1
digit should be stripped before the call is placed.
Prepend
Specify the digits to be prepended before the call is placed via the trunk.
Those digits will be prepended after the dialing number is stripped.
INBOUND ROUTES
Inbound routes can be configured via Web GUI->PBX->Basic/Call Routes->Inbound Routes.
•
Click on "Create New Inbound Rule" to add a new inbound route.
•
Click on "DID Features" to configure DID features for the inbound route.
•
Click on
to edit the inbound route.
Firmware Version 1.0.0.32
UCM6102/6104/6108/6116 USER MANUAL
Page 50 of 108
•
Click on
to delete the inbound route.
Table 19: Inbound Route Configuration Parameters
Trunks
Select the trunk to configure the inbound route.
DID Pattern
•
All patterns are prefixed with the "_".
•
X: Any Digit from 0-9.
•
Z: Any Digit from 1-9.
•
N: Any Digit from 2-9.
•
".": Wildcard. Match one or more characters.
•
"!": Wildcard. Match zero or more characters immediately.
Example:
[12345-9]: Any digit from 1 to 9.
Privilege Level
Select privilege level for the inbound rule.
•
Local: The lowest level required. All users can use this rule.
•
National: Users with National level or International level are allowed
to use this rule.
•
International:
The
highest
level
required.
Only
users
with
international level can use this rule.
Default Destination
Select the default destination.
•
Extension
•
Extension's voicemail
•
Call Queue
•
Conference Room
•
Operator
•
Hangup
•
Voicemail Dial Code
•
Congestion
•
Local Extension by DID
Time Condition
Start Time
Select the start time hour:minute for the trunk to use the inbound rule.
End Time
Select the end time hour:minute for the trunk to use the inbound rule.
Date
Select "By Week" or "By Day" and specify the date for the trunk to use
the inbound rule.
Destination
Select the destination when the inbound rule is used at the configured
time range..
Firmware Version 1.0.0.32
•
Extension
•
Extension's voicemail
UCM6102/6104/6108/6116 USER MANUAL
Page 51 of 108
•
Call Queue
•
Conference Room
•
Operator
•
Hangup
•
Voicemail Dial Code
•
Congestion
•
Local Extension by DID
DID Features
Dial Trunk
If enabled, users can dial outbound calls by DID through inbound trunks.
The privilege level can be set according to the corresponding inbound
rules.
DID Destination
Select the DID destination. Only the selected category can be reached
by DID.
Firmware Version 1.0.0.32
•
User Extension. This is selected by default.
•
Conference.
•
Call Queue.
•
Ring Group.
•
Page/Intercom Group.
UCM6102/6104/6108/6116 USER MANUAL
Page 52 of 108
CONFERENCE BRIDGE
Conference bridge configurations can be accessed under Web GUI->PBX->Call Features->Conference.
Users could create, edit, view and delete conference bridges. The conference room status and activity will
show in the page as well.
•
Click on "Create New Conference Room" to add a new conference bridge.
•
Click on
to edit the conference room.
•
Click on
to invite a user to the conference. The user will receive the ring to join the conference.
•
Click on
to kick a participant in the conference. This will hang up the conference call on the user.
•
Click on
to lock the conference room.
•
Click on
to delete the conference bridge.
Table 20: Conference Bridge Configuration Parameters
Extension
Configure the conference number for the users to dial and join the
conference.
Password
When configured, the users who would like to join the conference call
must enter this password before accessing the conference room.
Admin Password
Configure the password to join the conference room as administrator.
Enable Caller Menu
When enabled, conference participant could press the * key to access
the conference bridge menu. The default setting is disabled.
Record conference
When enabled, the calls in this conference room will be recorded in
a .wav format file. The default setting is disabled.
Quite Mode
When enabled, if there are users entering or leaving the conference
room, voice prompt or notification tone won't be played. The default
setting is disabled.
Wait For Admin
When enabled, the participants will not hear each other until the admin
joins the conference room. The default setting is disabled.
Enable User Invite
When enabled, users could press 0 to invite other users to join the
conference. The default setting is disabled.
Note:
Firmware Version 1.0.0.32
UCM6102/6104/6108/6116 USER MANUAL
Page 53 of 108
Admin can always press 0 to invite other users to the conference.
Announce Callers
When enabled, announcement will be made to all conference
participants when there is user joining in the conference. The default
setting is disabled.
Play Hold Music For First
When enabled, the PBX will play Hold music to the first participant until
Caller
another user joins the conference room. The default setting is disabled.
Skip
When
When enabled, the invitation from Web GUI for the conference bridge
Invite User via Trunk from Web
Authentication
with password will skip the authentication for the invited users. Please
GUI
be cautious to use this option. The default setting is disabled.
Firmware Version 1.0.0.32
UCM6102/6104/6108/6116 USER MANUAL
Page 54 of 108
IVR
CONFIGURING IVR
IVR configurations can be accessed under Web GUI->PBX->Call Features->IVR. Users could create, edit,
view and delete IVR.
•
Click on "Create New IVR" to add a new IVR.
•
Click on
to edit the IVR configuration.
•
Click on
to delete the IVR.
Table 21: IVR Configuration Parameters
Name
Configure the name of the IVR. Letters, digits, underscore and hyphen
are allowed.
Extension
Enter the extension number for users to access the IVR.
Dial Other Extensions
If enabled, callers to the IVR can dial extensions other than the ones
explicitly defined in the IVR. The default setting is disabled.
Dial Trunk
If enabled, users can use trunk with configured permission.
Permission
Select permission for users to use trunk for outgoing calls.
Welcome Prompt
Select a audio file to play as the welcome prompt. Click on "Prompt" to
add additional audio file.
Timeout
After playing the prompts in the IVR, the PBX will wait a period of time to
detect DTMF entry. This period of time is the timeout (in seconds). The
default setting is 10 seconds.
Timeout Prompt
Select the prompt message to be played when timeout occurs.
Invalid Prompt
Select the prompt message to be played when an invalid extension is
pressed.
Timeout Repeat Loops
Select the repeat time if no DTMF input. After the repeat time, go to the
timeout destination if configured, otherwise hangup. The default setting
is 4.
Invalid Repeat Loops
Select the repeat time if the input is invalid. After the repeat time, go to
the timeout destination if configured, otherwise hangup. The default
setting is 4.
Key Press Event
Firmware Version 1.0.0.32
Select the event for each key pressing for 0-9, *.
UCM6102/6104/6108/6116 USER MANUAL
Page 55 of 108
The event options are:
Extension
VoiceMail
Conference Rooms
VoiceMail Group
IVR
Ring Group
Queues
Page Group
IVR Prompt
Hangup
CREATING IVR PROMPT
To Record New IVR Prompt or Upload IVR Prompt, click on "Prompt" next to the "Welcome Prompt" option
and the users will be redirected to IVR Prompt page. Or users could go to Web GUI->PBX->Internal
Options->IVR Prompt page directly.
Figure 22: Click On Prompt To Create IVR Prompt
RECORD NEW IVR PROMPT
In Web GUI->PBX->Internal Options->IVR Prompt page, click on "Record New IVR Prompt" and follow
the steps below to record new IVR prompt.
Firmware Version 1.0.0.32
UCM6102/6104/6108/6116 USER MANUAL
Page 56 of 108
Figure 23: Record New IVR Prompt
•
Specify the IVR file name.
•
Select the format (GSM or WAV) for the IVR file.
•
Select the extension which will be dialed for the user to start recording the voice prompt.
•
Click the "Record" button. A request will be sent to the PBX and the PBX will then call the extension for
recording.
•
Pick up the call from the extension and start the recording.
UPLOAD IVR PROMPT
In Web GUI->PBX->Internal Options->IVR Prompt page, click on "Upload IVR Prompt" and choose a file
to upload. The requirement on the audio file is as follows:
•
PCM encoded.
•
16 bits.
•
8000HZ mono.
•
In .mp3 or .wav format; or raw/ulaw/alaw/gsm file with .ulaw or .alaw suffix.
•
File size smaller than 5M.
Click on
to select audio file from local PC and click on
Firmware Version 1.0.0.32
to start uploading.
UCM6102/6104/6108/6116 USER MANUAL
Page 57 of 108
VOICE PROMPT
Language
settings
for
voice
prompt
can
be
accessed
under
Web
GUI->PBX->Internal
Options->Language. Users could upload a voice prompt package and then select the language in the list
with available language options.
Figure 24: Language Settings For Voice Prompt
•
Click on
to select a voice prompt package from local PC.
The uploaded file must be smaller than 20 megabytes with package structure:
[Package]
[voice prompt dir]│[... dir]│[... files]
info.txt (containing the language name for display, in UTF8)
•
Click on
•
Voice Prompts Package Lists allows users to select the default language for voice prompt for internal
to start uploading.
calls, inbound calls and outbound calls.
Firmware Version 1.0.0.32
UCM6102/6104/6108/6116 USER MANUAL
Page 58 of 108
VOICEMAIL
CONFIGURING VOICEMAIL
General Voicemail settings can be accessed via Web GUI->PBX->Call Features->Voicemail.
Users could configure the PBX to send the users Email with the voicemail as attachment. Click on "Email
Settings For Voicemails" button to configure the Email attributes and content.
Table 22: Email Settings For Voicemails
Attach Recordings to E-Mail
If enabled, voicemails will be sent to user's Email address as the
configured template. The default setting is enabled.
Template For Voicemail Emails
Fill in the "From:", "Subject:" and "Message:" content. The template
variables are:
•
\t: TAB
•
${VM_NAME}: Recipient's firstname and lastname
•
${VM_DUR}: The duration of the voicemail message
•
${VM_MAILBOX}: The recipient's extension
•
${VM_CALLERID}: The caller id of the person who left the message
•
${VM_MSGNUM}: The message number in your mailbox
•
${VM_DATE}: The date and time the message was left
Click on "Load Default" button to view a default template as an example.
Figure 25: Default Email Template
Table 23: Voicemail Settings
Max Greeting
Configure the maximum number of seconds for the voicemail greeting.
The default setting is 60 seconds.
Firmware Version 1.0.0.32
UCM6102/6104/6108/6116 USER MANUAL
Page 59 of 108
Dial 0 For Operator
If enabled, the caller can press 0 to exit the voicemail application and
connect to the configured operator's extension.
Max Messages Per Folder
Configure the maximum number of messages in users' voicemail
folders. The default setting is 25.
Max Message Time
Configure the maximum length of the voicemail message (in seconds).
The default setting is 2 minutes.
Say Message Caller-ID
If enabled, the caller ID of the user leaving the message will be
announced at the beginning of the voicemail message. The default
setting is disabled.
Say Message Duration
If enabled, the message duration will be announced at the beginning of
the voicemail message. The default setting is disabled.
Play Envelope
If enabled, introduction of each message will be played when accessed
from the voicemail application. The default setting is enabled.
Allow Users To Review
If enabled, users can review the message before sending out. The
default setting is disabled.
CONFIGURING VOICEMAIL GROUP
Voicemail Group can be configured under Web GUI->PBX->Call Features->Voicemail Group. In this
page, users could create voicemail group which contains members that will receive the voicemail if the
voicemail group extension has voice messages. Click on "Create New Voicemail Mail Group" to configure
the group.
Figure 26: Voicemail Group
Firmware Version 1.0.0.32
UCM6102/6104/6108/6116 USER MANUAL
Page 60 of 108
•
Enter the Voicemail Group Extension. The voicemail messages left to this extension will be forwarded
to all the voicemail group members.
•
Configure the Name to identify the voicemail group. Letters, digits, underscore and hyphen are
allowed.
•
Select available mailboxes from the right list and add them to the left list.
•
Click Save the finish the configuration.
Firmware Version 1.0.0.32
UCM6102/6104/6108/6116 USER MANUAL
Page 61 of 108
RING GROUP
Users could create extension for ring group which contains members that will receive the call with specific
ring strategy if the group extension has incoming calls.
CONFIGURING RING GROUP
Ring group settings can be accessed via Web GUI->PBX->Call Features->Ring Group.
Figure 27: Ring Group
•
Click on "Create New Ring Group" to add ring group.
•
Click on
to edit the ring group.
•
Click on
to delete the ring group.
RING GROUP PARAMETERS
Table 24: Ring Group Parameters
Ring Group Name
Configure ring group name to identify the ring group. Letters, digits,
underscore and hyphen are allowed.
Extension
Configure the ring group extension.
Ring Group Members
Select available users to the ring group member list. Click on
to arrange the order.
Ring Strategy
Select the ring strategy.
•
Ring All Simultaneously. Ring all the members at the same time
when there is incoming call to the ring group extension. If any of the
member answers the call, it will stop ringing.
•
Ring In Order. Ring the members with the configured order one by
one. If the first member doesn't answer the call, it will stop ringing
the first member and start ringing the second member.
Firmware Version 1.0.0.32
UCM6102/6104/6108/6116 USER MANUAL
Page 62 of 108
Seconds to Ring Each Member
Configure the number of seconds to ring each member. If set to 0, it will
keep ringing (users could configure the ring timeout on the phone side
as well). The default setting is 30 seconds.
Enable Voicemail
If enabled, the ring group extension can use voicemail.
Secret
Configure the password to access the ring group voicemail.
Email Address
Configure the Email address of the ring group extension.
Figure 28: Ring Group Configuration
Firmware Version 1.0.0.32
UCM6102/6104/6108/6116 USER MANUAL
Page 63 of 108
PAGING AND INTERCOM GROUP
Paging
and
intercom
can
be
configured
in
group
level
under
Web
GUI->PBX->Call
Features->Paging/Intercom.
•
Click on "Create New Page/Intercom Group" to add page/intercom group.
Figure 29: Page/Intercom Group
Table 25: Page/Intercom Group Parameters
Extension
Configure page/intercom group extension.
Type
Select "2-way Intercom" or "1-way Page".
Page/Intercom
Group
Members
Select available users from the right list to the left.
•
Click on
to edit the page/intercom group.
•
Click on
to delete the page/intercom group.
•
Click on "Paging/Intercom Group Settings" to edit Alert-Info Header (see figure below). To edit
page/intercom feature code, click on "Feature Codes" in the following figure.
Firmware Version 1.0.0.32
UCM6102/6104/6108/6116 USER MANUAL
Page 64 of 108
Figure 30: Page/Intercom Group Settings
Firmware Version 1.0.0.32
UCM6102/6104/6108/6116 USER MANUAL
Page 65 of 108
CALL QUEUE
CONFIGURING CALL QUEUE
Call queue settings can be accessed via Web GUI->PBX->Call Features->Call Queue.
Figure 31: Call Queue
•
Click on "Create New Queue" to add call queue.
•
Click on
to edit the call queue.
•
Click on
to delete the call queue.
•
Click on "Agent Login Settings" to configure Agent Login Extension Postfix and Agent Logout
Extension Postfix. For example, if the call queue extension is 6500, Agent Login Extension Postfix is *
and Agent Logout Extension Postfix is **, users could dial 6500* to login and dial 6500** to logout.
CALL QUEUE PARAMETERS
Table 26: Call Queue Parameters
Extension
Configure the call queue extension.
Name
Configure the name to identify the call queue.
Strategy
Select the strategy for the call queue.
•
RingAll: Ring all available Agents simultaneously until one answers.
•
Linear: Ring agents in the specified order specified.
•
LeastRecent: Ring the agent being least recent called.
•
FewestCalls: Ring the agent with the fewest completed calls.
•
Random: Ring a random agent.
•
RRmemory: Ring the agents in Round Robin scheduling with
memory.
Music On Hold
Firmware Version 1.0.0.32
Select the Music On Hold class for the call queue.
UCM6102/6104/6108/6116 USER MANUAL
Page 66 of 108
Note:
Music On Hold classes can be managed from PBX->Internal
Options->Music On Hold.
Leave When Empty
Configure whether forcing the caller to leave if the call queue has no
agent.
•
Yes: Callers will be forced to leave the call queue if the call queue is
empty.
•
No: Never force the callers to leave the call queue when the queue
is empty.
•
Strict: Callers will be forced to leave the call queue if the agents are
paused, invalid or unavailable. This is the default setting.
John Empty
Configure whether the callers can join the call queue if the queue has no
agent. The default setting is No.
•
Yes: Callers can always join a call queue.
•
No: Callers cannot join the queue if the queue has no agent.
•
Strict: Callers cannot join a queue if the agents are paused, in an
invalid state or unavailable.
Dynamic Login Password
If enabled, the configured PIN number is required for the agent to login.
The default setting is disabled.
TimeOut
Configure the number of seconds an agent will ring before the call goes
to the next agent. The default setting is 15 seconds.
Wrapup Time
How many seconds after the completion of a call an Agent will have
before the Queue can ring them with a new call. 0 means no delay."
Max Len
How many calls can be queued at once. This count does not include
calls that have been connected with Agents, it only includes calls that
have not yet been connected. Default is 0, which is no limit. When the
limit has been reached, a caller will hear a busy tone and advance to the
next calling rule after attempting to enter the queue.",
Report Hold Time
If enabled, the PBX will report (to the agent) the duration of time of the
call before connected to the agent.
Wait Time
If enabled, users will be disconnected after the configured number of
seconds. The default setting is disabled.
Note:
It is recommended to configure Wait Time longer than the Wrapup Time.
Static Agents
Select the available agents from the right list to the left. Click on
to arrange the order.
Firmware Version 1.0.0.32
UCM6102/6104/6108/6116 USER MANUAL
Page 67 of 108
MUSIC ON HOLD
Music On Hold settings can be accessed via Web GUI->PBX->Internal Options->Music On Hold. In this
page, users could configure music on hold class and the music files. The "default" Music On Hold class
already have 5 audio files defined for users to use.
Figure 32: Music On Hold Default Class
•
Click on "Create New MOH Class" to add a new Music On Hold class.
•
Click on
•
Click on
to select music file from local PC and click on
uploaded has to be 8 KHz Mono format with size less than 5M.
•
Click on
to delete the selected Music On Hold class.
to start uploading. The music file
to delete the sound file for the selected Music On Hold file.
Firmware Version 1.0.0.32
UCM6102/6104/6108/6116 USER MANUAL
Page 68 of 108
FAX/T.38
On the UCM6102/6104/6108/6116, the Fax extension can receive T.38 Fax to the specified Email address.
Fax/T.38 settings can be accessed via Web GUI->PBX->Internal Options->FAX/T.38.
CONFIGURING FAX/T.38
•
Click on "Create New Fax Extension". In the popped up window, fill the extension, name and Email
address to send the received FAX to.
•
Click on "Settings to Fax" to configure the following options.
Table 27: FAX/T.38 Settings
Enable Error Correction Mode
(ECM)
Maximum Transfer Rate
Enable ECM for the Fax.
Configure the maximum transfer rate during the Fax rate negotiation.
The possible values are 2400, 4800, 7200, 9600, 12000 and 14400. The
default setting is 14400.
Minimum Transfer Rate
Configure the minimum transfer rate during the Fax rate negotiation. The
possible values are 2400, 4800, 7200, 9600, 12000 and 14000. The
default setting is 2400.
Default Email Address
Configure the Email address to send the received Fax to if user's Email
address cannot be found.
•
Click on
to edit the Fax extension.
•
Click on
to delete the Fax extension.
Note:
Users could also use Fax2Mail if "FaxDetect" option is enabled for the user and VoIP trunk. The Fax signal
will be detected during talking, and the detected Fax will be received and sent to user's Email. If user's
Email address is not configured, Fax will be sent to the default Email address in Table 27: FAX/T.38 Settings.
If the default Email address is empty, Fax will not be received.
Firmware Version 1.0.0.32
UCM6102/6104/6108/6116 USER MANUAL
Page 69 of 108
INTERNAL OPTIONS
The configuration for PBX internal options can be accessed via Web GUI->PBX->Internal Options.
INTERNAL OPTIONS/GENERAL
General Preferences
Global OutBound CID
This is the default global CallerID that is used for all outgoing calls when
no other CallerID is defined. If ther "User" tab or "VoIP Trunks" tab does
not have defined CallerID neither, this Global OutBound CID will be
used for CallerID.
Global OutBound CID Name
This is the global CallerID Name that is used for all outgoing calls. If this
value is defined, all outgoing calls will have a "CallerId Name" set to this
value. Usually this value could be your company name. Leave this value
blank if you would like to have the users' "CallerID Name" display on
outbound calls.
Operator Extension
The operator extension is the number dialed when users press "0" to exit
Voicemail. It's also available in IVR option.
Ring Timeout
Number of seconds to ring an extension before sending to the user's
voicemail box.
Extension Preferences
Enable Rand Password
If enabled, random password will be generated when the extension is
created. The default setting is enabled. It is recommended to enable it
for security purpose.
Disable Extension Range
If set to Yes, users could disable specified extension range. The default
extension range assignment are:
User Extension: 6000-6299
Conference Extension: 6300-6399
IVR Extension: 7000-7100
Ring Group Extension: 6400-6499
Queue Extensions: 6500-6599
VoiceMail Group Extension: 6600-6699
Note:
It is recommended to keep the system assignment for PBX to work
Firmware Version 1.0.0.32
UCM6102/6104/6108/6116 USER MANUAL
Page 70 of 108
properly.
INTERNAL OPTIONS/FEATURE CODES
Call Feature
Description
Blind Transfer
•
Default code: #1.
•
Enter the code during active call. After hearing "Transfer",
enter the number to transfer to. Then the user will be
disconnected.
•
Options
- Neither: Disable the feature code.
- Caller Enable: Enable the feature code on caller side only.
- Callee Enable: Enable the feature code on callee side only.
Attended Transfer
•
Default code: *2.
•
Enter the code during active call. After hearing "Transfer",
enter the number to transfer to and the user will be connected
to this number. Hang up the call to complete the attended
transfer.
•
Options
- Neither: Disable the feature code.
- Caller Enable: Enable the feature code on caller side only.
- Callee Enable: Enable the feature code on callee side only.
Disconnect
•
Default code: *0.
•
Enter the code during active call to disconnect the call.
•
Options
- Neither: Disable the feature code.
- Caller Enable: Enable the feature code on caller side only.
- Callee Enable: Enable the feature code on callee side only.
Call Parking
•
Default code: #72.
•
Enter the code during active call to park the call.
•
Options
- Neither: Disable the feature code.
- Caller Enable: Enable the feature code on caller side only.
- Callee Enable: Enable the feature code on callee side only.
Audio Record
•
Default code: *1.
•
Enter the code to record the audio call.
•
Options
- Neither: Disable the feature code.
Firmware Version 1.0.0.32
UCM6102/6104/6108/6116 USER MANUAL
Page 71 of 108
- Caller Enable: Enable the feature code on caller side only.
- Callee Enable: Enable the feature code on callee side only.
Audio Mix Record
•
Default code: *3.
•
Enter the code to record the audio call and the PBX will mix
the streams natively on the fly as the call is in progress.
•
Options
- Neither: Disable the feature code.
- Caller Enable: Enable the feature code on caller side only.
- Callee Enable: Enable the feature code on callee side only.
Do Not Disturb (DND) Active
•
Default code: *77.
Do Not Disturb (DND) Deactive
•
Default code: *78.
Call Forward Busy Active
•
Default Code: *71.
•
Enter the code and follow the voice prompt. Or enter the code
followed by the extension to forward the call.
Call Forward Busy Deactive
•
Default Code: *72.
Call Forward No Answer Active
•
Default Code: *73.
•
Enter the code and follow the voice prompt. Or enter the code
followed by the extension to forward the call.
Call Forward No Answer Deactive
•
Default Code: *74.
Call Forward Uncondition Active
•
Default Code: *75.
•
Enter the code and follow the voice prompt. Or enter the code
followed by the extension to forward the call.
Call Forward Uncondiion Deactive
•
Default Code: *76.
Feature Digit Timeout
•
Default Setting: 1000.
•
This is the maximum timeout (in milliseconds) between the
digits input of the feature code.
Extension to Dial to Park a Call
Extensions for Parked Calls
•
Default Extension: 700.
•
During an active call, press to park the call.
•
Default Extension: 701-720.
•
These are the extensions where the calls will be parked, i.e.,
parking lots that the parked calls can be retrieved.
Parked Call Timeout (in secs)
•
Default setting: 120.
•
This is the timeout for the call to be parked. After the timeout,
if the call is not retrieved, the extension who parked the call
will be called back.
Dial Voice Mail
•
Default Code: *98.
•
Enter *98 and follow the voice prompt. Or dial *98 followed by
the extension and # to access the entered extension's
Firmware Version 1.0.0.32
UCM6102/6104/6108/6116 USER MANUAL
Page 72 of 108
voicemail box.
Voice Mail Main
Agent Pause
Agent Unpause
Paging Prefix
•
Default Code: *97.
•
Press *97 to access the voicemail box.
•
Default Code: *83.
•
Pause the agent in all call queues.
•
Default Code: *84.
•
Unpause the agent in all call queues.
•
Default Code: *81.
•
To page an extension, enter the code followed by the
extension number.
Intercom Prefix
•
Default Code: *80.
•
To intercom an extension, enter the code followed by the
extension number.
Call Pickup
•
Default Code: **.
•
To pick up a call for extension xxxx, enter the code followed by
the extension number xxxx.
INTERNAL OPTIONS/RTP SETTINGS
RTP Start
RTP port starting address. The default setting is 10000.
RTP End
RTP port ending address. The default setting is 20000.
Strict RTP
Enables/disables strict RTP protection. When enabled, RTP packets
that do not come from the source of the RTP stream will be dropped.
The default setting is "Disable".
RTP Checksums
Enables/Disables RTP Checksums. The default setting is "Disable".
INTERNAL OPTIONS/HARDWARE CONFIG
Analog Hardware
Options
Select Loop Start or Kewl Start for each FXS port and FXO port.
Tone Region
Select country for default tones (dial tone, busy tone, ring tone and etc.
Advanced Settings
FXO Opermode
Specify On Hook Speed, Ringer Impedance, Ringer Threshold, Current
Limiting, TIP/RING voltage adjustment, Minimum Operational Loop
Firmware Version 1.0.0.32
UCM6102/6104/6108/6116 USER MANUAL
Page 73 of 108
Current, and AC Impedance as predefined for your country's analog line
characteristics. Select the country in the list. FCC is equivalent to United
States. TBR21 is equivalent to Austria, Belgium, Denmark, Finland,
France, Germany, Greece, Iceland, Ireland, Italy, Luxembourg,
Netherlands, Norway, Portugal, Spain, Sweden, Switzerland, and the
United Kingdom. If option is specified, FCC will be used by default.
ACIM Override
Check to override AC Impedance.
FXS Opermode
Specify On Hook Speed, Ringer Impedance, Ringer Threshold, Current
Limiting, TIP/RING voltage adjustment, Minimum Operational Loop
Current, and AC Impedance as predefined for your country's analog line
characteristics. Select the country in the list. FCC is equivalent to United
States. TBR21 is equivalent to Austria, Belgium, Denmark, Finland,
France, Germany, Greece, Iceland, Ireland, Italy, Luxembourg,
Netherlands, Norway, Portugal, Spain, Sweden, Switzerland, and the
United Kingdom. The default setting is FCC.
TISS Override
Check to override Two-Wire Impedance Synthesis.
PCMA Override
Specifies the codec to be used for analog lines.
should choose PCMU.
North American users
All other countries, unless otherwise known,
should be assumed to be PCMA. If no user choice is specified, the
default is PCMU.
Boost Ringer
Configure whether normal ringing voltage (40V) or maximum ringing
voltage (89V) for analog phones attached to the FXS port is required.
The default setting is Normal.
Fast Ringer
Configure to increase the ringing speed to 25HZ. This option can be
used with "Low Power" option. The default setting is "Normal".
Low Power
Configure the peak voltage during "Fast Ringer" operation. This option is
used with "Fast Ringer" option. The default setting is "Normal".
Ring Detect
Configure ring detection. If set to "Full Wave", false ring detection will be
prevented for lines where Caller ID is sent before the first ring and
proceeded by a polarity reversal, as in UK. The default setting is
"Standard".
MWI Mode
Configure the type of Message Waiting Indicator detection on trunk
(FXO) interfaces.
•
None: No detection
•
FSK: Frequency Shift Key detection
•
NEON: Neon MWI detection.
The default setting is "None".
Firmware Version 1.0.0.32
UCM6102/6104/6108/6116 USER MANUAL
Page 74 of 108
INTERNAL OPTIONS/STUN MONITOR
STUN Server
Configures the STUN server to query.
Valid format:
[(hostname | IP-address) [':' port]
The default port number is 3478 if not specified.
Leave this field blank to disable STUN.
STUN Refresh
Number of seconds between STUN Refreshes. The default setting is 30
seconds.
Firmware Version 1.0.0.32
UCM6102/6104/6108/6116 USER MANUAL
Page 75 of 108
PBX SETTINGS
IAX SETTINGS
The UCM6102/UCM6104/UCM6108/UCM6116 IAX Settings can be accessed via Web GUI->PBX->IAX
Settings.
IAX SETTINGS/GENERAL
Bind Port
Allows iax2 to listen to another port. The default setting is 4569.
Bind Address
Forces iax2 to bind to a specific address instead of all addresses. The
default setting is 0.0.0.0.
IAX1 Compatibility
Enables/disables iax1 style compatibility.
No Checksums
Enables/disables checksums.
Delay Reject
Enables/disables iax2 to delay reject of calls to avoid DOS.
ADSI
Enables/disables ADSI phone compatibility.
Music On Hold Interpret
Specifies Music On Hold class.
Music On Hold Suggest
Suggests Music On Hold for the channel.
Language
Configures default language for the channel. This can be used by
prompts.
Bandwidth
Configures allowed codecs for different bandwidth requirement. The
default setting is "Low".
IAX SETTINGS/CODECS
The following codes are supported in UCM6102/UCM6104/UCM6108/UCM6116 for IAX. Select the codecs
from the right side list to the left side. Click on
•
PCMU
•
PCMA
•
GSM
•
ILBC
•
G.722
•
G.726
•
ADPCM
•
LPC10
•
G.729
•
G.723
Firmware Version 1.0.0.32
to arrange the order.
UCM6102/6104/6108/6116 USER MANUAL
Page 76 of 108
•
H.263
•
H.263p
•
H.264
IAX SETTINGS/JITTER BUFFER
Enable Jitter Buffer
Enables the use of jitter buffer on the receiving side of a SIP channel.
Force Jitter Buffer
Forces the use of jitter buffer on the receiving side of a SIP channel.
Drop Count
Configures drop count.
MAX Jitter Buffer
Configures the maximum time (in milliseconds) 0 for the buffer.
MAX Interpolation Frames
Configures the maximum number of interpolated
frames the jitter
buffer should return consecutively.
Recync Threshold
Jumps in the frame timestamps over where the jitter buffer is
resynchronized. This feature is useful to improve the quality of voice
with big jumps in/broken timestamps sent from exotic devices and
programs. The default setting is 1000.
Max Excess Buffer
Configures the maximum number (in milliseconds) to pad the jitter
buffer.
Min Excess Buffer
Configures the minimum number (in milliseconds) to pad the jitter buffer.
Jitter Shrink Rate
Configures the jitter shrink rate.
IAX SETTINGS/REGISTRATION
Min Reg Expire
Minimum duration (in seconds) of registrations/subscriptions. The
default setting is 60.
Max Reg Expire
Maximum duration (in seconds) of incoming registration/subscriptions.
The default setting is 3600.
IAX Thread Count
Configures number of IAX threads.
IAX Max Thread Count
Configures maximum number of IAX threads.
Auto Kill
When set to "yes", the connection will be terminated if ACK for the NEW
message is not received in 2000ms. Users could also specify number (in
milliseconds) in addition to "yes" and "no".
Authentication Debugging
Enables/disables IAX related debug output in log messages.
Codec Priority
Configures codec negotiation priority to Caller, Host, Disabled or
Reqonly.
Type of Service
Configures ToS bit for preferred IP routing.
Trunk Frequency
Configures frequency of trunk frames measured in milliseconds.
Firmware Version 1.0.0.32
UCM6102/6104/6108/6116 USER MANUAL
Page 77 of 108
Trunk Time Stamps
Enables/disables attaching time stamps to trunk frames.
IAX SETTINGS/SECURITY
Call Token Optional
A single IP address or a range of IP addresses for which call token
validation
is
not
required
in
the
form
11.11.11.11
or
11.11.11.11/22.22.22.22.
Max Call Numbers
Max
Limits the amount of call numbers allowed for a single IP address.
Nonvalidated
Call
Limits the amount of nonvalidated call numbers for all IP addresses
Numbers
combined.
Call Number Limits
Limits the call numbers for a given IP range.
SIP SETTINGS
The UCM6102/UCM6104/UCM6108/UCM6116 IAX Settings can be accessed via Web GUI->PBX->SIP
Settings.
SIP SETTINGS/GENERAL
Realm
For
Digest
Authentication
Realms MUST be globally unique according to RFC 3261. Configure this
value as your host or domain name. The default setting is \"asterisk\". If
a system name is configured in asterisk.conf, this value will be set to the
configured system name.
UDP Port to Bind to
The default setting is 5060.
IP Address to Bind to
The default setting is 0.0.0.0, which means binding to all addresses.
Domain
Use
comma
to
separate
a
list
of
domains
that
the
UCM6102/UCM6104/UCM6108/UCM6116 will be responsible for.
Allow Guest Calls
Enables/disables guest calls.
Overlap Dialing Support
Enables/disables dialing support.
Allow Transfer
Enables/disables all transfers (unless enabled in peers or users)
initiated by the endpoint. The Dial() options 't' and 'T' are not related to
whether SIP transfers are allowed or not.
Enable DNS SRV Lookups (on
outbound calls)
MWI From
Firmware Version 1.0.0.32
Enables/disables DNS SRV lookups on calls.
When sending MWI NOTIFY requests, this value will be used in the
UCM6102/6104/6108/6116 USER MANUAL
Page 78 of 108
"From:" header as the \"name\" part. If no "fromuser" is configured, the
\"user\" part of the URI in the "From:" header will be filled with this value
as well.
From Domain
Configures the domain in the "From:" field of the SIP header. It may be
required by some providers for authentication.
Auto Domain
When turned on, the UCM6102/UCM6104/UCM6108/UCM6116 will add
local host name and local IP to domain list.
Allow External Domains
Allow
requests
for
domains
that
are
not
served
by
the
UCM6102/UCM6104/UCM6108/UCM6116.
SIP SETTINGS/CODECX
The following codes are supported in UCM6102/UCM6104/UCM6108/UCM6116 for IAX. Select the codecs
from the right side list to the left side. Click on
•
PCMU
•
PCMA
•
GSM
•
ILBC
•
G.722
•
G.726
•
ADPCM
•
LPC10
•
G.729
•
G.723
•
H.263
•
H.263p
•
H.264
to arrange the order.
SIP SETTINGS/JITTER BUFFER
Enable Jitter Buffer
Enables/disables the use of jitter buffer on the receiving side of a SIP
channel.
Force Jitter Buffer
Forces the use of jitter buffer on the receiving side of a SIP channel.
Log Frames
Enable/disables jitter buffer frame logging.
Max Jitter Buffer
Configures max length of the jitter buffer in milliseconds.
Resync Threshold
Jumps in the frame timestamps over where the jitter buffer is
resynchronized. This feature is useful to improve the quality of voice
Firmware Version 1.0.0.32
UCM6102/6104/6108/6116 USER MANUAL
Page 79 of 108
with big jumps in/broken timestamps sent from exotic devices and
programs. The default setting is 1000.
Implementation
The Jitter buffer implementation used on the receiving side of a SIP
channel. Users could select "Fixed" (with size always equals to
jbmaxsize) or "Adaptive" (with variable size which is the new jb of IAX2).
SIP SETTINGS/MISCELLANEOUS
Register
Register as a SIP user agent to a SIP proxy (provider).
Register Timeout
The
interval
(in
seconds)
for
the
UCM6102/UCM6104/UCM6108/UCM6116 to retry registration. The
default setting is 20.
Register Attempts
Number
of
registration
attempts
before
the
UCM6102/UCM6104/UCM6108/UCM6116 gives up. The default setting
is 0 (keep trying until the server side accepts the registration request).
Video Max Bitrate (kb/s)
Maximum bitrate (kb/s) for video calls. The default setting is 384.
Support for SIP Video
Enables/disables SIP video support.
Generate Manager Events
Generates manager events when SIP UA performs events (e.g. hold).
Reject NonMatching Invites
When rejecting an incoming INVITE or REGISTER request, always
reject with "401 Unauthorized" instead of notifying the requester that if
there is a matching user or peer for the request.
NonStandard G.726 Support
If the peer negotiates G726-32 audio, use AAL2 packing order instead of
RFC3551 packing order (this is required for Sipura and Grandstream
ATAs).
SIP SETTINGS/SESSTION TIMER
Session Timers
•
Originate: always request and run session-timers.
•
Accept: Run session-timers only when requested by other UA.
•
Refuse: Do not run session timers.
The default setting is "Accept".
Session Expires
The maximum session refresh interval (in seconds). The default setting
is 1800.
Min SE
The minimum session refresh interval (in seconds). The default setting is
90.
Session Refresher
Selects the session refresher to be UAC or UAS. The default setting is
UAC.
Firmware Version 1.0.0.32
UCM6102/6104/6108/6116 USER MANUAL
Page 80 of 108
SIP SETTINGS/TLS AND TCP
TCP Enable
Enables/disables server for incoming TCP connections. The default
setting is "No".
TCP Bindaddr
IP address for TCP server to bind to (0.0.0.0: binds to all interfaces). The
default port number is 5060 if not specified.
TLS Enable
Enables/disables server for incoming TLS (secure) connections. The
default setting is "No".
TLS Bindaddr
IP address for TLS server to bind to (0.0.0.0: binds to all interfaces). The
default port number is 5061 if not specified.
Note:
The IP address must match the common name (hostname) in the
certificate. Please do not bind a TLS socket to multiple IP addresses.
For details on how to construct a certificate for SIP, please refer to the
following document:
http://tools.ietf.org/html/draft-ietf-sip-domain-certs
TLS Self Signed CA
This is the CA certificate is the TLS server being connected to requires
self signed certificate, including server's public key. This file will be
renamed as "asterisk.ca" automatically.
Note:
The size of your ca file can't be larger than 2MB.
TLS Cert
This is the Certificate file (*.pem format only) used for TLS connections.
This file will be renamed as "asterisk.pem" automatically.
Note:
The size of your certificate can't be larger than 2MB.
TLS CA Cert
This file must be named with the CA subject name hash value. It
contains CA's (Certificate Authority) public key, which is used to verify
the accessed servers.
Note:
The size of your certificate can't be larger than 2MB.
TLS CA List
The list of files under the CA Cert directory.
SIP SETTINGS/NAT
External Address
Firmware Version 1.0.0.32
A static address (and port) that will be in outbound SIP messages if the
UCM6102/6104/6108/6116 USER MANUAL
Page 81 of 108
UCM6102/UCM6104/UCM6108/UCM6116 is behind NAT. If it's a
hostname, it will only be looked up only.
External Host
Specifies an external host, which is similar to External Address except
the hostname will be looked up every "External Refresh" interval and
Asterisk will perform DNS queries periodically.
External Refresh
Configures the refresh interval for the external host.
External TCP Port
Configures
the
externally
mapped
TCP
port
when
the
UCM6102/UCM6104/UCM6108/UCM6116 is behind a static NAT or
PAT.
External TLS Port
Configures
the
externally
mapped
TLS
port
when
UCM6102/UCM6104/UCM6108/UCM6116 is behind a static NAT or
PAT. The default value is 5061.
Local Network Address
A list of network addresses that are considered inside of the NAT
network. Multiple entries are allowed, e.g., a reasonable set could be as
follows:
192.168.0.0/255.255.0.0
NAT Mode
This is a global NAT setting that will affects all peers and users.
•
No: Use rport if the remote side requires it.
•
Force rport: Force rport to always be on. This is the default setting.
•
Yes: Force rport to always be on and perform comedia RTP
handling.
•
Comedia: Use rport if the remote side requires it and perform
comedia RTP handling.
Note:
"comedia RTP handling" refers to the technique of sending RTP to the
port where the other endpoint's RTP comes from. This can also be
rephrased as "connection-oriented media".
Allow RTP Reinvite
When turned on, the UCM6102/UCM6104/UCM6108/UCM6116 will try
to redirect the RTP media stream (audio) to go directly from the caller to
the callee.
•
Yes: Enables RTP Reinvite.
•
NoNAT: Allows media path redirection (reinvite) but only when the
peer is not be behind NAT. The RTP core can determine if the peer
is behind NAT or not based on the IP address where the media
comes from.
•
Firmware Version 1.0.0.32
Update: use UPDATE for media path redirection, instead of INVITE.
UCM6102/6104/6108/6116 USER MANUAL
Page 82 of 108
Note:
Some devices do not support this (especially if one of them is behind
NAT).
SIP SETTINGS/ToS
The following options are provided to configure SIP ToS on the UCM6102/UCM6104/UCM6108/UCM6116.
ToS For Signaling Packets
Configure the Type of Service for SIP packets. The default setting is
None.
ToS For RTP Audio Packets
Configure the Type of Service for RTP audio packets. The default
setting is None.
ToS For RTP Video Packets
Configure the Type of Service for RTP video packets. The default setting
is None.
Default
Incoming/Outgoing
Configure the default length of time (in seconds) of incoming/outgoing
Registration Time
registration. The default setting is 120.
Max Registration/Subscription
Configure the maximum length of time (in seconds) of incoming
Time
registration and subscription allowed by the PBX. The default setting is
3600.
Min
Registration/Subscription
Time
Configure the minimum length of time (in seconds) of incoming
registration and subscription allowed by the PBX. The default setting is
60.
Music On Hold Interpret
Configure the Music On Hold class for the channel when being put on
hold. This is used when the Music On Hold class is not set on the
channel in the dialplan and the peer channel placing the call on hold
doesn't suggest the Music On Hold class neither. The default Music On
Hold class will be used if not specified.
Music On Hold Suggest
Configure the Music On Hold class to suggest to the peer channel when
placing the peer on hold. It can be specified globally or per user/per
peer. The default Music On Hold class will be used if not specified.
Enable Relaxed DTMF
Configure to relax the DTMF handling. The default setting is disabled.
DTMF Mode
Select DTMF mode to send DTMF. The default setting is RFC2833. If
"Info" is selected, SIP INFO message will be used. If "Inband" is
selected, 64-kbit codec PCMU and PCMA are required. When "Auto" is
selected, RFC2833 will be used if offered, otherwise Inband will be
used.
RTP Timeout
If there is no RTP activity in the timeout (in seconds) configured in this
option, the call will be terminated. The default setting is no timeout. This
Firmware Version 1.0.0.32
UCM6102/6104/6108/6116 USER MANUAL
Page 83 of 108
setting doesn't apply to calls on hold.
RTP Hold Timeout
When the call is on hold, if there is no RTP activity in the timeout (in
seconds) configured in this option, the call will be terminated. This value
of RTP Hold Timeout should be larger than RTP Timeout. The default
setting is no timeout.
Trust Remote Party ID
Configure whether the Remote-Party-ID should be trusted. The default
setting is disabled.
Send Remote Party ID
Configure whether the Remote-Party-ID should be sent. The default
setting is disabled.
Generate In-Band Ringing
Configure whether the PBX should generate inband ringing. If "Never" is
selected, inband ringing will not be generated even the end point device
is not working properly. The default setting is Never.
Server User Agent
Configure to replace the user agent string.
Allow Nonlocal Redirect
If enabled, 302 or Redirect is allowed to non-local SIP address. The
default setting is disabled.
Add "user=phone" to URI
If enabled, "user=phone" will be added to URI that contains a valid
phone number. The default setting is disabled.
Send Compact SIP Headers
If enabled, compact SIP headers will be sent. The default setting is
disabled.
Time Between MWI Checks
Configure the default time (in seconds) between Mailbox checks for
peers. The default setting is 10.
Min Roundtrip Time (T1 Time)
Configure the minimum roundtrip time (in milliseconds) of the messages
sent to the monitored hosts. The default setting is 100.
SIP SETTINGS/DEBUG
Enable SIP Debugging
Enables/disables SIP debugging.
Record SIP History
Records SIP history.
Dump SIP History
Dumps SIP history at the end of SIP dialog.
Subscribe Context
Configures a specific context for SUBSCRIBE requests. This setting is
useful to limit subscriptions to local extensions.
Allow Subscribe
Enables/disables support for subscriptions.
Notify on Ringing
Sends out NOTIFY on ringing status.
Firmware Version 1.0.0.32
UCM6102/6104/6108/6116 USER MANUAL
Page 84 of 108
STATUS AND REPORTING
PBX STATUS
The UCM6102/UCM6104/UCM6108/UCM6116 monitors the status for Trunks, Extensions, Queues,
Conference Rooms, Interfaces and Parking lot. It presents administrators the real time status in different
sections under web GUI->Status->PBX Status.
Figure 33: Status->PBX Status
TRUNKS
Users could see all the configured trunk status in this section.
Figure 34: Trunk Status
Table 28: Trunk Status
Displays trunk status.
Status
•
For analog trunk, the possible status are:
Available
Firmware Version 1.0.0.32
UCM6102/6104/6108/6116 USER MANUAL
Page 85 of 108
Busy
Unavailable
Unknown Error
•
For SIP Peer trunk, the possible status are:
Unreachable: The hostname cannot be reached.
Unmonitored: QUALIFY feature is not turned on to be monitored.
Reachable: The hostname can be reached.
•
For SIP Register trunk, the possible status are:
Registered
Unrecognized Trunk
Trunks
Displays trunk name
Displays trunk Type.
Type
•
Analog: This trunk is an analog trunk
•
SIP: This trunk is a SIP trunk
•
IAX: This trunk is an IAX trunk
Username
Displays username for this trunk.
Port/Hostname/IP
Displays Port for analog trunk, or Hostname/IP for VoIP (SIP/IAX) trunk.
Other operations are also available in trunk status section:
•
Click on "Trunks", the web page will redirect to trunk configuration page which can also be accessed via
web GUI->PBX->Basic/Call Routes->Analog Trunks.
•
Click on
•
Click on [ + ] to expand the status detail table.
•
Click on [ - ] to hide the status detail table.
to refresh the trunk status.
EXTENSIONS
Users could see all the configured extension status in this section.
Firmware Version 1.0.0.32
UCM6102/6104/6108/6116 USER MANUAL
Page 86 of 108
Figure 35: Extension Status
Table 29: Extension Status
Displays extension number (including feature code). The color indicator has
the following definitions.
Extension
Name/Label
•
Green: Free
•
Blue: Ringing
•
Yellow: In Use
•
Grey: Unavailable
Displays name (callerID name) or label (feature code function) for the
extension.
Displays message status for the extension.
Status
Example: 2/4/1
Description: There are 2 urgent messages, 4 messages in total and 1
message that has been read already.
Displays extension type.
Type
•
SIP User
•
IAX User
•
Analog User
•
Features
Other operations are also available in extension status section:
Firmware Version 1.0.0.32
UCM6102/6104/6108/6116 USER MANUAL
Page 87 of 108
•
Click on "Extensions", the web page will redirect to extension configuration page which can also be
accessed via web GUI->PBX->Basic/Call Routes->Extensions.
•
Click on
•
Click on one of the tabs
to refresh the extension status.
to display the corresponding extensions
accordingly.
•
Click on [ + ] to expand the status detail table.
•
Click on [ - ] to hide the status detail table.
QUEUES
Users could see all the configured call queue status in this section. The following figure shows the call
queue 6500 being in used.
Figure 36: Queue Status
The
current
call
status
(caller
ID,
duration),
agent
status,
service
level,
calls
summary
(completed/abandoned) are shown for the call queue. The agent status is defined as below.
Table 30: Agent Status
The agent is available/idle.
The agent is talking/busy.
The agent is ringing.
The agent has been logged out.
On the UCM6102/UCM6104/UCM6108/UCM6116, Service Level is defined as the percentage of
high-quality calls over all calls in the call queue, where high-quality call means calls answered within 10
seconds.
Other operations are also available in queue status section:
Firmware Version 1.0.0.32
UCM6102/6104/6108/6116 USER MANUAL
Page 88 of 108
•
Click on "Queues", the web page will redirect to call queue configuration page which can also be
accessed via web GUI->PBX->Call Features->Call Queue.
•
Click on
•
Click on [ + ] to expand the call queue detail.
•
Click on [ - ] to hide the call queue detail.
to refresh the call queue status.
CONFERENCE ROOMS
Users could see all the conference room status in this section. It shows all the configured conference rooms,
current users and call duration for each user, as well as conference duration.
Figure 37: Conference Room Status
Other operations are also available in conference room status section:
•
Click on "Conference Rooms", the web page will redirect to conference room configuration page which
can also be accessed via web GUI->PBX->Call Features->Conference.
•
Click on
•
Click on [ + ] to expand the conference room details.
•
Click on [ - ] to hide the conference room details.
to refresh the conference room status.
INTERFACES STATUS
This section displays interface/port connection status on the UCM6102/UCM6104/UCM6108/UCM6116.
The following example shows the interface status for UCM6116 with USB, SD card, LAN port, FXS1
connected.
Firmware Version 1.0.0.32
UCM6102/6104/6108/6116 USER MANUAL
Page 89 of 108
Figure 38: UCM6116 Interfaces Status
Table 31: Interface Status Indicators
USB connected.
USB disconnected.
SD Card connected.
SD Card disconnected.
LAN/WAN connected.
LAN/WAN not configured.
LAN/WAN disconnected.
FXS/FXO connected.
FXS/FXO waiting.
FXS/FXO busy.
FXS/FXO not configured.
FXS/FXO disconnected.
Other operations are also available in interface status section:
•
Click on "Interfaces Status", the web page will redirect to hardware configuration page which can also
be accessed via web GUI->PBX->Internal Options->Hardware Config.
•
Click on
•
Click on [ + ] to expand the interface details.
•
Click on [ - ] to hide the interface details.
to refresh the interface status.
Firmware Version 1.0.0.32
UCM6102/6104/6108/6116 USER MANUAL
Page 90 of 108
PARKING LOT
The UCM6102/UCM6104/UCM6108/UCM6116 supports call park using feature code. When there is call
being parked, this section will display the parking lot status.
Figure 39: Parking Lot Status
Table 32: Parking Lot Status
Caller ID
Displays the caller ID who parks the call.
Channel
Displays channel for the call park.
Extension
Displays the parking lot number where the call is parked/retrieved.
Displays timeout (in seconds) for the parked call. The status page will
Timeout
dynamically update this timer from 120 seconds (default) to 0. When the
timer reaches 0, the caller who parked the call will be called back.
Other operations are also available in parking lot status section:
•
Click on "Parking Lot", the web page will redirect to feature codes page which can also be accessed via
web GUI->PBX->Internal Options->Feature Codes.
•
Click on
•
Click on [ + ] to expand the parking lot details.
•
Click on [ - ] to hide the parking details.
to refresh the parking lot status.
SYSTEM STATUS
The
UCM6102/UCM6104/UCM6108/UCM6116
system
status
can
be
accessed
via
GUI->Status->System Status, which displays the following system information.
•
General
•
Network
•
Storage Usage
•
Resource Usage
Firmware Version 1.0.0.32
UCM6102/6104/6108/6116 USER MANUAL
Page 91 of 108
Web
GENERAL
Under Web GUI->Status->System Status->General, users could check the hardware and software
information for the UCM6102/UCM6104/UCM6108/UCM6116. Please see details in the following table.
Table 33: System Status->General
Status ->System Status -> General
Model
Product model.
Part Number
Product part number.
System Time
Current system time.
Up Time
System up time since the last reboot.
Idle Time
System idle time since the last reboot.
Boot
Boot version.
Core
Core version.
Base
Base version.
Program
Program version. This is the main software release version.
Recovery
Recovery version.
NETWORK
Under Web GUI->Status->System Status->Network, users could check the network information for the
UCM6102/UCM6104/UCM6108/UCM6116. Please see details in the following table.
Table 34: System Status->Network
Status -> System Status -> Network
MAC Address
Global unique ID of device, in HEX format. The MAC address can be found on the
label coming with original box and on the label located on the bottom of the device.
IP Address
IP address.
Gateway
Default gateway address.
Subnet Mask
Subnet mask address.
DNS
DNS Server address.
Firmware Version 1.0.0.32
UCM6102/6104/6108/6116 USER MANUAL
Page 92 of 108
STORAGE USAGE
Users could access the storage usage information from Web GUI->Status->System Status->Storage
Usage. It shows the available and used space for the following partitions.
•
Configuration partition
Asterisk server configuration files and service configuration files.
•
Data partition
Voicemail, recording files, IVR file, music on hold files and etc.
•
USB disk
USB disk will display if connected.
•
SD Card
SD Card will display if connected.
Figure 40: System Status->Storage Usage
RESOURCE USAGE
When configuring and managing the UCM6102/UCM6104/UCM6108/UCM6116, users could access
resource usage information to estimate the current usage and allocate the resources accordingly. Under
Web GUI->Status->System Status->Resource Usage, the current CPU usage and Memory usage are
shown in the pie chart.
Firmware Version 1.0.0.32
UCM6102/6104/6108/6116 USER MANUAL
Page 93 of 108
Figure 41: System Status->Resource Usage
CDR (Call Detail Report)
A Call Detail Record (CDR) is a data record produced by telephone exchange activities or other
telecommunications equipment documenting the details of a phone call that passed through the PBX. The
CDR is composed of the following data fields on the UCM6102/UCM6104/UCM6108/UCM6116.
•
Start Time. Format: 2013-03-27 16:47:03.
•
Duration. Format: 0:00:10.
•
Source. Format: 6012.
•
Destination. Format: 6005.
•
Caller ID. Format: "John Doe"<6012>.
•
Disposition. Format: NO ANSWER, BUSY, ANSWERED, or FAILED.
Users could filter the call report by specifying the date range and criteria, depending on how the users
would like to include the logs to the report. Then click on the "View Report" button to display the generated
report.
Firmware Version 1.0.0.32
UCM6102/6104/6108/6116 USER MANUAL
Page 94 of 108
Figure 42: CDR Filter
Table 35: CDR Filter Criteria
Inbound calls
Inbound calls are calls originated from a non-internal source (like a VoIP trunk) and
sent to an internal extension.
Outbound calls
Outbound calls are calls sent to a non-internal source (like a VoIP trunk) from an
internal extension.
Internal calls
Internal calls are calls from one internal extension to another extension, which are
not sent over a trunk.
External calls
External calls are calls sent from one trunk to another trunk, which are not sent to
any internal extension.
The call report will display as the following figure shows.
Figure 43: Call Report
Firmware Version 1.0.0.32
UCM6102/6104/6108/6116 USER MANUAL
Page 95 of 108
Users could perform the following operations on the call report.
•
Sort
Click on the header of the column to sort by this category. For example, clicking on "Start Time" one
time to sort the report according to start time. Clicking on "Start Time" again to reverse the order.
•
Download Records
•
Delete All
On the bottom of the page, click on "Download Records" button to export the report in .csv format.
On the bottom of the page, click on "Delete All" button to remove all the call report information.
•
Play/Download/Delete Recording File (per entry)
If the entry has audio recording file for the call, the three icons on the most right column will be
activated for users to select. In the following picture, the first row has audio recording file for the call.
Figure 44: Call Report Entry With Audio Recording File
Click on
on
to play the recording file; click on
to download the recording file in .wav format; click
to delete the recording file (the call record entry will not be deleted).
CDR Statistics is an additional feature on the UCM6102/UCM6104/UCM6108/UCM6116 which provides
users a visual overview of the call report across the time frame. Users can filter with different criteria to
generate the statistics chart.
Figure 45: CDR Statistics
Firmware Version 1.0.0.32
UCM6102/6104/6108/6116 USER MANUAL
Page 96 of 108
Table 36: CDR Statistics Filter Criteria
Trunk Type
Call Type
Time Range
Select one of the following trunk type.
•
All
•
SIP Calls
•
PSTN Calls
Select one or more in the following checkboxes.
•
Inbound calls
•
Outbound calls
•
Internal calls
•
External calls
•
All calls
•
By month (of the selected year).
•
By week (of the selected year).
•
By day (of the specified month for the year).
•
By hour (of the specified date).
•
By range. For example, 2013-01 To 2013-03.
Firmware Version 1.0.0.32
UCM6102/6104/6108/6116 USER MANUAL
Page 97 of 108
UPGRADING AND MAINTENANCE
UPGRADING
UPGRADING VIA NETWORK
The UCM6102/UCM6104/UCM6108/UCM6116 can be upgraded via TFTP/HTTP/HTTPS by configuring
the URL/IP Address for the TFTP/HTTP/HTTPS server and selecting a download method. Configure a
valid URL for TFTP, HTTP or HTTPS; the server name can be FQDN or IP address.
Examples of valid URLs:
firmware.grandstream.com
The upgrading configuration can be accessed via Web GUI->Maintenance->Upgrade.
Figure 46: Network Upgrade
Table 37: Network Upgrade Configuration
Upgrade Via
Allow users to choose the firmware upgrade method: TFTP, HTTP or
HTTPS.
Firmware Server Path
Firmware Version 1.0.0.32
Define the server path for the firmware server.
UCM6102/6104/6108/6116 USER MANUAL
Page 98 of 108
Firmware File Prefix
If configured, only the firmware with the matching encrypted prefix will
be downloaded and flashed into the
UCM6102/UCM6104/UCM6108/
UCM6116.
Firmware File Suffix
If configured, only the firmware with the matching encrypted postfix will
be downloaded and flashed into the UCM6102/UCM6104/UCM6108/
UCM6116.
HTTP/HTTPS User Name
The user name for the HTTP/HTTPS server.
HTTP/HTTPS Password
The password for the HTTP/HTTPS server.
Click on "Save" and "Apply Changes". Then reboot the device to start the upgrading process.
UPGRADING VIA LOCAL UPLOAD
If
there
is
no
HTTP/TFTP
server,
users
could
also
upload
the
firmware
to
the
UCM6102/UCM6104/UCM6108/UCM6116 directly via Web GUI. Please follow the steps below to upload
firmware locally.
•
Download the latest UCM6102/UCM6104/UCM6108/UCM6116 firmware file from the following link
and save it in your PC.
http://www.grandstream.com/support/firmware
•
Log in the Web GUI as administrator in the PC.
•
Go to Web GUI->Maintenance->Upgrade, upload the firmware file by clicking on
and select
the firmware file from your PC.
•
Click on
to start upgrading.
Figure 47: Local Upgrade
•
Wait until the upgrading process is successful and a window will be popped up. Click on "OK" to reboot
the UCM6102/UCM6104/UCM6108/UCM6116 and check the firmware version when it boots up.
Firmware Version 1.0.0.32
UCM6102/6104/6108/6116 USER MANUAL
Page 99 of 108
Note:
Please do not interrupt or power cycle the UCM6102/UCM6104/UCM6108/UCM6116 when the upgrading
process is on.
NO LOCAL FIRMWARE SERVERS
For users that would like to use remote upgrading without a local TFTP server, Grandstream offers a
NAT-friendly HTTP server. This enables users to download the latest software upgrades for their devices
via this server. Please refer to the webpage:
http://www.grandstream.com/support/firmware.
Alternatively, users can download a free TFTP or HTTP server and conduct a local firmware upgrade. A
free windows version TFTP server is available for download from :
http://support.solarwinds.net/updates/New-customerFree.cfm
http://tftpd32.jounin.net/.
Instructions for local firmware upgrade via TFTP:
1. Unzip the firmware files and put all of them in the root directory of the TFTP server;
2. Connect the PC running the TFTP server and the UCM6102/UCM6104/UCM6108/UCM6116 device to
the same LAN segment;
3. Launch the TFTP server and go to the File menu->Configure->Security to change the TFTP server's
default setting from "Receive Only" to "Transmit Only" for the firmware upgrade;
4. Start
the
TFTP
server
and
configure
the
TFTP
server
in
UCM6102/UCM6104/UCM6108/UCM6116’s web configuration interface;
5. Configure the Firmware Server Path to the IP address of the PC;
6. Update the changes and reboot the UCM6102/UCM6104/UCM6108/UCM6116.
End users can also choose to download a free HTTP server from http://httpd.apache.org/ or use
Microsoft IIS web server.
BACKUP
LOCAL BACKUP
Firmware Version 1.0.0.32
UCM6102/6104/6108/6116 USER MANUAL
Page 100 of 108
the
Users
could
backup
the
configurations
for
restore
purpose
under
Web
GUI->Maintenance->Backup->Local Backup. Before creating new backup file, select the backup option
first.
•
If the Config-File is selected only, the backup file will be saved in the flash of the device.
•
If Voice-File, Voicemail-File, Voice-Records or CDR is selected, external storage devices (USB Flash
drive or SD Card) will be required because the backup file might be too large.
Once backup is done, the list of the backups will be displayed with date and time. Users then can download,
restore or delete it from the UCM6102/UCM6104/UCM6108/UCM6116 or the external device.
Figure 48: Local Backup
NETWORK BACKUP
Users could backup the voice records/voice mails/CDR/FAX in a daily basis via SFTP protocol
automatically under Web GUI->Maintenance->Backup->Network Backup.
Firmware Version 1.0.0.32
UCM6102/6104/6108/6116 USER MANUAL
Page 101 of 108
Figure 49: Network Backup
Table 38: Network Backup Configuration
Enable Backup
Enable the auto backup function.
Account
Enter the Account name on the SFTP backup server.
Password
Enter the Password associate with the Account on the SFTP backup
server.
Server Address
Enter the SFTP server address.
Backup Time
Enter 0-23 to specify the backup hour of the day.
All the backup logs will be listed on the bottom of the page.
CLEANER
Users could configure to clean the Call Detail Report/Voice Records/Voice Mails/FAX automatically under
Web GUI->Maintenance->Cleaner.
Firmware Version 1.0.0.32
UCM6102/6104/6108/6116 USER MANUAL
Page 102 of 108
Figure 50: Cleaner
Table 39: Cleaner Configuration
Enable CDR Cleaner
Enable the CDR Cleaner function.
CDR Clean Time
Enter 0-23 to specify the hour of the day to clean up CDR.
Clean Interval
Enter 1-30 to specify the day of the month to clean up CDR.
Enable VR Cleaner
Enter the Voice Records Cleaner function.
VR Clean Threshold
Specify the Voice Records threshold from 0 to 99 by using local storage
status in percentage.
VR Clean Time
Enter 0-23 to specify the hour of the day to clean up Voice Records.
Clean Interval
Enter 1-30 to specify the day of the month to clean up Voice Records.
All the cleaner logs will be listed on the bottom of the page.
RESET AND REBOOT
Users could perform reset and reboot under Web GUI->Maintenance->Reset and Reboot.
To factory reset the device, select the mode type first. There are three different types for reset.
Firmware Version 1.0.0.32
UCM6102/6104/6108/6116 USER MANUAL
Page 103 of 108
•
User Configuration: All the Extensions, Trunks and Routing configurations, as well as the local settings
(network settings, upgrading setting and etc) will be cleared.
•
User Data: All the data including voicemail, recordings, IVR Prompt, Music on Hold, CDR and backup
files will be cleared.
•
All: All the configurations and data will be reset to factory default.
Figure 51: Reset and Reboot
SYSLOG
On the UCM6102/UCM6104/UCM6108/UCM6116, users could dump to syslog information to a remote
server under Web GUI->Maintenance->Syslog. Enter the syslog server hostname or IP address and
select the module/level for the syslog information.
TROUBLESHOOTING
On the UCM6102/UCM6104/UCM6108/UCM6116, users could capture traces, ping remote host and
traceroute remote host for troubleshooting purpose under Web GUI->Maintenance->Troubleshooting.
ETHERNET CAPTURE
The captured trace can be downloaded for analysis. Also the instructions or result will be displayed in the
web GUI output result.
Firmware Version 1.0.0.32
UCM6102/6104/6108/6116 USER MANUAL
Page 104 of 108
Figure 52: Ethernet Capture
The output result is in .pcap format. Therefore, users could specify the capture filter as used in general
network traffic capture tool (host, src, dst, net, protocol, port, port range) before starting capturing the
trace.
PING
Enter the target host in host name or IP address. Then press "Start" button. The output result will
dynamically display in the window below.
Figure 53: PING
Firmware Version 1.0.0.32
UCM6102/6104/6108/6116 USER MANUAL
Page 105 of 108
TRACEROUTE
Enter the target host in host name or IP address. Then press "Start" button. The output result will
dynamically display in the window below.
Figure 54: Traceroute
Firmware Version 1.0.0.32
UCM6102/6104/6108/6116 USER MANUAL
Page 106 of 108
EXPERIENCING THE UCM6102/UCM6104/UCM6108/UCM6116
Please visit our website: http://www.grandstream.com to receive the most up- to-date updates on firmware
releases, additional features, FAQs, documentation and news on new products.
We encourage you to browse our product related documentation, FAQs and User and Developer Forum
for answers to your general questions. If you have purchased our products through a Grandstream
Certified Partner or Reseller, please contact them directly for immediate support.
Our technical support staff is trained and ready to answer all of your questions. Contact a technical support
member or submit a trouble ticket online to receive in-depth support.
Thank you again for purchasing Grandstream UCM6102/UCM6104/UCM6108/UCM6116, it will be sure to
bring convenience and color to both your business and personal life.
Firmware Version 1.0.0.32
UCM6102/6104/6108/6116 USER MANUAL
Page 107 of 108