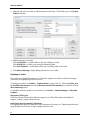
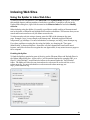
1
dtSearch Desktop
dtSearch Network
Version 7
Copyright 1991-2013 dtSearch Corp. www.dtsearch.com
SALES
1-800-483-4637
(301) 263-0731
Fax (301) 263-0781
[email protected]
TECHNICAL
(301) 263-0731
[email protected]
Table of Contents
1. Getting Started ____________________________________________________________ 1
Quick Start
1
Installing dtSearch on a Network
7
Automatic deployment of dtSearch on a Network
8
Command-Line Options
10
Keyboard Shortcuts
11
2. Indexes _________________________________________________________________ 13
What is a Document Index?
13
Creating an Index
13
Caching Documents and Text in an Index
15
Indexing Documents
15
Noise Words
18
Scheduling Index Updates
18
3. Indexing Web Sites ________________________________________________________ 19
Using the Spider to Index Web Sites
19
Spider Options
20
Spider Passwords
22
Login Capture
22
4. Sharing Indexes on a Network ______________________________________________ 25
Creating a Shared Index
25
Sharing Option Settings
25
Index Library Manager
26
Searching Using dtSearch Web
28
5. Working with Indexes ______________________________________________________ 29
Index Manager
29
Recognizing an Existing Index
29
Deleting an Index
29
Renaming an Index
29
Compressing an Index
29
Verifying an Index
30
List Index Contents
30
Merging Indexes
31
6. Searching for Documents __________________________________________________ 33
Using the Search Dialog Box
33
Browse Words
35
More Search Options
36
Search History
37
Searching for a List of Words
37
iii
dtSearch Manual
7. Search Results ___________________________________________________________ 41
Copying Retrieved Files
41
Saving Search Results
42
Selecting Items in Search Results
42
Search Reports
42
8. Search Requests__________________________________________________________ 45
Search Requests (Overview)
45
Words and Phrases
46
Wildcards (*, ?, and =)
46
Fuzzy Searching
46
Phonic Searching
47
Stemming
47
Synonym Searching
47
Numeric Range Searching
47
Field Searching
48
AND connector
50
OR Connector
50
W/N Connector
50
NOT and NOT W/N
50
Variable Term Weighting
51
Search Macros
51
9. Options _________________________________________________________________ 53
Indexing Options
53
Letters and Words
55
Alphabet Customization
56
Filtering Options
57
File Types
59
File Segmentation Rules
61
Text Fields
62
Search Options
64
Search Results Options
65
User Thesaurus
67
Document Display
67
Document Fonts and Colors
68
External Viewers
69
Settings Files
70
10. Index ___________________________________________________________________ 73
iv
Getting Started
Quick Start
dtSearch can search terabytes of text in a second. It does this by building an index that stores
the location of each word in your files. Therefore, to get started with dtSearch, the first step is to
build an index of your documents.
Indexing Documents
1. Click Index > Create Index.
2. In the Create Index dialog box, enter a name for the index and click OK.
1
dtSearch Manual
3. dtSearch will ask if you want to add documents to the index. Click Yes to go to the Update
Index dialog box.
4. Add documents to the index
Click Add Folder... to add a folder to the list of folders to index.
Click Add Web... to index a site using the dtSearch Spider.
Click Add Outlook... to add folders from your Outlook profile to the index.
5. Click Start Indexing to begin adding documents to your index.
Updating an Index
If you edit your original documents, you will need to update your index to reflect the changes
(otherwise, hit highlighting will be incorrect).
To update your index, click Index > Update Index (or press Ctrl+U). Check the Index new
or modified documents box and the Remove deleted documents box, and then click the
Start Indexing button.
To schedule automatic updates of your indexes, click Index > Index Manager > Schedule
Updates.
Supported File Types
For a list of the file formats that dtSearch supports, see "What file formats does dtSearch
support" at http://support.dtsearch.com.
Indexing Large Document Collections
For suggestions to improve indexing of large document collections, see "Optimizing indexing of
large document collections" at http://support.dtsearch.com.
2
Getting Started
Searching using the Index
1. Click the Search
Search dialog box.
button on the dtSearch button bar, or press Ctrl+S, to open the
Indexes to search
The top right of the dialog box shows a list of the indexes you have created; select one or
more to search.
Indexed word list
The top left of the dialog box shows a list of the words in the currently selected index. If
more than one index is selected for searching, you can select the index to display in the word
list by clicking the down arrow above the word list.
2. Enter a search under Search request.
3. Select any items under Search features (such as fuzzy searching) that you want to use.
4. Click Search to begin the search.
Search Types
Any words or All words
3
dtSearch Manual
Finds a list of words or phases
•
use "quotation marks" around phrases
•
add + in front of any word or phrase to require it
•
add - in front of any word or phrase or to exclude it
•
examples:
banana pear "apple pie"
"apple pie" -salad +"ice cream"
Boolean search
Finds a structured group of words or phrases linked by and, or, not, w/.
•
examples:
tart apple pie – the entire phrase must be present
apple pie and pear tart – both phrases must be present
apple pie or pear tart – either phrase must be present
apple pie and not pear tart - only apple pie must be present
apple w/5 pear – apple must occur within 5 words of pear
apple not w/27 pear - apple must not occur within 27 words of pear
subject contains apple pie – finds apple pie in a subject field
•
use ( ) when a search includes two or more connectors:
apple and pear or orange could mean (apple and pear) or orange, or it could
mean apple and (pear or orange)
Search Features
Stemming
Finds grammatical variations on endings, like applies, applied, applying in a search for apply
Fuzzy searching
Finds words even if they are misspelled. A search for alphabet with a fuzziness of 1 would also
find alphaqet. With a fuzziness of 3, the same search would find both alphaqet and alpkaqet
Phonic searching
Finds words that sound alike, like Smythe in a search for Smith
Synonym searching
Finds word synonyms using a comprehensive English language thesaurus or user-defined
custom thesaurus terms
4
Getting Started
Special Characters
? matches any single character
appl? matches apply or apple
* matches any number of characters
appl*ion matches application
~~ indicates numeric range
14~~18 looks for 14, 15, 16, 17 or 18
= matches any single digit
p12== matches p1234
variable term weights
A number after a word assigns a specific positive or negative weight when ranking retrieved
documents.
Example: apple:5 salad:-2
More Search Options
To search without an index, or to search by filename, date, or size, click the More Search
Options tab.
To view or reuse a prior search request, click the Search History tab in the Search dialog box.
For information on forensic searching, see Forensics-related features at
http://support.dtsearch.com.
Viewing Search Results
After a search, dtSearch will display the results of the search. The top half of the dtSearch
window will list all of the files retrieved in the search, and the lower half will show the first
document in the list, with hits highlighted in yellow.
5
dtSearch Manual
1. To select a document to view from the search results list, double-click on it.
2. To jump to the next hit in a document window, click Next Hit
press SPACEBAR).
Click the Next Doc
on the button bar (or
button (or press CTRL+SPACEBAR) to go to the next document.
3. To change the way search results are sorted, click on one of the column headers (Name,
Score, Location, Date, etc.).
4. Click the Launch
button (or press F8) to open a document in the application
associated with it. For example, a Word document would be launched in Microsoft Word.
See "Keyboard shortcuts" in the on-line help for a complete list of keyboard shortcuts.
6
Getting Started
Create a Quick Summary of Your Search Results
An easy way to see the hits in all retrieved documents is to build a search report. A search report
shows all hits along with the amount of context that you request.
1. Click Search > Search Report. The Generate Search Report dialog box will appear.
2. Enter the number of words (or paragraphs) of context that you want dtSearch to include in
your search report and click OK to generate the report.
3. The search report will open in your word processor so you can edit or print it.
Installing dtSearch on a Network
To install dtSearch on a network, you can either set up dtSearch to run from a shared directory
or you can install dtSearch on each user's computer. If dtSearch is installed separately on each
user's computer, it will generally load faster because local disk access is faster. In either case,
users can use shared index libraries or Recognize Index in the Index Manager to access shared
network indexes.
On Windows networks with Microsoft CMS, you can also automatically deploy dtSearch. See
"Automatic deployment of dtSearch on a network" in this manual for more information.
Running dtSearch from a shared network folder
To set dtSearch up to run from a shared network folder,
1. Install dtSearch in a folder on the server that each user will have read-only access to.
2. Create shortcuts for network users to run dtsrun.exe.
3. Use command-line options in the shortcuts to specify a private directory or shared index
library for users.
Command-line options
/dir <folder>
The /dir command-line option specifies a location for the user's personal dtSearch folder, if one
is not already set up for that user. If the /dir command-line switch is not provided, dtSearch will
see that is being run from a read-only directory and prompt the user for a folder to use for
personal dtSearch settings. Using /dir prevents this prompt from occurring. Once a personal
dtSearch folder is created, the location is stored in the registry and the user will not be prompted
again for a dtSearch folder.
/lib <index library>
The /lib command-line switch specifies a shared index library providing a list of indexes.
/cfg <options package>
The /cfg command-line switch specifies a dtSearch options package file, providing a list of
indexes as well as other settings (such as default stemming rules).
7
dtSearch Manual
Examples
Suppose dtSearch is installed in a network drive that all users see as P:\dtSearch. Assuming a
standard installation, the dtSearch program files will be in P:\dtSearch\bin, and the network
administrator's settings will be in P:\dtSearch\UserData. The network administrator has
created some shared indexes, which will be listed in the index library
P:\dtSearch\UserData\ixlib.ilb. The following shortcut will start dtSearch from any network
workstation, with access to the indexes:
P:\dtSearch\bin\dtsrun.exe /dir c:\dtsearch6 /lib
P:\dtSearch\UserData\ixlib.ilb
Now suppose that instead the network administrator installed dtSearch in P:\Program
Files\dtSearch. The shortcut should be modified to use quotation marks around all filenames,
because of the space in "Program Files":
"P:\Program Files\dtSearch\bin\dtsrun.exe" /dir c:\dtsearch6 /lib
"P:\Program Files\dtSearch\UserData\ixlib.ilb"
Simple Index Sharing
dtSearch has a simple index sharing feature that lets you share indexes on a network without the
need for any command-line switches. Instead, users just make a shortcut to dtsrun.exe in the
shared dtSearch BIN folder and dtSearch will detect the shared indexes automatically. To use
the simple index sharing feature:
1. Install dtSearch in a directory on the server that each user will have read-only access to.
2. Run dtSearch on the server and accept the default location for the UserData folder on the
server. For example, if you install dtSearch to C:\Program Files\dtSearch, the UserData
folder will go in C:\Program Files\dtSearch\UserData. This folder should also be read-only
for network users.
3. Create indexes using the default index library, which will be named IXLIB.ILB and which
will be stored in the UserData folder.
When a network user runs dtsrun.exe from the shared network folder, it will find the default
index library and the user will automatically be able to search the indexes listed there.
Automatic deployment of dtSearch on a Network
System Requirements
Automatic deployment requires network software that can automatically deploy Windows
Installer (MSI) files. If you are deploying to computers that all support Group Policy, you can
use Group Policy Objects in Microsoft's Active Directory to do this.
Two MSI files are used for automatic deployment: the dtSearchDesktop.msi file, which contains
the program files, and the dtSearchPolicy.msi file, which contains the settings for your network
installation. These files can be deployed and redeployed separately, so you can upgrade your
dtSearch installation without losing your settings, and you can update your settings without the
need to reinstall dtSearch.
8
Getting Started
Note: Some users may require updated versions of certain Windows components to use
dtSearch Desktop. If dtsrun.exe does not start correctly, please see this article on the dtSearch
web site for links to download the updated components:
http://support.dtsearch.com/faq/dts0187.htm.
Steps to deploy dtSearch
1. Obtain the dtSearchDesktop.msi file that installs dtSearch Desktop.
2. Create one or more shared index libraries on a network share.
3. Create one or more shared indexes on a network share.
4. Create a dtSearchPolicy.msi file that will configure your users' machines with information
about the location of the shared index libraries.
5. Use Active Directory or Microsoft SMS to deploy the dtSearchDesktop.msi and
dtSearchPolicy.msi files to your users.
Each of these steps is described below.
1. Obtain the dtSearchDesktop.msi file that installs dtSearch Desktop
dtSearchDesktop.msi will be on your dtSearch CD, in a subfolder named for the version number.
If you only have the dtSearch download file, open the file in Winzip or any other ZIP-compatible
program to extract dtSearchDesktop.msi. (The download file is in ZIP format even though it is
an .exe file.) Copy the dtSearchDesktop.msi file to a network folder.
2. Create one or more shared index libraries on a network share
An index library is just a list of index locations. Once you create a shared index library, you can
add indexes to it later and users will automatically see the updated list. To create an index
library, click Index > Index Manager > Index Library Manager, and click Add Library
to create an empty index library.
3. Create one or more shared indexes on a network share
Click Index > Create Advanced to create a new index and specify that it should be added to
the shared library that you created in the previous step. You can also use Index Library Manager
to add existing indexes to the shared library, as long as these indexes are also in a network
folder.
4. Create a dtSearchPolicy.msi file
To create a dtSearchPolicy.msi file, click Options > Create Group Policy... in dtSearch
Desktop. A dtSearchPolicy.msi file can specify the following settings:
Serial number
You can use a single serial number to register as many user installations as your license
covers. Providing a serial number in the Group Policy file eliminates the need for users to enter
serial numbers themselves.
9
dtSearch Manual
Shared index libraries
Specify the index libraries that should be included with this Group Policy. Once the index
libraries have been set up, you can add or remove indexes in the libraries, and network users will
automatically see the updates in their Search dialog box.
Specify where each user's settings should be stored
When first installed, dtSearch will prompt a user for the location of the folder for the user's
settings. Specifying the folder in the Group Policy eliminates the need for this prompt.
After setting up the Group Policy, click Save As to save the .MSI file to a location on your
network that your users will be able to access.
5. Use Active Directory or Microsoft SMS to deploy the dtSearchDesktop.msi
and dtSearchPolicy.msi files to your users.
When the steps above are done, you will have two MSI files in a network folder:
dtSearchDesktop.msi (the program files), and dtSearchPolicy.msi (the settings for your
network). Using Microsoft SMS or Active Directory, you can automatically install these MSI files
on all or part of your network. It does not matter which MSI file is installed first, and you can
uninstall and reinstall, or redeploy, either MSI file without affecting the other.
Command-Line Options
dtSearch Programs
Program
dtsearchw.exe
dtsrun.exe
dtindexerw.exe
dtindexer64.exe
dtinfo.exe
Purpose
dtSearch Desktop/Network
Launcher to start dtSearch Desktop/Network
dtSearch Indexer (32-bit)
dtSearch Indexer (64-bit, requires 64-bit version of Windows)
dtSearch diagnostic tools
dtSearch Desktop Options
Switch
/lib [index library]
/dir [folder]
/cfg [options package]
/xl
Purpose
Specify a shared index library to use
Specify a UserData folder to use for settings files
Specify an options package file to use
Do not use index libraries other than the one specified on
the command-line
The /xl command-line switch is used with the /lib or /cfg switch to prevent indexes other than
the ones specified on the command-line from being visible in dtSearch.
The /dir command-line switch has no effect if a dtSearch folder already exists on the
computer. It is used when running dtSearch from a network to specify a default local folder to
use for dtSearch settings. See "Installing dtSearch on a Network" for more information.
10
Getting Started
dtSearch Indexer Options
Switch
/i [index path]
/a
/c
/cat
/cad
Purpose
Specify the index to be updated
Index new or modified documents
Clear the index before adding documents
Enable caching of text in the index (when used with /c)
Enable caching of original documents in the index (when
used with /c)
Remove deleted documents from the index
Recognize an index (can be combined with /c to create
an index and recognize it)
Compress the index after adding documents
/r
/recog [index path]
/o
Filenames or directories that contain spaces should be quoted in command lines. If the path to
dtIndexerw.exe contains a space, it should also be quoted, like this:
"C:\Program Files\dtSearch\dtIndexerw.exe" /i "C:\Program
Files\dtSearch\UserData\MyIndex" /c /a
Keyboard Shortcuts
Document Windows
Key
Ctrl+Shift+Up or
Ctrl+Plus
Ctrl+Shift+Down or
Ctrl+Minus
Spacebar
Backspace
Tab
Ctrl+Spacebar
Ctrl+Backspace
Ctrl+Home
Ctrl+End
Ctrl+K
Ctrl+P
Purpose
Zoom in
Zoom out
Next hit in document
Previous hit in document
Switch to search results window
Next document in search results
Previous document in search results
Top of document
End of document
Advanced copy
Print document or, if text is selected, print selected block
Search Results Windows
Key
Enter
F8
Tab
Purpose
Open current document
Launch current document
Switch to document window
11
dtSearch Manual
Ctrl+P
Print document or, if text is selected, print selected block
Search Dialog Box
Key
Alt+1
Alt+2
Alt+3
Purpose
Select Search Request pane
Select More Search Options pane
Select Search History pane
Other Keyboard Shortcuts
Key
Ctrl+S
Ctrl+Shift+S
Ctrl+H
Ctrl+I
Ctrl+U
Alt+Down
Ctrl+Tab
12
Purpose
Search
Search in a new window
Search History
Index Manager
Update Index
Browse for file or folder where this icon is shown:
In Preferences Dialog box, switch to next preferences pane.
In Search Dialog box, switch to next search pane (Search
Request, More Search Options, or Search History)
Indexes
What is a Document Index?
A document index is a database that stores the locations of all of the words in a group of
documents except for noise words such as but and if.
Once you have built an index for a group of documents, dtSearch can use it to perform very fast
searches on those documents.
A document index is usually about one fourth the size of the original documents, although this
may vary considerably depending on the number and kinds of documents in the index. In
general, the more documents in the index, the smaller the index will be as a percentage of your
original documents.
Creating an Index
Menu option: Index > Create Index
Name
Enter the name of the index as it should appear in the Search dialog box.
Location
Enter the directory where dtSearch should store the index. By default, dtSearch will create
indexes in your "UserData" folder. To specify a different location, click Options > Preferences >
Indexing Options.
Logging
A Summary only log shows the number of files added or removed and a list of any files that
could not be indexed. A Detailed log adds a list of every file added to the index.
Advanced Options
Menu option: Index > Create Index (Advanced)
13
dtSearch Manual
Cache document text in the index
Cache documents in the index
dtSearch indexes can store documents in either, or both, of two ways: (1) the entire original file
can be stored, or (2) just the text of the file can be stored. Stored documents and text are
compressed using ZIP compression. Storing the text of documents makes generation of search
reports much faster, especially generation of the brief hits-in-context snippet in search results.
For more information, see: Caching Documents and Text in an Index
Case-sensitive
Check this box if you want dtSearch to take capitalization into account in indexing words. In a
case sensitive index, APPLE, Apple, and apple would be three different words. This option is
not recommended because most users would like to retrieve a document containing Apple in a
search for apple.
Accent-sensitive
Check this box if you want dtSearch to take accents into account in indexing words. Again, for
most users this is not recommended, because this option increases the chance that you will miss
retrieving a document if an accent was omitted in one letter.
Fields to display in search results
List the names of fields in your documents that you want to include in the search results list,
along with other document properties such as the filename and date.
14
Indexes
Select the index libraries that should include this index
When you create a new index, it is usually added to your default index library. The Create Index
(Advanced) dialog box lets you add the index to other libraries in one step. This can be useful
when you are sharing indexes on a network.
Caching Documents and Text in an Index
In addition to storing word locations to enable fast searching, dtSearch indexes can also store
the text of documents to make them open faster after a search. dtSearch indexes can optionally
store documents in either, or both, of two ways: (1) the entire original file can be stored, or (2)
just the text of the file can be stored. Option settings in the "Create Index (Advanced)" dialog
box enable these features when an index is created.
Storing the text of documents makes generation of search reports much faster, including
generation of the brief hits-in-context synopsis in search results.
Storing complete documents is useful in situations where the documents may not be accessible
at search time, or where access to the documents may be slow or unreliable. Examples include:
- Indexes of web sites created using the dtSearch Spider
- Indexes of Outlook message stores
- Indexes of network shares that may be offline or inaccessible for other reasons
Performance Implications of Caching Documents and Text
Search speed: No effect.
Search reports: Substantially faster if text is stored; no effect if only complete documents are
cached.
Opening documents after a search: Can be substantially faster if complete documents are
cached, and if access to the original documents is slow (for example, on a web site).
Indexing speed: Indexing will be slower due to the need to compress and store additional data
in the index.
Index size: Cached documents and text are compressed using ZIP compression.
Security Implications of Storing Documents and Text
A user who is able to search an index will also be able to open any documents that are cached in
the index. Therefore, if documents are subject to security restrictions, the same security
restrictions should apply to the index folder, if the documents are being stored in the index.
Indexing Documents
To add documents to a new index:
1. Click Index > Create Index to create the new index. Enter the name of the index to create
and click OK.
2. dtSearch will ask if you want to add documents to the index. Click Yes.
15
dtSearch Manual
3. In the Update Index dialog box, click Add Folder... or Add File... to add folders or files to
be indexed. You can also drag and drop files or folders from Explorer into the Update Index
dialog box. A "<+>" after a folder name means that subfolders will also be indexed. Rightclick a folder name to add or remove the <+> mark.
4. (Optional) Under Filename filters, enter filters (*.DOC, *.TXT, etc.) to select documents to
add. If you leave this blank, dtSearch will index all of the files in the directories you
selected. Under Exclude filters, enter filters (such as *.EXE) for any files you do not want
to include in the index.
5. Click Start Indexing.
To update an existing index:
1. Click Index > Update Index.
2. Select the index to update from the list.
3. Make any changes to the list of folders to be indexed. Click Remove to remove a folder or
Add Folder... to add a folder.
4. Check Index new or modified documents if it is not already checked.
5. If you have deleted or moved some files that were in the index and you want to remove them
from the index, check Remove deleted documents from index.
16
Indexes
6. If you have updated the index several times, you may want to check Compress index after
adding documents. Compressing an index removes obsolete document information from
an index. It can take a while (dtSearch completely reconstructs the index) but it makes the
index smaller and makes searches faster.
7. Click Start Indexing.
To rebuild an index:
To tell dtSearch to rebuild an index, check the Clear index before adding documents box,
check the Index new or modified documents box, and click Start Indexing.
To update multiple indexes:
To update more than one index at a time, click Index > Index manager... and then click the
Update Multiple Indexes... button. Check the box next to each index to be updated, and
check the boxes indicating the tasks to be performed, and click Start Indexing.
Notes
Supported File Types
For a list of the file formats that dtSearch supports, see "What file formats does dtSearch
support" at http://support.dtsearch.com.
Indexing Large Document Collections
For suggestions to improve indexing of large document collections, see "Optimizing indexing of
large document collections" at http://support.dtsearch.com.
UNC Paths
To index documents using UNC paths rather than mapped letter drives, select folders under
Network Neighborhood in the Add Folder dialog box. You can also convert a folder in the
What to index list to UNC format. To convert a folder name to UNC format, right-click the
folder name you want to convert and choose Make UNC from the menu that pops up.
Subfolders
A "<+>" after the folder name indicates that subfolders will also be indexed. To remove the <+>
mark after a folder name, right-click on the folder name and choose Do not index subfolders
from the menu that pops up.
Disk Space
An index is usually about one-third to one-fourth the size of the original documents, though this
can vary depending on the number and type of documents.
Indexing Documents on Removable Drives
When an index contains documents stored on floppy disk or other removable media such as a
CD-ROM, make sure that Remove deleted documents from index is not checked when you
update the index. You may find it useful to store the documents on each disk in a subdirectory
named after the disk. For example, if you have disks labeled SMITH and JONES, move the
documents on the SMITH disk into a directory called SMITH, and move the documents on the
JONES disk into a directory called JONES. This will help you to locate the documents after a
search. You can see which disk has the documents you want by looking at the directory name in
search results.
17
dtSearch Manual
Relative Paths
When documents are on the same drive as the index, dtSearch will automatically use relative
paths to store document locations. If you add c:\Sample\Documents\smith.doc to an index in
c:\Sample\Index, the index will store the document path as ..\Documents\smith.doc.
Noise Words
A noise word is a word such as the or if that is so common that it is not useful in searches. To
save time, noise words are not indexed and are ignored in index searches. To modify the list of
words defined as noise words, click Options > Preferences > Letters and Words, and click
the Edit button next to the noise word list name.
The words in the noise word list do not have to be in any particular order, and can include
wildcard characters such as * and ?. However, noise words may not begin with wildcard
characters.
When you create an index, the index will store its own copy of the noise word list. Changes you
make to the noise word list will be reflected in future indexes you create but will not affect
existing indexes.
Scheduling Index Updates
Menu option: Index > Index Manager > Schedule Updates
To update an index automatically:
1. Click the Schedule Updates button in Index Manager.
2. Click New Task to create a new index update task. (You can also click Modify Task to
change a pre-existing task or click Delete Task to remove a task.)
3. Select the indexes to be updated from the list, and check the indexing actions to be
scheduled.
4. Click the Next >> button. The indexing task will open in the Windows Task
Scheduler. Click the Schedule tab to set up the schedule for this task.
To access scheduled tasks directly, click Start > Control Panel > Administrative Tools >
Task Scheduler.
For each task, Task Scheduler lists the "Last Result". A value other than zero indicates an
error. If the error code is 8D (141), dtSearch does not have a folder set up for your personal
settings. To fix this, run the dtSearch Desktop search program and specify a location for your
dtSearch files. For more information, see Settings Files. If the error code is 8F (143), the index
could not be accessed, which may be because of a network or security issue or because the index
is damaged or missing.
18
Indexing Web Sites
Using the Spider to Index Web Sites
To index a web site with dtSearch, click Add web in the Update Index dialog box. You can do
this multiple times to add any number of web sites to an index. To modify a web site in the
Update Index dialog box, right-click the name in the What to index list and select Modify
web site.
When indexing using the Spider, it is usually a good idea to enable caching of documents and
text in the index, so dtSearch can highlight hits from the cached data. This ensures that you can
search and browse results even if you cannot access the site.
To index an entire web site using a sitemap, enter the URL of the sitemap as the start
page. Example: http://www.example.com/sitemap.xml. dtSearch supports XML and
compressed (.gz) sitemaps. For more information on sitemaps, see http://www.sitemaps.org.
If you have problems accessing the site using the Spider, try changing the "User agent
identification" to Internet Explorer. Some sites vary their appearance based on the user's
browser, and if the site does not recognize the user agent name, it may return incorrect pages or
fail to respond.
Limiting the Spider
To limit the Spider to particular areas of the site, use the Filename filters and Exclude filters in
the Update Index dialog box. A filter with a / will be matched against the complete URL, so a
filter of */OnlyThisOne/* would limit the indexer to documents under the "OnlyThisOne"
folder. The Spider will also obey any instructions in a robots.txt file on the web site or in a
robots meta tag. For more information on robots.txt and robots meta tags, see
http://www.robotstxt.org.
19
dtSearch Manual
Starting page for web site
This is the first page dtSearch will request from the site to start the crawl. Usually this will be the
home page of the web site.
Crawl depth
The crawl depth is number of levels into the web site dtSearch will reach when looking for
pages. When dtSearch indexes a web site, it starts from the page you specify, indexes that page,
and then looks for links from that page to other pages on the site. For each of those pages, it
looks for links to still more pages. With a crawl depth of zero, dtSearch would index only the
starting page. With a crawl depth of 1, dtSearch would index only pages that are directly linked
to the starting page.
Authentication settings and Passwords...
If the site requires authentication, click Passwords... to set up a username and password.
Allow the Spider to access web servers other than the starting server
By default, the Spider will not follow links to servers other than the starting server. For example,
if the start page for the crawl is www.dtsearch.com, the Spider will not follow links to
support.dtsearch.com. To enable the Spider to follow links to other servers, check this box and
list the other servers to include. You can use wildcards to specify the server names to match. For
example, *.dtsearch.com would match www.dtsearch.com, support.dtsearch.com, and
download.dtsearch.com.
Stop crawl after __ files
Use this setting to limit the number of pages the Spider should index on a web site.
Stop crawl after __ minutes
Use this setting to limit the amount of time the Spider will spend crawling pages on a web site.
Skip files larger than __ kilobytes
Use this setting to limit the maximum size of files that the Spider will attempt to access.
Time to pause between page downloads
Requiring the Spider to pause between page downloads can reduce the effect of indexing on the
web server.
User agent identification
Some web sites behave differently depending on the web browser being used to access
them. For these sites, you can use the User agent identification to specify a user agent
name (for example, Internet Explorer) for the Spider to use, so the Spider will index the same
view of the web site that users see with a web browser.
Spider Options
Menu option: Options > Preferences > Spider options
20
Indexing Web Sites
Spider Options
Automatically log on to web sites on my local area network
When you index web sites on your local area network, dtSearch can attempt to log on to the sites
using your Windows username and password. Un-check this box if you would prefer not to use
your Windows username and password to log on this way.
Logon even if a site only supports non-secure authentication methods
Some web sites only support "Basic" authentication, a type of authentication that requires your
password to be sent across the internet without encryption. Un-check this box to prevent
dtSearch from logging on to a site that does not support secure authentication methods.
Do not prompt for a password if access to a site is denied
If the dtSearch Spider receives an "Access denied" response from a web site when it tries to
download a page, and if no password is found for the site in the web site options, then the Spider
will prompt for a user name and password to access the page. Check this box to prevent
password prompts so that the Spider will continue without interruption.
Use Internet Explorer to download web pages
The dtSearch Spider will use the WinHTTP library to download web pages, unless this box is
checked. Use this option if you want the dtSearch Spider to use your Internet Explorer browser
settings to access the internet (for example, to use a proxy server).
Log the links found on each page in spiderlog.txt
To determine how the Spider found a particular page or file on a web site, check this box before
indexing the site. After the index is built, the file spiderlog.txt in the index folder will contain a
list of every link found on every page indexed.
Folder to use for temporary files
By default, dtSearch will use a sub-folder under your Windows "TEMP" folder for temporary
files downloaded by the Spider. You can specify a different location here if there is not enough
space on the disk drive where your TEMP folder is located.
Timeout limit for downloading pages
This is the maximum amount of time that you want the Spider to wait for a web page to
download before giving up and moving on to the next page.
21
dtSearch Manual
Spider Passwords
Menu option: Options > Preferences > Spider passwords
You can use the Spider passwords settings to store a user name and password for sites that
require login. Note that any password information you store this way will be accessible to
anyone else who uses this computer, or who has access to your files.
Server
This is the name of the server where the web site is located. This should be the domain name
only, without the "http://" or any filename or folder information.
Login using a form on a web page
Check this box if the web site uses an HTML form for logging in. Click Login... to have
dtSearch automatically capture the settings used to login to this site.
Ask for password when needed
Check this box to have dtSearch prompt for a password when a site requires you to log in. You
will have to enter the password each time you index the site, and dtSearch will not save your
password information.
Username
Password
These are the username and password to login for this server. If you leave this setting blank and
check the Ask for password when needed box, then dtSearch will ask for a username and
password when it accesses the site, if a password is needed. If you fill in a password, dtSearch
will remember the password so you can index or search on this server without entering a
password each time.
Note: Passwords are saved without encryption, so anyone who has access to your computer may
be able to read them.
Login Capture
Menu option: Options > Preferences > Spider passwords > Login...
22
Indexing Web Sites
Some web sites require you to fill out a web form to login and gain access to the site. The Login
capture dialog box provides a way to have dtSearch automatically capture all of the
information on this form, so you can use the Spider to index the site.
To have dtSearch capture your login information for a web site:
(1) Enter the address of the login form under Enter web address and click Go to navigate to
the login page. If the window is not large enough to see the login page, you can resize the
Login capture dialog box to make it larger.
(2) Login according to the instructions on the form.
(3) Click OK save the captured settings.
After you login, you will see your username, passwords, and any hidden form variables listed
under Captured login settings.
Note: Passwords are saved without encryption, so anyone who has access to your computer may
be able to read them.
23
Sharing Indexes on a Network
Creating a Shared Index
Any dtSearch index that is located on a network drive can be shared with other users. To create
a shared index, click Index > Create Index and under Location specify a location that other
network users will be able to access.
Once the shared index is created, other users can use Index > Recognize Index to access the
index.
To share multiple indexes, you can either use a shared index library or you can create a shared
options package that includes the indexes to share.
Drive Mapping. To avoid possible drive mapping problems, build an index on the same drive
as the documents it indexes. This prevents drive mapping problems because dtSearch uses
relative paths rather than absolute paths in indexes.
Read/Write Privileges. Write and read access to shared indexes is controlled by folder
permission settings. If an index is stored on a network drive, any user who has write access to
the folder containing the index will be able to update the index in dtSearch. Any user who has
read access to the index will be able to search the index or perform other functions (such as
Verify Index) that do not require write access.
Concurrent Access. dtSearch allows any number of users to search an index at the same
time. Only one user at a time can update or compress an index, so when a user is updating an
index, other users will be able to search but not update the index.
Sharing Option Settings
Menu option: Options > Create Options Package
An options package is a file that you can use to share some or all of your dtSearch option
settings, such as macros or file segmentation rules, with other users on a network. An options
package can also contain links to shared indexes.
Creating an Options Package
To create an options package,
25
dtSearch Manual
1. Select the type of package you want to create.
A Temporary package lets other users run dtSearch with the settings you specify without
changing their own settings. When a user opens a temporary package, dtSearch will apply
the settings in the package only during that session, and will leave the user's own settings
unchanged after dtSearch exits. A temporary package is a good way to give other users
access to your indexes and settings without requiring them to change their own settings.
A Permanent package will change the user's personal dtSearch settings to match the ones
you added to the package. Settings such as macros or stemming rules will replace any
settings the user already has. Indexes included in the package will be listed in a new index
library that will be placed in the user's UserData folder. A permanent package gives network
administrators an easy way to distribute a set of option settings throughout an organization.
2. Select the indexes to include in the package. The package will store the location of each
index that you select, but will not include any of the index contents. Therefore, indexes
selected should all be in shared network locations.
3. Select the option settings to include in the package. Any of the following settings can be
included: stemming rules, user thesaurus, macros, file type definitions, file segmentation
rules, text field definitions, external viewer settings, and display options.
4. Click OK to create the package.
Using an Options Package
To use an options package, browse to it in Windows Explorer and double-click on the name of
the package.
When you open a "temporary" package, dtSearch will open with the settings in the package. The
Search dialog box will contain only the indexes listed in the package.
When you open a "permanent" package, dtSearch will tell you which settings will be
changed. You can then decide to (1) accept the changes, (2) run dtSearch with the changed
settings on a temporary basis (as if the package was a temporary package), or (3) exit without
changing anything.
Index Library Manager
Menu option: Index > Index Manager > Index Library Manager
dtSearch uses index libraries to record the names and locations of the document indexes that
you create. When you select indexes to search, or pick an index to update, compress, etc., the
list of indexes displayed comes from your index libraries.
If you are not sharing indexes on a network, you can ignore index libraries. dtSearch starts out
with a library called IXLIB.ILB that will hold any indexes that you create.
Most commonly, index libraries are used to create a shared list of indexes on a network drive.
Another way to share indexes is to create a shared options package that includes index
references.
26
Sharing Indexes on a Network
Using the Index Library Manager
To create a new index library, click Add Library and enter the name of the library to
create.
To add a link to a shared network library, click Add Library and browse for the shared
library to add. When you find the correct library, click the Open button and the library will be
added to your list of index libraries, and any indexes in that library will appear in your "Indexes
to Search" list in the Search dialog box.
To remove a link to a shared network library, highlight the library to remove and click
Remove Library. The library will not be deleted; it will just be removed from the list of
libraries you are using in dtSearch.
To add an index to the currently-selected library, click the Add Index... button. Browse
for the index to add and click Open when you find any of the files in the index (they will be
named INDEX_I.IX, INDEX_N.IX, etc.).
To remove an index from the currently-selected library, highlight the index to remove
in the list of indexes, and click Remove Index. To remove an index and delete it from the disk,
click Delete Index instead of Remove Index.
Default Library for New Indexes
Use the drop-down list at the bottom of the Index Library Manager to specify the index library
to put new indexes into.
27
dtSearch Manual
How to Set up Shared Indexes
1. Make a shared index library on the network. To do this, click the Add Library button to
create a new index library named "Common" or "Shared".
2. Select this library as the "Working" library so you can add indexes to it.
3. If you already have indexes on the network to share, click Add Index... to add each of the
indexes to the Common library.
4. Close Index Library Manager if it is open and create the indexes to share on the
network. Ideally, each index should be on the same drive as the documents that it indexes,
so drive mapping complications can be avoided. Each of the indexes you create will be
added to the "Common" or "Shared" library.
5. Have each user link to the shared library.
You can also use command-line switches to specify a shared index library. See "Installing
dtSearch on a Network" in this manual for more information.
Automatically Detected Libraries
Each time it runs, dtSearch automatically checks for an index library named IXLIB.ILB in your
dtSearch "BIN" folder and in your "UserData" folder (the folder where your dtSearch personal
settings are stored). To prevent dtSearch from doing this, un-check the box in Index Library
Manager with the label Automatically check for index libraries in the dtSearch
program folder and in my UserData folder.
Searching Using dtSearch Web
dtSearch Web is a web server-based version of dtSearch. You can use dtSearch Desktop to
search indexes on a dtSearch Web server, if the server administrator has set up the indexes to be
accessible this way.
To access dtSearch Web indexes using dtSearch Desktop,
1. Open your web browser and go to the search form for the web site that you want to access.
2. Look for a Get index library link on the search form and click on it. If the link is not there,
the administrator who set up dtSearch Web on the server did not make the indexes
accessible through dtSearch Desktop.
3. When you click on the link, your browser will download a small text file named
dtSearchWeb.ilb. Save this file anywhere and open it by clicking on it in Windows
Explorer.
4. dtSearch Desktop will open and the indexes provided by the server will be listed in the
Search dialog box with "(web)" next to them.
Once you have done this, your list of indexes in dtSearch will include the dtSearch Web
indexes. To search the indexes, select them in the Search dialog box along with any other
indexes that you want to search. To remove some of the indexes, or to rename them in your
index library, use Index Manager.
Searches using dtSearch Web indexes will be similar to searching using local indexes, with a few
differences. Because the index is located on a web server, the scrolling list of index words will be
blank when you select a dtSearch Web index. When you click on a document in search results,
the method used to highlight hits in the document will be determined by the web server, so any
customizations you have done using the Display Options dialog box will not appear.
28
Working with Indexes
Index Manager
Menu option: Index > Index Manager
The Index Manager enables you to get information about each index you have created. To see
information about an index, move the cursor to it.
Buttons in the Index Manager let you create, update, recognize, delete, rename, verify, or list the
contents of an index.
Recognizing an Existing Index
Menu option: Index > Index Manager > Recognize Index
Recognize Index enables you to add an existing index to your index library, making it accessible
for searching or indexing. This can be useful on a network if you want to be able to search an
index that another user created on the network.
Use the Recognize Index dialog box to locate one of the files in the index you want to
recognize and choose OK. (dtSearch index files have names like INDEX_R.IX and
INDEX_V.IX. They always begin with INDEX and end with .IX) dtSearch will look in the
directory for the index, extract the information it needs to recognize the index, and add the
index to the list of indexes in the current index library.
Deleting an Index
Menu option: Index > Index Manager > Delete Index
Deleting an index does not affect the original documents. It just removes the index from your
system. To delete an index, click the Delete button in the Index Manager, select the index to
delete, and click OK.
Renaming an Index
Menu option: Index > Index Manager > Rename Index
To rename an index, click the Rename button in the Index Manager dialog box, select the index
to be renamed, enter the new name for the index, and click OK. Note that the name of the
directory in which the index is stored will not be affected.
Compressing an Index
When you reindex a document that you had previously indexed, dtSearch marks the information
about the old version of the document as "obsolete" but does not remove it from the
index. Compressing an index removes this obsolete information and also optimizes the index
for faster searching.
To compress an index, check the Compress index after adding documents box in the
Update Index dialog box.
29
dtSearch Manual
Verifying an Index
Menu option: Index > Index Manager > Verify Index
To verify that an index is in good condition, click the Verify button in the Index Manager dialog
box. As dtSearch examines the index, it will list every word, filename, and directory name in the
index. When dtSearch is done verifying the index, it will tell you whether the index has been
damaged.
List Index Contents
Menu option: Index > List Index Contents
To see a list of words, files, or fields in an index, click the List button. To save the list to a text
file, click the Save... button. If the list is very long, only partial results will appear in the
display window due to memory limitations, but the list saved to disk when you click Save... will
be complete.
Pattern to match
To limit the list to certain words or names, enter the pattern to match here. You can use the *
and ? wildcard characters and you can also use stemming, fuzzy searching, and phonic
searching, just as in the Search dialog box.
Include word counts
Check Include word counts to see the number of times each word occurs next to the word in
the list.
30
Working with Indexes
Include field names
Check this box to see the fields that each word is found in.
Merging Indexes
Menu option: Index > Index Manager > Merge Indexes
To merge two or more indexes into a single index,
1. Choose the indexes to merge from the list.
2. Choose the index that you want the indexes merged into from the list under Target
index. This list includes all of the indexes selected for merging.
3. To erase the contents of the target index before the merge, check Clear target.
4. Click Merge to start merging the indexes.
Merging multiple indexes into a new, empty index is generally faster than merging into an index
that already contains data, unless the amount of data being merged is small relative to the size of
the target index.
31
Searching for Documents
Using the Search Dialog Box
First, tell dtSearch where you want to search
1. Under Indexes to search, click on the name of each index you want to search.
2. To search without an index, click the More Search Options tab and then click the
Add Folder... button to select the folders to search. Under Unindexed and
combination search, select whether you want to combine the unindexed search with an
index search.
3. To limit your search by filename, date, or size, click the More Search Options tab
and then enter the criteria for your search. The More Search Options tab also provides a
way to limit the number of files retrieved to the most relevant.
Next, tell dtSearch what you want to find
1. Click the Search Request tab.
33
dtSearch Manual
2. Select one of the three search types:
A boolean search request consists of a group of words, phrases or macros linked by search
connectors such as AND and OR to precisely indicate the relationship between them.
An "any words" search request consists of an unstructured natural language or "plain
English" query. In a natural language search request, words such as AND and OR are
disregarded. Use quotation marks to indicate a phrase, + (plus) to indicate a word that must
be present, and - (minus) to indicate a word that must not be present.
An "all words" search is like an "any words" search except that all of the words in the search
request must be present for a document to be retrieved.
3. Enter a search request in the space provided.
4. Select the search features to use in your search.
Stemming searches other grammatical forms of the words in your search request. For
example, with stemming enabled a search for apply would also find applies.
Phonic searching finds words that sound similar to words in your request, like Smith and
Smythe.
Fuzzy searching sifts through scanning and typographical errors.
Synonym searching tells dtSearch to use a thesaurus to find synonyms of words in your
search request. dtSearch provides three ways to perform synonym searching:
Check Synonyms to find synonyms using the WordNet concept network included with
dtSearch.
Check Related words to find related words from the WordNet concept network.
Check User synonyms to find synonyms that you have defined in your own thesaurus.
5. Click Search to start the search.
Sorting Options
Sort by relevance
By default, dtSearch sorts retrieved documents by their relevance to your search
request. Weighting of retrieved documents takes into account: the number of documents each
word in your search request appears in (the more documents a word appears in, the less useful it
is in distinguishing relevant from irrelevant documents); the number of times each word in the
request appears in the documents; and the density of hits in each document.
Sort by date
Select date sorting to get the most recent documents that match your search request, rather than
the most relevant.
Sort by hits
Sorting by hits uses a simple count of the number of hits in each document (with no automatic
term weighting) to rank retrieved files.
After the search is over, you can re-sort the results by clicking the column headers in the search
results list.
34
Searching for Documents
Search Tools
Word List
At the top of the search dialog box is a scrolling list of the words in the index you have
selected. Next to each word is a number, which is the number of times the word occurs in the
index. As you type in a search request, the list will scroll to the word you are typing. If you have
selected more than one index to be searched, you can pick the index listed in the word list from
the drop-down list on top of the word list.
Fields
Click the fields... button to see a list of the searchable fields in the selected indexes.
Browse words
Click the Browse Words... button to see how dtSearch will search for words using fuzzy
searching, phonic searching, stemming, or synonym expansion.
Thesaurus
Click the Thesaurus... button to browse the thesaurus.
Search history
Click the Search History tab to see a list of your most recent search requests.
Searching within a previous search
After a search, click Search > Search within these results to do another search of just the
documents retrieved in your previous search. You can also use Search within these results
to search within the results of a search that you open from Search History.
Browse Words
Menu option: Search > Search > Browse Words
35
dtSearch Manual
Click Browse Words... in the search dialog box to see how dtSearch matches words in your
search request with words in the index, using any combination of wildcards and fuzzy, phonic,
stemming, or thesaurus search options. To see a list of matching words:
1.
2.
3.
4.
Type in the word you want to look up. The word can contain the wildcards * or ?.
Choose an index.
Select search features (see below).
Click Lookup...
To save the list of words in a file, click Save list.
More Search Options
Limit search results to the best matching files
Check this box and enter a number under Number of files to return to have dtSearch return
a limited number of items in search results. If you do not check the box, dtSearch will return all
of the documents that match a search request.
Enter a number for the Stop search after __ files setting to make the search halt when this
many files have been found. For example, if Number of files to return is 5,000, and Stop
search after __ files is 25,000, then the search will proceed until at 25,000 files are found,
and the best-matching 5,000 of these will be returned in search results.
36
Searching for Documents
File Filters
The File filters in the Search dialog box enable you to limit a search to files with a certain
name, modification date, or size.
Name matches
Enter a filename filter like *.DOC. To specify a folder name, enter a filter like this:
*\FolderName\*
Name does not match
To exclude documents enter a filter like *.EXE.
File size
Enter the maximum and/or minimum file size range (in bytes) for your search.
File modification date
Select the type of date comparison you want (between two dates, before a date, after a date) and
enter the relevant date or dates in the boxes following the comparison. Enter the date in the
format appropriate for your location (MM/DD/YYYY in the U.S.).
You can leave any of these fields blank. To clear all of the fields, click Clear filters.
Unindexed Searching
dtSearch can search without an index, and can combine indexed and unindexed searches in a
single request. To search without an index, select the type of search to be performed under
Search type (indexed search only, unindexed search only, or a combination of both
types). Click Add Files... or Add Folder... to select files or folders to be included in the
unindexed search.
Search History
Select the Search History tab to see a list of prior searches. The list at the top shows the last
100 searches you have done. Below the list is the search request and list of files retrieved for the
currently-selected search.
Click Delete to delete a search from your search history.
Click Delete All to delete all searches from your search history.
To open a prior search in dtSearch, click the Open button.
Click Insert to re-use a search request from a prior search.
To search within the results of a previous search, open the previous search and then click
Search > Search within these results.
Searching for a List of Words
Menu option: Search > Search for List of Words
37
dtSearch Manual
The Search for List of Words dialog box provides a way to search for a long list of words, and
create a list of matching files, in a single step. The list of words can be in any of the file formats
that dtSearch supports. To search for a list of words,
1. Create the word list in any of the file formats that dtSearch supports, such as Microsoft
Word, Excel, etc.
2. Click Search > Search for List of Words...
3. Enter the name of the file with the list of words. To browse for the file, click the ... button. If
some of the words in the list are not English words, the word list file should be in a format
that is able to store Unicode text, such as Microsoft Word or Excel, or the Unicode text
format.
4. Under Search type, select the option that describes the type of search request in the text
file. dtSearch will search for documents containing any of the words or phrases in the list.
One word or phrase per line - The text file contains a series of lines, each of which
contains a single word or phrase.
Natural language - Treat the entire contents of the file as a single natural language search
request.
One Boolean (and, or, not, ...) expression per line - The text file contains a series of
lines, each of which contains a single boolean search request. dtSearch will search for
documents containing any of the boolean expressions in the list.
38
Searching for Documents
5. Under Search features, select search options to use in the search (stemming, fuzzy
searching, etc.)
6. Select the type of search results that you want from the search.
Check Open search results in dtSearch to see the search results list in dtSearch
Desktop, just as you would after a search using the Search dialog box.
Check Export search results to a text file, and enter a filename under Name of file to
create, to get a plain text listing with all of the documents matching the search request. To
export the list to Excel, leave the file type as "Tab separated (CSV) for Excel", which is the
default.
If the search finds a very large number of files, the list of files in the text file will be complete,
and the search results in dtSearch Desktop will display the best-matching 5,000 documents.
39
Search Results
Copying Retrieved Files
Menu option: Edit > Copy File...
After a search, you can copy all or some of the retrieved documents to a folder. To copy files
listed in search results,
1. After the search, select the documents that you want to copy.
2. Click Edit > Copy File...
3. Enter a folder to store the copied files under Destination
Check the Preserve folder names box to include the folder name of each document in the
destination path. Otherwise, all files will be copied to the same folder without path
information.
The file modification date of each copied file will be the same as the original.
Check the Preserve file creation and last access times box to transfer the creation and last
access dates to the copied file as well.
If an index was created with caching of documents enabled, Copy File will copy the document
from the cached version stored in the index. Additionally, because dtSearch does not store last
access dates in the index, only the last modified and creation dates are preserved.
41
dtSearch Manual
Saving Search Results
Menu option: File > Save Search Results As...
After a search, you can save search results in XML or comma-separated values (CSV) format.
Click File > View File... to reopen search results that you have previously saved in XML
format. (You can also find previous searches in the Search History.)
Search results saved in CSV format can be opened in Excel or other programs that can import
CSV data.
Check the Selected items box to save only selected items from search results in the file.
Selecting Items in Search Results
To select all items in search results, click Edit > Select All.
To clear all selections, click Edit > Clear All Selections.
There are two ways to select individual items in search results:
(1) Hold down the Ctrl key and click on a filename to select it, and hold down the Shift key and
click on a filename to select all of the files between that filename and the previously-clicked
filename.
(2) If you prefer to use checkboxes, click Options > Preferences > Search Results, and
check the box to include checkboxes in search results. This will add a checkbox next to each
item in search results, making it easier to select individual items from a long list of retrieved
files.
Search Reports
Menu option: Search > Search Report
42
Search Results
A search report lists each hit found in each of the documents retrieved in a search with a
specified number of words or paragraphs of context surrounding it.
To create a search report from a Search Results window, choose Search Report from the
Search menu, enter the amount of context (words or paragraphs) you want surrounding each hit
in your report, and click OK. To include selected files in a search results list, hold down the
CTRL key and click on the files you want included, then choose Search Report from the
Search menu.
After dtSearch generates a search report, it will open the search report in your word processor so
that you can edit or print the report.
To change the layout of search reports, edit the SearchReportTemplate.rtf file in your dtSearch
templates folder.
43
Search Requests
Search Requests (Overview)
dtSearch supports three types of search requests:
An "any words" search is any sequence of text, like a sentence or a question. In an "any words"
search, use quotation marks around phrases, put + in front of any word or phrase that is
required, and - in front of a word or phrase to exclude it. Examples:
banana pear "apple pie"
"apple pie" -salad +"ice cream"
An "all words" search request is like an "any words" search except that all of the words in the
search request must be present for a document to be retrieved.
A "boolean" search request consists of a group of words, phrases, or macros linked by
connectors such as AND and OR that indicate the relationship between them. Examples:
Search Request
apple and pear
apple or pear
apple w/5 pear
apple not w/12 pear
apple and not pear
name contains smith
apple w/5 xfirstword
apple w/5 xlastword
Meaning
both words must be present
either word can be present
apple must occur within 5 words of pear
apple must occur, but not within 12 words of pear
only apple must be present
the field name must contain smith
apple must occur in the first five words
apple must occur in the last five words
If you use more than one connector (and, or, contains, etc.), you should use parentheses to
indicate precisely what you want to search for. For example, apple and pear or orange could
mean (apple and pear) or orange, or it could mean apple and (pear or orange). For best
results, always enclose expressions with connectors in parenthesis. Example:
(apple and pear) or (name contains smith)
Noise words, such as if and the, are ignored in searches.
Search terms may include the following special characters:
Character
Meaning
?
matches any character
=
matches any single digit
*
matches any number of characters
%
fuzzy search
#
phonic search
~
stemming
&
synonym search
~~
numeric range
##
regular expression
To enable fuzzy searching, phonic searching, synonym searching, or stemming for all search
terms, check the boxes under Search features in the search dialog box.
45
dtSearch Manual
Words and Phrases
To search for a phrase, use quotation marks around it, like this:
apple w/5 "fruit salad"
If a phrase contains a noise word, dtSearch will skip over the noise word when searching for
it. For example, a search for statue of liberty would retrieve any document containing the word
statue, any intervening word, and the word liberty.
Punctuation inside of a search word is treated as a space. Example: can't would be treated as a
phrase consisting of two words: can and t. 1843(c)(8)(ii) would become 1843 c 8 ii (four
words). (To customize the way dtSearch handles punctuation in text, see Alphabet
Customization.)
Wildcards (*, ?, and =)
A search word can contain the wildcard characters * and ?. A ? in a word matches any single
character, and a * matches any number of characters. The wildcard characters can be in any
position in a word. For example:
appl* would match apple, application, etc.
*cipl* would match principle, participle, etc.
appl? would match apply and apple but not apples.
ap*ed would match applied, approved, etc.
Use of the * wildcard character near the beginning of a word will slow searches somewhat.
The = wildcard matches any single digit. For example: N=== would match N123 but not N1234
or Nabc.
Fuzzy Searching
Fuzzy searching will find a word even if it is misspelled. For example, a fuzzy search for apple
will find appple. Fuzzy searching can be useful when you are searching text that may contain
typographical errors (such as emails), or for text that has been scanned using optical character
recognition (OCR). There are two ways to add fuzziness to your searches:
1. Check Fuzzy searching in the search dialog box to enable fuzzy searching for all of the
words in your search request. You can adjust the level of fuzziness from 1 to
10. (Usually values from 1 to 3 are best for moderate levels of error tolerance.)
2. Add fuzziness selectively using the % character. The number of % characters you add
determines the number of differences dtSearch will ignore when searching for a
word. The position of the % characters determines how many letters at the start of the
word have to match exactly. Examples:
ba%nana: Word must begin with ba and have at most one difference between it and
banana.
b%%anana: Word must begin with b and have at most two differences between it and
banana.
46
Search Requests
Phonic Searching
Phonic searching looks for a word that sounds like the word you are searching for and begins
with the same letter. For example, a phonic search for Smith will also find Smithe and Smythe.
To ask dtSearch to search for a word phonically, put a # in front of the word in your search
request. Examples: #smith, #johnson
Check Phonic searching in the Search features section of the search dialog box to enable
phonic searching for all of the words in your search request. Phonic searching is somewhat
slower than other types of searching and tends to make searches over-inclusive, so it is usually
better to use the # symbol to do phonic searches selectively.
Stemming
Stemming extends a search to cover grammatical variations on a word. For example, a search
for fish would also find fishing. A search for applied would also find applying, applies, and
apply. There are two ways to add stemming to your searches:
1. Check Stemming under Search features in the search dialog box to enable stemming for
all of the words in your search request. (By default, the box is checked.) Stemming does not
slow searches noticeably and is almost always helpful in making sure you find what you
want.
2. To add stemming selectively, add a ~ at the end of words that you want stemmed in a
search. Example: apply~
The stemming rules included with dtSearch are designed to work with the English
language. These rules are in the file stemming.dat. To implement stemming for a different
language, or to modify the English stemming rules that dtSearch uses, edit the stemming.dat
file. See the stemming.dat file for more information.
Synonym Searching
Synonym searching finds synonyms of a word that you include in a search request. For example,
a search for fast would also find quickly. To enable synonym searching, check the Synonym
searching box in the Search dialog box. You can also enable synonym searching selectively by
adding the & character after certain words in your request. Example: improve& w/5 search
dtSearch provides three ways to perform synonym searching:
Check Synonyms to find synonyms using the WordNet concept network included with
dtSearch.
Check Related words to find related words from the WordNet concept network.
Check User synonyms to find synonyms that you have defined in your own thesaurus.
Numeric Range Searching
A numeric range search is a search for any numbers that fall within a range. To add a numeric
range component to a search request, enter the upper and lower bounds of the search separated
by ~~ like this:
47
dtSearch Manual
apple w/5 12~~17
This request would find any document containing apple within 5 words of a number between 12
and 17.
Notes
1. A numeric range search includes the upper and lower bounds (so 12 and 17 would be
retrieved in the above example).
2. Numeric range searches only work with integers greater than or equal to zero, and less than
2,147,483,648
3. For purposes of numeric range searching, decimal points and commas are treated as spaces
and minus signs are ignored. For example, -123,456.78 would be interpreted as: 123 456 78
(three numbers). Using alphabet customization, the interpretation of punctuation
characters can be changed. For example, if you change the comma and period from space
to ignore, then 123,456.78 would be interpreted as 12345678.
Field Searching
When you index a database or other file containing fields, dtSearch saves the field information
so you can perform searches limited to a particular field. For example, if you index an Access
database with a Name field and a Description field, then you could search for apple in the Name
field like this:
Name contains apple
In addition to databases, dtSearch automatically recognizes metadata in supported file
types. For a list of supported metadata formats, see "What file formats does dtSearch support"
at http://support.dtsearch.com.
To see a list of all of the fields defined in your index, click the fields... button in the Search
dialog box.
Field searches can be combined using AND, OR, and NOT, like this:
(City contains (Portland or Seattle)) and (Address contains
(Washington))
The parenthesis are necessary to ensure that dtSearch interprets the search request correctly.
To search for text that is not in any field, search for //text contains (search request). The //text
field name means "not in any field".
Alternative field searching syntax
An alternative syntax for field searches is to add the field name and :: in front of each word, like
this:
(City::Portland or City::Seattle) and (Address::Washington)
The alternative syntax can be used where the boolean syntax is not possible, such as in "all
words" or "any words" searches and file conditions.
48
Search Requests
Nested Fields
Some file formats such as XML support nesting of fields. Example:
<record>
<name>John Smith</name>
<address>
<street>123 Oak Street</street>
<city>Middleton</city>
...
In dtSearch, a search of a field includes any fields that are nested inside of the field, so the XML
file above would be retrieved in a search for any of the following:
record contains oak
address contains oak
street contains oak
To specify a specific subfield of a field, use / to separate the field names, like this:
record/address contains oak
address/street contains oak
record/address/street contains oak
Put a / at the front of the field name to specify that it cannot be a sub-field of another field:
/record/name contains Smith
/name contains Smith
The second search request above would not match the XML example because, while it contains a
"name" field, the name field is a sub-field of the record-field. A search for /name specifies a
"name" field at the top of the field hierarchy.
Finally, you can use // to specify any number of unspecified intervening fields, like this:
/record//city contains Middleton
Segment Searches
You can also define a field at the time of a search by designating words that begin and end the
field, like this:
(beginning to end) contains (something)
The beginning TO end part defines the boundaries of the field. The CONTAINS part indicates
the words or phrases you are searching for in the field. The only connector allowed in the
beginning and end expressions in a field definition is OR. Examples:
(name to address) contains john smith
(name to (address or xlastword)) contains (oak w/10 lane)
The field boundaries are not considered hits in a search. Only the words being searched for
(john smith, oak, lane) are marked as hits.
49
dtSearch Manual
AND connector
Use the AND connector in a search request to connect two expressions, both of which must be
found in any document retrieved. For example:
apple pie and poached pear would retrieve any document that contains both phrases.
(apple or banana) and (pear w/5 grape) would retrieve any document that (1) contains
either apple OR banana, AND (2) contains pear within 5 words of grape.
OR Connector
Use the OR connector in a search request to connect two expressions, at least one of which must
be found in any document retrieved. For example, apple pie or poached pear would retrieve
any document that contained apple pie, poached pear, or both.
W/N Connector
Use the W/N connector in a search request to specify that one word or phrase must occur within
N words of the other. For example, apple w/5 pear would retrieve any document that contained
apple within 5 words of pear. The following are examples of search requests using W/N:
(apple or pear) w/5 banana
(apple w/5 banana) w/10 pear
(apple and banana) w/10 pear
The pre/N connector is like W/N but also specifies that the first expression must occur before
the second. Example:
(apple or pear) pre/5 banana
Some types of complex expressions using the W/N connector will produce ambiguous results
and should not be used. The following are examples of ambiguous search requests:
(apple and banana) w/10 (pear and grape)
(apple w/10 banana) w/10 (pear and grape)
In general, at least one of the two expressions connected by W/N must be a single word or
phrase or a group of words and phrases connected by OR. Example:
(apple and banana) w/10 (pear or grape)
(apple and banana) w/10 orange tree
If you enter an ambiguous search request, dtSearch will display a message warning you of the
error.
dtSearch uses two built in search words to mark the beginning and end of a file: xfirstword and
xlastword. The terms are useful if you want to limit a search to the beginning or end of a file.
For example, apple w/10 xlastword would search for apple within 10 words of the end of a
document.
NOT and NOT W/N
Use NOT in front of any search expression to reverse its meaning. This allows you to exclude
documents from a search. Example:
50
Search Requests
apple sauce and not pear
NOT standing alone can be the start of a search request. For example, not pear would retrieve
all documents that did not contain pear.
If NOT is not the first connector in a request, you need to use either AND or OR with NOT:
apple or not pear
not (apple w/5 pear)
The NOT W/ ("not within") operator allows you to search for a word or phrase not in association
with another word or phrase. Example:
apple not w/20 pear
Unlike the W/ operator, NOT W/ is not symmetrical. That is, apple not w/20 pear is not the
same as pear not w/20 apple. In the apple not w/20 pear request, dtSearch searches for apple
and excludes cases where apple is too close to pear. In the pear not w/20 apple request,
dtSearch searches for pear and excludes cases where pear is too close to apple.
Variable Term Weighting
When dtSearch sorts search results after a search, by default all words in a request count equally
in counting hits. However, you can change this by specifying the relative weights for each term
in your search request, like this:
apple:5 and pear:1
This request would retrieve the same documents as apple and pear but dtSearch would weight
apple five times as heavily as pear when sorting the results.
Search Macros
Menu option: Options > Preferences > Macros
Macros can be useful for abbreviating long names or phrases that you use frequently, or
abbreviating field definitions in field searches. A macro can contain anything that can be part of
a search request.
A macro has two parts: a Name, which you use to refer to the macro in search requests, and the
Expansion, which is what the macro is expanded to. A macro name must begin with the @
character in search requests.
For example, if you define the macro @IRC to mean internal revenue code, and then search for
standard deduction w/3 @IRC, dtSearch will search for standard deduction w/3 internal
revenue code.
51
Options
Indexing Options
Menu option: Options > Preferences > Indexing options
Index document properties
If checked, dtSearch will index document summary information fields in Office, PDF and
WordPerfect documents and META tags in HTML files.
Index filenames as text
If checked, dtSearch will append the filename of each document to the end of the text during
indexing, so text in a filename will be searchable like other document text.
Index MIME headers in emails
Basic email properties such as Subject, To, From, and Date are always indexed. Check this box
to also index the text of all MIME headers transmitted with a message.
Index HTML scripts, styles, links, and comments
Normally HTML scripts, styles, links and comments are not indexed and dtSearch will index
only visible text and META tags in HTML files. Check this box to make these hidden HTML
elements searchable.
Index numbers
If your documents contain a lot of numbers and you do not expect to want to search for them,
clear this checkbox to make dtSearch exclude numbers from your index. This will make your
indexes smaller and will speed indexing.
53
dtSearch Manual
Enable numeric range searching
By default, dtSearch indexes numbers both as text and as numeric values, which is necessary for
numeric range searching. Use this flag to suppress indexing of numeric values in applications
that do not require numeric range searching. Numbers will still be searchable as text if the
Index numbers option is checked. This setting can reduce the size of your indexes by about
20%.
Index hidden content in Office documents (such as macros)
In addition to the normally visible text, Office documents can contain a wide range of other
embedded data, such as macros, viruses, or other embedded documents. Check this box to
make these items visible in dtSearch.
Index NTFS Summary Information streams
Check this box to have dtSearch index NTFS Summary Information data for each document
indexed. NTFS Summary Information properties are created when you right-click a document
in Windows Explorer and enter values in the Summary Information fields (Author, Subject, etc.)
Index field names in XML files
Index field attributes in XML files
Check these boxes to have dtSearch index field names or field attributes in XML files. If both
boxes are unchecked, dtSearch will only index field values in XML.
Automatically recognize dates, email addresses and credit card numbers in text
Check this box to have the dtSearch indexer scan for anything that looks like a date, email
address, or credit card number during indexing. With this option enabled, you can search
specifically for text matching credit card numbers, email addresses, or ranges of dates. See:
Automatic recognition of dates, email addresses, and credit card numbers in this
manual.
Add file type name (Word, Excel, etc.) to documents
The file type name will appear at the end of each document in a searchable "File Type"
field. With this option enabled, you can include file type criteria in a search. Example: "apple
and (file type contains Excel)".
Index lists of file filenames in ZIP and RAR archives
This option provides a way to search on the list of files in a ZIP or RAR archive, even if the
individual files may be inaccessible due to encryption. When dtSearch indexes a ZIP or RAR
archive, in addition to the files actually present in the ZIP or RAR archive, it will also make a list
of all of the files in the archive and index it with the name ArchiveFileList.html. This is only
done if the filenames themselves are not encrypted in the archive.
The original file is not modified but the ArchiveFileList.html file is searchable as if it were part
of the ZIP or RAR file. The file consists of a list of the names of the files inside the archive.
Index properties of images embedded in documents
When images are indexed as individual files, their properties are always indexed. Check this box
to also index properties of images that are embedded in other documents.
Default location for new indexes
By default, indexes will be created in your dtSearch UserData folder. You can specify a different
location here. (In the Create Index dialog box, you can override this setting for each index that
you create.)
54
Options
Letters and Words
Menu option: Options > Preferences > Letters and words
Changes to the hyphenation, noise word list, and alphabet settings take effect when you create a
new index and will not affect existing indexes.
Alphabet file
The alphabet file determines how dtSearch interprets certain characters in your documents
(Unicode characters in the range from 32-127). Other character properties are set to conform to
the Unicode Standard and cannot be modified. The default alphabet file included with dtSearch
is DEFAULT.ABC.
To modify the alphabet file (for example, to make a character such as + searchable) click the
Edit... button.
Noise word list
The noise word list contains words that are generally too common to be useful in searching
(such as the).
Maximum word length
This is the number of letters dtSearch will consider when indexing long words.
Hyphens
By default, dtSearch treats hyphens as spaces in indexed text and in search requests. For
example, "first-class" would be treated like "first class." This option provides a way to select
alternative treatments.
Insert word breaks between Chinese, Japanese, and Korean characters in text
Check this box if you are searching Chinese, Japanese, or Korean documents that do not contain
word breaks.
55
dtSearch Manual
Some Chinese, Japanese, and Korean text does not include word breaks. Instead, the text
appears as lines of characters with no spaces between the words. Because there are no spaces
separating the words on each line, dtSearch sees each line of text as a single long word. To make
this type of text searchable, enable automatic insertion of word breaks around Chinese,
Japanese, and Korean characters, so each character will be treated as single word.
Alphabet Customization
Menu option: Options > Preferences > Letters and words
The Edit Alphabet dialog box displays a list of all of the characters and how dtSearch classifies
each one. dtSearch classifies characters into four categories: letter, space, hyphen, and ignore.
Letter
A searchable character. All of the characters in the alphabet (a-z
and A-Z) and all of the digits (0-9) should be classified as letters.
Space
A character that causes a word break. For example, if you classify
the period (".") as a space character, then dtSearch would process
U.S.A. as three separate words: U, S and A.
Ignored
A character that is disregarded in processing text. For example, if
you classify the period as ignore instead of space then dtSearch
would process U.S.A. as one word: USA.
Hyphen
Hyphen characters can receive special processing in dtSearch. By
default, only the '-' is defined as a hyphen. To specify the rules
for processing hyphens, click Options > Preferences > Indexing
Options.
For characters that are letters, you can specify whether the character is a lower case or upper
case letter.
Only characters in the Unicode range 33-127 can be modified using Alphabet
Customization. Other character properties are determined by the Unicode specification. See
www.unicode.org for more information about Unicode.
56
Options
Filtering Options
Menu option: Options > Preferences > Filtering options
Binary files
A binary file is a file that has a format dtSearch cannot recognize and that does not appear to be
a plain text file. Use the Binary files setting to specify whether you want dtSearch to index
these files as plain text, skip them entirely, filter out only the text, or index only the filenames.
Exclude filter list for new indexes
When an index is created, dtSearch will use this option setting to initialize the list of filename
filters to be excluded from the index.
Advanced Filtering Options
Binary files are files that dtSearch does not recognize as documents. Examples of binary files
include executable programs, fragments of documents recovered through an "undelete" process,
or blocks of unallocated or recovered data obtained through computer forensics. Content in
these files may be stored in a variety of formats, such as plain text, Unicode text, or fragments of
.DOC or .XLS files. Many different fragments with different encodings may be present in the
same binary file. Indexing such a file as if it were a simple text file would miss most of the
content.
The dtSearch filtering algorithm scans a binary file for anything that looks like text using
multiple encoding detection methods. The algorithm can detect sequences of text with different
encodings or formats in the same file, so it is much better able to extract content from recovered
or corrupt data than a simple text scan.
57
dtSearch Manual
Each binary file is first divided into blocks, and then the text is extracted from each block using
the Advanced filtering options settings. Each block is given a filename based on the original
document, the block number, the range of bytes in the file, and the language settings. Example:
sample.bin #16 @4194303 - 4456704 (0, 1, 2)
This name identifies the 16th block extracted from sample.bin, covering the range of data from
offsets 4194303 to 4456704 in the input file. The numbers in parenthesis encode the language
settings used to extract the text from this block.
The options described below apply only to text that is indexed as binary data using the filtering
algorithm. These options have no effect on indexing text in recognized document formats such
as Word, Excel, PDF, etc.
Languages to include
The Languages to include setting is used to help the filtering algorithm to distinguish text
from non-text data. It is only used as a hint in the algorithm, so if the text extraction algorithm
detects text in another language with a sufficient level of confidence, it will return that text even
if the language was not selected.
Block size
The Block size setting specifies how each input file is divided into blocks before being
filtered. For example, if you specify a block size of 100 kilobytes, then a 1000 kilobyte file would
be indexed as 10 separate blocks. Very large block sizes can make extraction of documents
slower after a search (because more data has to be extracted to view a block), so block sizes over
1 Mb are not recommended.
Overlap blocks
Overlapping blocks prevents text that crosses a block boundary from being missed in the
filtering process. With overlapping enabled, each block extends 256 characters past the start of
the previous block.
Extract blocks as HTML
Extracting blocks as HTML has no effect on the text that is extracted, but it adds additional
information in HTML comments to each extracted block. The HTML comments identify the
starting byte offset and encoding of each piece of text extracted from a file. To see the comments,
right-click anywhere in the text of a block that was retrieved in a search and select "View
source".
Minimum size of text segments
The minimum text segment size specifies how many text characters must occur consecutively for
a block of text to be included. At the default value, 6, a series of 5 text characters surrounded by
non-text data would be filtered out.
Allow filter to insert word breaks
The filter can automatically insert word breaks where appropriate (for example, where there is a
lower-case letter followed by a capital letter) and break up very long consecutive streams of
letters.
58
Options
Use filtering to index corrupt or encrypted documents
This option applies the filtering algorithm to attempt to recover text from corrupt or encrypted
documents, instead of just skipping these files during indexing. (By default, dtSearch will skip
documents that are corrupt or encrypted, and will report a list of these files in the index update
log. Only unencrypted text will be recovered from encrypted documents.)
Use filtering to index all documents
This option applies the filtering algorithm to index all documents, whether or not they appear to
have a recognizable file format. This option is not recommended for most users. It will cause
dtSearch to scan all files for segments of recognizable text, using the filtering algorithm
only. This type of scan can find data that was intentionally hidden or accidentally left in
documents such as text in unused streams in Microsoft Word or Excel files. However, this type
of scan will miss data that is only accessible through a file format-aware scan of a document,
such as compressed data in a PDF file. Therefore, this option should only be used in
combination with a standard file format-aware index.
File Types
Menu option: Options > Preferences > File types
dtSearch recognizes most file formats automatically. If you are indexing only files such as word
processor documents that dtSearch supports and can automatically recognize, you can disregard
this section.
If you are indexing other types of files, dtSearch provides a way to specify how you want
dtSearch to process the files. For each filter, you can specify a rule that tells dtSearch how you
want the file to be handled. You can also use file type rules to override the default handling of
some files. For example, you could make a rule to require *.html to be indexed as text, if you
want to be able to search HTML tags.
59
dtSearch Manual
Before using the file type information, dtSearch will try to detect the format itself. Therefore, no
matter what file type specifications you enter, dtSearch will recognize formats such as Microsoft
Word that it can detect automatically.
To set up a file type specification
1. Click New... to create a new item, and enter a name to identify it
2. Under File type, select the file format that the rule should select.
3. Under Filename filters, enter filters to identify files with this format.
4. Check the Override all other file type detection methods for these files box if
you want dtSearch to always apply the rule, even if a document appears to have a
different format.
File types
Several of the file types provide ways to change the way dtSearch indexes certain types of files,
such as indexing only the name of a file, or indexing attachments separately from email
messages.
"CSV as database"
"CSV as report"
CSV, or "comma-separated values", is a text format that can be used to store databases using
commas to separate field values. Usually each row of a CSV file corresponds to one row of the
database, with the field names in the first row. You can use these types to specify how dtSearch
should treat CSV files. The "CSV as database" format treats each row of the CSV file as a separate
document. The "CSV as report" format treats the whole CSV file as a report formatted into rows and
columns, like a spreadsheet.
"Filename only"
Use the "Filename only" type to index only the name of files, ignoring the file contents.
"Filtered Binary"
See Filtering Options for information on how filtered documents are indexed.
"IFilter"
IFilters are components that enable various Microsoft search products, such as Microsoft Index
Server, to extract text from documents. For example, when you install Microsoft OneNote, an IFilter
is installed to enable searching of *.one files. To tell dtSearch to use installed IFilters to process
some of your files, set up a rule in the file type table and under File type, select "IFilter".
"MIME Container"
"MIME Document"
A MIME file is an email file, usually with a .eml or .mht extension. MIME files can also be embedded
in MBOX email archives, such as the email archives created by Thunderbird and Eudora. dtSearch
can automatically detect MIME files and will index each email as a single document, combining the
contents of all attachments at the end of the message body.
60
Options
If you would rather have each attachment indexed as a separate document, you can create a rule
specifying the files to index as "MIME Container" instead of "MIME Document".
For more information on this option, please see "How to index attachments separately from email
messages"
"Outlook MSG Container"
A .msg file is an email created by Microsoft Outlook. When dtSearch indexes a PST message
archive or indexes Outlook messages using the "Add Outlook" option in the dtSearch Indexer, each
message is a single .msg file. dtSearch automatically detects .msg files and will index each email as
a single document, combining the contents of all attachments at the end of the message body.
If you would rather have each attachment indexed as a separate document, you can create a rule
specifying the files to index as "Outlook MSG Container".
For more information on this option, please see "How to index attachments separately from email
messages"
Default character encoding
Plain text files, some older word processsor files, and HTML files written in languages other
than English use a character encoding to specify the meaning of characters in the range from
128 to 255. For example, a Russian document might have the CP1251 encoding, which uses
these characters for Cyrillic letters. By default, dtSearch will try to automatically detect the
encoding of these types of documents based on an analysis of the contents. If you find that the
auto-detection is not working for your documents, you can specify the encoding that dtSearch
should assume for documents that do not specify one. To do this, select an encoding from the
drop-down list under Default character encoding.
File Segmentation Rules
Menu option: Options > Preferences > File segmentation
61
dtSearch Manual
The File Segmentation Rules dialog box provides a way to tell dtSearch that certain text files
should be indexed as many subdocuments instead of treating each file as a single large
document.
The maximum supported size for each individual segment is 16 Mb.
You can set up any number of rules specifying how groups of files will be subdivided. Each rule
includes the following elements:
Rule name
The name of a rule is used only to identify it in the File Segmentation rules dialog box.
New document starts at
This is a marker that indicates when a new document begins. For email message files, this is
often part of a message header such as "Date:" or "From:". To avoid incorrectly splitting a
message, this marker should be as unique as possible.
How to check for document boundaries in text
Each line of a file will be compared against the marker under New document starts at. Three
types of comparison are available:
Require exact match -- The entire line must exactly match the marker.
Match start of line -- The start of the line must match the marker.
Match regular expression -- The marker is interpreted as a regular expression. A
document boundary occurs when the marker is found anywhere in a line. To require a
marker to begin at the start of a line, precede it with the ^ character.
Ignore case
Match a document boundary even if the capitalization does not match.
First segment in a file is header for other segments
Check this box to have dtSearch insert the first segment in a file in every following
segment. This option is useful when segmenting XML or HTML files, because it allows the
HTML or XML header to be repeated for each segment.
Filename filters
For each rule, a filename filter determines which files the rule applies to. If more than one rule
could apply to a particular file, the first one to match the filename is the one applied.
Documents processed with file segmentation must be text files, XML, or HTML. If you use file
segmentation with XML or HTML files, use the First segment in a file is header for other
segments checkbox to make sure that the XML or HTML header is repeated for each segment.
In search results, each subdocument in a segmented document will have a name that identifies
the location of the subdocument in its disk file.
Text Fields
Menu option: Options > Preferences > Text fields
62
Options
Text fields are fields that dtSearch can extract from documents based on markers in the
text. For example, you could create a "Subject" field that contains everything from the word
"Subject:" to the end of the line. A field definition will apply to documents indexed after you
have defined the field.
To create a new field, click New... and enter the name of the field.
Display in search results
If you check this box, the field will appear as a column in search results.
Beginning of field
Enter text that identifies the start of this field. The text can be any combination of letters or
symbols.
End of field
Enter text that identifies the end of this field. To indicate that a field ends at the end of the line,
enter $$$ here.
How to check for field boundaries in text
There are three ways dtSearch can check for the field boundaries you specify: Ignore case
("Example" would match "EXAMPLE", "example", etc.), Require exact match, and Match
regular expression.
Where to look for this field
You can tell dtSearch to only check for a field in a certain number of lines of each file, and you
can enter filename filters to disable scanning for a field except in files matching the filters.
63
dtSearch Manual
Search Options
Menu option: Options > Preferences > Search options
Search dialog box font
Use the Search dialog box font setting to change the font in the search dialog box to a font
different from your system default. For example, you may want to use the Arial Unicode MS
font (included with Microsoft Office) so that you can search for words in languages that your
default system font cannot display. To change one of the fonts, un-check the Use default box
and then click the Choose Font... button to select a font.
Auto-complete search terms
Check this box to have dtSearch automatically complete your search terms as you enter a search
request. When you press SPACE or ), dtSearch will find the word in the index that starts with
the letters you have typed so far, and insert that word in the search request. For example, you
could type "examp" and a space and dtSearch would insert "example" in your search
request. With this setting off, you can still auto-complete search terms by pressing ShiftSPACE.
Search Limits
Limit search results to the best-matching files
Check this box and enter a number under Number of files to return to have dtSearch return
a limited number of items in search results. If you do not check the box, dtSearch will return all
of the documents that match a search request.
Enter a number for the Stop search after __ files setting to make the search halt when this
many files have been found. For example, if Number of files to return is 5,000, and Stop
search after __ files is 25,000, then the search will proceed until at 25,000 files are found,
and the best-matching 5,000 of these will be returned in search results.
64
Options
This setting is also accessible in the Search dialog box on the More Search Options tab.
Maximum number of unique words to match before halting a search
The limit on the number of unique words to match affects very broad wildcard searches. For
example, if you search for "s* or t* or r*" in a very large index, the search might match hundreds
of thousands of unique words, resulting in a "Too many words retrieved in index" error message.
This setting lets you increase the number of word matches dtSearch will find before
automatically halting a search. Unless you search for a term like *a*, it is very unusual to get
anywhere near this limit even with huge databases, because the number of words you retrieve is
generally a function of the specificity of the search rather than the size of the database.
Search Results Options
Menu option: Options > Preferences > Search results
You can also right-click the <--> symbol in the top right corner of search results to change these
settings.
Items to include in search results
Check an item to add it to the columns displayed in search results.
Always find the first hit when opening a document
Check this box to have dtSearch jump right to the first hit when a file is opened.
65
dtSearch Manual
Automatically open the first document in search results
If this box is not checked, the document pane will be blank after a search until you double-click a
document in search results.
Display the PDF Title as the filename for PDF files
Display the HTML <TITLE> as the filename for HTML files
HTML and PDF files have "Title" property that usually provides a more informative name than
the filename. For example, rpt2002.html might have the title "2002 Annual Report". Check
this box to see the title rather than the filename in the search results list. (You can still see the
filename for any item in search results by hovering the mouse over it and looking at the status
bar at the bottom of the dtSearch window.)
Disable JavaScript when displaying a retrieved HTML document
Some HTML files have JavaScript that will generate errors when the HTML is viewed outside of
its normal context. Check this box to disable JavaScript in HTML files when they are displayed
in dtSearch. (This setting only affects the display of a file in dtSearch and will not affect the
original document.)
Remember sort order from previous search
By default, dtSearch sorts search results according to the sort setting in the Search dialog box,
which has options to sort by relevance, hit count, or date. After a search you can click the
column headers in search results to sort by other document properties, such name or size. Check
this box to have dtSearch remember this sort order and apply it to subsequent searches.
Window layout
Choose whether you want to see search results on the left and documents on the right (vertical
split) or search results on top and documents below (horizontal split).
Column sizes
Choose how you want dtSearch to size columns when search results open.
Size columns to fit window ensures that the columns will fit in the window without
horizontal scrolling, even if some columns are too small to display all of the text.
Size columns to fit content ensures that all columns are large enough for their content.
Remember column widths tells dtSearch to remember manually-resized search results
column widths.
You can click the <--> symbol in the upper left corner of search results to automatically resize
columns to fit the window or the content. Each time you click the <--> symbol it will switch
between the first two methods of resizing.
Search results font
Choose the font to use for the search results list.
Synopsis color...
If the First hits in context box is checked under Items to include in search results, then
dtSearch will display, after each item in the search results list, a line with the first few hits in the
document in context. Use this setting to change the background color for this line of text.
Number of search results lists to keep
Enter the number of previous searches you want dtSearch to save, so you can see them in Search
History.
66
Options
User Thesaurus
Menu option: Options > Preferences > User Thesaurus
A synonym group is a group of words or phrases that dtSearch treats as equivalent when
performing a search. For example, if you define a synonym group to include improve,
ameliorate, amend, better, and help, then a search for improve would also find any of the other
words in the group.
Synonym searching works in combination with other search features like stemming. If you
enable both synonym searching and stemming in the above example, a search for amending
would also find improving, helped, etc.
To create a synonym group:
1. Click the New... button in the User Thesaurus tab of the Preferences dialog box and enter
a name for the synonym group. The name you select has no effect on searching and is just used
to identify the group.
2. Enter the words and phrases in the synonym group, one word or phrase on each line.
To edit an existing group:
1. Click on a group in the list. The synonyms in that group will appear in the Synonyms list.
2. Edit the list, adding or deleting words or phrases as needed.
Document Display
Menu option: Options > Preferences > Document display
67
dtSearch Manual
Display of long text files
Very large text files can take a long time to open in the dtSearch viewer. By default, documents
larger than 16 megabytes will open in "Report" view, which shows each hit with a specified
amount of context. To switch between the report view and the full text of the document, press
CTRL+R or click View > View as Report.
Report view
A report view of a document shows just the hits with the amount of context you specify, either in
paragraphs or words. (dtSearch can also generate a search report, which shows the hits from all
documents in the search in a document that opens in your word processor.)
Automatically update hit locations when opening documents with out-of-date
index information
If a document was modified since it was last indexed, or if it was indexed with an older version
of dtSearch, then word locations in the index for the document may be out of date. Check this
box to ensure that hit highlighting appears correctly after a search, even when index information
is out of date.
Display images in documents
Check this box to make images visible in documents that you open in dtSearch.
Document Fonts and Colors
Menu option: Options > Preferences > Fonts and colors
68
Options
The Fonts and colors settings let you modify the format dtSearch uses to display retrieved
files. You can set different display options for different categories of documents. For example,
you could have all files with a .CPP or .H extension displayed using the Courier font, and use
Arial for other documents.
To create a new document display category
1. Click New... and enter a name for the category.
2. Under Filename filters, enter filters like *.doc that identify the documents to be covered
by this category. If you check the Use these settings for all files box, the category covers
any documents that do not fall into one of the other categories.
3. Either select a font or check the box to use your web browser's default font. The font you
select will only apply to documents that do not already have font formatting, such as text
files.
4. For some file types, such as reports formatted as text or program source code, "wrapping"
the text at the end of long lines makes the file harder to read. Check the Do not wrap text
at the end of long lines box to tell dtSearch to display these files without word wrapping.
5. Under Hit highlighting, select the features that you want to use to identify hits.
External Viewers
Menu option: Options > Preferences > External viewers
69
dtSearch Manual
Use the External Viewers dialog box to tell dtSearch how you want your documents to be
displayed. The default is to display documents using the built-in dtSearch viewers. To specify a
different viewing method, click New... in the dialog box and enter a name for the application or
document type, then enter one or more filename filters identifying the documents, and click on
one of the three viewing options:
1. Display file in dtSearch with hits highlighted.
2. Display file in dtSearch without hits highlighted. dtSearch will display the file
using Internet Explorer or an Internet Explorer plug-in.
3. Launch in the application associated with the file.
Settings Files
Menu option: Options > Change dtSearch folder
Your Personal dtSearch Folder is where dtSearch options files and search results are
saved. When you run dtSearch the first time, dtSearch will ask where you want to put this
folder. The default location is a "UserData" folder located under your dtSearch program folder
(for example, c:\Program Files\dtSearch\UserData).
A separate option setting controls the default location for new indexes. See Indexing Options for
information on this setting.
The Personal dtSearch Folder can be specified on the command-line by using the /dir
command-line switch.
70
Options
Transfer my settings to the new folder
Select this option to copy settings from an existing folder to the new folder. Any settings in the
new folder will be replaced.
Use the settings already in the folder
Select this option if the new folder already has a set of options files that you want to use.
Files in this folder include:
File
default.abc
extview.xml
fields.xml
filetype.xml
fileseg.xml
macros.xml
stemming.dat
thesaur.xml
Purpose
Alphabet definition file
External viewer options
Text fields definitions
File type specifications
File segmentation rules
User-defined macros
Stemming rules
User-defined thesaurus entries
Your UserData folder is usually a folder named UserData under the dtSearch program
folder. To find out where your UserData folder is, click Options > dtSearch Folder.
A "template" folder under the dtSearch program folder contains template files:
71
dtSearch Manual
File
SearchReportTemplate.rtf
SearchListTemplate.rtf
Purpose
Template used to generate search reports.
Template used to make a printable list of search results
items.
If you change these template files, save the changed versions in your UserData folder rather than
in the templates folder. Otherwise, they may be overwritten the next time you install or upgrade
dtSearch.
72
Index
73
/
/cfg command-line switch ............................. 7, 27
/dir command-line switch........................7, 10, 75
/lib command-line switch ........................7, 10, 28
A
Accents............................................................. 60
Accent-sensitive index ..................................... 13
Acrobat ............................................................. 74
Add Documents to Index .................................. 15
Add Library ....................................................... 28
Add Web........................................................... 21
Adobe Reader ............................................70, 74
Alphabet Customization ................................... 60
Alphabet File .................................................... 59
Alphabets ......................................................... 60
AND Connector ................................................ 54
ANSI ................................................................. 63
Applications ...................................................... 63
ASCII ................................................................ 63
autocomplete .................................................... 69
Auto-complete .................................................. 69
Automatic deployment........................................ 8
Automatic Indexing ........................................... 18
Automatically Detected Libraries ..................... 28
B
Binary Files....................................................... 61
Browse Words in Index .................................... 39
Building an Index .............................................. 15
C
Caching documents in an index ....................... 15
Caching text in an index ................................... 15
Case-sensitive index ........................................ 13
Character Sets ................................................. 60
Combination Search ......................................... 37
Command-Line Options ................................... 10
Compressing an Index ..................................... 33
Creating an Index ............................................. 13
Ctrl-keys ........................................................... 11
Customizing the Display ................................... 73
D
Deleting an Index ............................................. 33
74
Index
Disable JavaScript ........................................... 70
Display Options ................................................ 73
dtSearch Folder ................................................ 75
dtSearch Web indexes ..................................... 30
dtsearch.noi File ............................................... 18
dtSearchPolicy.msi file ....................................... 8
dtSearchWeb.ilb file ......................................... 30
E
Edit Alphabet dialog ......................................... 60
External Viewers .............................................. 74
F
Field Searching ................................................ 52
File Date Search .............................................. 40
File Segmentation ............................................ 66
File Size Search ............................................... 40
File Types ......................................................... 63
Filename Search .............................................. 40
Filtered Binary .................................................. 61
Filtering Options ............................................... 61
FindPlus ........................................................... 21
Font .................................................................. 73
Fonts ................................................................ 69
Fuzzy Searching .............................................. 50
G
Generate Word List .......................................... 34
Getting Started ................................................... 1
Group Policy ....................................................... 8
Group Policy Objects ......................................... 8
H
History .............................................................. 42
Hotkeys ........................................................ 1, 11
HTML................................................................ 74
Hyphens ........................................................... 59
I
Index
Creating ........................................................ 13
Index Information ............................................. 33
Index Libraries ........................................8, 27, 28
Index Library Manager ..................................... 28
Index Manager ................................................. 33
Index Numbers ................................................. 52
75
dtSearch Manual
Index Search .................................................... 37
Indexes .................................................13, 15, 33
Indexing Documents ........................................ 15
Indexing Options .............................................. 57
Indexing Web Sites .......................................... 21
Installing dtSearch .............................................. 8
Installing dtSearch on a Network ....................... 7
International ..................................................... 60
Internet Explorer ............................................... 74
Introduction......................................................... 1
K
Keyboard Shortcuts .......................................... 11
KWIC View ....................................................... 46
L
Letters .............................................................. 59
List Words in Index ........................................... 34
Login................................................................. 23
Lookup Words .................................................. 39
M
Macros.............................................................. 56
Merging Indexes ............................................... 35
Microsoft SMS .................................................... 8
N
Netscape .......................................................... 74
Network ........................................................ 7, 27
Network Indexes .............................................. 27
Network installation ............................................ 8
Noise Words ...............................................18, 59
NOT Connector ................................................ 55
NOT W/N Connector ........................................ 55
NTFS Summary Information ............................ 57
Numbers ...............................................52, 57, 59
Numeric Range Searching ............................... 52
O
Obsolete Documents ........................................ 33
Options .................. 57, 63, 66, 67, 70, 73, 74, 75
Options Package .............................................. 27
OR Connector .................................................. 54
P
Passwords ........................................................ 23
76
Index
PDF .................................................................. 70
PDF Files.......................................................... 74
Personal dtSearch directory ............................. 75
Phonic Searching ............................................. 51
Proximity Search .............................................. 54
Punctuation ...................................................... 50
Q
Quick Start.......................................................... 1
Quick View ....................................................... 74
R
Recognizing an Index ....................................... 33
Remove Index .................................................. 28
Remove Library ................................................ 28
Renaming an Index .......................................... 33
S
Scheduled Tasks .............................................. 18
Scheduling........................................................ 18
Scheduling Index Updates ............................... 18
Search ............................................37, 46, 50, 51
Search Dialog Box ........................................... 37
Search Filters ................................................... 40
Search History .................................................. 42
Search Limits ................................................... 69
Search Macros ................................................. 56
Search Reports ................................................ 46
Search Requests ..................... 49, 50, 51, 54, 55
Search Requests (Overview) ........................... 49
Search Results Format .................................... 70
Search Terms ................................................... 50
Searching for a List of Words ........................... 42
Searching Using dtSearch Web ....................... 30
Setup Files ....................................................... 75
Shared Indexes ................................................ 27
Sharing Indexes .......................................7, 8, 27
Sharing Option Settings ................................... 27
Shortcuts .......................................................... 11
SMS.................................................................... 8
Spider .........................................................21, 23
Spider Options ................................................. 23
Stemming ......................................................... 51
Synonym Searching ......................................... 51
77
dtSearch Manual
T
Task Scheduler ................................................ 18
Text Fields ........................................................ 67
Thesaurus ..................................................51, 72
U
UNC.................................................................. 15
Unindexed Search ......................................37, 40
Update Index dialog ......................................... 15
User Thesaurus ................................................ 72
UserData .......................................................... 75
V
Variable Term Weighting.................................. 55
Verify Index ...................................................... 34
W
W/N Connector ................................................. 54
Web Site Indexing ............................................ 21
What is a Document Index ............................... 13
Wildcards.......................................................... 50
WinHTTP .......................................................... 23
WordNet ........................................................... 51
WordPerfect ..................................................... 63
Words ............................................................... 59
WordStar .......................................................... 63
X
XFIRSTWORD ................................................. 54
XLASTWORD .................................................. 54
78