1
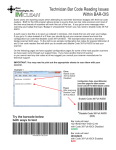
Installing Your POS Hardware
! Installing Your Barcode Scanner
Remove the scanner from the packing materials.
Attach the Y-cable to the scanner.
Orient the connector on one end of the Y-cable so it has the proper orientation for your PC.
(Most PCs will use the small connector which is about the size of a pencil eraser).
Disconnect the keyboard cable from the rear of your PC and plug it into the other branch
of the Y-cable. Now connect the free end of the Y-cable to the rear of your PC in place of the keyboard
plug. Now your PC will receive both keyboard commands and data from your barcode scanner.
Take the scanner and the sheet with the programming barcodes and program your scanner. For retailers
using USB scanners: look into your Scanner Instruction Manual for the page that has the scan code for
setting your scanner so your PC will know that it’s a USB device. After you’ve programmed the scanner
from the sheet, go ahead and follow the instructions on the USB scan code page.
You can always check your scanner by going to the DOS command shell and scanning any item. You’ll see
the barcode and the preceding “@” symbol after the folder prompt, followed by a “bad command or
filename” message. What you see is what is going to your PC and ComTrac.
! Installing Your Receipt Printer
Remove the receipt printer from the packing materials. Turn the printer upside down. You will see a printer
port on the bottom. Next to the printer port will be a small plastic plug. Remove the plug with a screwdriver
plug from the cash drawer will go into this plug, which will look exactly like a wall
or your fingernail. The
telephone plug.
Connect one end of your printer cable (supplied by us) to the bottom of the printer. Connect the
other end to the proper printer port on your PC. Note: You must use a parallel printer port, as
ComTrac/DOS does not support USB printers). Put the roll of receipt paper into the printer,
following the directions in your printer user manual. A roll of receipt paper should have shipped with your
printer.
! Installing Your Cash Drawer
Remove the cash drawer from the packing materials. There will be a short cable coming from the rear of the
cash drawer. Uncoil this cable. It will have a male phone plug at its end. Connect this to the small female
receptable at the bottom of the receipt printer. If the cash drawer won’t open, put your finger or a
screwdriver into the small slot on the rear side or bottom to press a lever to open the drawer. The keys are
inside.
! Arranging Your Hardware
Most ComTrac users store their PC system unit under the counter, especially as most PCs these
days are mini-towers. The cash drawer can be stored on top of the counter, with the receipt printer by its
side or on top, depending on the size of your monitor. The monitor is normally placed on top of the cash
drawer. It is best to keep the barcode scanner stored on its side when not in use, so you don’t put undue
strain on the connecting cable where it enters the scanner housing.
! Configure POS
Be sure to go into the POS program and configure it for your particular hardware package, following the
instructions in the POS User Manual.
! Configuring your Pole Display
The Config.Pos File
First, make sure that the file Config.Pos is located in your POS20 folder. If you need to create the file, open
Notepad or WordPad and copy and paste the following instructions into it and then save.
echoconfig
dosonly
dos=high, umb
device=%SystemRoot%\system32\himem.sys
files=65
Setting your Pole Display Switches
The Logic Controls CD-5220 pole displays are shipped from the factory with the wrong DIP switch settings.
Switches 6-8 must be ON, set POS to DSP-800 to work correctly and that the Pole Display Port is set to Com1:..
Setting Windows/XP for the Pole Display
Go to My Computer.
Click on Hardware.
Click on Device Manager.
Select Ports (Com and Lpt)
Select Communications Port (Com1)
Select Properties
Select the Port Settings Tab
Set the screen to look like this:
Turn pole display on. Try POS DOS. The pole display should work properly.
How to set up the CCD scanner for use with ComTrac POS
1. Scan the Program barcode.
3. Scan the Option Code 3 barcode.
2. Scan the Preamble barcode.
4. Scan the End barcode.
3. Scan the preamble barcodes.
5. Scan the Program barcode.
Scan first
Scan second
6. Scan the Auto Power Off Duration barcode.
4. Scan the Finish barcode.
7. Scan the Option Code 2 barcode.
5. Scan the End barcode.
8. Scan the End barcode.
6. Scan the Program barcode.
9. Scan the Program barcode.
7. Scan the UPC Setting barcode.
10. Scan the Double Scan Verification barcode.
8. Scan the Option Code 3 barcode.
11. Scan the Option Code 3 barcode.
9. Scan the End barcode.
12. Scan the End barcode.
[OPTIONAL] This will set up the CCD scanner to
stay on for 5-6 seconds after the trigger is pressed,
or after the scanner scans a good barcode, and will
program it to avoid inadvertent double scans.
1. Scan the Program barcode.
2. Scan CCD/Laser Scanner Operation Mode.
If things get completely messed up on your scanner,
you can scan the Master Default barcode below to
reset it.
Quick Installation
USB Keyboard Interface
The USB interface is one of the common standard peripheral
interfaces for today’s computer system working under
Windows 98 and Windows 2000 or above. All FuzzyScan
Universal Interface Models have already implemented USB
Keyboard interface for host linking.
FuzzyScan Universal Interface Models
To set or recover all USB keyboard interface related
parameters, you may scan the following bar code system
command for convenience.
§ Plug the 4-pin USB Type A connector into the desired USB port
USB Keyboard Interface
Quick Set Command
FuzzyScan Main Cable
USB Keyboard Interface Connection
To Computer USB Port
§ Make sure your computer has USB port and Operating System
is Windows 98, Windows NT 5.0, and Windows 2000 or above.
§ Plug the RJ45 phone plug of FuzzyScan’s main cable into USB
keyboard cable converter.
of your computer. You will hear the power-on beep twice to
signal you the power-on routine of the FuzzyScan is completed.
§ Whenever the FuzzyScan USB interface scanner is connected
to any computer system for the first time, a string of “USB
Manufacturer ID Message“ will be prompted to register the
FuzzyScan into the operating system.
§ Please scan the “ USB Keyboard Interface Quick Set
Command“ to configure the FuzzyScan into USB keyboard
interface mode. The FuzzyScan is ready to work for you now.
! Configuring your Pole Display
The Config.Pos File
First, make sure that the file Config.Pos is located in your POS20 folder. If you need to create the file, open
Notepad or WordPad and copy and paste the following instructions into it and then save.
echoconfig
dosonly
dos=high, umb
device=%SystemRoot%\system32\himem.sys
files=65
Setting your Pole Display Switches
The Logic Controls CD-5220 pole displays are shipped from the factory with the wrong DIP switch settings.
Switches 6-8 must be ON, set POS to DSP-800 to work correctly and that the Pole Display Port is set to Com1:..
Setting Windows/XP for the Pole Display
Go to My Computer.
Click on Hardware.
Click on Device Manager.
Select Ports (Com and Lpt)
Select Communications Port (Com1)
Select Properties
Select the Port Settings Tab
Set the screen to look like this:
Turn pole display on. Try POS DOS. The pole display should work properly.
Setting up Your POS Receipt Printer in ComTrac Windows
Setting up your POS receipt printer in Windows is quite different from the procedure in DOS ComTrac.
Follow these steps:
1.
2.
3.
4.
5.
6.
7.
8.
9.
10.
Plug in your receipt printer to the LPT1 parallel port on your PC.
Insert a roll of receipt paper into the printer as described in your printer user manual.
Insert the receipt printer print cartridge as described in your printer user manual.
Click on Start
Click on Printers & Faxes
Select Add Printer
Select Local Printer attached to computer
Select NO when prompted to automatically detect and install my Plug + Play printer
Select LPT1 in the “Use the following printer port” prompt
The Add Printer Wizard will appear. Select Generic and Generic/Text Only as shown in the
following screen example:
11.
12.
13.
14.
15.
If prompted whether to keep an existing printer driver, respond with Yes.
Enter the name of your receipt printer: Epson, Star, Citizen.
Enter No when asked whether this printer is to be your default printer.
Select Don’t Share when asked whether you want this printer to be shared or not.
Select No test page when asked whether you want to print a test page.
16. Right-click on the new Receipt Printer icon and select Properties. You will see a dialog box that is
similar to the one shown below.
I
17. Click on Printing Defaults and then click on Paper/Quality. You will see a dialog box similar to the
one below this paragraph. Select Cont Feed - No Break in the Paper Source prompt. This will
ensure that your receipts do not have any artificial “page breaks”.
18. Click on Ok. When back in the Properties dialog box, click on Apply | Ok. You are done.