1
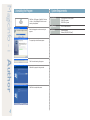
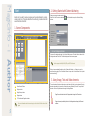
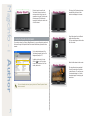
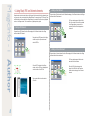
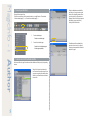
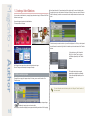
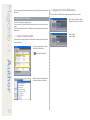
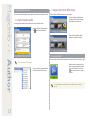
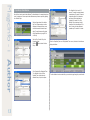
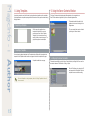
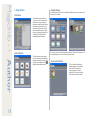
MagicInfo-i Premium Edition
Author
Quick Start Guide
This guide has been written so that users can use the software more easily and quickly. For
more information, refer to the MagicInfo-i Premium Edition user manual.
Author is a tool used to create effective presentations and
interactive content by arranging various elements. Content items
are managed and integrated by the server, and thus can easily
be used, searched and published.
MagicInfo - i Author
Key Features
Various Display Options
–– Standard resolution and customized resolution
–– Max. resolution: 5000 x 5000
–– Original Size / Fit to Screen / Lock Aspect Ratio
Designing with Elements
–– Constructs a screen divided into multiple elements
–– Elements can be resized, rotated or aligned
–– Supports various elements (Shape, Flash, Images, Input Source, Office, Sound, Text, Video,
Web, etc.)
An easy and convenient editing environment
–– Supports <Undo> and <Redo> features
–– Supports drag & drop
–– Reuses content items through templates
–– Offers detailed editing using the zoom-in/out feature (10 to 200%)
Designing with Layers
–– Supports overlapping layers, in which elements can be grouped
Using a Timeline
–– Offers intuitive scheduling of content using a timeline
–– Controls the playing duration of an element precisely down to 1/100 of a second.
Presentations with Pages
–– Supports presentations using multiple pages
–– Previews each page
–– A background image can be added to a page and displayed to fit the screen or displayed in the
original size, as a tile effect or in a locked aspect ratio.
–– Interactive content can be created using pages.
Preview Feature
–– Previews each page
–– Pages can be previewed starting with a selected page.
2
Reusing Content
–– Supports Clip Art media files
–– Content designing using templates.
–– User-created pages can be registered as templates.
Various Effects
–– Offers various effects, such as Alpha, Push, Reveal and Fade.
–– Supports slide transition effects between pages
Interactive Content
–– Controls events by content items, pages or elements
–– Supports a programming model for each element
–– Supports programming using VBScript
–– Supports various types of processing (moving between pages, changing element properties,
etc.) directed by commands, such as touch.
Publishing To Various Types of Media
–– Publishes content to a content management server, USB memory device or external disk
Compatibility
–– Content created using MagicInfo-i Pro can be converted to the format of MagicInfo Author.
–– Content created using MagicInfo-i Advanced Edition Author can be converted to the format of
MagicInfo-i Premium Edition Author.
MagicInfo - i Author
3
Installing the Program
Specify the folder to install the application to.
Run the setup file to initiate the installation process
for MagicInfo-i Author. Select the installation
language.
The preparing installation screen appears.
Click Next to start Installation Wizard
Check I accept the terms of the license agreement.
and click Next.
Enter the username and company and click Next.
Click Install to start installing the application.
A window indicating the installation progress
appears.
The installation process is completed.
MagicInfo - i Author
4
Uninstalling the Program
Click Start > All Programs > MagicInfo-i Premium
> Author > Uninstall MagicInfo-i Author to start
removing the application.
Select the language to use when removing the
program.
The preparing to uninstall screen appears.
Click Yes to start removing the program.
Wait while the program is being removed.
Click Finish to complete the process.
System Requirements
Hardware
CPU: Dual Core 2.5 GHz or greater
RAM: 2GB or greater
DISK: 50GB or greater
Software
IE 6.0 or later and DirectX
System
Windows platforms
Windows (2000/2003/XP/Vista/7)
MagicInfo - i Author
Start
2. Getting Started with Content Authoring
Author can be used for various purposes such as advertisements, posters,
visual content, etc. This guide describes the authoring procedures and the
overall functions of Author.
1. Screen Components
1
2
4
>> To insert background music
You can set the background music in the Content Setting screen. Click the <Select> button of the
<Background music file> field. The Select background music screen appears.

3
Author supports the WAV, WMA, MID, and MP3 file formats.
5
After you have completed the settings, click <Create with Wizard> or <Create> to open the
content authoring page. (Click <Create with Wizard> to open the <Content Wizard> for help with
content authoring.)
3. Using Image, Text and Video elements

1
2
3
4
5
Menu Bar and Toolbar
Design window
Design Setup window
Stage window
The most important thing about authoring a content item with Author is using elements. By using
elements apropriately, you can author a content item more effectively. There are 7 ways to add
elements. You can only add elements through the Stage Window.
Drag files on the local drive to the Stage window through the File window.
The Timeline and Pageline windows
For more information about the screen layout, refer to the last "Note" section of this
guide.
5
Create a new page to create a content item.
icon of the toolbar to open the Contents Setting
Select File > New Contents or select the
window.
Drag an element provided by Author to the Stage window through the Element
window.
MagicInfo - i Author
6
First, insert a background image element.
Drag the Image element from the
Multimedia category of the Element
window to the Stage window. The Open
window appears. Select an image in
the window. Increase the added image
element to full screen.
Drag a Clip Art media file provided in the Template window to the Stage window.
Download an element from the MagicInfo-i Server through the Server Contents
window and drag it into the Stage window.
Drag an element from the Element toolbar and drop it to the required location in
the Stage window. For an added element that requires a file, the Open window
automatically appears where you can select a file you need.
Right-click over the Stage window to open the context-sensitive menu. Click
<Insert element>, select an element to be added, and arrange it by dragging
it. For an added element that requires a file, the Open window automatically
appears where you can select a file you need.
Drag an element registered to the Favorite window to the Stage window.
Author provides various authoring
elements, simply called elements in the
instructions of this manual, that are
necessary for authoring content, each with
unique properties. Elements are classified
into the categories Other, Multimedia,
Chart, Shape, Event Raiser and WordArt.
Let's create a content item by using Image,
Text and Video elements.
>> Resizing an Image to Full Screen
To resize an image to full screen, manually resize the image by dragging the image with the
mouse, use the toolbar or double-click the image.

For more information, refer to the user manual.
Now, let's create a phrase to be inserted into the image.
Drag the Text element from the Multimedia category of the Element window to the Stage window.
MagicInfo - i Author
7
Enter the phrase to be used for the
Text element. However, since there is
a background color for the phrase, the
appearance is not good. Therefore, make
the background of the Text element
transparent. In addtion, also set the color
of the Text element.
>> Setting the Properties of a Text Element
If you select an element (e.g. Element, Stage Window, etc.), you can configure the properties of
the element through the Properties Window. Each element has different properties from other
elements.
The design of the Text element has been
completed. Now, let's insert a Video
element to be displayed on the screen.
Drag a Video element from the Element
window to the Stage window.
The Open window appears. Select a video
file in the window.
First, to make the background of the
Text element transparent, set the <Text
Background Opacity> to "0".
In addtion, set the color of the text.
Click the ( ) icon in the Font toolbar
to open the Color window. In the Color
window, select a color.
For more information about each property, refer to the “Element Properties” section
of the user manual.
Resize the Video element to the new size.
The content item has been completed.
Press the Preview button of the toolbar
or select Menubar > File, and then press
<Preview selected page> or <Preview
from selected page> to start playing the
content item.
MagicInfo - i Author
8
4. Using Flash, PDF and Internet elements
Some elements show the content items or still images of the elements while other elements show
only icons when they are inserted into the Stage Window. For example, when PDF, Internet, Flash
and Video files have been added to the Stage window, the contents of the files are only displayed
as icons in the Stage window. Their contents are only displayed when played.
>> Adding a Flash Element
Drag and drop a Flash element from the Multimedia category of the Element window to the Stage
window to add a Flash element.
The Open window appears. Select a Flash
file in the window. When the file is selected
in the Stage window, one scene of the
contents of the flash file is displayed as a
thumbnail.
>> Adding a PDF Element
Drag and drop a PDF element from the Other category of the Element window to the Stage
window to add a PDF element.
Drag and drop a PDF element to the Stage
window to open the Open window and
select a PDF file.
>> Adding an Internet Element
Drag and drop an Internet element from the Other category of the Element window to the Stage
window to add an Internet element.
The Open window appears. Select a web
document file in the window.
When the PDF is selected in the Stage
window, only the PDF icon is displayed and
not the contents of the PDF file.
Play a content file to view the contents
of the file.
Enter the URL of the web page to be
played in the URL field in the Properties
window to set a web page for an Internet
element.
MagicInfo - i Author
9
>> Previewing a content item
Playing a finished content item.
To preview a content item, click the preview toolbar icon, or select Menubar - File and select
<Preview selected page(V)...> or <Preview from selected page(F)...>.
1
Preview selected page...
2
Preview from selected page...
Select the added element and add files
and folders to it using the buttons at the
bottom of the Appending window. When
you click a button, the Open window is
displayed. Select a file or folder to append.
Alternatively, create a new folder by
clicking the Add Folder button.
Previews one selected page.
Previews from the selected page to
the last page sequentially.
>> To add an element with subfolders and files
Add the main file to the page first and then add the subfolders and files by using the Appending
window.
Select a file to be used as an element in
the File window first and then drag it to the
page you are creating. Alternatively, add an
element in the Element window and select
the main file.
If subfolders and files are added to the
append to list, as shown in the figure, it
means they are appended to the element
added to the page.
MagicInfo - i Author
5. Creating a Video-Slideshow
You can create a video-slideshow by arranging Image elements and apply In Effect and Out Effect
functions to each image.
Prepare the images to construct a video-slideshow.
This example will use 3 images.
Click the elements you want to select one by one while holding down the Ctrl key on the beyboard
to select them at the same time. Right-click in this state to open the context menu of the Timeline
window.
In the context menu, click <Sequential
Play(Q)> of <Adjust Time> to arrange
the elements sequentially in the Timeline
window.
Add 3 images to one page as shown above and maximize each image.
When all 3 images are maximized, the images will overlap.
The timeline tracks that are arranged
sequentially are played for approximately
10 seconds sequentially depending on the
playing time.
>> Editing overlapping images
If images fit to one page, the images overlap. In this case, you can use the function of the
Timeline window.

For more information about the timeline, refer to the "Using the Timeline" section of
the user manual.
Press the
icon marked in the figure above to display or hide the selected, overlapped image.
icon indicates the image is shown and can be edited.
The
Set the playing order after completing the arrangement and editing each element. Set the playing
10
time of each element to 10 seconds and specify the playing order. You can set the playing order
by adjusting the track in the timeline with the mouse. However, if there are a number of elements
unlike this example, it would be more convenient to select multiple elements and use the context
menu.
MagicInfo - i Author
11
Now, let's make playing between the elements smoother by applying effects to each element over
the timeline.
–– 2. Drag and drop from the Effects window
Click over an effect in the Effects window and drag and drop the effect into an element.
>> Adding an Effect to an Element
You can insert an effect to an element or a page.
You can insert an In Effect and Out Effect to an element while you can only insert an In Effect to
a page.
To insert an effect, specify an effect in the Properties window or drag and drop an effect from the
Effect window
Yellow: In Effect
Green: Out Effect
–– 1. Using the Properties window
Select an element to insert an effect into or click the track of the element in the timeline and view
the Properties window.
In the Properties window, you can specify
In Effect and Out Effect options.
The
When an effect is inserted, the effect is
displayed in the time bar of the element.
button shows the effects list.
Click over an effect in the displayed effects
list to insert the effect into the element.
MagicInfo - i Author
12
–– 2. Drag and drop from the Effect window
>> Inserting an Effect into a Page
You can insert an effect into a page in the same way that you can insert an effect into an element.
–– 1. Using the Properties window
Select an effect in the Effect window and insert it into a page.
Click over an effect in the Effect window
and drag and drop the effect to the page
that the effect is to be inserted to.
Click the page that you want to insert an effect into and view the Properties window.
Add an In Effect to the Properties window.
button shows the effects list.
The
When an effect is inserted, the effect is
displayed in the pageline of the page.
>> Previewing an Effect
You can preview an effect in the Effect window before inserting the effect into an element or page.
You can only add an In Effect to a page.
Select the element or page into which the
effect is to be inserted and click the effects
icon in the Effect window. Then click the
at the top right of the icon to preview
the effect.
Click over an effect in the displayed effects
list to insert the effect into the element.

For more information on using effects, refer to the "Effects" section of the user
manual.
MagicInfo - i Author
13
>> Repeating a Video-Slideshow
Now, let's learn how to repeat a video-slideshow. The video-slideshow in the example above stops
when it is played once. You can repeat a video-slideshow as many times as required by adjusting
the <Duration Policy>.
Select an Image element in the timeline
first. Since 3 images make up one videoslideshow in the example above, you can
set all the elements to the same repeat
setting. To apply the same setting, select
all the Image elements by using the Ctrl
or Shift key.
The <Repetition Cycle> is set to 30
seconds. This means the selected element
is repeated every 30 seconds. 30 seconds
is required to play all the 3 elements as
each element of the video-slideshow
is played for 10 seconds. The <Stop
Repetition Time> determines the total
repeat time of the video-slideshow. If it is
set to 2 minutes, the video-slideshow is
repeated every 30 seconds for 2 minutes.
View the Play > Duration Policy in the
Properties window.
Click the
button to select <Duration
Policy>.
When the <Repetition Cycle> and <Stop Repetition Time> are set, the tracks in the timeline are
displayed as follows.
Click <Repeat until the Designated Time>.
The <Repetition Cycle> and <Stop
Repetition Time> options below are
activated. Now, set up the two options.
The video-slideshow has been created. Now, you can view the page through the preview function.
MagicInfo - i Author
6. Adding a Page
To create a content item, create a page with elements and add the page so that each page
becomes one content item. If you have created one page, let's start adding more pages. You can
manage pages in the Pageline Window.
Each element and page has events which can be triggered. You can apply a script to these events
to move the element or page, There are 2 kinds of events: basic events and additional events.
>> Applying an Event Script
Applying a script to an event between a page and element allows you to create more interactive
and sophisticated content. The script provided by Author has been developed on the basis of
Visual Basic Script (a script language for Windows). Creating a script is easy if you are familiar
with Visual Basic Script. In addition, Author provides a Script Editor and a Script Wizard to make
creating a script easier.
For more information on using events, refer to the “Events” section of the user
manual.
Click the
button in the Pageline window to add a new page.
You can Delete, Copy and Paste as well as Add a page using the buttons at the bottom left of the
Pageline window.

For more information about pages, refer to the "Using Pageline" section of the user
manual.
14
7. Using Events
MagicInfo - i Author
15
8. Using Templates
9. Using the Server Contents Window
A page being created or one that is finished can be registered as a template and be reused later.
A page registered as a template is packaged with all elements and their properties inserted during
the page creation.
The Server Contents window displays media files registered on the connected server.
View LFD files created and registered by Author or download registered files.
To download a media file, select the file
registered on the server and drag it to the
Stage window.
>> Registering a Template
Click the page to be registered as a
template and right-click it to open the
context pop-up menu. Select <Register
Template> from the context menu and
specify the folder to save the page to. The
page will be registered as a template.
The server content items can be refreshed
by clicking the <Reload> button.
>> Importing a Template
You can import a registered template in the Template window. Double-click the template to be
imported into the Template window to add a new page and insert the template into the page.
A template is added to a new page.
>> Configuring the Server Connection
To download a media file by using the Server Contents Window, the MagicInfo-i Server must be
connected in advance. Click Menubar > Setting > Option.
Enter the IP address, port number, login ID
and password for the MagicInfo-i Server to
complete the server connection setting.
For more information on using templates, refer to the “Using Templates” section of
the user manual.
MagicInfo - i Author
16
10. Creating an Animation
You can create an animation with an element. You can configure a section of an animation by
adding the Key-Frame option. If you add key frames and configure different properties for each
key frame, the element changes according to the configured properties. In addition, you can
create a moving animation by setting the path of an element within one animation section.
>> Configuring Animation Sections
You can create sections by adding a key frame and insert an animation into each section. You can
configure a section of an animation by selecting the <Show the current time elements only>.
1
플레이어는
3개의
있습니다.
Select
the구성요소가
<Show the
current
1
2
1
1
2
3
2
2
3
4
3
3
4
5
4
4
5
6
5
5
6
7
6
6
7
8
7
7
8
9
8
8
9
9
9
플레이어는 3개의
있습니다.
10구성요소가
become
end of 있습니다.
the section.
플레이어는
3개의one
구성요소가
플레이어는 3개의 구성요소가 있습니다.
time elements only> option in the Timeline. TimeMarker and <Key-Frame> will be displayed. The indicated <Key-Frame> will
>> Creating Property-Changing Animations
In a section created by using <Insert Key-Frame>, you can create an animation in which the
properties change over time. Select the key frames at both ends of the section and specify
different properties for each of them in the Properties window. The element will change according
to the configured properties.
1
플레이어는
구성요소가
있습니다.
Add 3개의
an element
to the
Stage
1
2
1
2
3
2
3
4
3
플레이어는 3개의
10구성요소가 있습니다.
values.
플레이어는
3개의 구성요소가 있습니다.
4
5
4
window and add a Key-Frame into the Timeline. Select
each end of the section Key-Frame one by one and set the properties to different
10
For example,
11 set the <Background Color> for the left and right key frames to blue
10
and amber
respectively.
11
12
If you play
11 a content item with the above settings, the element color changes from
blue to amber within the section.
12
13
12
10
Add another
11 <Key-Frame> by right-clicking where you want the other end of the
10
section to
10be.
5
6
5
13
14
13
11
The area12
11between the newly added <Key-Frame> and the previous <Key-Frame>
becomes11a section.
12
13
You can12
create multiple sections by adding key frames.
12
13
14
13
13
14
15
14
14
16
15
Section1
2
3
4
15
15
19
17
16
16
16
19
18
20
17
19
17
19
17
18
20
18
20
18
20
6
7
6
14
15
14
7
8
7
16
15
15
17
16
16
18
17
17
18
18
8
9
8
9
9
19
19
20
19
20
20
MagicInfo - i Author
>> Creating a Motion Path Animation
11. Publishing Content
A Motion Path animation is created by changing the Location properties that are only applied to
one of the multiple animation sections.
1
1
1
2
1
2
2
3
2
3
3
3
4
4
4
4
5
5
5
5
6
6
6
6
7
7
7
7
8
8
8
8
9
9
9
9
플레이어는
구성요소가
있습니다.
After3개의
adding
an element
to the
플레이어는 3개의 구성요소가 있습니다.
and 3개의
<Set 구성요소가
Motion Path>.
플레이어는
있습니다.
10구성요소가 있습니다.
플레이어는 3개의
Stage window, right-click to select <Motion Path>
10path the element will move while holding the left mouse button down in
Draw the
10
the Stage
10
11window.
11
If you play
11 a content item, the element automatically moves along the specified
12
path. 11
12
12 the configured Motion Path of an element, right-click over the element
To remove
12
13
for which
13the path is set and select <Motion Path> and <Delete Motion Path>.
13
13
14
14
14
14
15
15
15
16
15
16
19
16
17
16
19
17
19
17
18
20
19
17
18
20
18
20
18
20
>> Publishing to a local area
1
1
2
2
1
3
2
3
4
3
4
5
4
5
6
5
6
7
6
7
8
7
8
9
8
9
9
플레이어는 3개의 구성요소가 있습니다.
In the menu bar, File > Publish or click ( ) in the toolbar to open the <Publish
Job> window.
10
플레이어는
구성요소가
플레이어는 3개의
3개의
구성요소가 있습니다.
있습니다.
10
Set the
<Location>
item in the <Publish Job> window. Click ( ) and select a
플레이어는 3개의 구성요소가 있습니다.
11to publish the content item to. Click ( ) to open the Browse for Folder
disk drive
10
window11
and then select the folder you want to publish the content item to.
12
11
Press the
) button to publish the content.
12(
1 플레이어는 3개의 구성요소가 있습니다.
13
The progress
is
displayed
and the published content item is saved in the folder
12
13
specified in Step ( 2 ).
10
14
13
14
3
11
15
14
15
4
16
12
16
15
19
17
5
13
19
17
16
18
20
6
19
14
18
20
17
18
17
7
20
15
8
16
9
17
19
18
20
MagicInfo - i Author
>> Publishing to a local disk drive
1 플레이어는 3개의 구성요소가 있습니다.
In the menu bar, click File > Publish or click ( ) on the toolbar to opent the
플레이어는 3개의
3개의 구성요소가
구성요소가 있습니다.
있습니다.
1 플레이어는
1
<Publish
Job> window.
3개의
1 플레이어는
2
10구성요소가 있습니다.
2
10
2
Set the <Protocol> of the <Upload Target> to <Local>.
2
10
3
11
3
3
Select
the
11 <Upload> option and select a local disk drive from the <Category> bar.
3
11
4
To share11
12the content item, select the <Share> option.
4
4
12
12
4
Click ( 12
) to publish the content.
5
13
5
13
13
After publishing
begins, check the status of the packaging and upload. When
5
13
6
14 is complete, the “Contents” and “Schedule” folders are automatically
publishing
6
6
created 14
and the content item is saved in a subfolder consisting of internal
14
6
14
7
identifiers.
15
7
7
15
15
7
15
16
8
16a MagicInfo-i
>88> Publishing to16
Server
19
17
16
8
9
19
19
17
17
19있습니다.
17구성요소가
20
1 플레이어는 3개의18
9
In the menu bar, click File > Publish or click ( ) in the toolbar to open the
9 플레이어는
3개의
구성요소가
1
18
20있습니다.
<Publish
Job>
window.
18
20
2
10
3개의 구성요소가 있습니다.
1 플레이어는
2
Set the 10
<Protocol> of the <Upload Target> to HTTP or FTP and enter the IP
3
address
and
port number
(HTTP or FTP) of the MagicInfo-i Server you want to
3개의
구성요소가
있습니다.
11
1 플레이어는
2
10
3
connect
to.
11
3개의
구성요소가 있습니다.
1 플레이어는
4
2
10
12
3
Enter the
<Login> information including the login ID and password for the
11
4
2
10
12 Server to which contents will be published. In the <Contents Name>
MagicInfo-i
3
5
13 the name of the content item to be displayed through the server.
11
field, enter
4
12
3
5
13
11
4
Select the
6
12
14 <Upload> option. If the MagicInfo-i Server is properly connected, the
5
13
contents
category for the MagicInfo-i Server appears in the <Category> field. Select
4
6
14
12
a category
to be uploaded. To share the content item, select the <Share> option.
7
5
13
15
6
14
7
5
13
15
Click ( 16
) to publish the content.
6
8
14
7
15
16
6
8
19
After publishing
begins,
check the status of the packaging and upload. When
14
17
7
9
publishing
15
19 the MagicInfo-i Server window appears. Confirm that the
17is complete,
16
8
content 15
has
registered by Author.
7
18 been 20
9
19
16
17
18
20
8
9
19
8
For more16
information
17
18
20 about content distribution, refer to the “Configuring the
9
Options and
19 Content” section of the user manual.
17 Publishing
18
20
9
18
18
20
* Note *
Let’s look at the screen layout of Author in more detail.
1. Menubar, Toolbar
Menubar: The menu bar is placed at the top of the screen and
contains all commands supported by the program.
File(F)
Manages content files.
Edit(E)
Provides submenus for editing.
Page(P)
Provides submenus regarding pages.
Design(D)
Performs tasks required for creating a content item, such as adding or
placing design elements.
View(V)
Displays the windows on the screen. An option is enabled when the
corresponding window is hidden and disabled when the corresponding
window is displayed.
Setting(S)
Help(H)
Toolbar: The toolbar is a collection of command icons (Design,
Element and Font) displayed under the menu bar.
Design toolbar
The Design toolbar is a collection of tools required to design
content items.
Element toolbar
The Element toolbar is a collection of key elements used for
designing.
Font toolbar
The Font toolbar is enabled for <Text> element but disabled
for other elements.
MagicInfo - i Author
19
2. Design window
Template Window
The Template window, offers Clip Art and Templates media files and allows you to register and use
the pages you have created.
File Window
The File window browses local drives in
<View List> or <View Thumbnail> mode.
Saved content item can be loaded and
documents or media files saved to disk can
be imported to a content item currently
being created. The documents or media
files can be added directly to the <Stage
window> by dragging and dropping them.
An added file in the <Stage window>
automatically becomes an element.
Element Window
The Element window contains elements
that can be selected from several different
categories and inserted into a content item.
A category can be selected by clicking .
Categories contain different elements.
In Clip Art, you can import a media file supported by MagicInfo-i Author and in Templates, you can
insert registered pages into the content item currently being created.
Server Content Window
The Server Contents window displays
media files registered on the connected
server. View LFD files created and
registered by Author or download
registered files. The server content items
can be refreshed by clicking <Reload>.
MagicInfo - i Author
20
3. Design Setup window
Appending window
The Appending window offers elements
containing files, folders or sub folders
that can be added to a page. The files,
folders or sub folders can be added as
attachments by clicking the buttons at the
bottom of the window.
Properties Window
The Properties window, sets the properties
and events for a selected element or
page. Properties of elements containing
the Custom feature can be configured by
clicking the <Custom Setting> button.
Favorite Window
The Effect Window
The Effect window offers, various effects
that can be selected and applied to
elements.
The Favorite window displays file
information (file name, size, format, and
duration). If you register a file to the page
currently being created, it is automatically
registered to the Favorite window.
To register a file to Favorite that isn’t
registered to a page, drag the file from the
File window to the Favorite window. The
file information will be saved along with the
content item.
MagicInfo - i Author
21
4. Stage window
Elements can be added in the Stage window when a content item is created using Author.
5. Timeline and Pageline windows
The Pageline window manages pages in a content item by adding or deleting pages.
Timeline Window
The Timeline window is automatically enabled if an element is added to the Stage window. The
timeline displays the arrangement of elements and allows you to group elements and organize
them into layers. You can preview playback of the page currently being created in the Stage
window and control the start time, end time and duration.
Pageline Window
Both finished and incomplete content items are displayed in pages.