1
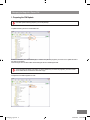
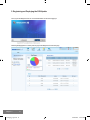
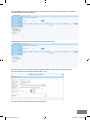
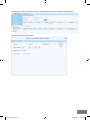
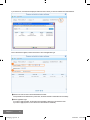
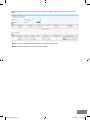
MagicInfo-i Player & MagicInfo-i Server
Configuration Guide
settingqsg_eng.indd 1
03/09/2009 1:55:50 PM
Configuring the MagicInfo-i Player and MagicInfo-i Server
If you have finished installing the MagicInfo-i Server, you have to configure the settings the connection between the
MagicInfo-i Player installed on each LFD and the MagicInfo-i Server you have just installed.
The MagicInfo-i Server must be installed on a public network which the MagicInfo-i Player and users can access.
MagicInfo-i
settingqsg_eng.indd 2
2
03/09/2009 1:55:50 PM
1. Configuring the MagicInfo-i Player
For all the devices (LFDs) where the MagicInfo-i Player is installed, the demo screen of the MagicInfo-i is displayed when
they are started. There are two ways to enter the configuration screen for the MagicInfo-i from the demo screen.
1 The first method is to use the menu toolbar.
If you click one of the four corners of the MagicInfo-i Player screen, the menu toolbar is displayed.
If you click the toothed wheel icon in the menu toolbar, you are moved to the Login screen of the MagicInfo-i Player.
3
settingqsg_eng.indd 3
03/09/2009 1:55:51 PM
2 The second method is to exit the demo screen and us the Iconin the Windows system tray.
Press the [ESC] key on the keyboard in the demo screen to exit to Windows.
You can configure the MagicInfo-i Player using the icon in the Windows system tray.
Check the status indicated by theMagicInfo-i Player icon in the Windows system tray.
If it is not connected to the server normally, the icon is displayed as being deactivated.
In this case, right-click the Icon and select [Setting] from the displayed menu.
If you enter your password in the displayed screen, you are moved to the next screen.
(The default password is: “000000”)
MagicInfo-i
settingqsg_eng.indd 4
4
03/09/2009 1:55:51 PM
In the above menu, select [Player Configuration].
The screen consists of five tabs : Basic, Network, Server, Schedule, Manage.
If you have changed the settings for the player, you have to save the changes for each tab. If you do not save the
changes you made in a tab, they will be removed without being applied. Therefore, before leaving a tab, make
sure to save the changes.
5
settingqsg_eng.indd 5
03/09/2009 1:55:51 PM
First, in the Basic tab, set the name of the device.
(For example, AST_device3)
Next, in the Network tab, configure the IP address settings of the device (LFD) which will be the client.
At this time, select either DHCP or Static.
· DHCP is a method for assigning an IP address to the MagicInfo-i Player automatically in accordance with the IP
address assigned to the LFD where the MagicInfo-i Player is installed.
· Staticis the method where the user enters the IP address, subnet mask, gateway address, DNS address, etc.
manually.
· The IP settings are already configured, so you need not enter them.
MagicInfo-i
settingqsg_eng.indd 6
6
03/09/2009 1:55:52 PM
If you have finished configuring the IP address settings, continue to configure the server which will be connected to the
MagicInfo-i Player.
To make it possible for the current device to communicate with the server, select the “Access schedule server periodically”
option and set the URL of the server.
Then, enter the IP address and port of the server through which content will be downloaded and select the download
method(FTP, HTTP). Also enter the path of the folder where the downloaded content is to be saved. (Default setting: d:\
Repository)
Then set the IP address of the tunneling server which relays networks for remote VNC connections between different
network environments. Usually, the tunneling server is installed automatically when the MagicInfo-i Server is installed.
Therefore, you have only to enter the IP address of the MagicInfo-i Server. If you want to install and use the tunneling server
on an external network, just enter its IP address.
If you click Save after finishing configuring the server, MagicInfo RM runs automatically and attempts to connect to the
server immediately and register the device information. If it is connected successfully, the tray icon of the MagicInfo-i Player
is displayed as shown in the figure below.
This tray icon indicates that the MagicInfo-i Player is connected to the server but has not yet been approved. In this state, the
server cannot use the corresponding device. Only if it is approved by the MagicInfo-i Server administrator, you can manage
and use the device. Now, we have finished configuring the MagicInfo-i Player.
For more information on the configuration of the MagicInfo-i Player, refer to the MagicInfo-i Player user manual.
7
settingqsg_eng.indd 7
03/09/2009 1:55:52 PM
2. Configuring the MagicInfo-i Server
When you have finished configuring the MagicInfo-i Player, MagicInfo RM runs immediately and requests approval from the
server. In this case, the connection is only completed if the approval is processed on the server.
First, login to the MagicInfo-i Server. Use the administrator account when logging in.
Device Approval Procedure
Click the [Manager](shown in amber) at the top right of the MagicInfo-i Server main page.
MagicInfo-i
settingqsg_eng.indd 8
8
03/09/2009 1:55:53 PM
Click [Device Management] in the menu to the left of the Manager.
A list of device groups is displayed.
All the devices waiting for approval are contained in the [Non-Approval] folder.
Click the [Non-Approval] folder. A list of devices waiting for approval is displayed.
Click the device you want to approve in the list above and then click the [Approval] button. The Approve Device screen
where you can enable a device group is displayed.
Click the [
] icon. A list of device groups is displayed.
9
settingqsg_eng.indd 9
03/09/2009 1:55:53 PM
Select a group and click the [Save] button to complete approval for the device. The approved device is moved to the
selected group.
When the device is approved through the procedures above,the icon of the MagicInfo-i Player is changed as shown in the
figure below.
If the icon as shown in the figure above is displayed, it means that configuration for the device and server is completed
successfully.
MagicInfo-i
settingqsg_eng.indd 10
10
03/09/2009 1:55:53 PM
Managing the MagicInfo-i Server S/W
1. Preparing the S/W Update
If the S/W Update is already prepared, you can skip this step.
To update the S/W, you have to create folders first.
Create the subfolders, Client and WSRMAgent, in a folder. Then place the programs you want to use to update the S/W of
the client into the folders.
Place the Player file in the Client folder and the RMAgent file in the WSRMAgent folder.
You must create both folders. Even when you want to update only one of the two programs, you have to create
the two folders above and leave the other folder empty.
Compress the two folders together into a file.
11
settingqsg_eng.indd 11
03/09/2009 1:55:54 PM
2. Registering and Deploying the S/W Update
Then, log into the MagicInfo-i Server. Use the administrator account when logging in.
Click the [Manager](shown in amber) at the top right of the MagicInfo-i Server main page.
MagicInfo-i
settingqsg_eng.indd 12
12
03/09/2009 1:55:54 PM
Click WS-RM Management in the menu at the left of the Manager and then click Software Management. The Software
Information Management page is displayed.
Click the [New] button at the top of the Software Information Management page.
Enter the information for the update file you want to register and select the update files you saved in the first step.
Also, set whether to use the Automatic SW Update function or not.
If you have finished entering the settings, click the [Save] button.
13
settingqsg_eng.indd 13
03/09/2009 1:55:54 PM
▪▪ The Automatic SW Update Function
If you use the Automatic SW Update function, the software is updated automatically without you having to reserve a
schedule to deploy the software. The Automatic SW Update function recognizes the software when bootstrapping(the
operation where information is exchanged when a client begins to connect to the server. Simply put, this is when a device
is connected to the server.) is performed and updates the specified software version if needed.
Configure the Automatic SW Update function using the two items marked in the figure above.
Select the [Update the software automatically] checkbox and enter the [Applicable Version]. If the currently used version
matches one of the applicable versions, the current version is updated automatically. If you click the right arrow button after
entering a version, it is added to the list. If you select a version in the list and the left arrow button, it is removed from the
list.
If you have finished registering a S/W file, it is added to the S/W List.
Then reserve a download so that the devices can download the registered S/W.
Click WS-RM Management -> S/W Download Management.
MagicInfo-i
settingqsg_eng.indd 14
14
03/09/2009 1:55:55 PM
Click the [Book Timer] button at the top of the page. The reserving of the schedule to deploy the software is started.
Click the icon marked in the figure below.
15
settingqsg_eng.indd 15
03/09/2009 1:55:55 PM
If you click the icon, the Model List is displayed. Select the device where you want the schedule to be downloaded to.
If the model has been applied, continue to the Service Time and Application Type.
1 Set the time when the device should download the S/W files.
If the specified time is earlier than the present time, the device will start to download them immediately.
2 Set the Application Type.
If you select “Apply By Model”, the S/W files are downloaded to all devices of the selected model.
If you select “Apply By Device”, each device has to download them individually.
MagicInfo-i
settingqsg_eng.indd 16
16
03/09/2009 1:55:55 PM
Click the [Save] button to finish reserving the schedule to deploy the software. Then the schedule is added to the list as
follows:
1 When reserving a schedule to deploy the software is finished, it is added to the list.
2 When a download is started, you can check the service status.
17
settingqsg_eng.indd 17
03/09/2009 1:55:55 PM
FAQ on MagicInfo-i
1. FAQ - Server
!
A schedule cannot be properly deployed to the device. In Deploy Status, a loading symbol is continuously rotating
but download is not performed.
1. Check the file name of content, which is mapped to the schedule and check the locale of OS for LFD, which has
an installed Player. If the OS for LFD cannot read characters for file name of the content, it is impossible to complete
download successfully.
For example, if LFD has an English OS, it cannot download a file with a Korean file name since it cannot recognize
Korean characters.
In this case, change the content name into English or any available characters for your OS and upload it to the Server
again to perform scheduling and deploying.
2. If Content Server IP or FTP Port in the Player settings for LFD are entered incorrectly, it might be impossible to
complete download successfully. Check settings in Admin->Device Management->Server to see whether they are
entered correctly. If they are not entered correctly, make the necessary corrections and perform deployment again.
3. If your network environment blocks the FTP Port number which is used to download content from Player and Server,
it might be impossible to perform download. In this case, ask you network administrator to unblock the FTP Port number
or set the different port number to the FTP Port to perform download again.
4. If the total file size of the schedule to deploy is bigger than remaining capacity of the drive to save content, it might be
impossible to perform download. If the capacity is insufficient to download schedule, MagicInfo-i Player automatically
deletes stored contents before start downloading. However, it is impossible to perform download if the remaining
capacity is still insufficient even after deleting all stored contents.
!
The Server shows message that the schedule has deployed successfully but the content does not run
successfully in the device.
If the video codec, Office viewer or PDF viewer is not installed in the device, the content might not be played
successfully.
!
Content is displayed in the content list at the top of the Content menu but it is not displayed in the content list when
registering new schedule in the top Schedule menu.
This is a problem due to a cache setting in the browser. Check whether the Temporary Internet Files option in Tools
->Internet Options of the browser is set to Every visit to the page.
!
Thumbnails in the content list are broken and not displayed.
In Internet Options->Advanced->International in the browser, ensure to check the Send UTF-8 URLs option. If it is
unchecked, check this option and try again.
MagicInfo-i
settingqsg_eng.indd 18
18
03/09/2009 1:55:55 PM
!
In the device, a message ‘the device is connected to the Server’ is displayed and the Player icon on the taskbar
has changed from grey to color. However, in the Server, device stats shown on the dashboard at the top of a
page are increased but the device is not shown in the Admin->Device Management->Non Approval options.
This problem occurs when the model of a device is not registered to the Server.
Register the device model in Admin->WS-RM Management->Device Info.Mgmt.
!
The device is shown in the device list but not in the LFD Control.
This problem occurs when device information (MO) for the new device model is not registered in MagicInfo-i Server.
Download and apply the proper patch for the model.
!
I can access the Server using web browser but I cannot login due to the ‘Invalid License’ message.
This problem occurs when license certification fails due to changed MAC address. Get the license certification again.
Inform the MagicInfo-i support team of your changed MAC address to get the new license again.
Using Notepad, open the license.magic file from the conf folder - a sub folder of a folder which MagicInfo-i has been
installed - and enter the new license key. Then reboot the Server.
!
The Server cannot operate properly when Server IP is changed.
1. Access the conf folder – a sub folder of a folder which MagicInfo-i has been installed – and open the config.
properties file with Notepad.
2. Replace the Server IP with the new one:
###################################################################
# Web Service Remote Management Configuration
###################################################################
# WS-Addressing Header [From]
ws_addressing.header.from =
http://[Changed Server IP]:[Server Port]/MagicInfo/WSRMReverse
# WS-Addressing Header [ReplyTo]
ws_addressing.header.replyTo =
http:// [Changed Server IP]:[Server Port]/MagicInfo/WSRMReverse
......
# Event Subscribe
Server.address = http:// [Changed Server IP]:[Server Port]/MagicInfo/WSRMService
####################################################################
DOWNLOAD Server configuration
###################################################################....
# DOWNLOAD Server IP
download.Server.ip = [Changed Server IP]
!
I am currently using a remote desktop connection to connect to a specific device with VNC. Can other users
connect to this device with remote desktop connection?
VNC only supports single remote desktop connection for one device. Only the first connection is effective.
19
settingqsg_eng.indd 19
03/09/2009 1:55:56 PM
!
While registering content, only thumbnails of video content are displayed in black.
Intel’s integrated graphic cards may cause this problem due to lack of compatibility. To get the normal thumbnails,
configure the color setting of the display to 16-bit.
!
Messages below are displayed in VNC.
1. Failed to connect to device! Check on-line status of device!
This message is displayed when the incorrect Tunneling Server IP Address has been entered. Check whether you are
using the designated tunneling Server IP address.
· To check and enter tunneling Server IP address:
Check Tunneling Server IP Address from the ADMINISTRATION->DEVICE MANAGER->SERVER SETTING tab.
2. Failed to connect to device!
This message is displayed when the device is turned off. Check whether the device is turned on.
3. Your connection has been rejected.
This message is displayed when trying connection again after canceling connection using the Cancel button while
trying to connect VNC to the device. This might occur when you try to re-connect to the device before disconnection
from the device is completed.
Try connection again after 3-5 seconds or after turning the browser off and back on again.
!
I checked the Automatic SW Update option when registering Player Update S/W, but devices are not updated
automatically.
When the Player version of the device and the uploaded S/W version are the same, Automatic SW Update is not
performed.
Check whether a version of the device is included in the update version list.
When the device is not bootstrapped (reconnection process between RM and Server) again, Automatic SW Update
cannot be performed; Automatic SW Update is performed only when the device is turned off and on again.
!
While playing Videowall, unmatched sync problem occurs. Pictures are not synchronized accurately.
Playing Videowall requires a specific video format and specifications. A video with MPEG2 PS 1080P format can be
played normally, but any other formats may experience unmatched sync problems. Convert them to the proper video
format.
!
Though the Server Login screen is displayed, the message “Failed to connect to the database. Please retry.” is
displayed when I enter my ID and password and click the Login button.
When the OS of the computer where the server is installed is not shut down normally, it may happen that the
PostgreSQL service does not operate normally. In this case, follow the steps below to connect to the MagicInfo-i Server.
1. Click Start > All Programs > PostgreSQL 8.3. Then click Stop Service to stop the running PostgreSQL service.
(At this time, you may be prompted with the message that the MagicInfo-i service must be stopped too. Then click Y(Yes).)
2. Click Start Service.
3. When the message “The service has been run well.” is displayed, run MagicInfow.exe in the \tomcat\bin sub folder of
the MagicInfo-I installation folder.
4. If the Service Status is Stopped, click the Start button.
5. If the Service Status is changed to Started, click the OK button.
6. Connect to the server using your web browser again.
MagicInfo-i
settingqsg_eng.indd 20
20
03/09/2009 1:55:56 PM
!
Though I have entered the correct server address in the Address box of my web browser, the Server Login
screen is not displayed. (The message “The web page cannot be displayed.” is displayed.)
This problem occurs when the MagicInfo-i service is not started normally. Follow the steps below to connect to the
MagicInfo-i Server.
1. Run MagicInfow.exe in the \tomcat\bin sub folder of the MagicInfo-I installation folder.
2. If the Service Status is Stopped, click the Start button.
3. If the Service Status is changed to Started, click the OK button.
4. Connect to the server using your web browser again.
!
I want to make remote desktop connections using VNC for the devices connected to an external network. To do
this, what settings should I configure?
You need to add the ports of both VNC connection directions to the exception list of the firewalls of the server, device,
and web browser. Add ports 54321 and 5902 to the exception list of the firewalls for all of the three VNC connection
environments of the server, device, and web browser.
!
I want to view the MagicInfo-i Server logs. Where can I view them?
Use Notepad to open the localhost.[date logged].log file in the C:\MagicInfo-i\tomcat\logs folder, where “C:\MagicInfo-i”
is the installation folder of the MagicInfo-i.
!
I want to adjust the WAS Heap memory of the MagicInfo-i Server.
Follow the steps below.
1. Run MagicInfow.exe in the \tomcat\bin sub folder of the MagicInfo-I installation folder. Then display the MagicInfo-i
Server Properties window.
2. Select the General tab and click the Stop button to stop the Service.
3. Select the Java tab and change the values of the Initial memory pool item and the Maximum memory pool item.
Then click the Apply button.
4. Move to the General tab again, and click the Start button to restart the Service.
5. Click the OK button to close the MagicInfo-i Server Properties window.
21
settingqsg_eng.indd 21
03/09/2009 1:55:56 PM
2. FAQ - Author
!
The Register License Key window continuously appears. Can I hide it?
If you do not have a License key, the 30-day free evaluation version runs. To hide it, register the proper License key.
!
What is the maximum resolution?
You can create content up to 5000 x 5000 pixels resolution.
!
Can I change resolution after creating content?
You can change resolution in the Create Content dialog box, which is accessible using the Setting->Contents Setting
menu.
!
Can I make content to always play the same background music?
You can set background music in the Create Content dialog box while creating content. You can also set it later in the
same Create Content dialog box, which is accessible using the Setting->Contents Setting menu.
!
Thumbnails of video elements are not displayed in the Design window.
To play a thumbnail and preview of canvas / pageline in video elements properly, you must install the proper codec for
that video file.
!
Thumbnails of flash elements are not displayed in the Design window.
To play a thumbnail and preview of canvas / pageline in flash elements properly, you must install the proper flash Player
for that flash file.
!
How can I play image elements repeatedly at a scheduled time?
Select images to play and go to the Properties window. In this window, set Duration Policy to Repeat until the
Designated Time or Loop and set duration in Repetition Cycle.
For example, if you set Repetition Cycle to 10 seconds and Duration to 5 seconds, an image will be displayed once
every 10 seconds and remain displayed for 5 seconds.
!
I cannot apply some effects to a page. Why?
3D and Fly On effects are not applicable to a page.
MagicInfo-i
settingqsg_eng.indd 22
22
03/09/2009 1:55:56 PM
!
Video playback is not available in a preview.
To play a video file in a preview, install the proper codec.
!
I tried to play 2 video files in a preview but only one file played.
Set the Overlay mode of video element to FALSE.
However, video playback might not be smooth when it is set to FALSE.
!
An effect that was applied to the video is not available in a preview.
To make an effect available, set the Overlay mode of video element to FALSE.
!
I cannot read an Office document in a preview.
Install the MS Word viewer, PowerPoint viewer, or Excel viewer.
!
I cannot read PowerPoint document even after installing the proper viewer.
To read a PowerPoint document, you should run the viewer and accept the License Policy first.
!
In a preview, an Excel or Word document is displayed as a full screen, while a PowerPoint document is displayed
as a designated size.
Unlike PowerPoint documents, Word and Excel documents do not support a function to display as designated size.
!
I cannot read a PDF document in a preview.
To preview PDF elements properly, you must install the PDF viewer for that PDF file.
!
a preview, a flash element from the lower level is displayed at the top of the screen.
Flash, internet, Office, and PDF elements are Windows-based elements which can be displayed at the top of the
screen with top priority.
!
I want to lock a specific element to the screen so that it cannot be changed while editing.
Select an element and set Lock Element in the Properties window to TRUE.
23
settingqsg_eng.indd 23
03/09/2009 1:55:56 PM
!
How can I group several elements and manage them?
There is currently no function available to manage elements as a group in the current version. However, you can use
layer as an alternative. Create a layer using the Insert New Layer button at the bottom of the Timeline tab and move an
element to the layer to show / hide elements in this layer.
!
I want to use the Undo / Redo function more.
In the Option dialog box, which is accessible from the Setting->Option menu, you can set Maximum number of Undo /
Redo. Restart the program to activate this function.
!
Can I change the basic duration which can be set while adding an element?
In the Option dialog box which is accessible from the Setting->Option menu, you can set the duration in Element
Duration.
!
Is there any easier way to arrange playback order of elements in a sequence?
Select elements and right-click the screen to display the context menu. In this menu, select Adjust Time and Sequential
Play.
!
I want to delete an effect that was applied to an element.
In the Timeline, display the context menu in the Duration area and select Delete In Effect or Delete Out Effect.
!
An error occurs in a preview which did not occur while creating script.
Script is an interpreter language which is able to verify errors only when executed. Thus, when you create a script, only
basic syntax errors can be verified. To verify errors which might occur while running, perform a preview.
!
Where is transferred Server content file saved?
Downloaded file is saved in the Temp folder under the Installation folder.
!
Where is registered template content saved?
It is saved in the Temp folder under the Installation folder.
MagicInfo-i
settingqsg_eng.indd 24
24
03/09/2009 1:55:57 PM
!
If I publish content without saving, where is packaged content created?
Packaged file is saved in the Temp folder under the Installation folder. Its location is displayed at the top of the Publish
screen.
!
Content is displayed as ‘Undefined’ even though I named the file while creating and uploading content.
A name used in searches in the Server is not a file name but a content name entered when creating it. You can set the
content name using the Setting->Contents Setting menu.
!
Where is transferred Server content file saved?
Downloaded file is saved in the Temp folder under the Installation folder.
!
While performing upload in the Publish window, a message “Failed to open URL. Check on Server configuration
information.” is displayed.
Check whether Server IP Address, Port Information, Login ID, and Password are set correctly.
!
While performing upload using FTP, a message “Failed to open URL. Check on Server configuration information.”
is displayed.
Check whether Server IP Address, Port Information, Login ID, and Password are set correctly. If you are using FTP
upload, you also set HTTP port information correctly.
!
A file added to Favorite is not displayed in the newly created content.
Favorite list is designated to individual content. If you create new content, Favorite list will be reset.
!
A preview stopped before finishing video playback.
Check the playing duration of a video element and playing duration of a page.
!
Effect preview is applied only for whole page.
To apply effect preview to a single element, select an element and run effect preview.
!
The File dialog box looks strange.
Check whether you are using a specific theme. Some themes might be interrupted with MagicInfo-i Author.
25
settingqsg_eng.indd 25
03/09/2009 1:55:57 PM
!
The time bar suddenly becomes longer when double-clicking it.
When you double-click the time bar, the time scale is changed to smaller measuring unit and the cursor moves to the
double-clicked point.
!
The Properties or Element tab suddenly disappears or changes shape. How can I return it to the default setting?
You can return it to the default setting using the View->Initialize layout menu.
!
I am using MagicInfo-i Author Standard version, but the option to add a page is no longer available. Is there a
page creation limit?
Using MagicInfo-i Author Standard version, you can create up to 50 pages. In addition, the number of elements per
single page is also limited to 50. To create more pages, use MagicInfo-i Author Advanced version.
MagicInfo-i
settingqsg_eng.indd 26
26
03/09/2009 1:55:57 PM
3. FAQ - Player
!
I cannot play video.
To play video, the proper codec is required. Check whether you have installed the codec.
!
I cannot read Office or PDF document.
Install Office (PowerPoint, Excel, Word) viewers and the PDF viewer.
!
Flash file playback is not available.
To play flash files, a Flash Player is required. To check whether you have Flash Player, run Internet Explorer and drag &
drop a flash file to it. If the file plays, you have a Flash Player.
!
The MagicInfo RM icon is displayed in grey and as Not Connected on the Windows system tray. How can I fix
this?
1. Check the connection status of LAN cable.
2. Run Internet Explorer and check whether you can connect to the Server page.
!
The MagicInfo Client icon is displayed in grey and as Not Connected on the Windows system tray.
1. Check the connection status of LAN cable.
2. Run Internet Explorer and check whether you can connect to the Server page.
3. In the Server tab from the Setup screen, check whether the IP information of the Schedule Server has been set up
correctly.
4. In the Server tab from the Setup screen, check whether the Schedule Server option is ‘access schedule Server
periodically’.
!
I cannot download content.
1. In the Server tab from the Setup screen, check whether the IP and port information of the Content Server has been
set up correctly.
2. Check whether any anti-virus application is running.
3. In an English OS, schedule name and file name should be in English.
27
settingqsg_eng.indd 27
03/09/2009 1:55:57 PM
!
A cursor is displayed in the Play screen.
In the Default tab from the Setup screen, check whether Show Cursor is set to Off.
!
I forgot my password.
To reset your password, reset the password of the device from the Server or press the 8, 2, 4, and ‘Enter’ keys on the
remote control. It will then return to the default password, 000000.
!
I cannot run a schedule published from the Server.
Check whether the MagicInfo Client and MagicInfo RM icons are displayed on the Windows system tray.
!
I cannot play a slide show with the USB.
1. Check whether you have the MagicInfoSlide folder under the Root folder of your USB storage.
2. Check whether you have image files under the MagicInfoSlide folder.
3. Check whether you have the Contents folder and Schedule folder under the Root folder of your USB storage. If a
local schedule and the MagicInfoSlide folder exist simultaneously, the local schedule is given priority.
!
I cannot use the Local Publish function with the USB.
1. Check whether you have the Contents folder and the Schedule folder under the Root folder of your USB storage.
2. Check whether you have designated one single schedule under the Schedule folder.
3. Check whether you have saved contents under the Contents folder.
!
I cannot change RGB Contrast and RGB Brightness while changing screen settings from the Monitor setting.
It is available only when the Magic Brightness mode is set to Custom.
!
I cannot change Red Gain, Green Gain, and Blue Gain while changing screen settings from the Monitor setting.
It is available only when Color Tone is set to Custom.
!
I cannot adjust Bass, Treble, and Balance in the Monitor setting.
It is available only when the mode is set to Custom.
MagicInfo-i
settingqsg_eng.indd 28
28
03/09/2009 1:55:57 PM


![[OL46B] User Manual - English](http://vs1.manualzilla.com/store/data/005698665_1-52a04aa641441dd0417ba4f49a494031-150x150.png)