1
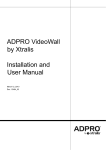
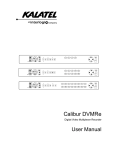
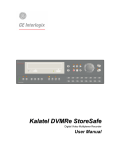
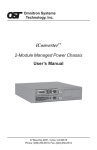
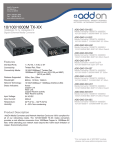
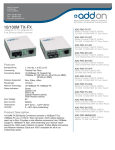
Quick Start Guide
Chimera
Hardened HD H.264 Network Video Codec
34 Mauchly, Ste. B
Irvine, CA 92618
Telephone: +888 941 2111
[email protected]
www.teradek.com
Ethernet System Diagram
Video Source Cabling
HD-SDI or HDMI
Ethernet Cable
Video Source
Chimera Decoder
Ethernet Cable
HD Monitor
LAN/WAN
Chimera Encoder
Network
HD-SDI or HDMI
Ethernet Cable
HD Monitor for Testing
PC for accessing WebUI
and/or optional NVR for
video recording.
ASI System Diagram
Video Source Cabling
Video Source
HD-SDI or HDMI
ASI Connection
Chimera Encoder
HD-SDI or HDMI
HD Monitor for Testing
Chimera Decoder
HD Monitor
Encoder Setup
1
Power Chimera -- Chimera can be
powered via an included A/C adapter
or with PoE using a capable network
switch
2
Connect HD-SDI Video Input
Connect video cable from the source to the SDI/ASI
BNC input on Chimera.
3
Connect ASI/SDI/HDMI Output
Connect video cable for local monitoring via HDMI or
SDI. If streaming over ASI, connect your ASI cable to
the SDI/ASI output BNC
HD-SDI or HDMI
OR
Connect Chimera to your network via
Ethernet cable
Chimera ASI Encoder
ASI Connection
BNC Cable
Chimera ASI Decoder
4
Browse Network to Locate Chimera
Open your web browser. Use Bonjour to browse and
locate the encoding Chimera on the network. Chimera
is displayed by its Friendly Name, which represents
the configuration and capabilities of the unit.
5
Login to Chimera’s Web Interface
In the Username and Password boxes, type admin,
then click Login.
6
Configure Input/Output
Use the menu system of Chimera’s WebUI to
configure the unit. Mouse over the menu system to
view the drop down lists.
Type admin into both
boxes and click Login
Bonjour is a plugin available for Firefox,
Internet Explorer, and included with Safari.
Bonjour discovers networked Zero
Configuration Networking devices.
7
Configure Stream
If desired, adjust stream type, bitrate, scaling, and other
settings on the Stream Settings and Encoder Settings
pages.
In Video - Encoder Settings, give
descriptive names to your video sources.
In Video Setup - Device Settings, Configure your
audio/video input settings and choose Ethernet or
ASI stream output .
8
Verify Live Local Video
Connect an HD monitor to Chimera’s HDMI or HDSDI output. Verify that Chimera is encoding video
locally before attempting to view video over the
network. (Optional)
9
Verify Live Streaming Video
Verify video at the streaming destination -- your
computer (using VLC), the decoder, or an ASI receiver
1
Decoder Setup
Connect to Network and Monitor
2
Connect HDMI or HD-SDI out from Chimera to your
monitor. Connect the network or ASI input. Power is
provided over ethernet (PoE), or via A/C adapter.
LAN/WAN
Open your web browser. Use Bonjour to browse and
locate the decoding Chimera on the network. Chimera
is displayed by its Friendly Name, which represents
the configuration and capabilities of the unit.
3
Login to Chimera’s Web Interface
In the Username and Password boxes, type admin,
then click Login.
Type admin into both
boxes and click Login
Ethernet Cable
HDMI Cable
4
Browse Network to Locate Chimera
Set Mode and Choose Stream source
Navigate to Video Setup - Device Settings and Change
the codec mode to Decoder. Pick your stream source. If
ASI is selected, there is no more configuration needed.
Bonjour is a plugin available for Firefox,
Internet Explorer, and included on Safari.
Bonjour discovers networked Zero
Configuration Networking devices. For more,
see section 7 of the user manual.
5
Drag Video Streams to Cameos
For streaming over Ethernet, you must choose a
network stream to decode. Go to Video Setup Decoder Settings to view available streams.
6
Assign Streams to Decoder Output
Drag and drop your chosen stream to the cameo at right
and click Apply. Choose Manually Configure if your
stream is not displayed or for more options.
Troubleshooting Guide
I can’t find Chimera with Bonjour.
I see video, but there is no sound.
Contact us
Check to ensure that all network firewalls are disabled. If
hardware firewalls or other filtering devices are present on the
network between Chimera and the client system, try moving
Chimera to a new network location that is not filtered by these
devices. Alternately, access Chimera using its default network
settings listed at right.
In the Video Input Settings menu, check that HDMI Audio is
selected in the audio field.
For further assistance, please contact Teradek Support.
What are the default network settings?
If you can see Chimera in Bonjour but cannot connect, ensure
that your network settings are compatible with Chimera’s
defaults.
• IP Address: 192.168.1.200
• Netmask: 255.255.255.0
• Default Gateway: 192.168.1.1
• DNS Server: 192.168.1.1
• Device Hostname: chimera-chm-10-xxxxx
• Zero Configuration Friendly Name: Chimera CHM 10 xxxxx
*xxxxx is the last five digits of Chimera’s serial number
E-mail - [email protected]
Phone - (888)941-2111
Available M-F 9AM-6PM Pacific