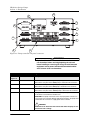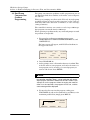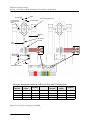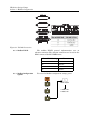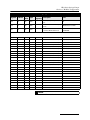
1
HLf Series Syringe Pumps Installation and Operation Guide Part #69-1243-968 of Assembly #60-1243-997 Copyright © 2013. All rights reserved, Teledyne Isco Rev. A, July 2014 HL Series Syringe Pumps Warnings, Cautions, and Notices Warnings and Cautions The lightning flash and arrowhead within the triangle is a warning sign alerting you to “dangerous voltage” inside the product. The exclamation point within the triangle is a warning sign alerting you to important instructions in this manual. Symboles de Sécurité Ce symbole signale la présence d’un danger d’électrocution. Ce symbole signale l’existence d’instructions importantes relatives au produit dans ce manuel. i HL Series Syringe Pumps Warnings, Cautions, and Notices Warnungen und Vorsichtshinweise Der gepfeilte Blitz im Dreieck ist ein Warnzeichen, das Sie vor „gefährlichen Spannungen“ im Inneren des Produkts warnt. Das Ausrufezeichen in Dreieck ist ein Warnzeichen, das Sie darauf aufmerksam macht, daß wichtige Anleitungen zu diesem Handbuch gehören. Advertencias y Precauciones Esta señal alerta sobre la presencia de alto voltaje en el interior del producto. Esta señal le advierte sobre la importancia de las instrucciones del manual que acompañan a este producto. ii HL Series Syringe Pumps Warnings, Cautions, and Notices “To prevent damaging the instrument or injuring yourself, it is absolutely necessary that you understand everything in English, above all, technical terms, before operating the instrument. Otherwise, it is necessary for you to receive complete instruction from someone qualified who understands both the instrument and English very well.” “Um eine Beschädigung des Gerätes oder eine Gefährdung des Anwenders zu vermeiden ist es notwendig, daß dieser vollstandig die englische Sprache und die technischen Bezeichnungen beherrscht. Oder der Anwender muß von einer Person eingeübt werden, die bereits vorher dieses Gerät bedienst hat.” “Pour empêcher dommage à l’instrument ou blesser vous-même, il faut absolument que vous compreniez tout en anglais, surtout les termes techniques, avant d’actionner l’instrument. Autrement, il faut que vous receviez l’instruction parfaite d’une personne très compétente qui comprend bien les deux l’instrument et anglais.” “Para prevenir cualquier daño en el instrumento o en el operador, es necesario que el usuario comprenda perfectamente el lenguaje inglés y las términos técnicos intrínsecos, o bien ser formado por una persona que haya trabajado ya previamente con este instrumento.” “For a forhindre skade på instrumentet eller operatøren er det nødvendig at brukeren har full forståelse for det engelske sprak og tekniske uttrykk Ellers må brukeren få opplæring av en person, som kan engelsk, for instrumentet tas i bruk.” “För att förhindra skade på instrumentet eller operatören, år det nötvändigt att användaren har fullständiga kunskaper i det engelska språket och dess tekniska termer, eller utbildas av en person, som tidigare brukat instrumentet.” “For at undgå skade på produktet eller på brugeren er det nødvendigt at brugeren til fulde forstår det engelske sprog for at forstå den tekniske formulering i den engelske manual. I modsat fald skal brugeren modtage træning, inden apparatet tages I drift.” iii HL Series Syringe Pumps Warnings, Cautions, and Notices Laitteelle tai käyttäjälle aiheutuvien vahinkojen välttämiseksi on tärkeää, että käyttäjä hallitsee englannin kielen ja englantilaiset tekniset termit tai on saanut käyttöopastuksen englantia osaavalta henkilöltä. “Per evitare danni allo struménto od incidenti all’operatore, é necessario che l’utilizzatore abbia una completa conoscensza della lingua inglese oppure che venga istruita da una persona che abbia utilizzato precedentemente questo strumento.” “Para impedir qualquer dano no aparelho ou ferimentos parao operador, é necessario que o utilizador tenha um conhecimento completo da lingua inglesa e dos respectivos termos técnicos, ou seja, treinado por uma pessoa que tenha esse conhecimento, antes de operar com este aparelho.” “‘ ” С цел да избегне повреда на апаратурата или нараняване на оператора е необходимо клиента добре да владее английски език и техчническата терминолгия, която е използувана в описанието или да бъде обучен от лице, което е вече работило с такъв апарат. Figyelmeztetés! A készülék meghibásodásának valamint a kezelö sérülésének megelözése érdekében a felhasználónak feltétlenül értenie kell az angol nyelvet, ezen belül a müszaki kifejezéseket, vagy pedig a használatba vételt megelözöen a készülék kezelésében már gyakarlott személy által történö betanitás szükséges! iv HL Series Syringe Pumps Warnings, Cautions, and Notices NOTICE If the pump has been used for pumping a hazardous or potentially lethal material: · Do not return the pump without contacting the Teledyne Isco Service Department. · Do not return the pump without first providing written guarantee that it has been decontaminated of hazardous or potentially lethal materials. · Teledyne Isco reserves the right to refuse shipment if no decontamination assurance has been provided prior to shipment. Failure to decontaminate a pump may result in legal action. Fluids Certified for Isco HLf Pumps WARNING Pumping fluids that are not compatible with the HLf Series Pump may damage critical components, resulting in property damage, personal injury, or even death. Users who pump fluids other than those listed below do so at their own risk. The fluid-contacting materials within the HLf Series Syringe Pump have been tested and certified to be compatible with the following fluids: • ethane • ethylene • propane • propylene • butane • butadiene • hexane • gasoline • diesel fuel • jet fuel • ammonia • methanol • isopropanol • acetone • acetonitrile • heptane • benzene • ethylbenzene • methane Consult with Isco before using any chemical not listed above. v HL Series Syringe Pumps Warnings, Cautions, and Notices WARNING: PLEASE READ At the request of our Supercritical Fluid Extraction laboratory staff, we want our customers to be aware of the potential hazards involved with supercritical fluid extraction. Oxidizing gases, such as nitrous oxide, in contact with organic matrices or flammable modifiers, can detonate under certain conditions. Likewise, flammable fluids, such as methane, under high pressure conditions can present a hazard. With concern for the safety of our customers, we have designed our extractors to be as safe as possible. However, we do not recommend the use of our instrument with potentially explosive reactions. The letter below, which appeared in the July 22, 1991 edition of Chemical and Engineering News, is reprinted with permission from Professor Robert E. Sievers and his colleagues at the University of Colorado at Boulder. Even though they were not performing supercritical fluid extraction, it details the problems their lab experienced using nitrous oxide under similar conditions. We add our support for their suggestion to use only carbon dioxide or other less hazardous fluids for supercritical fluid extraction. vi HL Series Syringe Pumps Warnings, Cautions, and Notices CAUTION: Avoid spills! Liquids associated with this instrument may be classified as carcinogenic, biohazardous, flammable, or radioactive. Should these liquids be used, it is highly recommended that this application be accomplished in an isolated environment designed for these types of materials in accordance with federal state and local regulatory laws and in compliance with your organization’s chemical/hygiene plan in the event of a spill. In all cases, when using Teledyne Isco instrumentation, prudence and common sense must be used. WARNING: Pinch point. This symbol warns you that your fingers or hands will sustain serious injury if you place them between the moving parts of the mechanism near this symbol. WARNING: Avoid hazardous practices! If you use this instrument in any way not specified in this manual, the protection provided by the instrument may be impaired; this will increase your risk of injury. CAUTION: Liquids associated with this instrument may be classified as carcinogenic, biohazardous, flammable, or radioactive. Should these liquids be used, it is highly recommended that this application be accomplished in an isolated environment designed for these types of materials, in accordance with federal, state, and local regulatory laws, and in compliance with your company’s chemical/hygiene plan in the event of a spill. In all cases, when using Teledyne Isco instrumentation, prudence and common sense must be used. WARNING: Team Lift. To reduce the risk of injury do not attempt to lift this instrument independently. It is highly recommenced that a team lift be used when lifting this instrument. vii HL Series Syringe Pumps Warnings, Cautions, and Notices AVIS: Éviter de répandre! Les liquides qui sont pompés dans cet instrument peuvent être cancérigènes, hasards biologiques, inflammables, ou radioactifs. Si vous devez utiliser ces liquides hasardeux, il est très recommandé que vous le faites à l'intérieur d'un environnement isolé conçu pour tels liquides. Cet environnement isolé devrait être construit selon les règlements fédéraux, provinciaux, et locaux, aussi que le plan de votre organisation qui concerne l'évènement d'un accident avec les matières hasardeuses. En tout cas, utilisez toujours l'instrumentation d'Isco avec prudence et sens commun. ATTENTION: Risque de pincement. Ce symbole vous avertit que les mains ou les doigts recevront une blessure sérieuse si vous les mettez entre les éléments en mouvement du mécanisme près de ce symbole. ATTENTION: Éviter les usages hasardeux! Si vous utilisez cet instrument d’une manière autre que celles qui sont specifiées dans ce manuel, la protection fournie par l’instrument peut être affaiblie; cela augmentera votre risque de blessure. AVIS: Les liquides qui sont analysés dans cet instrument peuvent être cancérigènes, hasards biologiques, inflammables, ou radioactifs. Si vous devez utiliser ces liquides hasardeux, il est très recommandé que vous le faites à l'intérieur d'un environnement isolé conçu pour tels liquides. Cet environnement isolé devrait être construit selon les règlements fédéraux, provinciaux, et locaux, aussi que le plan de votre organisation qui concerne l'évènement d'un accident avec les matières hasardeuses. En tout cas, utilisez toujours l'instrumentation d'Isco avec prudence et sens commun. viii Foreword This instruction manual is designed to help you gain a thorough understanding of the operation of the equipment. Teledyne Isco recommends that you read this manual completely before placing the equipment in service. Although Teledyne Isco designs reliability into all equipment, there is always the possibility of a malfunction. This manual may help in diagnosing and repairing the malfunction. If a problem persists, call or e-mail Teledyne Isco technical support for assistance. Simple difficulties can often be diagnosed over the phone. For faster service, please have your serial number ready. If it is necessary to return the equipment to the factory for service, please follow the shipping instructions provided by technical support, including the use of the Return Merchandise Authorization (RMA) specified. Be sure to include a note describing the malfunction. This will aid in the prompt repair and return of the equipment. Teledyne Isco welcomes suggestions that would improve the information presented in this manual or enhance the operation of the equipment itself. Teledyne Isco is continually improving its products and reserves the right to change product specifications, replacement parts, schematics, and instructions without notice. Contact Information Customer Service Phone: (800) 228-4373 (USA, Canada, Mexico) (402) 464-0231 (Outside North America) Fax: (402) 465-3022 Email: [email protected] Technical Support Phone: Toll Free (866) 298-6174 (Samplers, Flow Meters and Multi-parameter Probes) Toll Free (800) 775-2965 (Syringe Pumps and Liquid Chromatography) Email: [email protected] Return equipment to: 4700 Superior Street, Lincoln, NE 68504-1398 Other Correspondence Mail to: P.O. Box 82531, Lincoln, NE 68501-2531 Email: [email protected] Revised April 2014 HLf Series Syringe Pumps Table of Contents Section 1 Introduction 1.1 1.2 1.3 1.4 1.5 1.6 Introduction . . . . . . . . . . . . . . . . . . . . . . . . . . . . . . . . . . . . . . . . . . . . . . . . . . . . . . . . 1-1 Specifications. . . . . . . . . . . . . . . . . . . . . . . . . . . . . . . . . . . . . . . . . . . . . . . . . . . . . . . 1-1 Unpacking . . . . . . . . . . . . . . . . . . . . . . . . . . . . . . . . . . . . . . . . . . . . . . . . . . . . . . . . . 1-8 Controls and Indicators . . . . . . . . . . . . . . . . . . . . . . . . . . . . . . . . . . . . . . . . . . . . . . 1-8 Electrical Connections . . . . . . . . . . . . . . . . . . . . . . . . . . . . . . . . . . . . . . . . . . . . . . 1-13 Preliminary Checkout . . . . . . . . . . . . . . . . . . . . . . . . . . . . . . . . . . . . . . . . . . . . . . . 1-14 Section 2 Fluid System Connections & Accessories 2.1 Introduction . . . . . . . . . . . . . . . . . . . . . . . . . . . . . . . . . . . . . . . . . . . . . . . . . . . . . . . . 2-1 2.2 Fluid System Connections . . . . . . . . . . . . . . . . . . . . . . . . . . . . . . . . . . . . . . . . . . . . 2-1 2.2.1 Ports . . . . . . . . . . . . . . . . . . . . . . . . . . . . . . . . . . . . . . . . . . . . . . . . . . . . . . . . 2-1 2.3 Fluids Certified for Isco HLf Pumps . . . . . . . . . . . . . . . . . . . . . . . . . . . . . . . . . . . . 2-2 2.3.1 Installation Tips . . . . . . . . . . . . . . . . . . . . . . . . . . . . . . . . . . . . . . . . . . . . . . . 2-2 2.3.2 Tubing Requirements . . . . . . . . . . . . . . . . . . . . . . . . . . . . . . . . . . . . . . . . . . 2-2 2.3.3 Accessory Packages . . . . . . . . . . . . . . . . . . . . . . . . . . . . . . . . . . . . . . . . . . . . 2-3 2.3.4 Draining Overflow . . . . . . . . . . . . . . . . . . . . . . . . . . . . . . . . . . . . . . . . . . . . . 2-3 2.3.5 Cylinder Washing: Wash Gland . . . . . . . . . . . . . . . . . . . . . . . . . . . . . . . . . . 2-4 2.3.6 Cylinder Washing: Nitrogen Purge . . . . . . . . . . . . . . . . . . . . . . . . . . . . . . . . 2-5 2.4 Fluid Connection Accessories . . . . . . . . . . . . . . . . . . . . . . . . . . . . . . . . . . . . . . . . . . 2-6 2.4.1 Manual Refill Kit . . . . . . . . . . . . . . . . . . . . . . . . . . . . . . . . . . . . . . . . . . . . . . 2-6 2.4.2 Manual Outlet Valve Kit . . . . . . . . . . . . . . . . . . . . . . . . . . . . . . . . . . . . . . . . 2-7 2.4.3 In-Line Filter Package . . . . . . . . . . . . . . . . . . . . . . . . . . . . . . . . . . . . . . . . . . 2-9 2.5 Temperature and Pressure Controls . . . . . . . . . . . . . . . . . . . . . . . . . . . . . . . . . . . 2-10 2.5.1 Cylinder Insulating Cover . . . . . . . . . . . . . . . . . . . . . . . . . . . . . . . . . . . . . . 2-10 2.5.2 Temperature Control Jacket . . . . . . . . . . . . . . . . . . . . . . . . . . . . . . . . . . . . 2-11 2.5.3 Fluid Temperature and Volume . . . . . . . . . . . . . . . . . . . . . . . . . . . . . . . . . 2-12 2.5.4 Back Pressure Regulation . . . . . . . . . . . . . . . . . . . . . . . . . . . . . . . . . . . . . . 2-13 Section 3 Basic Programming and Operation 3.1 Introduction . . . . . . . . . . . . . . . . . . . . . . . . . . . . . . . . . . . . . . . . . . . . . . . . . . . . . . . . 3.2 General Controller Information . . . . . . . . . . . . . . . . . . . . . . . . . . . . . . . . . . . . . . . . 3.2.1 Rates, Units, and Limits . . . . . . . . . . . . . . . . . . . . . . . . . . . . . . . . . . . . . . . . 3.2.2 Programming Screens . . . . . . . . . . . . . . . . . . . . . . . . . . . . . . . . . . . . . . . . . . 3.2.3 Run Screens . . . . . . . . . . . . . . . . . . . . . . . . . . . . . . . . . . . . . . . . . . . . . . . . . . 3.2.4 Selecting Operating Parameters . . . . . . . . . . . . . . . . . . . . . . . . . . . . . . . . . . 3.3 Main Menus. . . . . . . . . . . . . . . . . . . . . . . . . . . . . . . . . . . . . . . . . . . . . . . . . . . . . . . . 3.4 Menu One . . . . . . . . . . . . . . . . . . . . . . . . . . . . . . . . . . . . . . . . . . . . . . . . . . . . . . . . . 3.4.1 Flow and/or Pressure Units of Measure . . . . . . . . . . . . . . . . . . . . . . . . . . . . 3.4.2 Pump Selection (if multiple pumps) . . . . . . . . . . . . . . . . . . . . . . . . . . . . . . . . . . . . . . . . . . . . 3.4.3 Refill . . . . . . . . . . . . . . . . . . . . . . . . . . . . . . . . . . . . . . . . . . . . . . . . . . . . . . . . 3.4.4 Power Failure [STOP] . . . . . . . . . . . . . . . . . . . . . . . . . . . . . . . . . . . . . . . . . . 3.4.5 System Reset (Restore Default Settings) . . . . . . . . . . . . . . . . . . . . . . . . . . . 3.4.6 Display Contrast . . . . . . . . . . . . . . . . . . . . . . . . . . . . . . . . . . . . . . . . . . . . . . 3.5 Menu Two . . . . . . . . . . . . . . . . . . . . . . . . . . . . . . . . . . . . . . . . . . . . . . . . . . . . . . . . . 3-1 3-1 3-1 3-1 3-2 3-3 3-3 3-3 3-3 3-4 3-4 3-5 3-5 3-5 3-5 xi HLf Series Syringe Pumps Table of Contents 3.5.1 Serial Option . . . . . . . . . . . . . . . . . . . . . . . . . . . . . . . . . . . . . . . . . . . . . . . . . 3-6 3.5.2 Pump Status . . . . . . . . . . . . . . . . . . . . . . . . . . . . . . . . . . . . . . . . . . . . . . . . . . 3-6 3.5.3 External Control . . . . . . . . . . . . . . . . . . . . . . . . . . . . . . . . . . . . . . . . . . . . . . 3-6 3.5.4 Multiple Pumps . . . . . . . . . . . . . . . . . . . . . . . . . . . . . . . . . . . . . . . . . . . . . . . 3-6 3.5.5 Total Volume Reset . . . . . . . . . . . . . . . . . . . . . . . . . . . . . . . . . . . . . . . . . . . . 3-6 3.5.6 Valve . . . . . . . . . . . . . . . . . . . . . . . . . . . . . . . . . . . . . . . . . . . . . . . . . . . . . . . . 3-7 3.6 Menu Three . . . . . . . . . . . . . . . . . . . . . . . . . . . . . . . . . . . . . . . . . . . . . . . . . . . . . . . . 3-7 3.6.1 Poor Fill Alarm . . . . . . . . . . . . . . . . . . . . . . . . . . . . . . . . . . . . . . . . . . . . . . . 3-7 3.6.2 Diagnostic Menu . . . . . . . . . . . . . . . . . . . . . . . . . . . . . . . . . . . . . . . . . . . . . . 3-7 3.6.3 Pressure Calibration . . . . . . . . . . . . . . . . . . . . . . . . . . . . . . . . . . . . . . . . . . . 3-7 3.6.4 Diff. Modes . . . . . . . . . . . . . . . . . . . . . . . . . . . . . . . . . . . . . . . . . . . . . . . . . . . 3-8 3.6.5 Press. Integral . . . . . . . . . . . . . . . . . . . . . . . . . . . . . . . . . . . . . . . . . . . . . . . . 3-8 3.6.6 Pressure Deadband . . . . . . . . . . . . . . . . . . . . . . . . . . . . . . . . . . . . . . . . . . . . 3-8 3.7 Menu Four . . . . . . . . . . . . . . . . . . . . . . . . . . . . . . . . . . . . . . . . . . . . . . . . . . . . . . . . . 3-9 3.7.1 Modbus Options . . . . . . . . . . . . . . . . . . . . . . . . . . . . . . . . . . . . . . . . . . . . . . . 3-9 3.8 Front Panel Keys. . . . . . . . . . . . . . . . . . . . . . . . . . . . . . . . . . . . . . . . . . . . . . . . . . . . 3-9 3.8.1 CONST PRESS and CONST FLOW . . . . . . . . . . . . . . . . . . . . . . . . . . . . . . . 3-9 3.8.2 PRGM GRAD . . . . . . . . . . . . . . . . . . . . . . . . . . . . . . . . . . . . . . . . . . . . . . . . . 3-9 3.8.3 HOLD . . . . . . . . . . . . . . . . . . . . . . . . . . . . . . . . . . . . . . . . . . . . . . . . . . . . . . . 3-9 3.8.4 RECALL . . . . . . . . . . . . . . . . . . . . . . . . . . . . . . . . . . . . . . . . . . . . . . . . . . . . . 3-9 3.8.5 STORE . . . . . . . . . . . . . . . . . . . . . . . . . . . . . . . . . . . . . . . . . . . . . . . . . . . . . . 3-9 3.8.6 REFILL . . . . . . . . . . . . . . . . . . . . . . . . . . . . . . . . . . . . . . . . . . . . . . . . . . . . . 3-9 3.8.7 LIMITS . . . . . . . . . . . . . . . . . . . . . . . . . . . . . . . . . . . . . . . . . . . . . . . . . . . . . . 3-9 3.8.8 RAPID PRESS . . . . . . . . . . . . . . . . . . . . . . . . . . . . . . . . . . . . . . . . . . . . . . . 3-11 3.8.9 DISP . . . . . . . . . . . . . . . . . . . . . . . . . . . . . . . . . . . . . . . . . . . . . . . . . . . . . . . 3-12 3.8.10 ACC CTRL . . . . . . . . . . . . . . . . . . . . . . . . . . . . . . . . . . . . . . . . . . . . . . . . . 3-12 3.8.11 ZERO PRESS . . . . . . . . . . . . . . . . . . . . . . . . . . . . . . . . . . . . . . . . . . . . . . . 3-12 3.9 Control of Multiple Pumps . . . . . . . . . . . . . . . . . . . . . . . . . . . . . . . . . . . . . . . . . . . 3-13 3.9.1 Multi-Pump Operation . . . . . . . . . . . . . . . . . . . . . . . . . . . . . . . . . . . . . . . . 3-13 3.9.2 Independent Control of up to Four Separate Pumps . . . . . . . . . . . . . . . . . 3-13 3.10 Operating Modes . . . . . . . . . . . . . . . . . . . . . . . . . . . . . . . . . . . . . . . . . . . . . . . . . . 3-14 3.10.1 Constant Flow . . . . . . . . . . . . . . . . . . . . . . . . . . . . . . . . . . . . . . . . . . . . . . 3-15 3.10.2 Constant Pressure . . . . . . . . . . . . . . . . . . . . . . . . . . . . . . . . . . . . . . . . . . . 3-15 3.10.3 Dispense Mode . . . . . . . . . . . . . . . . . . . . . . . . . . . . . . . . . . . . . . . . . . . . . . 3-16 3.11 External Control . . . . . . . . . . . . . . . . . . . . . . . . . . . . . . . . . . . . . . . . . . . . . . . . . . 3-17 3.12 External Control: Analog . . . . . . . . . . . . . . . . . . . . . . . . . . . . . . . . . . . . . . . . . . . 3-17 3.12.1 Wire connections . . . . . . . . . . . . . . . . . . . . . . . . . . . . . . . . . . . . . . . . . . . . 3-17 3.12.2 Preparation . . . . . . . . . . . . . . . . . . . . . . . . . . . . . . . . . . . . . . . . . . . . . . . . 3-17 3.12.3 External Control for Refill . . . . . . . . . . . . . . . . . . . . . . . . . . . . . . . . . . . . . 3-18 3.12.4 Calculation Examples . . . . . . . . . . . . . . . . . . . . . . . . . . . . . . . . . . . . . . . . 3-19 3.12.5 Setup . . . . . . . . . . . . . . . . . . . . . . . . . . . . . . . . . . . . . . . . . . . . . . . . . . . . . . 3-19 3.13 Remote RUN/STOP . . . . . . . . . . . . . . . . . . . . . . . . . . . . . . . . . . . . . . . . . . . . . . . . 3-19 3.13.1 Wire Connections . . . . . . . . . . . . . . . . . . . . . . . . . . . . . . . . . . . . . . . . . . . . 3-20 Section 4 Gradient Pumping for Pressure, Flow, and Concentration Modes 4.1 Introduction . . . . . . . . . . . . . . . . . . . . . . . . . . . . . . . . . . . . . . . . . . . . . . . . . . . . . . . . 4-1 4.2 Connecting the System . . . . . . . . . . . . . . . . . . . . . . . . . . . . . . . . . . . . . . . . . . . . . . . 4-2 4.2.1 Inlet Connections . . . . . . . . . . . . . . . . . . . . . . . . . . . . . . . . . . . . . . . . . . . . . . 4-4 4.2.2 Outlet Connections . . . . . . . . . . . . . . . . . . . . . . . . . . . . . . . . . . . . . . . . . . . . 4-5 4.3 Single-Pump Gradient Programming . . . . . . . . . . . . . . . . . . . . . . . . . . . . . . . . . . . 4-6 4.4 Dual Pump Concentration Gradient Programming . . . . . . . . . . . . . . . . . . . . . . . . 4-8 4.5 Review, Revise, & Hold Options. . . . . . . . . . . . . . . . . . . . . . . . . . . . . . . . . . . . . . . 4-10 4.6 Program Conclusion . . . . . . . . . . . . . . . . . . . . . . . . . . . . . . . . . . . . . . . . . . . . . . . . 4-10 xii HLf Series Syringe Pumps Table of Contents Section 5 Continuous Flow Introduction, Installation, & Operation 5.1 Introduction . . . . . . . . . . . . . . . . . . . . . . . . . . . . . . . . . . . . . . . . . . . . . . . . . . . . . . . . 5-1 5.2 Continuous Flow Air Valves . . . . . . . . . . . . . . . . . . . . . . . . . . . . . . . . . . . . . . . . . . . 5-1 5.2.1 Dual Air Valve Installation . . . . . . . . . . . . . . . . . . . . . . . . . . . . . . . . . . . . . . 5-2 5.3 User Supplied Valves . . . . . . . . . . . . . . . . . . . . . . . . . . . . . . . . . . . . . . . . . . . . . . . . 5-6 5.4 Continuous Flow Mode . . . . . . . . . . . . . . . . . . . . . . . . . . . . . . . . . . . . . . . . . . . . . . . 5-8 5.4.1 Defining Operation . . . . . . . . . . . . . . . . . . . . . . . . . . . . . . . . . . . . . . . . . . . . 5-8 5.4.2 Constant Flow Mode . . . . . . . . . . . . . . . . . . . . . . . . . . . . . . . . . . . . . . . . . . . 5-9 5.4.3 Constant Pressure Mode . . . . . . . . . . . . . . . . . . . . . . . . . . . . . . . . . . . . . . . 5-10 5.4.4 To Run or Stop . . . . . . . . . . . . . . . . . . . . . . . . . . . . . . . . . . . . . . . . . . . . . . . 5-11 5.4.5 Tips for Running Continuous Flow . . . . . . . . . . . . . . . . . . . . . . . . . . . . . . . 5-11 Section 6 Modbus Configuration 6.1 Overview . . . . . . . . . . . . . . . . . . . . . . . . . . . . . . . . . . . . . . . . . . . . . . . . . . . . . . . . . . 6.1.1 Modbus RTU . . . . . . . . . . . . . . . . . . . . . . . . . . . . . . . . . . . . . . . . . . . . . . . . . 6.1.2 Modbus TCP/IP . . . . . . . . . . . . . . . . . . . . . . . . . . . . . . . . . . . . . . . . . . . . . . . 6.1.3 Modbus Configuration Options . . . . . . . . . . . . . . . . . . . . . . . . . . . . . . . . . . . 6-1 6-1 6-2 6-2 Section 7 Serial Interface 7.1 7.2 7.3 7.4 7.5 7.6 7.7 7.8 Overview . . . . . . . . . . . . . . . . . . . . . . . . . . . . . . . . . . . . . . . . . . . . . . . . . . . . . . . . . . 7-1 Network Control and Communication . . . . . . . . . . . . . . . . . . . . . . . . . . . . . . . . . . . 7-2 USB Interface . . . . . . . . . . . . . . . . . . . . . . . . . . . . . . . . . . . . . . . . . . . . . . . . . . . . . . 7-3 Cabling for Serial Control. . . . . . . . . . . . . . . . . . . . . . . . . . . . . . . . . . . . . . . . . . . . . 7-3 7.4.1 One Controller . . . . . . . . . . . . . . . . . . . . . . . . . . . . . . . . . . . . . . . . . . . . . . . . 7-3 7.4.2 Two Controllers (Compiler required) . . . . . . . . . . . . . . . . . . . . . . . . . . . . . . 7-4 7.4.3 Three or More Controllers (Compiler required) . . . . . . . . . . . . . . . . . . . . . . 7-4 Serial Control Check List . . . . . . . . . . . . . . . . . . . . . . . . . . . . . . . . . . . . . . . . . . . . . 7-5 Controller Setup . . . . . . . . . . . . . . . . . . . . . . . . . . . . . . . . . . . . . . . . . . . . . . . . . . . . 7-5 7.6.1 Restore Defaults (if desired) . . . . . . . . . . . . . . . . . . . . . . . . . . . . . . . . . . . . . 7-5 7.6.2 Change Defaults . . . . . . . . . . . . . . . . . . . . . . . . . . . . . . . . . . . . . . . . . . . . . . 7-5 7.6.3 Verify Operation . . . . . . . . . . . . . . . . . . . . . . . . . . . . . . . . . . . . . . . . . . . . . . 7-6 User-written Software . . . . . . . . . . . . . . . . . . . . . . . . . . . . . . . . . . . . . . . . . . . . . . . 7-6 7.7.1 DASNET . . . . . . . . . . . . . . . . . . . . . . . . . . . . . . . . . . . . . . . . . . . . . . . . . . . . . 7-6 7.7.2 Universal Driver from Teledyne Isco . . . . . . . . . . . . . . . . . . . . . . . . . . . . . . 7-7 Serial Commands for the HLf Series Pump. . . . . . . . . . . . . . . . . . . . . . . . . . . . . . 7-15 7.8.1 Get Status Command . . . . . . . . . . . . . . . . . . . . . . . . . . . . . . . . . . . . . . . . . 7-20 7.8.2 Gradient Download Command . . . . . . . . . . . . . . . . . . . . . . . . . . . . . . . . . . 7-23 7.8.3 Gradient Upload Commands . . . . . . . . . . . . . . . . . . . . . . . . . . . . . . . . . . . . 7-24 7.8.4 Range Command . . . . . . . . . . . . . . . . . . . . . . . . . . . . . . . . . . . . . . . . . . . . . 7-28 7.8.5 Error Messages . . . . . . . . . . . . . . . . . . . . . . . . . . . . . . . . . . . . . . . . . . . . . . 7-29 Section 8 Pump Maintenance, Troubleshooting, and Servicing 8.1 Introduction . . . . . . . . . . . . . . . . . . . . . . . . . . . . . . . . . . . . . . . . . . . . . . . . . . . . . . . . 8.1.1 Service Department . . . . . . . . . . . . . . . . . . . . . . . . . . . . . . . . . . . . . . . . . . . . 8.1.2 How to Ship Returns . . . . . . . . . . . . . . . . . . . . . . . . . . . . . . . . . . . . . . . . . . . 8.2 General Cleaning. . . . . . . . . . . . . . . . . . . . . . . . . . . . . . . . . . . . . . . . . . . . . . . . . . . . 8.3 Resetting the System . . . . . . . . . . . . . . . . . . . . . . . . . . . . . . . . . . . . . . . . . . . . . . . . 8.3.1 Basic Reset . . . . . . . . . . . . . . . . . . . . . . . . . . . . . . . . . . . . . . . . . . . . . . . . . . . 8.3.2 Hard Reset . . . . . . . . . . . . . . . . . . . . . . . . . . . . . . . . . . . . . . . . . . . . . . . . . . . 8.4 Diagnostic Menu . . . . . . . . . . . . . . . . . . . . . . . . . . . . . . . . . . . . . . . . . . . . . . . . . . . . 8.4.1 LCD TEST . . . . . . . . . . . . . . . . . . . . . . . . . . . . . . . . . . . . . . . . . . . . . . . . . . . 8.4.2 ANALOG INPUTS . . . . . . . . . . . . . . . . . . . . . . . . . . . . . . . . . . . . . . . . . . . . . 8.4.3 KEYPAD TEST . . . . . . . . . . . . . . . . . . . . . . . . . . . . . . . . . . . . . . . . . . . . . . . 8.4.4 MOTOR CONTROL/LIMITS . . . . . . . . . . . . . . . . . . . . . . . . . . . . . . . . . . . . 8-2 8-2 8-2 8-3 8-3 8-3 8-3 8-4 8-4 8-4 8-5 8-5 xiii HLf Series Syringe Pumps Table of Contents 8.4.5 SERIAL TEST . . . . . . . . . . . . . . . . . . . . . . . . . . . . . . . . . . . . . . . . . . . . . . . . 8-6 8.5 Removing the Case Top. . . . . . . . . . . . . . . . . . . . . . . . . . . . . . . . . . . . . . . . . . . . . . . 8-7 8.5.1 Controller Case Top Removal . . . . . . . . . . . . . . . . . . . . . . . . . . . . . . . . . . . . 8-7 8.5.2 Pump Case Top Removal . . . . . . . . . . . . . . . . . . . . . . . . . . . . . . . . . . . . . . . . 8-8 8.6 Lubrication . . . . . . . . . . . . . . . . . . . . . . . . . . . . . . . . . . . . . . . . . . . . . . . . . . . . . . . . 8-8 8.6.1 Ball Nut . . . . . . . . . . . . . . . . . . . . . . . . . . . . . . . . . . . . . . . . . . . . . . . . . . . . . 8-9 8.7 Flushing the Cylinder . . . . . . . . . . . . . . . . . . . . . . . . . . . . . . . . . . . . . . . . . . . . . . . 8-10 8.7.1 Gas Solvent Changeover . . . . . . . . . . . . . . . . . . . . . . . . . . . . . . . . . . . . . . . 8-10 8.7.2 Liquid Solvent Changeover and Flushing . . . . . . . . . . . . . . . . . . . . . . . . . 8-10 List of Figures 1-1 100HLf refill flow rate range . . . . . . . . . . . . . . . . . . . . . . . . . . . . . . . . . . . . . . . . . . 1-6 1-2 260HLf refill flow rate range . . . . . . . . . . . . . . . . . . . . . . . . . . . . . . . . . . . . . . . . . . 1-6 1-3 500HLf refill flow rate range . . . . . . . . . . . . . . . . . . . . . . . . . . . . . . . . . . . . . . . . . . 1-7 1-4 1000HLf refill flow rate range . . . . . . . . . . . . . . . . . . . . . . . . . . . . . . . . . . . . . . . . . 1-7 1-5 Pump controller key functions . . . . . . . . . . . . . . . . . . . . . . . . . . . . . . . . . . . . . . . . . 1-8 1-6 Pump controller rear panel connectors . . . . . . . . . . . . . . . . . . . . . . . . . . . . . . . . . 1-10 1-7 Pump rear panel connectors . . . . . . . . . . . . . . . . . . . . . . . . . . . . . . . . . . . . . . . . . 1-11 1-8 Pump front panel controls . . . . . . . . . . . . . . . . . . . . . . . . . . . . . . . . . . . . . . . . . . . 1-12 1-9 Status Screen . . . . . . . . . . . . . . . . . . . . . . . . . . . . . . . . . . . . . . . . . . . . . . . . . . . . . 1-14 1-10 Four pump stop menu . . . . . . . . . . . . . . . . . . . . . . . . . . . . . . . . . . . . . . . . . . . . . 1-15 1-11 Three pump stop menu . . . . . . . . . . . . . . . . . . . . . . . . . . . . . . . . . . . . . . . . . . . . 1-16 2-1 Drain tube installation . . . . . . . . . . . . . . . . . . . . . . . . . . . . . . . . . . . . . . . . . . . . . . . 2-4 2-2 Drain tube installation and wash gland connection . . . . . . . . . . . . . . . . . . . . . . . . 2-5 2-3 Purge connector installation . . . . . . . . . . . . . . . . . . . . . . . . . . . . . . . . . . . . . . . . . . 2-6 2-4 Refill kit installation . . . . . . . . . . . . . . . . . . . . . . . . . . . . . . . . . . . . . . . . . . . . . . . . 2-7 2-5 Outlet valve package connection . . . . . . . . . . . . . . . . . . . . . . . . . . . . . . . . . . . . . . . 2-9 2-6 In-line filter package . . . . . . . . . . . . . . . . . . . . . . . . . . . . . . . . . . . . . . . . . . . . . . . 2-10 2-7 Cylinder insulation cover . . . . . . . . . . . . . . . . . . . . . . . . . . . . . . . . . . . . . . . . . . . . 2-11 2-8 System with temperature control jacket installed . . . . . . . . . . . . . . . . . . . . . . . . 2-12 2-9 Back pressure regulator . . . . . . . . . . . . . . . . . . . . . . . . . . . . . . . . . . . . . . . . . . . . . 2-14 3-1 Menu 1 program selections . . . . . . . . . . . . . . . . . . . . . . . . . . . . . . . . . . . . . . . . . . . 3-3 3-2 Units menu . . . . . . . . . . . . . . . . . . . . . . . . . . . . . . . . . . . . . . . . . . . . . . . . . . . . . . . . 3-3 3-3 Menu 2 program selections . . . . . . . . . . . . . . . . . . . . . . . . . . . . . . . . . . . . . . . . . . . 3-5 3-4 Serial option menu . . . . . . . . . . . . . . . . . . . . . . . . . . . . . . . . . . . . . . . . . . . . . . . . . . 3-6 3-5 Total volume reset . . . . . . . . . . . . . . . . . . . . . . . . . . . . . . . . . . . . . . . . . . . . . . . . . . 3-6 3-6 Menu 3 program selections . . . . . . . . . . . . . . . . . . . . . . . . . . . . . . . . . . . . . . . . . . . 3-7 3-7 Location of transducer midpoint value . . . . . . . . . . . . . . . . . . . . . . . . . . . . . . . . . . 3-8 3-8 Limits menu . . . . . . . . . . . . . . . . . . . . . . . . . . . . . . . . . . . . . . . . . . . . . . . . . . . . . . 3-10 3-9 Limits setpoint (Max Press) menu . . . . . . . . . . . . . . . . . . . . . . . . . . . . . . . . . . . . 3-10 3-10 Depiction of dispense mode sequence . . . . . . . . . . . . . . . . . . . . . . . . . . . . . . . . . 3-16 3-11 External control menu . . . . . . . . . . . . . . . . . . . . . . . . . . . . . . . . . . . . . . . . . . . . . 3-18 3-12 Button sequence for external control setup . . . . . . . . . . . . . . . . . . . . . . . . . . . . 3-19 4-1 Pump inlet connections . . . . . . . . . . . . . . . . . . . . . . . . . . . . . . . . . . . . . . . . . . . . . . 4-4 4-2 Pump outlet connections . . . . . . . . . . . . . . . . . . . . . . . . . . . . . . . . . . . . . . . . . . . . . 4-5 5-1 Air valve installation for 100HLf and 260HLf pumps . . . . . . . . . . . . . . . . . . . . . . 5-3 5-2 Air valve installation for 500HLf . . . . . . . . . . . . . . . . . . . . . . . . . . . . . . . . . . . . . . . . . . . . . . . . . 5-4 5-3 Air valve installation for 1000HLf pump . . . . . . . . . . . . . . . . . . . . . . . . . . . . . . . . 5-5 5-4 Keystrokes to specify valve type . . . . . . . . . . . . . . . . . . . . . . . . . . . . . . . . . . . . . . . 5-9 5-5 Keystrokes to reset volume totalizer . . . . . . . . . . . . . . . . . . . . . . . . . . . . . . . . . . . . 5-9 5-6 Keystrokes to set up constant flow . . . . . . . . . . . . . . . . . . . . . . . . . . . . . . . . . . . . 5-10 5-7 Keystrokes to set up constant pressure . . . . . . . . . . . . . . . . . . . . . . . . . . . . . . . . 5-10 5-8 Keystrokes to Run or Stop the pumps . . . . . . . . . . . . . . . . . . . . . . . . . . . . . . . . . . 5-11 6-1 RS-485 Connection . . . . . . . . . . . . . . . . . . . . . . . . . . . . . . . . . . . . . . . . . . . . . . . . . . 6-2 7-1 Serial network connection example - Single connection . . . . . . . . . . . . . . . . . . . . 7-4 7-2 Serial network connection example - Dual connection . . . . . . . . . . . . . . . . . . . . . . 7-4 xiv HLf Series Syringe Pumps Table of Contents 7-3 Get Status String “G” Command . . . . . . . . . . . . . . . . . . . . . . . . . . . . . . . . . . . . . . 7-21 7-4 Get Status String “GG” Command . . . . . . . . . . . . . . . . . . . . . . . . . . . . . . . . . . . . 7-21 7-5 Get All Status String “G&” Command . . . . . . . . . . . . . . . . . . . . . . . . . . . . . . . . . 7-22 7-6 Get all status strings from four pump operation “G&2” Command . . . . . . . . . . 7-23 7-7 Gradient Download Commands - Single pump flow gradient . . . . . . . . . . . . . . . 7-24 7-8 Gradient Download Commands - Two pump flow gradient . . . . . . . . . . . . . . . . . 7-25 7-9 Gradient Upload Commands - Single pump flow gradient . . . . . . . . . . . . . . . . . 7-26 7-10 Gradient Upload Commands - Two pump flow gradient . . . . . . . . . . . . . . . . . . 7-27 7-11 Upload Commands - Single pump pressure programming . . . . . . . . . . . . . . . . 7-28 7-12 Range Serial Commands . . . . . . . . . . . . . . . . . . . . . . . . . . . . . . . . . . . . . . . . . . . 7-28 8-1 Accessing the diagnostic menu . . . . . . . . . . . . . . . . . . . . . . . . . . . . . . . . . . . . . . . . 8-4 8-2 Analog Input diagnostic screen . . . . . . . . . . . . . . . . . . . . . . . . . . . . . . . . . . . . . . . . 8-4 8-3 Optical sensor, interrupted by flag (bottom sensor shown, rear tower cover plate removed) . . . . . . . . . . . . . . . . . . . . . . . . . . . . . . . . . . . . . . . . . . . . . . . . . . . . . . . . . . . 8-5 8-4 Serial connection to a computer . . . . . . . . . . . . . . . . . . . . . . . . . . . . . . . . . . . . . . . 8-6 8-5 Controller case top screws (2 of 4 shown) . . . . . . . . . . . . . . . . . . . . . . . . . . . . . . . . 8-8 8-6 Pump case top screws (3 of 6 shown) . . . . . . . . . . . . . . . . . . . . . . . . . . . . . . . . . . . . 8-8 8-7 Gear train lubrication and motor drive service . . . . . . . . . . . . . . . . . . . . . . . . . . . 8-9 List of Tables 1-1 1-2 1-3 1-4 1-5 1-6 1-7 1-8 1-9 2-1 2-2 2-3 2-4 2-5 3-1 4-1 4-2 4-3 5-1 5-2 5-3 6-1 6-2 6-3 6-4 6-5 6-6 7-1 100HLf Technical Specifications . . . . . . . . . . . . . . . . . . . . . . . . . . . . . . . . . . . . . . . 1-2 260HLf Technical Specifications . . . . . . . . . . . . . . . . . . . . . . . . . . . . . . . . . . . . . . . 1-3 500HLf Technical Specifications . . . . . . . . . . . . . . . . . . . . . . . . . . . . . . . . . . . . . . . 1-4 1000HLf Technical Specifications . . . . . . . . . . . . . . . . . . . . . . . . . . . . . . . . . . . . . . 1-5 Pump Controller Front Panel Label . . . . . . . . . . . . . . . . . . . . . . . . . . . . . . . . . . . . 1-8 Pump Controller Key Functions . . . . . . . . . . . . . . . . . . . . . . . . . . . . . . . . . . . . . . . 1-9 Pump Controller Rear Panel Connectors . . . . . . . . . . . . . . . . . . . . . . . . . . . . . . . 1-10 Pump Rear Panel Connectors . . . . . . . . . . . . . . . . . . . . . . . . . . . . . . . . . . . . . . . . 1-12 Pump Front Panel . . . . . . . . . . . . . . . . . . . . . . . . . . . . . . . . . . . . . . . . . . . . . . . . . 1-13 HLf Series Syringe Pump Accessory Packages . . . . . . . . . . . . . . . . . . . . . . . . . . . . 2-3 Manual Refill Kits . . . . . . . . . . . . . . . . . . . . . . . . . . . . . . . . . . . . . . . . . . . . . . . . . . 2-7 Manual Outlet Valve Kits . . . . . . . . . . . . . . . . . . . . . . . . . . . . . . . . . . . . . . . . . . . . 2-9 Optional in-line Filter Package 68-1247-011 . . . . . . . . . . . . . . . . . . . . . . . . . . . . . 2-9 Recommended Circulating Bath Volumes . . . . . . . . . . . . . . . . . . . . . . . . . . . . . . 2-13 Key functions in the Multi-pump Mode . . . . . . . . . . . . . . . . . . . . . . . . . . . . . . . . 3-13 Manual Refill Valve Kits . . . . . . . . . . . . . . . . . . . . . . . . . . . . . . . . . . . . . . . . . . . . . 4-1 Manual Outlet Valve Kits . . . . . . . . . . . . . . . . . . . . . . . . . . . . . . . . . . . . . . . . . . . . 4-2 Swaging Detail . . . . . . . . . . . . . . . . . . . . . . . . . . . . . . . . . . . . . . . . . . . . . . . . . . . . . 4-2 Continuous Flow Technical Specifications-Air Valves: . . . . . . . . . . . . . . . . . . . . . 5-2 Accessory Control Digital Outputs . . . . . . . . . . . . . . . . . . . . . . . . . . . . . . . . . . . . . 5-6 Key functions in the Multi-pump Mode . . . . . . . . . . . . . . . . . . . . . . . . . . . . . . . . . 5-8 Modbus TCP/IP Configuration Options . . . . . . . . . . . . . . . . . . . . . . . . . . . . . . . . . 6-3 Modbus RTU Configuration Options . . . . . . . . . . . . . . . . . . . . . . . . . . . . . . . . . . . . 6-3 Supported Modbus Function Codes . . . . . . . . . . . . . . . . . . . . . . . . . . . . . . . . . . . . . 6-3 Exception Responses . . . . . . . . . . . . . . . . . . . . . . . . . . . . . . . . . . . . . . . . . . . . . . . . 6-3 Coils . . . . . . . . . . . . . . . . . . . . . . . . . . . . . . . . . . . . . . . . . . . . . . . . . . . . . . . . . . . . . . 6-4 Holding Registers . . . . . . . . . . . . . . . . . . . . . . . . . . . . . . . . . . . . . . . . . . . . . . . . . . . 6-8 RS-232 External control connector serial pin connections . . . . . . . . . . . . . . . . . . . . . . . . . . . . . . . . . . . . . . . . . . . . . . . 7-2 7-2 USB Interface Pin Connections (on the USB/Ethernet connector) . . . . . . . . . . . . . . . . . . . . . . . . . . . . . . . . . . . . . . 7-3 7-3 Example of BASIC program to demonstrate conversion of pump commands to DASNET frames . . . . . . . . . . . . . . . . . . . . . . . 7-8 7-4 Example of C program to demonstrate conversion of pump commands to DASNET frames . . . . . . . . . . . . . . . . . . . . . . . 7-9 xv HLf Series Syringe Pumps Table of Contents 7-5 Serial Commands . . . . . . . . . . . . . . . . . . . . . . . . . . . . . . . . . . . . . . . . . . . . . . . . . . 7-15 7-6 Error Messages . . . . . . . . . . . . . . . . . . . . . . . . . . . . . . . . . . . . . . . . . . . . . . . . . . . . 7-29 xvi HLf Series Syringe Pumps Section 1 Introduction 1.1 Introduction This manual is intended to instruct the user on pump installation. 1.2 Specifications The technical specifications for the HLf Series Syringe Pumps are detailed in Tables 1-1 through 1-4. Note This equipment is suitable for use in Class I, Division 2, Groups A, B, C, and D, T4; hazardous locations and non-hazardous locations only. WARNING Explosion Hazard. Substitution of components may impair suitability for use in Class I, Division 2 environments. WARNING Connecting devices to energized circuits may cause personal injury or property damage. Power must be removed from the pump before connecting external devices. WARNING Explosion Hazard. The area must be known to be non-hazardous before servicing/replacing the unit and before installing or removing I/O wiring. Do not disconnect equipment unless power had been disconnected and the area is known to be non-hazardous 1-1 HLf Series Syringe Pumps Section 1 Introduction Table 1-1 100HLf Technical Specifications POWER REQUIREMENTS 117 ± 12 Vac, 3.2 A maximum 234 ± 23 Vac, 1.6 A maximum See section 1.5. } Factory Set LINE FREQUENCY 50 or 60 Hz LINE VOLTAGE NOISE TOLERANCE 1.7 nominal rms line voltage, 10 µsecond pulses, any phase angle, random or repetitive DIMENSIONS PUMP Width: 27.18 cm Depth: 46.74 cm Height: 101.09 cm WEIGHT PUMP 32.8 kg FLOW RATE RANGE CONTROLLER 27.18 cm 30.48 cm 13.59 cm CONTROLLER 2.96 kg 0.01 µl/min to 60 ml/min (at any pressure from 0 to 689.5 bar) a FLOW RATE ACCURACY ± 0.3% (maximum 0.25 µl/min seal leakage) FLOW RATE DISPLAY RESOLUTION 0.01 µl/min (1.0 µl/min in Constant Pressure Mode) ANALOG OUTPUT ACCURACYb ± 1% of selected range DISPLACEMENT RESOLUTION 3.86 nl REFILL TIME 1.72 minutes REFILL OR DEPRESSURIZATION RATE 0.01 µl/min to 60 ml/min for any pressure up to 551.5 bar. For higher pressures see Figure 1-1. PRESSURE RANGE 0.6895 to 689.5 bar PRESSURE ACCURACY ± 0.5% of full scale at constant temperature c PRESSURE REPEATABILITY ± 0.5% of full scale within 48 hours at constant temperature ZERO PRESSURE DRIFT ± 0.25% of full scale within 48 hours at constant temperature PRESSURE DISPLAY RESOLUTION 6.895 kPa AMBIENT TEMPERATURE RANGE 5 to 40°C TEMPERATURE DRIFT ± 0.12% of full scale/°C HUMIDITY 95% maximum CYLINDER CAPACITY 102.93 ml d DEAD (HEADSPACE) VOLUME 1.30 ± 0.020 ml POLLUTION DEGREE 2 INSTALLATION CATEGORY II MAXIMUM ALTITUDE 2000 m a. Using water at 137.9 bar and a temperature controlled environment at 30°C. b. The analog output is an optional accessory. c. Pressure repeatability specification is based upon re-zeroing pressure transducer every 48 hours. Refer to sub-section ZERO PRESS in Section 3 of the manual for re-zeroing procedure. d. Volume in and above the piston seal, head clearance at automatic shutoff, and inlet and outlet ports to the fittings. 1-2 HLf Series Syringe Pumps Section 1 Introduction Table 1-2 260HLf Technical Specifications POWER REQUIREMENTS 117 ± 12 Vac, 3.2 A maximum 234 ± 23 Vac, 1.6 A maximum See section 1.5. } Factory Set LINE FREQUENCY 50 or 60 Hz LINE VOLTAGE NOISE TOLERANCE 1.7 nominal rms line voltage, 10 µsecond pulses, any phase angle, random or repetitive DIMENSIONS PUMP Width: 27.18 cm Depth: 46.74 cm Height: 101.09 cm WEIGHT PUMP 32.8 kg FLOW RATE RANGE FLOW RATE CONTROLLER 2.96 kg 1.0 µl/min to 107 ml/min at any pressure from 0 to 517.1 bar ACCURACYa ± 0.5% (maximum 0.50 µl/min seal leakage) FLOW RATE DISPLAY RESOLUTION ANALOG OUTPUT CONTROLLER 27.18 cm 30.48 cm 13.59 cm ACCURACYb 1.0 µl/min ± 1% of selected range DISPLACEMENT RESOLUTION 6.65 nl REFILL TIME 2.5 minutes REFILL OR DEPRESSURIZATION RATE 1.0 µl/min to 107 ml/min for any pressure up to 276.1 bar. For higher pressures see Figure 1-2. PRESSURE RANGE 0.6895 to 517.1 bar PRESSURE ACCURACY ± 0.5% of full scale at constant temperature c PRESSURE REPEATABILITY ± 0.5% of full scale within 48 hours at constant temperature ZERO PRESSURE DRIFT ± 0.25% of full scale within 48 hours at constant temperature PRESSURE DISPLAY RESOLUTION 6.895 kPa AMBIENT TEMPERATURE RANGE 5 to 40°C TEMPERATURE DRIFT ± 0.15% of full scale/°C HUMIDITY 95% maximum CYLINDER CAPACITY 266.05 ml d DEAD (HEADSPACE) VOLUME 2.10 ± 0.020 ml POLLUTION DEGREE 2 INSTALLATION CATEGORY II MAXIMUM ALTITUDE 2000 m a. Using water at 137.9 bar and a temperature controlled environment at 30°C. b. The analog output is an optional accessory. c. Pressure repeatability specification is based upon re-zeroing pressure transducer every 48 hours. Refer to sub-section ZERO PRESS in Section 3 of the manual for re-zeroing procedure. d. Volume in and above the piston seal, head clearance at automatic shutoff, and inlet and outlet ports to the fittings. 1-3 HLf Series Syringe Pumps Section 1 Introduction Table 1-3 500HLf Technical Specifications POWER REQUIREMENTS 117 ± 12 Vac, 3.2 A maximum 234 ± 23 Vac, 1.6 A maximum See Section 1.5 } Factory Set LINE FREQUENCY 50 or 60 Hz LINE VOLTAGE NOISE TOLERANCE 1.7 nominal rms line voltage, 10 µsecond pulses, any phase angle, random or repetitive DIMENSIONS PUMP Width: 27.18 cm Depth: 46.74 cm Height: 102.36 cm WEIGHT PUMP 33.25 kg FLOW RATE RANGE FLOW RATE CONTROLLER 2.96 kg 1.0 µl/min to 204 ml/min at any pressure from 0 to 258.6 bar ACCURACYa ± 0.5% (maximum 1.0 µl/min seal leakage) FLOW RATE DISPLAY RESOLUTION ANALOG OUTPUT CONTROLLER 27.18 cm 30.48 cm 13.59 cm ACCURACYb 1.0 µl/min ± 1% of selected range DISPLACEMENT RESOLUTION 12.68 nl REFILL TIME 2.5 minutes REFILL OR DEPRESSURIZATION RATE 1.0 µl/min to 204 ml/min for any pressure up to 137.8 bar. For higher pressures see Figure 1-3. PRESSURE RANGE 0.6895 to 258.6 bar PRESSURE ACCURACY ± 0.5% of full scale at constant temperature c PRESSURE REPEATABILITY ± 0.5% of full scale within 48 hours at constant temperature ZERO PRESSURE DRIFT ± 0.25% of full scale within 48 hours at constant temperature PRESSURE DISPLAY RESOLUTION 6.895 kPa AMBIENT TEMPERATURE RANGE 5 to 40°C TEMPERATURE DRIFT ± 0.15% of full scale/°C HUMIDITY 95% maximum CYLINDER CAPACITY 507.38 ml DEAD (HEADSPACE) VOLUMEd 4.00 ± 0.020 ml POLLUTION DEGREE 2 INSTALLATION CATEGORY II MAXIMUM ALTITUDE 2000 m a. Using water at 137.9 bar and a temperature controlled environment at 30°C. b. The analog output is an optional accessory. c. Pressure repeatability specification is based upon re-zeroing pressure transducer every 48 hours. Refer to sub-section ZERO PRESS in Section 3 of the manual for re-zeroing procedure. d. Volume in and above the piston seal, head clearance at automatic shutoff, and inlet and outlet ports to the fittings. 1-4 HLf Series Syringe Pumps Section 1 Introduction Table 1-4 1000HLf Technical Specifications POWER REQUIREMENTS See section 1.5, Installation Instructions 117 ± 12 Vac, 3.2 A maximum 234 ± 23 Vac, 1.6 A maximum } Factory Set LINE FREQUENCY 50 or 60 Hz LINE VOLTAGE NOISE TOLERANCE 1.7 nominal rms line voltage, 10 µsecond pulses, any phase angle, random or repetitive DIMENSIONS PUMP Width: 27.18 cm Depth: 46.74 cm Height: 102.36 cm WEIGHTa PUMP 38.5 kg FLOW RATE RANGE FLOW RATE CONTROLLER 27.18 cm 30.48 cm 13.59 cm CONTROLLER 2.96 kg 1.0 µl/min to 408 ml/min at any pressure from 0 to 137.9 bar ACCURACYb ± 0.5% (maximum 1.5 µl/min seal leakage) FLOW RATE DISPLAY RESOLUTION ANALOG OUTPUT ACCURACY c 1.0 µl/min ± 1% of selected range DISPLACEMENT RESOLUTION 25.36 nl REFILL TIME 2.5 minutes REFILL OR DEPRESSURIZATION RATE 1.0 µl/min to 408 ml/min for any pressure up to 68.9 bar. For higher pressures see Figure 1-4. PRESSURE RANGE 0.6895 to 137.9 bar PRESSURE ACCURACY ± 0.5% of full scale at constant temperature d PRESSURE REPEATABILITY ± 0.5% of full scale within 48 hours at constant temperature ZERO PRESSURE DRIFT ± 0.25% of full scale within 48 hours at constant temperature PRESSURE DISPLAY RESOLUTION 6.895 kPa AMBIENT TEMPERATURE RANGE 5 to 40°C TEMPERATURE DRIFT ± 0.12% of full scale/°C HUMIDITY 95% maximum CYLINDER CAPACITY 1015.0 ml DEAD (HEADSPACE) VOLUMEe 11.0 ± 0.7 ml POLLUTION DEGREE 2 INSTALLATION CATEGORY II MAXIMUM ALTITUDE 2000 m a. A team lift is recommended when moving this instrument. b. Using water at 137.9 bar and a temperature controlled environment at 30°C. c. The analog output is an optional accessory. d. Pressure repeatability specification is based upon re-zeroing pressure transducer every 48 hours. Refer to sub-section ZERO PRESS in Section 3 of the manual for re-zeroing procedure. e. Volume in and above the piston seal, head clearance at automatic shutoff, and inlet and outlet ports to the fittings. 1-5 HLf Series Syringe Pumps Section 1 Introduction 100HLf Refill Flow Rate Range 65 60 55 Refill Flow Rate (ml/min) 50 45 40 35 30 25 20 15 10 5 0 0 50 100 150 200 250 300 350 400 450 500 550 600 650 700 Pressure (bar) Refill Flow Rate (ml/min) Maximum Pressure (bar) 0.0001 to 50 689.5 50 to 60 (100- Refill Flow Rate) x 13.789 Figure 1-1 100HLf refill flow rate range 260HLf Refill Flow Rate Range 110 100 90 Refill Flow Rate (ml/min) 80 70 60 50 40 30 20 10 0 0 25 50 75 100 125 150 175 200 225 250 275 300 325 350 375 400 425 450 475 500 525 550 Pressure (bar) Refill Flow Rate (ml/min) Maximum Pressure (bar) 0.001 to 64 517.1 64 to 107 (156.2- Refill Flow Rate) x 5.612 Figure 1-2 260HLf refill flow rate range 1-6 HLf Series Syringe Pumps Section 1 Introduction 500HLf Refill Flow Rate Range 200 180 Refill Flow Rate (ml/min) 160 140 120 100 80 60 40 20 0 0 20 40 60 80 100 120 140 160 180 200 220 240 260 Pressure (bar) Refill Flow Rate (ml/min) Maximum Pressure (bar) 0.001 to 122 258.6 122 to 204 (297.72- Refill Flow Rate) x 1.471 Figure 1-3 500HLf refill flow rate range Refill Flow Rate (ml/min) 1000HLf Refill Flow Rate Range 425 400 375 350 325 300 275 250 225 200 175 150 125 100 75 50 25 0 0 10 20 30 40 50 60 70 80 90 100 110 120 130 140 150 Pressure (bar) Refill Flow Rate (ml/min) Maximum Pressure (bar) 0.001 to 250 137.9 250 to 408 (566- Refill Flow Rate) x 0.4364 Figure 1-4 1000HLf refill flow rate range 1-7 HLf Series Syringe Pumps Section 1 Introduction 1.3 Unpacking After removing the pump, controller, and accessories from the shipping carton, examine them for signs of shipping damage. Be sure no internal parts have shaken loose in transit. If there is any shipping damage, file a claim with the delivering carrier immediately. Compare the contents of the boxes with the enclosed packing slip. If there are shortages, contact Teledyne Isco immediately. 1.4 Controls and Indicators The pump controller regulates all pumping functions. It is designed to sit on top of the pump base, but may be located elsewhere, according to safety and convenience. Programming and setup are performed using the keypad on the front panel. The controller front panel is shown in Figure 1-5 and described in Table 1-5. Table 1-6 explains the key functions. The rear panel of the pump controller contains several input and output connectors, explained in Table 1-7, and shown in Figure 1-6. The only operational control on the pump itself is the power switch, shown in Figure 1-8. The rear panel has several connectors, described in Table 1-8, and shown in Figure 1-7. Figure 1-5 Pump controller key functions Table 1-5 Pump Controller Front Panel Label Item No. on Figure 1-5 1-8 Connector Description 1 Programming keypad Used to program controller. 2 Softkeys Labeled A, B, C, and D; used to select menu items displayed directly above them. 3 Liquid crystal display 40 Characters 4 line. HLf Series Syringe Pumps Section 1 Introduction Table 1-6 Pump Controller Key Functions Key Description A, B, C, D Softkeys; used to select displayed options. PRGM GRAD Puts the pump in gradient mode and accesses the softkey driven gradient programming. CONST PRESS Constant pressure: Puts pump in constant pressure mode. CONST FLOW Constant flow: Puts pump in constant flow rate mode. STORE Stores the current program in nonvolatile memory and exits programming mode. LIMITS Displays and allows changes to the maximum and minimum pressure and flow rate limits. RAPID PRESS Rapid pressure: Allows rapid pressurization to the stable pressure point and then switches automatically to constant flow. (Available in constant flow mode only.) NOTE: This feature is automatic, i.e. RAPID PRESS is pressed only once and the user does not enter a pressure; although, entering a target pressure may speed equilibration. RECALL Replaces the current program with one recalled from nonvolatile memory. ACC CTRL Accessory control: Manually operates accessories such as valves. ZERO PRESS Zero pressure: Sets pressure display to zero. Active only from -750 to +750 psi. CLEAR ENTRY Clear the last digit entered from the numeric key. MENU Accesses software to set operational modes, units, and other optional parameters. DISP Activates dispense mode (refer to Section 3.10.3). HOLD Freezes the program clock. The unit will continue at the current gradient parameters. REFILL Turns on pump drive motor to move piston downward at a rate previously programmed. RUN Turns on pump drive motor to move piston upward in a previously programmed mode, such as “CONSTANT FLOW” or “CONSTANT PRESSURE.” STOP Stops the drive motor. ENTER Enters selected values to memory. NUMBER KEYS These keys are used to make menu selections and enter values when setting parameters. Note A more in-depth explanation of the keypad is provided in Section 3 Basic Programming and Operation, under Section 3.8 Front Panel Keys. 1-9 HLf Series Syringe Pumps Section 1 Introduction 10 9 1 8 2 3 7 4 6 5 Figure 1-6 Pump controller rear panel connectors WARNING Explosion Hazard. The area must be known to be non-hazardous before servicing/replacing the unit and before installing or removing I/O wiring. Do not disconnect equipment unless power had been disconnected and the area is known to be non-hazardous Table 1-7 Pump Controller Rear Panel Connectors Item No. on Figure 1-6 Connector Description 1 PUMP D This connector is only used during multiple pump operation. The control cable from the rear panel of the fourth pump is attached to this connector. 2 PUMP C This connector is only used during multiple pump operation. The control cable from the rear panel of the third pump is attached to this connector. 3 PUMP B This connector is only used during multiple pump operation. The control cable from the rear panel of the second pump is attached to this connector. 4 PUMP A This plug connects the control cable from the pump rear panel. This connection should be secured with the thumbscrews. IMPORTANT: The pump A connector is the only input power connector on the rear panel of the controller. During single pump operation, the pump must be attached to this connector to supply power to the controller. WARNING Do not connect or disconnect the control cable when the pump is connected to the mains voltage. 1-10 HLf Series Syringe Pumps Section 1 Introduction 5 ACCESSORY These terminals allow connection of input and output signals (such as analog controls and external RUN/STOP). 6 RS-232/RS-485 This serial port connector may be used with an RS-232 or RS-485 cable to place the pump under remote control. Refer to Section 7 for RS-232 and Section 6 for RS-485 pin connections. 7 USB/ETHERNET This connector may be used with a USB or Ethernet cable. Refer to Section 7 for USB pin connections and Section 6 for Ethernet pin connections. 8 4-20mA OUTPUT, DIGITAL I/O Optional circuit provides 4-20mA current loop output and additional digital inputs and outputs. 9 SERIAL TAG This tag indicates the serial number of the instrument. 10 CHASSIS GROUND Ground point for high static or remote controller installations. Figure 1-7 Pump rear panel connectors WARNING Explosion Hazard. The area must be known to be non-hazardous before servicing/replacing the unit and before installing or removing I/O wiring. Do not disconnect equipment unless power had been disconnected and the area is known to be non-hazardous 1-11 HLf Series Syringe Pumps Section 1 Introduction Table 1-8 Pump Rear Panel Connectors Item No. on Figure 1-7 Connector Description 1 Pressure transducer The pressure transducer cable must be plugged in for the pump to operate. 2 Control cable This cable connects the pump to the controller. 3 Chassis ground Ground point for high static installations. 4 Fuse Label 234 VAC Replace with Part Number 41-1461-264 117 VAC Replace with Part Number 41-1461-271 5 Main Fuses Call Teledyne Isco for replacement. 6 AC Main Power 120 Volt Systems: Green/Yellow- Earth Black- AC hot White-AC neutral 234 Volt Systems: Green/Yellow- Earth Brown- AC hot Blue- AC neutral WARNING Do not separate connections when circuits are energized. AC main power must be permanently wired to the AC power source. Never attach a plug or power cord to the wires. All input and output circuits must be wired using Division 2 wiring methods as specified in Article 501-4(b) of the National Electrical Code, NFPA 70 for installations in the U.S. In other countries local codes apply. Figure 1-8 Pump front panel controls 1-12 HLf Series Syringe Pumps Section 1 Introduction Table 1-9 Pump Front Panel Item No. on Figure 1-8 1 Connector Description Mains power switch Disconnects power from the pump circuits for setup changes, such as connecting the controller. “1” = mains power is applied to the pump circuitry. “0” = mains power is removed from the pump circuitry. 1.5 Electrical Connections The pump controller may be placed on top of the pump. Power is supplied to the pump controller through the control cable. CAUTION All connections between the pump and controller should be made BEFORE the pump is connected to mains power. 1. Connect the pressure transducer cable (which originates from the top of the pump cylinder) to the nine pin sub-D PRESSURE TRANSDUCER connector on the pump rear panel (Figure 1-7). Be sure to tighten the screws. 2. Connect the control cable (which originates from the pump rear panel) to the PUMP A connector on the rear panel of the controller (Figure 1-6), and tighten the screws. This cable must be plugged into the PUMP A connector. There are four PUMP connectors on the rear of the controller. Only PUMP A is wired to supply power to the controller; therefore, one pump must be attached to the PUMP A connector. 3. Check the serial number tag to make sure the voltage rating of the pump is correct. WARNING Do not make or separate connections while circuits are energized. AC mains power must be permanently wired to the AC power source. Never attach a plug or power cord to the wires. Electrical connections must be made according to governing directives. 4. Connect the AC Mains Power wiring from PUMP A to an AC power source. All input and output circuits must be wired using Division 2 wiring methods as specified in Article 501-4(b) of the National Electrical Code, NFPA 70 for installations. 1-13 HLf Series Syringe Pumps Section 1 Introduction 1.6 Preliminary Checkout Hard reset After the electrical connections have been completed, follow this brief test of the pump’s operation: Perform a hard reset: 1. Ensure that power has been removed from the pump controller. 2. Press and hold the CLEAR ENTRY key on the front panel keypad. 3. While holding the CLEAR ENTRY key, apply power to the pump controller. Keep the CLEAR ENTRY key pressed for one second. 4. Release the key. 5. Execute a system reset (described next). System Reset A system reset completely clears any user programmed settings. It will erase all programs and return units and limits to factory settings. If the ZERO PRESS key has been used, the corrected offsets will be lost. This resets all pumps that are connected to the controller. 1. Press the orange MENU key. 2. Select number 5. SYSTEM RESET. 3. Press softkey A, CONTINUE. Note System Checks Preliminary checkout the pump is performed without fluid in the pump. 1. The display will briefly show the software revision on the first line; and the pump model(s) connected to the controller on the following lines, Figure 1-9. PUMP CONTROLLER ISCO, INC. REV ______ <PUMP TYPE> Figure 1-9 Status Screen 2. Check the upper left corner of the controller screen. The current pump mode will be presented in a two-letter abbreviation, e.g. CF for constant flow. This will be followed by a lowercase letter indicating the current pump, e.g. lowercase “a” indicates that pump A is the current pump. The current pump is the one for which parameters are being set. a. If a pump other than pump A is currently selected: On the lower right corner of the screen, directly over softkey D, are the words “SELECT PUMP.” 1-14 HLf Series Syringe Pumps Section 1 Introduction Press softkey D and then softkey A to select pump A. The display will automatically switch to the run screen, and “a” will be displayed in the upper left corner. 3. Press the orange MENU key on the controller front panel. 4. Press number 1 to select UNITS. 5. Press number 3 to select PSI for the pressure units. 6. Press number 5 to select ML/MIN for the flow units. The first line of the display will show the selected units. 7. Press softkey D, PREVIOUS, to return to the main menu. 8. Press softkey D, RETURN, to exit the main menu. 9. Push the blue CONST FLOW key to set the pump mode to constant flow. CFa will be displayed in the upper left corner of the screen. 10. Press softkey A, FLOW RATE. The words “ENTER FLOW RATE” should flash on the display. Use the numeric keys to enter “1”, “0”, a flow rate of 10 ml/min. Press the ENTER key to load this setpoint. Note If you make an error, press the orange CLEAR ENTRY key to delete it. 11. Press the blue RUN key. Observe the flow rate displayed on the first line. After a few moments, the setpoint and flow rate display should match. 12. Once the setpoint and flow rate match, press the STOP key. a. If four pumps are connected to the controller, you will be prompted to press A to stop pump A, B to stop pump B, C to stop pump C, D to stop pump D, or STOP to stop all pumps. PRESS RUN KEY TO ESCAPE PRESS STOP KEY TO STOP ALL PUMP A A PUMP B PUMP C PUMP D B C D Figure 1-10 Four pump stop menu b. Otherwise, you will be prompted to press A to stop pump A, B to stop pump B, C to stop pump C, or D to stop all pumps. 1-15 HLf Series Syringe Pumps Section 1 Introduction PRESS RUN KEY TO ESCAPE PRESS ‘ALL PUMP’ OR STOP KEY TO STOP ALL PUMP A A PUMP B PUMP C ALL PUMP B C D Figure 1-11 Three pump stop menu If you encountered any problems during the preliminary checkout, please contact the Teledyne Isco Service Department. The number is (800) 775-2965 or (402) 464-0231. 1-16 HLf Series Syringe Pumps Section 2 Fluid System Connections & Accessories 2.1 Introduction This section discusses general fluid system connections, and the installation of fluid connection accessories, temperature and pressure control accessories, and optional kits and attachments. DANGER RISK OF INJURY. THIS EQUIPMENT PRODUCES HAZARDOUS PRESSURES. USE APPROPRIATE TUBING AND CONNECTIONS AS INSTRUCTED. Note When operating at flow rates at or below 500 µl/min, it is strongly suggested that an temperature control jacket be installed. See Sections . 2.2 Fluid System Connections 2.2.1 Ports All HLf Series pump models connect similarly, but with varying port sizes. Take care to follow the tips provided to ensure safety and proper operation. There are two ports in the pump standard cylinder cap. Either port can serve as the inlet or outlet. You may plug one port and use a single port as both the inlet and outlet. Standard port information • 1000HLf - 14" NPT • 100HLf, 260HLf- 18" Valco • 500HLf - 18" NPT Note Custom caps are available with different port configurations and sizing. Contact the factory for details. 2-1 HLf Series Syringe Pumps Section 2 Fluid System Connections & Accessories 2.3 Fluids Certified for Isco HLf Pumps WARNING Pumping fluids that are not compatible with the HLf Series Pump may damage critical components, resulting in property damage, personal injury, or even death. Users who pump fluids other than those listed below do so at their own risk. The fluid-contacting materials within the HLf Series Syringe Pump have been tested and certified to be compatible with the following fluids: • ethane • ethylene • propane • propylene • butane • butadiene • hexane • gasoline • diesel fuel • jet fuel • ammonia • methanol • isopropanol • acetone • acetonitrile • heptane • benzene • ethylbenzene • methane Consult with Isco before using any chemical not listed above. 2.3.1 Installation Tips • Be sure to keep the tubing as straight as possible at the end, as this will make it easier to install the ferrules. • Be sure to cut the ends of the tubing squarely. • Do not leave burrs on the ends of the tubing. • When installing ferrules on the tubing, be sure the tubing extends beyond the ferrule to allow for proper crimping. • If the connection leaks, retighten fittings. • Push the tubing completely into the port before tightening the nut. • When connections are made to the cylinder cap, the pressure reading may be affected. If the pressure no longer reads zero, release all pressure inside the pump, then press ZERO PRESSURE on the front panel of the controller to readjust. 2.3.2 Tubing Requirements The tubing must be cut squarely to prevent possible problems. Square ends are easier to insert through the ferrule, and will decrease dead volume. Purchased cut tubing Electrochemically machined steel tubing should be used throughout the plumbing system. Electrochemically machined tubing has flat, burr-free ends, and is free of cutting residues. This tubing is available pre-cut through many chromatographic supply distributors in assorted lengths. Cutting the tubing A less desirable alternative is to purchase a tubing cutter designed to handle steel tubing. For quick fixes, the tubing may also be cut by hand. 2-2 HLf Series Syringe Pumps Section 2 Fluid System Connections & Accessories CAUTION Wear goggles to perform the following procedure. Tools required: Fine jewelers file, goggles, and two pairs of pliers 1. Using the jewelers file, score the tubing around its entire circumference. 2. Secure the tubing with pliers on either side of the score line with approximately 1.5mm between each pair of pliers and the score line. Do not squeeze the tubing too tightly, as this will flatten or deform its exterior. 3. Bend the tubing back and forth to crack it at the score line. 4. It may be necessary to deburr the outer tubing ends with the file. Make sure the tubing ends are clean and the inner bore is clear before installing the cut tube. Note It is often impossible to remove a burr that blocks the inner bore. 2.3.3 Accessory Packages Installation The accessory packages for all pumps contain fittings that allow you to attach tubing to the pump. Note that the tubing is not included. 1. Slide first the nut and then the ferrule over the tubing. 2. Push the tubing all the way into the port. 3. Hold the tubing in place and tighten the nut. Table 2-1 HLf Series Syringe Pump Accessory Packages 2.3.4 Draining Overflow Pump Model Part Number 1000HLf 60-1269-010 500HLf 60-1269-011 260HLf 60-1269-012 100HLf 60-1269-013 The drip tray outlet on the pump cylinder provides a means of draining fluid from seal leakage. Use the 14" ID flexible tubing included with the accessory package to divert the leakage away from the pump. To install the drain tube, push one end of the tubing over the end of the drip tray outlet, as shown in Figure 2-1. Note The 1000HLf has two drain tube outlets, one for the drip tray, and one for the splash pan, located at the bottom of the pump (see Figure 2-2). The 1000HLf also includes a wash gland as a 2-3 HLf Series Syringe Pumps Section 2 Fluid System Connections & Accessories standard feature (see the following section for details). The wash gland tubes can also be used as lines for draining away fluid. Drip tray outlet Figure 2-1 Drain tube installation 2.3.5 Cylinder Washing: Wash Gland A thin film of liquid wets the inside of the cylinder each time the piston travels up the cylinder. The lowest flow rates are conducive to the most abrasive or corrosive pumping environments, as the deposited film remains on the inside of the cylinder wall for the longest time. The Model 1000HL f syringe pump is equipped for cylinder washing, with two 1/8" tubes on the back to feed and drain the wash gland, as shown in Figure 2-2 on the following page. A small pump can be used to deliver the wash fluid through one of the two tubes to rinse the cylinder and seals. The second tube drains the wash fluid to waste. If the system is configured to recirculate the wash fluid, ensure that you change the wash fluid at regular intervals. Select a wash fluid that will best flush the cylinder of any residue left by the pumped fluid, yet will not damage the seals. CAUTION The pressure in the wash gland and line should NEVER exceed the system pressure or the wash pressure limit as labeled on the pump. Units with a wash pressure limit label can be damaged if the pressure is exceeded. Note If the primary pump seal fails, the pressure of the delivery fluid will be exerted on the secondary (wash gland) seal. During operation, the wash gland outlet should always be uncapped and routed for either recirculation or drainage. 2-4 HLf Series Syringe Pumps Section 2 Fluid System Connections & Accessories Detailed information about pumping salt solutions and brines is available in technical bulletin TB04 Pumping Salt Solutions and Brines. Nitrogen purge port (1000D only) Drip tray outlet 1/8” Wash Gland Tubes Wash gland tubes 1/8” Tubing* Splash pan outlet Pump* Outlet Fluid* Inlet Fluid* * User-supplied Figure 2-2 Drain tube installation and wash gland connection Note Wash gland options are available for the 500HLf syringe pump, with 1/16" wash tubes. Contact Teledyne Isco for more information. 2.3.6 Cylinder Washing: Nitrogen Purge All pumps that do not have a wash gland are equipped with a purge connector tube near the top of the pump body. The purge connector enables the pump cylinder beneath the piston to be purged with nitrogen, which can increase useful cylinder life by flushing residue from the system. Figure 2-3 shows a typical connection to the purge tube on the back of the pump. 2-5 HLf Series Syringe Pumps Section 2 Fluid System Connections & Accessories To purge with nitrogen 1. Attach gas supply by slipping the plastic tube over the purge connector, as shown below. 2. Regulate the nitrogen supply to slightly above atmospheric pressure. Close-up view of nitrogen purge tube (This view applies to pumps other than the 1000D) Figure 2-3 Purge connector installation WARNING Liquids expelled by compressed gasses may cause injury. Wear eye protection. Certain liquids also may require other personal protective equipment. Refer to the applicable Material Safety Data Sheet (MSDS) for more information. 2.4 Fluid Connection Accessories The optional accessories discussed in this section are used to make fluid connections from the pump(s) to another apparatus. When making fluid connections that use ferrules, be sure to use the ferrules provided in the kit. Push the tubing completely into the connector and finger-tighten. Then tighten with a wrench to clamp the ferrules onto the tubing. 2.4.1 Manual Refill Kit 2-6 The optional manual refill kit provides a high pressure, two-way valve that connects to the pump inlet to a fluid reservoir. The kit contains all tubing and hardware necessary for valve installation. Kit components and connections are shown in Figure 2-4. HLf Series Syringe Pumps Section 2 Fluid System Connections & Accessories Kit installation 1. To attach the two-way valve to the pump housing, use the valve spacer block and screws provided. a. For the 500HLf pump, screw the male adapter into the inlet port of the pump. 2. Connect the pre-bent stainless steel tubing from the valve to the pump inlet. Use the nut and ferrule to connect the tubing at the inlet and the valve fittings to connect the tubing at the valve. 3. Connect the PTFE refill tubing (with the filter) to the port of the two-way valve, using the nuts and ferrules supplied. Note When connecting to pressurized sources in super critical fluid applications, use the stainless steel tubing without a filter. An in-line filter is contained in the CO2 connection package (refer to Section 2.4.3). Table 2-2 Manual Refill Kits Nut, ferrule To system Spacer block Pre-bent SST tubing Part Number 1000HLf 68-1247-117 500HLf 68-1247-083 100HLf, 260HLf 68-1247-077 DANGER Valve PTFE tubing or stainless steel tubing Pump Model RISK OF INJURY. THIS EQUIPMENT PRODUCES HAZARDOUS PRESSURES. PLEASE UTILIZE APPROPRIATE TUBING AND CONNECTIONS AS NOTED IN THE MANUAL. Filter Figure 2-4 Refill kit installation 2.4.2 Manual Outlet Valve Kit Kit installation The optional manual outlet valve kit provides manual control of the pump outlet port by connecting a shutoff valve between the pump and the rest of the system. 1. Attach the two-way valve using the spacer block and panhead screws. 2-7 HLf Series Syringe Pumps Section 2 Fluid System Connections & Accessories a. For the 500HLf pump, screw the male adapter into the pump outlet. 2. Connect the pre-bent length of stainless steel tubing to the outlet port on the pump using the nut and ferrule. Connect the other end to the top port on the valve using the valve fitting. Note For the 500HLf, this piece of tubing should be cut to the proper length for connection to your system. Due to the wide variety of applications for this model, fittings to connect the tubing to your system are not provided in the kit. Note When nuts are torqued to the cylinder cap ports, the pressure reading may be affected. If the pressure no longer reads zero, release the pressure in the cylinder and press ZERO PRESS. 3. Use the valve fittings to attach stainless steel tubing to the top port of the two-way valve. a. For models 100HLf and 260HLf, connect the reducing union to the other end of this tubing. 4. Connect the stainless steel tubing between the valve’s bottom port and your apparatus. Cut to the desired length. 2-8 HLf Series Syringe Pumps Section 2 Fluid System Connections & Accessories Table 2-3 Manual Outlet Valve Kits Nut, ferrule To refill kit assembly SST tubing Pump Model Part Number 1000HLf 68-1247-118 500HLf 68-1247-082 100HLf, 260HLf 68-1247-078 DANGER Spacer block Screws RISK OF INJURY. THIS EQUIPMENT PRODUCES HAZARDOUS PRESSURES. PLEASE UTILIZE APPROPRIATE TUBING AND CONNECTIONS AS NOTED IN THE MANUAL. Valve SST tubing to system Reducing union Figure 2-5 Outlet valve package connection 2.4.3 In-Line Filter Package The optional in-line filter package should be used when it is important to filter flow exiting the pump. This package contains a 0.5 µm filter and 116" tubing. Table 2-4 Optional in-line Filter Package 68-1247-011 Qty. Part Number Description 1 60-1243-231 1.5 m stainless steel tubing, 116" OD 0.020" ID 1 60-1243-232 0.3 m stainless steel tubing, 116" OD 0.020" ID 1 209-9012-17 In-line solvent filter with replacement frit, 0.5 micron filter 5 209-0094-07 Zero volume, 116" valve nut 5 209-0094-08 Zero volume, 116" valve ferrule Installation 1. Attach the reducing adapter from the pump accessory package to the pump outlet, using the nut and ferrule provided. Or, connect to the reducing union of the outlet valve package. 2. Attach the 116" - 1.5 m length of tubing to the reducing adapter. Cut to the desired length. 2-9 HLf Series Syringe Pumps Section 2 Fluid System Connections & Accessories 3. Then attach the in-line filter to the end of the tubing. The flow direction is indicated on the filter body. 4. Connect the remaining 0.3 m length of tubing between the in-line filter and the receiving device. Cut to the desired length. 0.3 m Tubing Length 1.5 m Tubing Length In-line Filter Figure 2-6 In-line filter package 2.5 Temperature and Pressure Controls 2.5.1 Cylinder Insulating Cover Some applications, such as those with very low flows, may require additional measures to maintain steady rates. The optional insulating cover can reduce flow noise due to temperature fluctuations and improve pump performance at flow rates under 500 µl/min. Note The insulating cover is not available for Model 1000HLf. Part numbers: • Insulating cover for 100HLf, and 260HLf 60-1267-003 • Insulating cover for 500HLf 60-1267-004 The cover consists of two pieces that fit over the cylinder, as shown in Figure 2-7. 2-10 HLf Series Syringe Pumps Section 2 Fluid System Connections & Accessories Figure 2-7 Cylinder insulation cover Notches in the cover provide openings for the inlet and outlet tubing, and for the cable to the pressure transducer. Installation 1. Install the back cover. 2. Route the cable around tubing through the appropriate tabs. 3. Install the front cover and secure the side latches. 2.5.2 Temperature Control Jacket The optional cylinder temperature jacket assists in maintaining cylinder temperatures (–30 to 100°C) by circulating liquids, such as water or water/ethylene glycol solution, through the 14" upper and lower hose connectors. 2-11 HLf Series Syringe Pumps Section 2 Fluid System Connections & Accessories CO2 CO2 connection kit User-supplied device T.C. Jacket Dip tube Circulating bath Syr in ge (Extruder Reactor Rock Core Etc.) Pu mp Figure 2-8 System with temperature control jacket installed The jacket is very useful for SFC applications where cylinder cooling facilitates filling with fluids such as liquid CO 2 . The jacket can also be used with a circulating temperature-controlled bath to keep the fluid inside the pump at a constant temperature. This may be necessary when operating at very low flow rates (below 500 µl/min), where temperature fluctuation can cause flow variations. Note Temperature control jackets must be pre-installed at the factory. 2.5.3 Fluid Temperature and Volume Temperature Ranges The fluid, circulation, and heating/cooling reservoir connected to the temperature control jacket are user-supplied. Water baths generally come with a built-in pump, and are available in a wide variety of temperature ranges and fluid capacities from many lab equipment suppliers, such as Cole Parmer or Thomas Scientific. The model 1162 120V refrigerated circulating bath from Sensotec is an example of a bath for applications such as super critical CO2. The jacket itself is rated from –30 to 100 °C. However, bath temperatures are also determined by the type of seals used in the syringe pump. • The standard pump seals are rated up to 70 °C. • While the High Temperature pump seals are rated up to 200 °C, due to the jacket seal rating, do not exceed 100 °C. • For pumps using virgin PTFE seals, contact the factory for assistance. 2-12 HLf Series Syringe Pumps Section 2 Fluid System Connections & Accessories Volume Fluid bath volume is determined by cylinder volume. To maximize temperature stability, a minimum of twice the cylinder volume should be used. Refer to Table 2-5 for recommended fluid volumes. Table 2-5 Recommended Circulating Bath Volumes 2.5.4 Back Pressure Regulation Pump Model Min. Volume (ml) 100HLf 205.86 260HLf 532.10 500HLf 1014.76 1000HLf 2030.00 The back pressure regulator option from Teledyne Isco reduces flow noise and improves pump performance at pressures less than 3.5 bar. Two back pressure regulators are available: • 7 bar, part#209-9012-22 • 5 bar, part#209-9012-21 Fittings to connect the tubing to the regulators are supplied. DANGER RISK OF INJURY. THIS EQUIPMENT PRODUCES HAZARDOUS PRESSURES. PLEASE UTILIZE APPROPRIATE TUBING AND CONNECTIONS AS NOTED IN THE MANUAL. Installation 1. Note the arrow on the regulator indicating the fluid direction. 2. Connect your tubing between the pump outlet and the regulator using the supplied fittings. 2-13 HLf Series Syringe Pumps Section 2 Fluid System Connections & Accessories Figure 2-9 Back pressure regulator 2-14 HLf Series Syringe Pumps Section 3 Basic Programming and Operation 3.1 Introduction This section will familiarize you with the HLf Series pump controller and describe operating the pump under each of the various modes: constant flow, constant pressure, and refill. Pump setup and operation is regulated by the HLf Series controller. Operating parameters are entered via the keypad on the front panel of the controller. Operating selections are displayed as menu items on the controller screen or are associated with a dedicated key on the controller keypad. Operating modes such as CONST FLOW, CONST PRESS, DISP, and REFILL all have such dedicated keys. WARNING UL (Underwriter Laboratories) has certified the HLf Series Controller and Pumps on the basis that explosive chemicals or chemicals that could become explosive under pressure are NOT used. The instruments are not explosion proof. Use extreme caution when pumping hazardous fluids. 3.2 General Controller Information The following information is intended to familiarize you with controller operation. Once you have become familiar with the keypad and the main menu, you will find it easy to direct the pumping operations required for your applications. If you make an incorrect entry, press CLEAR ENTRY to delete your last keystroke. If you have entered a programming mode but do not wish to make any changes, press ENTER to keep the current setting, or press softkey D to return to the previous screen. 3.2.1 Rates, Units, and Limits To allow pump operation to be tailored to your application, both the pressure and flow rate units may be set by the user, refer to Section 3.4.1. The pump also allows user programmed refill, as well as pumping rates, refer to Section 3.4.3. The system protection limits may also be set by the user, refer to Section 3.8.7. 3.2.2 Programming Screens The programming screens are divided into separate menus. These menus are accessed when different features are being programmed. For complete information about programming menus, refer to Sections 3.3 through 3.7. 3-1 HLf Series Syringe Pumps Section 3 Basic Programming and Operation 3.2.3 Run Screens The run screen appears once a program has been loaded and the pump is running. The run screen, which is determined by your program selections, displays current information about pump operation. The following sections explain the display line by line. Line One – No matter what mode you are in, the first line of the run screen is always the same. Active Pump Volume Remaining Actual Pressure .000 mL/MIN PGa PSI XXX.XX ml Actual Flow Rate Current Mode Line Two – The second line varies slightly depending on the operating mode. A file or step will only be displayed when operating in the gradient mode. Elapsed Time STOPPED FILE/STEP Status 000:00:00 Step of program running or loaded file number Line Three – Line three varies depending on the mode; the rate and units are set by the user, so these will vary depending on your programming requirements. The ending time will always be displayed on this line. Ending Time Current Pressure PS/MIN FINAL: PSI 00:00:00 Final Pressure Rate Line Four – Line four varies depending on the mode. The options presented on this line are softkey selectable, i.e. you use the softkeys (A - D) located under the screen to choose the option. 3-2 HLf Series Syringe Pumps Section 3 Basic Programming and Operation 3.2.4 Selecting Operating Parameters There are four ways to program the system from a menu screen. Menu Selection – The number keys are used to select from listed menu items. Softkey Selection – The softkey programming options appear on the fourth line of the screen. To either toggle or select an option, press the softkey, A-D, directly below that option. Keypad Selection – The programming keys are located on the left side of the keypad. The pump mode, limits, and refill are all options that may be selected from the keypad. Value Selection – The number keys are used to enter all numeric values required for pump operation. When a numeric value is required, a message will blink, prompting you to enter an appropriate value. 3.3 Main Menus There are four main menu screens. Access Menu 1 by pressing MENU. To move forward and back between Menus 1, 2, 3 and 4, or to return to the run screen, use softkeys A (MORE) and D (PREVIOUS/RETURN). Use the number keys to select a menu option. Selecting a menu option displays the programming parameters for that option in menu form. Note To exit a menu when multiple pumps are connected, press the STORE, RECALL, CLEAR ENTRY OR MENU key. 3.4 Menu One Menu 1 provides programming options for units of measure, pump selection, refill settings, power failure response, system reset, and display contrast adjustment. To save all settings and return to the main menu, press (D). 1. UNITS 4. POWER FAILURE [STOP] 2. SELECT PUMP 5. SYSTEM RESET 3. REFILL MORE 6. DISPLAY CONTRAST RETURN RETURN Figure 3-1 Menu 1 program selections 3.4.1 Flow and/or Pressure Units of Measure Displayed units are user-selectable by selecting menu 1 item 1. PRESSURE UNITS=___________FLOW UNITS=__________ 1. ATM 3. PSI 7. µL/MIN 5. mL/MIN 4. kPA 6. mL/HR 8. µL/HR 2. BAR PREVIOUS A B C D Figure 3-2 Units menu 3-3 HLf Series Syringe Pumps Section 3 Basic Programming and Operation Use numbers 1-4 to select the pressure units (ATM, BAR, PSI, kPa). The units selected will be displayed on the first line after PRESSURE UNITS=. Use numbers 5-8 (mL/MIN, mL/HR, µL/MIN, µL/HR) to set the flow rate units. The selected units will be displayed on the first line after FLOW UNITS=. 3.4.2 Pump Selection (if multiple pumps) If multiple pumps are connected to a single controller, the SELECT option selects the pump (A, B, C, or D) whose current state and settings appear on the display. PUMP The letter of the current pump will appear in lower-case in the upper left corner of the run screen. Note When multiple pumps are connected, the UNITS selected for one pump will apply to all of the pumps. 3.4.3 Refill The refill option allows you to set the refill rate or set the pump to automatically refill when a certain volume is reached. Press MENU > REFILL (3). The auto refill menu will appear. Note If more than one pump is connected to the controller, pump B, pump C, and pump D will be displayed on the fourth line. To select a pump, press the softkey under the pump designation. To set auto refill volume Press 1 to set the volume for pump A. The units to the right of the symbol will blink, indicating that you should enter a volume. Use the number keys to enter an appropriate value and then press ENTER. To set refill rate 1. Press 3 to set the refill rate for the designated pump. The refill rate can also be changed from the main screen while the pump is refilling. 2. A message will blink on the screen prompting you to enter the selected refill rate. 3. Enter the desired rate with the number keys; press ENTER. Disable/Enable auto refill 4. To save and exit the refill menu, press D, PREVIOUS. The first line will display “OFF” or “ON”, indicating whether or not this feature is enabled for pump A (or the currently selected pump). Press 4 to toggle this feature off or on for each pump. Note Auto refill can be set independently for each pump. If AUTO REFILL is ON, the pump will automatically switch to refill mode when the volume reaches the auto refill mark. After refilling, pumping will resume in the programmed mode. The ACCESSORY outputs, which drive powered valves, will switch in sequence. 3-4 HLf Series Syringe Pumps Section 3 Basic Programming and Operation Unless otherwise specified, the pump will refill to full cylinder capacity. To specify a smaller refill volume, press 2 and enter the desired volume. Press 5 to toggle this feature off or on for each pump. Note The system can also be programmed to refill a pump based on an external analog input voltage, with a range of 0 to 11.5 vo l t s. I n fo r m a t i o n a b o u t t h i s fe a t u r e i s p r o v i d e d i n Section 3.12.3. 3.4.4 Power Failure [STOP] This feature allows you to set the activity of the pump in the event of a power failure. Press 4 to toggle this feature between [STOP] (to remain stopped after power is restored) or [CONT] (to automatically resume after power is restored). Note In a multiple-pump system, this action is applied to all connected pumps. 3.4.5 System Reset (Restore Default Settings) To restore default program settings, press 5. To continue with the reset, press CONTINUE (A); to cancel the reset, press DO_NOT (D). CAUTION Resetting the system erases all programs and user settings. This is a basic reset. For information about performing a “hard” reset, refer to Section 8.3.2. 3.4.6 Display Contrast From the menu, you can adjust the screen brightness for your light conditions and viewing angle. Use softkeys B, DOWN, or C, UP to reduce or increase the brightness. 3.5 Menu Two Menu 2 provides programming options for serial communication, pump status, external control, multiple pump operation, volume reset, and valve control. To save all settings and return to the main menu, press VIOUS/RETURN (D). 1. SERIAL OPTION 4. MULTI PUMP 2. STATUS 5. TOTAL VOL RESET 3. EXTERNAL 6. VALVE MORE PRE - PREVIOUS Figure 3-3 Menu 2 program selections 3-5 HLf Series Syringe Pumps Section 3 Basic Programming and Operation 3.5.1 Serial Option The serial option menu allows you to set the baud rate and the unit identification number. BAUD RATE = 1200 UNIT # ID = 6 NEXT BAUD A PREVIOUS NEXT ID# B C D Figure 3-4 Serial option menu Use softkey A, NEXT BAUD, to scroll through the available baud rates. These are: 300, 1200, 2400, 4800, 9600, 19.2K, 38.4K, 57.6K, and 115.2K. Use softkey B, NEXT ID#, to scroll through the available ID numbers. These are 1-7. Six is the default, as this is the unit identifier for the Teledyne Isco LabView™ software. For a complete discussion of serial control, refer to Section 7 in this manual. 3.5.2 Pump Status This option displays the controller software revision, and model of connected pump(s). The first line displays the revision of the software. Lines 2, 3, and 4 display the type of pump connected to the A, B, C, and D pump connectors, respectively. This screen is also momentarily displayed automatically each time the pump controller is switched on. 3.5.3 External Control The pump pressure or flow rate operation can be controlled externally with an analog voltage. Complete instructions for this feature are provided in Sections 3.12 through 3.12.5. 3.5.4 Multiple Pumps One controller can control up to four pumps at once, either together or independent of each other. Complete information about using the MULTI PUMP feature is provided in Section 3.9 and Section 5.6. 3.5.5 Total Volume Reset This option resets the total volume display of multi-pump pair AB or multi-pump pair CD to zero when operating in continuous flow or modifier mode. 1. AB PUMPS 2. CD PUMPS 3. AB AND CD PUMPS Figure 3-5 Total volume reset 3-6 HLf Series Syringe Pumps Section 3 Basic Programming and Operation 3.5.6 Valve This feature identifies the type of valves (passive or active (air), being used for the flow operation. Valves are set to “active” by default. If “active value” is selected, the controller will match the pressure more closely before switching delivery pumps. The number for the selected valve type will be blinking. Press 1 or 2 to select the correct valve type. 3.6 Menu Three Menu 3 provides programming options for poor fills, diagnostics, pressure calibration, alternative pressure inputs, pressure control setting, and pressure setpoint tolerance. To save all settings and return to the main menu, press VIOUS/RETURN (D). 1. POOR FILL ALARM 4. DIFF. MODES 2. DIAGNOSTIC MENU 5. PRESS. INTEGRAL 3. PRESS. CALIBRATION 6. PRESS. DEADBAND PRE - PREVIOUS Figure 3-6 Menu 3 program selections 3.6.1 Poor Fill Alarm In constant pressure mode, this feature allows you to set a fill point as a percentage of pump volume. If this volume percentage is not reached after a refill and re-pressurization, the system issues an alarm and stops the pump. 3.6.2 Diagnostic Menu This selection displays an additional menu containing testing options for the system. Refer to Section 9.5 for a complete explanation of how to use the diagnostic menu. 3.6.3 Pressure Calibration This is a stored psi value to ensure optimal operation of the pressure transducer. On most pumps, this value, known as the “midpoint adjustment,” can be found on a tag on the transducer cable (shown below). Sta nd ard ca libration f or the transducer is a two-p oint adjustment, at zero and maximum pressure. The midpoint adjustment number is the difference between the pressure at half maximum, as read by a pressure gauge with a precision of 0.25% accuracy, and the syringe pump transducer output. 3-7 HLf Series Syringe Pumps Section 3 Basic Programming and Operation Figure 3-7 Location of transducer midpoint value Press CALA, CALB, CALC, or CALD to select the correct pump, enter the calibration number, and press ENTER. Note This calibration feature is not applicable to HLf model pumps. The midpoint adjustment value is individual to each pump, and is stored within the controller software. Therefore, this value must be re-entered if the controller or pump is switched, controller is reset, or if a pump is plugged into a different port on the controller. 3.6.4 Diff. Modes This feature allows the use of other analog inputs for pressure input to the pump. The standard pressure transducer MUST be connected to pump in order for this feature to work. Press 1, OFF, to turn off this feature. Press 2, 0 to 50 ANLG1, to use a 5 volt 50 psi transducer on ANALOG INPUT 1 of the ACCESSORY connector. Press 3, Custom ANLG1, to use 5 volt custom pressure transducer on ANALOG INPUT 1 of the ACCESSORY connector. Press 4, 500 ANLG2, to use a 5 volt 500 psi pressure transducer on ANALOG INPUT 2 of the ACCESSORY connector. Press 5, 5000 ANLG3, to use a 5 volt 5000 psi transducer on ANALOG INPUT 3 of the ACCESSORY connector. 3.6.5 Press. Integral If the pressure control appears to be unstable or incorrect, toggle this feature on by pressing 1, 2, 3, or 4 for the correct pump; this activates a proportional integral derivative (PID) controller, which minimizes errors in the pressure control process. This feature is on by default. 3.6.6 Pressure Deadband This feature dampens the corrective response to slight variations in pressure to reduce fluctuation. If the pressure reading at the programmed setpoint appears to be unstable, toggle this feature on by pressing 1, 2, 3, or 4 for the correct pump. This feature is on by default. 3-8 HLf Series Syringe Pumps Section 3 Basic Programming and Operation 3.7 Menu Four 3.7.1 Modbus Options 3.8 Front Panel Keys The Modbus RTU and Modbus TCP communications protocol is supported. Complete information about using Modbus RTU and Modbus TCP communication is provided in Section 6 “Modbus Configuration”. In addition to the menu options, certain functions and modes are selectable from the front panel keyboard. 3.8.1 CONST PRESS and CONST FLOW These keys place the system in constant pressure mode or constant flow mode, respectively. Information for these operating modes can be found in Section 3.10. 3.8.2 PRGM GRAD This key is used to place the pump system in gradient mode. For complete information about gradient programming, refer to Section 4 Gradient Pumping for Pressure, Flow, and Concentration Modes. 3.8.3 HOLD The HOLD key is used while a gradient is running. When HOLD is pressed, the program clock freezes and current gradient parameters are maintained. To continue the gradient, press HOLD or RUN. 3.8.4 RECALL The RECALL key can only be used when the pump(s) are stopped or when in HOLD mode. The RECALL key is used to recall a previously programmed gradient. When you select this option, the controller automatically loads the gradient and switches the pump to program gradient mode. 1. Press RECALL and use the number keys to enter the number name of the gradient you wish to recall. Press ENTER. 2. If you enter a number of a gradient that does not exist, the controller briefly displays the message “FILE NUMBER DOES NOT EXIST.” It then assumes you will be creating a new gradient under that number and displays the program gradient run screen. 3.8.5 STORE The STORE key is operational in the programmed gradient mode. It is used to save the program gradient parameters and exit the programming (parameter entry) mode. 3.8.6 REFILL The REFILL key manually places the pump in refill mode. 3.8.7 LIMITS The controller allows the user to set the minimum and maximum flow rate limits, the minimum and maximum pressure limits, and the maximum rate the pump will run while controlling the pressure in constant pressure mode. • When using a single controller to operate multiple pumps, you need to select the appropriate pump before setting any pump parameters. The available pumps will be displayed above the softkeys. These selections corre- 3-9 HLf Series Syringe Pumps Section 3 Basic Programming and Operation spond with the connector that the pump control cable is plugged into on the rear panel of the pump controller. To select a pump, press the softkey under the pump designation. The top line of the screen will indicate the currently selected pump. • The maximum and minium limits you set cannot exceed the pump specifications. To set the limits 1. Press LIMITS. To display the Limits menu, enter the number of the limit you wish to program. One of five limit setpoint menus will appear: MAX PRESS, MIN PRESS, MAX FLOW, MIN FLOW, or FLOW LIMIT. The MAX PRESS limit setpoint menu is shown in Figure 3-9. LIMITS: CURRENT PUMP 1. MAX PRESS _____ 2. MIN PRESS______ PUMP A A 3. MAX FLOW____ 4. MIN FLOW_____ 5. FLOW LIMIT_____ PREVIOUS C B D Figure 3-8 Limits menu MAX PRESS_____PSI 1. SET PRESS VALUE ON DISPLAY* A ON ALARM* OFF SHUTDOWN* B C PREVIOUS* D Figure 3-9 Limits setpoint (Max Press) menu Note These features are discussed later in this section under Limits Programming Options. 2. Press the number 1 key to set the value. A message will blink on the right side of the screen, prompting you to enter the selected limit. 3. Enter the desired limit setpoint, using the number keys. 4. Press ENTER to save the value. Note The pump can be set to shut off or not at this limit condition by pressing softkey C under shutdown. This will toggle this option to ON. 5. To exit the limit menu, press the softkey D, PREVIOUS. If four pumps are connected press STORE, RECALL, or CLEAR ENTRY to exit the limits menu. 3-10 HLf Series Syringe Pumps Section 3 Basic Programming and Operation Limits programming options 6. Once all the limits have been set, press softkey D, PREVIOUS, to return to the main menu. In addition to setting the upper and lower limits, the pump also allows the user to specify whether they want: • the alarm message displayed • an alarm to sound when the limit is reached • the pump to shut down when the limit is reached These features are set using the softkeys A - C, which toggle the feature on and off. Note The Max Press (maximum pressure) display on and alarm on options cannot be disabled. Display When a limit has been exceeded, this feature causes the display to automatically flash an OVER or UNDER LIMIT message. To turn off this function, press softkey A once to toggle to: OFF DISPLAY Alarm When a limit has been exceeded, this feature causes the pump to automatically beep a warning. To turn off this function, press softkey B once to toggle to: OFF ALARM Shutdown When a limit has been exceeded, this feature causes the pump to shut down. To turn off this function, press softkey C once to toggle to: ON SHUTDOWN Flow rate limit for pressure control When the pump is controlling pressure (CONSTANT PRESSURE MODE), the flow rate is not user-controlled, and may range up to the maximum flow of the pump. In some cases, it is desired to limit the rate of pumping during system pressurization. This can be done by selecting limit 5, FLOW LIMIT. The FLOW LIMIT value is used as the upper range of flow rate during pressure control. This limit is not the same as the MAX FLOW limit, which is a threshold above when the pump is stopped, or an alarm is activated as selected by the operator. To save your changes and return to the main menu, press softkey D, PREVIOUS. 3.8.8 RAPID PRESS This option is available when operating in the constant flow mode and in the two-pump concentration gradient mode. It allows rapid pressurization to a stable pressure point and then 3-11 HLf Series Syringe Pumps Section 3 Basic Programming and Operation switches automatically to the constant flow setpoint. This is helpful when you are operating at a low flow rate but wish to rapidly pressurize a solvent. 1. Press CONST FLOW to put the pump in constant flow mode, or enter a two-pump concentration gradient. 2. Press RAPID PRESS. 3. The controller will display maximum flow rate and target pressure setting. If these values are correct, press D to continue rapid pressurization. 4. If you know approximately what the pressure will be when the system is stable, enter this value as a target pressure. Press A and enter the desired pressure value. This should shorten the time required to stabilize the system pressure. 5. If you would like to limit the maximum flow rate during the rapid pressurization phase, press B and enter the desired flow rate limit. 6. Press D to continue rapid pressurization. 3.8.9 DISP 3.8.10 ACC CTRL The DISP key activates Dispense Mode, for applications such as reactant feed and batch delivery, where a specified volume is pumped. Refer to Section 3.10.3 for programming steps. The ACC CONTROL key will allow you to manually operate accessories, such as valves, via the Digital Output terminals on the back of the controller. 1. Press ACC CTRL. 2. From the accessory control menu, use the number keys 1-8 (1-A INLET, 2-A OUTLET, 3-B INLET, 4-B OUTLET, 5-C INLET, 6-C OUTLET, 7- D INLET, 8- D OUTLET) to toggle the desired valve open or closed. (Numbers 1-8 represent digital output terminals 1-8, respectively). 3. To exit, press PREVIOUS (D). 3.8.11 ZERO PRESS The ZERO PRESSURE key will correct pressure sensor drift. Before pressing ZERO PRESS, the pump should have port fittings installed, and be depressurized. 1. Press ZERO PRESS. The display will show the current pressure and ask if you want to zero the pressure. 2. Press A, B, C, or D to zero the desired pump. or, If the pump is not depressurized, press DO_NOT (D) to exit the zero pressure operation. If four pumps are connected press the STORE, RECALL OR CLEAR ENTRY key. 3-12 HLf Series Syringe Pumps Section 3 Basic Programming and Operation 3.9 Control of Multiple Pumps When using multiple pumps, there are two multi-pump operating modes of delivery and one independent mode: • Continuous flow in constant flow mode. • Continuous flow in constant pressure mode. • Independent mode. 3.9.1 Multi-Pump Operation A HLf Series continuous flow pumping system in constant flow mode will consist of two syringe pumps and a valve package, all regulated by one controller. Installation and operating instructions for this system are provided in Section 5. In these modes, the softkeys toggle between the options described in Table 3-1. Table 3-1 Key functions in the Multi-pump Mode Key A B C 6 Display Option Description NORMAL Uses a finer (slower) pressure match control when switching from one pump to the other. FAST Uses a coarser (faster) pressure match control when switching from one pump to the other. NORMAL PRESS Uses pressure matching when switching from one pump to the other LOW PRESS Uses no pressure matching when switching from one pump to the other. DELIVER Sets the pump into the delivery mode of operation. RECEIVE Sets the pump into the receive mode of operation. MIN/MAX POINTS Sets the fill and refill marks that are used with both continuous flow modes. Sets the NVC feature On/Off. 3.9.2 Independent Control of up to Four Separate Pumps A HL f Series syringe pump controller can run four syringe pumps independently of each other in either constant pressure, constant flow mode, dispense mode, or any combination of the three. To set up this option, use the following procedure. 1. Press MENU. 3-13 HLf Series Syringe Pumps Section 3 Basic Programming and Operation 2. Press softkey A, MORE. 3. Press number 4, MULTI PUMP. The multi-pump menu will appear. 4. Press number 1 for pumps A or B, press number 2 for pumps C or D. 5. Press number 4, INDEPENDENT. The controller will set the pumps to Independent mode. Number 4 will blink, indicating that INDEPENDENT mode is selected. 6. Select the HOLD PRESS or NORMAL mode of operation. Press softkey A to toggle between the two modes. HOLD PRESS: In constant pressure mode, after the pump is empty, if the outlet pressure rises past the set point the pump will restart and run the system to the set point pressure. NORMAL: This feature shuts the system down if a pump runs empty in constant pressure mode. Once the pumps have been set to this mode, they will operate independently from one another. Each pump will operate at its defined limit and rate. Independent mode is the default setting for the pump. When you select a command such as STOP or REFILL, the display will prompt you to designate which pump to stop or refill. Only the designated pump will stop; the other pumps will continue to run. 7. Return to the run screen by pressing D three times. Then press D (SELECT PUMP). The display will show each pump’s information and allow you to select any pump for programming changes. 3.10 Operating Modes The pump has three delivery modes and one refill mode. Note When using a single controller to operate multiple pumps independently, you need to select the appropriate pump run screen before selecting a mode. To select the appropriate pump, press SELECT PUMP (D) and an intermediate screen will be shown. Press the softkey for the appropriate pump, the run screen for that pump will appear. Constant Flow – Refer to Section 3.10.1 This mode is used when the flow rate must remain constant during the pumping operation. Constant Pressure – Refer to Section 3.10.2 The constant pressure mode is used when the application of fixed pressure throughout the pumping operation is required. The pump will maintain the desired pressure by positive or negative displacement of the piston. Programmed Gradient – Refer to Section 4 3-14 HLf Series Syringe Pumps Section 3 Basic Programming and Operation In the programmed gradient mode, the pump can provide the following types of gradient: • Two-pump concentration gradient on pumps A and B • Single-pump linear pressure gradients on pump A • Single-pump flow programs on pump A Dispense – For applications requiring delivery of a specific volume. Refer to Section 3.10.3. Refill – Refer to Section 3.4.3. You can set the refill rate and change it when in refill mode. 3.10.1 Constant Flow To set constant flow operation, use the following procedure: 1. Press CONST FLOW. “CFa” will be displayed in the upper left corner of the screen. This denotes that you will be defining constant flow parameters for pump A. If you wish to define parameters for pump B, C, or D, press softkey D, select pump, and then press softkey A, B, C, or D to select pump A, B, C, or D respectively. Note If the main menu is displayed, you must press D under CONST FLOW. 2. Press A to change the flow rate. The words ENTER FLOW RATE will flash on the screen. 3. Use the number keys to enter the desired flow rate. Note If you make an error, press CLEAR ENTRY to delete one character at a time. 4. Press ENTER once the desired flow rate is displayed. 5. Press RUN to begin pump operation. 3.10.2 Constant Pressure Programming a constant pressure operation only requires a few keystrokes. Use the following procedure: 1. Press CONST PRESS; CPa will be displayed in the upper left corner of the screen. This denotes that you will be defining constant pressure parameters for pump A. If you wish to define parameters for pump B, C, or D press softkey D, select pump, and then press softkey A, B, C, or D to select pump A, B, C, or D respectively. 3-15 HLf Series Syringe Pumps Section 3 Basic Programming and Operation Note If the main menu is displayed, you must press softkey D under RETURN before pressing CONST PRESS. 2. Press the A softkey to indicate to the program that you wish to enter the pressure. The words “ENTER PRESSURE” will flash on the screen. 3. Use the number keys to enter the desired pressure. Note If you make an error, press CLEAR ENTRY to delete one character at a time. 4. Press ENTER once the desired pressure is displayed. 5. Press RUN to initiate pump operation. 3.10.3 Dispense Mode For applications such as reactant feed and batch delivery where a specified volume is pumped, Dispense Mode is available with Teledyne Isco syringe pumps. Dispense mode flow rate begins at zero, ramps up to level out at the programmed flow rate, then ramps back down to zero, delivering a precise specified volume. The slope rate and run time are dependent upon the pump model being used. Stop Start Specified Flow 0 ramp up ramp down Figure 3-10 Depiction of dispense mode sequence Note For time-controlled delivery, you must run the pump in standard gradient mode, as described in Section 4. In order to access Dispense Mode control, the pump must be in Constant Flow mode. Press CONST FLOW to enter this mode. Toggle Dispense Mode off or on by pressing DISP. Note that pressing the DISP key while in Constant Pressure mode has no effect. To adjust the flow rate, press FLOWRATE (A), enter the desired rate using the number keys, and press ENTER. To specify the volume of the batch delivered, press VOLUME (C), enter the desired volume using the number keys, and press ENTER. 3-16 HLf Series Syringe Pumps Section 3 Basic Programming and Operation To dispense the batch, press RUN. The sequence runs once, then stops. To repeat the sequence, press RUN again. Note When the system is in Dispense Mode, all gradient modes, constant pressure mode, and auto-refill, as well as serial control, are unavailable until Dispense Mode is turned off. 3.11 External Control The pump can be externally controlled for pressure or flow rate operation with an analog voltage or through the serial interface. The serial interface allows you to control the pump operation from an IBM-PC or compatible computer that has an RS-232-C serial output. The serial interface accepts English command words from the computer, like constant pressure, refill, etc. For more information see Section 7 Serial Interface. 3.12 External Control: Analog The syringe pump can be controlled externally by analog voltage in either constant flow or constant pressure mode. The input range is 0 – 11.5 volts (for all pumps), with a resolution of 5000 increments per volt. WARNING 3.12.1 Wire connections Connecting devices to energized circuits may cause personal injury or property damage. Power must be removed from the pump before connecting external devices. Two wires are required for analog control. The analog common or ground wire should be connected to the GND terminal under ANALOG INPUT of the ACCESSORY connector on the controller rear panel. The analog control or input wire should be connected to terminal 1 under ANALOG INPUT. If two pumps are used with the controller, the second analog control or input wire should be connected to terminal 2 under ANALOG INPUT. If three pumps are used with the controller, the third analog control or input wire should be connected to terminal 3 under ANALOG INPUT. If four pumps are used with the controller, the fourth analog control or input wire should be connected to terminal 4 under ANALOG INPUT. When using one of the multi-pump operation modes, only the ANALOG INPUT terminal 1 needs to be connected to control the A-B pump pair and ANALOG INPUT terminal 3 needs to be connected to control the C-D pair. 3.12.2 Preparation Before programming the controller to accept the analog signal, you must know the maximum flow rate (constant flow) or the maximum pressure (constant pressure). 3-17 HLf Series Syringe Pumps Section 3 Basic Programming and Operation Note The high and low limits you enter cannot exceed the pump specifications: Normal input = 10V. To determine the analog voltage range, use the formula explained below: V FS ---- = Vmax U where: FS = Maximum flow rate or Maximum pressure (Full Scale): This is the same value entered when setting LIMITS, as described in Section 3 of your user manual, for MAX PRESS or MAX FLOW. V = Volts per unit of flow or pressure U = Incremental unit of flow or pressure Vmax = Maximum input voltage 3.12.3 External Control for Refill The refill option allows you to set the refill rate, or set the pump to automatically refill when a certain volume is reached. From Menu 2, the system can be programmed to automatically refill a pump based on an external analog signal, with a range of 0 to 11.5 volts. To access this feature, press MENU > MORE (A) > EXTERNAL (3). Figure 3-11 External control menu • To set the full-scale value (maximum 11.5 volts), press SET RANGE (1), enter the desired value, and press ENTER. • To place the pump under external control, press EXTERNAL (B). The feature will turn from OFF to ON. • To enable remote RUN/STOP control, press DIGITAL (A). This feature will turn from OFF to ON. • To set the external control for refill, press REFILL (C). The feature will turn from OFF to ON. 3-18 HLf Series Syringe Pumps Section 3 Basic Programming and Operation 3.12.4 Calculation Examples Flow Rate – If MAX FLOW is set at 25 ml/min in the LIMITS menu and the desired scale factor is 5.0 volts per 20 ml/min, do the following to determine the analog voltage range: 5 25 ------ = 6.25 20 In this example, the analog voltage range would be 0.0–6.25 volts. Pressure – If MAX PRESS is set at 510.2 ATM in the LIMITS menu and the desired scale factor is 2.0 volts per 100 ATM, do the following to determine the analog voltage range: 2 510.2 --------- = 10.204 100 In this example, the analog voltage range would be 0.0–10.204 volts. 3.12.5 Setup First, select the desired operating mode by pressing CONST PRESS or CONST FLOW. or (CP or CF and selected pump are displayed) (EXTERNAL) (On/Off) (MORE) (SET RANGE) Enter Vmax value Figure 3-12 Button sequence for external control setup 3.13 Remote RUN/STOP The HLf Series syringe pump RUN/STOP function can be externally controlled by a switch contact closure or TTL input. The input voltage is 5 volts and is internally pulled high (RUN). The 3-19 HLf Series Syringe Pumps Section 3 Basic Programming and Operation input is level sensitive (must remain high for RUN or low for STOP) and must be high for normal operation of serial (RS-232) control. To enable the remote RUN/STOP feature, press MENU > MORE> (A) > EXTERNAL > (3) > DIGITAL (A) “On”. Then press RUN or force the RUN/STOP pin low to enable the pump. Thereafter, the RUN/STOP pin will control operation. Pressing STOP on the front panel will override the RUN/STOP pin. WARNING Connecting devices to energized circuits may cause personal injury or property damage. Power must be removed from the pump before connecting external devices. 3.13.1 Wire Connections Two wires are required for external RUN/STOP control. The digital common or ground wire should be connected to one of the four DIGITAL GROUND terminals of the ACCESSORY connector on the controller rear panel. The control wire should be connected to terminal 1, under DIGITAL INPUT. If an electrically isolated relay is used, one relay terminal should be connected to digital ground and the other to terminal 1, under DIGITAL INPUT. If two pumps are used with the controller, the second control wire should be connected to terminal 2, under DIGITAL INPUT. If three pumps are used with the controller, the third control wire should be connected to terminal 3, under DIGITAL INPUT. If four pumps are used with the controller, the fourth control wire should be connected to terminal 4, under DIGITAL INPUT. 3-20 HLf Series Syringe Pumps Section 4 Gradient Pumping for Pressure, Flow, and Concentration Modes 4.1 Introduction Gradient pumping is used in applications requiring time-controlled or rate-controlled delivery of a specific volume at a set flow rate or pressure, or a two-pump flow concentration. You can program the controller to increase or decrease pressure or flow during different steps within a single program by entering a specific value at the beginning and end of each step. DANGER RISK OF INJURY. THE PRESSURE PRODUCED COULD BE 700 BAR. PLEASE UTILIZE APPROPRIATE TUBING AND CONNECTIONS NOTED IN THE MANUAL. Tools and Parts for Single Pump System Open-end wrenches: 1/4", 5/16", 7/16", 3/8" Manual Refill Valve Kit - see Table 4-1 Manual Outlet Valve Kit - see Table 4-2 Tools and Parts for Dual Pump System Open-end wrenches: 1/4", 5/16", 7/16", 3/8" Manual Refill Valve Kit see Table 4-1 (two kits required) Table 4-1 Manual Refill Valve Kits Pump Model Part Number 1000HLf 68-1247-117 500HLf 68-1247-083 100HLf , 260HLf 68-1247-077 4-1 HLf Series Syringe Pumps Section 4 Gradient Pumping for Pressure, Flow, and Concentration Modes Table 4-2 Manual Outlet Valve Kits 4.2 Connecting the System Pump Model Part Number 1000HLf 68-1247-118 500HLf 68-1247-082 100HLf , 260HLf 68-1247-078 The syringe pump has two ports at the top of the cylinder. One port is used as the inlet for filling the pump, and the other as the outlet (either port may be used as inlet or outlet). Inlet and outlet connections to each pump must be made identically. Standard plumbing connections vary between pump models. See Table 4-3 for standard port information. When making fluid connections that use ferrules, be sure to use the ferrules supplied for that pump by Teledyne Isco. Push the tubing completely into the connector and finger-tighten. Then tighten with a wrench to clamp the ferrules onto the tubing. Table 4-3 Swaging Detail 100HLf 260HLf 500HLf 1/8" Valco 1 /8" NPT FERRULE FRONT FERRULE BACK FERRULE 1000HLf 1 /4" NPT FRONT FERRULE BACK FERRULE NUT 5-16 - 24 1/2 TURN PAST FINGER-TIGHT NUT 5-16 - 24 3/4 TURN PAST FINGER-TIGHT NUT 7-16 - 20 1-1/4 TURN PAST FINGER-TIGHT Note Pump models 260HLf and 100HLf have a direct connection, as shown in Figures 4-1 and 4-2 on the following page. Valve kits for other models include male adapter fittings. A gradient pumping system includes high-pressure, two-way valves that connect the pump inlets to fluid reservoirs, and the pump outlets to the gradient mixer (dual pump system) or other apparatus (single pump system). Each refill kit and outlet valve package contains one two-way valve; the gradient package contains two. The kits contain all tubing and hardware necessary for valve installation. 4-2 Two-Way Valve part #209-0098-05 HLf Series Syringe Pumps Section 4 Gradient Pumping for Pressure, Flow, and Concentration Modes Following installation, the tubing connections must be tested for leaks before any program is run. If a leak is found, tighten the connection slightly. If the leak persists, swage the connection again with a new ferrule. Refer to Technical Bulletin TB05 Field Verification Procedures at http://www.isco.com/sp_applications/#techbulletins for leak test procedures. 4-3 HLf Series Syringe Pumps Section 4 Gradient Pumping for Pressure, Flow, and Concentration Modes 4.2.1 Inlet Connections Kit components and connections are shown in Figure 4-1. 1. Mount the inlet valve on the pump housing with the spacer block and screws provided. 2. Connect the pre-bent SST tubing from one port of the valve to the pump inlet. Use the nut and ferrule to connect the tubing at the inlet and the valve fittings to connect the tubing at the valve. 3. Connect the PTFE refill tubing (with the filter) to the other port of the valve, using the nuts and ferrules supplied. Note When connecting to pressurized sources in supercritical fluid applications, use the stainless steel tubing without a filter. An in-line filter is contained in the CO2 connection package (refer to technical bulletin TB08 CO 2 Applications and Technical Notes at http://www.isco.com/sp_applications/#techbulletins). Nut, ferrule To system Pre-bent SST tubing Spacer block Valve PTFE tubing or stainles steel tubing Filter Figure 4-1 Pump inlet connections 4-4 HLf Series Syringe Pumps Section 4 Gradient Pumping for Pressure, Flow, and Concentration Modes 4.2.2 Outlet Connections Kit components and connections are shown in Figure 4-2. 1. Mount the two-way outlet valve on the side of the pump housing opposite the refill valve, with the spacer block and screws provided. 2. Connect the pre-bent SST tubing between one port of the valve and the pump outlet. Use the nut and ferrule to connect the tubing at the outlet and the valve fittings to connect the tubing at the valve. 3. Connect the 5.1 cm length of 18" tubing to the other port of the valve, using the valve fittings. 4. Connect the 18" side of the reducing union to the tubing. 5. Connect the 116" side of the reducing union to the 1.5 m length of 116" tubing. (This tubing may be cut to an appropriate length.) Nut, ferrule To refill kit assembly SST tubing Spacer block Screws Valve Reducing union SST tubing to system Figure 4-2 Pump outlet connections 4-5 HLf Series Syringe Pumps Section 4 Gradient Pumping for Pressure, Flow, and Concentration Modes 4.3 Single-Pump Gradient Programming A single-pump gradient program is based on either pressure or flow, and controlled by either time duration (in minutes) or rate of change (units per minute). The controller’s memory can contain a total of up to 200 steps. One program can contain from 1 to 200 steps. When operating in gradient mode, any connected pumps not used for gradient are inoperable. 1. To access the gradient programming menus, press PRGM GRAD, select PRESSURE (2) or FLOW (3), and CONTINUE (C). The home screen will appear, with either PG (Pressure Gradient) or FG (Flow Gradient) in the upper left corner. PGa 0.000mL/MIN 2PSI 013.28mL STOPPED FILE:1 00:00:00 /MIN FINAL: PSI PROGRAM EDIT REVIEW OPTION 2. Press PROGRAM (A). 3. At the prompt, enter a file number between 1 and 99. This is the file name of your program, and can be the name of a new program you are creating, or a stored program you want to edit or run. Press ENTER. Note If a selected stored program is in a different mode than that of the controller selected in Step 1, a brief notification will appear, displaying the controller’s mode and the file’s mode. If you attempt to run the program without changing the mode of either it or the controller, the program will not run, and the same message will be displayed. 4. To enter the flow rate for this program, either press FLOWRATE (A) and use the number keys and Enter, or for maximum possible flow, simply press MAX (C). ENTER FLOWRATE 0.00000 FLOWRATE PREVIOUS XX.00000 MAX 5. To proceed to the programming screen, press STEP FWD (B). The programming screen will appear, with the file number and step number at the top of the screen. 4-6 HLf Series Syringe Pumps Section 4 Gradient Pumping for Pressure, Flow, and Concentration Modes PGa FILE# 1 1. INIT = 0PSI STEP# 1 3. RATE = STORE TO EXIT 0:00PSI/MIN 2. FINAL = 0PSI 4. DURATION = 1.0MIN INSERT DELETE or FGa FILE# 1 STEP# 1 STORE TO EXIT 1. INIT% = 3. RATE = 0.00%/MIN 2. FIN% = 4. DURATION = 1.0MIN INSERT DELETE 6. To set the initial pressure or flow for this step, press INIT (1) to activate this parameter. Use the number keys to enter the desired value, then press ENTER to save it. 7. To set the final pressure or flow for this step, press FINAL (2) to activate this parameter. User the number keys to enter the desired value, then press ENTER to save it. 8. Set either the desired RATE (3) of change or DURATION (4) in minutes. Once one value has been set and saved, the other will automatically appear. Note DURATION in minutes can have a resolution of 0.1, with a maximum of 9,999 minutes per step. 9. If you want to add another step to the file program, press INSERT (C). 10. The step number will increase by one, and the default initial value will be the final value entered for the previous step. Edit as desired. 11. When programming is complete, press the STORE key to save the file and return to the home screen. 12. To start the program, press RUN two times. Note When a gradient run is started, digital output 8 of the controller ACCESSORY connector will toggle from high to low (open to closed) for one second. Note that an entire gradient program can be removed only by deleting each of its steps one at a time, as discussed in Section 4.5 Review, Revise, & Hold Options. When the last remaining step is deleted, the entire file is removed. 4-7 HLf Series Syringe Pumps Section 4 Gradient Pumping for Pressure, Flow, and Concentration Modes 4.4 Dual Pump Concentration Gradient Programming Two-pump concentration gradients enable proportionate use of two different fluids that combine at the mixer (refer to Figures 4-1 and 4-2). This type of pumping uses flow mode (FG) only. A single-pump gradient program is based on either pressure or flow, and controlled by either time duration (in minutes) or rate of change (units per minute). The controller’s memory can contain a total of up to 200 steps. One program can contain from 1 to 200 steps. When operating in gradient mode, any connected pumps not used for gradient are inoperable. 1. To access the gradient programming menus, press PRGM GRAD, then DUAL SYSTEM GRADIENT (1) and CONTINUE (C). The home screen will appear, with FG (Flow Gradient) in the upper left corner. FGa 0.000mL/MIN STOPPED PROGRAM 2PSI 013.28mL FILE:1 00:00:00 FINAL: %B EDIT REVIEW OPTION 2. Press PROGRAM (A). 3. At the prompt, enter a file number between 1 and 99. This is the file name of your program, and can be the name of a new program you are creating, or a stored program you want to edit or run. Press ENTER. Note If a selected stored program is in a different mode than that of the controller selected in Step 1, a brief notification will appear, displaying the controller’s mode and the file’s mode. If you attempt to run the program without changing the mode of either it or the controller, the program will not run, and the same message will be displayed. 4. To enter the flow rate for this program, either press FLOWRATE (A) and use the number keys and Enter, or for maximum possible flow, simply press MAX (C). ENTER FLOWRATE 0.00000 FLOWRATE 4-8 PREVIOUS XX.00000 MAX HLf Series Syringe Pumps Section 4 Gradient Pumping for Pressure, Flow, and Concentration Modes 5. To proceed to the programming screen, press STEP FWD (B). The programming screen will appear, with the file number and step number at the top of the screen. FGa FILE# 1 STEP# 1 STORE TO EXIT 1. INIT% = 3. RATE = 0.00%/MIN 2. FIN% = 4. DURATION = 1.0MIN INSERT DELETE 6. To set the initial pressure or flow for this step, press INIT (1) to activate this parameter. Use the number keys to enter the desired value, then press ENTER to save it. 7. To set the final pressure or flow for this step, press FINAL (2) to activate this parameter. User the number keys to enter the desired value, then press ENTER to save it. 8. Set either the desired RATE (3) of change or DURATION (4) in minutes. Once one value has been set and saved, the other will automatically appear. Note DURATION in minutes can have a resolution of 0.1, with a maximum of 9,999 minutes per step. 9. If you want to add another step to the file program, press INSERT (C). 10. The step number will increase by one, and the default initial value will be the final value entered for the previous step. Edit as desired. 11. When programming is complete, press the STORE key to save the file and return to the home screen. 12. To start the program, press RUN two times. Note When a gradient run is started, digital output 8 of the controller ACCESSORY connector will toggle from high to low (open to closed) for one second. The flow rates and ramp rate for Pump A in each step will be in direct opposite proportion to the values set for Pump B (INIT%B, FIN%B, and RATE). Note that an entire gradient program can be removed only by deleting each of its steps one at a time, as discussed in the next section, 4.5 Review, Revise, & Hold Options. When the last remaining step is deleted, the entire file is removed. 4-9 HLf Series Syringe Pumps Section 4 Gradient Pumping for Pressure, Flow, and Concentration Modes 4.5 Review, Revise, & Hold Options While in the programming menu, you can also: Delete – To delete the current step, press DELETE (D). A deleted step cannot be recovered. Used repeatedly, this command can be used to delete an entire file. Review – To r e v i e w e x i s t i n g p r o g r a m s t e p s , p r e s s STEP BACK (A) or STEP FWD (B). Add New – To add a new step between two existing steps, navigate through the program to the step just before your addition. Press INSERT (C) and program the new step. Note that the initial value of the next step will default to the final value of the new step, and may need to be edited if a different initial value is needed. While Running – A gradient program can be reviewed or edited while it is running. Simply press EDIT (B) or REVIEW (C) to begin. If a new step duration is shorter than the elapsed time for that step, the program will proceed to the next step. If the total flow rate is changed, the program will immediately start using the new rate. To return to the run screen, press RETURN (D). Hold – You can hold a running gradient in its current state while retrieving a different program file to run in its place. Press Hold and then Recall to access the new program. This feature is used mainly in applications where it is necessary to keep the system pressurized during method changes. External Start – When a gradient program is in Hold mode, a momentary low on digital input 2 of the controller ACCESSORY connector will start the program. 4.6 Program Conclusion When a gradient program reaches the end, there are four selectable actions the system can then perform: • Hold the final value (example below) • Stop after the final step • Return to the initial value and hold it • Return to the initial value and repeat the program While the system is in gradient mode, these options can be edited at any point before or after gradient programming, and while a gradient is running. To access the options menu, from the home screen, press OPTIONS (D). GRADIENT ACTION=HOLD FINAL VALUE NEXT_ACTION PREVIOUS To scroll through the four options, press NEXT_ACTION (A). When you have reached the desired option, press PREVIOUS (D) to save and exit. 4-10 HLf Series Syringe Pumps Section 5 Continuous Flow Introduction, Installation, & Operation 5.1 Introduction A HL Series continuous flow pumping system consists of two syringe pumps and a valve accessory package regulated by one controller. This system allows you to continuously deliver liquefied gas or liquid under constant flow or constant pressure mode. Continuous flow can be used in either of two modes: continuous constant pressure or continuous constant flow. Both of these modes assume positive displacement of the piston, with the exception of continuous Receive Mode (for detailed information about Receive Mode, refer to technical bulletin TB02 Constant Pressure Pump Operation for Receive Mode, available on the Teledyne Isco web site). In any syringe pump continuous flow system, a flow irregularity occurs at the time of switch over from one pump module to the other. This flow irregularity can be measured as a pressure fluctuation. Teledyne Isco pressure fluctuation at switchover is ~0.35 bar (at system backpressures from 6.9 bar to the single pump maximum). Before programming continuous flow, appropriate valves must be connected, the pumps must contain fluid, and there must be backpressure for operation. 5.2 Continuous Flow Air Valves Air valves generally open and close faster and are less prone to error and component wear, making them suitable for industrial use and other applications where the system will be constantly running; however, they require a user-supplied pressurized air source of 80 to 115 psi (5.5 to 7.9 bar). Air Valve Package Numbers For 1000 HLf Systems 60-1247-143 For 500HLf Systems 60-1247-142 For 100HLf and 260HLf Systems 60-1247-141 5-1 HLf Series Syringe Pumps Section 5 Continuous Flow Introduction, Installation, & Operation Table 5-1 Continuous Flow Technical Specifications-Air Valves: Pressure fluctuation at switchover during delivery 5 psi (0.35 bar), at system backpressures from 100 psi (6.9 bar) to the single pump maximum. Higher fluctuation occurs at pressures below 100 psi. Minimum 50.76 psi (3.5 bar) Maximum system backpressure The single pump maximum. Valves rated to 10,000 psi (689.5 bar) Air supply source pressure 80 to 115 psi (5.5 to 7.9 bar) Maximum flow rate (ml/min) 265.2 132.6 69.55 32.50 Liquids: 65% of the single pump maximum rate. 1000HLf 500HLf 260HLf 100HLf Liquefied gases 45% of the single pump maximum rate. Cylinder cooling jackets should be used to obtain this rate. Temperature range 0 to 40°C Wetted materials in valve packages: Air valves Hastelloy, PEEK, and PTFE Tubing and fittings SS316, gold 5.2.1 Dual Air Valve Installation To install the air valve package (refer to Figure 5-1or 5-3, depending on your pump model): 1. Position the valve bases 1.3 cm apart. 2. Use the plugs to stopper the ports which will not be connected. DANGER RISK OF INJURY. THE PRESSURE PRODUCED COULD BE 700 BAR. PLEASE UTILIZE APPROPRIATE TUBING AND CONNECTIONS NOTED IN THE MANUAL. 3. Loosely attach the tubing lengths from the valve assembly to the pumps. Plumbing connections 4. Allow the bracket to hang vertically. Install the four #4 panhead screws on bottom of the bracket and the two #6 panhead screws. 5. Tighten the tubing nuts. 6. Connect the inlet tube to the supply reservoir. Connect the outlet tee to your apparatus. 5-2 HLf Series Syringe Pumps Section 5 Continuous Flow Introduction, Installation, & Operation Outlet 1/8" Valco Nut Pressure Transducer Cap 1/8" Valco Ferrule Pre-swaged 1/8" Valco Connector Tubing Check Valve Mounting plate Actuator Inlet (customer reservoir) #4 Panhead Screws (4) Air Supply #6 Panhead screws (2) Wire pair conversion table for A-B Pump Pair and C-D Pump Pair A-B Pump Wire Pair Digital Output +15 Wires C-D Pump Wire Pair Digital Output +15 Wires A1 A2 B3 B4 A1 A2 B3 B4 +15 +15 +15 +15 A1 A2 B3 B4 C5 C6 D7 D8 +15 +15 +15 +15 Figure 5-1 Air valve installation for 100HLf and 260HLf pumps 5-3 HLf Series Syringe Pumps Section 5 Continuous Flow Introduction, Installation, & Operation Outlet 1/8" Valco Nut Pre-swaged 1/8" male connector tubing 1/8" Valco Ferrule Pressure Transducer Cap Mounting plate Check Valve Actuator Inlet (customer reservoir) #4 Panhead Screws (4) Air Supply #6 Panhead screws (2) Wire pair conversion table for A-B Pump Pair and C-D Pump Pair A-B Pump Wire Pair Digital Output +15 Wires C-D Pump Wire Pair Digital Output +15 Wires A1 A2 B3 B4 A1 A2 B3 B4 +15 +15 +15 +15 A1 A2 B3 B4 C5 C6 D7 D8 +15 +15 +15 +15 Figure 5-2 Air valve installation for 500HLf 5-4 HLf Series Syringe Pumps Section 5 Continuous Flow Introduction, Installation, & Operation Outlet 1/4" Valco Nut Pre-swaged 1/4" male connector tubing 1/4" Valco Ferrule Pressure Transducer Cap Check Valve Mounting Plate Actuator #4 Panhead screws(4) Air Supply #6 Panhead crews (2) Inlet (customer reservoir) Wire pair conversion table for A-B Pump Pair and C-D Pump Pair A-B Pump Wire Pair Digital Output +15 Wires C-D Pump Wire Pair Digital Output +15 Wires A1 A2 B3 B4 A1 A2 B3 B4 +15 +15 +15 +15 A1 A2 B3 B4 C5 C6 D7 D8 +15 +15 +15 +15 Figure 5-3 Air valve installation for 1000HLf pump 5-5 HLf Series Syringe Pumps Section 5 Continuous Flow Introduction, Installation, & Operation 5.3 User Supplied Valves Users may also choose to supply their own valves. The following information is necessary to choose the appropriate valves to work with Teledyne Isco Continuous Flow software. • Check valves Do not use spring-loaded check valves if refilling at atmospheric pressure; the pump seals are not designed to draw against a vacuum. The balls in Teledyne Isco check valves are closed by gravity. • Powered valves These are electrically triggered from the pump controller and could be air or electrically actuated. Digital outputs 1-4 provide signals for control of four two-way valves. One wire for each valve is connected to its specific connector on the rear of the controller. A second wire for each valve connects to ground. The signal provided is an open collector which functions as a switch open for closure of the fluid path. A switch closure (low) signals opening of the fluid path. WARNING Connecting devices to energized circuits may cause personal injury or property damage. Power must be removed from the pump before connecting external devices. Table 5-2 shows the relationship between the digital output, pump valve location, and the fluid path status for the ACCESS CTRL connections. Refer to the accessory control connections on the rear panel of the pump controller. Table 5-2 Accessory Control Digital Outputs Digital Output Pump Valve Fluid Path Status Location 1 A Inlet (open or closed) 2 A Outlet (open or closed) 3 B Inlet (open or closed) 4 B Outlet (open or closed) 5 C Inlet (open or closed) 6 C Outlet (open or closed) 7 D Inlet (open or closed) 8 D Outlet (open or closed) Alternate connections can be made to drive low power 12-15 V relays or electric valves. Assume two wires per relay or valve. The first wire is connected to the appropriate digital output on the back of the pump controller. The second wire can be con- 5-6 HLf Series Syringe Pumps Section 5 Continuous Flow Introduction, Installation, & Operation nected to the +15 V connector, to supply a maximum of 200 mA for switching of relays or valves. Observe correct polarity if the valve or relay is polarized. 5-7 HLf Series Syringe Pumps Section 5 Continuous Flow Introduction, Installation, & Operation 5.4 Continuous Flow Mode Once your valve package has been properly installed and you have ensured that fluid connections are leak-free, the system is ready for operation. Note Teledyne Isco convention is to name the pumps “pump A” and “pump B,” reading from left to right. Before running in continuous flow mode, become familiar with independent mode, which allows the controller to operate two pumps independently and simultaneously. You must operate the two pumps manually for initial setup, i.e. refill and purging of air. If the Teledyne Isco air valve package is used, the air valves are switched through ACCESS CTRL. When air valves are used, lights on the air valve actuator indicate which valves are open. Table 5-3 Key functions in the Multi-pump Mode Key A B C 6 Display Option Description NORMAL Uses a finer (slower) pressure match control when switching from one pump to the other. FAST Uses a coarser (faster) pressure match control when switching from one pump to the other. NORMAL PRESS Uses pressure matching when switching from one pump to the other LOW PRESS Uses no pressure matching when switching from one pump to the other. DELIVER Sets the pump into the delivery mode of operation. RECEIVE Sets the pump into the receive mode of operation. OTHER OPTIONS Sets the fill and refill marks that are used with both continuous flow modes. Sets the NVC feature On/Off. 5.4.1 Defining Operation Select Pump – This menu allows you to select any pump to display its run screen (program and operation data) and to make program changes. Valve specification – To prevent pressure fluctuation at switchover, you must specify the type of valve package you are using. 5-8 HLf Series Syringe Pumps Section 5 Continuous Flow Introduction, Installation, & Operation or or (AIR) (CHECK VALVES) or (MORE) (2-WAY) (3-WAY) ELECTRIC ELECTRIC (PREVIOUS) Press 3x to return to run screen (VALVE) Figure 5-4 Keystrokes to specify valve type Note In Figure 5-4 Active refers to air or electric valves; Passive refers to check valves. Volume totalizer – The total volume delivered is displayed in liters at the top right corner of the screen. Refer to the figure below to reset the volume totalizer to zero. 1. AB Pumps 2. CD Pumps 3. AB & CD Pumps (TOTAL VOLUME RESET) (MORE) (PREVIOUS) Press 2x to return to run screen Figure 5-5 Keystrokes to reset volume totalizer 5.4.2 Constant Flow Mode Continuous flow mode is found under the multi-pump options on Menu 2. Once you have accessed the multi-pump options, you may select Constant Flow mode or Constant Pressure mode. 5-9 HLf Series Syringe Pumps Section 5 Continuous Flow Introduction, Installation, & Operation (CONTIN CONST FLOW) ‘1’ will blink (MORE) (MULTI-PUMP) (PREVIOUS) Press 3x to return to run screen Starts operation 1. AB Pumps 2. CD Pumps Figure 5-6 Keystrokes to set up constant flow 5.4.3 Constant Pressure Mode Continuous flow mode is found under the multi-pump options on Menu 2. Once you have accessed the multi-pump options, you may select Constant Flow mode or Constant Pressure mode. (CONTIN CONST PRESS) ‘2’ will blink (MORE) (MULTI-PUMP) 1. AB Pumps 2. CD Pumps Figure 5-7 Keystrokes to set up constant pressure 5-10 (PREVIOUS) Press 3x to return to run screen Starts operation HLf Series Syringe Pumps Section 5 Continuous Flow Introduction, Installation, & Operation 5.4.4 To Run or Stop This menu setting allows the operator to run or stop both pairs of pumps simultaneous. (PREVIOUS) Press 3x to return to run screen (MORE) (MULTI-PUMP) (FOUR PUMP RUN/STOP) Figure 5-8 Keystrokes to Run or Stop the pumps Note Before pressing RUN, ensure that ON CONT FLOW is displayed on the screen, and that the set flow rate/pressure is correct. Always verify the valve settings before running a program. If a controller is reset or moved to a different power source, it will revert back to default settings (Active). 5.4.5 Tips for Running Continuous Flow Liquids Checklist: 1. Degas liquids if appropriate. 2. Purge air from the system: a. Fill both pumps completely by pressing REFILL and selecting each pump to fill. b. Route the outlet to waste or reservoir and press RUN. Press STOP when fluid comes out of the outlet. c. Open the valves to atmosphere by pressing ACC CTRL, then selecting each valve to open. d. Zero the pressure in each pump by pressing ZERO PRESS and selecting each pump to zero. e. Connect the outlet tubing and fill each pump once more. 3. Reset total volume (see Figure 5-5). 5-11 HLf Series Syringe Pumps Section 5 Continuous Flow Introduction, Installation, & Operation Liquefied Gases Checklist: 1. Open the valves to atmosphere by pressing ACC CTRL, then selecting each valve to open. 2. Zero the pressure in each pump by pressing ZERO PRESS and selecting each pump to zero. 3. Fill both pumps completely by pressing REFILL and selecting each pump to fill. 4. Pressurize both pumps by pressing RAPID PRESS. Maximum flow rate and target pressure value will be displayed. Press D to continue pressurization. 5. Reset total volume (see Figure 5-5). Equilibration – When the pumps begin running, the system will go through an equilibration phase, during which both pumps must be full and delivering fluid. Additional guidelines – Please become familiar with the following guidelines: • Pressure limits for continuous constant flow mode are set by the limits of pump A for the A-B pair and pump C for the C-D pair. • Temperature changes can cause pressure fluctuations. For available temperature control options, contact Teledyne Isco. • For correct overpressure response, shutdown must be set to ON under PUMP LIMIT options. • Enter the same refill rate separately for pumps A, B, C, and D. The refill rate should always be as high as possible to allow time for refill and repressurization before the next switchover. 5-12 HLf Series Syringe Pumps Section 6 Modbus Configuration 6.1 Overview 6.1.1 Modbus RTU Modbus is a simple command/response mechanism to read from and write to specific memory locations called registers. A register is a holding place for a piece of digital information within the equipment. For more information on Modbus, please refer to the following documents which can be found on the www.modbus.org website: Modbus Application Protocol Vol. 1 and Modbus Over Serial Line Vol. 12 and Modbus Messaging on TCP/IP. The Isco HLf Series Syringe pump controller supports both the Modbus RTU and Modbus TCP/IP protocols. The Modbus RTU protocol implementation uses a 2-wire RS-485 connection. The RS-485 connections are located on the DB25 connector labeled RS-232/RS-485. We recommend connecting the ground reference wire as shown in Figure 6-1. The matching connection is a D-Subminiature 25-pin standard plug, such as an AMP part #747912-2 from an electronic parts supplier. WARNING Connecting devices to energized circuits may cause personal injury or property damage. Power must be removed from the pump before connecting external devices. 6-1 HLf Series Syringe Pumps Section 6 Modbus Configuration Figure 6-1 RS-485 Connection 6.1.2 Modbus TCP/IP The modbus TCP/IP protocol implementation uses an ethernet connection. The ethernet connections are located on the DB25 connector labeled USB/Ethernet. Pin on DB 25 Casing 6.1.3 Modbus Configuration Options Ethernet 2 Transmit + 14 Transmit - 15 Receive + 17 Receive - To access the Modbus configuration settings, press: Modbus Options (MORE) 1. Modbus RTU 2. Modbus TCP (MORE) (MORE) 6-2 HLf Series Syringe Pumps Section 6 Modbus Configuration Table 6-1 Modbus TCP/IP Configuration Options Item Description IP Address Internet protocol address of device (Default 192.168.1.200) Subnet Mask Subnet mask (Default 255.255.255.0) Gateway Gateway (Default 0.0.0.0) Port TCP port (Default 502) Table 6-2 Modbus RTU Configuration Options Item Value Description Baud Rate 300, 1200, 2400, 4800, 9600, 19200, 38400, 57600, 115200 Communication Speed (Default 19200) Slave ID 1-247 Device address (Default 1) Parity Even 1 Stop Bit, Odd 1 Stop Bit, None 1 Stop Bit, None 2 Stop Bit Communication parameters (Default Even 1 Stop Bit) Word Order Big Endian, Little Endian Word order for 32-bit integers and IEEE-754 floating point numbers. Big Endian: AB CD; Little Endian CD AB. (Default Big Endian) Character Time Min: Baud Rate dependent Max: 999ms Time to transmit single character t1. Used to calculate inter frame and inter character space t1.5, t3.5 (50 m sec default) Table 6-3 Supported Modbus Function Codes Function Code Description 01 Read Discrete Output Coils 03 Read Analog Output Holding Registers 05 Write Single Discrete Output Coil 15 Write Multiple Discrete Output Coils 16 Write Multiple Analog Output Holding Registers Table 6-4 Exception Responses Exception Code Name Description 01 Illegal Function Function code received is not supported. 6-3 HLf Series Syringe Pumps Section 6 Modbus Configuration Table 6-4 Exception Responses (Continued) 02 Illegal Data Address Data address received is not an allowable address. Illegal Data Value A value contained in the query data field is not an allowable value for the addressed location. This may indicate a fault in the structure of the remainder of a complex request, such that the implied length is incorrect. Does NOT mean data value is outside the expectation of the controller. 03 Table 6-5 Coils Register Address Type Size Description 00001 0 R/W 1 BIT 0: Stop Pump A 1: Run Pump A 00002 1 R/W 1 BIT 0: Stop Pump B 1: Run Pump B 00003 2 R/W 1 BIT 0: Stop Pump C 1: Run Pump C 00004 3 R/W 1 BIT 0: Stop Pump D 1: Run Pump D 00005 4 R/W 1 BIT Link Run/Stop operation of multi-pump pair AB & multi-pump pair CD 0: Disable 1:Enable 00006 5 R/W 1 BIT 0: Stop Pump A if in Refill 1: Run Pump A in Refill 00007 6 R/W 1 BIT 0: Stop Pump B if in Refill 1: Run Pump B in Refill 00008 7 R/W 1 BIT 0: Stop Pump C if in Refill 1: Run Pump C in Refill 00009 8 R/W 1 BIT 0: Stop Pump D if in Refill 1: Run Pump D in Refill 00010 9 R/W 1 BIT 1: Pump A in Constant Pressure mode 00011 10 R/W 1 BIT 1: Pump B in Constant Pressure mode 00012 11 R/W 1 BIT 1: Pump C in Constant Pressure mode 00013 12 R/W 1 BIT 1: Pump D in Constant Pressure mode 00014 13 R/W 1 BIT 1: Pump A in Constant Flow mode 00015 14 R/W 1 BIT 1: Pump B in Constant Flow mode 00016 15 R/W 1 BIT 1: Pump C in Constant Flow mode 00017 16 R/W 1 BIT 1: Pump D in Constant Flow mode 00018 17 R/W 1 BIT 1: Pump A & Pump B in Independent mode 00019 18 R/W 1 BIT 1: Pump A & Pump B in Continuous Flow Constant Flow mode 00020 19 R/W 1 BIT 1: Pump A & Pump B in Continuous Flow Constant Pressure mode 00021 20 R/W 1 BIT 1: Pump A & Pump B in Modifier addition mode 00022 21 R/W 1 BIT 1: Pump A & Pump B & Pump C in Continuous Modifier addition mode 00023 22 R/W 1 BIT 1: Pump C & Pump D in Independent mode 00024 23 R/W 1 BIT 1: Pump C & Pump D in Continuous Flow Constant Flow mode 00025 24 R/W 1 BIT 1: Pump C & Pump D in Continuous Flow Constant Pressure mode 00026 25 R/W 1 BIT 0:Multi-pump pair AB in Delivery mode 1: Multi-pump pair AB in Receive mode 6-4 HLf Series Syringe Pumps Section 6 Modbus Configuration Table 6-5 Coils (Continued) Register Address Type Size Description 00027 26 R/W 1 BIT 0: Multi-pump pair AB in Low Press operation 1: Multi-pump pair AB in Normal Press operation 00028 27 R/W 1 BIT 0: Use Fast (coarser) pressure match control for multi-pump pair AB 1: Use Normal (finer) pressure match control for multi-pump pair AB 00029 28 R/W 1 BIT 0: Multi-pump pair CD in Delivery mode 1: Multi-pump pair CD in Receive mode 00030 29 R/W 1 BIT 0: Multi-pump pair CD in Low Press operation 1: Put multi-pump pair CD in Normal Press operation 00031 30 R/W 1 BIT 0: Use Fast (coarser) pressure match control for multi-pump pair CD 1: Use Normal (finer) pressure match control for multi-pump pair CD 00032 31 R/W 1 BIT 1: Activates the automatic rapid pressurization cycle (Constant Flow mode only) for Pump A 00033 32 R/W 1 BIT 1: Activates the automatic rapid pressurization cycle (Constant Flow mode only) for Pump B 00034 33 R/W 1 BIT 1: Activates the automatic rapid pressurization cycle (Constant Flow mode only) for Pump C 00035 34 R/W 1 BIT 1: Activates the automatic rapid pressurization cycle (Constant Flow mode only) for Pump D 00036 35 R 1 BIT 1: Pump A is Equilibrating 00037 36 R 1 BIT 1: Pump B is Equilibrating 00038 37 R 1 BIT 1: Pump C is Equilibrating 00039 38 R 1 BIT 1: Pump D is Equilibrating 00040 39 R 1 BIT 1: Pump A is in Hold (clock stopped) 00041 40 R 1 BIT 1: Pump B is in Hold (clock stopped) 00042 41 R 1 BIT 1: Pump C is in Hold (clock stopped) 00043 42 R 1 BIT 1: Pump D is in Hold (clock stopped) 00044 43 R 1 BIT 1: Pump A & Pump B in Concentration Gradient 00045 44 R 1 BIT 1: Pump A in Pressure Gradient 00046 45 R 1 BIT 1: Pump A in Flow Gradient 00047 46 R/W 1 BIT 1: Controller in Local Operation 00048 47 R/W 1 BIT 1: Controller in Remote Operation 00049 48 R/W 1 BIT 1: Controller in External Operation 00050 49 R/W 1 BIT 1: External Refill control enabled 00051 50 R/W 1 BIT 1: Zero pressure sensor offset for Pump A 00052 51 R/W 1 BIT 1: Zero pressure sensor offset for Pump B 00053 52 R/W 1 BIT 1: Zero pressure sensor offset for Pump C 00054 53 R/W 1 BIT 1: Zero pressure sensor offset for Pump D 00055 54 R/W 1 BIT 0: Pressure Integrator for Pump A OFF 1: Pressure Integrator for Pump A ON 00056 55 R/W 1 BIT 0: Pressure Integrator for Pump B OFF 1: Pressure Integrator for Pump B ON 00057 56 R/W 1 BIT 0: Pressure Integrator for Pump C OFF 1: Pressure Integrator for Pump C ON 00058 57 R/W 1 BIT 0: Pressure Integrator for Pump D OFF 1: Pressure Integrator for Pump D ON 00059 58 R/W 1 BIT 0: Pressure Deadband for Pump A OFF 1: Pressure Deadband for Pump A ON 00060 59 R/W 1 BIT 0: Pressure Deadband for Pump B OFF 1: Pressure Deadband for Pump B ON 00061 60 R/W 1 BIT 0: Pressure Deadband for Pump C OFF 1: Pressure Deadband for Pump C ON 00062 61 R/W 1 BIT 0: Pressure Deadband for Pump D OFF 1: Pressure Deadband for Pump D ON 00063 62 R/W 1 BIT 0: AUTO REFILL A OFF 1: AUTO REFILL A ON 00064 63 R/W 1 BIT 0: AUTO REFILL B OFF 1: AUTO REFILL B ON 6-5 HLf Series Syringe Pumps Section 6 Modbus Configuration Table 6-5 Coils (Continued) Register Address Type Size Description 00065 64 R/W 1 BIT 0: AUTO REFILL C OFF 1: AUTO REFILL C ON 00066 65 R/W 1 BIT 0: AUTO REFILL D OFF 1: AUTO REFILL D ON 00067 66 R/W 1 BIT 0: AUTO FILL A OFF 1: AUTO FILL A ON 00068 67 R/W 1 BIT 0: AUTO FILL B OFF 1: AUTO FILL B ON 00069 68 R/W 1 BIT 0: AUTO FILL C OFF 1: AUTO FILL C ON 00070 69 R/W 1 BIT 0: AUTO FILL D OFF 1: AUTO FILL D ON 00071 70 R/W 1 BIT 0: DIGITAL OUTPUT BIT 1 HIGH 1: DIGITAL OUTPUT BIT 1 LOW 00072 71 R/W 1 BIT 0: DIGITAL OUTPUT BIT 2 HIGH 1: DIGITAL OUTPUT BIT 2 LOW 00073 72 R/W 1 BIT 0: DIGITAL OUTPUT BIT 3 HIGH 1: DIGITAL OUTPUT BIT 3 LOW 00074 73 R/W 1 BIT 0: DIGITAL OUTPUT BIT 4 HIGH 1: DIGITAL OUTPUT BIT 4 LOW 00075 74 R/W 1 BIT 0: DIGITAL OUTPUT BIT 5 HIGH 1: DIGITAL OUTPUT BIT 5 LOW 00076 75 R/W 1 BIT 0: DIGITAL OUTPUT BIT 6 HIGH 1: DIGITAL OUTPUT BIT 6 LOW 00077 76 R/W 1 BIT 0: DIGITAL OUTPUT BIT 7 HIGH 1: DIGITAL OUTPUT BIT 7 LOW 00078 77 R/W 1 BIT 0: DIGITAL OUTPUT BIT 8 HIGH 1: DIGITAL OUTPUT BIT 8 LOW 00079 78 R/W 1 BIT 0: Disable Dispense Mode A 1: Enable Dispense Mode A Only configure if in Constant Flow Mode 00080 79 R/W 1 BIT 0: Disable Dispense Mode B 1: Enable Dispense Mode B Only configure if in Constant Flow Mode 00081 80 R/W 1 BIT 0: Disable Dispense Mode C 1: Enable Dispense Mode C Only configure if in Constant Flow Mode 00082 81 R/W 1 BIT 0: Disable Dispense Mode D 1: Enable Dispense Mode D Only configure if in Constant Flow Mode 00083 82 R/W 1 BIT 1: Reset total volume delivered by multi-pump pair AB 00084 83 R/W 1 BIT 1: Reset total volume delivered by multi-pump pair CD 00085 84 R/W 1 BIT 1: Pressure Units =ATM 00086 85 R/W 1 BIT 1: Pressure Units = BAR 00087 86 R/W 1 BIT 1: Pressure Units = kPa 00088 87 R/W 1 BIT 1: Pressure Units = PSI 00089 88 R/W 1 BIT 1: Flow Units = ml/min 00090 89 R/W 1 BIT 1: Flow Units = ml/hr 00091 90 R/W 1 BIT 1: Flow Units = ul/min 00092 91 R/W 1 BIT 1: Flow Units = ul/hr 00093 92 R/W 1 BIT 0: Overpressure Alarm OFF 1: Overpressure Alarm ON 00094 93 R/W 1 BIT 0: Overpressure Display OFF 1: Overpressure Display ON 00095 94 R/W 1 BIT 0: Overpressure Shutdown OFF 1: Overpressure Shutdown ON 00096 95 R/W 1 BIT 0: Underpressure Alarm OFF 1: Underpressure Alarm ON 00097 96 R/W 1 BIT 0: Underpressure Display OFF 1: Underpressure Display ON 00098 97 R/W 1 BIT 0: Underpressure Shutdown OFF 1: Underpressure Shutdown ON 00099 98 R/W 1 BIT 0: Overflow Alarm OFF 1: Overflow Alarm ON 00100 99 R/W 1 BIT 0: Overflow Display OFF 1: Overflow Display ON 00101 100 R/W 1 BIT 0: Overflow Shutdown OFF 1: Overflow Display ON 6-6 HLf Series Syringe Pumps Section 6 Modbus Configuration Table 6-5 Coils (Continued) Register Address Type Size Description 00102 101 R/W 1 BIT 0: Underflow Alarm OFF 1: Underflow Alarm ON 00103 102 R/W 1 BIT 0: Underflow Display OFF 1: Underflow Display ON 00104 103 R/W 1 BIT 0: Underflow Shutdown OFF 1: Underflow Shutdown ON 00105 103 R/W 1 BIT 0: Poor Fill Alarm A OFF 1: Poor Fill Alarm A ON 00106 105 R/W 1 BIT 0: Poor Fill Alarm B OFF 1: Poor Fill Alarm B ON 00107 106 R/W 1 BIT 0: Poor Fill Alarm C OFF 1: Poor Fill Alarm C ON 00108 107 R/W 1 BIT 0: Poor Fill Alarm D OFF 1: Poor Fill Alarm D ON 00109 108 R/W 1 BIT 1: Stop all motor and reset flow rate and pressure set-points to default. 00110 109 R 1 BIT 0: Transducer of Pump A not connected 1: Transducer of Pump A connected 00111 110 R 1 BIT 0: Pump A not at upper flag limit 1: Pump A at upper Flag Limit (Empty) 00112 111 R 1 BIT 0: Pump A not at lower flag limit 1: Pump A at lower flag limit (Full) 00113 112 R 1 BIT 1: Pump A is overpressure 00114 113 R 1 BIT 1: Pump A is underpressure 00115 114 R 1 BIT 1: Motor failure Pump A 00116 115 R 1 BIT 0: Transducer of Pump B not connected 1: Transducer of Pump B connected 00117 116 R 1 BIT 0: Pump B not at upper flag limit 1: Pump B at upper Flag Limit (Empty) 00118 117 R 1 BIT 0: Pump B not at lower flag limit 1: Pump B at lower flag limit (Full) 00119 118 R 1 BIT 1: Pump B is overpressure 00120 119 R 1 BIT 1: Pump B is underpressure 00121 120 R 1 BIT 1: Motor failure Pump B 00122 121 R 1 BIT 0: Transducer of Pump C not connected 1: Transducer of Pump C connected 00123 122 R 1 BIT 0: Pump C not at upper flag limit 1: Pump C at upper Flag Limit (Empty) 00124 123 R 1 BIT 0: Pump C not at lower flag limit 1: Pump C at lower flag limit (Full) 00125 124 R 1 BIT 1: Pump C is overpressure 00126 125 R 1 BIT 1: Pump C is underpressure 00127 126 R 1 BIT 1: Motor failure Pump C 00128 127 R 1 BIT 0: Transducer of Pump D not connected 1: Transducer of Pump D connected 00129 128 R 1 BIT 0: Pump D not at upper flag limit 1: Pump D at upper Flag Limit (Empty) 00130 129 R 1 BIT 0: Pump D not at lower flag limit 1: Pump D at lower flag limit (Full) 00131 130 R 1 BIT 1: Pump D is overpressure 00132 131 R 1 BIT 1: Pump D is underpressure 00133 132 R 1 BIT 1: Motor failure Pump D 00134 133 R 1 BIT 1: POOR FILL A ERROR 00135 134 R 1 BIT 1: POOR FILL B ERROR 00136 135 R 1 BIT 1: POOR FILL C ERROR 00137 136 R 1 BIT 1: POOR FILL D ERROR 00138 137 R 1 BIT 1: VALVE ERROR 00139 138 R 1 BIT DIGITAL IN 1 00140 139 R 1 BIT DIGITAL IN 2 00141 140 R 1 BIT DIGITAL IN 3 6-7 HLf Series Syringe Pumps Section 6 Modbus Configuration Table 6-5 Coils (Continued) Register Address Type Size Description 00142 141 R 1 BIT DIGITAL IN 4 Table 6-6 Holding Registers Register Address Read/ Type Write # of Description Registers 40001 0 R/W FLOAT 2 Pressure set-point for Pump A in Constant Pressure mode. ATM; BAR; kPa; PSI See NOTE 1. 40003 2 R/W FLOAT 2 Pressure set-point for Pump B in Constant Pressure mode. ATM; BAR; kPa; PSI See NOTE 1. 40005 4 R/W FLOAT 2 Pressure set-point for Pump C in Constant Pressure mode. ATM; BAR; kPa; PSI See NOTE 1. 40007 6 R/W FLOAT 2 Pressure set-point for Pump D in Constant Pressure mode. ATM; BAR; kPa; PSI See NOTE 1. 40009 8 R/W FLOAT 2 Pressure set-point for multi-pump pair AB in ATM; BAR; kPa; PSI See NOTE 1. Continuous Flow Constant Pressure mode. 40011 10 R/W FLOAT 2 Pressure set-point for multi-pump pair CD in ATM; BAR; kPa; PSI See NOTE 1. Continuous Flow Constant Pressure mode. 40013 12 R/W FLOAT 2 Flow rate set-point for Pump A in Constant Flow mode. ml/min; ml/hr; ul/min; ul/hr See NOTE 2. 40015 14 R/W FLOAT 2 Flow rate set-point for Pump B in Constant Flow mode. ml/min; ml/hr; ul/min; ul/hr See NOTE 2. 40017 16 R/W FLOAT 2 Flow rate set-point for Pump C in Constant Flow mode. ml/min; ml/hr; ul/min; ul/hr See NOTE 2. 40019 18 R/W FLOAT 2 Flow rate set-point for Pump D in Constant Flow mode. ml/min; ml/hr; ul/min; ul/hr See NOTE 2. 40021 20 R/W FLOAT 2 Flow rate set-point for multi-pump pair AB in ml/min; ml/hr; ul/min; ul/hr See NOTE 2. Continuous Flow Constant Flow mode. 40023 22 R/W FLOAT 2 Flow rate set-point for multi-pump pair CD in ml/min; ml/hr; ul/min; ul/hr See NOTE 2. Continuous Flow Constant Flow mode. 40025 24 R/W FLOAT 2 Refill flow rate for Pump A. ml/min; ml/hr; ul/min; ul/hr See NOTE 2. 40027 26 R/W FLOAT 2 Refill flow rate for Pump B. ml/min; ml/hr; ul/min; ul/hr See NOTE 2. 40029 28 R/W FLOAT 2 Refill flow rate for Pump C. ml/min; ml/hr; ul/min; ul/hr See NOTE 2. Units 40031 30 R/W FLOAT 2 Refill flow rate for Pump D. ml/min; ml/hr; ul/min; ul/hr See NOTE 2. 40033 32 R/W FLOAT 2 Maximum pressure set-point for Pump A. ATM; BAR; kPa; PSI See NOTE 1. 40035 34 R/W FLOAT 2 Maximum pressure set-point for Pump B. ATM; BAR; kPa; PSI See NOTE 1. 40037 36 R/W FLOAT 2 Maximum pressure set-point for Pump C. ATM; BAR; kPa; PSI See NOTE 1. 40039 38 R/W FLOAT 2 Maximum pressure set-point for Pump D. ATM; BAR; kPa; PSI See NOTE 1. 40041 40 R/W FLOAT 2 Minimum pressure set-point for Pump A. ATM; BAR; kPa; PSI See NOTE 1. 40043 42 R/W FLOAT 2 Minimum pressure set-point for Pump B. ATM; BAR; kPa; PSI See NOTE 1. 40045 44 R/W FLOAT 2 Minimum pressure set-point for Pump C. ATM; BAR; kPa; PSI See NOTE 1. 40047 46 R/W FLOAT 2 Minimum pressure set-point for Pump D. ATM; BAR; kPa; PSI See NOTE 1. 40049 48 R/W FLOAT 2 Maximum flow rate set-point for Pump A. ml/min; ml/hr; ul/min; ul/hr See NOTE 2. 6-8 HLf Series Syringe Pumps Section 6 Modbus Configuration Table 6-6 Holding Registers (Continued) Register Address Read/ Type Write # of Description Registers 40051 50 R/W FLOAT 2 Maximum flow rate set-point for Pump B. ml/min; ml/hr; ul/min; ul/hr See NOTE 2. 40053 52 R/W FLOAT 2 Maximum flow rate set-point for Pump C. ml/min; ml/hr; ul/min; ul/hr See NOTE 2. 40055 54 R/W FLOAT 2 Maximum flow rate set-point for Pump D. ml/min; ml/hr; ul/min; ul/hr See NOTE 2. 40057 56 R/W FLOAT 2 Minimum flow rate set-point for Pump A. ml/min; ml/hr; ul/min; ul/hr See NOTE 2. 40059 58 R/W FLOAT 2 Minimum flow rate set-point for Pump B. ml/min; ml/hr; ul/min; ul/hr See NOTE 2. 40061 60 R/W FLOAT 2 Minimum flow rate set-point for Pump C. ml/min; ml/hr; ul/min; ul/hr See NOTE 2. 40063 62 R/W FLOAT 2 Minimum flow rate set-point for Pump D. ml/min; ml/hr; ul/min; ul/hr See NOTE 2. 40065 64 R/W FLOAT 2 Maximum flow limit in Constant Pressure mode for Pump A. ml/min; ml/hr; ul/min; ul/hr See NOTE 2. 40067 66 R/W FLOAT 2 Maximum flow limit in Constant Pressure mode for Pump B. ml/min; ml/hr; ul/min; ul/hr See NOTE 2. 40069 68 R/W FLOAT 2 Maximum flow limit in Constant Pressure mode for Pump C. ml/min; ml/hr; ul/min; ul/hr See NOTE 2. 40071 70 R/W FLOAT 2 Maximum flow limit in Constant Pressure mode for Pump D. ml/min; ml/hr; ul/min; ul/hr See NOTE 2. 40073 72 R FLOAT 2 Actual pressure of Pump A. ATM; BAR; kPa; PSI See NOTE 1. Units 40075 74 R FLOAT 2 Actual flow rate of Pump A. ml/min; ml/hr; ul/min; ul/hr See NOTE 2. 40077 76 R FLOAT 2 Volume remaining in Pump A. milliliters 40079 78 R FLOAT 2 Actual pressure of Pump B. ATM; BAR; kPa; PSI See NOTE 1. 40081 80 R FLOAT 2 Actual flow rate of Pump B. ml/min; ml/hr; ul/min; ul/hr See NOTE 2. 40083 82 R FLOAT 2 Volume remaining in Pump B. milliliters 40085 84 R FLOAT 2 Actual pressure of Pump C. ATM; BAR; kPa; PSI See NOTE 1. 40087 86 R FLOAT 2 Actual flow rate of Pump C. ml/min; ml/hr; ul/min; ul/hr See NOTE 2. 40089 88 R FLOAT 2 Volume remaining in Pump C. milliliters 40091 90 R FLOAT 2 Actual pressure of Pump D. ATM; BAR; kPa; PSI See NOTE 1. 40093 92 R FLOAT 2 Actual flow rate of Pump D. ml/min; ml/hr; ul/min; ul/hr See NOTE 2. 40095 94 R FLOAT 2 Volume remaining in Pump D. milliliters 40097 96 R FLOAT 2 System flow rate of multi-pump pair AB. ml/min; ml/hr; ul/min; ul/hr See NOTE 2. 40099 98 R FLOAT 2 System pressure of multi-pump pair AB. ATM; BAR; kPa; PSI See NOTE 1. Liters 40101 100 R FLOAT 2 Total volume delivered by multi-pump pair AB. 40103 102 R FLOAT 2 System flow rate of multi-pump pair CD. ml/min; ml/hr; ul/min; ul/hr See NOTE 2. 40105 104 R FLOAT 2 System pressure of multi-pump pair CD. ATM; BAR; kPa; PSI See NOTE 1. Liters 40107 106 R FLOAT 2 Total volume delivered by multi-pump pair CD. 40109 108 R FLOAT 2 Analog voltage input on Analog Input 1 of the accessory connector. Volts 40111 110 R FLOAT 2 Analog voltage input on Analog Input 2 of the accessory connector. Volts 40113 112 R FLOAT 2 Analog voltage input on Analog Input 3 of the accessory connector. Volts 6-9 HLf Series Syringe Pumps Section 6 Modbus Configuration Table 6-6 Holding Registers (Continued) Register Address Read/ Type Write # of Description Registers 40115 114 R FLOAT 2 Analog voltage input on Analog Input 4 of the accessory connector. 40117 116 R/W FLOAT 2 Volume at which Pump A will automatically milliliters switch to refill mode if AUTO REFILL A is ON. 40119 118 R/W FLOAT 2 Volume at which Pump B will automatically milliliters switch to refill mode if AUTO REFILL B is ON. 40121 120 R/W FLOAT 2 Volume at which Pump C will automatically milliliters switch to refill mode if AUTO REFILL C is ON . 40123 122 R/W FLOAT 2 Volume at which Pump D will automatically milliliters switch to refill mode if AUTO REFILL D is ON. 40125 124 R/W FLOAT 2 Volume that Pump A will be refill to if AUTO milliliters FILL TO A is ON. 40127 126 R/W FLOAT 2 Volume that Pump B will be refill to if AUTO milliliters FILL TO B is ON. 40129 128 R/W FLOAT 2 Volume that Pump C will be refill to if AUTO milliliters FILL TO C is ON. 40131 130 R/W FLOAT 2 Volume that Pump D will be refill to if AUTO milliliters FILL TO D is ON. 40133 132 R/W FLOAT 2 Percentage of total pump volume that the refilling pump of multi-pump pair AB will refill to. % 40135 134 R/W FLOAT 2 Percentage of total pump volume that the delivering pump of multi-pump pair AB will deliver to. % 40137 136 R/W FLOAT 2 Percentage of total pump volume that the refilling pump of multi-pump pair CD will refill to. % 40139 138 R/W FLOAT 2 Percentage of total pump volume that the delivering pump of multi-pump pair CD will deliver to. % 40141 140 R/W FLOAT 2 POOR FILL MARK A % VALID ENTRYS:10,20,30,40,50,60,70,80,90 40143 142 R/W FLOAT 2 POOR FILL MARK B % VALID ENTRYS:10,20,30,40,50,60,70,80,90 40145 144 R/W FLOAT 2 POOR FILL MARK C % VALID ENTRYS:10,20,30,40,50,60,70,80,90 40147 146 R/W FLOAT 2 POOR FILL MARK D % VALID ENTRYS:10,20,30,40,50,60,70,80,90 40149 148 R/W FLOAT 2 Volume being dispensed by Pump A in Dispense mode. milliliters 40151 150 R/W FLOAT 2 Volume being dispensed by Pump B in Dispense mode. milliliters 40153 152 R/W FLOAT 2 Volume being dispensed by Pump C in Dispense mode. milliliters 40155 154 R/W FLOAT 2 Volume being dispensed by Pump D in Dispense mode. milliliters 6-10 Units Volts HLf Series Syringe Pumps Section 6 Modbus Configuration Table 6-6 Holding Registers (Continued) Register Address Read/ Type Write # of Description Registers 40157 156 R/W FLOAT 2 Full scale input range voltage for External mode. 40159 168 R/W FLOAT 2 MIN MOD PRESS: Minimum modifier pump ATM; BAR; kPa; PSI See NOTE 1. pressure 40161 160 R/W FLOAT 2 Value of %B for Modifier addition mode.%C %B FOR MODIFIER OR %C FOR CONTINfor Continuous Modifier addition mode. UOUS MODIFIER 40201 200 R FLOAT 2 Absolute maximum pressure for Pump A. ATM; BAR; kPa; PSI See NOTE 1. 40203 202 R FLOAT 2 Absolute maximum flow rate for Pump A. ml/min; ml/hr; ul/min; ul/hr See NOTE 2. Units Volts 40205 204 R FLOAT 2 Absolute maximum refill rate for Pump A. ml/min; ml/hr; ul/min; ul/hr See NOTE 2. 40207 206 R FLOAT 2 Maximum volume for Pump A. milliliters 40209 208 R FLOAT 2 Absolute maximum pressure for Pump B. ATM; BAR; kPa; PSI See NOTE 1. 40211 210 R FLOAT 2 Absolute maximum flow rate for Pump B. ml/min; ml/hr; ul/min; ul/hr See NOTE 2. 40213 212 R FLOAT 2 Absolute maximum refill rate for Pump B. ml/min; ml/hr; ul/min; ul/hr See NOTE 2. 40215 214 R FLOAT 2 Maximum volume for Pump B. milliliters 40217 216 R FLOAT 2 Absolute maximum pressure for Pump C. ATM; BAR; kPa; PSI See NOTE 1. 40219 218 R FLOAT 2 Absolute maximum flow rate for Pump C. ml/min; ml/hr; ul/min; ul/hr See NOTE 2. 40221 220 R FLOAT 2 Absolute maximum refill rate for Pump C. ml/min; ml/hr; ul/min; ul/hr See NOTE 2. 40223 222 R FLOAT 2 Maximum volume for Pump C. milliliters 40225 224 R FLOAT 2 Absolute maximum pressure for Pump D. ATM; BAR; kPa; PSI See NOTE 1. 40227 226 R FLOAT 2 Absolute maximum flow rate for Pump D. ml/min; ml/hr; ul/min; ul/hr See NOTE 2. 40229 228 R FLOAT 2 Absolute maximum refill rate for Pump D. ml/min; ml/hr; ul/min; ul/hr See NOTE 2. 40231 230 R FLOAT 2 Maximum volume for Pump D. milliliters 40233 232 R FLOAT 2 PUMP TYPE A 40235 234 R FLOAT 2 PUMP TYPE B 40237 236 R FLOAT 2 PUMP TYPE C 40239 238 R FLOAT 2 PUMP TYPE D 40241 240 R FLOAT 2 SOFTWARE MAJOR REV 40243 242 R FLOAT 2 SOFTWARE MINOR REV 40245 244 R FLOAT 2 SOFTWARE MICRO REV Note Pressure and flow rate based on user selected units. 6-11 HLf Series Syringe Pumps Section 6 Modbus Configuration 6-12 HLf Series Syringe Pumps Section 7 Serial Interface 7.1 Overview The Teledyne Isco HLf Series pump can be remotely controlled by a computer through a built-in RS-232-C serial or USB interface. This function is supported by the Teledyne Isco LabView™ toolkit. You can write your own custom program to control Isco syringe pumps using any format, such as BASIC or C++. This section provides the syntax and responses for serial commands. Simplified examples of programs are also provided. It is possible for you to write custom programs capable of controlling up to 7 controllers from a single computer, each with up to 4 connected pumps. Writing programs for serial control requires substantial knowledge of the software language used, so Isco does not provide support for developing your own programs. The toolkit is a sample program capable of running one controller and one to three pumps. Its primary purpose is to provide an example to help the programmer start constructing custom programs for individual pump systems and applications. To modify the program in any way, you must have the complete LabView Compiler, available from LabView’s manufacturer: National Instruments Corporation www.ni.com Tel: (800) 531-5066 Fax: 512-683-8411 11500 N. Mopac Expwy Austin, TX 78759-3504 This section of the manual provides detailed information about: Cable Connections for Serial Control Setting up the Controller(s) for Serial Control DASNET Protocol Serial Commands 7-1 HLf Series Syringe Pumps Section 7 Serial Interface 7.2 Network Control and Communication Network communications are always initiated by the network controller, which is typically a computer. Messages from the instruments are in response to messages from the network controller. All information on the network is transmitted as groups of ASCII characters called frames. The message frames contain the origin of the message, the destination of the message, and a checksum to verify the validity of the message. Each instrument is provided with a method of selecting unit identification numbers and a baud rate. For proper operation, each instrument must be set to a unique unit identification number (see Section ). It is also important that each unit’s baud rate is set to the same speed. Possible baud rates are 1200 and 19200. Other baud rates of 300, 1200, 2400, 4800, 9600, 19200, 38400, 57600, and 115200 are supported by the HL f Series pumps but are not part of the Teledyne Isco defined communications standard. Electrical standards are RS-232-C; connector pin usage is outlined in Table 7-1. Characters consist of 1 start bit, 8 data bits (low order first with 8th bit always set to zero), and 1 stop bit. There is no parity bit used. All characters will be printable ASCII characters. Control characters (0-1FH) are ignored except for carriage return (0DH). The serial unit number and baud rate can be changed from the default values through the MENU key. Select SERIAL under the menu; and adjust the values using the softkeys. WARNING Connecting devices to energized circuits may cause personal injury or property damage. Power must be removed from the pump before connecting external devices. Table 7-1 RS-232 External control connector serial pin connections 7-2 Pin No. Name Use 1 CHASSIS GROUND Used to connect to the shield of the interconnect cable. 2 RECEIVE Serial interface data input. Standard RS-232-C signal levels. 3 TRANSMIT Serial interface data output. Standard RS-232-C signal levels. 4 REQUEST TO SEND RTS chain - RS-232-C input is buffered and connected to pin 21. 5 CLEAR TO SEND CTS buffered RS-232-C output of pin 25 input. 6 +11 VDC DATA SET READY is held on. 7 COMMON Signal common for all signals. 8 +11 VDC DATA CARRIER DETECT is held on. HLf Series Syringe Pumps Section 7 Serial Interface 9 +5 VDC Test Voltage. 10 -11 VDC Negative test voltage. 14 TRANSMIT CHAIN Serial data from next unit. 16 RECEIVE CHAIN Serial data to next unit. 21 RTS CHAIN RTS buffered RS-232-C output of pin 4 input. 25 CTS CHAIN CTS chain -RS-232-C input is buffered and connected to pin 5. NOTE: Only pins 2, 3, & 7 are required for serial interface to one controller. 7.3 USB Interface The Isco HL f Series syringe pump controller includes a USB interface. The USB connections are located on the pump controller rear panel labeled USB/Ethernet. The connector pin usage is outlined in Table 7-2. The drivers for the USB can be downloaded from http://www.isco.com/support/updates.asp WARNING Connecting devices to energized circuits may cause personal injury or property damage. Power must be removed from the pump before connecting external devices. Table 7-2 USB Interface Pin Connections (on the USB/Ethernet connector) Pin Number 7.4 Cabling for Serial Control Name 7 GND 11 Data - 12 Data + The cabling scheme for your system will depend on the number of instruments you need to control. The computer is always connected from the serial port to the serial port(s) of the HLf Series controller(s) it is controlling. Each controller is connected to its pumps in the normal fashion, i.e. the pump control cables are attached to the pump A, B, and C connectors on the rear panel of the pump controller. The cable you select to connect to your network will depend on the type of serial port your computer has and the number of controllers you wish to connect. Network communications are initiated by your computer. 7.4.1 One Controller To connect one controller, use a null-modem cable (available from Teledyne Isco, part #480-7996-00) to connect the 9-pin serial output port of the computer to the RS-232-C port on the rear of the controller, as shown in Figure 7-1. 7-3 HLf Series Syringe Pumps Section 7 Serial Interface RS-232/RS-485 Null Modem Cable part #480-7996-00 Figure 7-1 Serial network connection example - Single connection With this configuration, your sample program is capable of: • Constant flow • Constant pressure • Gradient 7.4.2 Two Controllers (Compiler required) To connect two controllers in the network, use the ‘Y’ cable #68-1020-198, as shown in Figure 7-2. Note In order for the network to operate properly, all instruments connected to the network must be turned on even if they are not being used. D D RS-232/RS-485 RS-232/RS-485 Figure 7-2 Serial network connection example - Dual connection 7.4.3 Three or More Controllers (Compiler required) 7-4 If additional instruments are to be connected in series, use the daisy chain cable, #68-1020-180. This cable is attached to the remaining connector on the ‘Y’ cable (Figure 7-2), and then to the RS-232-C connectors on the rear panels of the additional controllers. HLf Series Syringe Pumps Section 7 Serial Interface 7.5 Serial Control Check List In order to build and operate a custom program for Isco syringe pumps, you must have the following: 1. Sample program (Isco LabView toolkit)* 2. LabView Compiler (purchased separately) 3. Connection cable(s) 4. 1 controller: cable 480-7996-00 5. 2 controllers: cable 68-1020-198 6. 3 to 7 controllers: cables 68-1020-198 and 68-1020-180. 7. Source code (serial commands in computer language for DASNET conversion) 8. DASNET serial driver *The toolkit comes with directories for two different versions of LabView. Copy the .zip files onto your computer. The files within each directory are as follows: 7.6 Controller Setup \labview8.5 \labview5-8.2 CONTROL.LLB DASNET.DLL DATA.LLB ISCO1.LLB ISCO2.LLB ISCO3.LLB MULTPUMP.LLB PANEL.VI README.DOC SERIALIO.LLB CONTROL.LLB DASNET.DLL DATA.LLB ISCO1.LLB ISCO2.LLB ISCO3.LLB MULTPUMP.LLB PANEL.VI README.DOC SERIALIO.LLB Once the system is properly connected, turn the pump, controller(s), and computer on. Then use the following procedure to place your controller(s) in serial control mode. Press MENU > MORE (A) and select SERIAL (1). Factory controller default settings are baud rate 9600 and unit ID #6. 7.6.1 Restore Defaults (if desired) 7.6.2 Change Defaults To restore defaults, press M ENU , then SYSTEM RESET (5). Resetting a system erases all programs and user settings. 1. Press MENU > MORE (A) > 1. Serial Option to enter the serial option setup screen. 2. Select the communication baud rate (between 300 and 115.2K) by pressing NEXT BAUD (A) until you reach the desired baud rate. Note All units in the network must be set to the SAME baud rate. 7-5 HLf Series Syringe Pumps Section 7 Serial Interface 3. Select an identification number for each controller (up to seven) by pressing NEXT ID # (B) until you reach the desired number. Note Multiple controllers in a network must each have a different ID number. If several units are being configured, place a label on the rear of each instrument listing the ID number and baud rate. This will help identify the controller in the future and prevent assigning the same ID number to two controllers or assigning an incorrect baud rate. 7.6.3 Verify Operation To verify network operation, open a terminal emulator program on your computer, such as HyperTerminal, and establish connection with the controller. Note If you will be using multiple controllers daisy-chained to a single serial port, you must connect and test each controller one at a time. 1. Press MENU > MORE (A) > MORE (A), and select DIAGNOSTIC MENU (2). 2. Select SERIAL TEST (6). The SENT value displayed will increment indefinitely until you exit the test by pressing any key. This same value should appear on your computer screen. If it does not, verify that you are using the correct serial port on the computer, and that the communication cables are properly connected and in working order. 7.7 User-written Software 7.7.1 DASNET 7-6 When designing software to control the HLf Series pumps, you must follow the DASNET communications protocol. This protocol allows a number of instruments to be controlled from a single RS-232-C serial port. Up to seven HL f Series controllers may share a single serial data channel, with each controller only accepting commands that are meant for it. Each pump controller can then control up to three pumps each. Figure 7-1 shows a simple system where the PC is connected to the serial port on the rear panel of the pump controller (shown sitting on top of the pump module). The pump control cable is attached to the pump A connector on the rear panel of the controller. DASNET converts your direct serial commands into a form recognizable to our instruments. Using a computer language such as C or BASIC, serial commands can be entered, converted, and then sent to your instrument. HLf Series Syringe Pumps Section 7 Serial Interface Table 7-3 is an example BASIC language program which performs the required portion of the DASNET serial protocol. Table 7-4 is an example of a C language program which does the same. Both of these programs, including a DASNET serial driver written in Visual C++, are available on CD-ROM (P/N 60-1245-096) in the sleeve at the back of the printed manual. 7.7.2 Universal Driver from Teledyne Isco The Universal Driver from Teledyne Isco is a serial software driver that can translate commands for a variety of compilers. When you are creating programs for HLf Series syringe pumps, the driver converts serial commands to DASNET communications protocol, sends them to the serial port, and waits for a serial response. Note On our website: Detailed information about the Universal Driver is provided in Isco Technical Bulletin TB19 Universal Driver Software Tool. LabView operation is discussed in detail in Isco Technical Bulletin TB06 Basic Operation of LabView Toolkit. A copy of the driver can be found on the CD included in the back of your HLf Series pump user manual. It can also be downloaded from: http://www.isco.com/products/appnotes.asp?PL=105. Open the Software Utilities folder and select Universal D-Series Pump driver to download the utility to a zip folder. Extract the sub folder named "Remote Pump." 7-7 HLf Series Syringe Pumps Section 7 Serial Interface Table 7-3 Example of BASIC program to demonstrate conversion of pump commands to DASNET frames 1 CLS : Z$ = "": PRINT "INPUT ALL ENTRIES IN CAPITAL LETTERS" 5 INPUT "INPUT UNIT ID >> ", UNITNUM’GET UNIT NUMBER 30 REM OPEN COM PORT SET FOR COM2 EDIT TO COM1 IF NEED 40 OPEN "COM2:1200,N,8,1,ASC" FOR RANDOM AS #2 50 PRINT : INPUT "ENTER STRING (HIT Q TO EXIT) >> ", I$’GET OUTPUT STRING FROM USER 65 IF I$ = "" THEN GOTO 50 ’IF BLANK INPUT THEN GO BACK 70 IF I$ = "Q" THEN GOTO 200 ’IF "Q" INPUT THEN QUIT 80 GOSUB 10000 ’CONVERT STRING TO DASNET FORMAT 90 GOSUB 20000 ’OUT DASNET STRING TO COM 2 120 PRINT "DASNET FORMATTED CMD >> "; O$ ’OUTPUT FORMATTED CMD TO USER 124 PRINT : PRINT ">>>> PRESS CTRL-C IF NO RESPONSE FROM PUMP <<<<" 125 LINE INPUT #2, Z$ ’GET RESPONSE FROM PUMP ’CR’ ENDS STRING 127 PRINT "DASNET RESPONSE >> "; Z$ ’PRINT RESPONSE 128 Z$ = "" ’CLEAR BUFFER 130 GOTO 50 ’GO BACK 200 CLOSE #2 ’CLOSE COM2 210 SYSTEM ’END PROGRAM AND EXIT TO DOS 10000 REM this SUBROUTINE will convert a string (I$) into a string (O$) 10005 REM in DASNET protocol 10015 REM UNITNUM=UNIT NUMBER OF PUMP 10020 REM AFTER THE STRING IS SENT TO PUMP A CR IS REQUIRED TO TERMINATE MESSAGE 10030 REM VAR USED O$,I$,IL,Y$,LI,SUM,CSUM,UNITNUM 10100 O$ = CHR$(ASC("0") + UNITNUM) ’PUT UNIT ID FIRST IN OUTPUT STRING 10110 IL = LEN(I$) ’GET LENGTH OF INPUT STRING 10115 REM IF INPUT IS JUST "R" ADD SPACE AND JMP BY # CHAR 10120 IF I$ = "R" THEN I$ = I$ + " ": GOTO 10180 10130 O$ = O$ + "R" ’ADD "R" TO OUTPUT STRING 10140 Y$ = HEX$(IL) ’GET # OF CHAR IN INPUT STRING IN HEX 10150 IF IL < 16 THEN Y$ = "00" + Y$ ’PAD OUT # CHAR IN STRING IF NEED 10160 IF IL >= 16 THEN Y$ = "0" + Y$ ’IF MORE THAN 16 THEN ONLY ONE PAD 10170 O$ = O$ + Y$ ’ADD # CHAR TO OUTPUT STRING 10180 O$ = O$ + I$ ’ADD INPUT STRING TO OUTPUT STRING 10190 IL = LEN(O$): SUM = ’GET NEW LENGTH AND CLEAR SUM OUT 10200 FOR LI = 1 TO IL ’TO ADD ALL ASCII FOR SUM 10210 SUM = SUM + ASC(MID$(O$, LI, 1)) ’GET THE ASCII # OF (LI) ASCII CHAR 10220 NEXT LI 10230 REM THIS FINDS THE CHECKSUM 10235 REM THE # IS FIRST SUBTRACTED FROM 256 10236 REM THEN ANDED WITH 255 TO AND OFF EXTRA BITS 10240 CSUM = (256 - SUM) AND 255 ’GET CHECK SUM 10245 IF CSUM < 16 THEN O$ = O$ + "0" ’PAD OUT CSUM IF NEED 10250 O$ = O$ + HEX$(CSUM) ’PUT AT END OF OUTPUT STRING 10270 RETURN ’DONE RETURN 20000 REM THIS SUBROUTINE SENDS O$ TO THE COM PORT 20010 PRINT #2, ’CR’; ’SEND CR TO COM PORT 20020 PRINT #2, O$; ’SEND O$ TO COM PORT 20030 PRINT #2, ’CR’; ’SEND CR TO COM PORT 20040 RETURN ’DONE Note: Polling is part of the DASNET definition but is not required and is not shown in this example. If this program is run on a PC as is, the commands entered at the keypad will be output on serial port 2. This code was written in QBasic, version 4.5. QBasic is an integrated BASIC language interpreter created by Microsoft Corp, Redmond, WA, included in MSDOS version 5.0 and later, and in Windows 95, 98, NT 3.x and NT4. 7-8 HLf Series Syringe Pumps Section 7 Serial Interface Table 7-4 Example of C program to demonstrate conversion of pump commands to DASNET frames #include<stdio.h> #include<conio.h> #include "b:comm.c" /* edit to path needed */ /* a ’C’ example of DASNET serial control */ int conv_das(); unsigned char in[256],out[256],buf[256]; char unitnum; main() { unsigned port; int speed; cputs("ENTER UNIT ID="); /* get parms */ scanf("%d",&unitnum); cputs("ENTER COM PORT="); scanf("%d",&port); cputs("ENTER BAUD RATE="); scanf("%d",&speed); comm_open(port,speed); /* open comm port */ in[0]=50; cputs("ALL ENTRIES IN CAPS\n\r"); while(1) cputs("\n\rENTER STRING(Q TO QUIT) >>>"); cgets(in); if(in[2]==’Q’) break; conv_das(&in[2],out); /* convert string */ cputs("\nDASNET FORMATTED OUTPUT >>>"); puts(out); /* output converted string */ comm_putc(0x0d); /* send "CR" to serial port */ dput(out); /* output converted string to serial port */ comm_putc(0x0d); /* end with a "CR" */ dgets(buf); /* get response */ cputs("\nDASNET RESPONSE >>>"); puts(buf); /* output response */ comm_flush(); /* flush serial buffer to start again */ } comm_close(); } /* dasnet conversion utility */ conv_das(char *in, char *out) { unsigned sum; char *c_ptr; c_ptr=out; /* point to output */ *out++=unitnum+0x30; /* put id first */ *out++=’R’; /* add "R" to output */ if (!strcmp(in,"R")) /* if just "R" add space to string */ { *out++=’ ’; *out++=0x00; } else /* add # char to string */ sprintf(out,"%3.3X%s",strlen(in),in); for (sum=0 ; *c_ptr; c_ptr++) /* add all chars together */ sum+=*c_ptr; sum=(0x100 - sum) & 0x0FF; /* get check sum */ sprintf(c_ptr,"%2.2X",sum); /* insert into string */ } Note: Polling is part of the DASNET definition, but is not required and is not shown in this example. This code was written in TurboC, version 4.5. TurboC is a compiler created by Borland Software Corp., Austin, TX. It is no longer actively sold by Borland International. 7-9 HLf Series Syringe Pumps Section 7 Serial Interface There are three types of operation within the network: network controller, master, and slave. A computer typically serves as the network controller. It supervises all data flow on the network. It also polls each unit which initiates data transfer and commands. Note The network controller (typically a PC) should not be confused with the pump controller. The network controller is used in addition to the pump controller. The slave unit simply responds to commands accordingly. The HLf Series pump functions as a slave unit. These functions may be combined in one unit; i.e., a computer can function as both a network controller and a master. All data transfers are in a frame format. When the network controller polls an instrument, it will start to respond within 200 ms. If it does not reply, it will be polled again. If after three attempts at polling it does not reply, it will be dropped from the polling rotation. When the instrument does respond, the polling rotation does not advance until an error-free transfer has occurred. The frame format for data transfers from the network controller is as follows: destination\acknowledgement\message source \length\message\checksum\[CR] • The destination is the 1-digit unit identification number of the instrument to receive the message. • Acknowledgment is one character to indicate the success of the previous transmission. There are three possibilities: (1) E means error, resend the message immediately (E is sent by the network controller only. Other units signify errors by not replying; causing the controller to resend the message). (2) B means busy, resend message at next poll. (3) R signifies previous message was received. • Message source is the unit ID of the unit that originated the message. If there is no message, this location is a space (20H). • Length is the length of the message in 2 digit, hexadecimal format. Maximum length is 256, with 256 being represented by a 00. This field is eliminated if there are no messages. • Message field is the area where the actual information is located. The maximum length is 256 characters long. • Checksum is also a 2 digit hexadecimal number. This number, when added to all the previous characters in the message (excluding control characters), will result in a sum. If there are no errors, the result of modulo 256 division of this sum should be 0. 7-10 HLf Series Syringe Pumps Section 7 Serial Interface Examples Frame is R304STOPD1[CR] = (R) (3) (0) (4) (S) (T) (O) (P) 52H + 33H + 30H + 34H + 53H + 54H + 4FH + 50H + D1H = 300H 300H MODULO 256 = 00 It is important to note that all characters are converted to the ASCII equivalent and added, except for the checksum. The two characters of the checksum are converted to hexadecimal numbers and concatenated to form a single two-digit number. This number is then converted to its ASCII equivalent and added to the end of the message. Hexadecimal Format Using MODULO Step 1: 22FH = 52H + 33H + 30H + 34H + 53H + 54H +4FH + 50H 2R2FH Step 2: 2FH = 22FH · · 100H 100H Modulo 22FH 200H 2FH Step 3: D1H = 100H 2FH Step 4: Convert D1H to ASCII (Hex) and put at end of message. Step 5: Put a “CR” (0DH) at the end of message for end of frame. Decimal Format Using MODULO Step 1: 559 = 82 + 51 + 48 + 52 + 83 + 84 + 79 + 80 2R47 Step 2: 47 = 559 · · 256 256 Modulo 559 512 47 Step 3: 209 = 256 47 Step 4: Convert 209 to ASCII (Hex) and put at end of message. Step 5: Put a “CR” (13) at the end of message for end of frame. Hexadecimal Format Using NO MODULO Step 1: 22FH = 52H + 33H + 30H + 34H + 53H + 54H + 4FH + 50H Step 2: FED1H = 100H 22FH Step 3: D1H = FED1H & offH 7-11 HLf Series Syringe Pumps Section 7 Serial Interface Step 4: Convert D1H = to ASCII (Hex) and put at end of message. Step 5: Put a “CR” (0DH) at the end of message for end of frame. Decimal Format Using NO MODULO Step 1: 559 = 82 + 51 + 48 + 52 + 83 + 84 + 79 + 80 Step 2: 303 = 256 559 Step 3: 209 = 303 & 255 Step 4: Convert 209 into ASCII (Hex) and put at end of message. Step 5: Put a “CR” (13) at the end of message for end of frame. The carriage return “CR” signifies end of frame. The format for frames sent from the unit to the network controller is as follows: acknowledgement\message destination \length\message\checksum\[CR] All the parameters are as previously described except message destination. Message destination is the 1-digit identification number of the unit that the message is sent to. An example of a typical data exchange is summarized below. For illustration, we will assume the network consists of a computer serving as a combination network controller and master. There will be one slave unit; a Model 260D pump. Details on the pump message format are in section 7.8. The computer will be unit #0, and the pump will be unit #6. Network Controller and Master Unit #0 [CR]1R 5D[CR] Note A [CR] must start the network. The controller is checking for the presence of unit #1 but will get no response in 200 ms because there is no unit 1. Network Controller and Master Unit #0 1R 5D[CR] Still no response. Network Controller and Master Unit #0 1R 5D[CR] Still no response, so unit 1 will be dropped from the poll. 7-12 HLf Series Syringe Pumps Section 7 Serial Interface Network Controller and Master Unit #0 2R 5C[CR] Checks for unit 2 but will get no response in 200 ms because there is no unit 2. Network Controller and Master Unit #0 2R 5C[CR] Still no response. Network Controller and Master Unit #0 2R 5C[CR] Still no response, so unit 2 will be dropped from the poll. In this way units 3-5 will be checked and dropped from the poll. Network Controller and Master Unit #0 6R 58[CR] Check for presence of unit 6. Unit 6 R 8E[CR] Unit 6 responds. Network Controller and Master Unit #0 7R 57[CR] Since unit 7 does not exist, it will be dropped from the polling scheme. Network Controller and Master Unit #0 6R008IDENTIFY84[CR] The master verifies the fact that unit 6 is a Model ___D. In this example, the master and the network controller are a single unit. If they were separate units, the master would send the inquiry to the network controller; then the network controller would send the message to the slave unit the next time it is polled. The slave would respond with the message to the network controller. The next time the master is polled, the message would be relayed. The same sequence would occur with all messages. Since the master and the network controller are combined in this example, the relaying of messages is not necessary. Unit 6 R027SERIES=1240-02__, Model ___D PUMP, REV __XX[CR] The pump responds with identity and software revision letter. (In this example 02__ would be 021; Model ___D would be 260D; REV __ signifies the software revision, XX would be replaced by the correct checksum, which is B4.) Network Controller and Master Unit #1 6R006REMOTE16[CR] This places the pump in the remote mode. Unit 6 R 8E[CR] The pump acknowledges that it accepted the command. 7-13 HLf Series Syringe Pumps Section 7 Serial Interface Network Controller and Master Unit #1 6R00ACONST FLOWF8[CR] This puts the pump into constant flow rate mode. Unit 6 R 8E[CR] The pump verifies that it received the message. Network Controller and Master Unit #1 6R009FLOW=1.00AB[CR] This sets the pump’s flow rate to 1.00 ml per minute. Unit 6 R 8E[CR] The pump verifies that it received the message. Network Controller and Master Unit #1 6R 58[CR] Polls the pump. Unit 1 R 8E[CR] Pump responds. Network Controller and Master Unit #1 6R003RUNF0[CR] The pump is started. Unit 1 R 8E[CR] The pump responds. The system is now running and the network controller continues the polling scheme. If the controller gives an improper command, the units will respond with a problem message indicating the type of error. The format of the message is given in section 7.8 of this manual and specifies the commands used for this instrument. It is important to follow this format. Spaces are ignored anywhere within the message field. Commands must be in uppercase letters. The network definition allows multiple commands in a message field when delimited by semicolons, but the HLf Series controller is limited to single commands. It will respond with a PROBLEM=INVALID COMMAND message. 7-14 HLf Series Syringe Pumps Section 7 Serial Interface 7.8 Serial Commands for the HLf Series Pump Table 7-5 is a list of the serial commands recognized by the pump. These commands are the message part of the DASNET protocol. The operand always follows the equals sign. The REMOTE command must be sent once, before any command that changes the operation of the pump will be accepted. Note When setting a value, the serial command will always be followed by an equal sign. Table 7-5 Serial Commands Command Description %B=# Enter # for percentage of modifier. ALOG1 Status of the analog voltage input on pin 21, P6. See NOTE 1. ALOG2 Status of the analog voltage input on analog input 3 of the accessory connector. See NOTE 1. ALOG3 Status of the analog voltage input on analog input 2 of the accessory connector. See NOTE 1. ALOG4 Status of the analog voltage on analog input 1 of the accessory connector. See NOTE 1. ALOG5 Status of the analog voltage input for Press D. See NOTE 1. ALOG6 Status of the analog voltage on analog input 4 of the accessory connector. See NOTE 1. CLEAR Stops all motors, sets flow rate and pressure setpoints to zero. CONTIN CONST FLOW Puts pump in continuous flow under constant flow mode. CONTIN CONST FLOWCD CONTIN CONST PRESS Puts pump in continuous flow under constant pressure mode. CONTIN CONST PRESSCD CONTIN MODIFIER Put pump in continuous modifier addition mode. CONST FLOW CONST FLOWB CONST FLOWC CONST FLOWD Put pump in constant flow mode. CONST PRESS CONST PRESSB CONST PRESSC CONST PRESSD Put pump in constant pressure mode. DELIVER DELIVERCD Set the dual pump mode to deliver fluid when running. DIGITAL Returns the status (High or Low) of the digital outputs. Format is digital = xxxxxxxx, where “x” is either “H” or “L”. The status order returned corresponds with the outputs 1—8. “X”= no change. DIGITAL = xxxxxxxx 1 8 Sets the digital output either High or Low, where “x” is either “H” or “L”. The order corresponds with the outputs 1—8. 7-15 HLf Series Syringe Pumps Section 7 Serial Interface Table 7-5 Serial Commands (Continued) Command Description DIG CONTROL Returns the status of the digital output control bits as either REMOTE (R) or INTERNAL (I). The return message format is DIG CONTROL=xxxxxx, where “x” is either “R” or “I”. “R” indicates the corresponding bit is controlled remotely; and “I” indicates the corresponding bit is controlled internally by pump software. The status order returned corresponds with the outputs 1—8. DIG CONTROL = command 1 8 Sets the digital output control bits to either internal or remote, where “x” is either “R” for REMOTE or “I” for INTERNAL CONTROL. “R” indicates the corresponding bit will be controlled remotely (through the serial port). “I” indicates the corresponding bit will be controlled internally by pump software. The order corresponds with the outputs 1—8. DISPENSEA DISPENSEB DISPENSEC DISPENSED Returns the dispense volume for Dispense mode. DISPENSEA=# DISPENSEB=# DISPENSEC=# DISPENSED=# Sets the dispense volume for Dispense mode. Format is XXX.XXX ml. Leading and trailing zeros are not required. Can only be changed when pump is stopped. FLOW FLOWCD Returns the delivering pump’s flow rate in continuous pumping mode and modifier addition mode. In INDEPENDENT mode FLOW returns the pump A flow rate and FLOWCD returns the pump C flow rate. FLOWA FLOWB FLOWC FLOWD Returns the actual flow rate of the pump. FLOW=# FLOWB=# FLOWC=# FLOWD=# Returns the actual flow rate of the pump Enter # for a flow rate setpoint (constant flow mode). Format is XXX.XXXXXXX ml/min. Only 5 figures are significant. Leading and trailing zeros are not required. G GG G& G&2 Gets pump information. “G” returns a text string that contains current pressure, analog input, and digital input information. “G&” is the Get All command. This returns the same information as “G,” plus flow rates, units, operation status, and more. For four pump operation use the G&2 commands. Refer to 7.8.1 for a complete description of this serial command. IDENTIFY Pump responds “SERIES=1240-0___, MODEL ____D PUMP; REV__.” For each pump, REV__ is the internal pump program software revision. (For example, if the controller was attached to two 100DMs, the message would read “SERIES=1240-024, MODEL 100DM PUMP; SERIES=1240-024, MODEL 100DM; REV__.”) The series number is the original catalog number for the pump type. It may not match the production series number on the pump serial label. SERIES=1260-008, MODEL 260HL PUMP SERIES=1260-009, MODEL 500HL PUMP SERIES=1260-007, MODEL 100HLX PUMP SERIES=1260-010, MODEL 1000HL PUMP SERIES=1260-015, MODEL 260HLf PUMP SERIES=1260-011, MODEL 500HLf PUMP SERIES=1260-014, MODEL 100HLf PUMP SERIES=1260-016, MODEL 1000HLf PUMP INDEPENDENT INDEPENDENTCD 7-16 Put pumps in Independent mode. HLf Series Syringe Pumps Section 7 Serial Interface Table 7-5 Serial Commands (Continued) Command Description IPUMPA=1, IPUMPA=0 IPUMPB=1, IPUMPB=0 IPUMPC=1, IPUMPC=0 IPUMPD=1, IPUMPD=0 Turns the pressure integral control On and Off for the pump indicated. LGE,F:XX,A:0X Action to perform when gradient program reaches the end. The pump needs to be in local mode only. 1 = ON 0 = OFF File # F: 01-99 Action A: 00=Hold final value 01=Stop after final step 02=Return to initial value and hold 03=Return to initial value and repeat program LGGO Start Gradient Command. This starts a gradient program (same as the “RUN” key). This command will check to see if there is a gradient running and respond with “RUNNING” if there is. The pump needs to be in local mode only. LGSL,F:xx Select Gradient File Command. This selects a gradient file to be run. This command will reset the controller to the saved file gradient type. If the selected gradient file does not exist, the controller will respond with “PROBLEM=INVALID OPERAND.” The pump needs to be in local mode only. LGST Stop Gradient Command. This stops a gradient program. The pump needs to be in local mode only. LGDL,F:xx,S:xx Gradient Step Download command. This downloads a step from the pump to the PC. This command will respond with “PROBLEM=INVALID OPERAND” if the file or step does not exist. The controller will respond with step information if the command is valid. Refer to 7.8.2 for complete information on Gradient step download commands. The pump needs to be in local mode only. LGUL,F:xx,S:xx Gradient Step Upload command. This transfers a step from the PC to the controller. Refer to 7.8.3 for complete information on Gradient step download commands. The pump needs to be in local mode only. LIMITS LIMITSB LIMITSC LIMITSD Returns the pressure and flow rate limits. LOCAL Returns the instrument to local control. Front panel control is enabled and all motors are stopped (if control was previously remote). MAXFLOWA=# MAXFLOWB=# MAXFLOWC=# MAXFLOWD=# Enter # to designate the maximum flow rate setpoint. MAXFLOWA MAXFLOWB MAXFLOWC MAXFLOWD Returns the maximum flow rate setpoint. MAXPRESSA=# MAXPRESSB=# MAXPRESSC=# MAXPRESSD=# Enter # to designate the maximum pressure setpoint. MAXPRESSA MAXPRESSB MAXPRESSC MAXPRESSD Returns the maximum pressure setpoint. 7-17 HLf Series Syringe Pumps Section 7 Serial Interface Table 7-5 Serial Commands (Continued) Command Description MFLOWA=# MFLOWB=# MFLOWC=# MFLOWD=# Enter # to designate the maximum flow limit in constant pressure mode. MFLOWA MFLOWB MFLOWC MFLOWD Returns the maximum flow limit setpoint. MINFLOWA=# MINFLOWB=# MINFLOWC=# MINFLOWD=# Enter # to designate the minimum flow rate setpoint. MINFLOWA MINFLOWB MINFLOWC MINFLOWD Returns the minimum flow rate setpoint. MINPRESSA=# MINPRESSB=# MINPRESSC=# MINPRESSD=# Returns the minimum pressure setpoint. MINPRESSA MINPRESSB MINPRESSC MINPRESSD Returns the minimum pressure setpoint. MODE MODE A P, B P, C P, D-P A, B, C, D refer to the pump connection. P- Constance Pressure F- Constant Flow R- Refill PG- Pressure Gradient F1- Flow Gradient 1 Pump F2- Concentrated Gradient 2 Pump CF- Continuous Constant Flow CP- Continuous Constant Pressure MO- Modifier Mode 2 Pump MM- Modifier Mode 3 Pump MODIFIER Put pumps in modifier addition mode. PRESS=# PRESSB=# PRESSC=# PRESSD=# Enter # to designate pressure setpoint (constant pressure mode). PRESS PRESSCD Returns the delivering pump pressure in continuous pumping mode and modifier addition mode. In INDEPENDENT mode PRESS returns the pump A pressure and PRESSCD returns the pump C pressure. PRESSA PRESSB PRESSC PRESSD Returns the actual pressure of the pump. PRESSCNTRLDIFF1 Sets the pressure control input to Analog input 1, with a pressure range of 50 psi. 7-18 HLf Series Syringe Pumps Section 7 Serial Interface Table 7-5 Serial Commands (Continued) Command Description PRESSCNTRLDIFF1=XXXXX Sets the pressure control input to Analog input 1 and sets the pressure range. The range is 1 to 5000. the units are psi, with a value of 5000 representing 5000 psi at 5 volts. PRESSCNTRLDIFF2 Sets the pressure control input to Analog input 2, with a pressure range of 500 psi at 5 volts. PRESSCNTRLDIFF3 Sets the pressure control input to Analog input 2, with a pressure range of 5000 psi at 5 volts. PRESSCNTRLNORM Sets the pressure control input to the standard input. PRESSDIFF=XXXXX Differential pressure setpoint. (PSI*10) 0 to 50,000 maximum (0 to 5000 psi) PRESSDIFF Reads the differential pressure value. (PSI*10) The transducer can also be read via the “ALOGx” serial commands. RANGEA RANGEB RANGEC RANGED Provides scaling information for the system parameters. See 7.8.4 for more information about this serial command. RAPIDA RAPIDB RAPIDC RAPIDD Activates the automatic rapid pressurization cycle (constant flow mode only). RECEIVE RECEIVECD Set the dual pump mode to receive fluid when running. REFILL REFILLB REFILLC REFILLD Move cylinder to bottom at preset refill rate. REFILL=# REFILLB=# REFILLC=# REFILLD=# Enter # to designate refill rate. REMOTE Disables controller front panel control and enables all serial commands. Stops all motors (if control was previously local). RLIMITA RLIMITB RLIMITC RLIMITD Returns the refill flow rate limit. RSVP RSVPB RSVPC RSVPD Pump responds with “READY” message. RUN RUNB RUNC RUND RUNALL Same as front panel. Initiates pumping. SETFLOWA SETFLOWB SETFLOWC SETFLOWD Returns the flow rate setpoint. 7-19 HLf Series Syringe Pumps Section 7 Serial Interface Table 7-5 Serial Commands (Continued) Command Description SETPRESSA SETPRESSB SETPRESSC SETPRESSD Returns the pressure setpoint. STATUSA STATUSB STATUSC STATUSD Returns with status of pump. May be any combination of responses listed below. STOP STOPB STOPC STOPD STOPALL Same as front panel, except that pump remains under remote serial control. UNITSA= Enter the desired flow or pressure units after the equal sign. Acceptable values are: ATM, BAR, KPA, PSI, ML/MIN, ML/HR, UL/MIN, UL/HR. (Sets all pumps.) VOLA VOLB VOLC VOLD Return the volume remaining in cylinder in ml. Format is “XXX.XXXX” ml. VOLTOT VOLTOTCD Returns the total volume delivered when using continuous flow or modifier. VOL RESET VOL RESETCD Will reset the volume total to zero. ZEROA ZEROB ZEROC ZEROD “Zeros” the pressure sensor offset. ZERODIFF1 ZERODIFF2 ZERODIFF3 “Zeros” the pressure sensor offset for the respective analog input. STATUS= STOP RUN REFILL HOLD EQUIL. LOCAL REMOTE EXTERNAL PROBLEM= OVER PRESSURE UNDER PRESSURE CYLINDER FULL CYLINDER EMPTY MOTOR FAILURE NOTE 1: The analog input range is -1.5 to 11.6 volts. There is NO conversion of the returned number. The number returned (0 to 65535 decimal) will have an offset of 7500 added to the number (7500 = 0 volts) and a scale of 5000 for every 1 volt, for example: number 7500 = volts 5000 (32500 7500) = 5 volts 5000 NOTE 2: The only pump B commands accepted in continuous pumping mode or modifier addition mode are: %B, FLOWB, LIMITSB, PRESSB, REFILLB, REFILLB=, STATUSB, VOLB. 7.8.1 Get Status Command 7-20 The “G” and “G&” serial commands retrieve information from the pump controller. Each command returns a text string which can be read as shown in Figures 7-3 and 7-5. HLf Series Syringe Pumps Section 7 Serial Interface R046=37510,-00128, 01017, 06981, 05743, 00421, 00442, 00449,11111000,CS Pressure Pump A Pressure Pump B Pressure Pump C Units = (psi*5) Resolution = 0.2 psi Digital Inputs 1—8 1 = High 0 = Low ALOG1 — ALOG5 (refer to Table 7-5) Units = (volts * 5000) Resolution = 0.2 millivolt Range = 7500 to 58035 (1.5000V to 11.6070V) Figure 7-3 Get Status String “G” Command R049=37510,-00128, 01017, 06981, 05743, 00421, 00442, 00449, 25046,11111000,CS Pressure Pump A Pressure Pump B Pressure Pump C Units = (psi*5) Resolution = 0.2 psi Digital Inputs 1—8 1 = High 0 = Low ALOG1 — ALOG6 (refer to Table 7-5) Units = (volts * 5000) Resolution = 0.2 millivolt Range = 7500 to 58035 (1.5000V to 11.6070V) Figure 7-4 Get Status String “GG” Command 7-21 HLf Series Syringe Pumps Section 7 Serial Interface Same as Figure 7-3 Pump B Control Status Pump A L = Local control R = Remote control E = External control Operation Status Pump A S = Pump stopped R = Running F = Refilling H = Hold (clock stopped) E = Equilibrating Pump C Problem Status Pump A = No problem E = Empty cylinder B = Cylinder at bottom O = Over pressure U = Under pressure M = Motor failure N= Pump transduce disconnected Checksum Volume total Continuous flow or modifier mode Units = (Liters*E6) System pressure, multi-pump (displays Pump A for other modes) Units = (psi*5) Resolution = 0.2 psi System flow rate, multi-pump (displays Pump A for other modes) Units = (Liters/minute)*E10 Resolution = 0.1 nanoliter/minute 7-22 Volume Pump A Units = (Liters*E9) Resolution = 1 nanoliter Flow Rate Pump A Units = (Liters/minute)*E10 Resolution = 0.1 nanoliter/minute Figure 7-5 Get All Status String “G&” Command R0B5=37510,-00128, 01017, 06981, 05743, 00421, 00442, 00449,11111000, -0000005921,0010696698,R,R,-, 0027500000,0057744222,R,R,-, 0052500000,0016778750,R,R,-,-0000005921, 37500,00000000,24 Get All Status ALOG1-ALOG6 (refer to Table 8-5) Units = (volts *5000) Resolution = 0.2 millivolt Range = -7500 to 58035 (-1.5000v to 11.6070v) Flow Rate Pump A Units = (Liters/minute)* E10 Resolution = 0.1nanoliter/minute Volume Pump A Units = (Liters *E9) Resolution = 1nanoliter Operation Status Pump A S = Pump Stopped R = Running F = Refilling H = Holding E = Equilibrating Control Status Pump A L = Local Control R = Remote Control E = External Control Problem Status Pump A - = No problem E = Empty cylinder B = Cylinder at bottom O = Over pressure U = Under pressure M = Motor failure N = Transducer disconnected Pump C Check sum Pump D ,- ,L ,R ,0578776100 ,0000000001 ,- ,L ,R ,3261865300 ,0000000052 ,- ,L ,R ,2224477500 ,0000000020 - ,L ,F ,8966960100 ,0000000004- ,76072 ,005 ,5484 ,5422 ,5012 ,0 ,00597 ,00012 ,63033,00081=F70R Pressure Pump A Pressure Pump B Pressure Pump C Pressure Pump D Units = (psi *5) Resolution = 0.2psi Pump B Units = (Liters/minute) *E10 Resolution = 0.1 nanoliter/minute (displays Pump A for other modes) System flowrate, multi-pump pair AB Resolution = 0.2 psi Units = (psi *5) (displays Pump for other modes) System pressure, multi-pump pair AB Volume total, continuous flow or modifer mode multi-pump pair AB Units = (Liters *E6) Multipump Pair CD 7B ,0000000000 ,00012 ,0000000052 ,0000000000,00081 ,0000000004- HLf Series Syringe Pumps Section 7 Serial Interface Figure 7-6 Get all status strings from four pump operation “G&2” Command 7-23 HLf Series Syringe Pumps Section 7 Serial Interface 7.8.2 Gradient Download Command This command downloads a step from the HLf Series pump to the PC. This command will respond with “PROBLEM=INVALID COMMAND” if the file or step does not exist. If the file and step is valid, the controller will respond as shown in Figures 7-7 and 7-8. 7.8.3 Gradient Upload Commands These commands upload a step from the PC to the HL f Series pump. This command will respond with “PROBLEM=INVALID COMMAND” if the file or step does not exist. If the file and step is valid, the controller will respond as shown in Figures 7-9 and 7-10. Figure 7-11 shows an example of a pressure programming upload command. Note Gradient upload commands must follow the format shown in the figures below. Where necessary, leading and trailing zeros must be included so that the numerical values are represented properly. Also note that the single-pump gradient commands include spaces in the command string. Step Number 01: LGDL,F:xx,S:01,FL:xxx.xxxx,I %:xx.xx,F %:xx.xx,D:xxxx.x, Gradient Duration Range = (0000.1 – 9999.0 minutes) Final Gradient Percentage Range = (00.00 – 100.0) Initial Gradient Percentage Range = (00.00 – 100.0) Gradient Total Flow Rate Units = milliliters/minute Range = (000.0000 – Maximum Flow Rate) Step Number 01 File (01 – 99) Step Numbers 02 through 99: LGDL,F:xx,S:xx,I %:xx.xx,F %:xx.xx,D:xxxx.x, Gradient Duration Range = (0000.1 – 9999.0 minutes) Final Gradient Percentage Range = (00.00 – 100.0) Initial Gradient Percentage Range = (00.00 – 100.0) Step Number (02 – 99) File (01 – 99) Figure 7-7 Gradient Download Commands - Single pump flow gradient 7-24 HLf Series Syringe Pumps Section 7 Serial Interface Step Number 01 LGUL,F:xx,S:01,FL:xxx.xxxx,IB%:xx.xx,FB%:xx.xx,D:xxxx.x, Gradient Duration Range = (0000.1 – 9999.0 minutes) Final %B Range = (00.00 – 100.0) Initial %B Range = (00.00 – 100.0) Gradient Total Flow Rate Units = milliliters/minute Range = (000.0000 – Maximum Flow Rate) Step Number 01 File (01 – 99) Step Numbers 02 through 99 LGUL,F:xx,S:xx,IB%:xx.xx,FB%:xx.xx,D:xxxx.x, Gradient Duration Range = (0000.1 – 9999.0 minutes) Final %B Range = (00.00 – 100.0) Initial %B Range = (00.00 – 100.0) Step Number (02 – 99) File (01 – 99) Figure 7-8 Gradient Download Commands - Two pump flow gradient 7-25 HLf Series Syringe Pumps Section 7 Serial Interface Step Number 01: LGUL,F:xx,S:01,FL:xxx.xxxx,I %:xx.xx,F %:xx.xx,D:xxxx.x, Gradient Duration Range = (0000.1 – 9999.0 minutes) Final Gradient Percentage Range = (00.00 – 100.0) Initial Gradient Percentage Range = (00.00 – 100.0) Gradient Total Flow Rate Units = milliliters/minute Range = (000.0000 – Maximum Flow Rate) Step Number 01 File (01 – 99) Step Numbers 02 through 99: LGUL,F:xx,S:xx,I %:xx.xx,F %:xx.xx,D:xxxx.x, Gradient Duration Range = (0000.1 – 9999.0 minutes) Final Gradient Percentage Range = (00.00 – 100.0) Initial Gradient Percentage Range = (00.00 – 100.0) Step Number (02 – 99) File (01 – 99) Figure 7-9 Gradient Upload Commands - Single pump flow gradient 7-26 HLf Series Syringe Pumps Section 7 Serial Interface Step Number 01 LGUL,F:xx,S:01,FL:xxx.xxxx,IB%:xx.xx,FB%:xx.xx,D:xxxx.x, Gradient Duration Range = (0000.1 – 9999.0 minutes) Final %B Range = (00.00 – 100.0) Initial %B Range = (00.00 – 100.0) Gradient Total Flow Rate Units = milliliters/minute Range = (000.0000 – Maximum Flow Rate) Step Number 01 File (01 – 99) Step Numbers 02 through 99 LGUL,F:xx,S:xx,IB%:xx.xx,FB%:xx.xx,D:xxxx.x, Gradient Duration Range = (0000.1 – 9999.0 minutes) Final %B Range = (00.00 – 100.0) Initial %B Range = (00.00 – 100.0) Step Number (02 – 99) File (01 – 99) Figure 7-10 Gradient Upload Commands - Two pump flow gradient 7-27 HLf Series Syringe Pumps Section 7 Serial Interface LGUL,F:xx,S:xx,I:xxxxx,F:xxxxx,D:xxxx.x, Pressure Duration Range = 0000.1 – 9999.0 minutes Final Pressure Range = 00010 – Maximum Units = psi Initial Pressure Range = 00010 – Maximum Units = psi Step Number (01 – 99) File (01 – 99) Figure 7-11 Upload Commands - Single pump pressure programming 7.8.4 Range Command The RANGE command provides scaling information for the system parameters. For example, 6R006RANGEA34 may return a string similar to the one shown in Figure 7-12. R02CP= 10000,F=2500000,R=30.00000,V=102.9600,40 Checksum Max Volume = 102.96 Units = milliliters Max Refill Rate = 30.0 milliliters/minute Max Flow Rate = 25 milliliters/minute Maximum Pressure = 10,000 psi Figure 7-12 Range Serial Commands 7-28 HLf Series Syringe Pumps Section 7 Serial Interface 7.8.5 Error Messages If an error occurs in a message, one of the following responses will be sent. The format of an error message is “PROBLEM=_____.” Refer to Table 7-6. Table 7-6 Error Messages Error Description PROBLEM=LOCAL MODE The pump was sent a command before being placed in remote mode. See Section 7.8. PROBLEM=INVALID COMMAND The command sent was not recognized by the pump. PROBLEM=INVALID OPERAND The operand (character(s) following the = sign) is missing or is incorrect; e.g., the number was too large. PROBLEM=PUMP RUNNING The command sent is only valid when the pump is stopped. PROBLEM=OVERPRESSURE PROBLEM=UNDERPRESSURE Sent in response to a high or low pressure limit condition. PROBLEM=CYLINDER EMPTY Sent when the pump cylinder is empty. PROBLEM=CYLINDER FULL Sent when the pump cylinder is full. PROBLEM=NO PUMP Sent when the pump is not present PROBLEM=WRONG PUMP MODE Sent when the pump is in the incorrect mode for the command. 7-29 HLf Series Syringe Pumps Section 7 Serial Interface 7-30 HLf Series Syringe Pumps Section 8 Pump Maintenance, Troubleshooting, and Servicing DANGER RISK OF ELECTRIC SHOCK - DISCONNECT THE ELECTRIC POWER BEFORE SERVICING. ONLY TRAINED SERVICE PERSONNEL MAY REMOVE THE CASE TOP. DANGER RISQUE DE CHOC ÉLECTRIQUE. COUPER L´ALIMENTATION AVANT LA RÉPARATION. L´USAGER NE DOIT PAS DÉMONTER L´INSTRUMENT OU DÉRANGER LE MÉCANISME DEDANS. ADRESSER LA REPARATION SEULEMENT AUX TECHNICIENS COMPÉTENTS. WARNING Only trained service personnel may perform service work on this equipment. Failure to comply will result in serious risk to life and limb, and will void the hazardous locations certification. WARNING Earth ground bonding conductor. Do not remove or disconnect. Mise à la terre. Ne pas enlever ni déconnecter. WARNING Line voltage is present inside this unit at all times, regardless of switch settings. If internal adjustments or repairs are necessary, the line cords must be disconnected to remove possible shock hazard before opening the case. 8-1 HLf Series Syringe Pumps Section 8 Pump Maintenance, Troubleshooting, and Servicing 8.1 Introduction The following sections contain maintenance and repair procedures which you can do yourself or have done by a technician at your site. To view the schematic drawings referred to in this section, first find the serial number for your unit. Then go to our Web site at www.isco.com. In the left column, under Service & Support, click Schematics. Enter your serial number in the field provided and click Get Schematics. If you need assistance, or don’t see the correct schematic for your specific unit, contact our service department. 8.1.1 Service Department If you have a question about a procedure, need parts information, or need some help, call or email the Teledyne Isco Service department. In your message, be sure to include all the details about your instrument and the nature of the error. Call the Service Department before returning the unit for factory repair. Often a problem can be solved in the field with just a little extra help. Contact us at: Toll free (800) 775-2965 Outside USA, Canada, and Mexico: (402) 464-0231 Email [email protected] 8.1.2 How to Ship Returns In the rare event that an instrument must be returned for maintenance the following measures must be taken to ensure a proper return: • Teledyne Isco Technical Service (800-775-2965) must be contacted prior to shipment to obtain a clean return form. • The applicable MSDS paperwork, of the last substance ran, must be received by Technical Service. • The syringe pump must be shipped with the cylinders removed from the pumps and any residue completely rinsed with methanol or water. • Wrap the unit in heavy paper or a plastic bag. If the original box is not available, put the wrapped unit in a strong cardboard box at least six inches longer in each basic dimension than the unit. • Fill the box equally around the unit with resilient packing material. • Seal it with strapping tape and ship it to the address on the warranty. The warranty at the end of the manual 8-2 HLf Series Syringe Pumps Section 8 Pump Maintenance, Troubleshooting, and Servicing also describes the conditions under which Teledyne Isco will pay surface shipping cost NOTICE · Do not return the pump without contacting the Teledyne Isco Technical Service. · Do not return the pump without first providing written guarantee that it has been decontaminated of hazardous or potentially lethal materials. · Teledyne Isco reserves the right to refuse shipment if no decontamination assurance has been provided prior to shipment. Failure to decontaminate a pump may result in legal action taken by state or federal authorities. Note It is very important that the shipment be well-packed and fully insured. Damage claims must be settled between you and the carrier. This can delay repair and return of the unit to you. 8.2 General Cleaning For general cleaning of the instrument’s front panel or enclosure, use a mild detergent in water or isopropyl alcohol on a sponge which is mostly squeezed out. 8.3 Resetting the System This action completely deletes user programmed settings, erasing all programs and returning the controller to factory default settings. Record your program settings and parameters before performing a reset operation. If ZERO PRESS has been pressed, all corrected offsets will be lost. 8.3.1 Basic Reset To perform a basic reset, press MENU > SYSTEM RESET (5) > CON(A). TINUE 8.3.2 Hard Reset To perform a hard reset: 1. Ensure that power has been removed from the pump controller. 2. Press and hold the CLEAR ENTRY key on the front panel keypad. 3. While holding the CLEAR ENTRY key, apply power to the pump controller. Keep the CLEAR ENTRY key pressed for one second. 4. Release the key. 8-3 HLf Series Syringe Pumps Section 8 Pump Maintenance, Troubleshooting, and Servicing 8.4 Diagnostic Menu The syringe pump controller can run a number of system tests that are initialized using the keypad. (MORE) (MORE) (DIAGNOSTIC MENU) 1. LCD TEST 4. KEYPAD TEST 2. ANALOG INPUTS 5. MOTOR CONTROL/LIMITS 3. A/D CAL 6. SERIAL TEST PREVIOUS MORE Figure 8-1 Accessing the diagnostic menu 8.4.1 LCD TEST Cycles all segments of the display through all displayed characters. To stop the test, press any key. 8.4.2 ANALOG INPUTS Displays the values of all analog inputs in volts. In the left column, with all connected pumps at zero pressure, the pressure readings should be near zero. After the initial reading, pressurize the pump and then observe the test screen once more to verify that the value for that pump has increased. The right column represents the four analog input terminals on the rear panel of the controller. For any terminal shorted to ground, the value should read a steady zero. A B C MORE D = = = = XX.XXXX XX.XXXX XX.XXXX XX.XXXX ACC1 ACC2 ACC3 ACC4 = = = = XX.XXXX XX.XXXX XX.XXXX XX.XXXX Gnd Figure 8-2 Analog Input diagnostic screen Press EXIT (D) to return to the diagnostic menu. 8-4 EXIT HLf Series Syringe Pumps Section 8 Pump Maintenance, Troubleshooting, and Servicing 8.4.3 KEYPAD TEST The screen will briefly display the name of each key pressed. Press EXIT (D) to return to the diagnostic menu. 8.4.4 MOTOR CONTROL/LIMITS Tests the digital position controls. From the Limits menu, you can set minimum and maximum flow rate limits and pressure limits, as well as the maximum flow rate in constant pressure mode. High and low limits cannot exceed pump specifications. The pump stays within these limits by means of a flag that moves up and down with the ball nut assembly, and two optical sensors at the top and bottom of the tower side plate. When a sensor is interrupted, it has a logic 1; when it is uninterrupted, it has a logic 0. Therefore: Top 0, Bottom 1 = Cylinder is full. Top 1, Bottom 0 = Cylinder is empty. Top 1, Bottom 1 = Illegal state. An illegal state can indicate failure of one or both sensors. The controller display will toggle immediately between CYLINDER FULL and CYLINDER EMPTY when you press REFILL or RUN (the pump will not run). Flag Sensor Figure 8-3 Optical sensor, interrupted by flag (bottom sensor shown, rear tower cover plate removed) Select the pump to be tested (A, B, or C). TRAVEL LIMIT SENSE AND MOTOR POSITION Upper limit = 0 Lower limit = 0 Tach counter = ########### Up 100 Down 100 Exit Press UP 100 (A) or DOWN 100 (B) to move the piston up or down 100 counts. The tach counter value will increase or decrease by 100 counts, accordingly. When the ball nut assembly reaches the top or bottom of the tower, the corresponding limit will change from 0 to 1. If the cylinder was refilled using the REFILL button, 8-5 HLf Series Syringe Pumps Section 8 Pump Maintenance, Troubleshooting, and Servicing it may require multiple presses of the ‘UP 100’ softkey before the ‘Lower Limit’ indicator changes to 0. When the Lower Limit indicator is 1, pressing the DOWN 100 softkey will have no effect. If the rear tower cover plate is removed to expose the sensors, as shown above in Figure 8-3, you can simply interrupt the sensors with a slip of paper, rather than using the flag. If either sensor fails, the sensor harness must be replaced. Press EXIT (D) to return to the diagnostic menu. 8.4.5 SERIAL TEST Tests the serial channel. First, confirm operation of the internal port. On the RS-232-C port on the rear of the controller, short pins 2 and 3 and then run the test. The screen should display: Rec: ****** Serial Test #### ***** Sent: ****** Serial Test #### ***** Press any key to exit The four digits in the REC line should match the four digits in the SENT line, with a very slight delay. If the unit passes the internal port test, next perform the I/O test. Use a null-modem cable (available from Teledyne Isco, part #480-7996-00) to connect the 9-pin serial output port of a computer to the RS-232-C port, as shown on the following page. Null Modem Cable part #480-7996-00 Figure 8-4 Serial connection to a computer Open a terminal emulator program such as HyperTerminal (©Hilgraeve, Inc. Monroe, MI). The factory default port settings are: BPS - 9600. Baud rate should match controller setting (refer to Section 7.2) Data bits - 8 8-6 HLf Series Syringe Pumps Section 8 Pump Maintenance, Troubleshooting, and Servicing Parity - None Stop bits - 1 Flow control - None Run the test again. The screen should display: Rec: [whatever is typed from PC] Sent: ****** Serial Test #### ***** Press any key to exit Anything typed on the computer keyboard should appear in the top line on the controller display. The computer should continually display the serial test shown in the second line of the controller display. 8.5 Removing the Case Top For some maintenance procedures, the case top of the controller or the pump may need to be removed. Because interior access is easier with the controller, this method of troubleshooting should be used whenever possible. DANGER RISK OF ELECTRIC SHOCK - DISCONNECT THE ELECTRIC POWER BEFORE SERVICING. ONLY TRAINED SERVICE PERSONNEL MAY REMOVE THE CASE TOP. DANGER RISQUE DE CHOC ÉLECTRIQUE. COUPER L´ALIMENTATION AVANT LA RÉPARATION. L´USAGER NE DOIT PAS DÉMONTER L´INSTRUMENT OU DÉRANGER LE MÉCANISME DEDANS. ADRESSER LA REPARATION SEULEMENT AUX TECHNICIENS COMPÉTENTS. 8.5.1 Controller Case Top Removal Troubleshooting for a number of issues can be done on the controller main circuit board. Remove the four screws holding the case top in place (two screws on each side). Lift the cover straight up and off. 8-7 HLf Series Syringe Pumps Section 8 Pump Maintenance, Troubleshooting, and Servicing Figure 8-5 Controller case top screws (2 of 4 shown) 8.5.2 Pump Case Top Removal Some maintenance and troubleshooting procedures require accessing the pump module interior. Remove the six screws holding the case top in place (three screws on each side). Lift the cover straight up and off. Figure 8-6 Pump case top screws (3 of 6 shown) 8.6 Lubrication The pump is a precision engineered instrument that must be lubricated every two years or every 6,000 strokes (whichever comes first) to ensure proper service life. The pump has an easy-to-access lube wheel that keeps the main gears lubricated during operation. See Figure 8-7. For your convenience, a lubrication kit (containing Never-seez and DUOLEC 1608 lubricants) is included in your pump accessory package. 8-8 HLf Series Syringe Pumps Section 8 Pump Maintenance, Troubleshooting, and Servicing Ball Screw Lube Wheel Worm Gear Figure 8-7 Gear train lubrication and motor drive service Worm/Worm Gear The worm and worm gear are lubricated by a lubrication wheel. Apply DUOLEC 1608 directly to the wheel until it is saturated. The wheel may also be directly lubricated by trickling oil into the wheel while the pump is running. Note Use only DUOLEC 1608 lubrication on the worm and worm gear. Do not substitute. 8.6.1 Ball Nut The ball screw, which drives the ball nut, must be kept lubricated with Never-seez. 1. Remove the case top, as detailed in section 8.5, and front cover to gain access to all parts requiring lubrication. 2. To lubricate the ball nut, run the pump until the ball nut reaches its maximum height. 3. Apply two beads of lubricant, on opposite sides of the ball screw, down its entire length. The precision thrust bearing at the base of the ball screw (refer to Figure 8-7) is factory lubricated and should not need re-greasing. 8-9 HLf Series Syringe Pumps Section 8 Pump Maintenance, Troubleshooting, and Servicing 8.7 Flushing the Cylinder After cylinder/seal maintenance or during modifier (liquid solvent) change, the pump cylinder should be flushed to remove possible residue. The way in which the cylinder is flushed will depend on your pumping system and whether you are pumping a liquefied gas such as CO 2 (see Section 8.7.1) or a liquid modifier such as methanol (see Section 8.7.2). 8.7.1 Gas Solvent Changeover This procedure is used when changing from one gaseous solvent to another. 1. Close the valve on the fluid supply tank so that no solvent is supplied to the system. 2. Turn the controller ON. 3. Run the pump until the cylinder is empty. If there was any pressure in the system, wait until all the pressure bleeds off. 4. Change the solvent tank. 5. Close the pump outlet valve. 6. Open the valve on the tank to repressurize the system. 7. Cycle the pump between REFILL and RUN a few times, opening and closing the appropriate valves at the proper time to purge any remaining gas from the pump. Use about 10 - 20 mls per stroke to purge. 8.7.2 Liquid Solvent Changeover and Flushing This procedure is typically used for modifier systems when changing from one liquid solvent to another. Note If high ionic strength aqueous reagent solutions are allowed to remain in the pump, solid residues may be formed, which will scratch the seals and the polished inner surface of the cylinder of the pump. These scratches allow leakage, which decreases flow rate. To clean the cylinder 1. Press CONST FLOW > RUN. You will be asked to designate which pump if more than one is present. 2. Press a softkey to run the desired pump. 3. Run the pump until the message “CYLINDER EMPTY” is displayed. 4. Place the pump inlet line in a flask containing a compatible solvent or a detergent solution. 5. Press REFILL. You will be asked to designate the pump to refill if more than one is present. Press a softkey to refill the pump. 6. Fill the pump and repeat this procedure several times. 7. Place the pump inlet line in a flask containing distilled water or appropriate solvent. Fill the pump once more and 8-10 HLf Series Syringe Pumps Section 8 Pump Maintenance, Troubleshooting, and Servicing then run it until empty. You are now ready to fill the pump with the new liquid solvent. Note Do not leave buffer solutions which contain dissolved salts or corrosive buffers in the cylinder overnight or for long periods of time. The pump should be stored with methanol or isopropanol (at least partially fill the cylinder with either solvent and then run the piston all of the way up) when it is not being used. 8-11 HLf Series Syringe Pumps Section 8 Pump Maintenance, Troubleshooting, and Servicing 8-12 HLf Series Syringe Pumps Index HLf Series Syringe Pumps Index A Acc ctrl key, 3-12 Accessories back pressure regulation, 2-13 CO2 cylinder connection package, 2-7 cooling/heating jacket, 2-11 cylinder insulating cover, 2-10 in-line filter package, 2-9 manual control, 3-12 outlet valve package, 2-7 refill kit, 2-6 Air valve package, 5-1 Alarms pressure limits, 3-11 Automatic refill, 3-4 analog control, 3-17 controller, 1-10 pump, 1-12 Error messages - serial command, 7-29 External control, 3-17 analog, 3-6 DASNET, 7-6 pinout, 7-2 remote run/stop, 3-19 serial commands, 7-15 serial error messages, 7-29 serial interface, 6-1, 7-1 F Flow rate limit, 3-11 B H Back pressure regulation, 2-13 Baud rate, 3-6 Help key, 3-12 C Check valve package, 5-1 CO2 cylinder connection package, 2-7 Commands, serial, 7-15 Constant flow mode, 3-15 Constant pressure mode, 3-15 Contact Service Department, 8-2 Continuous flow, 5-1 air valves, 5-1 check valves, 5-1 operation, 5-8 software, 5-6 specifications, 5-2 Controller front panel label, 1-8 keypad, 3-9 rear panel connectors, 1-10 Cooling/heating jacket, 2-11 Cutting tubing, 2-2 I ID numbers, 3-6 In-line filter accessory package, 2-9 K Keypad acc ctrl, 3-12 help, 3-12 hold, 3-9 limits, 3-9 multi-pump mode, 3-13, 5-8 rapid press, 3-11 recall, 3-9 store, 3-9 zero press, 3-12 L Liquid connections drain tube, 2-3 D M DASNET protocol, 7-6 Displays setting the contrast, 3-5 Drain tube, 2-3 Main menu, 3-3 units, 3-3 Maintenance, 8-1 flushing the cylinder, 8-10 lubrication, 8-8 removing the case top, 8-7 seal cleaning and replacement, 8-10 E Electrical connections, 1-13 Index-1 HLf Series Syringe Pumps Index solvent changeover, 8-10 Teledyne Isco Service, 8-2 Master (network), 7-10 Menus display contrast, 3-5 main menu, 3-3 power failure, 3-5 pump status, 3-6 refill, 3-4 serial options, 3-6 total volume reset, 3-6 Modes of operation, 3-14 Multi-pump, 3-6 key functions, 3-13, 5-8 N T Technical specifications, 1-2–1-5 Total volume reset, 3-6 Tubing cutting by hand, 2-2 pre-cut, 2-2 Network, 7-10 Noise reduction, 2-10 U O V Operating modes, 3-14 Operational test, 1-14 Outlet valve accessory package, 2-7 P Power failure actions, 3-5 Preliminary checkout, 1-14 Pressure drift, 3-12 limits - setting, 3-9 rapid pressurization, 3-11 Pump front panel, 1-13 rear panel connectors, 1-12 status, 3-6 R Refill kit, 2-6 Refill rate - setting, 3-4 Remote run/stop, 3-19 Repairs, 8-2 Returning equipment, 8-2 S Safety, 1-i–1-viii Seals cleaning and replacement, 8-10 Serial control cabling, 7-15 commands, 7-15 error messages, 7-29 examples, 7-11 set-up, 7-29 Serial options, 3-6 Service Department, 8-2 Slave (network), 7-10 Software Index-2 continuous flow, 5-6 DASNET, 7-6 example - BASIC, 7-8 example - C, 7-9 user-written, 7-6 Solvent changeover, 8-10 Specifications, 1-2–1-5 System preliminary checkout, 1-14 Unpacking, 1-13 Valve designating as passive, active, or electric, 3-7 user supplied, 5-6 悐ẞ⎵䦘 Component Name ṏ⑩ᷕ㚱㭺㚱⭛䈑峐ㆾ⃫䳈䘬⎵䦘⍲⏓慷 Name and amount of Hazardous Substances or Elements in the product ᴹ∂ᴹᇣ⢙䍘ᡆݳ㍐ Hazardous Substances or Elements 䫵 ⊎ 䭹 ޝԧ䬜 ཊⓤ㚄㤟 ཊⓤҼ㚄㤟 (Pb) (Hg) (Cd) (Cr(VI)) (PBB) (PBDE) 乧嶗㜧 Circuit Boards 㵚㘞㗦䣢 LCD Display 䓝妋䓝⭡ Capacitor ㍍乧 Wiring ℭ悐䓝亮 Internal Cables ⢾悐䓝亮 External Cables ᷣ䓝㸸乧 Line Cord ⎀⌳☐ Transformer ⇵朊㜧㞯⽿ Front Panel Label ⮷擖䚀 Keypad 䚜㳩䓝㛢 DC Motor X O O O O O X O O O O O O O O O X O O O O O X O O O O O X O O O O O X O O O O O X O X O O O X O O O O O X O O O O O X O X O O O X O ṏ⑩ᷕ㚱㭺㚱⭛䈑峐ㆾ⃫䳈䘬⎵䦘⍲⏓慷烉Name and amount of Hazardous Substances or Elements in the product O: 堐䣢宍㚱㭺㚱⭛䈑峐⛐宍悐ẞ㚱⛯峐㛸㕁ᷕ䘬⏓慷⛯⛐ST/ 㞯Ⅾ奬⭂䘬旸慷天㯪ẍᶳˤ O: Represent the concentration of the hazardous substance in this component’s any homogeneous pieces is lower than the ST/ standard limitation. X烉堐䣢宍㚱㭺㚱⭛䈑峐军⮹⛐宍悐ẞ䘬㝸ᶨ⛯峐㛸㕁ᷕ䘬⏓慷崭↢ST/ 㞯Ⅾ奬⭂䘬旸慷天㯪ˤ (ẩ᷂⎗⛐㬌⢬炻㟡㌖⭆旭ね⅝⮡ᶲ堐ᷕㇻ“X” 䘬㈨㛗⍇⚈徃埴徃ᶨ㬍宜㖶ˤ) X: Represent the concentration of the hazardous substance in this component’s at least one homogeneous piece is higher than the ST/ standard limitation. (Manufacturer may give technical reasons to the “X”marks) 䍗ᾅἧ䓐㛇䓙乷樴䠖⭂ˤ The Environmentally Friendly Use Period (EFUP) was determined through experience. 䓇ṏ㖍㛇塓亾䞩⛐䲣↿⎟䞩ᷕˤ⇵ᶱỵ㔘⫿ᷢ䓇ṏ⸜(207 ẋ堐2007⸜) ˤ昷⎶䘬ᶨ᷒⫿㭵ẋ堐㚰ấ烉A ᷢᶨ㚰炻BᷢḴ㚰炻䫱䫱ˤ The date of Manufacture is in code within the serial number. The first three numbers are the year of manufacture (207 is year 2007) followed by a letter for the month. "A" is January, "B" is February and so on. HL Series Hazmat Table 60-1263-072 Rev. - Warranty Radio Interference Statement FCC This equipment has been tested and found to comply with the limits for a class A digital device, pursuant to Part 15 of the FCC Rules. These limits are designed to provide reasonable protection against harmful interference when the equipment is operated in a commercial environment. This equipment generates, uses, and can radiate radio frequency energy and, if not installed and used in accordance with the instruction manual, may cause harmful interference to radio communications. Operation of this equipment in a residential area is likely to cause harmful interference in which the user will be required to correct the interference at his own expense. Canada This ISM apparatus meets all requirements of the Canadian InterferenceCausing Equipment Regulations. Ce générateur de fréquence radio ISM respecte toutes les exigences du Règlement sur le materiel brouilleur du Canada. Teledyne Isco One Year Limited Factory Service Warranty* This warranty exclusively covers Teledyne Isco instruments, providing a one-year limited warranty covering parts and labor. Any instrument that fails during the warranty period due to faulty parts or workmanship will be repaired at the factory at no charge to the customer. Teledyne Iscos exclusive liability is limited to repair or replacement of defective instruments. Teledyne Isco is not liable for consequential damages. Teledyne Isco will pay surface transportation charges both ways within the 48 contiguous United States if the instrument proves to be defective within 30 days of shipment. Throughout the remainder of the warranty period, the customer will pay to return the instrument to Teledyne Isco, and Teledyne Isco will pay surface transportation to return the repaired instrument to the customer. Teledyne Isco will not pay air freight or customers packing and crating charges. This warranty does not cover loss, damage, or defects resulting from transportation between the customers facility and the repair facility. The warranty for any instrument is the one in effect on date of shipment. The warranty period begins on the shipping date, unless Teledyne Isco agrees in writing to a different date. Excluded from this warranty are normal wear; expendable items such as pH sensors, charts, ribbon, lamps, tubing, and glassware; fittings and wetted parts of valves; and damage due to corrosion, misuse, accident, or lack of proper maintenance. This warranty does not cover products not sold under the Teledyne Isco trademark or for which any other warranty is specifically stated. No item may be returned for warranty service without a return authorization number issued by Teledyne Isco. This warranty is expressly in lieu of all other warranties and obligations and Teledyne Isco specifically disclaims any warranty of merchantability or fitness for a particular purpose. The warrantor is Teledyne Isco, 4700 Superior, Lincoln, NE 68504, U.S.A. * This warranty applies to the USA and countries where Teledyne Isco does not have an authorized dealer. Customers in countries outside the USA, where Teledyne Isco has an authorized dealer, should contact their Teledyne Isco dealer for warranty service. Before returning any instrument for repair, please call, fax, or e-mail the Teledyne Isco Service Department for instructions. Many problems can often be diagnosed and corrected over the phone, or by e-mail, without returning the instrument to the factory. Instruments needing factory repair should be packed carefully, and shipped to the attention of the service department. Small, non-fragile items can be sent by insured parcel post. PLEASE BE SURE TO ENCLOSE A NOTE EXPLAINING THE PROBLEM. Shipping Address: Mailing Address: Phone: Fax: Email: Teledyne Isco - Attention Repair Service 4700 Superior Street Lincoln, NE 68504 USA Teledyne Isco PO Box 82531 Lincoln, NE 68501 USA Repair service: (800) 775-2965 (lab instruments) (866) 298-6174 (samplers & flow meters) Sales & General Information: (800) 228-4373 (USA & Canada) (402) 465-3001 [email protected] October 11, 2013 P/N 60-1002-040 Rev H 1-1 1-2 1-3 1-4 1-5 1-6 1-7 1-8 1-9 2-1 2-2 2-3 2-4 2-5 3-1 4-1 4-2 4-3 5-1 5-2 5-3 6-1 6-2 6-3 6-4 6-5 6-6 7-1 7-2 7-3 7-4 7-5 7-6 100HLf Technical Specifications . . . . . . . . . . . . . . . . . . . . . . . . . . . . . . . . . . . . . . . 1-2 260HLf Technical Specifications . . . . . . . . . . . . . . . . . . . . . . . . . . . . . . . . . . . . . . . 1-3 500HLf Technical Specifications . . . . . . . . . . . . . . . . . . . . . . . . . . . . . . . . . . . . . . . 1-4 1000HLf Technical Specifications . . . . . . . . . . . . . . . . . . . . . . . . . . . . . . . . . . . . . . 1-5 Pump Controller Front Panel Label . . . . . . . . . . . . . . . . . . . . . . . . . . . . . . . . . . . . 1-8 Pump Controller Key Functions . . . . . . . . . . . . . . . . . . . . . . . . . . . . . . . . . . . . . . . 1-9 Pump Controller Rear Panel Connectors . . . . . . . . . . . . . . . . . . . . . . . . . . . . . . . 1-10 Pump Rear Panel Connectors . . . . . . . . . . . . . . . . . . . . . . . . . . . . . . . . . . . . . . . . 1-12 Pump Front Panel . . . . . . . . . . . . . . . . . . . . . . . . . . . . . . . . . . . . . . . . . . . . . . . . . 1-13 HLf Series Syringe Pump Accessory Packages . . . . . . . . . . . . . . . . . . . . . . . . . . . . 2-3 Manual Refill Kits . . . . . . . . . . . . . . . . . . . . . . . . . . . . . . . . . . . . . . . . . . . . . . . . . . 2-7 Manual Outlet Valve Kits . . . . . . . . . . . . . . . . . . . . . . . . . . . . . . . . . . . . . . . . . . . . 2-9 Optional in-line Filter Package 68-1247-011 . . . . . . . . . . . . . . . . . . . . . . . . . . . . . 2-9 Recommended Circulating Bath Volumes . . . . . . . . . . . . . . . . . . . . . . . . . . . . . . 2-13 Key functions in the Multi-pump Mode . . . . . . . . . . . . . . . . . . . . . . . . . . . . . . . . 3-13 Manual Refill Valve Kits . . . . . . . . . . . . . . . . . . . . . . . . . . . . . . . . . . . . . . . . . . . . . 4-1 Manual Outlet Valve Kits . . . . . . . . . . . . . . . . . . . . . . . . . . . . . . . . . . . . . . . . . . . . 4-2 Swaging Detail . . . . . . . . . . . . . . . . . . . . . . . . . . . . . . . . . . . . . . . . . . . . . . . . . . . . . 4-2 Continuous Flow Technical Specifications-Air Valves: . . . . . . . . . . . . . . . . . . . . . 5-2 Accessory Control Digital Outputs . . . . . . . . . . . . . . . . . . . . . . . . . . . . . . . . . . . . . 5-6 Key functions in the Multi-pump Mode . . . . . . . . . . . . . . . . . . . . . . . . . . . . . . . . . 5-8 Modbus TCP/IP Configuration Options . . . . . . . . . . . . . . . . . . . . . . . . . . . . . . . . . 6-3 Modbus RTU Configuration Options . . . . . . . . . . . . . . . . . . . . . . . . . . . . . . . . . . . . 6-3 Supported Modbus Function Codes . . . . . . . . . . . . . . . . . . . . . . . . . . . . . . . . . . . . . 6-3 Exception Responses . . . . . . . . . . . . . . . . . . . . . . . . . . . . . . . . . . . . . . . . . . . . . . . . 6-3 Coils . . . . . . . . . . . . . . . . . . . . . . . . . . . . . . . . . . . . . . . . . . . . . . . . . . . . . . . . . . . . . . 6-4 Holding Registers . . . . . . . . . . . . . . . . . . . . . . . . . . . . . . . . . . . . . . . . . . . . . . . . . . . 6-8 RS-232 External control connector serial pin connections . . . . . . . . . . . . . . . . . . . . . . . . . . . . . . . . . . . . . . . . . . . . . . . 7-2 USB Interface Pin Connections (on the USB/Ethernet connector) . . . . . . . . . . . . . . . . . . . . . . . . . . . . . . . . . . . . . . 7-3 Example of BASIC program to demonstrate conversion of pump commands to DASNET frames . . . . . . . . . . . . . . . . . . . . . . . 7-8 Example of C program to demonstrate conversion of pump commands to DASNET frames . . . . . . . . . . . . . . . . . . . . . . . 7-9 Serial Commands . . . . . . . . . . . . . . . . . . . . . . . . . . . . . . . . . . . . . . . . . . . . . . . . . . 7-15 Error Messages . . . . . . . . . . . . . . . . . . . . . . . . . . . . . . . . . . . . . . . . . . . . . . . . . . . . 7-29