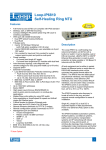
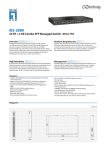
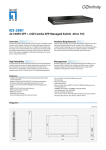
1
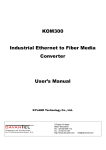
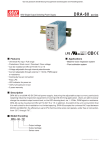
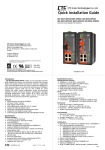
Overview LevelOne IES-2891 Industry Ethernet Switch provides 24 100BaseFX SFP slots plus 4 port Gigabit Combo SFP to enable high speed network at mission-critical environment. With the 1U height rackmountable size, this switch can be easily installed in the cabinet, plus the clearly visible status LEDs provide simple monitoring of port link activity. Moreover, the SFP slots support pluggable modules that enabling you to choose from a variety of transceivers. Substation & Railway Applications IES-2891 24 100FX SFP + 4 GE Combo SFP Managed Switch -40 to 75C, IEC61850 Quick Installation Guide This device is complied with IEC 61850-3 / IEEE 1613 for the power substations and EN 50121-4 for the railway applications. IEC 618503 is an international standard for electrical substation systems. The standard enables integration of all control, measurement, monitoring and protection functions within a substation. GOOSE Message Critical GOOSE (Generic Object Oriented Substation Event) messages can be sent reliably using the multicast and prioritisation functionality within LevelOne Industrial switches. Moreover, the test was conducted by KEMA, a renowned laboratory for testing and certification for substations. Default Setting IP Login Password Console 192.168.10.1 root Management [blank] 115200, n, 8, 1 It supports a variety of management features including: CLI via Console or Telnet; Graphic User Interface via Web Browser or Simple Network Management Protocol via SNMP tools. It provides better visibility and management of those critical assets. v1.00 - 1206 IES-2891 Features Page 1 LED Status Complies with IEC61850-3 and IEEE1613 environmental requirements for substation and power automation. Complies with EN50121-4 environmental requirements for railway applications. Meets EN61000-6-2 & EN61000-6-4 EMC Generic Standard Immunity for industrial environment. RS-232 console, Telnet, SNMP v1 & v2c & v3, RMON, Web Browser, and TFTP management. Supports Command Line Interface in RS-232 console. Supports 8192 MAC addresses. Provides 3M bits memory buffer. Supports IEEE802.3/802.3u/802.3ab/802.3z/802.3x. Auto-negotiation: 1000Mbps-full-duplex; 10/100Mbps-full/half-duplex; Auto MDI/MDIX. 100Base-FX: Multi mode SC or ST type, Single mode SC or ST type; 100Base-BX: WDM Single mode SC type. 1000Base-SX/LX: Multi mode or Single mode SC type; 1000Base-BX: WDM Single mode SC type. SFP socket for Gigabit fibre optic expansion. Store-and-forward mechanism. Full wire-speed forwarding rate. AC inlet power socket: 100~240VAC, 50~60Hz internal universal PSU. Terminal Block power input: +48VDC, -48VDC, 88~370VDC, or 90~264VAC. Supports redundant power supplies for flexible application. -40℃ to 75℃ (-40℉ to 167℉) operating temperature range. Tested for functional operation @ -40℃ to 85℃ (-40℉ to 185℉). Hardened metal case. Supports Rack Mounting installation LED Status Description Steady Power On Off Power Off PWR 100FX-SFP Steady Network connection is established Flashing Transmitting or Receiving data LNK/ACT 10/100/1000Base-TX (G1 to G4) Steady Network connection is established Flashing Transmitting or Receiving data Steady A valid SFP connection established Off No SFP LNK/ACT 1000-SFP SFP Package Contents IES-2891 Quick Installation Guide CD User Manual 19inch Rack mount kits IES-2891 Page 2 IES-2891 Page 3 AC Inlet Power Input Power Console Configuration 100-240VAC, 50-60Hz internal universal PSU Terminal Block Power Supply (Optional) +48VDC Terminal Block Power -48VDC 88-370VDC 90-264VAC + +48 0 88-370 L – 0 -48 0 N 1. Connect to the switch console: 2. Connect the DB9 straight cable to the RS-232 serial port of the device and the RS-232 serial port of the terminal or computer running the terminal emulation application. Direct access to the administration console is achieved by directly connecting a terminal or a PC equipped with a terminal-emulation program (such as HyperTerminal) to the switch console port. 3. Configuration settings of the terminal-emulation program: 4. Baud rate: 115,200bps, Data bits: 8, Parity: none, Stop bit: 1, Flow control: none. 5. Press the “Enter” key. The Command Line Interface (CLI) screen should appear as below: 6. Logon to Exec Mode (View Mode): 7. At the “switch_a login:” prompt just type in “root” and press <Enter> to logon to Exec Mode (or View Mode). And the “switch_a>” prompt will show on the screen. Earth Ground Protect Ground <Note> Dielectric withstand (Hipot) test for DC power input, must remove metal chip between Earth Ground and Protect Ground of the terminal block power input to avoid damage to the Switch. Redundant Power System is also available, please contact your local sales representative for more details IES-2891 Page 4 11. At the “switch_a#” prompt just type in “configure terminal” and press <Enter> to logon to Configure Mode (or Configure Terminal Mode). And the “switch_a(config)#” prompt will show on the screen. 12. Set new IP address and subnet mask for Switch: 13. At the “switch_a(config)#” prompt just type in “interface vlan1.1” and press <Enter> to logon to vlan 1 (vlan1.1 means vlan 1). And the “switch_a(config-if)#” prompt will show on the screen. 14. Command Syntax: “ip address A.B.C.D/M”. “A.B.C.D” specifies IP address. “M” specifies IP subnet mask. “M”= 8: 255.0.0.0, 16:255.255.0.0, or 24: 255.255.255.0. 15. For example, At the “switch_a(config-if)#” prompt just type in “ip address 192.168.1.10/24” and press <Enter> to set new IP address (192.168.1.10) and new IP subnet mask (255.255.255.0) for Switch 8. Logon to Privileged Exec Mode (Enable Mode): 9. At the “switch_a>” prompt just type in “enable” and press <Enter> to logon to Privileged Exec Mode (or Enable Mode). And the “switch_a#” prompt will show on the screen. 10. Logon to Configure Mode (Configure Terminal Mode): IES-2891 Page 5 Web Configuration 1. Login the switch: 2. Specify the default IP address (192.168.1.10) of the switch in the web browser. A login window will be shown as below: 3. Enter the factory default login ID: root. 4. Enter the factory default password (no password). 5. Then click on the “Login” button to log on to the switch. Note: Please refer to User Manual for more detailed information IES-2891 Page 6 IES-2891 Page 7