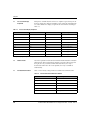
1
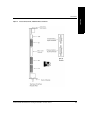
Interface for Ion Gauge Controllers
Process Control and RS-232 or RS-485
Interface for Granville-Phillips® Series
340, 358 & 360 Ion Gauge Controllers
Addendum
Addendum Instruction Manual part number 011979
Revision D - November 2014
Interface for Ion Gauge Controllers
Process Control and RS-232 or RS-485
Interface for Granville-Phillips Series
340, 358 & 360 Ion Gauge Controllers
®
This Addendum Instruction Manual is for use with Granville-Phillips
Series 340, 358, and 360 Ion Gauge Controllers. A list of applicable
catalog numbers is provided on the following page.
For Customer Service or Technical Support 24 hours per day,
7 days per week, every day of the year including holidays:
Phone: +1-800-227-8766 or +1-303-652-4691
MKS, Granville-Phillips Division
6450 Dry Creek Parkway
Longmont, CO 80503 USA
Phone:
FAX:
Email:
1-303-652-4691 or 1-800-776-6543
1-303-652-2844
[email protected]
Corporate Office
MKS Instruments, Inc.
2 Tech Drive, Suite 201
Andover, MA 01810 USA
Phone: 1-978-645-5500
www.mksinst.com
Addendum
© 2007-2014 MKS Instruments, Inc. All rights reserved.
Granville-Phillips® is a registered trademark of MKS Instruments, Inc. All other
trademarks and registered trademarks are the properties of their respective owners.
Catalog numbers for ion gauge controllers that can use
the interface capability explained in this Addendum
This addendum instruction manual is for use with the following ion gauge Controllers:
(20)340040
360180
(20)358018
360258
(20)360174
360259
(20)360175
Table of Contents
Chapter 1
Introduction
1.1
1.2
1.3
1.4
1.5
1.6
1.7
1.8
1.9
1.10
1.11
1.12
1.13
Chapter 2
.........................................
Definitions of Terms . . . . . . . . . . . . . . . . . . . . . . . . . . . . . .
Process Control Installation . . . . . . . . . . . . . . . . . . . . . . . . .
Process Control System Connections . . . . . . . . . . . . . . . . . .
To Display a Setpoint . . . . . . . . . . . . . . . . . . . . . . . . . . . . .
To Modify a Setpoint . . . . . . . . . . . . . . . . . . . . . . . . . . . . . .
Process Control Connector . . . . . . . . . . . . . . . . . . . . . . . . .
Process Control Display Assignment . . . . . . . . . . . . . . . . . .
Manual Override . . . . . . . . . . . . . . . . . . . . . . . . . . . . . . . .
RS-232/RS-485 Installation . . . . . . . . . . . . . . . . . . . . . . . . .
Setpoint Display and Adjustment . . . . . . . . . . . . . . . . . . . .
Switch Settings . . . . . . . . . . . . . . . . . . . . . . . . . . . . . . . . . .
RS-232 Connectors . . . . . . . . . . . . . . . . . . . . . . . . . . . . . . .
RS-485 Connector . . . . . . . . . . . . . . . . . . . . . . . . . . . . . . . .
7
7
7
7
8
8
9
10
10
10
12
13
16
17
Operation
19
2.1
19
20
20
20
21
21
21
22
23
23
25
2.2
2.3
2.4
............................................
RS-232/RS-485 Command Syntax . . . . . . . . . . . . . . . . . . . .
DG . . . . . . . . . . . . . . . . . . . . . . . . . . . . . . . . . . . . . . . . . . .
DGS . . . . . . . . . . . . . . . . . . . . . . . . . . . . . . . . . . . . . . . . . .
IGB . . . . . . . . . . . . . . . . . . . . . . . . . . . . . . . . . . . . . . . . . . .
RD . . . . . . . . . . . . . . . . . . . . . . . . . . . . . . . . . . . . . . . . . . .
F1 . . . . . . . . . . . . . . . . . . . . . . . . . . . . . . . . . . . . . . . . . . . .
F2 . . . . . . . . . . . . . . . . . . . . . . . . . . . . . . . . . . . . . . . . . . . .
PC . . . . . . . . . . . . . . . . . . . . . . . . . . . . . . . . . . . . . . . . . . . .
Error Messages . . . . . . . . . . . . . . . . . . . . . . . . . . . . . . . . . .
RS-232/RS-485 Signals . . . . . . . . . . . . . . . . . . . . . . . . . . . .
RS-232 and RS-485 Start Characters . . . . . . . . . . . . . . . . . .
Chapter 3
Troubleshooting
.....................................
27
Chapter 4
Specifications
........................................
29
PC/RS-232/RS-485 Interface for Ion Gauge Controllers - 011979 - Rev. D
5
6
PC/RS-232/RS-485 Interface for Ion Gauge Controllers - 011979 - Rev. D
Introduction
The Process Control/RS-485/RS-232 interface for Granville-Phillps’ ion
gauge controllers allows data output to, and gauge control by, a host
computer. Output is by a command-response mechanism. Process Control
features of this module provide the ion gauge controller with single-pole,
double-throw relays that may be controlled either by digital setpoints or by
the built-in manual override switches.
1.1
Definitions of Terms
Table 1-1
• Table 1-1 lists terms describing the interface module and the ion gauge
controllers with which the module can be used.
Terms Describing the Interface Module and Ion Gauge Controllers
Description
Interface Module
The module which is installed in an ion gauge controller to provide additional
process control and system interface capability. See Figures 1-1 and 1-2.
Ion Gauge (IG)
A Bayard-Alpert type ionization gauge, which indicates pressure by producing a
current that is proportional to gas density.
Ion Gauge Controller (IG controller)
An ionization gauge controller, as refered to in this instruction manual, is any of
the Granville-Phillps products listed on page 4.
Process Control Installation
Operation
Term
1.2
It is the installers responsibility to ensure that the automatic signals provided
by the Process Control Module are always used in a safe manner. Carefully
check manual operation of the system and the setpoint programming before
switching to automatic operation.
Process Control System
Connections
Prior to connecting the process controls to the system, it is recommended
that the following steps be followed. If application assistance is desired,
contact a Granville-Phillips application engineer. Contact information is
provided on page 3 and the back cover of this instruction manual.
Unless the control logic is simple and obvious, develop a logic diagram
of the process control function.
2.
Prepare a specification table which lists the proposed pressure setting,
system measurement point, and polarity for each PC channel.
3.
Draw a circuit schematic which specifies exactly how each piece of
system hardware will be connected to the IG controller process control
relays.
PC/RS-232/RS-485 Interface for Ion Gauge Controllers - 011979 - Rev. D
7
Specifications
1.
Troubleshooting
Where an equipment malfunction could cause a hazardous situation,
always provide for fail-safe operation. For example, in an automatic backfill
operation where a malfunction might cause high internal pressures, provide
an appropriate pressure relief device.
1.3
Introduction
Chapter 1
Chapter 1
1.4
1.5
8
To Display a Setpoint
To Modify a Setpoint
4.
Check that the power required for the load is within the specified
ratings of the relay.
5.
With the process Control Module connector disconnected from the
open board, connect the process control cable to the devices to be
controlled.
6.
Ensure that all devices are under manual control before connecting to
the Process Control Module.
1.
Be sure the “CAL” switch of the electrometer is in its center position;
otherwise, the calibration data in display lines 1 and 2 will conflict
with the display of the setpoints.
2.
Set the selector switch (Figure 1-1) to the number of the channel you
want to display.
3.
Toggle the setpoint switch to either the up (left) or down (right) position
and release. The setpoint will appear for 2 seconds in the
corresponding display.
1.
Set the selector switch to the number of the channel you want to
modify.
2.
Toggle and hold the setpoint switch to the direction you want the
setpoint to change.
3.
The setpoint will scroll until the switch is released. It will scroll slowly
until a decade boundary is crossed and then will speed up to facilitate
rapid changes across many decades. Release the switch when you
have entered the desired decade, and then depress it again to scroll
slowly within the decade to reach the exact setpoint needed.
PC/RS-232/RS-485 Interface for Ion Gauge Controllers - 011979 - Rev. D
Introduction
Introduction
Figure 1-1
Process Control, RS-232, and RS-485 Module Panels
Operation
Note that if the ion gauge is OFF, any PC relay which is programmed to the
top display will deactivate.
1.6
Process Control Connector
The following pins are used for the process control relay contacts. This is a
D-15P and is the lower connector on the rear panel of this module.
Table 1-2
Troubleshooting
After the setpoint switch is released, the display will return to pressure data
after two seconds. At this time the new setpoint will be stored in
non-volatile memory.
Process Control Connector (D-15P)
Process control channel
1
2
3
4
Pole
10
13
3
6
Normally closed
12
2
5
8
Normally open
9
1
4
7
Chassis ground, Pin 11; No connection to pins 14 and 15.
Specifications
PC/RS-232/RS-485 Interface for Ion Gauge Controllers - 011979 - Rev. D
9
Chapter 1
1.7
Each process control channel can have its setpoint assigned to any one of
the three display lines of the IG controller. Two sections of switch block S9
are used to choose the display assignment for each channel according to
Table 1-3.
Process Control Display
Assignment
Table 1-3
Process Control Display Assignment
Process Control
Switch A
Switch B
Factory Setting
PC1
S9.1
S9.2
Top
PC2
S9.3
S9.4
Top
PC3
S9.5
S9.6
Middle
PC4
S9.7
S9.8
Bottom
Display
Switch A
Switch B
Factory Setting
Top
ON
ON
None (not applicable)
Middle
ON
OFF
None (not applicable)
Bottom
OFF
ON
None (not applicable)
Disabled
OFF
OFF
None (not applicable)
Example: To program setpoint 3 to operate with the middle readout, S9.5 = ON, S9.6 = OFF.
1.8
Manual Override
These three-position switches on the front of the PC/RS-485/RS-232 module
allow override of the programmed setpoints at any time. When moved to
the right, the relay is activated. When moved to the left, the relay is
deactivated. When left in the center position, the relay is controlled
automatically.
1.9
RS-232/RS-485 Installation
Table 1-4 lists factory settings for RS-232 and RS-485 communication.
Table 1-4
10
RS-232 and RS-485 Communication Defaults
Variable
Default Setting
Baud rate
9600 baud
Parity
None
RS–485 address
01
Character bits
8
Stop bits
1
Protocol
RS-232 protocol
PC/RS-232/RS-485 Interface for Ion Gauge Controllers - 011979 - Rev. D
Introduction
Introduction
Figure 1-2
Process Control, RS-232, and RS-485 Interface Connectors
Operation
Troubleshooting
Specifications
PC/RS-232/RS-485 Interface for Ion Gauge Controllers - 011979 - Rev. D
11
Chapter 1
1.10
Setpoint Display and
Adjustment
Setpoints are stored in non-volatile memory, and are specified by a 2-digit
mantissa and 2-digit exponent. They may be set anywhere in the range
1.0–12 to 9.95. This allows for the entire pressure range of all supported
transducer types and systems of units.
The setpoint is compared directly to the display data, so units of measure
are implicit. Changing the units switch on the gauge control modules will
not change the stored setpoints. They must be reprogrammed in the new
system of units.
No change in status of any relay programmed to the top display will occur
during degas. It will function as if the pressure were frozen at the instant
degas was initiated.
There is a programmed 10% hysteresis on each process control setpoint. For
example, with a pressure setpoint of 6.3 x 10⁻⁶ Torr the relay will activate
when the display reaches 6.2 x 10⁻⁶ Torr and will deactivate when the
pressure rises to one significant digit above the setpoint plus 10%, i.e.,
6.3 x 10⁻⁶ + 0.6 x 10⁻⁶ + 0.1 x 10⁻⁶ or 7.0 x 10⁻⁶ Torr. For setpoints where
the second digit is 0.5 or greater the 10% value is rounded up. For example,
if the setpoint is programmed to 6.6 x 10⁻⁶ Torr the relay will activate at
6.5 x 10⁻⁶ Torr and will deactivate when the pressure rises to 6.6 x 10⁻⁶ +
0.7 x 10⁻⁶ + 0.1 x 10⁻⁶ or 7.4 x 10⁻⁶ Torr.
Since this module derives pressure data directly from the display bus, it is
unable to update pressure data while setpoints are being displayed. Thus it
will not mistakenly interpret setpoint data as pressure data, but will simply
retain the last displayed pressure data until two seconds after the SET key is
released.
12
PC/RS-232/RS-485 Interface for Ion Gauge Controllers - 011979 - Rev. D
Introduction
Switch Settings
Table 1-5
Table 1-5 details the functions and settings of the four blocks of DIP
switches located along the top edge of the module. To access these
switches, remove the top cover of the IG controller per the instructions in
the controller instruction manual. Each switch block is labeled with
silkscreening on the pc board, and each switch is numbered on the block.
Setting of switch S10 may only be changed when power to the IG controller
is OFF.
Introduction
1.11
Module Switch Functions and Settings
S7
Function
Factory Setting
1
Not used
2
Interface select: RS-232 = OFF; RS-485 = ON
OFF
3
Invert RTS handshake: Invert = OFF
ON
4
Controller series: IG controller = ON
ON
5
RS-485 address — See Table 1-8
OFF
6
RS-485 address — See Table 1-8
ON
7
RS-485 address — See Table 1-8
ON
8
RS-485 address — See Table 1-8
ON
Switch
Function
Factory setting
1
Talk only mode (RS-232 only): Enabled = OFF
ON
2
RS-485 address — See Table 1-8
ON
3
Character framing — See Table 1-7
ON
4
Character framing — See Table 1-7
OFF
5
Character framing — See Table 1-7
OFF
6
Baud rate — See Table 1-6
ON
7
Baud rate — See Table 1-6
ON
8
Baud rate — See Table 1-6
OFF
Operation
Switch
S8
Troubleshooting
Specifications
PC/RS-232/RS-485 Interface for Ion Gauge Controllers - 011979 - Rev. D
13
Chapter 1
Table 1-5
Module Switch Functions and Settings (continued)
S9
Switch
Function
Factory Setting
1
PC 1 display assignment — See Table 1-3
ON
2
PC 1 display assignment — See Table 1-3
ON
3
PC 2 display assignment — See Table 1-3
ON
4
PC 2 display assignment — See Table 1-3
ON
5
PC 3 display assignment — See Table 1-3
ON
6
PC 3 display assignment — See Table 1-3
OFF
7
PC 4 display assignment — See Table 1-3
OFF
8
PC 4 display assignment — See Table 1-3
ON
Switch
Function
Factory Setting
1
RS-232/RS-485 drivers — UP = RS-232; DOWN = RS-485
UP
2
RS-232/RS-485 drivers — UP = RS-232; DOWN = RS-485
UP
3
RS-232/RS-485 drivers — UP = RS-232; DOWN = RS-485
UP
4
RS-232/RS-485 drivers — UP = RS-232; DOWN = RS-485
UP
S10
Table 1-6
Baud Rate Switch Settings
S8.6
S8.7
S8.8
Baud Rate
ON
ON
ON
19200
ON
ON
OFF
9600*
ON
OFF
ON
4800
ON
OFF
OFF
2400
OFF
ON
ON
1200
OFF
ON
OFF
600
OFF
OFF
ON
300
OFF
OFF
OFF
150
* Factory setting.
14
PC/RS-232/RS-485 Interface for Ion Gauge Controllers - 011979 - Rev. D
Introduction
Introduction
Table 1-7
Character Framing Switch Settings
S8.4
S8.5
Character Bits
Parity
Stop Bits
ON
ON
ON
8
None
2
ON
ON
OFF
8
Even
1
ON
OFF
ON
8
Odd
1
ON
OFF
OFF
8
None
1*
OFF
ON
ON
7
Even
1
OFF
ON
OFF
7
Odd
1
OFF
OFF
ON
7
Even
2
OFF
OFF
OFF
7
Odd
2
Operation
S8.3
* Factory setting.
Table 1-8
RS-485 Address Switch Settings
Switch Settings
Decimal Value
Hex Value
Binary Value
S8.2
S7.8
S7.7
S7.6
S7.5
1
01
00001
ON
ON
ON
ON
OFF
2
02
00010
ON
ON
ON
OFF
ON
4
04
00100
ON
ON
OFF
ON
ON
8
08
01000
ON
OFF
ON
ON
ON
16
10
10000
OFF
ON
ON
ON
ON
The maximum total cable length for RS-485 is 4000 ft. The maximum
number of devices connected is 32.
Troubleshooting
S7.3 selects the polarity of the RTS handshake line. Normal (EIA standard)
RTS is with S7.3 = ON; inverted RTS is with S7.3 = OFF. This function is
used only with RS-232.
Specifications
PC/RS-232/RS-485 Interface for Ion Gauge Controllers - 011979 - Rev. D
15
Chapter 1
1.12
Serial interface connector, J2, is configured for DCE operation when in
RS-232 mode.
RS-232 Connectors
Table 1-9
RS-232 Connector Pinout
J3 pin Number
Mnemonic
Name
DCE
1
DCD
Data carrier detect*
Output (ON)
2
RXD
Received data
Output
3
TXD
Transmitted data
Input
4
DTR
Data terminal ready*
Input (not used)
5
GND
Signal ground
N/A
6
DSR
Data set ready*
Output (ON)
7
RTS
Request to send*
Input
8
CTS
Clear to send*
Output
9
RI
Ring indicator*
Output (OFF)
* Optional connection.
RS-232 connections to a 9-pin IBM AT compatible may be made by using
a straight through cable.
Table 1-10 9-pin RS-232 Connections
Cable Pinout
Signal Name
PC/AT Connector
DB9 Male
DB9 Female
DB9 Male
IG Controller (DCE)
DB9 Female
RXD
Pin 2
Pin 2
Pin 2
Pin 2
TXD
Pin 3
Pin 3
Pin 3
Pin 3
Signal ground
Pin 5
Pin 5
Pin 5
Pin 5
CTS
Pin 8
Pin 8
Pin 8
Pin 8
RTS
Pin 7
Pin 7
Pin 7
Pin 7
16
PC/RS-232/RS-485 Interface for Ion Gauge Controllers - 011979 - Rev. D
Introduction
Introduction
If the computer has a 25 pin connector, use the configuration listed in
Table 1-11.
Table 1-11 25-pin RS-232 Connections
Cable Pinout
DB9 Female
DB9 Male
IG Controller (DCE)
DB9 Female
RXD
Pin 3
Pin 3
Pin 2
Pin 2
TXD
Pin 2
Pin 2
Pin 3
Pin 3
Signal ground
Pin 7
Pin 7
Pin 5
Pin 5
CTS
Pin 5
Pin 5
Pin 8
Pin 8
RTS
Pin 4
Pin 4
Pin 7
Pin 7
To use a 3 wire interface, connect pin 7 to pin 8 on the IG controller and
run only RXD, TXD and signal ground to the host computer.
1.13
RS-485 Connector
Operation
Signal Name
PC/AT Connector
DB9 Male
Connect TX on the gauge controller to RX on the host computer and
connect RX on the gauge controller to TX on the host computer. Connect
TX to TX and RX to RX on all instruments on the bus.
The polarity may have to be reversed on the computer and other
instruments; you may have to try it both ways. No damage will result if
connections are wrong.
Table 1-12 RS-485 Connector Pinout
Pin Number
+TX
2
TX
8
+RX
3
–RX
7
Ground
5
Troubleshooting
Signal
Specifications
PC/RS-232/RS-485 Interface for Ion Gauge Controllers - 011979 - Rev. D
17
18
PC/RS-232/RS-485 Interface for Ion Gauge Controllers - 011979 - Rev. D
Operation
Consult the user manual for the host computer to be sure the protocol used
is in accord with that established via the switch configuration you have
chosen for the IG controller RS-485 module.
Introduction
Chapter 2
Communication with the gauge controller is via ASCII strings. An RS-485
message to an IG controller consists of a start character “#”, an address, a
command, and a command modifier, followed by a terminator. An RS-232
message to an IG controller is the same, except the address is omitted. That
is: A start character “#“, a command, a command modifier, and a
terminator. The message may contain leading spaces, and the command
and modifier may optionally be separated by spaces or commas. No spaces
may appear within the command or the modifier, only between them.
The terminator expected by an IG controller is an ASCII carriage return
denoted here by the ↵ symbol. Note that the terminator is sometimes
appended automatically, by the host computer’s interface software, to the
message string supplied by the user. If extra characters are found in the
message after it has been successfully interpreted but before the terminator,
they will be ignored.
Operation
The address expected by an IG controller is programmed via the switch
settings of S7.5, S7.6, S7.7, S7.8, and S8.2. The syntax is “#AA” where AA
is an ASCII representation of the hex address of the IG controller.
All messages to an IG controller with the appropriate address header will
receive a reply, consisting of an ASCII string terminated with CR. Pressures
will be returned in the format X.XXE±XX. All replies contain 11 characters
including terminator.
2.1
RS-232/RS-485 Command
Syntax
• The syntax shown is for RS-485 protocol. The command syntax for
RS-232 is the same as for RS-485 except that the address characters “AA”
should not be sent.
• The ↵ symbol is the carriage return.
Troubleshooting
Messages to an IG controller may use upper or lower case alpha characters.
The IG controller will always respond with upper case characters.
Specifications
PC/RS-232/RS-485 Interface for Ion Gauge Controllers - 011979 - Rev. D
19
Chapter 2
DG
Definition:
Turn degas ON or OFF
Modifiers:
1 or 0
Response:
1 DG ON or 0DG OFF if command accepted,
or ? INVALID if rejected
Example:
From computer:
From IG Controller:
#AADG1 ON↵
* 1DG ON ↵
• Command is INVALID if the IG is not ON.
• A response to the DG1 command of 1DG ON indicates only that a signal
requesting degas has been sent to the electrometer. Degas may fail to
activate, e.g., if the pressure is above 5 x 10⁻⁵ Torr, or if your controller
does not have degas capability. Use the DGS command (see below) to
verify that degas has been successfully initiated.
DGS
Definition:
Display degas status
Modifiers:
None
Response:
1DG ON if degas is on, 0DG OFF if degas is
OFF
Example:
IGB
From computer:
From IG Controller:
#AADGS↵
* 1DG ON
Definition:
Display ion gauge status
Modifiers:
None
Response:
00 if filament is ON
01 if filament 1 is ON
10 if filament 2 is ON
↵ (Indicating degas is ON)
Example:
From computer:
From IG Controller:
20
#AAIGS↵
* 01
↵ (Indicating filament 1 is ON)
PC/RS-232/RS-485 Interface for Ion Gauge Controllers - 011979 - Rev. D
Operation
Introduction
RD
Definition:
Display pressure reading
Modifiers:
1 or 2 or A or B or None
Response:
ASCII string representing the pressure for the
ion gauge requested
Example:
From computer:
From IG Controller:
#AARD↵
* l.20E–03↵
• If the requested ion gauge is turned off, or is in its first few seconds of
operation, the IG controller will return “9.90E+09”.
F1
Definition:
Turn filament ON or OFF
Modifiers:
1 or 0
Response:
11G1 ON or 01G1 OFF
Operation
• RD1 returns filament 1 pressure, RD2 returns filament 2 pressure, RD
returns whichever filament is on. EDA returns CGA (middle display)
pressure, RDB returns CGB (bottom display) pressure.
Example:
From computer:
From IG Controller:
#AAF1 1↵
* 11G1 ON ↵
A response to the F1 command of 11G1 ON indicates only that a signal
requesting that IG1 be turned on has been sent to the electrometer. The tube
may fail to come on, e.g., if the system pressure is too high or if the tube is
disconnected. To verify that IG1 is on, use the IGS command.
F2
Definition:
Like F1 command but for filament 2
Troubleshooting
Specifications
PC/RS-232/RS-485 Interface for Ion Gauge Controllers - 011979 - Rev. D
21
Chapter 2
PC
Definition:
Display process control channel status
Modifiers:
1 or 2 or 3 or 4 or B or S or ASCII string
representing PC number and pressure
Response:
Depends on modifier. The response will
always be 11 characters long. The described
response is followed by ASCII spaces then
carriage return.
Table 2-1
PC command modifiers and responses
Modifier
Response
Single digit
(1 through 4)
Single ASCII digit
• 0 if the corresponding relay is inactive
• 1 if the corresponding relay is active
B
• A byte of data with bits 0 through 5 set/clear
according to whether the corresponding relay is
active/inactive
• Bit 6 will always be set to guarantee that the returned
byte will not appear as a terminator byte
S
A string of 4 ASCII zeroes and ones giving the status of
all four channels
• Binary 1 indicates the channel is active
• Process control channel 1 is in bit 0
ASCII character string
representing PC number
and pressure
“* PROGM OK”
Examples: Assume that channels 1 through 3 are active, and 4 is inactive.
From computer:
From IG Controller:
#AAPCS 1↵
* 1
↵
Front computer:
From IG Controller:
#AAPCS B↵
* G
↵
The ASCII “G” corresponds to the bit pattern 01000111 and represents the
status of the PC channels.
From computer:
From IG Controller:
#AAPCS↵
* 1110
↵
Example for setting process control pressure setpoint:
From computer:
From IG Controller:
22
#AAPC1_7.6E–06↵
*_PROGM_OK↵
PC/RS-232/RS-485 Interface for Ion Gauge Controllers - 011979 - Rev. D
Operation
• Pressure syntax must have 2 mantissa digits separated by a period, an “E”,
+ or – sign, and 2-digit exponent.
Introduction
• Space between channel number and pressure is optional.
• Other possible response is ? RAN FAIL. If this occurs, there may be a
defective non-volatile RAM but the setpoint will operate properly until
power is cycled.
• Non-volatile memory requires approximately 1/2 second to cycle when
this command is sent. Use the IG controller response to pace subsequent
programming commands to prevent a failure in communication.
2.2
Error Messages
If an error is found in the incoming message, the following messages will be
returned in place of the normal response:
? PRITY ER↵
Returned if the parity of a byte in the incoming message does not match that
programmed by the switches.
Operation
? OVERR ER↵
Returned if the incoming message overflows the IG controller’s buffer. This
may indicate a flaw in the host software.
? SYNTX ER↵
Returned if the message fails to parse as a valid IG controller command.
? RAM FAIL↵
Returned after setpoint program if non-volatile RAM fails.
2.3
RS-232/RS-485 Signals
The IG controller RS-485 interface implements the following signals:
Table 2-2
RS-485 Connector Pinout
Pin Number
+TX
2
–TX
8
+RX
3
–RX
7
Ground
5
Troubleshooting
Signal
Specifications
PC/RS-232/RS-485 Interface for Ion Gauge Controllers - 011979 - Rev. D
23
Chapter 2
The timing of the RS-232 or RS-485 data transfer is shown in Figure 2-1.
Figure 2-1
RS-232 and RS-485 Data Timing
RX
Data
Data
T0
T1
TX
Data
TO = 500 ms when PCX (pressure) command is sent. For all other
commands, TO = 630 μS minimum. T1 = 300 μS minimum.
The IG controller RS-232 mode implements the following signals:
Table 2-3
RS-485 Connector Pinout
Signal
Pin Number
Direction
Data carrier detect
1
Output
Received data
2
Output
Transmitted data
3
Input
Signal ground
5
Ground
Data set ready
6
Output
Request to send
7
Input
Clear to send
8
Output
Ring indicator
9
Output
The connector is wired for DCE operation. Signal names refer to the host
computer. The output signals, DO, DSR are wired ON and RI is wired OFF.
These signals do not change while power is applied. The output signal, CTS
is ON after the IG controller is powered and the software is ready to receive
data. This signal then remains ON until power is removed. The input signal,
RTS, controls the flow of data from the IG controller. If OFF, it will wait to
send its response until turned ON. When RTS is turned ON, the IG
controller will send its entire packet of data.
24
PC/RS-232/RS-485 Interface for Ion Gauge Controllers - 011979 - Rev. D
Operation
RS-232 and RS-485 Start
Characters
The “*” or “7” start characters from the IG controller indicate a “good” or
“bad” response, respectively. The host computer may take action
dependent on which start character it receives. The response from the IG
controller always contains 11 characters with a carriage return being the
last.
Introduction
2.4
The start character “#“from the host computer signals to the IG controller to
reset its buffer for incoming data. If a string of data is received by the IG
controller, including more than one “#”, only the data after the last “#” will
be interpreted. The terminator character from the host computer signals to
the IG controller to give its response.
Operation
Troubleshooting
Specifications
PC/RS-232/RS-485 Interface for Ion Gauge Controllers - 011979 - Rev. D
25
26
PC/RS-232/RS-485 Interface for Ion Gauge Controllers - 011979 - Rev. D
Troubleshooting
The first thing to do if trouble arises is check the following configuration
options:
Check interface cable connections.
2.
Check switching settings. Be sure baud rate, character format and
framing, and interface protocol are matched to your host computer or
terminal’s requirements. Note that there could be several mismatched
parameters.
3.
Check command format. Be sure the strings you output to the IG
controller are in accord with the syntax defined in the command syntax
section.
RS-232/RS-485 Troubleshooting Guide
Operation
Table 3-1
1.
Introduction
Chapter 3
Possible Cause
Microcontroller reset LED CR1 lit or flashing.
Microcontroller failure.
No response or garbled output.
Baud rate incorrect, character length incorrect or stop bit
incorrect.
Will not respond intermittently.
Poor cable connections, ground fluctuations (the maximum
common mode potential across the system is 7V) or EMI from
other sources. If the start character is not received properly,
the IG controller may not interpret it as a start character and
the IG controller will not respond. Host software must be
prepared to re-send a command if a response is not generated
within a reasonable period of time.
OVERRUN ERROR message.
Stop bit(s) incorrect, host software failure.
PARITY ERROR message.
Parity incorrect.
SYNTAX ERROR message.
Message to IG controller not in accord with specified syntax.
Troubleshooting
Symptom
Specifications
PC/RS-232/RS-485 Interface for Ion Gauge Controllers - 011979 - Rev. D
27
28
PC/RS-232/RS-485 Interface for Ion Gauge Controllers - 011979 - Rev. D
Table 4-1
Specifications
RS-232/RS-485 Specifications
Half Duplex, Asynchronous
Data Rate
19200, 9600, 4800, 2400, 1200, 600, 300, 150 baud
Character Length
8 bit or 7 bit ASCII.
Parity
No parity, even, or odd.
Stop Bits
1 or 2
Handshake
None
Address
0 through 31 selectable (RS–485 only)
Number of Connections
Up to 32 devices (RS-485 only)
Total Cable Length
4000 ft. maximum (RS-485 only)
Connector
D-9S on module rear panel
Operation
Format
Table 4-2
Introduction
Chapter 4
Process Control Specifications
1to 4
Pressure Range
1.0 x 10⁻¹² to 9.9 x 10⁵
Hysteresis
10%
Setpoint Adjustment
• Digital, 2 significant digits plus exponent
• Via module front panel or serial interface
Output Relays
Activate below setpoint pressure
Contacts
1 A @ 120 VAC or 2A @ 30 Vdc
Form
SPDT
Override
Via module front panel switches
Connector
D-15P on rear panel of module
Troubleshooting
Number of Channels
Specifications
PC/RS-232/RS-485 Interface for Ion Gauge Controllers - 011979 - Rev. D
29
30
PC/RS-232/RS-485 Interface for Ion Gauge Controllers - 011979 - Rev. D
.
Interface for Ion Gauge Controllers
Process Control and RS-232 or RS-485
Interfaces for Granville-Phillips® Series
340, 358 & 360 Ion Gauge Controllers
For Customer Service or Technical Support 24 hours per day,
7 days per week, every day of the year including holidays:
Phone: +1-800-227-8766 or +1-303-652-4691
MKS, Granville-Phillips Division
6450 Dry Creek Parkway
Longmont, CO 80503 USA
Phone:
FAX:
Email:
1-303-652-4691 or 1-800-776-6543
1-303-652-2844
[email protected]
Corporate Office
MKS Instruments, Inc.
2 Tech Drive, Suite 201
Andover, MA 01810 USA
Phone: 1-978-645-5500
www.mksinst.com
Addendum
Addendum Instruction Manual part number 011979
Revision D - November 2014