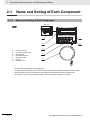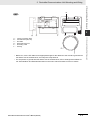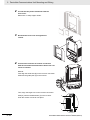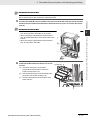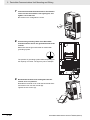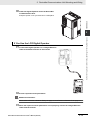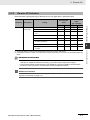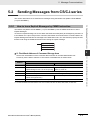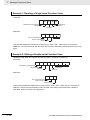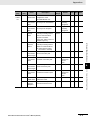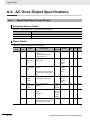
1
Inverter MX2/RX Series DeviceNet Communications Unit User’s Manual 3G3AX-MX2-DRT-E 3G3AX-RX-DRT-E I581-E1-03 OMRON, 2012 All rights reserved. No part of this publication may be reproduced, stored in a retrieval system, or transmitted, in any form, or by any means, mechanical, electronic, photocopying, recording, or otherwise, without the prior written permission of OMRON. No patent liability is assumed with respect to the use of the information contained herein. Moreover, because OMRON is constantly striving to improve its high-quality products, the information contained in this manual is subject to change without notice. Every precaution has been taken in the preparation of this manual. Nevertheless, OMRON assumes no responsibility for errors or omissions. Neither is any liability assumed for damages resulting from the use of the information contained in this publication. Introduction Introduction Thank you for purchasing a DeviceNet Communications Unit (Model: 3G3AX-MX2-DRT-E/ 3G3AX-RX-DRT-E). This User's Manual describes the installation and wiring of the 3G3AX-MX2-DRT-E/3G3AX-RX-DRT-E and parameter setting method which is required for the operation, as well as troubleshooting and inspection methods. Intended Audience This manual is intended for the following personnel, who must also have knowledge of electrical systems (an electrical engineer or the equivalent). • Personnel in charge of introducing the control equipment • Personnel in charge of designing the control systems • Personnel in charge of installing and maintaining the control equipment • Personnel in charge of managing the control systems and facilities Notice This manual contains information you need to know to correctly use the DeviceNet Communications Unit (Model: 3G3AX-MX2-DRT-E/3G3AX-RX-DRT-E). Before using the DeviceNet Communications Unit, read this manual and gain a full understanding of the information provided herein. After you finished reading this manual, keep it in a convenient place so that it can be referenced at any time. Make sure this manual is delivered to the end user. DeviceNet Communications Unit User’s Manual (I581-E1) 1 Manual Configuration Manual Configuration This User's Manual is compiled section by section for user's convenience as follows. Outline Section 1 Outline This section provides an outline, features, and specifications of the DeviceNet Communications Unit. Section 2 DeviceNet Communications Unit Mounting and Wiring This section provides the part names of the DeviceNet Communications Unit and mounting/wiring methods. Section 3 Network Startup This section describes inverter parameter settings and DeviceNet settings/startup. Section 4 Remote I/O This section describes the configuration method and function of Remote I/O (DeviceNet assembly I/O). Section 5 Message Communications This section describes how to read/write inverter parameters by the Message communications function (DeviceNet Explicit Message). Section 6 Troubleshooting This section describes the troubleshooting for various problems which may occur in DeviceNet, the inverter, and the DeviceNet Communications Unit. Appendices 2 This section contains the general object specifications and AC drive object specifications. DeviceNet Communications Unit User’s Manual (I581-E1) Manual Structure Manual Structure Page Structure and Symbol Icons The following page structure and symbol icons are used in this manual. Level 1 heading Level 2 heading 3 Network Startup 3-1 Inverter Configuration To use the DeviceNet Communications Unit, you need to configure node addresses and the necessary Remote I/O and other functions The configuration of the DeviceNet Communications Unit is all done through parameters built into the MX2/RX-series Inverter. This section describes the inverter parameters that must be configured to use the DeviceNet Communications Unit. Because the settings of the DeviceNet Communications Unit vary depending on the type of the Remote I/O function to be used, information in this section is described for each of the following three types of Remote I/O. Section Name 3-1-1 Basic and Extended Speed I/O Settings Note, Supplementary Information, Reference Target A note, supplementary information, reference target, etc. are provided with difference icons. 3-1-2 Remote I/O Settings Using Torque Reference 3-1-3 Special I/O and Flexible Format Settings Applicable Remote I/O Basic Speed I/O Extended Speed I/O Extended Speed and Acceleration Control Extended Speed and Torque Control Extended Control I/O Extended Control I/O and Multi function I/O Monitor Outline Types of Remote I/O that support general speed control applications. Types of Remote I/O that include the torque reference and other interfaces related to torque control. These Remote I/O types can be configured even if the torque reference is not used. Types of Remote I/O that utilize Modbus communication, allowing flexible function selection. Special I/O Flexible Format Precautions for Correct Use • For details about the Remote I/O function, refer to Section 4 Remote I/O on page 4-1. • Parameter configuration is required if you in stall the DeviceNet Communications Unit on an MX2/RX-series Inverter for the first time. After replacing the DeviceNet Communications Unit with new one, the inverter parameters is retained and thus parameter configuration is not required. 3-1-1 Level 3 heading Basic and Extended Speed I/O Settings Normally, inverter operation can be controlled using the Basic Speed I/O or Extended Speed I/O function included as standard in DeviceNet. To set the acceleration/deceleration time, however, you need to use OMRON's unique Extended Speed and Acceleration Control function. This section explains how to configure these three types of Remote I/O. Inverter parameters can be configured using the Digital Operator, CX-Drive, or a DeviceNet EDS file (in CX-Integrator). 3-2 Manual Name DeviceNet Communications Unit User’s Manual (I581-E1) 3 Network Startup Allocation Relay 04 CIO 3204 05 CIO 3205 06 CIO 3206 15 to 0 Input Allocation Relay Area Allocation Relay This DeviceNet Communications Unit [Node address 4] Extended Control I/O setting: Occupies 4 output words CIO 3305 CIO 3304 CIO 3306 07 CIO 3207 08 CIO 3208 – (Not allocatable) CIO 3308 09 CIO 3209 ··· CIO 3309 15 to 0 This DeviceNet Communications Unit [Node address 4] Extended Control I/O setting: Occupies 4 input words CIO 3307 16-point Input Unit [Node Address 8] ··· The actual fixed allocations steps for the DeviceNet Communications Unit are shown below. Operation Steps 1 Power on the inverter(s) first and configure the following settings according to 3-1 Inverter Configuration on page 3-2. • Set the node address. According to the fixed allocations node address setting example above, set inverter parameter P192 (DeviceNet Node Address). • Set the type of Remote I/O. Set inverter parameter P046 (Assembly Instance No.) that suits your application. Precautions for Correct Use • Be sure to set the type of Remote I/O at this point. The number of words occupied by the DeviceNet Communications Unit varies depending on the set Remote I/O type. Unless the Remote I/O type is set correctly, automatic network configuration cannot be completed successfully. • To connect additional DeviceNet Slaves, set the node addresses for them simultaneously at this point. 2 3 Cycle the power supply of the inverter. Then, power ON all network components (Master Unit, other Slaves, and Communications power supply). 3 3-2-2 Fixed Allocation Steps Describes the operation steps. 3-2 Network Configuration (Scan List Configuration) Output Allocation Relay Area Fixed Allocations Address Level 2 heading Shows which sub-section the content of the current page belongs to. Section Number of Level 1 heading Shows which section the content of the current page belongs to. Level 3 heading Shows which paragraph the content of the current page belongs to. Once the network is restarted with the new settings, check that the DeviceNet Communications Unit's LED indicators indicate normal operation. Following the steps below to configure the Master Unit causes both the MS (Module Status) and NS (Network Status) LED indicators to light green. If the LED indicators indicate a different pattern, please refer to Section 6 Troubleshooting on page 6-1 to take corrective action. (1) Change the CS/CJ-series CPU Unit to Program mode. (2) Set the Master Function Enable switch (Master Unit's allocation relay area CIO n, bit 06) from OFF to ON. Note Skip this step if the Master function is already enabled. (3) Set the Scan List Clear switch (Master Unit's allocation relay area CIO n, bit 01) from OFF to ON. Note Skip this step if the Scan List is already enabled. (4) Select a fixed allocation area between 1 and 3 (Master Unit's allocation relay area CIO n, bit 08 to 10). (5) Set the Scan List Enable switch (Master Unit's allocation relay area CIO n, bit 00) from OFF to ON to enable the Scan List. DeviceNet Communications Unit User’s Manual (I581-E1) 3 - 15 Note The above page is only a sample for illustrative purposes. It is not the actual content of the manual. DeviceNet Communications Unit User’s Manual (I581-E1) 3 Manual Structure Special Information Special information in this manual is classified as follows: Precautions for Safe Use Precautions on what to do and what not to do to ensure safe usage of the product. Precautions for Correct Use Precautions on what to do and what not to do to ensure proper operation and performance. Additional Information Additional information to read as required. This information is provided to increase understanding or make operation easier. 4 DeviceNet Communications Unit User’s Manual (I581-E1) Sections in this Manual Sections in this Manual 1 2 1 Outline 3 2 DeviceNet Communications Unit Mounting and Wiring 4 3 Network Startup 4 Remote I/O 6 5 Message Communications A I 6 Troubleshooting A Appendices I 5 Index DeviceNet Communications Unit User’s Manual (I581-E1) 5 CONTENTS CONTENTS Introduction .............................................................................................................. 1 Manual Configuration .............................................................................................. 2 Manual Structure ...................................................................................................... 3 Sections in this Manual ........................................................................................... 5 CONTENTS ................................................................................................................ 6 Read and Understand this Manual.......................................................................... 9 Safety Precautions ................................................................................................. 12 Precautions for Safe Use ....................................................................................... 14 Precautions for Correct Use.................................................................................. 16 Regulations and Standards ................................................................................... 18 Trademarks ............................................................................................................. 19 Items to Check After Unpacking ........................................................................... 20 Related Manuals ..................................................................................................... 22 Revision History ..................................................................................................... 23 Section 1 Outline 1-1 Outline of DeviceNet Communications Unit ....................................................................... 1-2 1-2 Outline of DeviceNet Communications ............................................................................... 1-5 1-2-1 1-2-2 1-2-3 1-2-4 1-3 Specifications ...................................................................................................................... 1-10 1-4 Restrictions on Use............................................................................................................. 1-14 1-4-1 1-4-2 1-4-3 1-5 2-1 DeviceNet Communications Unit Mounting and Wiring Name and Setting of Each Component ............................................................................... 2-2 2-1-1 2-1-2 2-1-3 2-2 Supported Inverters................................................................................................................... 1-14 Inverter Safety (ISO13849-1) .................................................................................................... 1-14 Restrictions ............................................................................................................................... 1-15 Comparison with Conventional Models ............................................................................ 1-16 Section 2 Name and Setting of Each Component....................................................................................... 2-2 LED Indicators............................................................................................................................. 2-4 Node Address Setting ................................................................................................................. 2-4 Installation.............................................................................................................................. 2-5 2-2-1 6 Functions..................................................................................................................................... 1-5 Features ...................................................................................................................................... 1-5 Configuration............................................................................................................................... 1-7 Maximum Number of Inverter Connections................................................................................. 1-8 Mounting Procedure of DeviceNet Communications Unit on MX2-series Inverter...................... 2-6 DeviceNet Communications Unit User’s Manual (I581-E1) CONTENTS 2-2-2 2-2-3 2-2-4 Section 3 3-1 Network Startup Inverter Configuration........................................................................................................... 3-2 3-1-1 3-1-2 3-1-3 3-1-4 3-2 Section 4 Remote I/O Configuration ..................................................................................................... 4-2 Torque Control Configuration.................................................................................................... 4-10 Extended Speed and Torque Control (123/173) ........................................................................4-11 Extended Control I/O (101/151/153)......................................................................................... 4-13 Extended Control I/O and Multi function I/O Monitor (101/153)................................................ 4-15 Special I/O and Flexible Format ......................................................................................... 4-17 4-4-1 4-4-2 4-4-3 4-5 Basic Speed I/O (20/70) ............................................................................................................. 4-4 Extended Speed I/O (21/71) ....................................................................................................... 4-5 Extended Speed and Acceleration Control (110/111) ................................................................. 4-7 Remote I/O with Torque Reference Support ..................................................................... 4-10 4-3-1 4-3-2 4-3-3 4-3-4 4-4 Remote I/O Types....................................................................................................................... 4-2 Remote I/O Selection................................................................................................................. 4-3 Basic and Extended Speed I/O ............................................................................................. 4-4 4-2-1 4-2-2 4-2-3 4-3 Connecting CX-Drive (via DeviceNet) ...................................................................................... 3-25 Outline of CX-Drive................................................................................................................... 3-30 Remote I/O 4-1-1 4-1-2 4-2 How to Edit Device Parameters with EDS File ......................................................................... 3-21 Restrictions of Edit Device Parameters Function with EDS File............................................... 3-22 Editing Parameters with CX-Drive ..................................................................................... 3-25 3-4-1 3-4-2 4-1 EDS File Installation ................................................................................................................. 3-14 Fixed Allocation Steps .............................................................................................................. 3-14 User Allocation Steps (Scan List Configuration) ....................................................................... 3-16 Device Parameters with EDS File....................................................................................... 3-21 3-3-1 3-3-2 3-4 Basic and Extended Speed I/O Settings..................................................................................... 3-2 Remote I/O Settings Using Torque Reference............................................................................ 3-6 Special I/O and Flexible Format Settings ................................................................................... 3-9 Utilizing Multi-function Inputs/Outputs for Host ......................................................................... 3-12 Network Configuration (Scan List Configuration)............................................................ 3-14 3-2-1 3-2-2 3-2-3 3-3 Mounting Procedure of DeviceNet Communications Unit on RX-series Inverter........................ 2-9 Operating Environment............................................................................................................. 2-14 Connector Wiring ...................................................................................................................... 2-14 Frequency Reference/RUN Command Selection ..................................................................... 4-17 Special I/O (100/150) ................................................................................................................ 4-17 Flexible Format (139/159)......................................................................................................... 4-20 When to Input the RUN Command after Establishment of Communications ................ 4-22 Section 5 Message Communications 5-1 Outline of Explicit Message.................................................................................................. 5-2 5-2 Sending Messages from CS/CJ-series ................................................................................ 5-3 5-2-1 5-2-2 How to Issue Explicit Messages by CMND Instruction ............................................................... 5-3 When to Issue/Read an Explicit Message .................................................................................. 5-6 5-3 Outline of Message Function and Response...................................................................... 5-8 5-4 Parameter Read/Write (Class 64 hex) ................................................................................ 5-11 5-4-1 5-4-2 5-4-3 5-4-4 Supported Service Codes..........................................................................................................5-11 Parameter Data Size .................................................................................................................5-11 Parameter Read/Write Data ..................................................................................................... 5-12 Saving Changes to Holding Registers (ENTER Command)..................................................... 5-13 DeviceNet Communications Unit User’s Manual (I581-E1) 7 CONTENTS 5-4-5 5-4-6 5-5 Parameter Class/Instance/Attribute .......................................................................................... 5-13 Ladder Programming Example ................................................................................................. 5-14 Parameter Read/Write (Class 65 hex) ................................................................................ 5-15 5-5-1 5-5-2 Section 6 Supported Service Codes ......................................................................................................... 5-15 Supported Instance and Attribute Codes .................................................................................. 5-15 Troubleshooting 6-1 Outline of Error Indication .................................................................................................... 6-2 6-2 Errors on a Communications Line ....................................................................................... 6-3 6-3 Errors on Inverter or DeviceNet Communications Unit ..................................................... 6-5 6-3-1 6-3-2 6-3-3 6-4 Error Codes Related to DeviceNet Communications Error ......................................................... 6-5 Error Codes Related to DeviceNet Communications Unit........................................................... 6-7 Parameter Setting Error in DeviceNet Communications Unit...................................................... 6-8 Errors Related to Message Communications ..................................................................... 6-9 6-4-1 6-4-2 FINS Message Errors (CS/CJ-series) ......................................................................................... 6-9 Explicit Message Errors ............................................................................................................ 6-10 6-5 Special I/O Errors................................................................................................................. 6-11 6-6 Removing DeviceNet Communications Unit..................................................................... 6-12 6-6-1 6-6-2 How to Remove DeviceNet Communications Unit - MX2-series .............................................. 6-13 How to Remove DeviceNet Communications Unit - RX-series................................................. 6-14 Appendices A-1 General Object Specifications..............................................................................................A-2 A-1-1 A-1-2 A-1-3 A-1-4 A-1-5 A-1-6 A-1-7 A-1-8 Identity Object (Class 01 hex) .....................................................................................................A-2 Message Router Object (Class 02 hex) ......................................................................................A-5 DeviceNet Object (Class 03 hex) ................................................................................................A-5 Assembly Object (Class 04 hex) .................................................................................................A-6 Connection Object (Class 05 hex) ..............................................................................................A-7 Discrete Input Point Object (Class 08 hex) ...............................................................................A-12 Discrete Output Point Object (Class 09 hex) ............................................................................A-12 Unit Parameter Object (Class 94 hex) ......................................................................................A-13 A-2 AC Drive Object Specifications ..........................................................................................A-14 A-2-1 A-2-2 A-2-3 Motor Data Object (Class 28 hex).............................................................................................A-14 Control Supervisor Object (Class 29 hex).................................................................................A-15 AC/DC Drive Object (Class 2A hex)..........................................................................................A-19 Index 8 DeviceNet Communications Unit User’s Manual (I581-E1) Read and Understand this Manual Read and Understand this Manual Warranty and Limitations of Liability WARRANTY OMRON's exclusive warranty is that the products are free from defects in materials and workmanship for a period of one year (or other period if specified) from date of sale by OMRON. OMRON MAKES NO WARRANTY OR REPRESENTATION, EXPRESS OR IMPLIED, REGARDING NONINFRINGEMENT, MERCHANTABILITY, OR FITNESS FOR PARTICULAR PURPOSE OF THE PRODUCTS. ANY BUYER OR USER ACKNOWLEDGES THAT THE BUYER OR USER ALONE HAS DETERMINED THAT THE PRODUCTS WILL SUITABLY MEET THE REQUIREMENTS OF THEIR INTENDED USE. OMRON DISCLAIMS ALL OTHER WARRANTIES, EXPRESS OR IMPLIED. LIMITATIONS OF LIABILITY OMRON SHALL NOT BE RESPONSIBLE FOR SPECIAL, INDIRECT, OR CONSEQUENTIAL DAMAGES, LOSS OF PROFITS OR COMMERCIAL LOSS IN ANY WAY CONNECTED WITH THE PRODUCTS, WHETHER SUCH CLAIM IS BASED ON CONTRACT, WARRANTY, NEGLIGENCE, OR STRICT LIABILITY. In no event shall the responsibility of OMRON for any act exceed the individual price of the product on which liability is asserted. IN NO EVENT SHALL OMRON BE RESPONSIBLE FOR WARRANTY, REPAIR, OR OTHER CLAIMS REGARDING THE PRODUCTS UNLESS OMRON'S ANALYSIS CONFIRMS THAT THE PRODUCTS WERE PROPERLY HANDLED, STORED, INSTALLED, AND MAINTAINED AND NOT SUBJECT TO CONTAMINATION, ABUSE, MISUSE, OR INAPPROPRIATE MODIFICATION OR REPAIR. DeviceNet Communications Unit User’s Manual (I581-E1) 9 Read and Understand this Manual Application Considerations SUITABILITY FOR USE OMRON shall not be responsible for conformity with any standards, codes, or regulations that apply to the combination of products in the customer's application or use of the products. At the customer's request, OMRON will provide applicable third party certification documents identifying ratings and limitations of use that apply to the products. This information by itself is not sufficient for a complete determination of the suitability of the products in combination with the end product, machine, system, or other application or use. The following are some examples of applications for which particular attention must be given. This is not intended to be an exhaustive list of all possible uses of the products, nor is it intended to imply that the uses listed may be suitable for the products: • Outdoor use, uses involving potential chemical contamination or electrical interference, or conditions or uses not described in this manual. • Nuclear energy control systems, combustion systems, railroad systems, aviation systems, medical equipment, amusement machines, vehicles, safety equipment, and installations subject to separate industry or government regulations. • Systems, machines, and equipment that could present a risk to life or property. Please know and observe all prohibitions of use applicable to the products. NEVER USE THE PRODUCTS FOR AN APPLICATION INVOLVING SERIOUS RISK TO LIFE OR PROPERTY WITHOUT ENSURING THAT THE SYSTEM AS A WHOLE HAS BEEN DESIGNED TO ADDRESS THE RISKS, AND THAT THE OMRON PRODUCTS ARE PROPERLY RATED AND INSTALLED FOR THE INTENDED USE WITHIN THE OVERALL EQUIPMENT OR SYSTEM. PROGRAMMABLE PRODUCTS OMRON shall not be responsible for the user's programming of a programmable product, or any consequence thereof. 10 DeviceNet Communications Unit User’s Manual (I581-E1) Read and Understand this Manual Disclaimers CHANGE IN SPECIFICATIONS Product specifications and accessories may be changed at any time based on improvements and other reasons. It is our practice to change model numbers when published ratings or features are changed, or when significant construction changes are made. However, some specifications of the products may be changed without any notice. When in doubt, special model numbers may be assigned to fix or establish key specifications for your application on your request. Please consult with your OMRON representative at any time to confirm actual specifications of purchased products. DIMENSIONS AND WEIGHTS Dimensions and weights are nominal and are not to be used for manufacturing purposes, even when tolerances are shown. PERFORMANCE DATA Performance data given in this manual is provided as a guide for the user in determining suitability and does not constitute a warranty. It may represent the result of OMRON's test conditions, and the users must correlate it to actual application requirements. Actual performance is subject to the OMRON Warranty and Limitations of Liability. ERRORS AND OMISSIONS The information in this manual has been carefully checked and is believed to be accurate; however, no responsibility is assumed for clerical, typographical, or proofreading errors, or omissions. DeviceNet Communications Unit User’s Manual (I581-E1) 11 Safety Precautions Safety Precautions To ensure that the DeviceNet Communications Unit (Model: 3G3AX-MX2-DRT-E/3G3AX-RX-DRT-E) is used safely and correctly, be sure to read this Safety Precautions section and the main text before using the product. Learn all items you should know before use, regarding the equipment as well as required safety information and precautions. Make an arrangement so that this manual also gets to the end user of this product. After reading this manual, keep it in a convenient place so that it can be referenced at any time. Definition of Precautionary Information The following notation is used in this manual to provide precautions required to ensure safe usage of a DeviceNet Communications Unit (Model: 3G3AX-MX2-DRT-E/3G3AX-RX-DRT-E). The safety precautions that are provided are extremely important to safety. Always read and heed the information provided in all safety precautions. The following notation is used. Meaning of Warning Indication DANGER Indicates a potentially hazardous situation which, if not avoided, could result in death or serious injury. Additionally, there may be severe property damage. Caution Indicates a potentially hazardous situation which, if not avoided, may result in minor or moderate injury, or property damage. Explanation of Symbols This symbol indicates a prohibited item (an item you must not do). The specific instruction is indicated using an illustration or text inside or near The symbol shown to the left indicates "disassembly prohibited." . This symbol indicates danger and caution. The specific instruction is indicated using an illustration or text inside or near The symbol shown to the left indicates "beware of electric shock." . This symbol indicates a compulsory item (an item that must be done). The specific instruction is indicated using an illustration or text inside or near The symbol shown to the left indicates a "general mandatory item." 12 . DeviceNet Communications Unit User’s Manual (I581-E1) Safety Precautions DANGER Do not attempt to remove the terminal block cover or disconnect and reconnect the DeviceNet Communications Unit during power on or within 10 minutes after power off. Doing so may result in severe injury due to electric shock. Caution Inverters contain high voltage parts and short-circuits may sometimes cause product damage or property damage. Measures must be taken to prevent chips, lead-wire pieces, or other metal waste from entering the product, for example, by installing a cover. Do not attempt to disassemble, repair, or modify the DeviceNet Communications Unit. Doing so may result in injury. DeviceNet Communications Unit User’s Manual (I581-E1) 13 Precautions for Safe Use Precautions for Safe Use Installation and Storage Do not store or use the DeviceNet Communications Unit in the following environment: • Locations subject to direct sunlight • Locations subject to ambient temperatures outside the range specified in the specifications • Locations subject to relative humidity outside the range specified in the specifications • Locations subject to condensation as the result of severe temperature fluctuations • Locations subject to corrosive or flammable gases • Locations near flammable materials • Locations subject to dust, salt spray, or iron powder • Locations subject to water, oil, or chemical splashes • Locations subject to direct shock or vibration Transportation, Installation, and Wiring • Do not drop or apply strong impact on the product. Doing so may result in damaged parts or malfunction. • When transporting the inverter with a mounted DeviceNet Communications Unit, do not hold the DeviceNet Communications Unit. • Do not remove the cover of the DeviceNet Communications Unit. Tighten an Unit fixation screw to the specified torque. • Install an appropriate stopping device to ensure safety. In particular, if configured to operate continuously even in the event of a communications error, the inverter may not stop, resulting in equipment damage. • If the DeviceNet Communications Unit is used in the following locations, provide sufficient shielding measures. Using the DeviceNet Communications Unit in any of these locations may result in equipment damage. Locations subject to static electricity or other forms of noise Locations subject to strong electromagnetic fields Locations close to power lines • During installation, wiring, and network setting on the DeviceNet Communications Unit, please refer to applicable sections of this manual to ensure the correct connection and configuration procedures. • When removing the DeviceNet Communications Unit, do not pull the flat cable. • When mounting the DeviceNet Communications Unit, be sure that the flat cable is not pinched. • When mounting the DeviceNet Communications Unit, be careful about burrs of the break-outs on the inverter. Operation and Adjustment • Be sure to confirm the permissible range of motors and machines before operation because the speed can be set from low to high. • Before starting the CPU Unit and inverter programs, check the program contents as well as the interactions between these programs. 14 DeviceNet Communications Unit User’s Manual (I581-E1) Precautions for Safe Use Maintenance and Inspection • Be sure to confirm safety before conducting maintenance, inspection or parts replacement. • Invalid parameter configuration may result in a communications error, interrupting the communications function of other units. Before participating in the network, make sure that the communications configuration parameters are set properly. • Using a support tool to write all inverter parameters causes the DeviceNet configuration parameters to be overwritten. Before reconnecting to DeviceNet, make sure that the address and I/O allocations are correct. DeviceNet Communications Unit User’s Manual (I581-E1) 15 Precautions for Correct Use Precautions for Correct Use Installation Be sure to meet the constraints on the mounting direction of the inverter. Modbus-RTU Communication Mounting the DeviceNet Communications Unit disables the inverter's Modbus-RTU communication capability. Product Disposal Comply with the local ordinance and regulations when disposing of the product. Warning Labels • The product's warning label is located in the following position when the DeviceNet Communications Unit is mounted on the inverter. • For the model 3G3AX-RX-DRT-E, the warning label is attached to the inverter. • Be sure to follow the instructions. Note The appearance differs depending on the capacity of the inverter. 200V 3PHASE SYSDRIVE 3G3MX2 INVERTER RUN PWR Hz ALM A RUN PRG STOP RESET Warning Description The model 3G3AX-MX2-DRT-E (for the MX2-series) has an English warning label attached when shipped from the factory. Affix an appropriate language label included with the product on it if necessary. 16 DeviceNet Communications Unit User’s Manual (I581-E1) Precautions for Correct Use Supported Inverter Versions There is a restriction on the unit version of the inverter that can be used with the DeviceNet Communications Unit. Make sure that your inverter's unit version is 1.1 or later. Make sure that your inverter is 3G3RX-V1 series (unit version 2.0 or later). Note The inverter unit version is indicated on the nameplate attached to the inverter. DeviceNet Communications Unit User’s Manual (I581-E1) 17 Regulations and Standards Regulations and Standards To export (or provide to nonresident aliens) any part of this product that falls under the category of goods (or technologies) for which an export certificate or license is mandatory according to the Foreign Exchange and Foreign Trade Control Law of Japan, an export certificate or license (or service transaction approval) according to this law is required. Therefore, for the DeviceNet Communications Unit which is an EC-compliant product, it is the user's responsibility to check and ensure the compliance of the equipment and the entire system with the applicable EC Directives. EC Directives EC Directives Applicable Standard EMC Directive EN61800-3 Low Voltage Directive EN61800-5-1 UL and cUL Standards Standard UL/cUL Applicable standards UL508 Machinery Directive Mounting the DeviceNet Communications Unit to an inverter will void the certification of the inverter under Machinery Directive. 18 DeviceNet Communications Unit User’s Manual (I581-E1) Trademarks Trademarks • DeviceNet is a registered trademark of the Open DeviceNet Vendor Association (ODVA). • Windows is a registered trademark of Microsoft Corporation in the United States and other countries. • Other company names and product names in this document are the trademarks or registered trademarks of their respective companies. DeviceNet Communications Unit User’s Manual (I581-E1) 19 Items to Check After Unpacking Items to Check After Unpacking On delivery, be sure to check that the delivered product is what you ordered. In case that you find any problems with the product, immediately contact your nearest local sales representative or OMRON sales office. Checking the Nameplate The product has a nameplate on its rear face. Checking the Model 3 G 3 A X - M X 2 - D R T- E DeviceNet Communications Unit For MX2 Series 3 G 3 A X - R X - D R T- E DeviceNet Communications Unit For RX Series 20 DeviceNet Communications Unit User’s Manual (I581-E1) Items to Check After Unpacking Checking the Accessories The DeviceNet Communications Unit (Model: 3G3AX-MX2-DRT-E and 3G3AX-RX-DRT-E) comes with the following accessories. OMRON DeviceNet Communications Unit 3G3AX-MX2-DRT-E (For MX2 Series) Manual Thank you for purchasing an OMRON product. Please check that this is the one you intended and read this manual carefully before use. Always keep this manual in a safe and handy place. Catalog Type Catalog Number 3G3AX-MX2-DRT-E/3G3AX-MX2-DRT-E User's Manual I581 OMRON Corporation ©OMRON Corporation 2011 All Right Reserved. DeviceNet Communications Unit (supplied with a DeviceNet connector) Instruction Sheet Warning Labels OMRON DeviceNet Communications Unit 3G3AX-RX-DRT-E (For RX Series) Manual Thank you for purchasing an OMRON product. Please check that this is the one you intended and read this manual carefully before use. Always keep this manual in a safe and handy place. Catalog Type 3G3AX-MS2-DRT-E/3G3AX-RX-DRT-E User's Manual Catalog Number I581 OMRON Corporation ©OMRON Corporation 2011 All Right Reserved. DeviceNet Communications Unit (supplied with a DeviceNet connector) Instruction Sheet DeviceNet Communications Unit fixation screw (M3x40) DeviceNet Communications Unit User’s Manual (I581-E1) 21 Related Manuals Related Manuals To operate this DeviceNet Communications Unit, you must be familiar with the equipment connected to it. Please refer to the following manuals for information on the related products. Inverter Manuals Model and Name Catalog No. Multi-function Compact Inverter MX2 User's Manual I570 High-function General-purpose Inverter 3G3RX--V1 User's Manual I578 Note For inverter operation, please refer to the manual for the inverter. DeviceNet Communications Unit Manuals Model and Name 22 Catalog No. CS/CJ-series DeviceNet Units Operation Manual W380 DeviceNet Operation Manual W267 DeviceNet Communications Unit User’s Manual (I581-E1) Revision History Revision History The manual revision code is a number appended to the end of the catalog number found in the bottom right-hand corner of the front and back covers. Example Cat.No. I581-E1-03 Revision code Revision Code 01 Revision Date January 2012 Revised Content Original production 02 April 2012 Corrected mistakes. 03 October 2012 Descriptions about 3G3AX-RX-DRT-E were added. The revised parts are marked with DeviceNet Communications Unit User’s Manual (I581-E1) . 23 Revision History 24 DeviceNet Communications Unit User’s Manual (I581-E1) 1 Outline This section provides an outline, features, and specifications of the DeviceNet Communications Unit. 1-1 Outline of DeviceNet Communications Unit . . . . . . . . . . . . . . . . . . . . . . . . 1-2 1-2 Outline of DeviceNet Communications . . . . . . . . . . . . . . . . . . . . . . . . . . . . 1-5 1-2-1 1-2-2 1-2-3 1-2-4 Functions . . . . . . . . . . . . . . . . . . . . . . . . . . . . . . . . . . . . . . . . . . . . . . . . . . . . . Features . . . . . . . . . . . . . . . . . . . . . . . . . . . . . . . . . . . . . . . . . . . . . . . . . . . . . . Configuration . . . . . . . . . . . . . . . . . . . . . . . . . . . . . . . . . . . . . . . . . . . . . . . . . . Maximum Number of Inverter Connections . . . . . . . . . . . . . . . . . . . . . . . . . . . 1-5 1-5 1-7 1-8 1-3 Specifications . . . . . . . . . . . . . . . . . . . . . . . . . . . . . . . . . . . . . . . . . . . . . . . . 1-10 1-4 Restrictions on Use . . . . . . . . . . . . . . . . . . . . . . . . . . . . . . . . . . . . . . . . . . . 1-14 1-4-1 1-4-2 1-4-3 Supported Inverters . . . . . . . . . . . . . . . . . . . . . . . . . . . . . . . . . . . . . . . . . . . . 1-14 Inverter Safety (ISO13849-1) . . . . . . . . . . . . . . . . . . . . . . . . . . . . . . . . . . . . . 1-14 Restrictions . . . . . . . . . . . . . . . . . . . . . . . . . . . . . . . . . . . . . . . . . . . . . . . . . . . 1-15 1-5 Comparison with Conventional Models . . . . . . . . . . . . . . . . . . . . . . . . . . . 1-16 DeviceNet Communications Unit User’s Manual (I581-E1) 1-1 1 Outline 1-1 Outline of DeviceNet Communications Unit The DeviceNet Communications Unit (Model: 3G3AX-MX2-DRT-E) is used in conjunction with a multi-function compact inverter, the MX2-series. On the other hand, the DeviceNet Communications Unit (Model: 3G3A-RX-DRT-E) is intended for high-function general-purpose inverter, the RX-series. The DeviceNet Communications Unit is an interface unit that realizes data communications between an inverter and a CS/CJ-series Programmable Controller. By connecting the DeviceNet Communications Unit to your inverter, you can start and stop the inverter, monitor its operation status, and change various settings from a CS/CJ-series to support a wide range of applications. Precautions for Correct Use Connecting the DeviceNet Communications Unit disables the RS-422/485 communications function of the inverter. Communications Functions as if using I/O Function In DeviceNet Communications with a CS/CJ-series and Inverters, the following two communications functions can be used concurrently. Remote I/O Remote I/O is a function that enables a Slave (Inverter) to exchange I/O data with the CPU Unit that has no program running. For example, you can send inverter control inputs such as run/stop automatically from the CS/CJ-series to your inverter and return the operation status, output frequency monitor, or other data from the inverter to the CS/CJ-series. Messaging Messaging is a function that enables you to use specific instructions such as CMND and IOWR in a program to exchange data between a CPU Unit with the Master Unit and Slaves (Inverters). These specific instructions vary depending on the CS/CJ-series model. Unless you configure certain parameters, monitor the output frequency, output voltage, output current, or other parameter data of the inverter, or use Remote I/O communications, you can also use the Messaging function to send inverter control inputs such as run/stop. The Remote I/O function of the DeviceNet Communications Unit communicates via the I/O area word address 4 to 20 of the CS/CJ-series. Because the Remote I/O function offers the basic control input and output, frequency setting, and output frequency monitor functions, you can control your inverter as if you were handling ordinary I/O control data. 1-2 DeviceNet Communications Unit User’s Manual (I581-E1) 1 Outline A DeviceNet communications system can be used in conjunction with a CS/CJ-series programmable controller. You can connect up to 63 Inverters to a DeviceNet communications system and control them. Precautions for Correct Use • The maximum number of inverter connections depends on the operating conditions. Refer to 1-2-4 Maximum Number of Inverter Connections on page 1-8. • Specifically, "CS/CJ-series" represents the following models of programmable controllers. CS1G/H-CPUH, CS1G/H-CPU(-V1), CJ1G/H-CPUH, CJ1M-CPU, CJ1G-CPU, CJ2H-CPU6(-EIP), CJ2H-CPU Multi-vendor Network This DeviceNet Communications Unit conforms to the DeviceNet specifications and can be connected to a third party device (Master or Slave). It also supports the AC/DC drive object defined in the DeviceNet specifications. Options for Communications Functions The DeviceNet Communications Unit offers a wide range of communications options that address your inverter application. Support for the Master's Communication Method The DeviceNet Communications Unit supports Poll which is one of the DeviceNet I/O connection methods. Remote I/O The Remote I/O function is available in one of the following eight types. Configure the function that suits your application. Function Name Description Basic Speed I/O Remote I/O function included as standard in DeviceNet. Extended Speed I/O Remote I/O function included as standard in DeviceNet. This is the default of this DeviceNet Communications Unit. Extended Speed and Acceleration Control Extended Speed I/O function with an additional acceleration/deceleration time configuration function. Extended Speed and Torque Control Extended Speed I/O function with an additional torque control function. Extended Control I/O Remote I/O optimized for the actual input/output functions of the inverter. It includes a torque control function. Extended Control I/O and Multi function I/O Monitor Extended Control I/O function with an additional Multi-function Input Monitor function. It enables you to use the inverter inputs as general-purpose PLC inputs by configuring an appropriate parameter. Special I/O Remote I/O function that provides functions similar to those available in Modbus communication. Flexible Format Remote I/O function that allows you to select and allocate up to 10 words of parameter data for input and output. DeviceNet Communications Unit User’s Manual (I581-E1) 1-3 1-1 Outline of DeviceNet Communications Unit Communications with CS/CJ-series 1 1 Outline Messaging You can use the Explicit Message function of DeviceNet to control and monitor your inverter. It supports messages that conform to the AC/DC drive object defined in the DeviceNet specifications. In addition, you can use the Parameter Read/Write message object (Class 64), a unique enhancement by OMRON, to read/write the parameter settings and monitor values stored in the inverter. Using the Explicit Message function in conjunction with Remote I/O enables the use of data not allocated to Remote I/O because these function can be used independent of each other. Support for a Wide Range of System Configurations The DeviceNet Communications Unit provides two communications functions, Remote I/O and Messaging. You can use the Remote I/O function for control inputs normally and the Messaging function as required to monitor each inverter. These communications functions also allow you to control whether to enable the control inputs from the communications line or the local control inputs. Precautions for Correct Use For each inverter's DeviceNet Communications Unit, use a T-branch tap and fine wire communications cables (Model: DCA1-5C10) to provide T-branching. Automatic Baud Rate Recognition The DeviceNet Communications Unit automatically detects the Master Unit's communication baud rate, so no user configuration is required. Precautions for Correct Use To change the DeviceNet Master Unit's baud rate, be sure to reset the Master Unit first. Then, turn power supply OFF and ON the inverter (DeviceNet Communications Unit) to have the new bard rate detected. Parameter Edit Using CX-Drive via DeviceNet Connecting the Inverter/Servo parameter support tool CX-Drive via DeviceNet communications enables editing of inverter parameters. You can change parameters for all Slaves without switching the connection of the software. Precautions for Correct Use This DeviceNet Communications Unit is supported in CX-Drive Ver.2.6 or higher. 1-4 DeviceNet Communications Unit User’s Manual (I581-E1) 1 Outline Outline of DeviceNet Communications 1-2-1 Functions Communications Function Remote I/O communications Description Enable automatic data exchange between a PLC (Master Unit/CPU Unit) and Slave Units in a cyclic manner. Explicit Message communica- Enable low-priority communications where messages are sent from a PLC to tions Slave Units. It enables you to read/write parameters, read the operation status, or perform other operations. 1-2-2 Features Multi-vendor Network This DeviceNet Communications Unit conforms to the DeviceNet specifications and can be connected to a third party device (Master or Slave). When used in conjunction with DeviceNet-compliant products including valves and various sensors, it can support a wide range of field-level applications. Concurrent Execution of Remote I/O and Messaging Services The DeviceNet Communications Unit supports concurrent execution of the Remote I/O function that enables constant data exchange between a CS/CJ-series unit and Slaves and the Message communications function that enables sending/receiving of data from a CS/CJ-series unit as needed. Therefore, by using a DeviceNet network, you can flexibly support applications that require sending/receiving of bit information and data (a message). Note that, Message communications provide the function of issuing DeviceNet Explicit Messages, in addition to OMRON FINS commands. Connection of Multiple CS/CJ-series Units on a Single Network With the network configuration tool CX-Integrator (sold separately), you can connect two or more Master Units on a single network to establish Messaging communications between CS/CJ-series units and Remote I/O communications between a CS/CJ-series unit and Slaves in two or more groups. This enables integration of various control devices with reduced wire connections using DeviceNet as a kind of a common bus. Multi-layer Network to Support Multi-point Control and Line Expansion With the network configuration tool CX-Integrator (sold separately), you can mount two or more Master Units on a single CS/CJ-series unit to provide multi-point Remote I/O control. Furthermore, you can easily address line expansion or other needs. DeviceNet Communications Unit User’s Manual (I581-E1) 1-5 1 1-2-1 Functions DeviceNet is a multi-vendor network optimized for multi-bit communications systems such as machineand line-control systems, where control data and other information are mixed. DeviceNet is one of the network families that implements the Common Industrial Protocol (CIP) at its upper layer. DeviceNet communications are broadly divided into the following two types. 1-2 Outline of DeviceNet Communications 1-2 1 Outline Flexible Remote I/O Allocation With the network configuration tool CX-Integrator (sold separately), you can configure Remote I/O allocations flexibly in any areas in any order of node addresses. This enables area allocation depending on your application to facilitate programming, resulting in efficient area utilization in the CS/CJ-series unit. Support of Slaves with Various Response Speeds With the network configuration tool CX-Integrator (sold separately), you can configure the communications cycle time to support Slaves with slow response speeds. Wide Variety of Connection Options for Flexible Line Expansion/Changes In addition to multi-drop connections, the DeviceNet Communications Unit supports multi-branching of up to three branches and branching lines. These connection options can be combined according to your floor configuration, enabling the construction of a highly flexible system. Precautions for Correct Use For each Inverter's DeviceNet Communications Unit, use a T-branch tap and fine wire communications cables (Model: DCA1-5C10) to provide T-branching. 1-6 DeviceNet Communications Unit User’s Manual (I581-E1) 1 Outline 1-2 Outline of DeviceNet Communications 1-2-3 Configuration Configuration (Example) OMRON Master Unit Third-party Master OMRON Master Unit OMRON CX-Integrator 1 1-2-3 Configuration DeviceNet Network OMRON CX-Integrator OMRON Slave OMRON Slave Third-party Slave DeviceNet Network Third-party Slave Third-party Slave OMRON Slave DeviceNet Slave MX2 Series DeviceNet Communications Unit (Model: 3G3AX-MX2-DRT-E) DeviceNet Communications Unit User’s Manual (I581-E1) DeviceNet Slave RX-V1 Series DeviceNet Communications Unit (Model: 3G3AX-RX-DRT-E) 1-7 1 Outline 1-2-4 Maximum Number of Inverter Connections The maximum number of inverters you can connect depends on the following factors. • Type of the CS/CJ-series Master Unit connected • Type of the inverter's Remote I/O function • Type of Remote I/O allocations Refer to the following tables for details. When the Master Unit is CS1W-DRM21 (-V1) or CJ1W-DRM21 Not Using CX-Integrator (Remote I/O fixed allocation) Item Master Unit model Supported communications Maximum number of slaves per Master Maximum number of control points per Master CS-series CJ-series CS1W-DRM21 (-V1) CJ1W-DRM21 Remote I/O, Messaging 63 nodes 2048 points Allocation areas Select one of the following ranges of areas.*1 1: OUT: CIO 3200 to CIO 3263/IN: CIO 3300 to CIO 3363 (Default) 2: OUT: CIO 3400 to CIO 3463/IN: CIO 3500 to CIO 3563 3: OUT: CIO 3600 to CIO 3663/IN: CIO 3700 to CIO 3763 Allocation type Slaves are allocated to the above areas in a fixed order of node addresses. • 8-point slaves: Occupies 1 word (1 node address) • 16-point slaves: Occupies 1 word (1 node address) • Slaves with more than 16 points: Occupies more than 1 word (more than 1 node address) Maximum number of inverter connections 32 (when Remote I/O occupies 4 words) 21 (when Remote I/O occupies 6 words) 16 (when Remote I/O occupies 8 words) ··· 6 (when Remote I/O occupies 20 words) *1 Select with the soft switch (fixed area setting 1/2/3 switch) in the Master Unit allocation relay area. 1-8 DeviceNet Communications Unit User’s Manual (I581-E1) 1 Outline 1-2 Outline of DeviceNet Communications Using allocation DM areas or CX-Integrator (User allocations) Item Master Unit model Supported communications CS-series CJ-series CS1W-DRM21 (-V1) CJ1W-DRM21 Remote I/O, Messaging Maximum number of slaves per Master 63 nodes Using allocation DM areas: 16000 points (IN 500 words x 1 block, OUT 500 words x 1 block) Using CX-Integrator: 32000 points (IN 500 words x 2 block, OUT 500 words x 2 block) Allocation areas CIO: CIO 0000 to CIO 6143 WR: W000 to W511 HR: HR000 to HR511 DM: D00000 to D32767 EM: E00000 to E32767 Allocation type Slaves can be allocated freely node by node to the above areas using CX-Integrator. However, the following restrictions apply. Using allocation DM areas If you use the allocation DM areas of the Master Unit to perform user allocations, the following restrictions apply. • An allocation area must consist of two contiguous blocks of words, OUT1 and IN1. • In an allocated area, words of each slave must be allocated in order of node addresses. However, unused node addresses need not be allocated. • 8-point slaves cannot be allocated to the high byte. Using CX-Integrator If you use CX-Integrator, more flexible allocation than using allocation DM areas is possible, with less restrictions as follows. • An allocation area must consist of four contiguous blocks of words, OUT1, OUT2, IN1, and IN2. • In an allocated area, words of each slave can be allocated flexibly in any order, regardless of node addresses. Restrictions commonly applied to both allocation types The following restrictions apply commonly to both types of allocation, using allocation DM areas and using CX-Integrator. • A block must consist of 500 words or less. • For slaves with more than 8 points, the starting byte cannot be set to the high byte (7 to 15). • The same Slave cannot be shared by more than 1 Master Unit. Each type of Slave occupies words as follows. • 8-point slaves: Occupies the high or low byte of 1 word. • 16-point slaves: Occupies 1 word. • Slaves with more than 16 points: Occupies more than 1 word. For Slaves with an odd number of contacts, the last Slave occupies only the low byte. Maximum number of inverter connections for a single Master Unit Maximum number of inverter connections for multiple Master Units 63 Calculate based on the number of words in the above allocation area and the number of words occupied by the Inverters (4 to 8 words).*1 *1 Bit operation cannot be performed in the DM (Data Memory) area. In other words, this area is not appropriate for the Remote I/O allocation area for an inverter because it cannot be used as a contact. DeviceNet Communications Unit User’s Manual (I581-E1) 1-9 1 1-2-4 Maximum Number of Inverter Connections Maximum number of control points per Master 1 Outline 1-3 Specifications DeviceNet Communications Unit Item Installation Installation Environment Specification Unit type MX2-series DeviceNet Communications Unit Model 3G3AX-MX2-DRT-E Dimensions (W x H x D) 68 x 60 x 45 mm Weight 100 g or less (Shipping weight: Approx. 170 g) Unit type RX-series DeviceNet Communications Unit Model 3G3AX-RX-DRT-E Dimensions (W x H x D) 80 x 67 x 49 mm Weight 100 g or less (Shipping weight: Approx. 170 g) Ambient operating temperature -10 to 50°C Ambient operating humidity 20 to 90%RH (no condensation) Ambient storage temperature -20 to 65°C Vibration resistance 5.9 m/s2 (0.6G) at 10 to 55 Hz Dielectric strength 500 VAC (between isolated circuits) Location of use 1,000 m above sea level, indoor (No corrosive gas or dust) EC Directives EN61800-3: 2004 (2004/108/EC) Second environment, Category C3 EN61800-5-1: 2007 (2006/95/EC) SELV DeviceNet Interface UL/cUL standards UL508 Enclosure rating IP 20 Communications protocol DeviceNet Certification DeviceNet Conformance Test DeviceNet profile AC Drive (0x02) Supported connections Remote I/O: Master-Slave connection Poll Bitstrobe Change of state Cyclic Expricit Message Conform to the DeviceNet specifications Communications power supply 11 to 25 VDC (max. 50 mA, typ. 20 mA) Unit device address range Node address MAC ID 0 to 63, set with inverter parameter P192 Supported baud rates 125, 250, or 500 kbps Automatically detects baud rate of Master Unit. DeviceNet Default connection path Configuration Supported assemblies EDS file 1 - 10 Supported, set with inverter parameter P046 Basic Speed I/O (Output assembly 20, Input assembly 70) Extended Speed I/O (21, 71) Extended Speed and Torque Control (123, 173) Special I/O (100, 150) Extended Control I/O (101, 151) Extended Control I/O and Multi-function Input Monitor (101, 153) Flexible Format (139, 159) Extended Speed and Acceleration Control (110, 111) In case the DeviceNet Master Unit is configured using user allocation, only the input/output pairs can be configured. Depends on the inverter model. (See the next page.) DeviceNet Communications Unit User’s Manual (I581-E1) 1 Outline 1-3 Specifications The required EDS file for the DeviceNet Communications Unit depends on the model of the MX2/RX-series Inverter. MX2-series Device List ID Code Name of EDS File 3G3MX2-AB001 3G3MX2-A2001 Inverter Model 3G3AX-MX2-DRT-AB001_A2001 Product Name 1920 3G3AX-MX2-DRT-AB001_A2001.eds 3G3MX2-AB002 3G3MX2-A2002 3G3AX-MX2-DRT-AB002_A2002 1921 3G3AX-MX2-DRT-AB002_A2002.eds 3G3MX2-AB004 3G3MX2-A2004 3G3AX-MX2-DRT-AB004_A2004 1922 3G3AX-MX2-DRT-AB004_A2004.eds 3G3MX2-AB007 3G3MX2-A2007 3G3AX-MX2-DRT-AB007_A2007 1924 3G3AX-MX2-DRT-AB007_A2007.eds 3G3MX2-AB015 3G3MX2-A2015 3G3AX-MX2-DRT-AB015_A2015 1926 3G3AX-MX2-DRT-AB015_A2015.eds 3G3MX2-AB022 3G3MX2-A2022 3G3AX-MX2-DRT-AB022_A2022 1927 3G3AX-MX2-DRT-AB022_A2022.eds 3G3MX2-A2037 3G3AX-MX2-DRT-A2037 1929 3G3AX-MX2-DRT-A2037.eds 3G3MX2-A2055 3G3AX-MX2-DRT-A2055 1931 3G3AX-MX2-DRT-A2055.eds 3G3MX2-A2075 3G3AX-MX2-DRT-A2075 1932 3G3AX-MX2-DRT-A2075.eds 3G3MX2-A2110 3G3AX-MX2-DRT-A2110 1933 3G3AX-MX2-DRT-A2110.eds 3G3MX2-A2150 3G3AX-MX2-DRT-A2150 1934 3G3AX-MX2-DRT-A2150.eds 3G3MX2-A4004 3G3AX-MX2-DRT-A4004 1942 3G3AX-MX2-DRT-A4004.eds 3G3MX2-A4007 3G3AX-MX2-DRT-A4007 1944 3G3AX-MX2-DRT-A4007.eds 3G3MX2-A4015 3G3AX-MX2-DRT-A4015 1946 3G3AX-MX2-DRT-A4015.eds 3G3MX2-A4022 3G3AX-MX2-DRT-A4022 1947 3G3AX-MX2-DRT-A4022.eds 3G3MX2-A4030 3G3AX-MX2-DRT-A4030 1948 3G3AX-MX2-DRT-A4030.eds 3G3MX2-A4040 3G3AX-MX2-DRT-A4040 1950 3G3AX-MX2-DRT-A4040.eds 3G3MX2-A4055 3G3AX-MX2-DRT-A4055 1951 3G3AX-MX2-DRT-A4055.eds 3G3MX2-A4075 3G3AX-MX2-DRT-A4075 1952 3G3AX-MX2-DRT-A4075.eds 3G3MX2-A4110 3G3AX-MX2-DRT-A4110 1953 3G3AX-MX2-DRT-A4110.eds 3G3MX2-A4150 3G3AX-MX2-DRT-A4150 1954 3G3AX-MX2-DRT-A4150.eds RX-series Device List Inverter Model 3G3RX-A2004 3G3RX-A2007 3G3RX-A2015 3G3RX-A2022 3G3RX-A2037 3G3RX-A2055 3G3RX-A2075 3G3RX-A2110 3G3RX-A2150 3G3RX-A2185 3G3RX-A2220 3G3RX-A2300 3G3RX-A2370 3G3RX-A2450 3G3RX-A2550 Product Name 3G3AX-RX-DRT-A2004-V1 3G3AX-RX-DRT-A2007-V1 3G3AX-RX-DRT-A2015-V1 3G3AX-RX-DRT-A2022-V1 3G3AX-RX-DRT-A2037-V1 3G3AX-RX-DRT-A2055-V1 3G3AX-RX-DRT-A2075-V1 3G3AX-RX-DRT-A2110-V1 3G3AX-RX-DRT-A2150-V1 3G3AX-RX-DRT-A2185-V1 3G3AX-RX-DRT-A2220-V1 3G3AX-RX-DRT-A2300-V1 3G3AX-RX-DRT-A2370-V1 3G3AX-RX-DRT-A2450-V1 3G3AX-RX-DRT-A2550-V1 DeviceNet Communications Unit User’s Manual (I581-E1) ID Code 2203 2204 2205 2206 2207 2208 2209 2210 2211 2212 2213 2214 2215 2216 2217 Name of EDS File 3G3AX-RX-DRT-A2004-V1.eds 3G3AX-RX-DRT-A2007-V1.eds 3G3AX-RX-DRT-A2015-V1.eds 3G3AX-RX-DRT-A2022-V1.eds 3G3AX-RX-DRT-A2037-V1.eds 3G3AX-RX-DRT-A2055-V1.eds 3G3AX-RX-DRT-A2075-V1.eds 3G3AX-RX-DRT-A2110-V1.eds 3G3AX-RX-DRT-A2150-V1.eds 3G3AX-RX-DRT-A2185-V1.eds 3G3AX-RX-DRT-A2220-V1.eds 3G3AX-RX-DRT-A2300-V1.eds 3G3AX-RX-DRT-A2370-V1.eds 3G3AX-RX-DRT-A2450-V1.eds 3G3AX-RX-DRT-A2550-V1.eds 1 - 11 1 1 Outline Inverter Model 3G3RX-A4004 3G3RX-A4007 3G3RX-A4015 3G3RX-A4022 3G3RX-A4037 3G3RX-A4055 3G3RX-A4075 3G3RX-A4110 3G3RX-A4150 3G3RX-A4185 3G3RX-A4220 3G3RX-A4300 3G3RX-A4370 3G3RX-A4450 3G3RX-A4550 3G3RX-B4750 3G3RX-B4900 3G3RX-B411K 3G3RX-B413K Product Name 3G3AX-RX-DRT-A4004-V1 3G3AX-RX-DRT-A4007-V1 3G3AX-RX-DRT-A4015-V1 3G3AX-RX-DRT-A4022-V1 3G3AX-RX-DRT-A4037-V1 3G3AX-RX-DRT-A4055-V1 3G3AX-RX-DRT-A4075-V1 3G3AX-RX-DRT-A4110-V1 3G3AX-RX-DRT-A4150-V1 3G3AX-RX-DRT-A4185-V1 3G3AX-RX-DRT-A4220-V1 3G3AX-RX-DRT-A4300-V1 3G3AX-RX-DRT-A4370-V1 3G3AX-RX-DRT-A4450-V1 3G3AX-RX-DRT-A4550-V1 3G3AX-RX-DRT-B4750-V1 3G3AX-RX-DRT-B4900-V1 3G3AX-RX-DRT-B411K-V1 3G3AX-RX-DRT-B413K-V1 ID Code 2230 2231 2232 2233 2234 2235 2236 2237 2238 2239 2240 2241 2242 2243 2244 2245 2246 2247 2248 Name of EDS File 3G3AX-RX-DRT-A4004-V1.eds 3G3AX-RX-DRT-A4007-V1.eds 3G3AX-RX-DRT-A4015-V1.eds 3G3AX-RX-DRT-A4022-V1.eds 3G3AX-RX-DRT-A4037-V1.eds 3G3AX-RX-DRT-A4055-V1.eds 3G3AX-RX-DRT-A4075-V1.eds 3G3AX-RX-DRT-A4110-V1.eds 3G3AX-RX-DRT-A4150-V1.eds 3G3AX-RX-DRT-A4185-V1.eds 3G3AX-RX-DRT-A4220-V1.eds 3G3AX-RX-DRT-A4300-V1.eds 3G3AX-RX-DRT-A4370-V1.eds 3G3AX-RX-DRT-A4450-V1.eds 3G3AX-RX-DRT-A4550-V1.eds 3G3AX-RX-DRT-B4750-V1.eds 3G3AX-RX-DRT-B4900-V1.eds 3G3AX-RX-DRT-B411K-V1.eds 3G3AX-RX-DRT-B413K-V1.eds Dimensions of the DeviceNet Communications Unit w d3 d4 h d1 c d d2 Dimensions of DeviceNet Communications Unit (when Mounted on MX2-series Inverter) Item Dimension Item h 60.0 mm c w 67.6 mm d d1 *1 Dimension Item Dimension 18.7 mm d2 31.3 mm 52.6 mm d3 44.8 mm 26.4 mm d4 28.4 mm *1 Dimension d1 gives the increase in the depth of the MX2-series Inverter when the DeviceNet Communications Unit is mounted. 1 - 12 DeviceNet Communications Unit User’s Manual (I581-E1) 1 Outline 1-3 Specifications 1 Dimensions of DeviceNet Communications Unit (when Mounted on RX-series Inverter) Item Dimension Item Dimension Item Dimension p*1 35.1 mm r 43.9 mm u 31.7 mm q 79.8 mm s 66.5 mm v 32.7 mm t 66.1 mm w 48.1 mm *1 Dimension p gives the increase in the depth of the RX-series Inverter when the DeviceNet Communications Unit is mounted. DeviceNet Communications Unit User’s Manual (I581-E1) 1 - 13 1 Outline 1-4 1-4-1 Restrictions on Use Supported Inverters The DeviceNet Communications Unit (Model: 3G3AX-MX2-DRT-E) supports the MX2-series Inverters with Ver. 1.1 or later. The MX2-series inverter version can be identified by the inverter type label. Please check that your inverter type label indicates Ver.1.1 or later in the position displayed in this illustration. Inverter version The DeviceNet Communications Unit (Model: 3G3AX-RX-DRT-E) supports the RX-series Inverters with Ver.2.0 or later. The RX-series Inverter version can be identified by the inverter type label. Please check that your inverter type label indicates Ver.2.0 or later version number in the position displayed in this illustration. Ver. 2.0 1-4-2 Inverter version Inverter Safety (ISO13849-1) The MX2-series Inverters provide a safety function to perform a safe stop according to EN60204, stop category 0. Note that the Inverters are not covered by this safety standard when connected to a DeviceNet Communications Unit. Precautions for Safe Use The built-in safety function of the MX2-series inverter does not meet (accurately, is not certified by any third-party body regarding) the safety standard ISO13849-1 when combined with this option unit. Precautions for Correct Use The 3G3AX-MX2-DRT-E is not a safety device and does not implement any safety protocols. 1 - 14 DeviceNet Communications Unit User’s Manual (I581-E1) 1 Outline Restrictions Restriction on Inverter Control Mode The following modes are disabled when the DeviceNet Communications Unit is used with an inverter. • PM Motor mode • High Frequency mode When the DeviceNet Communications Unit is used, MX2/RX-series RS485 communications (Modbus) port is disabled. In addition, when the MX2-series is used with an inverter, the external Digital Operator is disabled with RJ45 connector function. Restrictions on Inverter Light Load Mode The MX2/RX-series Inverter can be set to the Heavy Load or Light Load mode. Switching from the default Heavy Load mode to the Light Load mode disables the vector control, torque control, and other functions. As a result, in the Light Load mode, the following restrictions arise. • The Light Load mode disallows writing of the torque reference, configuring a Remote I/O allocation that includes torque reference data results in an error. • In CX-Integrator, download of parameters using the EDS file fails. Because the Light Load mode disallows writing of some parameter data, you cannot use the EDS file to download parameters. If you execute a download, an error will occur when a write-prohibit parameter is encountered, causing the process to be terminated. Precautions for Correct Use To edit parameters via network, use the Inverter/Servo support software CX-Drive to establish connection via an OMRON PLC and DeviceNet. Restrictions on Editing Device Parameters If you use CX-Integrator to edit device parameters with an EDS file, you cannot edit the second and third control parameters of the inverter. Precautions for Correct Use To edit parameters via network, use the Inverter/Servo support software CX-Drive to establish connection via an OMRON PLC and DeviceNet. DeviceNet Communications Unit User’s Manual (I581-E1) 1 - 15 1 1-4-3 Restrictions Restrictions on RS485 Communications and MX2-series Unit's RJ45 Connector 1-4 Restrictions on Use 1-4-3 1 Outline 1-5 Comparison with Conventional Models Category Function Conventional Units This Unit 3G3AX-MX2-DRT-E This Unit 3G3AX-RX-DRT-E -PDRT2 -PDRT1-SIN Basic Speed I/O Extended Speed I/O Extended Speed and Acceleration Control – – Extended Speed and Torque Control – – Advanced Remote I/O – – – Special I/O – – Extended Control I/O Unit Status – – – Extended Control I/O and Multi function I/O Monitor – Flexible Format – – *1 *1 Switching to Default Connection Path (Selection of I/O allocation immediately after power-on on Slave) Automatic Baud Rate (Communications Speed) Recognition – Inverter Parameter Configuration Smart Slave Function Average Power Monitor – – – Remote I/O DeviceNet Master Support Connection Support Poll Switching of Connection Path (Selection of I/O allocation with inverter parameter) Warning Torque Detection – – – Current Tracing – – – Operation Time Monitoring – – – Accumulated Operating Time Monitoring – – – Contact Operation Count Monitoring – – – Power-ON Time Monitoring – – – Network Power Supply Voltage Monitoring – – – Unit Comment – – – Connection Device Comment – – – Communications Error Log Monitoring – – – Last Maintenance Date (Maintenance function) – – – *1 Switch using inverter parameter P046 for Remote I/O devices. After changes, cycle the power supply. 1 - 16 DeviceNet Communications Unit User’s Manual (I581-E1) DeviceNet Communications Unit Mounting and Wiring 2 This section provides the part names of the DeviceNet Communications Unit and mounting/wiring methods. 2-1 Name and Setting of Each Component . . . . . . . . . . . . . . . . . . . . . . . . . . . . 2-2 2-1-1 2-1-2 2-1-3 Name and Setting of Each Component . . . . . . . . . . . . . . . . . . . . . . . . . . . . . . 2-2 LED Indicators . . . . . . . . . . . . . . . . . . . . . . . . . . . . . . . . . . . . . . . . . . . . . . . . . 2-4 Node Address Setting . . . . . . . . . . . . . . . . . . . . . . . . . . . . . . . . . . . . . . . . . . . . 2-4 2-2 Installation . . . . . . . . . . . . . . . . . . . . . . . . . . . . . . . . . . . . . . . . . . . . . . . . . . . 2-5 2-2-1 2-2-2 2-2-3 2-2-4 Mounting Procedure of DeviceNet Communications Unit on MX2-series Inverter . . . . . . . . . . . . . . . . . . . . . . . . . 2-6 Mounting Procedure of DeviceNet Communications Unit on RX-series Inverter . . . . . . . . . . . . . . . . . . . . . . . . . . . 2-9 Operating Environment . . . . . . . . . . . . . . . . . . . . . . . . . . . . . . . . . . . . . . . . . . 2-14 Connector Wiring . . . . . . . . . . . . . . . . . . . . . . . . . . . . . . . . . . . . . . . . . . . . . . 2-14 DeviceNet Communications Unit User’s Manual (I581-E1) 2-1 2 DeviceNet Communications Unit Mounting and Wiring 2-1 Name and Setting of Each Component 2-1-1 Name and Setting of Each Component Rear face A F B G C A B C D E F G • • • • 2-2 - Inverter connector LED indicators (MS, NS) Warning label DeviceNet connector Grounding cable Housing Mounting screw D E The LED indicators (B) allow easy diagnosis. An attached grounding cable (E) is sized to reach the ground terminals on all MX2-series models. The DeviceNet connector is located on the bottom of the DeviceNet Communications Unit. The inverter connector (A) must be properly connected with the inverter's connector. DeviceNet Communications Unit User’s Manual (I581-E1) 2 DeviceNet Communications Unit Mounting and Wiring 2-1 Name and Setting of Each Component B 2 D - Inverter connection PCB LED indicators (MS, NS) Flat cable DeviceNet connector Grounding cable Housing E • Before use, cut the FG cable into an appropriate length for the distance to the Inverter's ground terminal and the size of terminal block, and crimp the crimp terminal. • For the position of ground terminal and the size of terminal block, refer to Arrangement of Main Circuit Terminal Block and External Dimensions in the user's manual for MX2 or RX-V1 Inverters. DeviceNet Communications Unit User’s Manual (I581-E1) 2-3 2-1-1 Name and Setting of Each Component A B C D E F F 2 DeviceNet Communications Unit Mounting and Wiring 2-1-2 LED Indicators The LED indicators on the front face indicate the operational mode and status of the DeviceNet Communications Unit and the network. LED Indicators Indicator Color Status Meaning MS (Module status) Green Lit Normal operation Red Lit Unrecoverable fault • DeviceNet Communications Unit hardware error • Unsupported inverter version Flashing Recoverable fault • Network power supply is OFF. • Node address was changed. • Illegal Flexible Format configuration • DeviceNet Communications Unit parameters are out of range or cannot be read. • DeviceNet Communications Unit detected consecutive communication errors. – NS (Network status) Green Not lit • Power is not supplied to DeviceNet Communications Unit. • DeviceNet Communications Unit is not properly connected with inverter. • DeviceNet Communications Unit is reset. Lit Network is operating normally (communications established). Flashing Network is operating normally, but communications have not been established. Red Lit DeviceNet Communications Unit detects that network communications are disabled due to some communications error: • Node address duplication • Bus–off error Flashing DeviceNet Communications Unit detected a communications timeout error. – Not lit • Power is not supplied to DeviceNet Communications Unit. (Check Module Status LED.) • Network power supply is OFF or DeviceNet connector is unplugged. • Checking for node address duplication (intermediate state) Additional Information Refer to Section 6 Troubleshooting on page 6-1 for troubleshooting using LED indicators. 2-1-3 Node Address Setting The DeviceNet node address can be set using the following DeviceNet Communications Unit parameter, instead of the conventional method of using rotary switches. Set the DeviceNet node address using inverter parameter P192. Parameter P192 2-4 Description DeviceNet Node Address Setting 0 to 63 (Default: 63) DeviceNet Communications Unit User’s Manual (I581-E1) 2 DeviceNet Communications Unit Mounting and Wiring 2-2 Installation Do not attempt to remove the terminal block cover or disconnect and reconnect the DeviceNet Communications Unit during power on or within 10 minutes after power off. Doing so may result in severe injury due to electric shock. 2-2 Installation DANGER 2 Caution Inverters contain high voltage parts and short-circuits may sometimes cause product damage or property damage. Measures must be taken to prevent chips, lead-wire pieces, or other metal waste from entering the product, for example, by installing a cover. Do not attempt to disassemble, repair, or modify the DeviceNet Communications Unit. Doing so may result in injury. Installation and Storage Do not store or use the DeviceNet Communications Unit in the following environment: • Locations subject to direct sunlight • Locations subject to ambient temperatures outside the range specified in the specifications • Locations subject to relative humidity outside the range specified in the specifications • Locations subject to condensation as the result of severe temperature fluctuations • Locations subject to corrosive or flammable gases • Locations near flammable materials • Locations subject to dust, salt spray, or iron powder • Locations subject to water, oil, or chemical splashes • Locations subject to direct shock or vibration Transportation, Installation, and Wiring • Do not drop or apply strong impact on the product. Doing so may result in damaged parts or malfunction. • When transporting the inverter with a mounted DeviceNet Communications Unit, do not hold the DeviceNet Communications Unit. • Do not remove the cover of the DeviceNet Communications Unit. Tighten all unit fixation screws to the specified torque. • Install an appropriate stopping device to ensure safety. In particular, if configured to operate continuously even in the event of a communications error, the inverter may not stop, resulting in equipment damage. DeviceNet Communications Unit User’s Manual (I581-E1) 2-5 2 DeviceNet Communications Unit Mounting and Wiring • If the DeviceNet Communications Unit is used in the following locations, sufficient isolation measures must be provided to prevent equipment damage. Locations subject to static electricity or other forms of noise Locations subject to strong electromagnetic fields Locations close to power lines • During installation, wiring, and network setting on the DeviceNet Communications Unit, please refer to applicable sections of this manual to ensure the correct connection and configuration procedures. • When removing the DeviceNet Communications Unit, do not pull the flat cable. • When mounting the DeviceNet Communications Unit, be sure that the flat cable is not pinched. • When mounting the DeviceNet Communications Unit, be careful about burrs of the break-outs on the inverter. 2-2-1 Mounting Procedure of DeviceNet Communications Unit on MX2-series Inverter 1 2 2-6 Loosen the screw of the option cover. Remove the cover. For Inverters up to 4.0 kW only: Loosen the screws of the terminal block cover. This is for the ground terminal wiring. DeviceNet Communications Unit User’s Manual (I581-E1) 2 DeviceNet Communications Unit Mounting and Wiring 3 Connect the DeviceNet Communications Unit's grounding cable to inverter with a mounting screw. 1-phase 200 V 0.1 to 2.2 kW 3-phase 200 V 0.1 to 3.7 kW 3-phase 400 V 0.4 to 4.0 kW 3-phase 200 V 5.5 to 15 kW 3-phase 400 V 5.5 to 15 kW 2-2 Installation 2 5 2-2-1 Mounting Procedure of DeviceNet Communications Unit on MX2-series Inverter 4 If removed in Step 2, reinstall the terminal cover and tighten the screw. Push the DeviceNet Communications Unit into the previous location of the DeviceNet Communications Unit cover until it clicks into place. DeviceNet Communications Unit User’s Manual (I581-E1) 2-7 2 DeviceNet Communications Unit Mounting and Wiring 6 7 8 9 2-8 Press down on the indicated corner of the DeviceNet Communications Unit housing to ensure proper connection of the DeviceNet Communications Unit connector. Check that there is no gap between the top edges of the DeviceNet Communications Unit and the inverter casing. Secure the DeviceNet Communications Unit in place to the inverter with the mounting screw. Select an appropriate language from the warning label sheet and affix it on the English warning if necessary. DeviceNet Communications Unit User’s Manual (I581-E1) 2 DeviceNet Communications Unit Mounting and Wiring Precautions for Correct Use Some inverter models do not include a screw for the grounding cable. Please supply the recommended screw, lock-washer, and washer to attach the grounding cable. Inverter Model 3-phase 200V 5.5to 7.5 kW 2-2 Installation Ground cable screw selection - MX2-series Grounding Cable Attachment Screw M4 x 6 3-phase 400V 5.5to 7.5 kW 3-phase 200V 11 to 15 kW M5 x 6 3-phase 400V 11 to 15 kW 2 For how to remove the DeviceNet Communications Unit, refer to 6-6 Removing DeviceNet Communications Unit on page 6-12. 2-2-2 Mounting Procedure of DeviceNet Communications Unit on RX-series Inverter [Preparation] • Before use, cut the FG cable into an appropriate length for the distance to the Inverter's ground terminal and the size of terminal block, and crimp the crimp terminal. • For the position of ground terminal and the size of terminal block, refer to Arrangement of Main Circuit Terminal Block and External Dimensions in the user's manual for MX2 or RX-V1 Inverters. 1 Remove the following parts from the RX-series Inverter: A. Digital Operator B. Spacer cover C. Terminal cover D. Front cover E. Operator connector Remove the operator connector (E) only if you connect the LED operator via a cable. D E A B C DeviceNet Communications Unit User’s Manual (I581-E1) 2-9 2-2-2 Mounting Procedure of DeviceNet Communications Unit on RX-series Inverter Additional Information 2 DeviceNet Communications Unit Mounting and Wiring 2 3 4 Cut out the two plastic break-outs from the front cover. Make sure no sharp edges remain. Reinstall the front cover and tighten the screws. Connect the connector of inverter connection PCB of DeviceNet Communications Unit to the connector of inverter. Method: First align the small hole (B) on the Inverter connection PCB with the guide-post (D) in the Inverter. A C B Then, align the larger hole on the Inverter connection PCB (C) with the threaded hole (F) in the Inverter. Push the Inverter connector into place. F E D 2 - 10 DeviceNet Communications Unit User’s Manual (I581-E1) 2 DeviceNet Communications Unit Mounting and Wiring Precautions for Correct Use The Inverter connector is fixed with a sufficient binding force against vibration. It is not necessary to secure the Inverter connection PCB with screws. Fold the flat cable (B) into the middle of the Unit so that the flat cable will not be pinched between the DeviceNet Communications Unit and the front cover of inverter. (As shown with A) Precautions for Correct Use 2 2-2-2 Mounting Procedure of DeviceNet Communications Unit on RX-series Inverter • When mounting the DeviceNet Communications Unit, be sure that the flat cable is not pinched. • When mounting the DeviceNet Communications Unit, be careful about burrs of the break-outs on the inverter. • When removing the DeviceNet Communications Unit, do not pull the flat cable. B A 6 Install DeviceNet Communications Unit on the Inverter. (a) Insert two locking pins of the upper DeviceNet Communications Unit in the break-outs and push it up. (b) Insert the bottom part of the DeviceNet Communications Unit while pushing it up. (c) Push the DeviceNet Communications Unit down and fix it. (a) Push up (b) Insert into the bottom (c) Push down DeviceNet Communications Unit User’s Manual (I581-E1) 2-2 Installation 5 2 - 11 2 DeviceNet Communications Unit Mounting and Wiring 7 8 Insert the DeviceNet Communications Unit fixation screw into the hole shown in the right figure, and tighten it to fix the Unit. Be careful not to overtighten the screw. Connect the grounding cable of the DeviceNet Communications Unit to the ground terminal of the inverter. Make sure that the ground terminal is marked with grounding symbol. The position of grounding symbol differs depending on the capacity of inverter. The figure is just an example. G 9 Reinstall the terminal cover and tighten the two screws to fix it in position. Reinstall the terminal cover under the DeviceNet Communications Unit onto the Inverter (B). Tighten the two screws (A). B A A 2 - 12 DeviceNet Communications Unit User’s Manual (I581-E1) 2 DeviceNet Communications Unit Mounting and Wiring 10 Install the Digital Operator above the DeviceNet Communications Unit. Keep the spacer cover you removed in a safe place. 2-2 Installation 2 2-2-2 Mounting Procedure of DeviceNet Communications Unit on RX-series Inverter If You Use the LCD Digital Operator 11 Connect the Digital Operator via a straight Ethernet cable to the RJ45 connector in the Inverter. 12 Set the required Inverter parameters. Additional Information Please refer to Section 3 Network Startup on page 3-1 and Section 4 Remote I/O on page 4-1. 13 When the required inverter parameters are set properly, remove the straight Ethernet cable from the Inverter. DeviceNet Communications Unit User’s Manual (I581-E1) 2 - 13 2 DeviceNet Communications Unit Mounting and Wiring Additional Information For how to remove the DeviceNet Communications Unit, refer to 6-6 Removing DeviceNet Communications Unit on page 6-12. 2-2-3 Operating Environment For information on the installation environment, refer to Section 2 Design of the MX2 User's Manual (Cat. No. I570) or RX User's Manual (Cat. No. I578). In addition to this, provide sufficient clearance to allow connection and removal of the DeviceNet connector. When connecting a cable, provide a sufficient allowance to prevent it from being pulled or bent. 2-2-4 Connector Wiring The DeviceNet Communications Unit is supplied with a connector with seals (color chips) corresponding to the wire colors. Connect each wire of the cable to the connector terminal according to the seal colors. No termination is provided inside the DeviceNet Communications Unit. Red (+V, 24V) White (CAN H) Shield Blue (CAN L) Black (-V) DeviceNet connector signals 2 - 14 Color Signal Description Red +V Communications power supply (+24 VDC) White CAN H Communications data line (High) – Shield Cable shielding Blue CAN L Communications data line (Low) Black -V Communications power supply GND DeviceNet Communications Unit User’s Manual (I581-E1) 2 DeviceNet Communications Unit Mounting and Wiring Precautions for Correct Use Connection of Thin Cables with the Multi-drop Connector 2 Example. When using a non-screw type connector Use a dedicated crimp terminal to crimp the two wires inserted into the same hole, as shown below. 2-wire crimping Wire OMRON recommends the following crimp terminal and crimping tool. Both products are manufactured by PHOENIX CONTACT. Crimp terminal Crimping tool Model: AI-TWIN2x0.5-8WH (Product number 3200933) Model: UD06 (Product number 1204436) DeviceNet Communications Unit User’s Manual (I581-E1) 2 - 15 2-2-4 Connector Wiring To connect thin cables by using the multi-drop connector, use a crimp terminal as shown below to insert two wires with the same color into the same connector hole. Crimp terminal 2-2 Installation • For DeviceNet systems, use DeviceNet cables that conform to the DeviceNet specifications. • Connect a termination resistance at each end of the trunk line. Be sure to use 121 termination resistances. • Connect cable shielding to the connector at each end of the cable. • For details about cables and connectors, refer to 2-3 Cables, Connectors, and Related Devices of DeviceNet Operation Manual (Cat. No. W267). 2 DeviceNet Communications Unit Mounting and Wiring 2 - 16 DeviceNet Communications Unit User’s Manual (I581-E1) Network Startup 3 This section describes inverter parameter settings and DeviceNet settings/startup. 3-1 Inverter Configuration . . . . . . . . . . . . . . . . . . . . . . . . . . . . . . . . . . . . . . . . . . 3-2 3-1-1 3-1-2 3-1-3 3-1-4 Basic and Extended Speed I/O Settings . . . . . . . . . . . . . . . . . . . . . . . . . . . . . . 3-2 Remote I/O Settings Using Torque Reference . . . . . . . . . . . . . . . . . . . . . . . . . 3-6 Special I/O and Flexible Format Settings . . . . . . . . . . . . . . . . . . . . . . . . . . . . . 3-9 Utilizing Multi-function Inputs/Outputs for Host . . . . . . . . . . . . . . . . . . . . . . . . 3-12 3-2 Network Configuration (Scan List Configuration) . . . . . . . . . . . . . . . . . . 3-14 3-2-1 3-2-2 3-2-3 EDS File Installation . . . . . . . . . . . . . . . . . . . . . . . . . . . . . . . . . . . . . . . . . . . . 3-14 Fixed Allocation Steps . . . . . . . . . . . . . . . . . . . . . . . . . . . . . . . . . . . . . . . . . . . 3-14 User Allocation Steps (Scan List Configuration) . . . . . . . . . . . . . . . . . . . . . . . 3-16 3-3 Device Parameters with EDS File . . . . . . . . . . . . . . . . . . . . . . . . . . . . . . . . 3-21 3-3-1 3-3-2 How to Edit Device Parameters with EDS File . . . . . . . . . . . . . . . . . . . . . . . . 3-21 Restrictions of Edit Device Parameters Function with EDS File . . . . . . . . . . . 3-22 3-4 Editing Parameters with CX-Drive . . . . . . . . . . . . . . . . . . . . . . . . . . . . . . . 3-25 3-4-1 3-4-2 Connecting CX-Drive (via DeviceNet) . . . . . . . . . . . . . . . . . . . . . . . . . . . . . . . 3-25 Outline of CX-Drive . . . . . . . . . . . . . . . . . . . . . . . . . . . . . . . . . . . . . . . . . . . . . 3-30 DeviceNet Communications Unit User’s Manual (I581-E1) 3-1 3 Network Startup 3-1 Inverter Configuration To use the DeviceNet Communications Unit, you need to configure node addresses and the necessary Remote I/O and other functions The configuration of the DeviceNet Communications Unit is all done through parameters built into the MX2/RX-series Inverter. This section describes the inverter parameters that must be configured to use the DeviceNet Communications Unit. Because the settings of the DeviceNet Communications Unit vary depending on the type of the Remote I/O function to be used, information in this section is described for each of the following three types of Remote I/O. Section Name 3-1-1 Basic and Extended Speed I/O Settings 3-1-2 Remote I/O Settings Using Torque Reference 3-1-3 Special I/O and Flexible Format Settings Applicable Remote I/O Basic Speed I/O Extended Speed I/O Extended Speed and Acceleration Control Extended Speed and Torque Control Extended Control I/O Extended Control I/O and Multi function I/O Monitor Special I/O Flexible Format Outline Types of Remote I/O that support general speed control applications. Types of Remote I/O that include the torque reference and other interfaces related to torque control. These Remote I/O types can be configured even if the torque reference is not used. Types of Remote I/O that utilize Modbus communication, allowing flexible function selection. Precautions for Correct Use • For details about the Remote I/O function, refer to Section 4 Remote I/O on page 4-1. • Parameter configuration is required if you install the DeviceNet Communications Unit on an MX2/RX-series Inverter for the first time. After replacing the DeviceNet Communications Unit with new one, the inverter parameters is retained and thus parameter configuration is not required. 3-1-1 Basic and Extended Speed I/O Settings Normally, inverter operation can be controlled using the Basic Speed I/O or Extended Speed I/O function included as standard in DeviceNet. To set the acceleration/deceleration time, however, you need to use OMRON's unique Extended Speed and Acceleration Control function. This section explains how to configure these three types of Remote I/O. Inverter parameters can be configured using the Digital Operator, CX-Drive, or a DeviceNet EDS file (in CX-Integrator). 3-2 DeviceNet Communications Unit User’s Manual (I581-E1) 3 Network Startup Complete Parameter Display By default, you cannot view all parameters. To display all parameters, set Display Selection (b037) to 00: Complete display. Function Name b037 Display Selection Monitor or Data Range 3-1 Inverter Configuration Parameter No. 00: Complete display 01: Individual display of functions 02: User setting + b037 03: Data comparison display 04: Basic display 05: Monitor display only DeviceNet Node Address Setting 3 Inverter parameter P192 sets the DeviceNet node address MAC ID. P192 Description Setting DeviceNet Node Address 0 to 63 (Default: 63) Remote I/O Setting Inverter parameter P046 (Assembly Instance No.) sets the type of Remote I/O. Select the combination of output and input that fits your application requirements. The settings for Basic Speed I/O, Extended Speed I/O, and Extended Speed and Acceleration Control are shown below. • Basic Speed I/O: P046 = 00 • Extended Speed I/O: P046 = 01 • Extended Speed and Acceleration Control: P046 = 07 Parameter P046 Description Assembly Instance No. Setting Assembly No. (hex) No. of occupied bytes (No. of words) Output Input Output Input 00: Basic Speed I/O 20 70 4 (2) 4 (2) 01: Extended Speed I/O 21 71 4 (2) 4 (2) 07: Extended Speed and Acceleration Control 110 111 8 (4) 8 (4) Reset Mode Setting For the MX2/RX-series, by default, the Reset mode is set to Always enabled. This means that resetting the inverter also resets the DeviceNet Communications Unit, which in turn causes the communication connection to be reset. To prevent the communication connection from being reset when the inverter is reset, OMRON recommends the following setting. For the details of this parameter, refer to the MX2 User's Manual (Cat. No. I570) or RX User's Manual (Cat. No. I578). Parameter C102 Description Reset Selection DeviceNet Communications Unit User’s Manual (I581-E1) Setting 03: Trip reset only (recommended setting) 3-3 3-1-1 Basic and Extended Speed I/O Settings Parameter 3 Network Startup Detailed DeviceNet Communications Unit Settings The DeviceNet Communications Unit can be configured in more detail using inverter parameters P044, P045, P048, and P049. Set these parameters according to the following explanation. Detailed DeviceNet Communications Unit Settings Parameter Description P044 Communications Error Detection Timer Setting Monitors data exchange between the inverter and the DeviceNet Communications Unit. Normally, this parameter is not required. 0 to 9999 in units of 0.01 s . (Default: 1.00) 0: Disabled P045 Operation at Host Communications Error Selection Sets the inverter operation if a network error such as Busoff occurs. 00: Trip (Default) 01: Trip after deceleration stop 02: Ignore 03: Free-run stop 04: Deceleration stop P048 Operation at Idle Mode Detec- Sets the inverter operation in Network Idle mode. OMRON's tion Setting DeviceNet Master Units do not support transition to the Network Idle mode and therefore this parameter is not required. 00: Trip (Default) 01: Trip after deceleration stop 02: Ignore 03: Free-run stop 04: Deceleration stop P049 Number of Poles for Rotation Speed Setting (For conversion to the rpm unit used in DeviceNet communications) 3-4 Setting Sets the number of poles on the motor. Use this parameter to execute inverter commands on DeviceNet in rpm. 0/2/4/6/8/10/12/14/16/18/20/22/24/26/28/30/34/36/38/40/42/ 44/46/48 0 (Default): Frequency setting (in units of 0.01 Hz) Not 0: rpm (in units of rpm) Conversion equation: rpm = 120 x Frequency (Hz) / P049 DeviceNet Communications Unit User’s Manual (I581-E1) 3 Network Startup Frequency Reference/RUN Command Settings Inverter parameters A001 and A002 set Frequency reference selection and RUN command selection. When P046 = 0 (Basic Speed I/O), 1 (Extended Speed I/O), or 7 (Extended Speed and Acceleration Control), set these parameters according to the following table. Setting 3-1 Inverter Configuration Setting 3 Destination Selection Parameter Settings Parameter Description A001 1st Frequency Reference Selection A002 1st RUN Command Selection 04: Option Destination Selection Parameter Settings Parameter Description 1st Frequency Reference Selection A002 1st RUN Command Selection 05: Option 2 Precautions for Correct Use To switch the Control Method using the REF (Net.Ref.) or CTR (Net.Ctrl.) bit signal, set as follows. Bit Name Description CTR Net.Ctrl. 0: Follow the setting of parameter A002. 1: Follow the reference from network. REF Net.Ref. 0: Follow the setting of parameter A001. 1: Follow the reference from network. Set the Control Method to which you want to switch in parameter A001/A002. Restarting the Inverter Be sure to cycle the power supply of the MX2/RX-series inverter to enable the changes. Precautions for Correct Use • Be sure that the POWER LED indicator is not lit before cycling the power supply when restarting the MX2/RX-series Inverter. The time until the light turns off varies with the inverter model. • Some DeviceNet Master Units in market may send Idle messages during specific events (start-up, PLC program mode, etc). In this case, consider to set Operation at Idle Mode Detection Setting (P048) to 2 (Ignore). DeviceNet Communications Unit User’s Manual (I581-E1) 3-5 3-1-1 Basic and Extended Speed I/O Settings A001 3 Network Startup 3-1-2 Remote I/O Settings Using Torque Reference The MX2/RX-series Inverter provides the torque control function. To enable torque control, use OMRON's unique Extended Speed and Torque Control, Extended Control I/O, or Extended Control I/O and Multi function I/O Monitor. This section explains how to configure the Remote I/O settings using the torque reference. Inverter parameters can be configured using the Digital Operator, CX-Drive, or a DeviceNet EDS file (in CX-Integrator). DeviceNet Node Address Setting Inverter parameter P192 sets the DeviceNet node address MAC ID. Parameter P192 Description Setting DeviceNet Node Address 0 to 63 (Default: 63) Remote I/O Setting Inverter parameter P046 (Assembly Instance No.) sets the type of Remote I/O. Select the combination of output and input that fits your application requirements. Here, you configure the settings of Extended Speed and Torque Control, Extended Control I/O, or Extended Control I/O and Multi function I/O Monitor. • Extended Speed and Torque Control: P046 = 02 • Extended Control I/O: P046 = 04 • Extended Control I/O and Multi function I/O Monitor: P046 = 05 Parameter P046 3-6 Description Assembly Instance No. Assembly No. (hex) Setting No. of occupied bytes (No. of words) Output Input Output Input 02: Extended Speed and Torque Control 123 173 6 (3) 6 (3) 04: Extended Control I/O 101 151 8 (4) 8 (4) 05: Extended Control I/O and Multi function I/O Monit 101 153 8 (4) 9 (4.5) DeviceNet Communications Unit User’s Manual (I581-E1) 3 Network Startup Reset Mode Setting Parameter C102 Description Reset Selection Setting 03: Trip reset only (recommended setting) Detailed DeviceNet Communications Unit Settings 3 Detailed DeviceNet Communications Unit Settings Parameter Description P044 Communications Error Detection Timer Setting Monitors data exchange between the inverter and the DeviceNet Communications Unit. Normally, this parameter is not required. 0 to 9999 in units of 0.01 s . (Default: 1.00) 0: Disabled P045 Operation at Host Communications Error Selection Sets the inverter operation if a network error such as bus-off occurs. 00: Trip (Default) 01: Trip after deceleration stop 02: Ignore 03: Free-run stop 04: Deceleration stop P048 Operation at Idle Mode Detec- Sets the inverter operation in Network Idle mode. OMRON's tion Setting DeviceNet Master Units do not support transition to the Network Idle mode and therefore this parameter is not required. 00: Trip (Default) 01: Trip after deceleration stop 02: Ignore 03: Free-run stop 04: Deceleration stop P049 Number of Poles for Rotation Speed Setting DeviceNet Communications Unit User’s Manual (I581-E1) Setting Sets the number of poles on the motor. Use this parameter to execute inverter commands on DeviceNet in rpm. 0/2/4/6/8/10/12/14/16/18/20/22/24/26/28/30/34/36/38/40/42/ 44/46/48 0 (Default): Frequency setting (in units of 0.01 Hz) Not 0: rpm (in units of rpm) Conversion equation: rpm = 120 x Frequency (Hz) / P049 3-7 3-1-2 Remote I/O Settings Using Torque Reference The DeviceNet Communications Unit can be configured in more detail using inverter parameters P044, P045, P048, and P049. Set these parameters according to the following explanation. (For conversion to the rpm unit used in DeviceNet communications) 3-1 Inverter Configuration For the MX2/RX-series, by default, the Reset mode is set to Always enabled. This means that resetting the inverter also resets the DeviceNet Communications Unit, which in turn causes the communication connection to be reset. To prevent the communication connection from being reset when the inverter is reset, OMRON recommends the following setting. For the details of this parameter, refer to the MX2 User's Manual (Cat. No. I570) or RX User's Manual (Cat. No. I578). 3 Network Startup Frequency Reference/RUN Command Settings Inverter parameters A001 and A002 set Frequency reference selection and RUN command selection. When P046 = 2 (Extended Speed and Torque Control), 4 (Extended Control I/O), or 5 (Extended Control I/O and Multi function I/O Monitor), set the these parameters according to the following table. Destination Selection Parameter Settings Parameter Description A001 1st Frequency Reference Selection A002 1st RUN Command Selection Setting 04: Option Destination Selection Parameter Settings Parameter Description A001 1st Frequency Reference Selection A002 1st RUN Command Selection Setting 05: Option 2 Precautions for Correct Use To switch the Control Method using the REF (Net.Ref.) or CTR (Net.Ctrl.) bit signal, set as follows. Bit Name Description CTR Net.Ctrl. 0: Follow the setting of parameter A002. 1: Follow the reference from network. REF Net.Ref. 0: Follow the setting of parameter A001. 1: Follow the reference from network. Set the Control Method to which you want to switch in parameter A001/A002. Torque Control Settings To use torque control, configure the parameters related to torque control according to the MX2/RX-series User's Manual. Configure the torque control parameters as follows if you want to use the Torque Reference or Torque Bias Mode on DeviceNet Remote I/O. Torque Control Parameter Settings Parameter Description Setting P033 Torque Reference Input Selection 06: Option P036 Torque Bias Mode 05: Option Torque Control Parameter Settings Parameter 3-8 Description Setting P033 Torque Reference Input Selection 07: Option 2 P036 Torque Bias Mode 06: Option 2 DeviceNet Communications Unit User’s Manual (I581-E1) 3 Network Startup Restarting the Inverter Be sure to cycle the power supply of the MX2/RX-series Inverter to enable the changes. Precautions for Correct Use 3-1 Inverter Configuration • Be sure that the POWER LED indicator is not lit before cycling the power supply when restarting the MX2/RX-series Inverter. The time until the light turns off varies with the inverter model. • Some DeviceNet Master Units in market may send Idle messages during specific events (start-up, PLC program mode, etc). In this case, consider to set Operation at Idle Mode Detection Setting (P048) to 2 (Ignore). 3-1-3 Special I/O and Flexible Format Settings DeviceNet Node Address Setting Inverter parameter P192 sets the DeviceNet node address MAC ID. Parameter P192 Description Setting DeviceNet Node Address 0 to 63 (Default: 63) Remote I/O Setting Inverter parameter P046 (Assembly Instance No.) sets the type of Remote I/O. Select the combination of output and input that fits your application requirements. • Special I/O: P046 = 03 • Flexible Format: P046 = 06 Parameter P046 Description Assembly Instance No. Setting Assembly No. (hex) No. of occupied bytes (No. of words) Output Input Output Input 03: Special I/O*1 100 150 8 (4) 8 (4) 06: Flexible Format 139 159 20 (10)*2 20 (10)*2 *1 The format of Special I/O is different from that of the conventional Advanced Remote I/O. *2 If you select Flexible Format, the number of occupied bytes (words) will change depending on the number of Modbus registers set in parameters P160 to 179. Additional Information The DeviceNet Communications Unit supports read/write of double-word data. Refer to 4-4-2 Special I/O (100/150) on page 4-17. DeviceNet Communications Unit User’s Manual (I581-E1) 3-9 3 3-1-3 Special I/O and Flexible Format Settings Special I/O and Flexible Format that utilize the Modbus communication method enable you to control various inverter functions and parameters through the Remote I/O function. This section describes how to configure these types of Remote I/O. Inverter parameters can be configured using the Digital Operator, CX-Drive, or a DeviceNet EDS file (in CX-Integrator). 3 Network Startup Reset Mode Setting For the MX2/RX-series, by default, the Reset mode is set to Always enabled. This means that resetting the inverter also resets the DeviceNet Communications Unit, which in turn causes the communication connection to be reset. To prevent the communication connection from being reset when the inverter is reset, OMRON recommends the following setting. For the details of this parameter, refer to the MX2 User's Manual (Cat. No. I570) or RX User's Manual (Cat. No. I578). Parameter C102 Description Reset Selection Setting 03: Trip reset only (recommended setting) Detailed DeviceNet Communications Unit Settings The DeviceNet Communications Unit can be configured in more detail using inverter parameters P044, P045, P048, and P049. Set these parameters according to the following explanation. Detailed DeviceNet Communications Unit Settings Parameter Description P044 Communications Error Detection Timer Setting Monitors data exchange between the Inverter and the DeviceNet Communications Unit. Normally, this parameter is not required. 0 to 9999 in units of 0.01 s . (Default: 1.00) 0: Disabled P045 Operation at Host Communications Error Selection Sets the inverter operation if a network error such as bus-off occurs. 00: Trip (Default) 01: Trip after deceleration stop 02: Ignore 03: Free-run stop 04: Deceleration stop P048 Operation at Idle Mode Detec- Sets the inverter operation in Network Idle mode. OMRON's tion Setting DeviceNet Master Units do not support transition to the Network Idle mode and therefore this parameter is not required. 00: Trip (Default) 01: Trip after deceleration stop 02: Ignore 03: Free-run stop 04: Deceleration stop P049 Number of Poles for Rotation Speed Setting (For conversion to the rpm unit used in DeviceNet communications) 3 - 10 Setting For other types of Remote I/O that use DeviceNet communications, the number of poles on the motor is set for the Rotation Speed Reference. However, this setting is disabled for Remote I/O types that utilizes Modbus communication. This parameter is fixed to the frequency value (0.01 Hz) regardless of the value you set. DeviceNet Communications Unit User’s Manual (I581-E1) 3 Network Startup Frequency Reference/RUN Command Settings Inverter parameters A001 and A002 set Frequency reference selection and RUN command selection. When P046 is set to 3: Special I/O or 6: Flexible Format, Modbus communication is used. Set these parameters according to the following table. 3-1 Inverter Configuration Destination Selection Parameter Settings Parameter Description Setting A001 1st Frequency Reference Selection A002 1st RUN Command Selection 03: Modbus communication (Modbus-RTU) Destination Selection Parameter Settings Parameter Description 3 Setting 1st Frequency Reference Selection A002 1st RUN Command Selection 03: Modbus communication (Modbus-RTU) Torque Control Settings To use torque control, configure parameters according to the MX2/RX User's Manual. To configure the Torque reference and Torque bias settings through the Remote I/O function, set torque control parameters as follows. Torque Control Parameter Settings Parameter Description Setting P033 Torque Reference Input Selection 03: Operator To input the torque reference through Special I/O or Flexible Format, allocate P034 to the torque reference. P036 Torque Bias Mode 01: Operator To input the Torque Bias mode through Special I/O or Flexible Format, allocate 037 to the torque bias. Torque Control Parameter Settings Parameter Description Setting P033 Torque Reference Input Selection 03: Operator To input the torque reference through Special I/O or Flexible Format, allocate P034 to the torque reference. P036 Torque Bias Mode 01: Operator To input the Torque Bias mode through Special I/O or Flexible Format, allocate 037 to the torque bias. DeviceNet Communications Unit User’s Manual (I581-E1) 3 - 11 3-1-3 Special I/O and Flexible Format Settings A001 3 Network Startup Flexible Format Settings The Flexible Format (Assembly 139/159) gives you the freedom to allocate inverter Modbus registers to Remote I/O devices. A maximum of 10 words can be allocated for input and output. Please refer to 4-4 Special I/O and Flexible Format on page 4-17 for details. Parameter Description Setting P160 Output Register 1 Contents Modbus register allocated to general-purpose output word 1 P161 Output Register 2 Contents Modbus register allocated to general-purpose output word 2 P162 Output Register 3 Contents Modbus register allocated to general-purpose output word 3 P163 Output Register 4 Contents Modbus register allocated to general-purpose output word 4 P164 Output Register 5 Contents Modbus register allocated to general-purpose output word 5 P165 Output Register 6 Contents Modbus register allocated to general-purpose output word 6 P166 Output Register 7 Contents Modbus register allocated to general-purpose output word 7 P167 Output Register 8 Contents Modbus register allocated to general-purpose output word 8 P168 Output Register 9 Contents Modbus register allocated to general-purpose output word 9 P169 Output Register 10 Contents Modbus register allocated to general-purpose output word 10 P170 Input Register 1 Contents Modbus register allocated to general-purpose input word 1 P171 Input Register 2 Contents Modbus register allocated to general-purpose input word 2 P172 Input Register 3 Contents Modbus register allocated to general-purpose input word 3 P173 Input Register 4 Contents Modbus register allocated to general-purpose input word 4 P174 Input Register 5 Contents Modbus register allocated to general-purpose input word 5 P175 Input Register 6 Contents Modbus register allocated to general-purpose input word 6 P176 Input Register 7 Contents Modbus register allocated to general-purpose input word 7 P177 Input Register 8 Contents Modbus register allocated to general-purpose input word 8 P178 Input Register 9 Contents Modbus register allocated to general-purpose input word 9 P179 Input Register 10 Contents Modbus register allocated to general-purpose input word 10 Restarting the Inverter Be sure to cycle the power supply of the MX2/RX-series Inverter to enable the changes. Precautions for Correct Use • Be sure that the POWER LED indicator is not lit before cycling the power supply when restarting the MX2/RX-series Inverter. The time until the light turns off varies with the inverter model. • Some DeviceNet Master Units in market may send Idle messages during specific events (start-up, PLC program mode, etc). In this case, consider to set Operation at Idle Mode Detection Setting (P048) to 2 (Ignore). 3-1-4 Utilizing Multi-function Inputs/Outputs for Host The multi-function inputs and multi-function outputs built into the inverter can be used as general-purpose inputs and outputs for the host. Configure a type of Remote I/O that includes the multi-function input monitor and multi-function output commands (Extended Control I/O, Extended Control I/O and Multi function I/O Monitor, Special I/O, or Flexible Format) and set parameters as follows. 3 - 12 DeviceNet Communications Unit User’s Manual (I581-E1) 3 Network Startup Multi-function Input Settings Multi-function Input Monitor Settings Description C001 Multi-function Input 1 Selection C002 Multi-function Input 2 Selection C003 Multi-function Input 3 Selection C004 Multi-function Input 4 Selection C005 Multi-function Input 5 Selection C006 Multi-function Input 6 Selection C007 Multi-function Input 7 Selection Setting No (255): No allocation Set these parameters to use the inverter inputs as the PLC's inputs. 3 Multi-function Input Monitor Settings Description C001 Multi-function Input 1 Selection C002 Multi-function Input 2 Selection C003 Multi-function Input 3 Selection C004 Multi-function Input 4 Selection C005 Multi-function Input 5 Selection C006 Multi-function Input 6 Selection C007 Multi-function Input 7 Selection C008 Multi-function Input 8 Selection Setting No (255): No allocation Set these parameters to use the inverter inputs as the PLC's inputs. Multi-function Output Settings Multi-function Output Terminal Parameter Settings Parameter Description C021 Multi-function Output Terminal P1/EDM Selection C022 Multi-function Output Terminal P2 Selection C026 Multi-function Relay Output Selection Setting 63: OPO (Option) Set these parameters to use the inverter outputs as the PLC's outputs. Multi-function Output Terminal Parameter Settings Parameter Description C021 Multi-function Output Terminal P1/EDM Selection C022 Multi-function Output Terminal P2 Selection C023 Multi-function Output Terminal P3 Selection C024 Multi-function Output Terminal P4 Selection C025 Multi-function Output Terminal P5 Selection C026 Multi-function Relay Output Selection DeviceNet Communications Unit User’s Manual (I581-E1) Setting 63: OPO (Option) Set these parameters to use the inverter outputs as the PLC's outputs. 3 - 13 3-1-4 Utilizing Multi-function Inputs/Outputs for Host Parameter 3-1 Inverter Configuration Parameter 3 Network Startup 3-2 Network Configuration (Scan List Configuration) Network configuration is the process to set the DeviceNet Master Unit using CX-Integrator. Basically, you allocate each slave's Remote I/O functionality to the I/O Memory of the PLC or CPU Unit. There are two ways to do this, as follows. • Fixed allocations (Automatic allocation) • User allocations (Arbitrary, individual allocation) For details about configuring the Master Unit (Model: CS1W-DRM21 (-V1)/CJ1W-DRM21) using the network configuration software CX-Integrator, refer to the CX-Integrator Operation Manual (Cat. No.W464). 3-2-1 EDS File Installation For each combination of the MX2/RX-series Inverter model and the DeviceNet Communications Unit, a dedicated EDS file is required. EDS files provide the parameter data (defaults and ranges) for each inverter that CX-Integrator utilizes. EDS files for DeviceNet Communications Units are installed on a CX-Integrator with the following version or higher. Note that EDS files are not installed on a CX-Integrator with a version lower than the following version. Please update CX-ONE or CX-Integrator. • CX-ONE Ver. 4.26 • CX-Integrator Ver. 2.55 3-2-2 Fixed Allocation Steps Fixed allocation is the method of allocating each Slave to the allocation relay area based on the idea that "a single Slave node address occupies a single input word and a single output word." In this allocation method, each Slave's node address must be set according to the following rules. • Node addresses must be set in a sequence starting with "0". • If the maximum number of occupied input or output words is greater than 1 word, the Slave occupies more than one node address. • If the maximum number of occupied input or output words is less than 1 word, the Slave occupies a single word (node address). An example of fixed allocation is shown below. For each slave, set the node address enclosed in brackets [ ]. 3 - 14 Output Allocation Relay Area Input Allocation Relay Area Fixed Allocations Address Allocation Relay 00 CIO 3200 01 CIO 3201 – (Not allocatable) CIO 3301 – (Not allocatable) 02 CIO 3202 CIO 3203 This DeviceNet Communications Unit [Node address 2] Extended Speed I/O setting: Occupies 2 output words CIO 3302 03 CIO 3303 This DeviceNet Communications Unit [Node address 2] Extended Speed I/O setting: Occupies 2 input words 15 to 0 16-point Output Unit [Node Address 0] Allocation Relay 15 CIO 3300 – (Not allocatable) to 0 8-point Input Unit [Node Address 1] DeviceNet Communications Unit User’s Manual (I581-E1) 3 Network Startup Allocation Relay 04 CIO 3204 05 CIO 3205 06 CIO 3206 07 CIO 3207 08 09 15 to 0 Input Allocation Relay Area Allocation Relay CIO 3304 This DeviceNet Communications Unit [Node address 4] Extended Control I/O setting: Occupies 4 output words CIO 3305 CIO 3208 – (Not allocatable) CIO 3308 CIO 3209 ··· CIO 3309 CIO 3306 15 to 0 This DeviceNet Communications Unit [Node address 4] Extended Control I/O setting: Occupies 4 input words CIO 3307 16-point Input Unit [Node Address 8] ··· The actual fixed allocations steps for the DeviceNet Communications Unit are shown below. 1 Precautions for Correct Use • Be sure to set the type of Remote I/O at this point. The number of words occupied by the DeviceNet Communications Unit varies depending on the set Remote I/O type. Unless the Remote I/O type is set correctly, automatic network configuration cannot be completed successfully. • To connect additional DeviceNet Slaves, set the node addresses for them simultaneously at this point. 2 3 Cycle the power supply of the inverter. Then, power ON all network components (Master Unit, other Slaves, and Communications power supply). Once the network is restarted with the new settings, check that the DeviceNet Communications Unit's LED indicators indicate normal operation. Following the steps below to configure the Master Unit causes both the MS (Module Status) and NS (Network Status) LED indicators to light green. If the LED indicators indicate a different pattern, please refer to Section 6 Troubleshooting on page 6-1 to take corrective action. (1) Change the CS/CJ-series CPU Unit to Program mode. (2) Set the Master Function Enable switch (Master Unit's allocation relay area CIO n, bit 06) from OFF to ON. Note Skip this step if the Master function is already enabled. (3) Set the Scan List Clear switch (Master Unit's allocation relay area CIO n, bit 01) from OFF to ON. Note Skip this step if the Scan List is already enabled. (4) Select a fixed allocation area between 1 and 3 (Master Unit's allocation relay area CIO n, bit 08 to 10). (5) Set the Scan List Enable switch (Master Unit's allocation relay area CIO n, bit 00) from OFF to ON to enable the Scan List. DeviceNet Communications Unit User’s Manual (I581-E1) 3 - 15 3 3-2-2 Fixed Allocation Steps Power on the inverter(s) first and configure the following settings according to 3-1 Inverter Configuration on page 3-2. • Set the node address. According to the fixed allocations node address setting example above, set inverter parameter P192 (DeviceNet Node Address). • Set the type of Remote I/O. Set inverter parameter P046 (Assembly Instance No.) that suits your application. 3-2 Network Configuration (Scan List Configuration) Output Allocation Relay Area Fixed Allocations Address 3 Network Startup 4 Once the Scan List is completed, check each Slave's MS and NS LED indicator pattern to verify that the network has been established successfully. If all the Slaves are correctly configured, the MS and NS LED indicators light green. If the LED indicators indicate a different pattern, please refer to Section 6 Troubleshooting on page 6-1 to take corrective action. Additional Information The fixed allocation method requires no DeviceNet configuration tool. The Master Unit checks the connection information on each slave and automatically allocates the output and input data of the Slaves to the data areas of the OMRON CS/CJ-series. 3-2-3 User Allocation Steps (Scan List Configuration) User allocation is the method of allocating each Slave to the allocation relay area using CX-Integrator. This allocation method allows a maximum of 63 node addresses to be used, thus ensuring efficient allocation of the allocation relay areas. In addition, it allows up to two blocks of allocation relay areas to be set for input and output, in which you can allocate the Slaves flexibly in any order as follows: • If the maximum number of occupied input or output words is greater than 1 word, the Slave occupies more than one node address. • If the maximum number of occupied input or output words is less than 1 word, the Slave occupies only the low byte of that single word. An example of user allocation is shown below. For each slave, you can set the node address enclosed in brackets [ ], regardless of the allocation relay area. 3 - 16 Output Allocation Relay Area Input Allocation Relay Area Fixed Allocation Address Allocation Relay 00 CIO 3200 16-point Output Unit [Node Address 0] CIO 3300 16-point Input Unit [Node Address 10] 01 CIO 3201 16-point Output Unit [Node Address 1] CIO 3301 8-point Input Unit 8-point Input Unit [Node Address 12] [Node Address 11] 02 CIO 3202 CIO 3203 This DeviceNet Communications Unit [Node address 21] Extended Speed I/O setting: Occupies 2 output words CIO 3302 03 This DeviceNet Communications Unit [Node address 21] Extended Speed I/O setting: Occupies 2 input words 04 CIO 3204 05 CIO 3205 06 CIO 3206 07 CIO 3207 08 CIO 3208 09 CIO 3209 15 to Allocation Relay 0 This DeviceNet Communications Unit [Node address 22] Extended Control I/O setting: Occupies 4 output words CIO 3303 CIO 3304 CIO 3305 CIO 3306 15 to 0 This DeviceNet Communications Unit [Node address 22] Extended Control I/O setting: Occupies 4 input words CIO 3307 16-point Output Unit [Node Address 2] ··· CIO 3308 CIO 3309 16-point Input Unit [Node Address 13] ··· DeviceNet Communications Unit User’s Manual (I581-E1) 3 Network Startup 1 Power on the inverter(s) first and configure the following settings according to 3-1 Inverter Configuration on page 3-2. • Set the node address. According to the user allocations node address setting example above, set inverter parameter P192 (DeviceNet Node Address). • Set the type of Remote I/O. Set inverter parameter P046 (Assembly Instance No.) that suits your application. Precautions for Correct Use • Be sure to set the type of Remote I/O at this point. The number of words occupied by the DeviceNet Communications Unit varies depending on the set Remote I/O type. Unless the Remote I/O type is set correctly, automatic network configuration cannot be completed successfully. • To connect additional DeviceNet Slaves, set the node addresses for them simultaneously at this point. 3 Cycle the power supply of the inverter. Then, power ON all network components (Master Unit, other Slaves, and Communications power supply). Then, to configure the network, start the network configuration tool CX-Integrator. In CX-Integrator, right-click New Project, select Insert Network and register the DeviceNet network. If more than one Master Unit is mounted on a single CPU Unit, in CX-Integrator, select [Tools] [Start Routing table] to set their network addresses. However, if there is only a single Master Unit, select No network address. DeviceNet Communications Unit User’s Manual (I581-E1) 3 - 17 3 3-2-3 User Allocation Steps (Scan List Configuration) 2 3-2 Network Configuration (Scan List Configuration) The actual user allocation steps for the DeviceNet Communications Unit using CX-Integrator are shown below. 3 Network Startup 4 5 Right-click in the network configuration window of CX-Integrator and select the required Master and Slave from the Components list to display all the network components. Double-click the Master Unit displayed in the window. The [Edit Device Parameters] screen opens. In the [General] tab, select each Slave listed under Unregistered Device List and click the Registration ( ) button. The Slave is now registered and listed under Registered Device List. 3 - 18 DeviceNet Communications Unit User’s Manual (I581-E1) 3 Network Startup In the [I/O Allocation (OUT)] tab, click the [Edit] button and enter the number of output words occupied by the inverter's Remote I/O function and its allocation relay area. If you change the Remote I/O function by editing the inverter's Assembly Instance No. (parameter P046), also change the number of occupied bytes according to the number of output words occupied by that changed Remote I/O. In the box "Allocated", enter the start word of the allocation relay area to which the Slave's output is allocated. 3-2 Network Configuration (Scan List Configuration) 6 3 In the [I/O Allocation (IN)] tab, click the [Edit] button and enter the number of input words occupied by the inverter's Remote I/O function and its allocation relay area. If you have changed the Remote I/O selection by editing the inverter's Assembly Instance No. (parameter P046), also change the number of occupied bytes according to the number of input words occupied by that changed Remote I/O. In the box "Allocated", enter the start word of the allocation relay area to which the Slave's input is allocated. DeviceNet Communications Unit User’s Manual (I581-E1) 3 - 19 3-2-3 User Allocation Steps (Scan List Configuration) 7 3 Network Startup 8 9 Register all unregistered Slaves by repeating steps 5 to 7 and click the [OK] button in the lower right of the [Edit Device Parameters] screen to close it. Following the above steps to edit the network configuration (Scan List) of the Master Unit results in a conflict with the Slave information and an yellow exclamation point symbol [ ] appears under each Slave. To solve this conflict, select each Slave in CX-Integrator's Network Configuration window. Then, right-click each Slave and select [Property] - [Slave Property]. In the screen displayed, select the [I/O Information] tab and click the [Get I/O Size from the Scanlist.] button and solve the conflict. When this process is done for all the Slaves, save the project. Precautions for Correct Use • Be sure to get the Scan List in the I/O Information tab for each slave. If there is a conflict between the Scan List and I/O information of any Slave, you may not be able to configure the network successfully. • Each EDS file of the DeviceNet Communications Unit contains a specific Assembly Instance No. (parameter P046) for selecting the Remote I/O function. This means that downloading a wrong EDS file causes the Assembly Instance No. (parameter P046) to be overwritten, resulting in an error in the network configuration process. Therefore, OMRON recommends that you edit and save parameter P046 of the EDS file according to the actual parameter setting of your inverter. 10 Make CX-Integrator online and right-click the [DeviceNet] icon under the project to select the connection. To download the Scan List into the Master Unit, double-click the Master Unit in the network configuration window, and click the [Download] button in the [Edit Device Parameters] screen. 11 Restart the network (cycle the power supply) and check the MS and NS LED indicators on the Master Unit and on each Slave Unit to verify that the network has been established successfully. If all the Slaves are correctly configured, the MS and NS LED indicators light green. If the LED indicators indicate a different pattern, please refer to Section 6 Troubleshooting on page 6-1 to take corrective action. Precautions for Correct Use • If you have changed any setting of the Master Unit, be sure to cycle the power supply of the inverter to enable the new setting. • For a third-party Master, change inverter parameter P046 according to the Master Unit's setting. 3 - 20 DeviceNet Communications Unit User’s Manual (I581-E1) 3 Network Startup 3-3 Device Parameters with EDS File 3-3-1 How to Edit Device Parameters with EDS File In CX-Integrator, double-click the DeviceNet Communications Unit displayed in the Network Configuration window. Then, the [Edit Device Parameters] screen opens. The [Edit Device Parameters] screen provides the following functions. Detailed Description Parameter group selection Inverter parameters are divided into groups A to P. You can select the parameter group that is displayed in the Parameter Edit window. Parameter Edit window The window where you can edit the set inverter parameter values. To edit a currently set parameter value, double-click the Value area for that parameter. However, you cannot edit the value of any read-only parameter. Upload inverter parameters When CX-Integrator is connected online, clicking the [Upload] button causes all the inverter parameter settings to be uploaded. Remember that the uploaded settings will overwrite the parameter values displayed in the Parameter Edit window. Before uploading, be sure to save the edited data.*1 Download inverter parameters When CX-Integrator is connected online, clicking the [Download] button causes all the inverter parameter settings to be downloaded via DeviceNet communications. *2 Compare inverter parame- When CX-Integrator is connected online, clicking the [Compare] button causes all ters the current inverter parameter settings to be compared with the set values displayed in the Parameter Edit window. Any mismatch parameters detected in the comparison process will be displayed in a pop-up window.*3 Reset DeviceNet Communications Unit When CX-Integrator is connected online, clicking the [Reset] button causes the DeviceNet communications to be hard reset. Note that this also causes the DeviceNet Communications Unit to be once disconnected from the network. Reset edited data to default settings Clicking the [Default Setup] button causes the edited parameter data in the Parameter Edit window to revert to the initial values. However, this operation does not affect the parameters stored in Inverters connected via DeviceNet. Save edited data When you finished editing data in the [Edit Device Parameters] screen, click [OK] and then save the project. This saves not only the project settings, but also the edited data. *1 When the data was uploaded, the value of the parameter 0410 (Write to EEPROM) is 0. When you download the parameter data next time, change this value to 2. Otherwise, your changes will not be saved in the inverter EEPROM. *2 The download process may be stopped if a problem occurs when downloading inverter parameters. To be able to save the downloaded data into the inverter EEPROM, make sure that parameter 0410 (Write to EEPROM) is set to 2. *3 Parameters with dXXX indicate monitor functions. These parameters cause no problem even if detected in the comparison process. DeviceNet Communications Unit User’s Manual (I581-E1) 3 - 21 3 3-3-1 How to Edit Device Parameters with EDS File Function 3-3 Device Parameters with EDS File In DeviceNet communications, EDS files are used to establish communication connection. EDS files for DeviceNet Communications Units are installed with CX-Integrator (Ver. 2.55 or higher). Using a correct EDS file, you can edit inverter parameters in the [Edit Device Parameters] screen. This section describes how to use an EDS file for editing device parameters and the functional restrictions applied when using it. 3 Network Startup 3-3-2 Restrictions of Edit Device Parameters Function with EDS File [Edit Device Parameters] is a function accomplished by using the EDS file and Explicit Message functions defined in the DeviceNet Communications. This means that, if an error occurs in sending/receiving an Explicit Message, [Edit Device Parameters] cannot function. In particular, the upload/download function sends Explicit Messages in order of the parameters list in EDS files. An error affects significantly these functions to read and write inverter parameters. If an error occurs in sending/receiving an Explicit Message, the upload/download process will be interrupted. An error occurs due to environmental factors such as noise in the transmission path as well as due to the restrictions on inverter parameters as shown below. If the upload/download process is interrupted, try to avoid the following causes. If these are hardly unavoidable, change to editing parameters from CX-Drive according to the next section, 3-4 Editing Parameters with CX-Drive on page 3-25. Error Contents Detailed Description Error due to restrictions between parameters Some inverter parameters put restrictions on other inverter parameters. These restrictions are shown in the next table (P.3-24). Change the parameter settings to avoid the restrictions. If this is not possible, edit the parameter settings from CX-Drive. Parameter setting range error The download process will be interrupted if the data contains a set value that exceeds the upper or lower limit of the parameter setting range. This occurs, for example, if the parameter setting range is set by another parameter. Check the restriction in the next table (P.3-24) and change the parameter setting accordingly. *1 3 - 22 Writing to a write-prohibit parameter. The download process will be interrupted if you write a set value to a write-prohibit Reading from a read-prohibit parameter. When using the Light Load mode, some parameters are write-prohibited or read-only. Therefore, in the Light Load mode, you cannot use the [Edit Device Parameters] function. Always use CX-Drive to edit the inverter parameters. parameter.*1 Check if the following conditions exist and take corrective action. • Downloading while the inverter operates. • Soft Lock Selection (b031) is set to write-prohibit parameter. DeviceNet Communications Unit User’s Manual (I581-E1) 3 Network Startup Detailed Description Set values are not stored in EEPROM. In order to download parameters on the [Edit Device Parameters] screen, you need to set the last parameter Write to EEPROM to a correct value.*2 0: Recalculate motor parameters (Data not saved to EEPROM). 1: Store set values (Data saved to EEPROM). 2: Recalculate motor parameters and stores set values (Data saved to EEPROM). *1 When using the Light Load mode, always edit the inverter parameters from CX-Drive. The DeviceNet Communications Unit cannot be used in the High Frequency mode and the PM Motor mode. *2 When the data was uploaded from an inverter, the value of the parameter Write to EEPROM is read as 0. When downloading the parameter data next time, be sure to set the parameter value again. Precautions for Correct Use Additional Information The number displayed when the upload/download process is in progress is the parameter number for the parameter data being transferred. The parameter number is displayed to the left of each parameter data in the Parameter Edit window. You can identify which parameter caused abnormal termination from the number displayed when the upload/download process was terminated. DeviceNet Communications Unit User’s Manual (I581-E1) 3 - 23 3 3-3-2 Restrictions of Edit Device Parameters Function with EDS File • To write the parameter data downloaded from the [Edit Device Parameters] screen (in CX-Integrator) to the inverter's EEPROM, make sure that the parameter Write to EEPROM is set to 1 or 2. • When uploading parameters from an inverter on the [Edit Device Parameters] screen (in CX-Integrator), the value of the parameter Write to EEPROM is read as 0. When downloading the parameter data next time, be sure to set Write to EEPROM again. • When downloading inverter parameters from the [Edit Device Parameters] screen, always check that the Remote I/O setting parameter P046 (Assembly Instance No.) is set correctly. If a different parameter setting is transferred, the number of words occupied by the DeviceNet Communications Unit will be changed, which affects the network configuration. • When using the inverter in the Light Load mode, always edit the inverter parameters from CX-Drive. • In the High Frequency mode and the PM Motor mode, the DeviceNet Communications Unit cannot be used. 3-3 Device Parameters with EDS File Error Contents 3 Network Startup Restrictions between Parameters Multi-function Input Selection 1 to 8 (C001 to C008) = 1st Frequency Upper Limit (A061) 1st Frequency Lower Limit (A062) Output Frequency Setting (F001) 1st Multi-step Speed Reference 0 (A020) Output Frequency Setting (F001), 1st Multi-step Speed Reference 0 (A020) 1st Frequency Lower Limit (A062) > > > Multi-function Input Selection 1 to 8 (C001 to C008)*1 1st Maximum Frequency (A004) 1st Maximum Frequency (A004) 1st Maximum Frequency (A004) > 1st Frequency Upper Limit (A061) > Starting Frequency (B082) Starting Frequency (B082) Starting Frequency (B082) > > > Starting Frequency (B082) Output Frequency Setting (F001), 1st Multi-step Speed Reference 0 (A020) Multi-step Speed Reference 1 to 15 (A021 to A035) Free V/f Frequency 7 (B112) Free V/f Frequency 7 (B112) Free V/f Frequency 7 (B112) > = Output Frequency Setting (F001), 1st Multi-step Speed Reference 0 (A020) 1st Frequency Upper Limit (A061) 1st Frequency Lower Limit (A062) Output Frequency Setting (F001), 1st Multi-step Speed Reference 0 (A020) Jogging Frequency (A038) Jump Frequency*1 (A063/A065/A067±A064/A066/A068) 2nd Frequency Upper Limit (A261) 2nd Frequency Lower Limit (A262) Output Frequency Setting (F001), 2nd Multi-step Speed Reference 0 (A220) Output Frequency Setting (F001), 2nd Multi-step Speed Reference 0 (A220) 2nd Frequency Lower Limit (A262) = > > > > > > 1st Frequency Upper Limit (A061) 1st Frequency Lower Limit (A062) Output Frequency Setting (F001), 1st Multi-step Speed Reference 0 (A020) 2nd Maximum Frequency (A204) 2nd Maximum Frequency (A204) 2nd Maximum Frequency (A204) > 2nd Frequency Upper Limit (A261) Output Frequency Setting (F001), 2nd Multi-step Speed Reference 0 (A220) Starting Frequency (B082) > 2nd Frequency Upper Limit (A261) Starting Frequency (B082) > 2nd Frequency Lower Limit (A262) Starting Frequency (B082) > Output Frequency Setting (F001), 2nd Multi-step Speed Reference 0 (A220) Output Frequency Setting (F001), = Jump Frequency*2 2nd Multi-step Speed Reference 0 (A220) (A063/a065/a067±a064/a066/a068) Free V/f Frequency 7 (B112) > 2nd Frequency Upper Limit (A261) Free V/f Frequency 7 (B112) > 2nd Frequency Lower Limit (A262) Free V/f Frequency 7 (B112) > Output Frequency Setting (F001), 2nd Multi-step Speed Reference 0 (A220) *1 The process will be terminated abnormally if the same set value exists in Multi-function input selection 1 to 8. The process will also be terminated abnormally if, when setting values in the order of Multi-function input selection 1 to 8, the value already set for a latter parameter is set for a preceding parameter. *2 The process will be terminated if the frequency set for F001, A020, A220, or A021 to A035 is within the frequency range set for Jump frequency. 3 - 24 > DeviceNet Communications Unit User’s Manual (I581-E1) 3 Network Startup 3-4 Editing Parameters with CX-Drive 3-4-1 3 Connecting CX-Drive (via DeviceNet) Connecting to the Inverter by registering its connection type In this method, you connect CX-Drive to your inverter after creating a new inverter project and setting its connection type. Follow the steps below. Start CX-Drive and select [File] - [New] to create a new project. DeviceNet Communications Unit User’s Manual (I581-E1) 3 - 25 3-4-1 Connecting CX-Drive (via DeviceNet) There are two ways to connect CX-Drive to your inverter via DeviceNet. In this section, the connection procedures for the these methods are described in the following order. • Connecting to the inverter by registering its connection type • Automatically detecting the connected inverter 1 3-4 Editing Parameters with CX-Drive The Inverter/Servo support tool CX-Drive is the support software to edit inverter parameters. Installing the OMRON CX-One software simultaneously installs CX-Drive onto the PC. CX-Drive enables you to connect your PC to the RJ45 or USB connector of an inverter to directly edit its parameters. In addition, CX-Drive can be connected to the CS/CJ-series CPU Unit so that you can edit inverter parameters via DeviceNet communications. (This feature is supported in Ver.2.6 or higher.) This section describes how to connect CX-Drive via DeviceNet to your inverter and provides a functional outline of CX-Drive. For the functional details of CX-Drive, refer to the CX-Drive Operation Manual (Cat. No. W453). 3 Network Startup 2 3 3 - 26 In the New Drive window, select the Drive Type of the inverter and the Option Board Type. In the [Drive Type] section, select the inverter series and click the [Settings] button to the right. In the Drive Type Settings window, select the Enclosure Rating, Voltage Class, and Maximum Motor Capacity and, in the Option Board Type section, select "DRT (DeviceNet Communications Unit)" as Option Boards. After selecting, click the OK button to close the Drive Type Settings window. Next, in the New Drive window, select the type of connection to the inverter. In the [Connection Type] section, select "Via PLC (DeviceNet)" and click the [Settings] button to the right. In the [Network] tab, select each node address of the DeviceNet Master Unit and the inverter (DeviceNet Communications Unit). DeviceNet Communications Unit User’s Manual (I581-E1) 3 Network Startup 4 3-4 Editing Parameters with CX-Drive Click the [Gateway PLC] tab and select the type of connection between CX-Drive and the CS/CJ-series CPU Unit. Click the [Properties] button and configure the following settings. • Device Type: Select the model of the CPU Unit to which CX-Drive is connected. • Network Type: Select the network via which CX-Drive is connected to the CPU Unit. 3 When the above settings are done, use the [OK] button to close all the windows. A new project is registered in the workspace. You can now click the Work Online button [ DeviceNet Communications Unit User’s Manual (I581-E1) ] to connect the inverter. 3 - 27 3-4-1 Connecting CX-Drive (via DeviceNet) 5 3 Network Startup Automatically detecting the connected Inverter In this method, you connect CX-Drive to your inverter using the Autodetect function after configuring the [Autodetect Options] in CX-Drive. Follow the steps below. 1 2 Start CX-Drive and select [Drive] - [Autodetect Options] to open the Options window. In the [Autodetect] tab, in the [Drive Type Selection] section, select [Inverter] by clicking the [Inverter] check box. Then, in the [Connection Type Selection] section, select [Via PLC (DeviceNet)] by clicking the [Via PLC (DeviceNet)] check box. Next, click the [Advanced Options: Via PLC (DeviceNet)] to the right. Additional Information For quicker Autodetect operation, narrow down the scope of Auto detection by deselecting unnecessary check boxes. 3 - 28 DeviceNet Communications Unit User’s Manual (I581-E1) 3 Network Startup 3 3-4 Editing Parameters with CX-Drive In the Advanced Options: [Via PLC (DeviceNet)] window, configure the following two settings. • DeviceNet node addresses: Select each node address of the DeviceNet Master Unit and the inverter (DeviceNet Communications Unit). • [Gateway PLC]: Click the [Settings] button in the [Gateway PLC] section and select the Device Type and the Network Type. 3 When the above settings are done, use the [OK] button to close all the windows and click the [Autodetect] button. The Autodetection function starts to automatically create a new drive project. DeviceNet Communications Unit User’s Manual (I581-E1) 3 - 29 3-4-1 Connecting CX-Drive (via DeviceNet) 4 3 Network Startup 3-4-2 Outline of CX-Drive The Inverter/Servo support tool CX-Drive enables you to edit inverter parameters and monitor the inverter status. This section provides a functional outline of CX-Drive. Screen Structure of CX-Drive The screen structure of CX-Drive is shown below. Registered drive projects are displayed in the workspace. Double-clicking a project displays the functions associated with it. Double-clicking a function opens the window associated with the function. Screen structure Workspace Window Toolbar Output window Status bar Precautions for Correct Use CX-Drive, by default, does not allow connection to the inverter unless the software versions match. • Software number of the iInverter set in the CX-Drive project • Software number of the inverter actually connected If you cannot connect to the inverter due to a software number mismatch, select [Tools] [Options] in the menu bar and, in the [Online] tab, deselect the [Check Drive Software Compatibility] check box. This allows CX-Drive to connect to the inverter operate normally, although a warning will appear. To match the software numbers, right-click the project, select [Properties], and click the [Settings] button in the [Drive Type] section. In the Drive Type Settings window, set the Software Number that matches that of the inverter. If you cannot find the applicable software number in the CX-Drive's Software Number list, please upgrade the CX-Drive version. 3 - 30 DeviceNet Communications Unit User’s Manual (I581-E1) 3 Network Startup Editing Device Parameters Using CX-Drive 3-4 Editing Parameters with CX-Drive Double-clicking Parameter Editor in the project opens a window in which all inverter parameters are listed (in ascending order). You can edit inverter parameters in this window. To upload/download inverter parameters, use the Transfer buttons in the toolbar. • Double-click one of the folders under Parameter Editor to narrow down the parameter list to only those parameters associated with it. • Edit the value set for each parameter in the Value field of the parameter list. • When a parameter is selected, the explanation of that parameter is displayed in the upper area. • At the left end of the parameter list, the state of each parameter value is displayed. You can display only the parameters in the same state. A parameter is in one of the three states: Not default, Different from the inverter, or Invalid. • You can selectively transfer only the required parameter(s) to the inverter. 3 3-4-2 Outline of CX-Drive DeviceNet Communications Unit User’s Manual (I581-E1) 3 - 31 3 Network Startup Status Function of CX-Drive Open the Status folder in the project and double-click the status information. The window corresponding to the selected status information opens. • Digital Inputs: Displays the current ON/OFF status of digital inputs, including the input settings of the connected inverter. • Digital Outputs: Displays the current ON/OFF status of digital outputs, including the output settings of the connected inverter. • Inverter Status (Drive Status 1 and Drive Status 12): Displays the status values of dxxx in the inverter. • Alarms: Displays the log of the current and past alarms. Monitor Function of CX-Drive Open the Monitor folder in the project and double-click Real Time Trace. The Real Time Trance window opens, in which you can monitor the operation status of the inverter. • A maximum of seven signals can be traced. • The ON/OFF timing of the inverter Status or a value can be set as a trigger. 3 - 32 DeviceNet Communications Unit User’s Manual (I581-E1) Remote I/O This section describes the functions of Remote I/O. 4 4-1 Remote I/O Configuration . . . . . . . . . . . . . . . . . . . . . . . . . . . . . . . . . . . . . . . 4-2 4-1-1 4-1-2 Remote I/O Types . . . . . . . . . . . . . . . . . . . . . . . . . . . . . . . . . . . . . . . . . . . . . . . 4-2 Remote I/O Selection . . . . . . . . . . . . . . . . . . . . . . . . . . . . . . . . . . . . . . . . . . . . 4-3 4-2 Basic and Extended Speed I/O . . . . . . . . . . . . . . . . . . . . . . . . . . . . . . . . . . . 4-4 4-2-1 4-2-2 4-2-3 Basic Speed I/O (20/70) . . . . . . . . . . . . . . . . . . . . . . . . . . . . . . . . . . . . . . . . . . 4-4 Extended Speed I/O (21/71) . . . . . . . . . . . . . . . . . . . . . . . . . . . . . . . . . . . . . . . 4-5 Extended Speed and Acceleration Control (110/111) . . . . . . . . . . . . . . . . . . . . 4-7 4-3 Remote I/O with Torque Reference Support . . . . . . . . . . . . . . . . . . . . . . . 4-10 4-3-1 4-3-2 4-3-3 4-3-4 Torque Control Configuration . . . . . . . . . . . . . . . . . . . . . . . . . . . . . . . . . . . . . 4-10 Extended Speed and Torque Control (123/173) . . . . . . . . . . . . . . . . . . . . . . . .4-11 Extended Control I/O (101/151/153) . . . . . . . . . . . . . . . . . . . . . . . . . . . . . . . . 4-13 Extended Control I/O and Multi function I/O Monitor (101/153) . . . . . . . . . . . . . . . . . . . . . . . . . . . . . . . . . . . . . . . . . . . . . . 4-15 4-4 Special I/O and Flexible Format . . . . . . . . . . . . . . . . . . . . . . . . . . . . . . . . . 4-17 4-4-1 4-4-2 4-4-3 Frequency Reference/RUN Command Selection . . . . . . . . . . . . . . . . . . . . . . 4-17 Special I/O (100/150) . . . . . . . . . . . . . . . . . . . . . . . . . . . . . . . . . . . . . . . . . . . 4-17 Flexible Format (139/159) . . . . . . . . . . . . . . . . . . . . . . . . . . . . . . . . . . . . . . . . 4-20 4-5 When to Input the RUN Command after Establishment of Communications . . . . . . . . . . . . . . . . . . . . . . . . . . . . . . 4-22 DeviceNet Communications Unit User’s Manual (I581-E1) 4-1 4 Remote I/O 4-1 4-1-1 Remote I/O Configuration Remote I/O Types There are eight types of Remote I/O as described below. You can use the appropriate Remote I/O type for your application. Type 4-2 Description Basic Speed I/O Remote I/O included as standard for DeviceNet communications. This Remote I/O offers limited functions. Extended Speed I/O Remote I/O included as standard for DeviceNet communications. This Remote I/O offers general inverter control functions. Extended Speed and Acceleration Control OMRON's unique Remote I/O not defined in the DeviceNet specifications. This is the Extended Speed I/O with an additional Acceleration/Deceleration Time setting function. Extended Speed and Torque Control OMRON's unique Remote I/O not defined in the DeviceNet specifications. This is the Extended Speed I/O with an additional Torque Reference function. Extended Control I/O OMRON's unique Remote I/O not defined in the DeviceNet specifications. This Remote I/O is optimized for the input/output function of Inverters. You can select the desired input/output function by setting a multi-function input/output parameter. Extended Control I/O and Multi function I/O Monitor OMRON's unique Remote I/O not defined in the DeviceNet specifications. This is the Extended Control I/O function with an additional Multi-function Input Monitor function. You can use this Remote I/O as general-purpose host inputs by configuring the multi-function inputs (C001 to C009). Special I/O OMRON's unique Remote I/O not defined in the DeviceNet specifications. This Remote I/O enables access to inverter's internal parameter areas via Modbus communication. Flexible Format OMRON's unique Remote I/O not defined in the DeviceNet specifications. This Remote I/O enables more than one data including those in inverter's internal parameter areas to be allocated via Modbus communication. You can select the data to be allocated using parameters P160 to P179. DeviceNet Communications Unit User’s Manual (I581-E1) 4 Remote I/O 4-1-2 Remote I/O Selection Select and set the appropriate type of Remote I/O for your application in parameter P046. Description P046 Assembly Instance No. Setting No. of occupied bytes (No. of words) Output Input Output Input 00: Basic Speed I/O 20 70 4(2) 4(2) 01: Extended Speed I/O (Default) 21 71 4(2) 4(2) 02: Extended Speed and Torque Control 123 173 6(3) 6(3) 03: Special I/O*1 100 150 8(4) 8(4) 04: Extended Control I/O 101 151 8(4) 8(4) 05: Extended Control I/O and Multi function I/O Monitor 101 153 8(4) 9(4.5) 06: Flexible Format 139 159 20(10)*2 20(10)*2 07: Extended Speed and Acceleration Control 110 111 8(4) 8(4) Precautions for Correct Use • During network connection, the Remote I/O is not updated even if parameter P046 is changed. To update the Remote I/O setting, cycle the inverter's input power supply. • Using the DeviceNet Communications Unit disables the inverter's Modbus communication function. Do not connect the communications cable to Modbus interface. Additional Information The DeviceNet Communications Unit supports read/write of double-word data. Refer to 4-4-2 Special I/O (100/150) on page 4-17. DeviceNet Communications Unit User’s Manual (I581-E1) 4-3 4 4-1-2 Remote I/O Selection *1 Special I/O differs from the conventional Advanced Remote I/O in the data format. *2 In Flexible Format, the number of occupied bytes changes depending on the number of allocated Modbus registers. 4-1 Remote I/O Configuration Parameter Assembly No. (hex) 4 Remote I/O 4-2 Basic and Extended Speed I/O 4-2-1 Basic Speed I/O (20/70) Basic Speed I/O is a type of Remote I/O included as standard for DeviceNet communications. This Remote I/O offers more limited functions than Extended Speed I/O. Basic Remote Output Assembly ID: 20 Dec (14 hex) Output Format (CS/CJ-series Inverter) Bit Allocation Word No. Byte No. bit 7 bit 6 bit 5 bit 4 bit 3 bit 2 bit 1 bit 0 n 0 – – – – – RS – FW 1 – – – – – – – – n+1 2 Rotation Speed Reference (Low byte) 3 Rotation Speed Reference (High byte) Output Bit/Data Details Name Description FW Forward/Stop 0: Stop 1: Forward RS Reset 0: – 1: Fault reset Rotation Speed Reference If parameter P049 (Number of Poles for Rotation Speed Setting) is set appropriately, the rotational speed unit is [min-1]. If parameter P049 (Number of Poles for Rotation Speed Setting) is set to 0, the frequency unit is [0.01 Hz]. Precautions for Safe Use For safety reasons, the FWD, RV, and RS command must be output after the cause of fault/trip is removed. Basic Remote Input Assembly ID: 70 Dec (46 hex) Input Format (CS/CJ-series Inverter) Byte No. bit 7 bit 6 bit 5 bit 4 bit 3 bit 2 bit 1 bit 0 n 0 – – – – – FWR – AL 1 – – – – – – – – n+1 4-4 Bit Allocation Word No. 2 Rotation Speed Monitor (Low byte) 3 Rotation Speed Monitor (High byte) DeviceNet Communications Unit User’s Manual (I581-E1) 4 Remote I/O Input Bit/Data Details Name Description Alarm output 0: Normal 1: Fault/Trip FWR During forward operation 0: During reverse run/Stopping 1: During forward run Rotation Speed Monitor If parameter P049 (Number of Poles for Rotation Speed Setting) is set appropriately, the rotational speed unit is [min-1]. If parameter P049 (Number of Poles for Rotation Speed Setting) is set to 0, the frequency is monitored in units of [0.01 Hz]. 4-2-2 Extended Speed I/O (21/71) Standard I/O is a type of Remote I/O included as standard for DeviceNet communications. This Remote I/O offers general inverter control functions. 4 Standard Remote Output Assembly ID: 21 Dec (15 hex) Bit Allocation Word No. Byte No. bit 7 bit 6 bit 5 bit 4 bit 3 bit 2 bit 1 bit 0 n 0 – REF CTR – – RS RV FW 1 – – – – – – – – 2 Rotation Speed Reference (Low byte) 3 Rotation Speed Reference (High byte) Output Bit/Data Details Name Description FW Forward/Stop 0: Stop 1: Forward RV Reverse/Stop 0: Stop 1: Reverse RS Reset 0: – 1: Fault reset CTR Net Ctrl. 0: Follow the setting of parameter A002. 1: Follow the reference from network control. REF Net Ref. 0: Follow the setting of parameter A001. 1: Follow the reference from network control. Rotation Speed Reference If parameter P049 (Number of Poles for Rotation Speed Setting) is set appropriately, the rotational speed unit is [min-1]. If parameter P049 (Number of Poles for Rotation Speed Setting) is set to 0, the frequency unit is [0.01 Hz]. Precautions for Safe Use For safety reasons, the FWD, RV, and RS command must be output after the cause of fault/trip is removed. DeviceNet Communications Unit User’s Manual (I581-E1) 4-5 4-2-2 Extended Speed I/O (21/71) Output Format (CS/CJ-series Inverter) n+1 4-2 Basic and Extended Speed I/O AL 4 Remote I/O Standard Remote Input Assembly ID: 71 Dec (47 hex) Input Format (CS/CJ-series Inverter) Bit Allocation Word No. Byte No. bit 7 bit 6 bit 5 bit 4 bit 3 bit 2 bit 1 bit 0 n 0 FA1 RFN CFN IRDY RVR FWR WR AL n+1 1 Drive Status 2 Rotation Speed Monitor (Low byte) 3 Rotation Speed Monitor (High byte) Input Bit/Data Details Name Description AL Alarm output 0: Normal 1: Fault/Trip WR Warning 0: Normal 1: Warning FWR During forward operation 0: During reverse run/Stopping 1: During forward run RVR During reverse operation 0: During forward run/Stopping 1: During reverse run IRDY Operation ready 0: Not ready 1: Ready CFN Ctrl. from Net 0: Follow the setting of parameter A002. 1: DeviceNet reference RFN Ref. from Net 0: Follow the setting of parameter A001. 1: DeviceNet reference FA1 Constant speed reached 0: Accelerating or decelerating/Stopping 1: Frequency agree Drive Status 1: Startup 2: Not ready 3: Ready 4: Operation in progress 5: Stopping 6: Fault/Trip stop 7: Fault/Trip Rotation Speed Monitor If parameter P049 (Number of Poles for Rotation Speed Setting) is set appropriately, the rotational speed unit is [min-1]. If parameter P049 (Number of Poles for Rotation Speed Setting) is set to 0, the frequency is monitored in units of [0.01 Hz]. 4-6 DeviceNet Communications Unit User’s Manual (I581-E1) 4 Remote I/O 4-2-3 Extended Speed and Acceleration Control (110/111) Extended Speed and Acceleration Control is OMRON's unique Remote I/O not defined in the DeviceNet specifications. This is the Extended Speed I/O with an additional Acceleration/Deceleration Time setting function. Output Format (CS/CJ-series Inverter) Bit Allocation Word No. Byte No. bit 7 bit 6 bit 5 bit 4 bit 3 bit 2 bit 1 bit 0 n 0 – REF CTR – FRS RS RV FW 1 – – – – – – – – n+1 n+2 Rotation Speed Reference (Low byte) Rotation Speed Reference (High byte) 4 Acceleration Time (Low byte) 5 Acceleration Time (High byte) 6 Deceleration Time (Low byte) 7 Deceleration Time (High byte) 4 4-2-3 Extended Speed and Acceleration Control (110/111) n+3 2 3 Output Bit/Data Details Name Description FW Forward/Stop 0: Stop 1: Forward RV Reverse/Stop 0: Stop 1: Reverse RS Reset 0: – 1: Fault reset FRS Free-run stop 0: Ignore 1: Free-run stop CTR Net Ctrl. 0: Follow the setting of parameter A002. 1: Follow the reference from network control. REF Net Ref. 0: Rotation Speed Reference follows the setting of parameter A001; Acceleration/Deceleration Time follows the setting of parameter F002/F003. 1: Follow the reference from network control. Rotation Speed Reference If parameter P049 (Number of Poles for Rotation Speed Setting) is set appropriately, the rotational speed unit is [min-1]. If parameter P049 (Number of Poles for Rotation Speed Setting) is set to 0, the frequency unit is [0.01 Hz]. Acceleration Time Reference acceleration time. Unit: [0.1 s], Setting range: [0.1 to 3600.0] The set value must be within this setting range. Deceleration Time Reference deceleration time. Unit: [0.1 s], Setting range: [0.1 to 3600.0] The set value must be within this setting range. If REF (Net.Ref.) is set to 0, the setting of parameter F002 is enabled. If REF (Net.Ref.) is set to 0, the setting of parameter F003 is enabled. DeviceNet Communications Unit User’s Manual (I581-E1) 4-2 Basic and Extended Speed I/O Extended Speed and Acceleration Control Assembly ID: 110 Dec (6E hex) 4-7 4 Remote I/O Precautions for Safe Use For safety reasons, the FWD, RV, and RS command must be output after the cause of fault/trip is removed. Extended Speed and Acceleration Control Assembly ID: 111 Dec (6F hex) Input Format (CS/CJ-series Inverter) Bit Allocation Word No. Byte No. bit 7 bit 6 bit 5 bit 4 bit 3 bit 2 bit 1 bit 0 n 0 MI3 MI2 MI1 FA1 – AL RVR FWR MI5 MI4 1 n+1 n+2 n+3 Drive Status Detail 2 Rotation Speed Monitor (Low byte) 3 Rotation Speed Monitor (High byte) 4 Output Current Monitor (Low byte) 5 Output Current Monitor (High byte) 6 7 Trip Cause RFN CFN FWT M18 MI7 MI6 Input Bit/Data Details Name 4-8 Description FWR During forward operation 0: During reverse run/Stopping 1: During forward run RVR During reverse operation 0: During forward run/Stopping 1: During reverse run AL Alarm output 0: Normal 1: Fault/Trip FA1 Constant speed reached 0: Accelerating or decelerating 1: Frequency agree MI1 to MI7 Multi-function Input Monitor Monitors multi function inputs S1 to S7 0: OFF 1: ON MI8 Multi-function Input Monitor Monitors multi function inputs S8 0: OFF 1: ON CFN Ctrl. from Net 0: Rotation Speed Reference follows the setting of parameter A001; Acceleration/Deceleration Time follows the setting of parameter F002/F003. 1: DeviceNet reference RFN Ref. from Net 0: Follow the setting of parameter A001. 1: DeviceNet reference FWT Forward Rotation Terminal Input Monitor Monitors the forward rotation command terminal state. 0: OFF 1: ON DeviceNet Communications Unit User’s Manual (I581-E1) 4 Remote I/O Name Description 0 1 2 3 4 5 7 8 10 11 : : : : : : : : : : Stopping Running Jogging Free running Direct current DC braking Restart (Retry)/Error detection (Deceleration stop) Restart (Retry) in process Waiting for restart (retry) Fault/Trip Undervoltage condition Rotation Speed Monitor If parameter P049 (Number of Poles for Rotation Speed Setting) is set appropriately, the rotational speed unit is [min-1]. If parameter P049 (Number of Poles for Rotation Speed Setting) is set to 0, the frequency is monitored in units of [0.01 Hz]. Output Current Monitor Unit: [0.1 A] Trip Cause Displays direct trip cause. Decimal values 1 to 99 correspond to trips E01 to E99. 4-2 Basic and Extended Speed I/O Drive Status Detail 4 4-2-3 Extended Speed and Acceleration Control (110/111) DeviceNet Communications Unit User’s Manual (I581-E1) 4-9 4 Remote I/O 4-3 Remote I/O with Torque Reference Support 4-3-1 Torque Control Configuration The type of Remote I/O described in this section provides the torque reference for torque control function, in addition to normal inverter speed control. The Remote I/O functions described here can be used without the use of torque control. In this case, the input/output function related to torque control is disabled. Precautions for Correct Use If the inverter is set to the Light Load mode, torque reference input is prohibited and therefore you cannot use Remote I/O with the torque reference enabled. Use another type of Remote I/O. Torque Control Configuration Steps To use torque control, the inverter must operate under vector control. Follow the steps below to enable torque control. 1 2 3 4 5 Select the vector control. Enable Vector Control by setting parameter A044 (1st Control Method) according to the MX2/RX-series Inverter User's Manual. Perform auto-tuning of the motor. Perform auto-tuning of the motor parameters on the connected motor according to the MX2/RX-series Inverter User's Manual. After auto-tuning, save the motor parameters into inverter. Configure the torque control. Configure the torque control function according to the MX2/RX-series Inverter User's Manual. Configure DeviceNet. Configure the DeviceNet parameters according to 3-1-2 Remote I/O Settings Using Torque Reference on page 3-6. Configure the multi-function input to enable torque control. To enable torque control,you must set the Multi-function Input (C001 to C008) to 52 (Torque reference input permission) and turn it ON. Turn ON the multi-function input configured via an external terminal or DeviceNet Remote I/O. Additional Information For details about torque control, refer to Section 5-11 Torque Control of the MX2 User's Manual (Cat. No. I570) and Section 6-9 Torque Control of the RX User's Manual (Cat. No. I578). Disabling Torque Control Torque control is disabled unless the multi-function input is set to 52 (Torque reference input permission). Configuration of parameters related to torque control is unnecessary if toque control is disabled. 4 - 10 DeviceNet Communications Unit User’s Manual (I581-E1) 4 Remote I/O 4-3-2 Extended Speed and Torque Control (123/173) Extended Speed and Torque Control Output Assembly ID: 123 Dec (7B hex) Output Format (CS1/CJ1-series Inverter) Bit Allocation Word No. Byte No. bit 7 bit 6 bit 5 bit 4 bit 3 bit 2 bit 1 bit 0 n 0 – REF CTR – – RS RV FW 1 – – – – – – – – n+1 n+2 Rotation Speed Reference (Low byte) Rotation Speed Reference (High byte) 4 Torque Reference (Low byte) 5 Torque Reference (High byte) 4 4-3-2 Extended Speed and Torque Control (123/173) 2 3 Output Bit/Data Details Name Description FW Forward/Stop 0: Stop 1: Forward RV Reverse/Stop 0: Stop 1: Reverse RS Reset 0: – 1: Fault reset CTR Net Ctrl. 0: Follow the setting of parameter A002. 1: Follow the reference from network control. REF Net Ref. 0: Follow the setting of parameter A001. 1: Follow the reference from network control. Rotation Speed Reference If parameter P049 (Number of Poles for Rotation Speed Setting) is set appropriately, the rotational speed unit is [min-1]. If parameter P049 (Number of Poles for Rotation Speed Setting) is set to 0, the frequency is monitored in units of [0.01 Hz]. Torque Reference Reference torque. Unit: [%] Precautions for Safe Use For safety reasons, the FWD, RV, and RS command must be output after the cause of fault/trip is removed. DeviceNet Communications Unit User’s Manual (I581-E1) 4-3 Remote I/O with Torque Reference Support Extended Speed and Torque Control is OMRON's unique Remote I/O not defined in the DeviceNet specifications. This is the Extended Speed I/O with an additional Torque Reference function. 4 - 11 4 Remote I/O Extended Speed and Torque Control Input Assembly ID: 173 Dec (AD hex) Input Format (CS1/CJ1-series Inverter) Bit Allocation Word No. Byte No. bit 7 bit 6 bit 5 bit 4 bit 3 bit 2 bit 1 bit 0 n 0 FA1 RFN CFN IRDY RVR FWR WR AL n+1 n+2 1 Drive Status 2 Rotation Speed Monitor (Low byte) 3 Rotation Speed Monitor (High byte) 4 Torque Actual (Low byte) 5 Torque Actual (High byte) Input Bit/Data Details Name Description AL Alarm output 0: Normal 1: Fault/Trip WR Warning 0: Normal 1: Warning FWR During forward operation 0: During reverse run/Stopping 1: During forward run RVR During reverse operation 0: During forward run/Stopping 1: During reverse run IRDY Operation ready 0: Not ready 1: Ready CFN Ctrl. from Net 0: Follow the setting of parameter A002. 1: DeviceNet reference RFN Ref. from Net 0: Follow the setting of parameter A001. 1: DeviceNet reference FA1 Constant speed reached 0: Accelerating or decelerating/Stopping 1: Frequency agree Drive Status 1: Startup 2: Not ready 3: Ready 4: Operation in progress 5: Stopping 6: Fault/Trip stop 7: Fault/Trip Rotation Speed Monitor If parameter P049 (Number of Poles for Rotation Speed Setting) is set appropriately, the rotational speed unit is [min-1]. If parameter P049 (Number of Poles for Rotation Speed Setting) is set to 0, the frequency is monitored in units of [0.01 Hz]. Torque Actual 4 - 12 Actual torque monitor. Unit: [%] DeviceNet Communications Unit User’s Manual (I581-E1) 4 Remote I/O 4-3-3 Extended Control I/O (101/151/153) Extended Control I/O Output Assembly ID: 101 Dec (65 hex) Output Format (CS1/CJ1-series Inverter) Bit Allocation Word No. Byte No. bit 7 bit 6 bit 5 bit 4 bit 3 bit 2 bit 1 bit 0 n 0 CI8 CI7 CI6 CI5 CI4 CI3 RV FW 1 CO2 CO1 CR CO5 CO4 CO3 RS EXT n+1 n+2 Rotation Speed Reference (Low byte) 3 Rotation Speed Reference (High byte) 4 Torque Reference (Low byte) 5 Torque Reference (High byte) 6 Torque Compensation Bias (Low byte) 7 Torque Compensation Bias (High byte) 4 4-3-3 Extended Control I/O (101/151/153) n+3 2 Output Bit/Data Details Name Description FW Forward/Stop 0: Stop 1: Forward RV Reverse/Stop 0: Stop 1: Reverse CI3 to CI7 Multi-function Input Follows the setting of each multi-function input (C003 to C008). 0: OFF 1: ON CI8 Multi-function input [8] Follows the setting of each multi-function input (C003 to C008). 0: OFF 1: ON EXT External trip 0: – 1: External fault RS Reset 0: – 1: Fault reset CR Multi-function Contact Output CO1, CO2 Multi-function Output If a multi-function output (C021 to C026) is set to 63 (OPO: Option Board), you can control the corresponding inverter multi-function output. 0: OFF 1: ON CO3 to CO5 Multi-function Output If a multi-function output (C021 to C026) is set to 63 (OPO: Option Board), you can control the corresponding inverter multi-function output. 0: OFF 1: ON DeviceNet Communications Unit User’s Manual (I581-E1) 4-3 Remote I/O with Torque Reference Support Extended Control I/O is OMRON's unique Remote I/O not defined in the DeviceNet specifications. This type of Remote I/O is optimized for the input/output function of Inverters, allowing you to select each input/output function by setting a multi-function input/output parameter. 4 - 13 4 Remote I/O Name Description Rotation Speed Reference If parameter P049 (Number of Poles for Rotation Speed Setting) is set appropriately, the rotational speed unit is [min-1]. If parameter P049 (Number of Poles for Rotation Speed Setting) is set to 0, the frequency is monitored in units of [0.01 Hz]. Torque Reference Reference torque: Unit: [%] Torque Compensation Bias Compensation bias torque. Unit: [%] Precautions for Safe Use For safety reasons, the FWD, RV, and RS command must be output after the cause of fault/trip is removed. Extended Control I/O Input Assembly ID: 151 Dec (97 hex) Input Format (CS1/CJ1-series Inverter) Bit Allocation Word No. Byte No. bit 7 bit 6 bit 5 bit 4 bit 3 bit 2 bit 1 bit 0 n 0 AL WR IRDY FA1 – RVR ZS FWR 1 MO4 MO3 MO2 MO1 MR CFN – – n+1 n+2 n+3 2 Rotation Speed Monitor (Low byte) 3 Rotation Speed Monitor (High byte) 4 Torque Actual (Low byte) 5 Torque Actual (High byte) 6 Output Current Monitor (Low byte) 7 Output Current Monitor (High byte) Input Bit/Data Details Name 4 - 14 Description FWR During forward operation 0: During reverse run/Stopping 1: During forward run ZS 0 Hz 0: At non-zero speed 1: At zero speed RVR During reverse operation 0: During forward run/Stopping 1: During reverse run FA1 Constant speed reached 0: Accelerating or decelerating/Stopping 1: Frequency agree IRDY Operation ready 0: Not ready 1: Ready WR Warning 0: Normal 1: Warning AL Alarm output 0: Normal 1: Fault/Trip CFN Ctrl. from Net 0: Follow the setting of parameter A002. 1: DeviceNet reference MO1, MO2, MR Multi-function (Contact) Output Follows the setting of each multi-function input (C021 to C026). 0: OFF 1: ON DeviceNet Communications Unit User’s Manual (I581-E1) 4 Remote I/O Name Multi-function Output Rotation Speed Monitor Follows the setting of each multi-function input (C021 to C026). 0: OFF 1: ON If parameter P049 (Number of Poles for Rotation Speed Setting) is set appropriately, the rotational speed unit is [min-1]. If parameter P049 (Number of Poles for Rotation Speed Setting) is set to 0, the frequency is monitored in units of [0.01 Hz]. Torque Actual Actual torque monitor. Unit: [%] Output Current Monitor Unit: [0.1 A] 4-3-4 Extended Control I/O and Multi function I/O Monitor (101/153) This is the Extended Control I/O function with an additional Multi-function Input Monitor function. The output format (CS/CJ series Inverter) is the same as that of Extended Control I/O. The input format (CS/CJ series Inverter) is as shown below. 4-3 Remote I/O with Torque Reference Support MO3, MO4 Description 4 Input Format (CS1/CJ1-series Inverter) Bit Allocation Word No. Byte No. bit 7 bit 6 bit 5 bit 4 bit 3 bit 2 bit 1 bit 0 n 0 AL WR IRDY FA1 – RVR ZS FWR 1 MO4 MO3 MO2 MO1 MR CFN – – MI2 MI1 n+1 n+2 n+3 n+4 2 Rotation Speed Monitor (Low byte) 3 Rotation Speed Monitor (High byte) 4 Torque Actual (Low byte) 5 Torque Actual (High byte) 6 Output Current Monitor (Low byte) 7 Output Current Monitor (High byte) 8 MI8 MI7 MI6 MI5 MI4 MI3 Input Bit/Data Details Name Description FWR During forward operation 0: During reverse run/Stopping 1: During forward run ZS 0 Hz 0: At non-zero speed 1: At zero speed RVR During reverse operation 0: During forward run/Stopping 1: During reverse run FA1 Constant speed reached 0: Accelerating or decelerating/Stopping 1: Frequency agree IRDY Operation ready 0: Not ready 1: Ready WR Warning 0: Normal 1: Warning DeviceNet Communications Unit User’s Manual (I581-E1) 4 - 15 4-3-4 Extended Control I/O and Multi function I/O Monitor (101/153) Extended Control I/O and Multi function I/O Monitor Assembly ID: 153 Dec (99 hex) 4 Remote I/O Name Description AL Alarm output 0: Normal 1: Fault/Trip CFN Ctrl. from Net 0: Follow the setting of parameter A002. 1: DeviceNet reference MO1, MO2, MR Multi-function (Contact) Output Follows the setting of each multi-function input (C021 to C026). 0: OFF 1: ON MO3, MO4 Multi-function Output Follows the setting of each multi-function input (C021 to C026). 0: OFF 1: ON Rotation Speed Monitor If parameter P049 (Number of Poles for Rotation Speed Setting) is set appropriately, the rotational speed unit is [min-1]. If parameter P049 (Number of Poles for Rotation Speed Setting) is set to 0, the frequency is monitored in units of [0.01 Hz]. 4 - 16 Torque Actual Actual torque monitor. Unit: [%] Output Current Monitor Unit: [0.1 A] MI1 to MI7 Multi-function Input Follows the setting of each multi-function input (C001 to C008). By setting these parameters to 255 (No allocation), you can use the inverter's multi-function inputs as general-purpose host inputs. 0: OFF 1: ON MI8 Multi-function Input Follows the setting of each multi-function input (C001 to C008). By setting these parameters to 255 (No allocation), you can use the inverter's multi-function inputs as general-purpose host inputs. 0: OFF 1: ON DeviceNet Communications Unit User’s Manual (I581-E1) 4 Remote I/O 4-4 Special I/O and Flexible Format 4-4-1 Frequency Reference/RUN Command Selection Destination Selection Parameter Settings Parameter 4-4-2 Description Setting A001 1st Frequency Reference Selection 03: Modbus communication (Modbus-RTU) A002 1st RUN Command Selection 4 Special I/O (100/150) Special Remote Output Assembly ID: 100 Dec (64 hex) Output Format (CS1/CJ1-series Inverter) Byte No. n 0 n+1 n+2 n+3 Bit Allocation bit 7 bit 6 bit 5 bit 4 bit 3 bit 1 bit 0 Function Code 1 (Set 0.) 2 First Register No. (Low byte) 3 First Register No. (High byte) 4 Data 0 (Low byte) 5 Data 0 (High byte) 6 Data 1 (Low byte) 7 Data 1 (High byte) DeviceNet Communications Unit User’s Manual (I581-E1) bit 2 4 - 17 4-4-1 Frequency Reference/RUN Command Selection Special I/O is OMRON's unique Remote I/O not defined in the DeviceNet specifications. This Remote I/O enables access to inverter's internal parameter areas via Modbus communication. Special I/O enables you to read/write data for two consecutive register numbers by setting the function code. In addition, you can also read/write data to/from more than one register by switching the function code/register number at fixed intervals using a host program. In this case, on the host, check that the register numbers match before handing the communications. Once the register number set for output matches the register number displayed for input, proceed to the next register number setting step. Word No. 4-4 Special I/O and Flexible Format Special I/O and Flexible Format are types of Remote I/O that utilize Modbus communication. This means that, only when using Special I/O or Flexible Format, you specify Modbus communication as an input method for the frequency reference and RUN command. 4 Remote I/O Output Bit/Data Details Name Description Function Code*1 10: Write data (1 word) 03: Read data (1 word) 50: Write data (Consecutive 2 words) 43: Read data (Consecutive 2 words) Register No. Write the register number corresponding to the inverter parameter. Data 0, 1 Set the data to write to the specified register. Set Data 1 to "0" to write one word of data. *1 Note that these codes are not the same as the Explicit Message service code/Modbus communication function code. Precautions for Correct Use The register number and read/write data are the same as those for Modbus communication. For these settings, refer to Section 6-8 Modbus Communication (Modbus-RTU) Data List of the MX2 User's Manual (Cat. No. I570) and 8-5 Modbus Communication Register Number List of the RX User's Manual (Cat. No. I578). Special Remote Input Assembly ID: 150 Dec (96 hex) Input Format (CS1/CJ1-series Inverter) Bit Allocation Word No. Byte No. n 0 Function Code 1 – n+1 n+2 n+3 bit 7 bit 6 bit 5 bit 4 bit 3 2 First Register No. (Low byte) 3 First Register No. (High byte) 4 Data 0 (Low byte) 5 Data 0 (High byte) 6 Data 1 (Low byte) 7 Data 1 (High byte) bit 2 bit 1 bit 0 Input Bit/Data Details Word No. Byte No. Write Success Read Success Failure n 0 0x10 / 0x50 0x03 / 0x43 Function Code OR'ed with 0x80 for Each bit 1 – – – n+1 4 - 18 2 First Register No. (Low byte) 3 First Register No. (High byte) n+2 4 – Data 0 (Low byte) n+3 7 Error Code 5 – Data 0 (High byte) – 6 – Data 1 (Low byte) – – Data 1 (High byte) – DeviceNet Communications Unit User’s Manual (I581-E1) 4 Remote I/O Precautions for Correct Use The register number and read/write data are the same as those for Modbus communication. For these settings, refer to Section 6-8 Modbus Communication (Modbus-RTU) Data List of the MX2 User's Manual (Cat. No. I570) and 8-5 Modbus Communication Register Number List of the RX User's Manual (Cat. No. I578). Special Remote Input Error Codes Error Code Name Description Function Code Error A code other than 03/10/43 or 50 hex is set as function code. 02 hex Register No. Error The specified register number does not exist. 04 hex Slave Device Error The Option Board failed to communicate with the inverter. 21 hex Data Setting Error An upper or lower limit for the write data setting range is exceeded. 22 hex Write Mode Error Writing to a register that is write-prohibited or in a read-only state (for example, during operation). 23 hex Register Size Error Reading/Writing 2-byte data from/to a 4-byte register or 4-byte data from/to a 2-byte register. Precautions for Correct Use If a Special I/O read/write error occurs, the most significant bit (word address n, bit 7) of the function code turns ON. Prepare a program that starts error processing from this bit on the host. Reading/Writing Input/Output Bit Data (Modbus Coil Information) In Modbus communication, the MX2/RX-series Inverters set control input, status monitor, or other bit information as coil information. This means that you cannot set/check data by reading/writing from/to communications registers. Use the following registers provided to enable reading/writing of input and output bit information. Register No. 1F01 hex for DeviceNet output (Inverter control input) Bit 15 14 13 12 11 10 9 8 7 Name – In8 In7 In6 In5 In4 In3 In2 In1 Value 0 0 0 0 0 0 0 0 0 6 5 4 3 2 1 0 – – RS EXT Dir Opr – 0 0 0 0 0 0 0 Opr RUN command (0: Stop/1: Run) In3 General-purpose output terminal [3] Dir Rotation direction command (0: Forward/1: Reverse) In4 General-purpose output terminal [4] EXT External trip In5 General-purpose output terminal [5] RS Reset In6 General-purpose output terminal [6] In1 General-purpose output terminal [1] In7 General-purpose output terminal [7] In2 General-purpose output terminal [2] In8 General-purpose output terminal [8] DeviceNet Communications Unit User’s Manual (I581-E1) 4 - 19 4 4-4-2 Special I/O (100/150) 01 hex 4-4 Special I/O and Flexible Format The error codes for the Special IO operation are listed below. 4 Remote I/O Register No. 1E01 hex for DeviceNet input (Inverter status monitor) 4-4-3 Bit 15 14 13 12 11 10 9 8 7 6 5 4 3 2 1 0 Name ONT RNT TRQ UV – OTQ FA3 AL OD OL FA2 FA1 RUN – IRDY Dir Value 0 0 0 0 0 0 0 0 0 0 0 0 0 0 1 0 Dir Rotation direction (0: Forward/1: Reverse) AL Alarm output IRDY Operation ready FA3 Set frequency only RUN During RUN OTQ Overtorque/Undertorque FA1 Constant speed reached UV During undervoltage FA2 Set frequency exceeded TRQ During torque limit OL Overload warning RNT RUN time over OD Excessive PID deviation ONT Power ON time over Flexible Format (139/159) Flexible Format is OMRON's unique Remote I/O not defined in the DeviceNet specifications. This Remote I/O enables you to allocate more than one data value including those in inverter's internal parameter areas via Modbus communication. You can select the data to allocate using parameters P160 to P179. • Any data can be selected from all Modbus registers. • This Remote I/O helps minimize the communications traffic because it sets only the I/O data required for communications. Flexible Format I/O Allocation The relationship between Flexible I/O and inverter parameters is as follows. Flexible Format I/O Allocation Word Offset 4 - 20 Description Output Area Input Area +0 Modbus register set by P160 Modbus register set by P170 +1 Modbus register set by P161 Modbus register set by P171 +2 Modbus register set by P162 Modbus register set by P172 +3 Modbus register set by P163 Modbus register set by P173 +4 Modbus register set by P164 Modbus register set by P174 +5 Modbus register set by P165 Modbus register set by P175 +6 Modbus register set by P166 Modbus register set by P176 +7 Modbus register set by P167 Modbus register set by P177 +8 Modbus register set by P168 Modbus register set by P178 +9 Modbus register set by P169 Modbus register set by P179 DeviceNet Communications Unit User’s Manual (I581-E1) 4 Remote I/O Flexible Format Configuration • Start configuring the parameters from P160 or P170 in order and, when finished configuring the last Modbus register, be sure to set the remaining parameters to 0000 (zero). Setting a parameter to 0000 (zero) causes the register setting to be ignored and not allocated to Remote I/O. The number of words occupied by Remote I/O will be the number of allocated input registers (for input) and the number of allocated output registers (for output). • Be sure to allocate non-zero registers at least once in the outputs/inputs area of Remote I/O. • It is not allowed to allocate the same register more than once in the output area of Remote I/O. • Be sure to configure registers that can always be written to for the output area of Remote I/O. • Double-word registers must be allocated with two consecutive Modbus registers, firstly the high word and secondly the low word. • Communications data will be written constantly to register numbers which are allocated to the output area of Remote I/O. If you set any of the following write-prohibited parameters, an error will be detected in the DeviceNet Communications Unit. Write-prohibited Parameters Registers write-prohibited during operation Parameters which are write-prohibited in the Light Load mode. (When using the Light Load mode.) Parameters which are protected by parameter b031 (Soft Lock Selection) (Set b031 = 10 to cancel.) • In the output area of Remote I/O, double-word registers allow only the low word to be set for the output area of Remote I/O. In this case, the high-word data is always set to 0000. However, for the input area of Remote I/O, it is not possible to set only the low word. • For reading/writing input or output bit data (Modbus coil information), use register No. 1F01 hex (inverter control input) or register No. 1E01 hex (inverter status monitor) as described in 4-4-2 Special I/O (100/150) on page 4-17, respectively. • If there is any incorrect setting in parameters P160 to 179, an error will be detected (the MS LED will blink red), causing the inverter to be in a trip state (error code E64). In such a case, correct the incorrect parameter value and cycle the power supply of the inverter. • When using the Flexible Format function, the number of words occupied by the DeviceNet Communications Unit changes. After cycling the power supply of the inverter, change the number of occupied words on the Master Unit. Additional Information Refer to the following information for a Modbus register list: Holding Register List in 6-8 Modbus Communication (Modbus-RTU) Data List (ii) of the MX2 User's Manual (Cat. No. I570) 8-5 Modbus Communication Register Number List of the RX-series Manual (Cat. No. I578). DeviceNet Communications Unit User’s Manual (I581-E1) 4 - 21 4 4-4-3 Flexible Format (139/159) Precautions for Correct Use 4-4 Special I/O and Flexible Format Configure the Modbus registers for the functions you want to allocate to the Remote I/O outputs using parameters P160 to P169 and to the Remote I/O inputs using parameters P170 to P179, respectively. A maximum of 10 words can be allocated for both input and output. After completing the following configuration steps, cycle the power supply of the inverter (DeviceNet Communications Unit). 4 Remote I/O 4-5 When to Input the RUN Command after Establishment of Communications For safety reasons, this DeviceNet Communications Unit is designed to ignore the input of the RUN command (Forward/Stop or Reverse/Stop) executed (turned ON) before communications are established. This section describes when to input the RUN command via DeviceNet after establishment of communications. Communication Connection Process and Establishment of Communications The DeviceNet Communications Unit executes the process of communication connection with the Master Unit in any of the following situations to establish communications. You can check whether or not communications are established with the Normal Slave Table on the Master Unit. • When the inverter (DeviceNet Communications Unit) is powered on. • When the inverter (DeviceNet Communications Unit) is reset. • When communications are re-established from the Master Unit. • When the inverter (DeviceNet Communications Unit) is newly connected to the network When to Input the RUN Command The RUN command (Forward/Stop or Reverse/Stop) must be input to the DeviceNet Communications Unit in the following timing after communications are established. • Upon establishment of communications, the DeviceNet Communications Unit sends the inverter ready signal. • After confirming the Inverter ready signal, the RUN command is input. • If the DeviceNet Communications Unit recognizes the RUN command successfully and the inverter moves to a RUN state, it outputs the inverter running (During forward run or During reverse run) signal. DeviceNet Communications Unit input power supply Normal Slave (Communications established/not established) ON Time ON ON Inverter ready Inverter RUN command (Forward/Stop) ON ON Inverter running (During forward run) Max. 50 ms + 2 communications cycles*1 4 - 22 DeviceNet Communications Unit User’s Manual (I581-E1) 4 Remote I/O 4-5 When to Input the RUN Command after Establishment of Communications *1 You can check the communication cycle time of DeviceNet communications using CX-Integrator. When the network configuration is displayed in CX-Integrator, double-click the Master Unit icon to display the [Edit Device Parameters] window. In the [Communication Cycle Time] tab, check the [Communication Cycle Time (Auto Setting)] value. Because the Communication Cycle Time of DeviceNet communications varies depending on the network configuration, after network configuration changes, be sure to check the Communication Cycle Time and, when necessary, review the input timing of the RUN command. 4 Additional Information For how to calculate the accurate communication cycle time of DeviceNet communications, refer to Section 8-1 Remote I/O Communications Performance of the CS/CJ-series DeviceNet Units Operation Manual (W380). Precautions for Correct Use • In any of the following situations, for safety reasons, turn OFF the inverter RUN command from the host program. When the system power supply is OFF, an error occurs, or the Reset command is input to the inverter. • If the inverter fails to move to the RUN state, once turn OFF the RUN command and input the command again. • With a third-party Master, the IDLE (communication not ready) message may persist after establishment of communications. In such a case, wait until the IDLE message disappears and, after communications are started normally, secure a sufficient wait time so that the DeviceNet Communications Unit can recognize the RUN command OFF state. • DeviceNet Communications Unit may not recognize the RUN command OFF state if normal communications are blocked due to noise or other problems since establishment of communications. In this case, take measures against noise for the entire network. DeviceNet Communications Unit User’s Manual (I581-E1) 4 - 23 4 Remote I/O 4 - 24 DeviceNet Communications Unit User’s Manual (I581-E1) Message Communications This section describes how to read/write inverter parameters by the Message communications function (DeviceNet Explicit Message). 5-1 Outline of Explicit Message . . . . . . . . . . . . . . . . . . . . . . . . . . . . . . . . . . . . . 5-2 5-2 Sending Messages from CS/CJ-series . . . . . . . . . . . . . . . . . . . . . . . . . . . . . 5-3 5-2-1 5-2-2 How to Issue Explicit Messages by CMND Instruction . . . . . . . . . . . . . . . . . . . 5-3 When to Issue/Read an Explicit Message . . . . . . . . . . . . . . . . . . . . . . . . . . . . 5-6 5-3 Outline of Message Function and Response . . . . . . . . . . . . . . . . . . . . . . . 5-8 5-4 Parameter Read/Write (Class 64 hex) . . . . . . . . . . . . . . . . . . . . . . . . . . . . . 5-11 5-4-1 5-4-2 5-4-3 5-4-4 5-4-5 5-4-6 Supported Service Codes . . . . . . . . . . . . . . . . . . . . . . . . . . . . . . . . . . . . . . . . .5-11 Parameter Data Size . . . . . . . . . . . . . . . . . . . . . . . . . . . . . . . . . . . . . . . . . . . . .5-11 Parameter Read/Write Data . . . . . . . . . . . . . . . . . . . . . . . . . . . . . . . . . . . . . . 5-12 Saving Changes to Holding Registers (ENTER Command) . . . . . . . . . . . . . . 5-13 Parameter Class/Instance/Attribute . . . . . . . . . . . . . . . . . . . . . . . . . . . . . . . . 5-13 Ladder Programming Example . . . . . . . . . . . . . . . . . . . . . . . . . . . . . . . . . . . . 5-14 5-5 Parameter Read/Write (Class 65 hex) . . . . . . . . . . . . . . . . . . . . . . . . . . . . . 5-15 5-5-1 5-5-2 Supported Service Codes . . . . . . . . . . . . . . . . . . . . . . . . . . . . . . . . . . . . . . . . 5-15 Supported Instance and Attribute Codes . . . . . . . . . . . . . . . . . . . . . . . . . . . . 5-15 DeviceNet Communications Unit User’s Manual (I581-E1) 5-1 5 5 Message Communications 5-1 Outline of Explicit Message Explicit Message is a Message communications function defined in the DeviceNet specifications. It uses the Node Address, Service Code, Class, Instance, Attribute, and other data to achieve Message communications. Because the communications frame of an Explicit Message is standardized in the DeviceNet specifications, the DeviceNet Communications Unit can perform Message communications even with third-party Masters. Explicit Messages are sent/received as follows: In Explicit Message communication, data is sent/received basically in units of 1 byte (8 bits). Explicit Message Communications Frame Header Node Address Service Code Class Item 5-2 Instance Attribute Data Footer Description Header The start of the Explicit Message. It shows that this frame is for an Explicit Message request or a response to an Explicit Message. This segment is set by DeviceNet transparently to the user. Node Address Request: Set the node address of the Slave/Master to send a request. Response: The node address of the Slave/Master that returns a response is set. Service Code Request: Set the service code for a request (read/write etc.). Response: The service code of the requested service is returned, with the value of the most significant bit (MSB) changed to 1. Class Functional category (Major category) Instance Item category (Minor item) Attribute Attribute (The set value of each function is allocated.) Data Request: Set the data to write, etc. Response: The requested data to be read or error message is attached. Footer The end of the Explicit Message. It is used for the CRC check etc. This segment is set by DeviceNet transparently to the user. These show categories of each function which are defined in the DeviceNet specifications. Use these three codes to specify a function. DeviceNet Communications Unit User’s Manual (I581-E1) 5 Message Communications 5-2 Sending Messages from CS/CJ-series This section describes how to send/receive messages using the Master Unit (Model: CS1W-DRM21 (-V1)/CJ1W-DRM21). How to Issue Explicit Messages by CMND Instruction The Master Unit (Model: CS1W-DRM21 (-V1)/CJ1W-DRM21) uses the CMND instruction to issue Explicit Messages. To issue an Explicit Message, be sure to attach the FINS command (2801) at the beginning and issue it to the Master Unit. Upon receipt of this command, the Master Unit transforms the command data to an Explicit Message and transfer the message to the destination node. You cannot directly specify the destination node using the CMND instruction when issuing an explicit message. (↑) CMND (490) S D C 5 S: First Word Address of Command Storage Area S Bit No. 15 to 8 7 to Command code (Set the FINS Explicit Message command (2801).) S+1 Node address of the Slave/Master to which the Explicit Message is sent: 0 to 3F hex (0 to 63) S+2 Class ID code (Set the DeviceNet Class code of the target function.)*1 Explicit Message service codes Write: 10, Read: 0E S+3 Instance ID code (Set the DeviceNet Instance code of the target function.) S+4 Attribute ID code (Set the DeviceNet Attribute code of the target function.) … 0 Attachment data (in case of a write request etc.) Attachment data (in case of a write request etc.) *1 For the DeviceNet Communications Unit on an inverter, set 0001 to 002A, 0064, 0065, or 0094 hex. DeviceNet Communications Unit User’s Manual (I581-E1) 5-3 5-2-1 How to Issue Explicit Messages by CMND Instruction Set the first word address of the command data to transfer to the DeviceNet Master Unit. Previously set the data to transfer to consecutive word addresses as shown below. Word Address 5-2 Sending Messages from CS/CJ-series 5-2-1 5 Message Communications D: First Word Address of Response Storage Area Set the first word address of the area to store the response to the Explicit Message. Precautions for Correct Use • When the CMND instruction issues an Explicit Message, due to the following reason, the attachment data to the Explicit Message is sent in reverse order of high and low bytes. Data on communications lines: Sent in order of low byte (L) to high byte (H). Data processed in PLC: Sent in order of high byte (H) to low byte (L). The attachment data in a response will also be sent in this order. Note this when sending or receiving a single-word (16-bit) or double-word (32-bit) data. Most inverter parameters take single-word data, except for the frequency reference, output frequency, and other parameters that take single-word data. Example) In an Explicit Message communications, single-word data 1234 hex will be sent in order of 34 hex to 12 hex on a communications line. On the other hand, double-word data 12345678 hex will be sent in order of 78 hex, 56 hex, 34 hex, and 12 hex. Command Format Example: 1234 hex 34 Example: 12345678 hex 12 78 Service Data 56 34 12 Service Data Therefore, in the CMND instruction, set the data in operand S+4 and onwards as follows. Example: 1234 hex Example: 12345678 hex When setting from high byte 15 bit S+4 08 07 34 00 When setting from high byte S+4 12 When setting from low byte bit 15 08 07 S+4 00 34 12 15 bit 08 07 00 78 56 34 12 When setting from low byte bit 15 08 07 S+4 00 78 56 34 12 5-4 DeviceNet Communications Unit User’s Manual (I581-E1) 5 Message Communications C: First Word Address of Control Data Set the first word address to configure the required control data for Message communications. The DeviceNet Master Unit requires that the following control data is previously set to consecutive word addresses. Word Address Bit No. 15 14 to 8 7 to Number of bytes of command data: 0000 to 021E hex (0 to 542 bytes) C+1 Number of bytes of response data: 0000 to 021E hex (0 to 542 bytes)*2 C+2 Network address: 0000 to 007F hex (0 to 127)*3 C+3 Command destination node address 0 *1 Command destination unit address*5 *4 :00 to 3F hex (0 to 63)* C+4 C+5 Response*6 Communications port number: Number of sends: 00 to 0F hex 0 to 7*7 (0 to 15)*8 Response monitor time: 0000 hex 2 s [in units of 0.1 0001 to FFFF hex 0.1 to 6553.5 s s] *9 DeviceNet Communications Unit User’s Manual (I581-E1) 5-5 5 5-2-1 How to Issue Explicit Messages by CMND Instruction *1 Set how many bytes the command data storage area occupies from first word address S. *2 Set how many bytes the response data storage area occupies from first word address D. *3 The setting of 0000 hex indicates the local network. To use the CMND instruction on the CS/CJ-series, you need to set a network address for each DeviceNet Master Unit. These network addresses can be edited using the routing table editing function of your peripheral tool (except for the programming console). *4 The node address of the destination Master Unit. If you set this to 00 hex when word address C + 2 is 0000 hex (local network), the destination is set to the local node. *5 Set this to FE (Master Unit) or set the Master Unit's unit number 10 to 1F hex (0 to 15). *6 In word address C + 4, bit 15, set whether the response is required (0) or not required (1). For Explicit Messages, this must be set to 0 (Response required). *7 Set the port used for DeviceNet. *8 Set the how many times the message is to be resent in case of an error response. *9 For Explicit Messages, this must be set to 2 seconds or more. 5-2 Sending Messages from CS/CJ-series C 5 Message Communications 5-2-2 When to Issue/Read an Explicit Message An example of input conditions for issuing the CMND instruction is shown below. Note that the CMND instruction can be executed only once per communications port. Do not execute the CMND instruction when the Network Communications Command Execution Enabled Flag corresponding to each port is set to 0 (OFF). When to Issue an Explicit Message The CMND instruction must be issued with a condition which the CS/CJ-series unit's Network Communications Command Execution Enabled Flag and the Master Unit's Message Communications Enabled Flag AND are set. Command Execution Condition Network Communications Command Online Status (or Message Communications Enabled Flag) Execution Enabled Flag (↑) CMND (490) S D C When to Read Response to an Explicit Message The response to an Explicit Message must be read at the rising edge of the Network Communications Command Execution Enabled Fag for each communications port. Network Communications Command Execution Enabled Flag Response Read Process 5-6 DeviceNet Communications Unit User’s Manual (I581-E1) 5 Message Communications Flags Related to DeviceNet Communications Type Flag Name Address Word Network Communications Command Execution Error Flag A219 7 6 5 4 3 2 1 0 Port 0 Port 1 Port 2 Port 3 Port 4 Port 5 Port 6 Port 7 Master Unit's Status Flag 7 6 5 4 3 2 1 0 Description 0: Execution disabled (Executing) 1: Execution enabled (Not Executing) 0: Terminated normally 1: Terminated abnormally Online Status 1500 +2 5 x Unit Number + 11 00 0: Offline 1: Online Message Communications Enabled Flag 1500 +2 5 x Unit Number + 24 12 Shows the same status as the online status.*1 0: Offline 1: Online 5-2 Sending Messages from CS/CJ-series A202 Port 0 Port 1 Port 2 Port 3 Port 4 Port 5 Port 6 Port 7 CS/CJ-series Network Communications Unit's Flag Command Execution Enabled Flag Bit *1 This function is compatible with that of C200HW-DRM21-V1. 5 Precautions for Correct Use DeviceNet Communications Unit User’s Manual (I581-E1) 5-2-2 When to Issue/Read an Explicit Message For details about the status flag, refer to 3-2 Allocated Relay Area of the CS/CJ-series DeviceNet Units Operation Manual (W380). 5-7 5 Message Communications 5-3 Outline of Message Function and Response When using the Message function, the DeviceNet Communications Unit on the inverter returns the response in the following method. In DeviceNet communications, data is sent/received basically in units of 1 byte (8 bits). For single-word (16-bit) data, the order of high and low bytes will be reversed due to the following reason. • Data on communications lines: Sent/received in order of low byte to high byte. • Data processed in programmable controller when issuing a command etc.: Sent/received in order of high byte to low byte. Therefore, for attributes indicated as "word" in the Size column of the tables provided in A-1 General Object Specifications on page A-2 and A-2 AC Drive Object Specifications on page A-14, create attachment data or read response data in reverse order of high and low bytes. Precautions for Correct Use For Remote I/O, this need not be considered because high and low bytes will be reversed automatically. Command Format 28 01 Command Code (FINS Command for CS/CJ) Max. 32 bytes Destination Service node address Code Class ID Instance ID Service Data (Attribute No. or Attribute No. + Write Data) Response Format Normal response 28 01 Command Code (FINS Command for CS/CJ) 00 00 End Code Max. 32 bytes No. of received bytes Destination Service node address Code Service Data (Read Data) Error response 28 01 Command Code (FINS Command for CS/CJ) 00 00 End Code 94 No. of received bytes Destination Service node address Code 2 bytes Error Code Send failure or timeout 28 01 Command Code FINS Command for CS/CJ) 5-8 End Code (FINS Error code) DeviceNet Communications Unit User’s Manual (I581-E1) 5 Message Communications The DeviceNet Communications Unit supports the following service codes. Service Codes Service Description Write Reset Command 0E hex 10 hex 05 hex Normal response 8E hex 90 hex 85 hex Parameter Details Destination Node Address (Command) This parameter specifies the destination node address for the Explicit Message. For the Send Explicit Message command, specify the Master Unit of the local node in the control data of the CMND instruction and the actual destination node in this parameter. Service Code (Command, Response) For a command, specify the service code defined in the DeviceNet network. For a normal response, a value will be returned with bit 15 of the service code in the command set to 1 (ON). For an error response, 94 hex, which indicates an error, will be returned. 5 Class ID (Command) Specify the destination Class ID for the Explicit Message. Instance ID (Command) Specify the destination Instance ID for the Explicit Message. Service Data (Command, Response) For a command, specify the data defined by the service code. For a response, the reception data defined by the service code will be returned. Number of Received bytes (Response) The number of bytes of data received from the destination (remote node) node address onwards will be returned. Destination (Remote Node) Node Address (Response) The remote node address of the response issuing source will be returned. Error Code (Response) The error code defined in the DeviceNet specifications will be returned. DeviceNet Communications Unit User’s Manual (I581-E1) 5-3 Outline of Message Function and Response Read 5-9 5 Message Communications Description • The Explicit Message Send Command sends the Explicit Message defined in the DeviceNet specifications to a Slave Unit and receives a response. • For the Explicit Message Send Command, unlike other FINS commands, specify the DeviceNet Master Unit as the destination of the control code in the CMND instruction and the actual destination node as the destination node address in the Explicit Message Send Command, respectively. Be sure to specify the Master Unit in the control code of the CMND instruction. Additional Information • For details about Explicit Message parameters, refer to the DeviceNet specifications. • For how to obtain the DeviceNet specifications, contact ODVA. Home Page: http://www.odva.org/ 5 - 10 DeviceNet Communications Unit User’s Manual (I581-E1) 5 Message Communications 5-4 Parameter Read/Write (Class 64 hex) Explicit messages can be used to read and write inverter parameters. The DeviceNet Communications Unit provides the Instance and Attribute registers corresponding to each parameter of the inverter in Class 64 hex (100 dec). According to the following instructions, set parameters in the corresponding Class, Instance, and Attribute registers to issue an Explicit Message. Supported Service Codes The service codes that support the Parameter Read/Write object (Class 64 hex) are shown below. Service Code No. (hex) 5-4-2 Service Description 0E Reads Attribute data. 10 Writes Attribute data. Parameter Data Size Single-word Parameters Most inverter parameters take single-word data, although some parameters take double-word data. Be sure to handle data as single-word data even if it is a small value such as 0 or 1. Double-word Parameters For double-word (32-bit) parameters such as the frequency reference and multi-step position command, two Attributes (each Modbus Register No.) are allocated. Use these Attributes (each Modbus Register No.) as appropriate as follows. • The high-level Attribute (each Modbus Register No.) indicated as HIGH takes double-word data. Data must be always all sent/received at the double-word (32-bit) size to/from this Attribute, regardless of the value to be sent. • The low-level Attribute (each Modbus Register No.) indicated as LOW takes single-word data. If the setting range “0 to 65535” is sufficient, this Attribute can be used for a single-word data. When writing data, set the high-level Attribute to “0000”. When reading data, an error will be detected if the value is larger than “65535”. In this case, use the high-level Attribute indicated as HIGH to handle it as double-word (32-bit) data. DeviceNet Communications Unit User’s Manual (I581-E1) 5 - 11 5 5-4-1 Supported Service Codes Inverter parameter can take data in two sizes, single-word (16-bit) data and double-word (32-bit) data. Fit the size appropriately to each Attribute data size (each Modbus Register No.) to send/receive data to/from Class 64 hex using Explicit Message. If the data size is inappropriate, you will receive an error response to the Explicit Message. Check the error code attached to the error response to correct the data size. 5-4 Parameter Read/Write (Class 64 hex) 5-4-1 5 Message Communications Precautions for Correct Use If single-word (16-bit) or double-word (32-bit) data is sent/received in an Explicit Message, the order of high and low bytes will be reversed due to the following reason. Therefore, in the Parameter Read/Write data, the Attribute value is located in high byte and the low byte of data is located in low byte. The high byte of data is located in high byte of the next word. • Data on communications lines: Sent/received in order of low byte to high byte. • Data processed in PLC when issuing a command etc.: Sent/received in order of high byte to low byte. 5-4-3 Parameter Read/Write Data The Parameter Read/Write data is calculated according to the rules below and sent/received as a hexadecimal value. • The set value is divided by the data resolution and converted into a hexadecimal value. Precautions for Correct Use The data resolution indicates the minimum setting unit for each Modbus register. Example: If the output frequency setting is 60 Hz and the data resolution is 0.01 Hz 60 / 0.01 = 6000 1770 hex • Any negative value is represented as a 2's complement number. Example: If the Torque Bias Value (P037) is set to -100% and the data resolution is 0.01 Hz (for 3G3MX2) 100 / 1 = 100 dec 0064 hex, -100% FF9C hex 0064 hex = 0 0 0 0 0 0 0 0 0 1 1 0 0 1 0 0 bit reversed 1 1 1 1 1 1 1 1 1 0 0 1 1 0 1 1 = FF9B hex +1 1 1 1 1 1 1 1 1 1 0 0 1 1 1 0 0 = FF9C hex • If the set data is already represented in a hexadecimal form, the data will be sent without converting. • Each unused bits must be set to 0. • Do not set data in any unused register. 5 - 12 DeviceNet Communications Unit User’s Manual (I581-E1) 5 Message Communications 5-4-4 Saving Changes to Holding Registers (ENTER Command) Using an Explicit Message to set data in each Attribute causes the new data to overwrite the existing data. However, this new data is not stored in EEPROM and will be lost when the inverter is powered off. To save changes to the holding registers into EEPROM, you need to issue the ENTER command using the method shown below. In addition, if you have changed a control parameter, you must recalculate the motor parameters. In this case also, use the ENTER command to execute recalculation. To issue the ENTER command (Write to EEPROM), send an Explicit Message to the following Attribute. At this time, select the value to be written using the following table. Class: 64 hex, Instance: 09 hex, Attribute: 00 hex (Register: 0900 hex) Set Value Description 0000 Recalculates the motor parameters. 0001 Stores the set values. 0002 to FFFF Recalculates the motor parameters and stores the set values. 5 Precautions for Correct Use Item Function Code Item A003/A203 Base Frequency H003/H203 Motor Capacity A004/A204 Maximum Frequency H004/H204 Motor Pole Number A044/A244 Control Method H005/H205 Speed Response A082/A282 Motor Incoming Voltage Selection H020/H220 to H024/H224 Various Motor Parameter b112 Free V/f Frequency 7 H030/H230 to H034/H234 Various Motor Parameter (Auto-tuning Data) H002/H202 Motor Parameter • Because the inverter EEPROM has a limitation in the number of overwrites (approximately 100,000 times), frequent use of the ENTER command may reduce the life expectancy of the inverter. 5-4-5 Parameter Class/Instance/Attribute To specify each parameter of the register object in Class 64 hex, use the Modbus register number. Set high byte of the Modbus register to Instance and low byte to Attribute. For a complete list of Modbus register numbers for each inverter function and parameter, refer to Section 6-8 Modbus Communication (Modbus-RTU) Data List of the MX2 User's Manual (Cat. No. I570) and 8-5 Modbus Communication Register Number List of the RX User's Manual (Cat. No. I578). DeviceNet Communications Unit User’s Manual (I581-E1) 5 - 13 5-4-4 Saving Changes to Holding Registers (ENTER Command) • If you change any of the following parameters, you must recalculate the motor parameters by writing a value of 0000 or 0002 hex to the holding register for the ENTER command. Parameters that require recalculation of motor parameters Function Code 5-4 Parameter Read/Write (Class 64 hex) How to Issue ENTER Command (Common to the MX2/RX-series) 5 Message Communications 5-4-6 Ladder Programming Example Ladder Programming Example The following is an example of a program that writes a value of 7.00 s (2BC hex in unit of 0.01 s) into parameter F002 1st Acceleration Time Setting (Modbus Register No. 1103 hex). Parameter F002 1st Acceleration Time Setting takes double-word data. A20011 (071) BSET #0000 D00000 D02999 000000 Sets D00000 to D02999 to #0000. P_First_Cycle (1 Cycle ON at Operation Start Sets D00000 to #000D. (Number of bytes of sent data: 13) flag) (021) MOV #000A D00001 (021) MOV #0001 D00002 (021) MOV #05FE D00003 (021) MOV #0000 D00004 Sets D00001 to #000A. (Number of bytes of received data: 10) Sets D00002 to #0001. (Destination network address 01) Sets D00003 to #05FE. (Destination node address 05, Destination unit address FE) Sets D00004 to #0000. (Response required, Communications port No. 0, No. of resends 0) Sets D00005 to #000A. (Response monitor time 1.0 s) Sets D01000 to #2801. (Explicit command) Sets D10001 to #0B01. Sets D10002 to #0064. Sets D10003 to #0011. (Command data) Sets D10004 to #03BC. Sets D10005 to #0200. Sets D10006 to #00--. Command Execution Condition 000000 Sets 0000CH to #0001. A20200 151100 000014 Wait for Command Execution Completion 000001 Network Online Status Communications (Word address Command Execution n + 11, bit 00) Enabled A20200 A21900 000019 Network Network Communications Communications Command Command Execution Execution Error Enabled A21900 000025 (490) CMND D01000 D02000 D00000 (025) ASL 0000 (021) MOV A203 D00006 (026) ASR 0000 (001) END Issues 9 bytes of command data from D01000 to destination node address 05 and stores 10 bytes of response data to D02000 on local node (D00000: Control data) Shifts contents of word address 0000 one bit to left (to turn 000001 ON). Stores A203 (Network communications response code) in D00006. Shifts contents of word address 0000 one bit to right and retry in next cycle (to turn 000000 ON). Ends if successful. END 5 - 14 DeviceNet Communications Unit User’s Manual (I581-E1) 5 Message Communications 5-5 5-5-1 Parameter Read/Write (Class 65 hex) Supported Service Codes Function Code Object (Class 65 hex) - Supported Service Codes 5-5-2 Service Description 0E Reads Attribute data. 10 Writes Attribute data. Supported Instance and Attribute Codes Use each inverter parameter number as a function code for the Instance and Attribute. A function code is calculated using a sequence number of the parameter function group (A = 0, B = 1, etc) x 1000 + the 3-digit parameter number. This function code is used to allocate the Instance (2 high bytes) and Attribute (2 low bytes). Function Code Object (Class 0x65) - Supported Instance and Attribute Codes Function Code Decimal Range 0 1 - 999 0001 to 03E7 b001 to b999 1000 1000 - 1999 03E9 to 07CF C001 to C999 2000 2001 - 2999 07D1 to 0BB7 d001 to d999 3000 3001 - 3999 0BB9 to 0F9F F001 to F999 5000 5001 - 5999 1389 to 176F H001 to H999 7000 7001 - 7999 1B59 to 1F3F P001 to P999 15000 15001 - 15999 3A99 to 3E7F U001 to U999 20000 20001 - 20999 4E21 to 5207 Additional Information • For details about Modbus registers and data sizes, refer to section 6-8 Modbus Communication (Modbus-RTU) Data List of the MX2 User's Manual (Cat. No. I570) and 8-5 Modbus Communication Register Number List of the RX User's Manual (Cat. No. I578). • All data written by the function code object are saved temporary in the inverter memory. Be sure to execute the ENTER command at the end of the writing sequence to store the values in EEPROM. • Function code F001 cannot be written using the function code object. • Parameter b127 takes double-word data, which is different from the data size of Modbus registers (single word). • The ENTER command is executed by the following object and written to EEPROM. Refer to 5-4-4 Saving Changes to Holding Registers (ENTER Command) on page 5-13. Write to EEPROM: Class 65 hex, Instance 09 hex, Attribute 00 (0900 hex) DeviceNet Communications Unit User’s Manual (I581-E1) 5 hexadecimal Range 5-5-1 Supported Service Codes A001 to A999 Decimal Base 5-5 Parameter Read/Write (Class 65 hex) Service Code No. (hex) 5 - 15 5 Message Communications Example 1: Reading a Single-word Function Code Parameter d005: Multi-function Input Monitor Command: 0E 65 0B Destination node address Service Code BD Attribute ID Instance ID Class ID Response: 03 8E No. of received bytes Source node address Service Code 01 00 Data Instance and Attribute are determined as Value 3 (d) x 1000 + 005 = 3005, which is converted to 0BBD hex. The response shows that the value 0001 is read. In DeviceNet, data is sent from low to high bytes. Example 2: Writing a Double-word Function Code Parameter P060: Multi-step Position Command 0 (Value: 128000 or 01F400 hex) Command: 10 65 3A Destination node address Service Code Class ID D4 00 F4 01 00 Data Attribute ID Instance ID Response: 02 90 No. of received bytes Source node address Service Code Instance and Attribute are determined as Value 15 (P) x 1000 + 060 = 15060, which is converted to 3AD4 hex. Please note the swapping of the byte order when setting the decimal value 128000. In DeviceNet, data is sent from low to high bytes. 5 - 16 DeviceNet Communications Unit User’s Manual (I581-E1) Troubleshooting This section describes the troubleshooting for various problems which may occur in DeviceNet, the inverter, and the DeviceNet Communications Unit. 6-1 Outline of Error Indication . . . . . . . . . . . . . . . . . . . . . . . . . . . . . . . . . . . . . . . 6-2 6-2 Errors on a Communications Line . . . . . . . . . . . . . . . . . . . . . . . . . . . . . . . . 6-3 6-3 Errors on Inverter or DeviceNet Communications Unit . . . . . . . . . . . . . . . 6-5 6-3-1 6-3-2 6-3-3 Error Codes Related to DeviceNet Communications Error . . . . . . . . . . . . . . . . 6-5 Error Codes Related to DeviceNet Communications Unit . . . . . . . . . . . . . . . . 6-7 Parameter Setting Error in DeviceNet Communications Unit . . . . . . . . . . . . . . . . . . . . . . . . . . . . . . . . . . . . . . . . . . . . . . . . 6-8 6-4 Errors Related to Message Communications . . . . . . . . . . . . . . . . . . . . . . . 6-9 6-4-1 6-4-2 FINS Message Errors (CS/CJ-series) . . . . . . . . . . . . . . . . . . . . . . . . . . . . . . . . 6-9 Explicit Message Errors . . . . . . . . . . . . . . . . . . . . . . . . . . . . . . . . . . . . . . . . . 6-10 6-5 Special I/O Errors . . . . . . . . . . . . . . . . . . . . . . . . . . . . . . . . . . . . . . . . . . . . . 6-11 6-6 Removing DeviceNet Communications Unit . . . . . . . . . . . . . . . . . . . . . . . 6-12 6-6-1 6-6-2 How to Remove DeviceNet Communications Unit - MX2-series . . . . . . . . . . 6-13 How to Remove DeviceNet Communications Unit - RX-series . . . . . . . . . . . . 6-14 DeviceNet Communications Unit User’s Manual (I581-E1) 6-1 6 6 Troubleshooting 6-1 Outline of Error Indication If an error occurs during DeviceNet communications, or if the DeviceNet Communications Unit fails, you can check the content of the error with the LED indicator on the inverter Digital Operator and the MS/NS LED indicators on the DeviceNet Communications Unit. After eliminating the cause of the error according to the instructions provided in this section, reset the inverter. Example of LED indicators on MX2-series MS NS MS Not lit MS Lit red MS Lit green MS MS Flashing Unknown state Inverter error code Unknown state Precautions for Correct Use Do not clear the trip state before you finish troubleshooting the error. If you clear the trip, the error code will be cleared from the 4-digit display. As a result, you may lose the error information before start troubleshooting. Checking data in the error log is still an option in this case. 6-2 DeviceNet Communications Unit User’s Manual (I581-E1) 6 Troubleshooting 6-2 Errors on a Communications Line If the DeviceNet Communications Unit cannot continue DeviceNet communications due to interruption, short circuit, reverse connection, node address duplication, superimposed noise, or other cause, a transmission fault will be detected. If a transmission fault occurs, the inverter turns ON the fault contact to stop the motor (free run stop). In this case, check the LED indicator on the DeviceNet Communications Unit and take corrective action. MS/NS LED Indicators in DeviceNet Communications : Lit, Indication Indicator Name Color MS Green Red – State Operation State Description : Flashing, : Not lit Corrective Action Power ON DeviceNet Communications Unit is operating normally. Not set up DeviceNet Communications Unit is in initial setup state or not ready for communications. • This DeviceNet Communications Unit does not indicate this state. Fatal fault • Hardware error occurred in DeviceNet Communications Unit. • Unsupported inverter version is used. • Cycle the inverter's input power supply. • Replace DeviceNet Communications Unit. • Install an inverter with Ver.1.1 or later for MX2-series/Ver.2.0 or later for RX-series. Minor fault Recoverable fault • Network power supply is OFF. • Node address is changed. • Illegal Flexible Format configuration • DeviceNet Communications Unit parameter is out of range or write-prohibited. • DeviceNet Communications Unit detected consecutive communication errors. Take the following actions and cycle the power supply. • Check network power supply for correct input. • Correct node address configuration. • Review Flexible Format configuration. • Check and correct Remote I/O settings and register numbers. • Take environmental measures such as noise isolation. Power OFF • Check DeviceNet Communica• Power is not supplied to tions Unit connector and turn inverter. on inverter's input power sup• Power is not supplied to ply. DeviceNet Communications Unit because it is not prop- • Check DeviceNet Communications Unit connector and cycle erly connected with inverter. the inverter's input power sup• Unit is reset. ply. Replace DeviceNet Communications Unit if error persists. • Check and correct inverter's reset input state or its setting (C102). DeviceNet Communications Unit User’s Manual (I581-E1) – 6-3 6-2 Errors on a Communications Line The DeviceNet Communications Unit has the MS and NS LED indicators that indicate the states of the power supply and communications. 6 6 Troubleshooting Indication Indicator Name Color NS Green Red – State Operation State Description Corrective Action Online/Communication connection established Network is in normal communication state. – Online/Communication connection not established Network operates normally, but communications with Master Unit are not established. Take the following actions and cycle the power supply. • Register Master Unit to Scan List. • Check and reconfigure Connection Path (P046). • Power on Master Unit. Fatal communications error DeviceNet Communications Unit detected that network communications were disabled due to some communications error. • Node address duplication • Busoff error, etc. Take the following actions and cycle the power supply. • Correct node address duplication. • Connect a termination resistance to each end of communications line. • Correct improper connections on communications line. • Correct Master Unit error. (This error occurs if Master Unit stops after establishment of communications.) • Take environmental measures such as noise isolation. Minor communications error DeviceNet Communications Unit detected a communications timeout error. Take the following actions and cycle the power supply. • Connect a termination resistance to each end of communications line. • Correct improper connections on communications line. • Take environmental measures such as noise isolation. Offline/ Power OFF • Power not supplied to DeviceNet Communications Unit. • Network power supply is OFF or DeviceNet connector is unplugged. • Node address duplication (during intermediate process) • Check DeviceNet Communications Unit connector and turn on inverter's input power supply. Replace DeviceNet Communications Unit if error persists. • Check and correct network power supply and connections. • Correct node address duplication. Additional Information If an error occurs on a communications line, a detailed error code is displayed on the LED display of the Master Unit. Check this error code and take corrective action according to Section 9 Troubleshooting and Maintenance of the CS/CJ-series DeviceNet Units Operation Manual (W380). 6-4 DeviceNet Communications Unit User’s Manual (I581-E1) 6 Troubleshooting 6-3 Errors on Inverter or DeviceNet Communications Unit 6-3-1 Error Codes Related to DeviceNet Communications Error If an error occurs during DeviceNet communications, it is indicated with the MS/NS LED indicators on the DeviceNet Communications Unit, as well as the inverter error code. Check the content of the error according to the MS/NS LED indicators and the error code. The table below shows the error and the corrective action. MX2 Error Codes & Indicators MS MS MS MS NS NS NS Assumed Cause Corrective Action Waiting for connection – 6 NS NS MS NS MS NS Device Node Address (P192) does not match Unit's current online address. This error may occur if Device Node Address (P192) is changed when communication connection is established. Cycle the power supply of inverter. DeviceNet Master Unit cannot communicate with DeviceNet Communications Unit because node address is already used. Check (and correct) the following items: • Does Master Unit or any other slave device on DeviceNet network also use the same node address? Communication idle was detected during RUN mode. Check (and correct) the following items: • Is DeviceNet Master Unit sending IDLE messages? Check P048 and select an operation from Operation at Idle Mode Detection Setting. Note P048 configuration is unnecessary because OMRON's Master Unit does not send IDLE messages. Network power supply failure Check (and correct) the following items: • Are wires connected to proper pins of DeviceNet connector? • Are there any short circuits or line interruptions? • Is proper power supplied (11 to 25 V)? MS NS DeviceNet Communications Unit User’s Manual (I581-E1) 6-5 6-3-1 Error Codes Related to DeviceNet Communications Error MS RX Error Codes & Indicators 6-3 Errors on Inverter or DeviceNet Communications Unit If an error occurs in the inverter or DeviceNet Communications Unit, an error code is displayed on the Digital Operator's LED indicator. This section provides information on the error code, assumed cause, and corrective action mainly related to errors on the DeviceNet Communications Unit. For errors related to the inverter, refer to 7 Maintenance Operations of the MX2 User's Manual (Cat. No.I570) and 10-1 Alarm Codes and Remedies of the RX User's Manual (Cat. No. I578). 6 Troubleshooting MX2 Error Codes & Indicators MS MS 6-6 NS NS RX Error Codes & Indicators MS NS MS NS Assumed Cause Corrective Action Major communications error Too many communications errors are detected. (Busoff) Check (and correct) the following items: • Are wires connected to proper pins of DeviceNet connector? • Are there any short circuits or line interruptions? • Is the ground cable of DeviceNet Communications Unit connected with ground terminal of inverter? Is the ground terminal of inverter connected securely to ground? • Take measures against noise for the entire network according to Section 2-5 Measures against Noise of the DeviceNet Operation Manual (Cat. No. W267). • Are you using proper cable type? • If you have branches from DeviceNet cable trunk line: Are any of these branches too long? • Are termination resistances mounted only on both trunk ends? Connection timeout was detected. Check (and correct) the following items: • Are wires connected to proper pins of DeviceNet connector? • Are there any short circuits or line interruptions? • Take measures against noise for the entire network according to Section 2-5 Measures against Noise of the DeviceNet Operation Manual (Cat. No. W267). DeviceNet Communications Unit User’s Manual (I581-E1) 6 Troubleshooting 6-3-2 Error Codes Related to DeviceNet Communications Unit If an error occurs inside the DeviceNet Communications Unit, the inverter stops with the error code displayed. The table below shows the errors and the corrective action. RX Error Codes & Indicators Assumed Cause Inverter does not power on. MS NS Corrective Action Perform troubleshooting according to Section 7-2 Troubleshooting of the MX2 User's Manual (Cat. No. I570). Perform troubleshooting according to 10-4 Troubleshooting of the RX User's Manual (Cat. No. I578). Replace DeviceNet Communications Unit. DeviceNet Communications Unit's Inverter connector is damaged. MS NS MS NS Inverter RS input is ON. Switch inverter RS input OFF. DeviceNet Communications Unit encountered a major error during power-on. Check if DeviceNet Communications Unit is mounted properly and connector is sufficiently inserted, and then restart DeviceNet Communications Unit. If problem persists, replace DeviceNet Communications Unit. Inverter does not support DeviceNet Communications Unit. Replace the inverter with another inverter, Ver.1.1 or later for MX2-series/Ver.2.0 or later for RX-series. MS MS MS NS NS NS MS NS MS NS MS NS DeviceNet Communications Unit encountered a major error during operation. Check if DeviceNet Communications Unit is mounted properly and connector is sufficiently inserted, and then restart DeviceNet Communications Unit. If problem persists, replace DeviceNet Communications Unit. The inverter is tripped with Force external fault/Trip through Fieldbus. Clear External trip (EXT) from DeviceNet communications and reset trip state. A fatal error was detected while DeviceNet Communications Unit operates. Check if DeviceNet Communications Unit is mounted properly and connector is sufficiently inserted, and then restart DeviceNet Communications Unit. If problem persists, replace DeviceNet Communications Unit. DeviceNet Communications Unit User’s Manual (I581-E1) 6-7 6 6-3-2 Error Codes Related to DeviceNet Communications Unit Replace DeviceNet Communications Unit. DeviceNet Communications Unit's inverter connector is damaged. 6-3 Errors on Inverter or DeviceNet Communications Unit MX2 Error Codes & Indicators 6 Troubleshooting 6-3-3 Parameter Setting Error in DeviceNet Communications Unit If the configuration of a parameter disables the DeviceNet Communications Unit to operate normally, an error code will be displayed. The table below shows the errors and the corrective action. MX2 Error Codes & Indicators MS NS RX Error Codes & Indicators MS NS Assumed Cause One of configuration parameters P160 to P179 is rejected by inverter. Corrective Action Check (and correct) the following items: • Is one of parameters P160 to P179 specifying a Modbus register that does not exist? • Is one of parameters P160 to P169 specifying a double-word Modbus register? If so, are low and high words specified in sequence by two consecutive parameters? • Is one of parameters P170 to P179 specifying a double-word Modbus register? If so, are high and low words specified in sequence by two consecutive parameters? • Is a specific Modbus register specified twice in output parameters P160 to P169? • Is one of parameters P160 to P169 specifying a Modbus register that is read-only? A register is read-only if it has an "R" in the R/W column of the register table in Section 6-8 Modbus Communication (Modbus-RTU) Data List of the MX2 User's Manual (Cat. No. I570). A register is read-only if it has an "R" in the R/W column of the register table in 8-5 Modbus Communication Register Number List of the RX User's Manual (Cat. No. I578). • Is one of output parameters P160 to P169 specifying a Modbus register that is write-prohibited during operation? A parameter is write-prohibited during operation if "no" is put in the "Data can be changed during RUN" column of the table in Section 4 of the MX2 Inverter manual (Cat. No. I570). A parameter is write-prohibited during operation if "No" is put in the "Changes during operation" column of the table in Appendix 1 Parameter List of the RX Inverter manual (Cat. No. I578). After correcting configuration, cycle the power supply. MS 6-8 NS MS NS Inverter settings are not compatible with this version of DeviceNet Communications Unit. • Check P046 value is in range [0 to 7] and restart DeviceNet Communications Unit. • Initialize inverter parameters. DeviceNet Communications Unit User’s Manual (I581-E1) 6 Troubleshooting 6-4 Errors Related to Message Communications To send a DeviceNet explicit message from a CS/CJ-series unit, use a FINS message. If any Explicit Message/FINS message is not completed normally, check the contents of the FINS message response. FINS Message Errors (CS/CJ-series) The table below shows the assumed cause and corrective action for each FINS response. FINS Response Description Assumed Cause Corrective Action 0000 Normal completion – – 0101 Local node not in network Local node (Master Unit) is not participating in network. Check Master Unit settings and network configuration. 0105 Local node address range error Local node address (Master Unit) setting is out of range 0 to 63. Set DeviceNet node address correctly. Set a non-duplicate node address in range of 0 to 63. 0106 Local node address duplication Local node (Master Unit) MAC address setting overlaps with that of another node in network. 0201 Destination node not in network Destination node is not in network. (MS and NS LED indicators not indicating normal state) Add destination node correctly to the network. 0202 Destination node unit missing Node address setting is incorrect. Check destination node address. Master Unit FINS address is incorrect. Check FINS address in CMND instruction control data. Response timeout Response monitor time in CMND instruction control data is too short. Increase length of response monitor time. Message frame was destroyed by noise. Check noise conditions (external noise from communications power supply, communication lines, switching device, etc.) and take corrective action. Increase number of retries. Master Unit received a undefined command. Check FINS command (2801) in CMND instruction. Master Unit received a FINS command not destined for it. Check FINS address in CMND instruction control data. 0401 Undefined command 6 Additional Information For details about FINS commands not described above, refer to SYSMAC CS/CJ-series Communications Commands Reference Manual (Cat. No. W342).No. DeviceNet Communications Unit User’s Manual (I581-E1) 6-9 6-4-1 FINS Message Errors (CS/CJ-series) 0205 6-4 Errors Related to Message Communications 6-4-1 6 Troubleshooting 6-4-2 Explicit Message Errors If there is an Explicit message that is issued but not completed normally, the response will be returned with one of the following error codes attached to service code 94. If this occurs, check the error message and correct the request message or otherwise resend the message in a timely fashion. Error Code 6 - 10 Description Corrective Action 0000 Normal completion response – 02FF Internal communication error Check if DeviceNet Communications Unit's connector is sufficiently inserted and resend. If problem persists, replace DeviceNet Communications Unit. 08FF Requested service does not exist. Correct service code and resend. 09FF Invalid Attribute was detected. Correct Attribute value and resend. 0CFF Requested service cannot be executed in object mode/state. Stop inverter and resend. 0EFF Request for changing unchangeable Attribute was received. Correct service code/Attribute value and resend. 10FF Service execution disabled mode Requested service cannot be executed in current inverter mode. Correct mode or service and resend. 13FF Data is insufficient for this service. Provide data in correct size and resend. 14FF There is no Attribute for this service. Correct service code/Attribute value and resend. 15FF There is too much data for this service. Provide data in correct size and resend. 16FF Specified object does not exist. Correct Class/Instance value and resend. 20FF Parameter for this request is invalid, or data is out of range. Check data setting range, correct data, and resend. 1FFF Vendor-specific error Stop inverter and resend. Or check data setting range, correct data, and resend. DeviceNet Communications Unit User’s Manual (I581-E1) 6 Troubleshooting 6-5 Special I/O Errors If a problem is found in the output data of Special I/O, the inverter returns an error code to the input data without executing the request. Determine whether or not an error occurred by the most significant bit (word address n, bit 7) of the function code in the input data. In case of an error, the function code in the input data has a value of the output data added with 80 hex. The table below shows the error code and corrective action for each Special I/O error. Error Code Name Description Corrective Action Function Code Error A code other than 03/10/43 or 50 hex is set as function code. Check and correct function code. 02 hex Register No. Error Specified register number does not exist. Check and correct register number. 04 hex Slave Device Error Option inverter communications error (Internal communications error occurred between DeviceNet Communications Unit and inverter) Check if DeviceNet Communications Unit is mounted properly (if connector is sufficiently inserted). If problem persists, replace DeviceNet Communications Unit. 21 hex Data Setting Error Upper or lower limit of write data setting range is exceeded. Check and correct data size so data is within data setting range. 22 hex Write Mode Error Inverter mode is incorrect. • Changing unchangeable register during operation. • ENTER command was issued dur- • Write after stopping inverter operation. • Write after clearing UV error. • Write after releasing soft lock. • Correct after checking if terminal is changeable. • Write after completing auto-tuning. • Write after canceling password setting. ing operation (UV*1). • Writing to register in trip (UV*1) state. • Writing to register in soft lock mode. • Changing an unchangeable input/output terminal. • Changing contact type of terminal to which RS (Reset) is allocated. • Writing to a register when auto-tuning is enabled. • Writing to a lock-enabled register during password setting. 23 hex Register Size Error Reading/Writing 2-byte data from/to a 4-byte register or 4-byte data from/to a 2-byte register. Check and correct data size properly. *1 UV: During undervoltage DeviceNet Communications Unit User’s Manual (I581-E1) 6 - 11 6-5 Special I/O Errors 01 hex 6 6 Troubleshooting 6-6 Removing DeviceNet Communications Unit DANGER Do not attempt to remove the terminal block cover or disconnect and reconnect the DeviceNet Communications Unit during power on or within 10 minutes after power off. Doing so may result in severe injury due to electric shock. Caution Inverters contain high voltage parts and short-circuits may sometimes cause product damage or property damage. Measures must be taken to prevent chips, lead-wire pieces, or other metal waste from entering the product, for example, by installing a cover. Do not attempt to disassemble, repair, or modify the DeviceNet Communications Unit. Doing so may result in injury. Operation and Adjustment • Be sure to confirm the permissible range of motors and machines before operation because the speed can be set from low to high. • Before starting the CPU Unit and inverter programs, check the program contents as well as the interactions between these programs. Maintenance and Inspection • Be sure to confirm safety before conducting maintenance, inspection or parts replacement. • Invalid parameter configuration may result in a communications error, interrupting the communications function of other units. Before participating in the network, make sure that the communications configuration parameters are set properly. • Using a support tool to write all inverter parameters causes the DeviceNet configuration parameters to be overwritten. Before reconnecting to DeviceNet, make sure that the address and I/O allocations are correct. 6 - 12 DeviceNet Communications Unit User’s Manual (I581-E1) 6 Troubleshooting 6-6-1 How to Remove DeviceNet Communications Unit - MX2-series When you remove the DeviceNet Communications Unit for replacement or inspection, follow the steps below. For the mounting steps, refer to 2-2 Installation on page 2-5. 1 6-6 Removing DeviceNet Communications Unit 2 Loosen the DeviceNet Communications Unit mounting screw. Pull the DeviceNet Communications Unit straight out of the inverter while pushing down on the indicated sides to release the snap-fits. 6 6-6-1 How to Remove DeviceNet Communications Unit - MX2-series 3 For Inverters up to 4.0 kW, loosen the screws of the terminal block cover to remove the cover. DeviceNet Communications Unit User’s Manual (I581-E1) 6 - 13 6 Troubleshooting 4 Unscrew and remove the DeviceNet Communications Unit grounding cable. 1-phase 200 V 0.1 to 2.2 kW 3-phase 200 V 0.1 to 3.7 kW 3-phase 400 V 0.4 to 4.0 kW 6-6-2 3-phase 200 V 5.5 to 15 kW 3-phase 400 V 5.5 to 15 kW How to Remove DeviceNet Communications Unit - RX-series When you remove the DeviceNet Communications Unit for replacement or inspection, follow the steps below. For the mounting steps, refer to 2-2 Installation on page 2-5. 1 6 - 14 Remove the Digital Operator by pushing the lip on the top. DeviceNet Communications Unit User’s Manual (I581-E1) 6 Troubleshooting Remove the terminal cover from the Inverter. 3 Remove the grounding cable of inverter. 6-6 Removing DeviceNet Communications Unit 2 G 4 6 (b) Draw out the bottom (a) Push up 5 Remove the Inverter connection PCB by holding at the indicated locations. DeviceNet Communications Unit User’s Manual (I581-E1) 6 - 15 6-6-2 How to Remove DeviceNet Communications Unit - RX-series Remove the DeviceNet Communications Unit by the indicated step. Be careful not to stress the flat cable. (a) Push up the DeviceNet Communications Unit to have a space under the bottom. (b) While pushing it up, draw out the DeviceNet Communications Unit to the near side. 6 Troubleshooting 6 - 16 DeviceNet Communications Unit User’s Manual (I581-E1) Appendices This section contains the general object specifications and AC drive object specifications. A-1 General Object Specifications . . . . . . . . . . . . . . . . . . . . . . . . . . . . . . . . . . . A-2 A-1-1 A-1-2 A-1-3 A-1-4 A-1-5 A-1-6 A-1-7 A-1-8 Identity Object (Class 01 hex) . . . . . . . . . . . . . . . . . . . . . . . . . . . . . . . . . . . . . . A-2 Message Router Object (Class 02 hex) . . . . . . . . . . . . . . . . . . . . . . . . . . . . . . A-5 DeviceNet Object (Class 03 hex) . . . . . . . . . . . . . . . . . . . . . . . . . . . . . . . . . . . A-5 Assembly Object (Class 04 hex) . . . . . . . . . . . . . . . . . . . . . . . . . . . . . . . . . . . . A-6 Connection Object (Class 05 hex) . . . . . . . . . . . . . . . . . . . . . . . . . . . . . . . . . . A-7 Discrete Input Point Object (Class 08 hex) . . . . . . . . . . . . . . . . . . . . . . . . . . . A-12 Discrete Output Point Object (Class 09 hex) . . . . . . . . . . . . . . . . . . . . . . . . . A-12 Unit Parameter Object (Class 94 hex) . . . . . . . . . . . . . . . . . . . . . . . . . . . . . . A-13 A-2 AC Drive Object Specifications . . . . . . . . . . . . . . . . . . . . . . . . . . . . . . . . . A-14 A-2-1 A-2-2 A-2-3 Motor Data Object (Class 28 hex) . . . . . . . . . . . . . . . . . . . . . . . . . . . . . . . . . . A-14 Control Supervisor Object (Class 29 hex) . . . . . . . . . . . . . . . . . . . . . . . . . . . . A-15 AC/DC Drive Object (Class 2A hex) . . . . . . . . . . . . . . . . . . . . . . . . . . . . . . . . A-19 DeviceNet Communications Unit User’s Manual (I581-E1) A-1 A Appendices A-1 General Object Specifications A-1-1 Identity Object (Class 01 hex) Supported Service Codes I Table A-1 Identity Object - Supported Service Codes Service Code No. (hex) Service Description 0E Reads Attribute data. 05 Resets data (to initial status). Object Details Table A-2 Identity Object - Object Details Instance (hex) Attribute (hex) 01 01 Vendor ID Indicates the manufacturer's ID. ---- 02 Device Type Indicates the DeviceNet profile classification. 03 Product Code 04 05 Name Setting Range Description Default Read Write Size 47 (OMRON Configuration) Yes No UINT ---- 2 (AC Drive) Yes No UINT Depends on the inverter model. ---- Refer to Table A-3 or A-4. Yes No UINT Revision Indicates overall software revisions for the DeviceNet Communications Unit and the inverter. Note that this Attribute depends on both the DeviceNet Communications Unit and the inverter. Be sure to apply the correct EDS file to this revision during configuration. ---- Depends on Unit. Yes No word Status Indicates the communications status for the DeviceNet Communications Unit. ---- 0 hex Yes No UINT ---- Unique to each Unit Yes No LONG Bit allocation: 0: Always ON 8: Minor recoverable fault 9: Minor unrecoverable fault 10: Major recoverable fault 11: Major unrecoverable fault 06 A-2 Serial Number Indicates the serial number of the DeviceNet Communications Unit. DeviceNet Communications Unit User’s Manual (I581-E1) Appendices Instance (hex) Attribute (hex) 01 07 Product Name Depends on the inverter model. ---- 09 Configuration Consistency Value Indicates the consistency value which is incremented if an inverter parameter is changed and stored to EEPROM through the DeviceNet Communications Unit interface. Name Description Setting Range Default Read Write Size Refer to Table A-3 or A-4 Yes No UINT ---- 0 hex Yes No UINT ---- Depends on Unit. Yes No word Please note that changes using the other inverter interfaces (Serial, Digital Operator) do not influence this Attribute. 65 Firmware Indicates the software verRevision sion of the DeviceNet ComOption Board munications Unit. Additional Information The product code and the product name depend on the model of inverter being used, as shown in the following tables. A Table A-3 MX2-series Model List ID Code Name of EDS File 3G3MX2-AB001 3G3MX2-A2001 3G3AX-MX2-DRT-AB001_A2001 1920 3G3AX-MX2-DRT-AB001_A2001.eds 3G3MX2-AB002 3G3MX2-A2002 3G3AX-MX2-DRT-AB002_A2002 1921 3G3AX-MX2-DRT-AB002_A2002.eds 3G3MX2-AB004 3G3MX2-A2004 3G3AX-MX2-DRT-AB004_A2004 1922 3G3AX-MX2-DRT-AB004_A2004.eds 3G3MX2-AB007 3G3MX2-A2007 3G3AX-MX2-DRT-AB007_A2007 1924 3G3AX-MX2-DRT-AB007_A2007.eds 3G3MX2-AB015 3G3MX2-A2015 3G3AX-MX2-DRT-AB015_A2015 1926 3G3AX-MX2-DRT-AB015_A2015.eds 3G3MX2-AB022 3G3MX2-A2022 3G3AX-MX2-DRT-AB022_A2022 1927 3G3AX-MX2-DRT-AB022_A2022.eds 3G3MX2-A2037 3G3AX-MX2-DRT-A2037 1929 3G3AX-MX2-DRT-A2037.eds 3G3MX2-A2055 3G3AX-MX2-DRT-A2055 1931 3G3AX-MX2-DRT-A2055.eds 3G3MX2-A2075 3G3AX-MX2-DRT-A2075 1932 3G3AX-MX2-DRT-A2075.eds 3G3MX2-A2110 3G3AX-MX2-DRT-A2110 1933 3G3AX-MX2-DRT-A2110.eds 3G3MX2-A2150 3G3AX-MX2-DRT-A2150 1934 3G3AX-MX2-DRT-A2150.eds 3G3MX2-A4004 3G3AX-MX2-DRT-A4004 1942 3G3AX-MX2-DRT-A4004.eds 3G3MX2-A4007 3G3AX-MX2-DRT-A4007 1944 3G3AX-MX2-DRT-A4007.eds 3G3MX2-A4015 3G3AX-MX2-DRT-A4015 1946 3G3AX-MX2-DRT-A4015.eds DeviceNet Communications Unit User’s Manual (I581-E1) A-3 A-1-1 Identity Object (Class 01 hex) Product Name Inverter Model A-1 General Object Specifications Writing to EEPROM Save (Modbus address 0900 hex, Class 64 hex, Instance 09 hex, Attribute 0 hex) also increments this value. Appendices Inverter Model Product Name ID Code Name of EDS File 3G3MX2-A4022 3G3AX-MX2-DRT-A4022 1947 3G3AX-MX2-DRT-A4022.eds 3G3MX2-A4030 3G3AX-MX2-DRT-A4030 1948 3G3AX-MX2-DRT-A4030.eds 3G3MX2-A4040 3G3AX-MX2-DRT-A4040 1950 3G3AX-MX2-DRT-A4040.eds 3G3MX2-A4055 3G3AX-MX2-DRT-A4055 1951 3G3AX-MX2-DRT-A4055.eds 3G3MX2-A4075 3G3AX-MX2-DRT-A4075 1952 3G3AX-MX2-DRT-A4075.eds 3G3MX2-A4110 3G3AX-MX2-DRT-A4110 1953 3G3AX-MX2-DRT-A4110.eds 3G3MX2-A4150 3G3AX-MX2-DRT-A4150 1954 3G3AX-MX2-DRT-A4150.eds Table A-4 RX-series Model List Inverter Model A-4 Product Name ID Code Name of EDS File 3G3RX-A2004 3G3AX-RX-DRT-A2004 2203 3G3AX-RX-DRT-A2004.eds 3G3RX-A2007 3G3AX-RX-DRT-A2007 2204 3G3AX-RX-DRT-A2007.eds 3G3RX-A2015 3G3AX-RX-DRT-A2015 2205 3G3AX-RX-DRT-A2015.eds 3G3RX-A2022 3G3AX-RX-DRT-A2022 2206 3G3AX-RX-DRT-A2022.eds 3G3RX-A2037 3G3AX-RX-DRT-A2037 2207 3G3AX-RX-DRT-A2037.eds 3G3RX-A2055 3G3AX-RX-DRT-A2055 2208 3G3AX-RX-DRT-A2055.eds 3G3RX-A2075 3G3AX-RX-DRT-A2075 2209 3G3AX-RX-DRT-A2075.eds 3G3RX-A2110 3G3AX-RX-DRT-A2110 2210 3G3AX-RX-DRT-A2110.eds 3G3RX-A2150 3G3AX-RX-DRT-A2150 2211 3G3AX-RX-DRT-A2150.eds 3G3RX-A2185 3G3AX-RX-DRT-A2185 2212 3G3AX-RX-DRT-A2185.eds 3G3RX-A2220 3G3AX-RX-DRT-A2220 2213 3G3AX-RX-DRT-A2220.eds 3G3RX-A2300 3G3AX-RX-DRT-A2300 2214 3G3AX-RX-DRT-A2300.eds 3G3RX-A2370 3G3AX-RX-DRT-A2370 2215 3G3AX-RX-DRT-A2370.eds 3G3RX-A2450 3G3AX-RX-DRT-A2450 2216 3G3AX-RX-DRT-A2450.eds 3G3RX-A2550 3G3AX-RX-DRT-A2550 2217 3G3AX-RX-DRT-A2550.eds 3G3RX-A4004 3G3AX-RX-DRT-A4004 2230 3G3AX-RX-DRT-A4004.eds 3G3RX-A4007 3G3AX-RX-DRT-A4007 2231 3G3AX-RX-DRT-A4007.eds 3G3RX-A4015 3G3AX-RX-DRT-A4015 2232 3G3AX-RX-DRT-A4015.eds 3G3RX-A4022 3G3AX-RX-DRT-A4022 2233 3G3AX-RX-DRT-A4022.eds 3G3RX-A4037 3G3AX-RX-DRT-A4037 2234 3G3AX-RX-DRT-A4037.eds 3G3RX-A4055 3G3AX-RX-DRT-A4055 2235 3G3AX-RX-DRT-A4055.eds 3G3RX-A4075 3G3AX-RX-DRT-A4075 2236 3G3AX-RX-DRT-A4075.eds 3G3RX-A4110 3G3AX-RX-DRT-A4110 2237 3G3AX-RX-DRT-A4110.eds 3G3RX-A4150 3G3AX-RX-DRT-A4150 2238 3G3AX-RX-DRT-A4150.eds 3G3RX-A4185 3G3AX-RX-DRT-A4185 2239 3G3AX-RX-DRT-A4185.eds 3G3RX-A4220 3G3AX-RX-DRT-A4220 2240 3G3AX-RX-DRT-A4220.eds 3G3RX-A4300 3G3AX-RX-DRT-A4300 2241 3G3AX-RX-DRT-A4300.eds 3G3RX-A4370 3G3AX-RX-DRT-A4370 2242 3G3AX-RX-DRT-A4370.eds 3G3RX-A4450 3G3AX-RX-DRT-A4450 2243 3G3AX-RX-DRT-A4450.eds 3G3RX-A4550 3G3AX-RX-DRT-A4550 2244 3G3AX-RX-DRT-A4550.eds 3G3RX-B4750 3G3AX-RX-DRT-B4750 2245 3G3AX-RX-DRT-B4750.eds 3G3RX-B4900 3G3AX-RX-DRT-B4900 2246 3G3AX-RX-DRT-B4900.eds 3G3RX-B411K 3G3AX-RX-DRT-B411K 2247 3G3AX-RX-DRT-B411K.eds 3G3RX-B413K 3G3AX-RX-DRT-B413K 2248 3G3AX-RX-DRT-B413K.eds DeviceNet Communications Unit User’s Manual (I581-E1) Appendices A-1-2 Message Router Object (Class 02 hex) Object Details No vendor-specific attributes are supported. A-1-3 DeviceNet Object (Class 03 hex) Supported Service Codes Table A-5 DeviceNet Object - Supported Service Codes Service Code No. (hex) Service Description Reads Attribute data. 10 Writes Attribute data. Object Details Table A-6 DeviceNet Object - Object Details Instance (hex) Attribute (hex) 01 01 MAC ID 02 Baud Rate Setting Range Default Node address of DeviceNet Communications Unit 0-63 0: 125 kbit/s 1: 250 kbit/s 2: 500 kbit/s 0-2 Name Description Read Write Size 63 Yes Yes USINT 0 Yes No UINT A BOI BOI Busoff interruption ---- 0 Yes No BOOL 04 Busoff Counter Number of Busoff detections ---- 0 Yes No USINT 05 Allocation Information DeviceNet communication connection information ---- 0 Yes No word 06 MAC ID Switch Changed Node address change required after power-off or reset ---- 0 Yes No BOOL 08 MAC ID Switch Value Node address setting actual value ---- 63 Yes No UINT A-5 A-1-2 Message Router Object (Class 02 hex) 03 DeviceNet Communications Unit User’s Manual (I581-E1) A-1 General Object Specifications 0E Appendices A-1-4 Assembly Object (Class 04 hex) Supported Service Codes Table A-7 Assembly Object - Supported Service Codes Service Code No. (hex) Service Description 0E Reads Attribute data. 10 Writes Attribute data. Object Details Table A-8 Assembly Object - Object Details A-6 Instance (hex) Attribute (hex) Setting Range Default 14 03 Remote I/O Data Same function as Basic Speed I/O (Output) ---- 15 03 Remote I/O Data Same function as Extended Speed I/O (Output) 46 03 Remote I/O Data 47 03 64 Name Description Read Write Size 00 00 00 00 Yes Yes byte x4 ---- 00 00 00 00 Yes Yes byte x4 Same function as Basic Speed I/O (Input) ---- 00 00 00 00 Yes No byte x4 Remote I/O Data Same function as Extended Speed I/O (Input) ---- 00 00 00 00 Yes No byte x4 03 Remote I/O Data Same function as Special I/O (Output) ---- 00 00 00 00 00 00 00 00 Yes Yes byte x8 65 03 Remote I/O Data Same function as Extended Control I/O (Output) ---- 00 00 00 00 00 00 00 00 Yes Yes byte x8 6E 03 Remote I/O Data Same function as Extended Speed and Acceleration Control (Output) ---- 00 00 00 00 00 00 00 00 Yes Yes byte x8 6F 03 Remote I/O Data Same function as Extended Speed and Acceleration Control (Input) ---- 00 00 00 00 00 00 00 00 Yes No byte x8 7B 03 Remote I/O Data Same function as Extended Speed and Torque Control (Output) ---- 00 00 00 00 00 00 Yes Yes byte x6 8B 03 Remote I/O Data Same function as Flexible Format (Output) ---- 00 00 00 00 00 00 00 00 00 00 00 00 00 00 00 00 00 00 00 00 Yes Yes byte x 20 max.* 96 03 Remote I/O Data Same function as Special I/O (Input) ---- 00 00 00 00 00 00 00 00 Yes No byte x8 DeviceNet Communications Unit User’s Manual (I581-E1) Appendices Instance (hex) Attribute (hex) 97 03 Remote I/O Data Same function as Extended Control I/O (Input) ---- 99 03 Remote I/O Data Same function as Extended Control I/O and Multi function I/O Monitor (Input) 9F 03 Remote I/O Data Same function as Flexible Format (Input) Name Setting Range Description Default Read Write Size 00 00 00 00 00 00 00 00 Yes No byte x8 ---- 00 00 00 00 00 00 00 00 00 Yes No byte x9 ---- 00 00 00 00 00 00 00 00 00 00 00 00 00 00 00 00 00 00 00 00 Yes No byte x 20 max.* * The size of the Flexible Format assembly is dependent on the actual configuration. A-1 General Object Specifications Additional Information • The data to be allocated to each assembly in this object is the same as that defined in Section 4 Remote I/O on page 4-1. A-1-5 Connection Object (Class 05 hex) Supported Service Codes Table A-9 Connection Object - Supported Service Codes Service Code No. (hex) Service Description 0E Reads Attribute data. 10 Writes Attribute data. A Table A-10 Connection Object - Object Details Instance (hex) Attribute (hex) Setting Range Default 01 Explicit Message 01 State Status of the Instance ---- 02 Instance Type Type of the Instance 03 Transport Class Trigger 04 Name Description Read Write Size 3 Yes No USINT ---- 0 Yes No USINT Defines communications type by code. ---- 83 hex Yes No byte Produced Connection ID Indicates the communications ID set by the DeviceNet Master Unit. ---- ---- Yes No UINT 05 Consumed Connection ID Indicates the communications ID set by the DeviceNet Master Unit. ---- ---- Yes No UINT 06 Initial Comm Characteristics Indicates the communication configuration of the DeviceNet Master Unit. ---- 21 hex Yes No byte DeviceNet Communications Unit User’s Manual (I581-E1) A-7 A-1-5 Connection Object (Class 05 hex) Object Details Appendices Instance (hex) Attribute (hex) 01 Explicit Message 02 Polled I/O A-8 Setting Range Default Indicates the maximum number of bytes for transmission. ---- Consumed Connection Size Indicates the maximum number of bytes for reception. 09 Expected Packet Rate Indicates the length of the internal processing timeout when a communications request is received (incremented in units of 10 ms). 0C Watchdog Timeout Action Name Description Read Write Size 07 Produced Connection Size 260 Yes No UINT 08 ---- 260 Yes No UINT 065535 0 Yes Yes UINT Indicates the action for internal processing timeout related to communications. 00: Retain timeout status (until reset or cleared) 01: Cut connection automatically 02: Operate with the same connection ---- 1 Yes Yes USINT 0D Number of bytes for the proProduced Connection duced connection path. Path Length Zero (0) for Explicit Messages ---- 0 Yes No UINT 0E Produced Connection Path Specifies the application object for the produced connection path. No data for explicit messages ---- Empty Yes No ARRAY 0F Consumed Number of bytes for the conConnection sumed connection path. Path Length Zero (0) for Explicit Messages ---- 0 Yes No UINT 10 Consumed Connection Path Specifies the application object for the consumed connection path. No data for explicit messages ---- Empty Yes No ARRAY 11 Production Inhibit Time Specifies the production inhibit timer value. ---- 0 Yes No UINT 12 Connection Timeout Multiplier Specifies the multiplier for the connection timeout event. ---- Fixed to 4. Yes No USINT 01 State Status of the Instance ---- ---- Yes No USINT 02 Instance Type Type of the Instance ---- 1 Yes No USINT 03 Transport Class Trigger Defines the communications type by code. ---- 82 hex Yes No byte 04 Produced Connection ID Indicates the communications ID set by the DeviceNet Master Unit. ---- ---- Yes No UINT 05 Consumed Connection ID Indicates the communications ID set by the DeviceNet Master Unit. ---- ---- Yes No UINT DeviceNet Communications Unit User’s Manual (I581-E1) Appendices Instance (hex) Attribute (hex) Read Write Size 02 Polled I/O 06 Initial Comm Characteristics Indicates the communication configuration of the DeviceNet Master Unit. ---- 01 hex Yes No byte 07 Produced Connection Size Indicates the maximum number of bytes for transmission. ---- Depends on assembly configured. Yes No UINT 08 Consumed Connection Size Indicates the maximum number of bytes for reception. ---- Depends on assembly configured. Yes No UINT 09 Expected Packet Rate Indicates the length of the internal processing timeout when a communications request is received. Unit is [ms]. Value is set to a multiple of [10 ms]. 065535 0 Yes Yes UINT 0C Watchdog Timeout Action Indicates the action for the internal processing timeout related to communications. 00: Retain timeout status (until reset or cleared) ---- 0 Yes No USINT 0D Number of bytes for the proProduced Connection duced connection path. Path Length ---- 3 Yes No UINT 0E Produced Connection Path ---- Depends on Default Connection Path. Yes No ARRAY 0F Consumed Number of bytes for the conConnection sumed connection path. Path Length ---- 3 Yes No UINT 10 Consumed Connection Path Specifies the allocation for the consumed connection path. ---- Depends on Default Connection Path. Yes No ARRAY 11 Production Inhibit Time Specifies the production inhibit timer value. ---- 0 Yes No UINT 12 Connection Timeout Multiplier Specifies the multiplier for the connection timeout event. ---- Fixed to 4. Yes No USINT Specifies the allocation for the produced connection path. DeviceNet Communications Unit User’s Manual (I581-E1) A-9 A A-1-5 Connection Object (Class 05 hex) Default Description A-1 General Object Specifications Setting Range Name Appendices Instance (hex) Attribute (hex) 03 BitStrobe 01 State 02 Instance Type 03 Transport Class Trigger 04 03 BitStrobe A - 10 Setting Range Default Status of the Instance ---- Type of the Instance ---- Defines the communications type by code. Produced Connection ID 05 Consumed Connection ID Name Description Read Write Size ---- Yes No USINT 1 Yes No USINT ---- 82 hex Yes No byte Indicates the communications ID set by the DeviceNet Master Unit. ---- ---- Yes No UINT Indicates the communications ID set by the DeviceNet Master Unit. ---- ---- Yes No UINT 06 Initial Comm Indicates the communication Characteristics configuration of the DeviceNet Master Unit. ---- 02 hex Yes No byte 07 Produced Connection Size Indicates the maximum number of bytes for transmission. ---- Depends on configured assembly. Yes No UINT 08 Consumed Connection Size Indicates the maximum number of bytes for reception. ---- 0 Yes No UINT 09 Expected Packet Rate Indicates the length of the internal processing timeout when a communications request is received. Unit is [ms]. Value is set to a multiple of [10 ms]. 065535 0 Yes Yes UINT 0C Watchdog Timeout Action Indicates the action for the internal processing timeout related to communications. 00: Retains timeout status (until reset or cleared). ---- 0 Yes No USINT 0D Number of bytes for the proProduced Connection duced connection path. Path Length ---- 3 Yes No UINT 0E Produced Connection Path Yes No ARRAY 0F Consumed Number of bytes for the conConnection sumed connection path. Path Length 10 Consumed Connection Path 11 12 Specifies the allocation for the produced connection path. ---- Default: Flexible I/O (Input) 62 39 46 ---- 0 Yes No UINT Specifies the allocation for the consumed connection path. ---- ---- Yes No ARRAY Production Inhibit Time Specifies the production inhibit timer value. ---- 0 Yes No UINT Connection Timeout Multiplier Specifies the multiplier for the connection timeout event. ---- Fixed to 4. Yes No USINT DeviceNet Communications Unit User’s Manual (I581-E1) Appendices Instance (hex) Attribute (hex) 04 Cyclic I/O 01 State 02 Instance Type 03 Transport Class Trigger 04 Default Status of the Instance ---- Type of the Instance ---- Defines the communications type by code. Produced Connection ID 05 Consumed Connection ID Description Size ---- Yes No USINT 1 Yes No USINT ---- 82 hex Yes No byte Indicates the communications ID set by the DeviceNet Master Unit. ---- ---- Yes No UINT Indicates the communications ID set by the DeviceNet Master Unit. ---- ---- Yes No UINT 06 Initial Comm Indicates the communication Characteristics configuration of the DeviceNet Master Unit. ---- 01 hex Yes No byte 07 Produced Connection Size Indicates the maximum number of bytes for transmission. ---- Depends on onfigured assembly. Yes No UINT 08 Consumed Connection Size Indicates the maximum number of bytes for reception. ---- 0 Yes No UINT 09 Expected Packet Rate Indicates the length of the internal processing timeout when a communications request is received. Unit is [ms]. Value is set to a multiple of [10 ms]. 065535 0 Yes Yes UINT 0C Watchdog Timeout Action Indicates the action for the internal processing timeout related to communications. 00: Retain timeout status (until reset or cleared) ---- 0 Yes No USINT 0D Number of bytes for the proProduced Connection duced connection path. Path Length ---- 3 Yes No UINT 0E Produced Connection Path Yes No ARRAY 0F Consumed Number of bytes for the conConnection sumed connection path. Path Length Yes No UINT 10 Consumed Connection Path Specifies the allocation for the consumed connection path. ---- Yes No ARRAY 11 Production Inhibit Time Specifies the production inhibit timer value. ---- 0 Yes Yes UINT 12 Connection Timeout Multiplier Specifies the multiplier for the connection timeout event. ---- Fixed to 4. Yes No USINT Specifies the allocation for the produced connection path. DeviceNet Communications Unit User’s Manual (I581-E1) ---- ---- Default: Flexible I/O (Input) 62 39 46 4 Acknowledge Handler Object 20 2B 24 01 A - 11 A A-1-5 Connection Object (Class 05 hex) Read Write A-1 General Object Specifications 04 Cyclic I/O Setting Range Name Appendices A-1-6 Discrete Input Point Object (Class 08 hex) Supported Service Codes Table A-11 Discrete Input Point Object - Supported Service Codes Service Code No. (hex) Service Description 0E Reads Attribute data. 10 Writes Attribute data. Object Details Table A-12 Discrete Input Point Object - Object Details Instance (hex) Attribute (hex) 01 to 09 03 Value 69 Override Setting Range Default Terminal state 0: OFF 1: ON ---- Terminal state (Override) 0: OFF 1: ON ---- Name Description Read Write Size ---- Yes No BOOL ---- Yes Yes BOOL Precautions for Correct Use Instances 1 to 7 correspond to the inverter's multi-function input terminals S1 to S7. Instances 1 to 8 correspond to the inverter's multi-function input terminals S1 to S8. Instance 9 corresponds to the FW input terminal. A-1-7 Discrete Output Point Object (Class 09 hex) Supported Service Codes Table A-13 Discrete Output Point Object - Supported Service Codes Service Code No. (hex) A - 12 Service Description 0E Reads Attribute data. 10 Writes Attribute data. DeviceNet Communications Unit User’s Manual (I581-E1) Appendices Object Details Table A-14 Discrete Output Point Object - Object Details Instance (hex) Attribute (hex) 01 to 06 03 Name Value Description Terminal state 0: OFF 1: ON Setting Range Default ---- ---- Read Write Size Yes BOOL Yes Precautions for Correct Use Instances 1 to 3 correspond to the inverter's multi-function output terminals P1/P2 and the relay output terminal. Instances 1 to 6 correspond to the inverter's multi-function output terminals P1 to P5 and the relay output terminal. A-1 General Object Specifications A-1-8 Unit Parameter Object (Class 94 hex) Supported Service Codes Table A-15 Unit Parameter Object - Supported Service Codes Service Code No. (hex) Service Description 0E Reads Attribute data. 10 Writes Attribute data. A Object Details Instance (hex) Attribute (hex) 01 64 Name Default Connection Path Description 0: Basic Speed I/O 1: Extended Speed I/O 2: Extended Speed and Torque Control 3: Special I/O 4: Extended Control I/O 5: Extended Control I/O and Multi function I/O Monitor 6: Flexible Format 7: Extended Speed and Acceleration Control Setting Range Default 0-7 1 Read Write Size Yes USINT Yes Precautions for Correct Use The value written to this Instance is reflected on Assembly Instance No. (P046). DeviceNet Communications Unit User’s Manual (I581-E1) A - 13 A-1-8 Unit Parameter Object (Class 94 hex) Table A-16 Unit Parameter Object - Object Details Appendices A-2 AC Drive Object Specifications A-2-1 Motor Data Object (Class 28 hex) Supported Service Codes Table A-17 Motor Data Object - Supported Service Codes Service Code No. (hex) Service Description 0E Reads Attribute data. 10 Writes Attribute data. Object Details Table A-18 Motor Data Object - Object Details Instance (hex) Attribute (hex) Name Setting Range Default 01 03 Motor Type 3: PM synchronous motor (d060 = 3) 7: Squirrel cage induction motor (d060 3) ---- 7 06 Motor Rated Current Motor rated current Unit: [0.1 A] ---- 07 Motor Rated Voltage Motor rated voltage Unit: [V] Description Read Write Size Yes Yes USINT Depends on the inverter type. Yes Yes UINT ---- Depends on the inverter type. Yes Yes UINT ---- Depends on the inverter type. Yes Yes UINT Reflected on inverter parameter A082 (AVR voltage selection). 08 Motor Rated Power Reflected on inverter parameter H003 (Motor Capacity). 09 Motor Rated Frequency Motor rated frequency Unit: [Hz] 0B Max. Speed Maximum allowable motor speed Unit: [min-1] 0C A - 14 Pole Count Number of motor poles (Speed conversion only) Only even numbers are valid. 300 to Max. Speed 50 Yes Yes UINT Depends on the inverter mode (d060). 50 Yes Yes UINT 0 - 38 0 Yes Yes UINT DeviceNet Communications Unit User’s Manual (I581-E1) Appendices A-2-2 Control Supervisor Object (Class 29 hex) Supported Service Codes Table A-19 Control Supervisor Object - Supported Service Codes Service Code No. (hex) Service Description 0E Reads Attribute data. 10 Writes Attribute data. Object Details Table A-20 Control Supervisor Object - Object Details Attribute (hex) Setting Range Default 01 03 Forward/ Stop 0: Stop 1: Forward ---- 04 Reverse/ Stop 0: Stop 1: Reverse 05 Net Control 06 Name Description Read Write Size 0 Yes Yes BOOL ---- 0 Yes Yes BOOL 0: Follow the setting of parameter A002. 1: DeviceNet reference ---- 0 Yes Yes BOOL State Drive status ---- ---- Yes No UINT 07 During Forward Run 0: Stop 1: During forward run ---- ---- Yes No BOOL 08 During reverse run 0: Stop 1: During reverse run ---- ---- Yes No BOOL 09 Inverter Ready 0: Not ready 1: Ready ---- ---- Yes No UINT 0A Fault 0: Normal 1: Fault ---- ---- Yes No BOOL 0B Alarm 0: Normal 1: Alarm ---- ---- Yes No BOOL 0C Fault Reset Resets the Fault/Trip state of the inverter when written to 1. ---- 0 Yes Yes BOOL 0D Fault Code Fault/Trip state code ---- ---- Yes No UINT A The comparison between the inverter Error/Trip codes and the CIP Fault/Warning codes is shown in Table A-21. A - 15 A-2-2 Control Supervisor Object (Class 29 hex) Additional Information DeviceNet Communications Unit User’s Manual (I581-E1) A-2 AC Drive Object Specifications Instance (hex) Appendices A - 16 Instance (hex) Attribute (hex) 01 Setting Range Name Description Default Read Write Size 0F Control From Net Run Signal Input Status 0: Follow the setting of parameter A002. 1: DeviceNet ---- ---- Yes No BOOL 10 DeviceNet Fault Mode Indicates the inverter operation on network error. 0: Inverter Fault/Trip and stop (P045 = 1) 1: Ignore (P045 = 2) 2: Vendor-specific ---- 2 Yes Yes UINT 11 Force Fault/Trip Communications External Fault Input Inverter's External trip (EXT) input ---- 0 Yes Yes BOOL 12 Force Status Communications External Fault Input Status External trip (EXT) input status 0: Communicating 1: Fault detected ---- 0 Yes No BOOL 14 Net Idle Mode Indicates the inverter operation on network idle mode. 0: Stop (P048 = 4) 1: Ignore (P048 = 2) 2: Vendor-specific ---- 2 Yes Yes USINT 64 Drive State Detail Inverter Drive State Detail value: 0 : Stopping 1 : Running 2 : Jogging 3 : Free running 4 : Direct current DC braking 5 : Restart (Retry) Error detected (Decelerated stop) 7 : Restart (Retry) in process 8 : Waiting for restart (retry) 10 : Fault/Trip 11 : Undervoltage condition ---- ---- Yes No USINT 65 Trip Cause Returns a direct Trip cause (E01 to E99). ---- ---- Yes No USINT 66 Free Run Enables/disables free run. 0: Ignore 1: Free run enabled ---- 0 Yes Yes BOOL DeviceNet Communications Unit User’s Manual (I581-E1) Appendices Table A-21 Error Code Conversion DeviceNet Communications Unit User’s Manual (I581-E1) 4200 5000 3130 5410 5400 7300 9000 9000 2221 5300 7500 7510 7510 7510 7510 6320 7510 7510 7510 7510 7510 7510 7510 7510 7510 6320 7510 7510 7510 7510 7510 7305 Device temperature Device hardware Phase failure Output stages Power section Sensor External malfunction External malfunction Continuous overcurrent 1 Operator control circuit Communications Serial interface 1 Serial interface 1 Serial interface 1 Serial interface 1 Parameter error Serial interface 1 Serial interface 1 Serial interface 1 Serial interface 1 Serial interface 1 Serial interface 2 Serial interface 2 Serial interface 2 Serial interface 2 Parameter error Serial interface 2 Serial interface 2 Serial interface 2 Serial interface 2 Serial interface 2 Incremental encoder 1 defective A - 17 A A-2-2 Control Supervisor Object (Class 29 hex) E21 E22 E24 E25 E30 E35 E36 E37 E38 E40 E41 E60 E61 E62 E63 E64 E65 E66 E67 E68 E69 E70 E71 E72 E73 E74 E75 E76 E77 E78 E79 E80 Code 2200 2214 2213 2200 2220 7112 3210 6320 3220 5210 6100 9000 9000 2120 3110 3120 4000 CIP Fault/Warning Code Name Current inside device Overcurrent during slowdown Overcurrent during startup Current inside device Continuous overcurrent Brake chopper overcurrent Overvoltage inside device Parameter error Undervoltage inside device Measurement circuit Internal software External malfunction External malfunction Short to ground Trunk line overvoltage Trunk line undervoltage Temperature A-2 AC Drive Object Specifications Code E01 E02 E03 E04 E05 E06 E07 E08 E09 E10 E11 E12 E13 E14 E15 E16 E20 Error/Trip Code Name Overcurrent protection at constant speed Overcurrent protection during deceleration Overcurrent protection during acceleration Other overcurrent protection Overload protection Braking resistor overload protection Overvoltage protection EEPROM error Undervoltage Current detector error CPU error External trip USP error Ground fault Input overvoltage protection Momentary power interruption protection Temperature error due to cooling fan frequency lowering Temperature error CPU error Phase failure Main circuit error Driver error Thermistor error Braking error Emergency disconnect Low-speed overload protection Operator connection error Modbus communication error Option error (Inverter communications error) Option error (Duplicated MAC ID) Option error (External trip) DRT/CRT communications lost/idle Illegal flexible mapping Option error (Reserved) Option error (Reserved) Option error (Reserved) Option error (Reserved) Option error (Inverter communications lost error) Option error (Inverter communications error) Option error (Duplicated MAC ID) Option error (External trip) DRT/CRT communications lost/idle Illegal flexible mapping Option error (Reserved) Option error (Reserved) Option error (Reserved) Option error (Reserved) Option error (Inverter communications lost error) Encoder disconnection Appendices Code E81 E82 E83 A - 18 Error/Trip Code Name Excessive speed Positioning error Position control range trip Code 8401 8500 8501 CIP Fault/Warning Code Name Velocity following error Positioning error Position following error DeviceNet Communications Unit User’s Manual (I581-E1) Appendices A-2-3 AC/DC Drive Object (Class 2A hex) Supported Service Codes Table A-22 AC/DC Drive Object - Supported Service Codes Service Code No. (hex) Service Description 0E Reads Attribute data. 10 Writes Attribute data. Object Details Table A-23 AC/DC Drive Object - Object Details Attribute (hex) 01 03 At Reference 0: Stopping/Accelerating or decelerating 1: At reference 04 Net Reference Speed reference selection 0: Follow the setting of parameter A002. 1: Network control 06 Drive Mode 0: Vendor-specific mode 07 Speed Actual If parameter P049 (Number of Poles for Rotation Speed Setting) is set appropriately, the Name Description Setting Range Default ---- Read Write Size ---- Yes No BOOL 0-1 0 Yes Yes BOOL 0 0 Yes No USINT ---- ---- Yes No INT rotational speed unit is [min-1]. If parameter P049 (Number of Poles for Rotation Speed Setting) is set to 0, the frequency unit is [0.01 Hz]. Speed Reference If parameter P049 (Number of Poles for Rotation Speed Setting) is set appropriately, the A 0Max. Speed 0 Yes Yes INT ---- ---- Yes No INT rotational speed unit is [min-1]. If parameter P049 (Number of Poles for Rotation Speed Setting) is set to 0, the frequency unit is [0.01 Hz]. 09 Current Actual Output current monitor Unit: [0.1 A] DeviceNet Communications Unit User’s Manual (I581-E1) A - 19 A-2-3 AC/DC Drive Object (Class 2A hex) 08 A-2 AC Drive Object Specifications Instance (hex) Appendices A - 20 Instance (hex) Attribute (hex) Setting Range Default 01 0F Power Actual Output power monitor Unit: [W] ---- 11 Output Voltage Output voltage monitor Unit: [V] 12 Accel Time 13 Name Description Read Write Size ---- Yes No INT ---- ---- Yes No INT Unit: [ms] 10 3600000 10000 Yes Yes UINT Decel Time Unit: [ms] 10 3600000 10000 Yes Yes UINT 1D Reference From the Net Speed reference input selection monitor: 0: Follow the setting of parameter A002. 1: DeviceNet 0-1 0 Yes Yes BOOL 77 Torque Actual Rel Actual torque monitor Unit: [%] ---- ---- Yes Yes INT 78 Torque Ref Rel Reference torque Unit: [%] 0 - 200 0 Yes Yes INT 79 Torque Compensation Bias Rel Compensation bias torque Unit: [%] -200 200 0 Yes Yes INT 7A At Zero Speed 0: Non-zero speed 1: At zero speed ---- ---- Yes No BOOL DeviceNet Communications Unit User’s Manual (I581-E1) Index I DeviceNet Communications Unit User’s Manual (I581-E1) I-1 Index Index A Allocation areas ....................................................... 1-8, 1-9 allocation relay area ..................................................... 3-15 Allocation type ......................................................... 1-8, 1-9 Assembly Instance No. ............................3-3, 3-6, 3-9, 3-15 Assembly No. .......................................................... 3-3, 3-6 Attribute ................................................................. 5-2, 5-13 Attribute ID ..................................................................... 5-3 Autodetect .................................................................... 3-28 Automatic Baud Rate Recognition ................................. 1-4 auto-tuning ................................................................... 4-10 B Basic Speed I/O .........................................1-3, 3-2, 4-2, 4-4 AL ............................................................................. 4-5 FW ............................................................................ 4-4 FWR ......................................................................... 4-5 Rotation Speed Monitor ............................................ 4-5 Rotation Speed Reference ........................................ 4-4 RS ............................................................................. 4-4 Busoff ...................................................................... 3-4, 6-4 C Class ..................................................................... 5-2, 5-13 Class ID .......................................................................... 5-3 Clear switch .................................................................. 3-15 CMND Instruction ........................................................... 5-3 communications timeout ................................................. 6-4 Compare ....................................................................... 3-21 Compare inverter parameters ...................................... 3-21 Control Supervisor Object ............................................A-15 CTR ................................................................................ 3-5 CX-Integrator ....................................................... 1-15, 3-14 CX-ONE ....................................................................... 3-14 D Device Parameters ....................................................... 1-15 Device Type .................................................................. 3-27 DeviceNet Communications Unit Dimensions ............................................................. 1-12 DeviceNet connector signals ........................................ 2-14 Discrete Input Point Object ...........................................A-12 Discrete Output Point Object ........................................A-12 Download ..................................................................... 3-21 download ............................................................. 3-22, 3-23 Download inverter parameters ..................................... 3-21 E Editing Device Parameters ........................................... 3-21 I-2 EDS file ............................................................... 1-15, 3-14 Enable switch ............................................................... 3-15 ENTER Command ....................................................... 5-13 error code ....................................................................... 6-5 Explicit Message Errors ............................................... 6-10 Extended Control I/O ........................1-3, 3-2, 3-6, 4-2, 4-13 AL ........................................................................... 4-14 CFN ........................................................................ 4-14 CI3 to CI7 ............................................................... 4-13 CI8 .......................................................................... 4-13 CO1 ........................................................................ 4-13 CO2 ........................................................................ 4-13 CO3 to CO5 ............................................................ 4-13 CR .......................................................................... 4-13 EXT ......................................................................... 4-13 FA1 ......................................................................... 4-14 FW .......................................................................... 4-13 FWR ....................................................................... 4-14 IRDY ....................................................................... 4-14 MO1 ........................................................................ 4-14 MO2 ........................................................................ 4-14 MO3 ........................................................................ 4-15 MO4 ........................................................................ 4-15 MR .......................................................................... 4-14 Output Current Monitor ........................................... 4-15 Rotation Speed Monitor .......................................... 4-15 Rotation Speed Reference ..................................... 4-14 RS ........................................................................... 4-13 RV ........................................................................... 4-13 RVR ........................................................................ 4-14 Torque Actual .......................................................... 4-15 Torque Compensation Bias .................................... 4-14 Torque Reference ................................................... 4-14 WR .......................................................................... 4-14 ZS ........................................................................... 4-14 Extended Control I/O and Multi function I/O Monitor ..............1-3, 3-2, 3-6, 4-2, 4-15 AL ........................................................................... 4-16 CFN ........................................................................ 4-16 FA1 ......................................................................... 4-15 FWR ....................................................................... 4-15 IRDY ....................................................................... 4-15 MI1 to MI7 ............................................................... 4-16 MI8 .......................................................................... 4-16 MO1 ........................................................................ 4-16 MO2 ........................................................................ 4-16 MO3 ........................................................................ 4-16 MO4 ........................................................................ 4-16 MR .......................................................................... 4-16 Output Current Monitor ........................................... 4-16 Rotation Speed Monitor .......................................... 4-16 RVR ........................................................................ 4-15 Torque Actual .......................................................... 4-16 WR .......................................................................... 4-15 ZS ........................................................................... 4-15 DeviceNet Communications Unit User’s Manual (I581-E1) Index Extended Speed and Acceleration Control ............................... 1-3, 3-2, 4-2, 4-7 Acceleration Time ......................................................4-7 AL ..............................................................................4-8 CFN ...........................................................................4-8 CTR ...........................................................................4-7 Deceleration Time .....................................................4-7 Drive Status Detail .....................................................4-9 FA1 ............................................................................4-8 FRS ...........................................................................4-7 FW .............................................................................4-7 FWR ..........................................................................4-8 FWT ..........................................................................4-8 MI1 to MI7 .................................................................4-8 MI8 ............................................................................4-8 Output Current Monitor .............................................4-9 REF ...........................................................................4-7 RFN ...........................................................................4-8 Rotation Speed Monitor .............................................4-9 Rotation Speed Reference ........................................4-7 RS .............................................................................4-7 RV .............................................................................4-7 RVR ...........................................................................4-8 Trip Cause .................................................................4-9 Extended Speed and Torque Control ............................... 1-3, 3-2, 3-6, 4-2, 4-11 AL ............................................................................4-12 CFN .........................................................................4-12 CTR ......................................................................... 4-11 Drive Status .............................................................4-12 FA1 ..........................................................................4-12 FW ........................................................................... 4-11 FWR ........................................................................4-12 IRDY ........................................................................4-12 REF ......................................................................... 4-11 RFN .........................................................................4-12 Rotation Speed Monitor ...........................................4-12 Rotation Speed Reference ......................................4-11 RS ........................................................................... 4-11 RV ........................................................................... 4-11 RVR .........................................................................4-12 Torque Actual ..........................................................4-12 Torque Reference ....................................................4-11 WR ..........................................................................4-12 Extended Speed I/O .................................. 1-3, 3-2, 4-2, 4-5 AL ..............................................................................4-6 CFN ...........................................................................4-6 CTR ...........................................................................4-5 Drive Status ...............................................................4-6 FA1 ............................................................................4-6 FW .............................................................................4-5 FWR ..........................................................................4-6 IRDY ..........................................................................4-6 REF ...........................................................................4-5 RFN ...........................................................................4-6 Rotation Speed Monitor .............................................4-6 Rotation Speed Reference ........................................4-5 RS .............................................................................4-5 RV .............................................................................4-5 DeviceNet Communications Unit User’s Manual (I581-E1) RVR ...........................................................................4-6 WR ............................................................................4-6 F FINS command ...............................................................5-3 FINS Message Errors .....................................................6-9 Fixed allocations ...........................................................3-14 Flexible Format ................................ 1-3, 3-2, 3-9, 4-2, 4-20 Flexible Format I/O Allocation .......................................4-20 Frequency Reference ...................................................4-17 Frequency reference selection .......................................3-5 Function Code ............................................4-17, 4-18, 6-11 Function Code Object ...................................................5-15 G general-purpose input ...................................................3-12 general-purpose output .................................................3-12 H High Frequency mode ..................................................1-15 I Identity Object ................................................................ A-2 IDLE ..............................................................................4-23 Idle Mode Detection Setting ............................................3-4 Input Register ...............................................................3-12 Input/Output Bit Data ....................................................4-19 Instance .................................................................5-2, 5-13 Instance ID ......................................................................5-3 Inverter connection PCB .................................................2-3 Inverter connector ...........................................................2-2 Issuing an Explicit Message ...........................................5-6 L LED indicators ................................................. 2-2, 2-3, 2-4 Light Load Mode ...........................................................1-15 M Master Unit ............................................................1-8, 3-15 CJ1W-DRM21 ...........................................................1-8 CS1W-DRM21 ..........................................................1-8 Maximum Number of Inverter Connections ....................1-8 Message function ............................................................5-8 Messaging ......................................................................1-4 Explicit Message ................................................1-4, 5-2 Modbus Coil Information ...............................................4-19 Modbus communication ................................. 3-2, 3-9, 4-17 Modbus communication (Modbus-RTU) ....................... 3-11 Modbus register ...................................................3-12, 4-21 Modbus-RTU ........................................................3-11, 4-17 Module status ........................................................2-4, 3-15 Motor Data Object ........................................................ A-14 MS .......................................................... 2-4, 3-15, 6-2, 6-3 I-3 I Index Multi-function Input Monitor .......................................... 3-13 multi-function inputs ..................................................... 3-12 Multi-function Output Terminal Parameter .................... 3-13 multi-function outputs ................................................... 3-12 N Net.Ctrl. .......................................................................... 3-5 Net.Ref. .......................................................................... 3-5 Network Communications Command Execution Enabled Flag ............................................... 5-6 network configuration tool CX-Integrator ........................ 1-5 Network status ....................................................... 2-4, 3-15 Network Type ............................................................... 3-27 No. of occupied bytes .............................................. 3-3, 3-6 No. of occupied words .................................................. 3-16 Node Address .......................................................... 2-4, 3-3 NS ...........................................................2-4, 3-15, 6-2, 6-4 Torque Reference Input Selection ......................... 3-8, 3-11 U Unit Parameter Object .................................................. A-13 Upload .......................................................................... 3-21 upload ................................................................. 3-22, 3-23 Upload inverter parameters .......................................... 3-21 upload/download ................................................. 3-22, 3-23 User allocations ................................................... 3-14, 3-16 V vector control ................................................................ 4-10 O Online Status .................................................................. 5-6 Output Register ............................................................ 3-12 P Parameter ..................................................................... 5-11 Parameter Setting Error ................................................. 6-8 PM Motor mode ............................................................ 1-15 Poll ........................................................................ 1-3, 1-16 R Reading Response to an Explicit Message .................... 5-6 REF ................................................................................ 3-5 Register No. for DeviceNet input .................................. 4-20 Register No. for DeviceNet output ................................ 4-19 Register Number ................................................. 4-17, 4-18 Remote I/O ..................................................................... 1-3 Reset Mode .................................................................... 3-3 RJ45 Connector ........................................................... 1-15 RS485 Communications ............................................... 1-15 RUN Command ............................................................ 4-17 RUN command selection ................................................ 3-5 S Scan List .............................................................. 3-15, 3-16 Scan List Configuration ................................................ 3-16 Special I/O ....................................... 1-3, 3-2, 3-9, 4-2, 4-17 Special Remote Input Error Codes ............................... 4-19 T termination resistance .................................................. 2-15 Torque Bias Mode ................................................. 3-8, 3-11 Torque Control ................................................3-2, 3-8, 4-10 Torque Control Function ............................................... 4-10 torque reference .................................................... 3-2, 4-10 I-4 DeviceNet Communications Unit User’s Manual (I581-E1) OMRON Corporation Industrial Automation Company Authorized Distributor: Tokyo, JAPAN Contact: www.ia.omron.com Regional Headquarters OMRON EUROPE B.V. Wegalaan 67-69-2132 JD Hoofddorp The Netherlands Tel: (31)2356-81-300/Fax: (31)2356-81-388 OMRON ELECTRONICS LLC One Commerce Drive Schaumburg, IL 60173-5302 U.S.A. Tel: (1) 847-843-7900/Fax: (1) 847-843-7787 OMRON ASIA PACIFIC PTE. LTD. No. 438A Alexandra Road # 05-05/08 (Lobby 2), Alexandra Technopark, Singapore 119967 Tel: (65) 6835-3011/Fax: (65) 6835-2711 OMRON (CHINA) CO., LTD. Room 2211, Bank of China Tower, 200 Yin Cheng Zhong Road, PuDong New Area, Shanghai, 200120, China Tel: (86) 21-5037-2222/Fax: (86) 21-5037-2200 © OMRON Corporation 2012 All Rights Reserved. In the interest of product improvement, specifications are subject to change without notice. Cat. No. I581-E1-03 1012