1
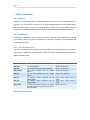
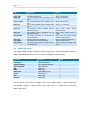
1|P a g e WPOS TM Web-based Point of Sale User Manual Version 1.0 The Web-based Point of Sale system provides Internet Merchants with an easy solution for processing credit card transactions through their ecommerce websites. It involves calling a few functions to set the parameters of the transaction order, and then finalise the process by authorizing the transfer of funds to the Merchant Account. www.merchalite.com/products/wpos FIRST EDITION Written by: Desmond Campbell © 1998-2009 Merchalite® Card Services 2|P a g e WPOS™ Web-based Point of Sale © 1998-2009 Merchalite® Card Services A registered trademark of iLite® Group, Inc. http://www.merchalite.com http://www.ilitegroup.com Brand names, logos and acronyms referenced within this document are trademarks of their respective entities. Where this is not explicitly stated, it is not to be assumed that Merchalite® endorses the view(s) of a third-party when referenced in this publication. PUBLICATION HISTORY Application Version 1.0 Released April 5, 2009 Manual First Edition Released February 22, 2009 COPYRIGHT NOTICE Where applicable, permission and respective guidelines will be issued to Subscribers for proper editing of code and applications distributed by Merchalite®, or by any subsidiary of iLite® Group, Inc. Exclusive of this, republication, reengineering or copied distribution of licensed software in any form, entirely or partly, whether for monetary gain or otherwise is strictly prohibited. Failure to adhere to this copyright infringement legislation warrants a permanent closure of all services and licences issued to the Subscriber. Please read more at: http://www.merchalite.com/terms. OTHER USEFUL LINKS Terms of Use: http://www.merchalite.com/corporate_id/terms/index.html Privacy Statement: http://www.merchalite.com/corporate_id/privacy/index.html Merchant Accounts: http://www.merchalite.com/services/merchant-accounts WPOS™ product page: http://www.merchalite.com/products/wpos Other Merchalite® products: http://www.merchalite.com/products 3|P a g e CONTENTS PREFACE .......................................................................................................................................................5 GLOSSARY....................................................................................................................................................5 1 2 OVERVIEW ..........................................................................................................................................7 1.1 GETTING STARTED ................................................................................................................................... 7 1.2 WPOS™ SOURCE FILES .......................................................................................................................... 8 1.3 THE MERCHALITE® DATABANK ................................................................................................................ 9 1.4 SUMMARY ................................................................................................................................................ 9 1.5 SUPPORT ............................................................................................................................................... 10 FUNDAMENTALS..............................................................................................................................11 2.1 3 4 5 6 BASIC REQUIREMENTS ........................................................................................................................... 11 HTML FORMS....................................................................................................................................12 3.1 INTRODUCTION ...................................................................................................................................... 12 3.2 HTML FORM CONTROLS ........................................................................................................................ 12 3.3 CREATING A FORM ................................................................................................................................. 13 3.4 CONCLUSION ......................................................................................................................................... 14 PHP REVISION.................................................................................................................................15 4.1 SERVERSIDE SCRIPTING ......................................................................................................................... 15 4.2 ABOUT PHP........................................................................................................................................... 15 4.3 GETTING STARTED WITH PHP................................................................................................................ 15 4.4 SYNTAX ................................................................................................................................................. 15 4.5 VARIABLES ............................................................................................................................................. 16 4.6 CONSTANTS ........................................................................................................................................... 17 4.7 DATA TYPES WITHIN THE WPOS™........................................................................................................ 17 4.8 CALLING A FUNCTION ............................................................................................................................. 18 FORM HANDLING IN PHP .............................................................................................................19 5.1 OVERVIEW ............................................................................................................................................. 19 5.2 THE FORM DATA CHANNEL ..................................................................................................................... 19 5.3 GET HEADERS ....................................................................................................................................... 19 5.4 POST HEADERS .................................................................................................................................... 20 5.5 DATA VALIDATION ................................................................................................................................. 20 PHP CLASSES ...................................................................................................................................21 6.1 INTRODUCTION TO CLASSES ........................................................................................................................ 21 4|P a g e 7 8 9 6.2 INCLUDING A FILE IN PHP ..................................................................................................................... 21 6.3 HOW TO USE THE CLASS FUNCTIONS ..................................................................................................... 21 WPOS™ TRANSACTIONS...............................................................................................................23 7.1 OVERVIEW ............................................................................................................................................. 23 7.2 TRANSACTIONS ...................................................................................................................................... 23 7.3 CREDIT CARD TYPES .............................................................................................................................. 24 WPOS™ API FUNCTIONS ..............................................................................................................25 8.1 OVERVIEW ............................................................................................................................................. 25 8.2 WPOS::CONNECT ................................................................................................................................. 25 8.3 WPOS::IGNOREERROR ......................................................................................................................... 25 8.4 WPOS::SETPARAMETER ........................................................................................................................ 26 8.5 WPOS::SAVEPARAMETERS .................................................................................................................... 26 8.6 WPOS::AUTHORISE .............................................................................................................................. 26 8.7 WPOS::AUTHORISEDEMO ..................................................................................................................... 27 8.8 WPOS::CHARGECARD ........................................................................................................................... 27 8.9 WPOS::CHARGECARDDEMO.................................................................................................................. 27 8.10 WPOS::GETSTATUS ............................................................................................................................. 28 8.11 WPOS::CLOSE ...................................................................................................................................... 28 ADDITIONAL INFORMATION.......................................................................................................29 5|P a g e Preface Merchalite® affords Internet Merchants with economical means of organising internet transactions and monitoring e-sales generation, with the coupled use of a Merchant Account and supporting web application software. This document provides concise and technically simplified supporting material to one of such software, the Web-based Point of Sale (WPOS™) system distributed by Merchalite®. This system allows website owners to integrate a programming interface seamlessly into their existing website, enabling them to validate and charge major credit cards around the world in real time. The ability to process credit cards and collect live payments is an asset to any Internet business. It increases the opportunity of market expansion and coverage, leading to success in what is now an extremely competitive electronic commercial industry. This user manual also presents a basic introduction to the programming background required for the use of the WPOS™ API integration. We encourage the reader to research the topics and learn the additional content in order to support their foundation in this regard. Glossary Subscriber A Merchant who acquires a licence to use Merchalite® services, whether in demo or paid. Merchalite® Transaction Database (MTD) The storage engine which collects and organises all data generated by transactions. This is the source of information for the transaction report generators. Merchalite® Credit Card Engine (MCCE) The application that processes transactional requests [and feeds] that involve credit card manipulation. Processes such as validating and charging are most common to this application. 6|P a g e Web Application (WA) or Processing Script The .php, .aspx or .cgi script (or other) residing on the Subscriber’s website that will be used for the processing of form data, and communication to the MTD using WPOS™ source files. Application Programming Interface (API) Refers to the WPOS™ acting as an interface between the WA and the MCCE via web server channels. Information transferred between the two is not visible by the end user, unless it is manually delivered to a web page as output via the WA. 7|P a g e 1 Overview The WPOS™ API takes a different structural form based on the programming language or platform that is applicable to the Subscriber’s website. However, the core function of the software remains non-specific, and involves collecting data through the Web Application (WA) and passing it to the Merchalite® Transaction Database (MTD). In the first release (current), only PHP development is supported. The PHP curl function (http://www.php.net/curl) is used to carry out the data communication tasks, and is required to be installed on the Subscriber’s web host. The curl function enables the WA to communicate with the MTD in a secure mode. This software is being further developed for Windows gurus particularly those who utilise ASP and ASP.net technology, as well as Cold Fusion and others. Besides the curl technology, the WPOS™ doesn't need additional software to operate on any website, as it is bundled with all the functions required via the dependency files distributed. More importantly, these functions only use native PHP functions embedded in PHP 4 or higher. 1.1 Getting Started 1.1.1 Obtaining a Merchant® Account To gain access to any of the tools provided by Merchalite®, you need to first obtain a Merchant Account subscription. For your testing purposes, we have adjusted the system to facilitate a fully functional Demo Merchant Account. Your demo account will work forever, but it will not charge credit cards, and will flush transaction histories every 7 days. How to Acquire a Demo Merchant Account The demo account is available by default when you sign up for a Member’s Account. If you don’t have a Member’s Account, you can obtain one for free at: http://register.merchalite.com. If you already have a Member’s Account but no demo account is associated with it, you can obtain one here: http://www.merchalite.com/getdemo. How to Acquire a Paid Merchant Account Assuming that you already have a Member’s Account, you can easily obtain a Paid Merchant Account here: http://www.merchalite.com/subscribe. 8|P a g e You can read more about Merchant Accounts, the different types and charges associated at: http://www.merchalite.com/services/merchant-accounts. 1.2 WPOS™ Source Files Each licensed Subscriber will be provided with two core source files, a script file and a package file, for installation onto a maximum of 3 different websites. To originate transactions on additional websites using the same account, an extra subscription charge will incur. Below is a brief description of the source files distributed and their purpose. 1.2.1 Script File Code within this file will be included inside existing code contained in your processing script, for the sole purpose of collecting the data submitted through user forms, and passing this data to the MTD across the API. The only data required are the shipping and billing addresses, along with credit card details. This is necessary for constituting a fully defined transaction record. The original script file serves as a template that may be edited to suit an existing program. This file also contains instructions in "comments" that should serve as a guide while editing to ensure that acceptable and correct data is passed to the server. 1.2.2 Package File The package file is intended to be hard coded in conjunction with the script file, and will create a link between the credit card engine and the script file. Functions to be used in the script file will be defined fully in this package file. An example of the functions used is the Connect() function, which authorises the transaction session with the Subscriber’s credentials specified within the script file configuration section. Other functions perform tasks such as charging the credit card or validating the card, etc. 1.2.3 Downloading the Source Files The source files may be obtained through the Merchalite® Resource Centre, a dedicated website for this type of information, as well as user manuals and other files to support the Merchant Account tools. This website is located at: http://download.merchalite.com. 1.2.4 Keeping Source Files Updated Handling of credit card information over a web server is serious business. We have put a lot of work into this project, to ensure that your customers’ transactions are safely carried out. In order to take full advantage of our system, we implore you to keep the source files up-to-date. Whenever a critical update is necessary, the Merchalite® Robot will send you an alert by email. 9|P a g e How to Obtain File Updates You can obtain a fully updated version of all the source files any time through the resource centre at: http://download.merchalite.com/resources/#api. Optionally, you can learn more about automatic updates, which involves running a script, obtainable through the same resource centre. More about automatic updates: http://kb.merchalite.com/articles/4755678/how-to-automaticically-update-api-source-files. Note well that if your files are not updated, the functions won’t be accessible through the API. This means that your transactions will not go through when your customers attempt to make purchases. It is your responsibility to ensure that the updates are installed in a timely manner. 1.3 The Merchalite® Databank All data that is generated by the use of your Merchant Accounts will be stored in the Merchalite® Databank (MDB). For your use, the MDB is designed as an informative report generator with up-tothe-second transaction results for Merchants with high traffic. To access the MDB, visit: http://databank.merchalite.com. To access the control panel, visit: http://cp.merchalite.com. 1.4 Summary This API is very simple to use, given that you have a basic PHP background. If not, you can study the section contained in this manual on PHP Basics, together with a few tutorials from off the Internet. All that is required to do is to edit the script file so as to specify each parameter of the “transaction order” (shipping address, billing address, credit card number etc.). To complement the process, the appropriate function will be invoked to save the data to the MTD and then functions to validate/charge the credit card. 10 | P a g e 1.5 Support In addition to this manual, we provide technical support for all our products. Online support is available at the knowledgebase located at: http://kb.merchalite.com. You can also find an active forum for discussion of product related topics at: http://www.merchalite.com/product-forums. Lastly, for correspondence relating to this service or any other, the following contact information may be used. Contact Information Technical Support 1-868-479-8429 1-876-565-3483 [email protected] General Inquiries http://www.merchalite.com/contact/index.htm 11 | P a g e 2 2.1 Fundamentals Basic Requirements In order to run the WPOS™ from within your website, you need at least the following basic requirements. 2.1.1 System Requirements (Web Host) 1. PHP 4 or later PHP is the scripting language that this version of the software is developed in. Older versions of PHP might work, but we cannot warrant you a full working product in an older version than version 4, as we have only tested on version 4 and higher, due to major instabilities in lower versions of PHP. 2. Curl process function installed and activated Curl is a native PHP function that enables behind the scene fetching of a webpage and HTTP content. It has to be enabled by your web host in order for this process to work. 3. A valid SSL certificate installed on the host server You need to have a SSL certificate installed on your server to secure the transactions that are fired through the WPOS™. Contact your web host about issuing a dedicated IP address and installing a SSL on your portion of the host server. 2.1.2 Programming Knowledge Requirements 1. Data manipulation and data types particularly “strings” and “integers” You are required to know the distinction between data types and how they are represented, so as to avoid errors in your script file coding. 2. HTML coding and form implementation. If you need to use your own HTML forms then you are required to know how to code the forms in order to protect the data being transferred and also to pass valid data to the system. 3. PHP handling of form data, variable assignment and function calling You are required to know the basics of PHP regarding variable assignment, function calling and how to handle form data for validation purposes and also to collect the right data to be sent to the server. 12 | P a g e 3 HTML Forms 3.1 Introduction HTML Forms are objects inside your HTML page that you use to collect information from users. Depending on the type of information you wish to collect, you would choose an appropriate “HTML form control”. 3.2 HTML Form Controls i. Textbox Textboxes allow the user to type information. You can control the maximum length required and you can specify how the box appears such as the type of border, the colour and font-size. Textboxes are used to request names, addresses, and any other type of field where a textual answer is required. ii. Select box A select box allows the user to choose an item from a list. For example, you can present a list of countries for the user to select the country to which she belongs. Select boxes are used to request any type of selection, including occupation and month, day & year for birthdays. iii. Multiple select box Similarly to the select box, this allows the user to select more than one item from the list, by using the Ctrl key. Sometimes you have a list of services on your website that you allow members to choose. If you wish to allow them to select a combination of services, e.g., this is a handy control to use. iv. Checkbox Provides the user with a small box allowing them to tick or un-tick an item. For example, the user can tick a checkbox to specify that they have read the Terms of Service and agreed. v. Radio button A radio button offers a selection just like the select box, but usually is used for smaller lists, for example, gender list (male or female). 13 | P a g e vi. Command button A command button allows the user to click to initiate an event that is handled by a function. For example, when the user clicks a submit button in a form, a function that specifies what should be done when is button is clicked, will fire. 3.3 Creating a Form A form is created by use of the form tag, and by specifying the basic attributes of the form which are the name, action and method. Name The name of the form identifies it to the document. Action The action of the form specifies the script on the server that will handle the data submitted through the form. Method There are two methods of submitting form data, GET and POST. For now we will use the safer method, POST; but when reviewing the section on PHP form handling, a better understanding of the different methods is guaranteed. Here is a simple HTML form that asks a user for her name and address. <form name=”simple-form” action=”http://myexample.com/script-handler.php” method=”post”> <p>Type your name below</p> <p><input type=”text” name=”user_name” /></p> <p>Type your address below</p> <p><input type=”text” name=”user_address” /></p> <p>Select your country</p> <p><select name=”user_country”> <option value=”TT”>Trinidad</option> <option value=”JM”>Jamaica</option> <option value=”BD”>Barbados</option> </select></p> <p>Click the button below to submit your data</p> <p><input type=”submit” value=”Submit My Information” /></p> </form> 14 | P a g e When the submit button of this form is clicked, the user will be redirected to the URL: http://myexample.com/script-handler.php. This URL is the location of the script that will handle all the data that is being sent through the form by the user. 3.4 Conclusion You now know how to create a HTML form with controls to collect information from the user. This is just how much you need to know in order to start using the system. Adding to this, you may need to know how to format your HTML controls, text and other objects. Bear in mind that all these may be specified by setting attributes using the tags that represent these objects. Learning HTML is always easy, but what you need after that is a reference to use for your practicing purpose. You need a list of HTML tags, and a list of all the attributes that you can set for these tags, since you already know how to code a tag and its attribute. See the final section of this document for a list of resources. 15 | P a g e 4 4.1 PHP Revision Serverside Scripting In the previous section, you learned how to code a HTML form to collect information from the user. You are limited with HTML forms for the fact that you cannot interact with the server directly, so you cannot do tasks such as saving the information collected, just by using the HTML form. For this purpose you need to link the HTML form to a script on the server that has the power to do all this and more. Based on this rationale, the HTML document is classified as a client-side document (since it deals with the client or user), while the script on the server is called a server-side document. 4.2 About PHP PHP stands for Hypertext Preprocessor. It is a common serverside language that is widely used for the purposes mentioned above, even though it is much more powerful than what we want out of it here. This section only provides a basic set of tutorials for PHP, particularly what is needed to know in order to utilise this system. The reader is encouraged to visit the PHP online manual to learn the language and how to install and try the implementation. Link: http://www.php.net/manual/en/index.php 4.3 Getting Started with PHP PHP scripts cannot be run from your computer as with HTML documents. They have to be placed on a server with PHP installed, so that the PHP engine can read the script and execute the instructions that you placed inside it. To enable PHP to run on your computer for testing purposes, you have to install a web server and then download and install PHP onto it. The best choice for a web server is the Apache HTTP server. You can download with the following links. PHP: http://www.php.net/downloads.php Apache: http://httpd.apache.org/download.cgi 4.4 Syntax PHP is a scripting language and must be referenced with a .php extension. So if you place PHP code into a HTML document, you have to rename the document to a PHP file, in order to have the PHP code executed. The HTML part of the document will be recognised automatically. 16 | P a g e 4.4.1 Opening and Closing PHP Code To allow the PHP engine to recognise PHP code, you have to enclose it within PHP tags as follows: <?php # comment Line of code 1; Line of code 2; ?> Everything between the PHP tag: <?php and ?> will be recognised as PHP code and will be executed line by line by the PHP engine installed on the server. Each line of code is separated with a ;. 4.4.2 Comments In programming, sometimes you want to write lines of code that you want to be ignored, either for documentation or for debugging purposes. For this reason, PHP enables comments, which are identified by either // or #. These two symbols are used to comment a single line of code. To comment multiple lines you can either place the symbol at the beginning of each line, or you can comment the block of lines by using the following: /* to open and */ to close the block. 4.5 Variables For the WPOS™, there are pieces of data that you will need to specify in creating the order. These include the shipping address, name, country, telephone, credit card number, credit card expiration date and others. The assignment of these pieces of data are done line by line, hence to effect an easy process, you can create a temporary memory location or a “variable” to store each piece of data so that you can use them when you have collected all of them. Variables in PHP are named with a leading dollar sign. Creating the variable involves assigning it a value. We are going to create a variable named “shipping_country”, and we are going to give it a value “Trinidad”. Here is the PHP code for this: $shipping_country = “Trinidad”; 17 | P a g e Notice that the country name is placed between quotes. This specifies that the data type is a “string”, or a “text”. In PHP, data types can be of many different types, such as integer (int), Boolean or true/false (bool), and floating point (float), arrays and many more. See: http://www.php.net/manual/en/language.types.php. 4.6 Constants Also within the WPOS™, there are other pieces of data that are already specified that will not change. These are called constants since they are designed to hold a constant value. Constants are represented in a user friendly fashion to enhance readability. In our system, constants are used to represent credit card types. E.g. there is a numeric value, “1” associated with the Visa card type. Instead of writing 1 everywhere we reference a Visa card, we write CARD_VISA. So when you see this text, right away you are sure that the reference is to a Visa card, rather than seeing a 1 and trying to remember what 1 represents. PHP constants are not written with quotes, they are written as bare text. The following example calls one of the WPOS™ functions using the credit card type “MasterCard”. $wpos->SetParameter(“card_type”,CARD_MASTERCARD); The important part of this function for now is the second argument, CARD_MASTERCARD which represents a value of “2”. 4.7 Data Types within the WPOS™ The WPOS™ only supports string types. So for variables that contain data such as prices, they must be written as strings. The following examples serve as a guide to the manipulation of data with respect to data type within the WPOS™. $price = $250; $price = 250; $price = $250.00; $price = “$250”; $price = “£250”; 18 | P a g e All the above representations are wrong. In the WPOS™, they technically mean the same thing and should be written as follows. $price = “250”; For currency conversions, you are expected to implement whatever calculation that needs to be done to convert to US dollars, which is the benchmark currency for the WPOS™. If the representation is not correct, the expression will be evaluated to 0 by the WPOS™ API-Engine. 4.8 Calling a Function A function is block of code that takes an “argument” and performs a set of instructions on it, to return a value. For example, a function called “square” would take a number as an argument, and return the square of the number as the result. In the WPOS™, you don’t need to get involved in the actual working of the function, because that is taken care of in the API package file. However you will need to call the function to set the parameters and so on. This is how a function is called: function_name($argument1, $argument2); A function can take as many arguments as necessary but returns one result. If more than one result is needed from a function, the function can return a single list with as many results as needed. 19 | P a g e 5 Form Handling in PHP 5.1 Overview Since HTML is limited to the client side (the computer that is being used to access the webpage), only a little can be done with the data collected without the use of a serverside scripting language such as PHP. Some common required tasks are as follows: Validation of data input by user. Storage of data into a database or a file on the server. Sending a response to the user based on what is written in the form. Sending a confirmation email to the customer after the order has been processed. 5.2 The Form Data Channel The data channel is a specification of the path which the data takes to reach to the PHP script, from the form. There are two paths: GET header and POST header as explained below. 5.3 GET Headers Data sent through the GET headers are done so by the use of query strings. Take a look at the following URL. http://www.example.com/script.php?user_name=My+Name&user_country=England This URL consists of the following major parts: http://www.example.com/ This is the domain path for the script. script.php This is the name of the script file. ?user_name=My+Name&user_country=England This is the “query string” for the current URL. You can visualise the query string as a one line assignment of many different variables. In this case, the variables “user_name” and “user_country” are assigned values of “My+Name” and “England” respectively. 20 | P a g e How is the Query String Formed? In a previous section when dealing with HTML forms, we saw where each element of the form was given a name. Each variable in the query string represents an item from within the same HTML form. Accessing the Query String with PHP PHP can be used to access the query string and do wonders with it. This is how you read one variable from the query string: $name = $_GET[‘user_name’]; In this example, we are using the variable $name to store the value of the query string item “user_name”. 5.4 POST Headers When you send data using a GET method of the form, all the data being sent is visible to anyone, since it is contained in the URL. To hide this from the user, you would send it via the POST method. The data is accessed in a similar manner, but using the keyword: $_POST instead of $_GET. Alluding to the example above for the GET method, the URL would be: http://www.example.com/script.php To read the name, the following code would be used: $name = $_POST[‘user_name’]; 5.5 Data Validation Various methods are used to validate data submitted by a user to ensure that is in the right format and within the right ranges etc. You can either use our API to validate data, or you can use your own data validation methods. To learn about form validation with PHP, see the following URLs: http://www.php-mysql-tutorial.com/wikis/php-tutorial/form-validation-using-php.aspx http://www.oreillynet.com/pub/a/php/2004/04/22/php_css_forms.html http://www.go4expert.com/forums/showthread.php?t=438 There are many other tutorials out there, use them in an organised way. 21 | P a g e 6 PHP Classes 6.1 Introduction to Classes PHP allows designers to wrap their functions in portable blocks called classes. It is by the use of a PHP class that we are able to distribute the same API source code to you, and to all other Subscribers, and furthermore it allows us to update seamlessly. When it is time for an update, all we need to do is replace the package file, because it contains all the functions that would need updating, without interfering with your programs. We will not be going into the details of construction of a class; however it is worth knowing at least how to reference the functions from a class. 6.2 Including a File in PHP The package file can either be copied and pasted into your script, or to keep your programming tidy, you can virtually include it using the include function. The include function takes the file path and virtually places the contents of that file in line with the script, without you seeing it. We will use the file “WPOSAPI.php” for our purposes. This is the original file name of the distributed package file. include(“WPOSAPI.php”); Without including this file, you won’t be able to use the functions it contains. 6.3 How to Use the Class Functions As stated before, the class is a list of functions made for reuse. This section will teach you how to reference these functions from the class. First to load the class, a variable is created for further reference: $wpos = new WPOS; The keyword new initialises a new instance of the class WPOS™. The name, “WPOS” is what identifies the class and is set within the package file itself. Now that you have initiated the class, all the functions within are available. 22 | P a g e The first function inside the class is the Connect() function. This function takes three arguments and returns a result equal to the authorisation string generated from the attempted connection. The three arguments are: store id (your Merchant Account number), store password and domain. To call this function, you have to tell PHP that you are calling it from the “WPOS” class. Hence the full line of code is thus: $a = $wpos->Connect($store_id, $store_pw, $domain); In the above example, the variable $a stores the result of the connect function (the auth string). The symbol -> indicates that the function on its right will be called from the class on its left. This is the manner in which you call all the functions from within the class. 23 | P a g e 7 WPOS™ Transactions 7.1 Overview The WPOS™ is nothing less than a point-of-sale terminal that you use at the supermarket or the pharmacy. The only difference is that this one is being integrated directly into your website without your customers having to visit your physical location to swipe. This section breaks down the construction of a WPOS™ transaction, and shows how the system is built to handle the transaction. 7.2 Transactions “Transaction” is a collective term for the processes that are involved from the opening to the closing of the “WPOS” class. This includes the construction of the order, the saving of the parameters and the charging of the card. 7.2.1 The Transaction Order The order comprises a set of parameters that fully defines it. All the parameters are necessary in order to keep a good record of the transaction. Below is a full list of parameters that constitute the WPOS™ transaction order. Name Description Values ship_name ship_add ship_city ship_country The name associated with the shipping address. The shipping address. The city associated with the shipping address. The country associated with the shipping address. The zip code associated with the shipping address. The telephone number associated with the shipping address. The facsimile number associated with the shipping address. An option that specifies whether the shipping information should be copied and used for the buyer information. String, String, String, String, ship_zip ship_tel ship_fax ship_repeat (Continued on the next page.) 4-50 4-64 0-32 4-64 characters. characters. characters. characters. String, 0 or 5 characters. String, phone number format or empty. String, phone number format or empty. String, “yes” or “no”. 24 | P a g e Name Description Values buyer_name buyer_add buyer_city The name of the buyer. The address of the buyer. The city associated with the address of buyer. The country associated with the address of buyer. The zip code associated with the address of buyer. The telephone number associated with address of the buyer. The facsimile number associated with address of the buyer. The credit card number to be used for current transaction. The type of the chosen credit card. The expiry date on chosen credit card. The amount that should be charged for current transaction the String, 4-50 characters. String, 4-64 characters. String, 0-32 characters. the String, 4-64 characters. the String, 0 or 5 characters. the String, phone number format. Cannot be empty. String, phone number format or empty. String, credit card number format based on credit card type. String, or constant from list below. String in format “mm/yy”. String containing a floating point number. buyer_country buyer_zip buyer_tel buyer_fax card_number card_type card_expire card_amount 7.3 the the the Credit Card Types This system accepts a variety of different credit card types. There are constants defined inside the WPOS™ API package file. Here is a list of constants representing the different types. Card Type Constant Value Visa MasterCard American Express Discover/NOVUS JCB Delta Diners Club Switch Solo Eurocard CARD_VISA CARD_MASTERCARD CARD_AMERICAN_EXPRESS CARD_DISCOVER CARD_JCB CARD_DELTA CARD_DINERS_CLUB CARD_SWITCH CARD_SOLO CARD_EURO 1 2 3 4 5 6 7 8 9 10 You can type any of the forms, for example, either “Visa” or CARD_VISA or 1. Note well that when the constant is written, no quotes should surround the value. I.e., “CARD_VISA” is wrong but CARD_VISA is right. 25 | P a g e 8 WPOS™ API Functions 8.1 Overview This section presents the various functions contained within the package file. These functions are available to you once you include the file and have a correct set of Subscriber credentials. 8.2 WPOS::Connect Description Establishes a connection to the MTD/MCCE from your script. Arguments Store Number The Merchant Account number. Store Password The password for current Merchant Account. Domain The current domain. Call & Result $au = $wpos->Connect($store_id, $store_pw, $domain); Returns an authorisation string to be used for the current transaction. 8.3 WPOS::IgnoreError Description Specifies whether or not the engine should ignore errors with data entering. If set to ignore, a flag will raise on the transaction for our monitoring purposes, only if the data is not valid. Arguments Yes ? No A “yes” or “no” string. Call & Result $ir = $wpos->IgnoreError(“yes”); Returns a status code for the operation. 26 | P a g e 8.4 WPOS::SetParameter Description Individually sets the parameters of the Transaction Order. Arguments Parameter Name A string representing the parameter name. Parameter Value A string representing the parameter value. Call & Result $sp = $wpos->SetParameter($param_name, $param_value); Returns a status code for the operation. 8.5 WPOS::SaveParameters Description Records the parameters of the Transaction Order to a temporary location on the MTD. Arguments None Call & Result $sv = $wpos->SaveParameters(); Returns a status code for the operation. 8.6 WPOS::Authorise Description Executes an authorisation process on the credit card, using information from the current Transaction Order. Arguments None Call & Result $authorise = $wpos->Authorise(); 27 | P a g e Returns a status code for the operation. 8.7 WPOS::AuthoriseDemo Description Executes a DEMO authorisation process on the credit card, using information from the current Transaction Order. Arguments None Call & Result $authorise_demo = $wpos->AuthoriseDemo(); Returns a status code for the operation. 8.8 WPOS::ChargeCard Description Executes a charge on the credit card, using information from the current Transaction Order (TO). Arguments None Call & Result $charge = $wpos->ChargeCard(); Returns a status code for the operation. 8.9 WPOS::ChargeCardDemo Description Executes a DEMO charge on the card, using information from the current TO. Arguments None 28 | P a g e Call & Result $charge = $wpos->ChargeCardDemo(); Returns a status code for the operation. 8.10 WPOS::GetStatus Description Looks up an explanation for a status code response. Arguments Status Code A string in number format resulting from an operation. Call & Result $status = $wpos->GetStatus($status_code); Returns a string explaining the status code. 8.11 WPOS::Close Description Kills the connection to the server. Arguments None Call & Result $wo = $wpos->Close(); Returns a status code for the operation. 29 | P a g e 9 Additional Information This section provides useful links to information you might need to further support the lectures contained in this manual. HTML TAGS http://www.w3schools.com/tags/default.asp HTML STYLESHEETS http://www.w3schools.com/css/default.asp PHP MANUAL http://www.php.net/manual/en/index.php MERCHALITE® KNOWLEDGEBASE http://kb.merchalite.com WPOS™ API SAMPLE CODES http://kb.merchalite.com/shelves/1540346/api-web-services#web-based-point-of-sale-api-samplecodes You are encouraged to review these sites and many others to get a full grasp of the content. Merchalite® Helpdesk will support you even with PHP; but we cannot guarantee any additional support for functions that we do not use. To contact the Merchalite® Helpdesk, use: [email protected]. 30 | P a g e 31 | P a g e