1
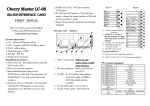
V1.0
TALK Electronics
Edwards Audio Series
MC3 User Manual
TALK
TALK Electronics
3 Eliot Close
CAMBERLEY
Surrey
GU15 1LW
Phone: +44 (0) 8456 123388
www.talkelectronics.com
CAUTION: TO REDUCE THE RISK OF ELECTRIC SHOCK, DO NOT REMOVE THE
POWER SUPPLY UNIT COVER. THERE ARE NO USER SERVICEABLE PARTS INSIDE.
REFER ALL SERVICING TO QUALIFIED PERSONNEL.
Please read this manual carefully and keep it in a safe place for future reference.
•
•
•
•
•
•
•
•
•
•
•
•
•
•
•
•
•
•
•
This appliance MUST be Earthed, please ensure that it is plugged into a suitable AC socket with the
safety earth connected.
Any slots in the top covers or on the underside that may be present are provided for necessary
ventilation. To ensure reliable operation of this apparatus, and protect from overheating, these slots
must never be blocked or covered by items such as newspapers, table-cloths or curtains. A clearance
of 100mm is required at all times on all top/side surfaces.
No naked flame sources such as lighted candles should be placed on this apparatus, failure to
observe this could cause a risk of fire.
Do not place a liquid containing vessel, such as a vase on this apparatus, as this can result in a risk of
fire or electric shock.
Do not expose this apparatus to rain or place it where it may come into contact with splashing or
dripping water.
If this apparatus accidentally gets wet, unplug it and contact an authorised service agent or dealer
immediately.
You can clean this apparatus with a damp, lint free cloth ,when necessary but be sure to isolate and
unplug the apparatus first.
To cut off the power source totally, unplug the apparatus from the wall outlet.
Do not overload wall outlets, extension cords or adaptors beyond their capacity, since this can result in
fire or electric shock.
Use only the supplied AC power chords for the country of use, should they need replacement please
use a cable with the correct certifications for the country of use. See also our section on ‘Connections’
for more information.
Be sure to hold the plug, not the cord, when disconnecting this apparatus from an electric socket.
Power supply cords should be routed so that they are not likely to be walked on or pinched by items
placed upon or against them, paying particular attention to cords at the plug end, adaptors
and the point they exit from the appliance.
Before connecting the AC power cord to the Power supply unit, make sure the voltage of the Power
supply unit, as marked on the label at the rear, corresponds to the local electricity supply.
Never insert anything metallic into the open parts of this apparatus.
Locate this apparatus near an easily accessible AC outlet.
If this apparatus does not operate normally in particular, if there are any unusual sounds or
smells, unplug it immediately and consult an authorised dealer, service agent or re-seller.
Unplug this apparatus from the AC outlet before attempting any service work.
Only a qualified technician should remove the Power supply unit cover.
ONLY connect the supplied Edwards Audio series PSU 3 to the MC3 DC socket labelled on the rear
of the Phono Stage.
LOAD-C
LOAD-R
Warp
GAIN
Diagram 2
Max Input MC........................................................................................................................10mV
Nominal Input ..................................................................................................................0.1-1mV
Max Gain MC input (MM).............................................................................................73dB (40dB)
THD Distortion ..............................................................................<0.006% 1kHz - <0.02% 20kHz
Signal to noise.....................................................................................................-80dB A-Weighted
RIAA .........................................................................................................................within 0.25dB
Frequency response* ...................................................................................20-100kHz within 0.3dB
Stereo separation better than .................................................................................55dB - 20-20kHz
Input Loading MC/MM......................................................................100R with 2n2/47K with 120pF
Output impedance ........................................................................................................<10 Ohms
Nominal output.............................................................................................................100mV - 1V
Max output level .....................................................................................9.8v depending upon input
Dimensions WxHxL.............................................................................114.5mm x 47.5mm x 160mm
Weight...................................................................................................................................3.5kg
Power consumption (Max)........................................................................................................3.5W
Table of Contents
1. Safety Instructions
2. Un-packing list
3. Connections
4. Adjustments
5. Operation
6. Guarantee
Thank you for purchasing an Edwards Audio series phono stage, with care over the
correct installation we are sure that it will give many years of pleasure.
* depends upon loading
E&OE in accordance with our policy of ongoing research and development we reserve the right to change the specification at any time
.
Inside the box you will find the following items supplied as standard:-
is part of TALK Electronics
3 Eliot Close, Camberley, Surrey GU15 1LW UK
Telephone 08456 123388 or 07736 421928
fax 01276 613250
email:- [email protected]
website:- www.talkelectronics.com
1. EA MC3 head unit.
2. EA PSU3 dedicated Power Supply Unit (PSU).
3. Dedicated DC chord (1M).
4. AC Power chord (2M)
5. User manual.
NOT Supplied
Connecting lead from the turntable
Connecting lead to your Pre-amplifier/Integrated amplifier
Fig 1
R
C
approx. Bandwidth -3dB point
47K
120pF/(470pF)
7-28kHz
7-56kHz
Only use 120pF - 470pF only for MM with low
inductance
1K
470pF/(10nF)
7-338kHz
7-16kHz
Suggest 1nF is used (HOMC cartridge type)
470R
1nF/(10nF)
7-338kHz
7-33.8kHz
Suggest 1nF is used
220R
1nF/(10nF)
7-720kHz
7-72kHz
Suggest 2.2nF is used
100R
2n2F/(10nF)
7-720kHz
7-72kHz
Standard setting
47R
2n2F/(10nF)
7-1.5MHz
7-150kHz
Watch out for RF pick up from the arm cable
Table of settings
Comment
Before connecting the MC3 into your system you may need to read the section on ADJUSTMENTS so that if
using an MC type cartridge you can maximise the performance.
The main MC3 should be placed on a separate shelf next to or near your Turntable. There are 2 inputs
available, one is marked ‘MM’ and the other is marked ‘MC’. Connect your turntables arm leads to the
required input observing, Red for RIGHT and White/Black for LEFT. If you have an additional Earth or
Ground cable attach this to the GND terminal provided above the input sockets. Next connect an additional
pair of high quality RCA Phono cables (not supplied) between the output sockets and any available LINE
input on your amplifier, this is usually marked AUX.. Do NOT connect it to any input that may be marked
‘Phono’. For optimum performance we recommend a TALK Reference series cable, these can be purchased
from your supplier. Next, connect the Edwards Audio series MC3 to the Edwards Audio series PSU 3 that will
have been supplied at the same time using the power mini DIN cable provided, there is more than one
suitable outlet, it does not matter which is used. The power mini DIN cable provided is equipped with locking
connectors which will only release as you pull on the outer part of the plug out. Pulling on the cable will only
result in damage. Please observe the polarity, the flat face should be uppermost and do not force the plug
into the socket, it is designed to be a tight fit and is robust but undue force can result in damage. Next the
Power supply should be connected in to any available AC outlet near to your system. We recommend that
you use the power chord supplied and that you do NOT use a pre-filtered supply as we have designed a
high performance filter into the PSU already. A fully screened after market power chord, like the TALK
Reference power cord, without any filtering added
may bring about an improvement in performance in certain environments but ALWAYS ‘try before you buy’ In
many cases it will actually get worse, so listen in your system context. There are no hard and fast rules about
this, what works in one system may well not work in another. To power ‘ON’ switch on the AC power supply
at the wall, there is no power switch on the power supply or phono stage itself. The front panels on both the
PSU3 and the MC3 should illuminate.
INPUT SWITCHING.
This is straight forward, simply press the small black button found between the input sockets to select the desired
input, unused inputs should be shorted for maximum performance. The front panel will illuminate according
to the selected input.
MONO MODE.
There is an optional MONO mode which will sum the outputs so as to produce a real mono experience when
playing mono recordings. This is activated by switching the rear panel ‘Mono’ switch located near the output
sockets, the front panel display will change colour to RED to indicate that you have activated this mode.
All adjustments MUST be performed with the MC3 unplugged for your own safety.
LOADING:
The MC3 is equipped with adjustable input loading and gain. This is achieved via internal jumpers which are
accessed by removing the 4 screws on the rear panel marked in red on diagram 1 and sliding the PCB out
backwards, see diagram 1. The PCB is clearly labelled but for greater clarity can be used in conjunction with
diagram 2. There are two separate banks, one for each channel so the jumpers should mirror each other. The
default values that are set at the factory are 100R with 2.2nF which is suitable for the vast majority of cartridges.
The best course of action is to use the cartridge manufacturers recommended loading for both resistance and
capacitance, however feel free to experiment as different combinations will often require adjustment. The most
common values are catered for, if you really need any non standard` values then please ask your retailer to
contact the factory and we can supply an exchange PCB with the desired values on, there is usually a small
charge for this to cover carriage. In some cases there will be no recommended capacitive loading but it is
usually required to prevent RF Problems more than any sound quality reasons, if in doubt use the default 2.2nF
position - unlike most phono stages there is a small series ‘damping’ resistor to prevent the creation of a tuned
‘tank’ circuit. Whilst you are free to trial any combination be warned that some combinations will cause sever
in band response changes as well as gain changes , to help avoid major problems there is a table at the end
of this manual which you can use as a guide as to the likely results using the various positions. If after listening
to various combinations you are unsure it is best to revert to the factory standard settings or 100R and 2.2nF.
Bear in mind that if you change the resistance it will change the output, louder is not always better!!
GAIN:
There are 6 different levels available, in essence the idea is to best match the level when compared with that
of another input like a CD player. So simply play a CD and switch between that and the input you have used
for your MC3 (usually AUX) and move the jumpers to a position that roughly equalises the levels. If in doubt
opt for a slightly quieter value - high gain positions will reduce the input overload of the MC3 as there is a
direct relationship between the two and excess gain may overload the input of your pre-amplifier, especially if
it is a valve based one which usually have very high sensitivity.
There is an internally selectable ‘warp’ filter which operates at around 7Hz, when shipped this is set to the ON
position. We suggest that you leave it in this position for best results however you can remove this to achieve
a ‘flat ‘ response by moving the jumpers identified on diagram 2. Do not confuse this with the normal 20Hz
RIAA roll off filter which is NOT implemented as we believe that this is not desirable due to phase shifts induced.
The action of this filter is aimed at the more common arm/cartridge resonant frequencies and is there to make
your amplifiers life a little easier. A great deal of valuable output power from your amplifier can be consumed
trying to reproduce these frequencies. As a rule of thumb if your amplifier is 100 Watts or less and /or your
room is smaller than 300 sq feet leave it in the ‘ON’ position. If you have a bigger amplifier or bigger room
then feel free to play with it but bear in mind that if your amplifier gets hot it means that it is working very hard
and it will probably sound better with the filter ON.
You can change the brightness of the front panel LED indicators, This can be accessed by removing the 4
screws on the rear panel marked in red on diagram 1. and sliding the PCB out backwards, see diagram 1
On the front panel you will see a small POT on the front panel PCB (see diagram 3) adjusting this will vary the
brightness of the display. In it’s minimum position the display will be off.
WARNING
On the PSU3 this is complicated by the fact that you need to release the transformer fixing so this is best left
to a qualified engineer as there are dangerous mains voltages present.
Having successfully connected and installed the MC3 into your system, for best results we suggest that any
noise is reduced to minimum. To do this select the Aux input on your amplifier (or whatever input you used to
plug the MC3 into) and advancing the volume control slowly, hopefully no hum but a small amout of hiss will
be heard. Assuming all is well, enjoy many late evenings listening to your system as the sound will not easily
let you go to bed!!. If for some reason you do hear some hum try the following:- experiment with the physical
position of the MC3 and or the ground connection. There is also an earth lift switch on the PSU which may
help. It may well be that the quietest position is not on a shelf at all. There are no hard and fast rules as to
where to best position the MC3, basically the quieter it is the better it will sound, all you should hear is a feint
hiss, if this is on the floor behind your equipment rack the so be it. Don’t be worried about where it is, it’s
position and orientation will have no detrimental effect on the MC3's function or reliability.
If you are using an MM type of cartridge you can use input 2, this has a standard 47K and 120pF loading
which is correct for the vast majority of cartridges. If you are using a high output moving coil type ( HOMC)
then it is best to use the MC input and set the loading and gain to the required positions, we suggest the
minimum gain setting be used.
There are no user serviceable parts inside, so please do not be tempted to play or modify any part of the MC3,
this will invalidate your guarantee. Your guarantee entitles you to have the unit repaired free of charge, during
the first ten years after purchase, provided that it was originally purchased from an authorised Talk/Edwards
Audio dealer or distributor nd registered via our website www.talkelectronics.com. The manufacturer can take
no responsibility for defects arising from accident, misuse, abuse, wear and tear, neglect or through
unauthorised adjustment and/or repair, neither can they accept responsibility for damage or loss occurring
during transit to or from the person claiming under the guarantee. THE WARRANTY COVERS parts and labour
costs for ten years from the purchase date. After ten years you must pay for both parts and labour costs. The
warranty does NOT cover transportation costs at anytime.
This equipment should be packed in the original packing and returned to the dealer from whom it
was purchased, or failing this, directly to the Talk/Edwards Audio distributor in the country of residence. It
should be sent carriage prepaid by a reputable carrier – NOT by post. No responsibility can be accepted for
the unit whilst in transit to the dealer or
distributor and customers are therefore advised to insure the unit against loss or damage whilst in transit. The
Edwards Audio series MC3 has been manufactured to conform with the protection requirements of the EC
Council directive 89/336/EEC relating to EMC by application of the following standards:EN50081-1 1997 Emissions Standard
EN50082-1 1997 Immunity Standard
and also the requirements of the EC low voltage directive relating to electrical safety by application of the
following standard:BSEN/IEC60065: 2002 International Safety standard For the purposes of testing the MC3 was used with the
high quality interconnects supplied by TALK Cables. Compliance with the above standards may only be made
if the unit is
installed as per this manual and using the correct cables.