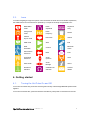
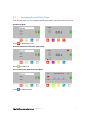
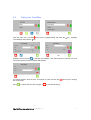
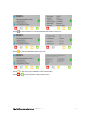
1
Innovating Together. Uni-pulse Defibrillator Analyser Copyright © 2012 SEAWARD GROUP Last Update: 15th October 2013 Instruction Manual 386A550 Revision 1.1 Rigel Uni-Pulse Defibrillator Analyser Instruction Manual 386A550 Issue 1.1 October 2013 © 2013 Seaward Group Issue 1.1 Rigel Medical 24 Month Warranty Statement Rigel Medical provides a standard 12-month manufacturer’s warranty against breakdown during normal use. This warranty can be upgraded to a 24-month warranty (terms and conditions apply*). Problems caused through misuse, damage, fair wear & tear, consumables and accessories are excluded from standard warranty. Such components found to be being used in excess of their manufacturer’s operating recommendations are also excluded. Shipping to an authorised service centre is the responsibility of the sender. *Terms and Conditions of 24 Month Warranty The Rigel product must be registered with Rigel Medical within 30 days of purchase to be eligible for the extended 24-month warranty. Instruments must be returned to an authorised service centre complete with proof of purchase within 13 months of purchase for calibration at the current rate. Any items returned for calibration outside of the 13 month period stated above may not be eligible for the second 12 month section of warranty. The second 12 month section of the warranty begins at the expiry of the initial 12 month period, not when the unit is calibrated. Details correct at time of going to print. The manufacturer retains the right to make amendments to the above terms and conditions without prior notice. Calibration Statement The Rigel Uni-Pulse Defibrillator Analyser is fully calibrated and found to be within the specified performance and accuracy at the time of production. The Seaward Group provides its products through a variety of channels; therefore it may be possible that the calibration date on the provided certificate may not represent the actual date of first use. Experience has indicated that the calibration of this instrument in not effected by storage prior to receipt by the user. We therefore recommend that the recalibration period be based on a 12 month interval from the first date the unit is placed in to service. Date received into service; / / . © Copyright 2012 All rights reserved. Nothing from this edition may be multiplied, or made public in any form or manner, either electronically, mechanically, by photocopying, recording, or in any manner, without prior written consent from the SEAWARD GROUP. This also applies to accompanying drawings and diagrams. Due to a policy of continuous development the SEAWARD GROUP reserves the right to alter the equipment specification and description outlined in this publication without prior notice and no part of this publication shall be deemed to be part of any contract for the equipment unless specifically referred to as an inclusion within such contract. Rigel Uni-Pulse Instruction Manual – Revision 1.1 i Disposal of old product The Rigel Uni-Pulse has been designed and manufactured with high quality materials and components, which can be recycled and reused. When this symbol is attached to a product it means the product is covered by the European Directive 2012/96/EC. Please familiarise yourself with the appropriate local separate collection system for electrical and electronic products or contact your local supplier for further information. Please dispose of this product according to local regulations. Do not dispose of this product along with normal waste material. By offering your old products for recycling, you will help prevent potential negative consequences for the environment and human health. Rigel Uni-Pulse Instruction Manual – Revision 1.1 ii Certificate of Conformity Manufactured by: Seaward Electronic Ltd, Bracken Hill, South West Industrial Estate Peterlee, County Durham, SR8 2SW, England Statement of Conformity As the manufacturer of the apparatus listed, declare under our sole responsibility that the product: Rigel Uni-Pulse Defibrillator Analyser To which the declaration relates are in conformity with the relevant clauses of the following standard(s): BS EN 60601-1:2005 Medical electrical equipment - Part 1: General requirements for basic safety and essential performance. BS EN 61010-1:2010 Safety requirements for electrical equipment for measurement, control, and laboratory use – Part 1: General requirements. BS EN 61326:2006 Electrical equipment for measurement, control, and laboratory use - EMC requirements. CISPR 11, Ed. 4.1. (2004-06) Performance: The instrument operates within specification when used under the conditions in the above standards EMC and Safety Standards. The product identified above conforms to the requirements of Council Directive 2004/108/EC and 2006/95/EC. This Conformity is indicated by the symbol , i.e. “Conformité Européenne” Seaward Electronic Ltd. is registered under BS EN ISO9001:2000 Certificate No.: Q05356. Rigel Uni-Pulse Instruction Manual – Revision 1.1 iii Index Index ..................................................................................... 1 1. Introduction ................................................................... 3 1.1. 1.2. 2. 2.1. 2.2. 3. 3.1. 3.2. 4. 4.1. 4.2. 4.3. 4.4. 4.5. 4.6. 4.7. 5. 5.1. 5.2. 5.3. 5.4. 6. 7. 7.1. 7.2. 7.3. 7.4. 8. 8.1. 8.2. 8.3. 8.4. 8.5. 9. Design Philosophy ................................................................ 3 Unpacking the Uni-Pulse....................................................... 3 Warnings and Cautions................................................. 4 User Notes ............................................................................ 4 Safety Notes ......................................................................... 4 At a Glance ................................................................... 5 Uni-Pulse Overview............................................................... 5 Icons ..................................................................................... 6 Getting started .............................................................. 6 Turning the Uni-Pulse On and Off ......................................... 6 Accessing the Uni-Pulse Tests.............................................. 7 Setting the Time/Date ........................................................... 8 Setting the Language ............................................................ 9 Displaying Uni-Pulse Information .......................................... 9 Clearing the Results Memory .............................................. 11 Restoring Factory Settings .................................................. 11 Analysing Defibrillators ............................................... 12 Connecting a Defibrillator to the Uni-Pulse.......................... 12 Testing Energy Discharge ................................................... 13 Testing Cardiac Synchronisation......................................... 14 Testing Charge Time........................................................... 15 Analysing Automated External Defibrillators (AED) .... 16 Viewing Data ............................................................... 18 Saving a Test Result ........................................................... 18 Viewing a Saved Test Result .............................................. 18 Printing a Saved Test Result............................................... 19 Deleting a Saved Test Result.............................................. 20 Simulating ECG Waveforms ....................................... 21 Connecting ECG leads to the Uni-Pulse.............................. 21 Simulating a Waveform ....................................................... 21 Simulating an Arrhythmia Waveform ................................... 23 Simulating a Performance Waveform .................................. 24 Simulating a Pacer Waveform............................................. 25 Connecting to another Device..................................... 26 Rigel Uni-Pulse Instruction Manual – Revision 1.1 1 9.1. 9.2. 9.3. Searching for a Bluetooth Device ........................................ 26 Connecting to the Test ‘n’ Tag Elite Printer ......................... 27 Connecting to the Bluetooth Barcode Scanner.................... 28 10. Environmental Conditions ........................................... 29 11. Maintaining the Rigel Uni-Pulse .................................. 30 11.1. 11.2. 11.3. Cleaning........................................................................... 30 User Maintenance ............................................................ 30 Return Instructions ........................................................... 30 12. Accessories................................................................. 31 12.1. 12.2. 12.3. Standard Contents ........................................................... 31 Optional Accessories ....................................................... 31 Replacement Spare Parts ................................................ 31 13. Specifications .............................................................. 32 13.1. 13.2. Technical Specifications................................................... 32 General Specifications ..................................................... 34 14. Support........................................................................ 34 14.1. Contact Us ....................................................................... 34 Rigel Uni-Pulse Instruction Manual – Revision 1.1 2 1. Introduction 1.1. Design Philosophy The Rigel Uni-Pulse is a portable and battery operated defibrillator analyser, designed to safely test the performance of all mono and bi-phasic, standard and pulsating waveforms and AED applications. Control of the Rigel Uni-Pulse is through a menu driven colour graphic user interface (GUI). 1.2. Unpacking the Uni-Pulse Carefully unpack all items from the box and ensure the following items are included: Rigel Uni-Pulse Defibrillator Analyser AC Power Supply ECG Snap Adapters (pack of 10) Uni-Pulse Quick Start Guide Utilities Disc Carry Case USB Bluetooth Adapter Rigel Uni-Pulse Instruction Manual – Revision 1.1 3 2. Warnings and Cautions 2.1. User Notes The following symbols are used throughout this Instruction Manual. Warning of electrical danger! Indicates instructions must be followed to avoid danger to persons. Important, follow the documentation! This symbol indicates that the operating instructions must be adhered to in order to avoid danger. 2.2. Safety Notes Users - The Rigel Uni-Pulse Defibrillator Analyser is designed for use by adequately trained technical personnel only. Operation - The Rigel Uni-Pulse Defibrillator Analyser is designed for use within the published specifications. Any application outside of these specifications or any unauthorised user modifications may result in hazardous conditions or improper operation. Operation - The Rigel Uni-Pulse Defibrillator Analyser is designed for use with Defibrillators and Automated External Defibrillators (AED’s) only. Operation - Refer to the Device Under Test (DUT) manufacturer operating instructions to ensure safe operation whilst analysing the DUT. Safety - Ensure that only accessories supplied by the manufacturer or accessories that meet the manufacturer’s specification are used. Safety - Use extreme caution when working with voltages greater than 30 Volts. Safety - Where safe operation of the Uni-Pulse is no longer possible it should be immediately shut down and secured to prevent accidental operation. It must be assumed that safe operation is no longer possible: if the instrument or leads show any sign of damage or the instrument does not function or after long periods of storage under adverse environmental conditions. Rigel Uni-Pulse Instruction Manual – Revision 1.1 4 3. At a Glance 3.1. Uni-Pulse Overview 7 8 9 10 11 1 2 3 12 4 5 6 1 2 3 4 5 6 7 8 9 10 11 12 Large colour graphic display Function keys F1 - F5 QWERTY keyboard Directional navigation keys Power ON/Start button Power OFF/Stop button Defib/paddle adaptor box connection Variable load box connection ECG-Hi output USB connection Power supply socket 10 x ECG connections Rigel Uni-Pulse Instruction Manual – Revision 1.1 5 3.2. Icons To make navigating through the options of the Uni-Pulse an easier and more intuitive experience, the traditional menu format has been replaced by a unique set of easily recognisable icons: Defibrillator mode Pulse amplitude Keyboard entry Charge time mode Pulse frequency Delete Cardiac Synch mode Heart rate Search AED mode Start Edit ECG simulation Confirm Bluetooth active Performance waveform Back Print Arrhythmia waveform Scroll up/down Save Pulse width Scroll left/right About Waveform selection Variable load selection Contact details 4. Getting started 4.1. Turning the Uni-Pulse On and Off To turn the Uni-Pulse ON, press and hold the green ON key until the Rigel Medical splash screen appears. To turn the Uni-Pulse OFF, press and hold the red OFF key until power is removed from the unit. Rigel Uni-Pulse Instruction Manual – Revision 1.1 6 4.2. Accessing the Uni-Pulse Tests From the main menu you can access the following test menus using the function keys F1-F5: Defibrillator Mode Press for Defibrillator mode. Automated External Defibrillator (AED) Mode Press for AED mode. Electrocardiogram (ECG) Simulation Mode Press for ECG simulation. Rigel Uni-Pulse Instruction Manual – Revision 1.1 7 4.3. Setting the Time/Date From the main menu, use the arrow keys to highlight Setup and press the key. Highlight Local settings and press the key. Highlight Time and press to edit the time settings. Use the keyboard to edit the hour and minute and use F3 to switch between AM and PM. To change between 12/24 Hr clock, scroll down to Clock and use the the clock format. Press to confirm and save the changes, or Rigel Uni-Pulse Instruction Manual – Revision 1.1 arrow keys to change to exit without saving. 8 4.4. Setting the Language From the main menu, use the arrow keys to highlight Setup and press the key. Highlight Local settings and press the key. To change the Language, scroll through the available languages using the Press 4.5. to confirm and save the changes, or arrow keys. to exit without saving. Displaying Uni-Pulse Information From the main menu press to view the unit information, serial no., calibration status and calibration and service contact details. Rigel Uni-Pulse Instruction Manual – Revision 1.1 9 Press to view the serial no. and hardware/firmware version of the unit. Press to view the calibration status of the unit. Press to view service and calibration contact information. Press or to exit and return to the previous menu. Rigel Uni-Pulse Instruction Manual – Revision 1.1 10 4.6. Clearing the Results Memory From the main menu, use the Memory and press the key. arrow keys to highlight Setup and press the key. Highlight Press to delete the results memory and press 4.7. Restoring Factory Settings to confirm. From the main menu, use the arrow keys to highlight Setup and press the key. Highlight Factory restore and press the key. Rigel Uni-Pulse Instruction Manual – Revision 1.1 11 Press to restore factory settings. 5. Analysing Defibrillators 5.1. Connecting a Defibrillator to the Uni-Pulse The defibrillator or AED under test can be connected direct to the Uni-Pulse using 4mm connectors, or the paddle adaptor box can be used as shown above. Rigel Uni-Pulse Instruction Manual – Revision 1.1 12 5.2. Testing Energy Discharge From the main menu press the defibrillator discharge. for Defibrillator mode. The Uni-Pulse is now ready to measure Charge the defibrillator. Once the defibrillator is charged, use the shock/discharge button to safely deliver the electrical energy into the Uni-Pulse. Ensure all safety precautions and safe operating procedures are observed as highlighted in the manufacturer operating instructions for your device. The measured energy will be displayed on the Uni-Pulse screen along with peak voltage, peak current and pulse duration. Press the Press key to view the waveform graph and a measurement summary. to save the test result or to exit. Rigel Uni-Pulse Instruction Manual – Revision 1.1 13 5.3. Testing Cardiac Synchronisation From the Defibrillator mode menu press for Cardiac Synch mode. The Uni-Pulse is now ready to measure the cardiac synchronisation time. Activate Synchronisation mode on the defibrillator. Charge the defibrillator. Once the defibrillator is charged, use the shock/discharge button to safely deliver the electrical energy into the Uni-Pulse. Ensure all safety precautions and safe operating procedures are observed as highlighted in the manufacturer operating instructions for your device. The cardiac synchronisation time will be displayed on the Uni-Pulse screen along with the measured energy, peak voltage, peak current and pulse duration. Press to save the test result or to exit. Rigel Uni-Pulse Instruction Manual – Revision 1.1 14 5.4. Testing Charge Time From the Defibrillator mode menu press for Charge time mode. To accurately measure charge time the defibrillator charge must be called for at exactly the same time is pressed to begin the timer. As soon as the defibrillator is charged, use the shock/discharge button to safely deliver the electrical energy into the Uni-Pulse. Once the energy discharge is registered by the Uni-Pulse the timer will stop. Ensure all safety precautions and safe operating procedures are observed as highlighted in the manufacturer operating instructions for your device. The charge time will be displayed on the Uni-Pulse screen along with the measured energy, peak voltage, peak current and pulse duration. Press to save the test result or to exit. Rigel Uni-Pulse Instruction Manual – Revision 1.1 15 6. Analysing Automated External Defibrillators (AED) From the main menu press the AED. Press Use the for AED mode. The Uni-Pulse is now ready to test the function of to change the output waveform of the Uni-Pulse. arrow keys to scroll through the selection of shockable and non-shockable rhythms: Ventricular Fibrillation Fine (VFBF), shockable Ventricular Fibrillation Coarse (VFBC), shockable Polymorphic Ventricular Tachycardia (PVT), shockable. Normal Sinus Rhythm (NSR), non-shockable Monomorphic Ventricular Tachycardia (MVT), non-shockable Atrial Fibrillation (AFB), non-shockable Asystole (ASYS), non-shockable Press to change the heart rate. This is only available for NSR, MVT and AFB. ASYS. VFBF and VFBC are set to a default. Use the keyboard to enter a value between 20 and 300 BPM and press to confirm. Press again to return to the AED menu. Rigel Uni-Pulse Instruction Manual – Revision 1.1 16 The simulation is active when the red heart symbol is pulsing. Power on the AED and follow the instructions. The AED will monitor the output rhythm and confirm whether a shock is necessary. If a shock is advised, use the shock/discharge button to safely deliver the electrical energy into the Uni-Pulse. Ensure all safety precautions and safe operating procedures are observed as highlighted in the manufacturer operating instructions for your device. The measured energy will be displayed on the Uni-Pulse screen along with peak voltage, peak current and pulse duration. Press the Press key to view the waveform graph and a measurement summary. to save the test result or to exit. Rigel Uni-Pulse Instruction Manual – Revision 1.1 17 7. Viewing Data 7.1. Saving a Test Result At the end of a test press to save. Enter the save details using the keyboard or scan the Asset ID using the Bluetooth barcode scanner. If an item of information has previously been saved, the Uni-Pulse will predict the data entry from the first key presses. Once all of the information has been entered press confirm the save. 7.2. to save. A message will be displayed to Viewing a Saved Test Result From the main menu, use the arrow keys to highlight Select data and press the key. Enter search criteria using the keyboard or an Asset ID using the Bluetooth barcode scanner on the search screen. Press to display the results. Rigel Uni-Pulse Instruction Manual – Revision 1.1 18 Use the 7.3. arrow keys to highlight the asset you wish to view and press to view the test result. Printing a Saved Test Result From the main menu, use the arrow keys to highlight Select data and press the key. Enter search criteria using the keyboard or an Asset ID using the Bluetooth barcode scanner on the search screen. Press to display the results. Use the arrow keys to highlight the asset you wish to view and press result or to print results for all items in the list. Press to either print this test to connect to the printer. Rigel Uni-Pulse Instruction Manual – Revision 1.1 19 Once the connection is made press 7.4. to print. Deleting a Saved Test Result From the main menu, use the arrow keys to highlight Select data and press the key. Enter search criteria using the keyboard or an Asset ID using the Bluetooth barcode scanner on the search screen. Press to display the results. Use the arrow keys to highlight the asset you wish to delete and press test result or to delete all results in the list. Press to either delete this to confirm. Rigel Uni-Pulse Instruction Manual – Revision 1.1 20 Press again to confirm or press to exit. 8. Simulating ECG Waveforms 8.1. Connecting ECG leads to the Uni-Pulse Use the supplied ECG snap connectors to connect ECG leads to the 4mm ECG terminals on the rear of the Uni-Pulse. The ECG connectors are colour coded as per international standards. 8.2. Simulating a Waveform From the main menu press for ECG simulation then press Rigel Uni-Pulse Instruction Manual – Revision 1.1 for simulation waveforms. 21 Use the Press arrow keys to move between the available simulation waveforms. to change the Pulse Amplitude to a fixed value of 0.5mV, 1mV, 2mV or 5mV. Press to confirm or Press or to exit without saving. to change the Heart Rate to any value between 20 and 300 BPM. Press to confirm to exit without saving. Press to confirm the simulation settings and begin the new simulation. The new amplitude and heart rate settings can be viewed on the left hand side of the display. The following simulation waveforms are available: Normal Sinus Rhythm (NSR) ST Elevation ST Depression Myocardial Infarction Tall T Rigel Uni-Pulse Instruction Manual – Revision 1.1 22 8.3. Simulating an Arrhythmia Waveform From the main menu press Use the menu. Use the for ECG simulation then press for arrhythmia waveforms. arrow keys to highlight the required arrhythmia type and press arrow keys to scroll through the available arrhythmias and press to enter the subto confirm or to exit. The following arrhythmia waveforms are available: Ventricular Ventricular Fibrillation Coarse (VFBC) Ventricular Fibrillation Fine (VFBF) Monomorphic Ventricular Tachycardia (MVT) Polymorphic Ventricular Tachycardia (PVT) Right Focal Premature Ventricular Contraction (RFPVC) Premature Ventricular Contraction Intermittent (PVCI) Premature Ventricular Contraction Continuous (PVCC) Bigeminy (BIG) Trigeminy (TRIG) Ventricular Flutter (VFLT) Atrial Conduction First Degree AV Block (FAVB) Second Degree AV Block Mobitz I (SAVB_MI) Second Degree AV Block Mobitz II (SAVB_MII) Third Degree AV Block (TAVB) Right Bundle Branch Block (RBB) Left Bundle Branch Block (LBB) Left Anterior Hemiblock (LAH) Rigel Uni-Pulse Instruction Manual – Revision 1.1 Atrial Sinus Arrhythmia (SAR) Missing Beat (MB) Atrial Flutter (AFLT) Atrial Fibrillation (AFB) Paroxysmal Atrial Tachycardia (PAT) Junctional Premature Contraction (JPC) 23 Press to change the Pulse Amplitude and press to change the Heart Rate. If either of these options are unavailable, then the selected waveform has a default setting which can not be changed. Press 8.4. to confirm the waveform and again to begin the simulation. Simulating a Performance Waveform From the main menu press for ECG simulation then press for performance waveforms. Use the arrow keys to highlight the required performance waveform. Press Pulse Amplitude. Rigel Uni-Pulse Instruction Manual – Revision 1.1 to change the 24 Press to change the Pulse Frequency. Pulse frequency can be set to any value between 0.1Hz and 100Hz. Press 8.5. to confirm the settings or to exit. Simulating a Pacer Waveform From the main menu press for ECG simulation then press Press to change the Pulse Amplitude. Press to confirm or for pacer waveforms. to exit. Rigel Uni-Pulse Instruction Manual – Revision 1.1 25 Press 2ms. to change the Pulse Width. Pulse width can be set to any value between 0.1ms and Press to confirm or Press to change the Heart Rate. to exit. This option is only available for Synchronous Atrial and Asynchronous Atrial. The remaining pacer simulations have a set default heart rate. Press to confirm or to exit. 9. Connecting to another Device 9.1. Searching for a Bluetooth Device From the main menu use the arrow keys to highlight Setup and press . Highlight Bluetooth Pairing and press . The Uni-Pulse is now ready to search for Bluetooth devices. Rigel Uni-Pulse Instruction Manual – Revision 1.1 26 Press to begin searching for Bluetooth devices. A blue progress bar will appear displaying the progress of the search. 9.2. Connecting to the Test ‘n’ Tag Elite Printer Ensure the Test ‘n’ Tag Elite Printer is switched on. Consult the user manual for this device for instructions. A list of available Bluetooth devices will be displayed one searching is complete. Use the arrow keys to scroll through the list and identify the device you wish to pair with. Press to tick the devices to be paired with then press to confirm. A confirmation message will appear and your paired device will appear in the Bluetooth pairing menu. Press to confirm and exit. Rigel Uni-Pulse Instruction Manual – Revision 1.1 27 9.3. Connecting to the Bluetooth Barcode Scanner Ensure the Bluetooth Barcode Scanner is switched on and is discoverable. Consult the user manual for this device for instructions. A list of available Bluetooth devices will be displayed one searching is complete. Use the Up/Down arrow keys to scroll through the list and identify the device you wish to pair with. Press to tick the devices to be paired with then press to confirm. A confirmation message will appear and your paired device will appear in the Bluetooth pairing menu. Press to confirm and exit. Rigel Uni-Pulse Instruction Manual – Revision 1.1 28 10. Environmental Conditions The Rigel Uni-Pulse has been designed to perform tests and measurements in a dry environment. Maximum barometric elevation for making measurements is 2000m. Protective system IP40 according to IEC 60529. Electromagnetic compatibility (EMC). Interference immunity and emitted interference conforming to IEC 61326-1. Operating temperature range of 0°C to +40°C, without moisture condensation. The Uni-Pulse can be stored at any temperature in the range -15°C to +60°C (relative humidity up to 90%). Operating altitude 0 to 2000m. Rigel Uni-Pulse Instruction Manual – Revision 1.1 29 11. Maintaining the Rigel Uni-Pulse 11.1. Cleaning Clean the external case of the Rigel Uni-Pulse with a clean dry cloth. Avoid using solvents and abrasive scouring agents to clean the external case of the Rigel Uni-Pulse. Do not allow liquid inside the Rigel Uni-Pulse or near the sockets. Do not use abrasives, solvents or alcohol. If the Uni-Pulse is subject to liquid ingress, the unit should be returned for repair, stating clearly the cause for repair. 11.2. User Maintenance The Rigel Uni-Pulse is a rugged quality instrument. However, care should always be taken when using, transporting and storing this type of equipment. Failure to treat the product with care will reduce both the life of the instrument and its reliability. Always check the Uni-Pulse and all accessories for damage and signs of wear before use. Do not attempt to open the Uni-Pulse. Maintenance should only be performed by authorised personnel. The Uni-Pulse contains no user serviceable parts. Keep the Uni-Pulse and accessories clean and dry. The recommended calibration period for this unit is 12 months. 11.3. Return Instructions For repair or calibration of the Uni-Pulse, please contact Calibration House. Calibration House 11 Bracken Hill Southwest Industrial Estate Peterlee County Durham SR8 2LS Tel: +44 (0)191 587 8739 Fax: +44 (0)191 518 4666 Email: [email protected] Prior to returning your unit, please contact Calibration House to obtain a RMA. By obtaining a RMA, your service request can be booked in advance allowing for a quicker turnaround time of your equipment. Please have your instrument make, model and serial number available. Rigel Uni-Pulse Instruction Manual – Revision 1.1 30 12. Accessories 12.1. Standard Contents Uni-Pulse defibrillator analyser unit Sling style carry case AC power supply ECG snap adaptors Uni-Pulse quick start guide USB bluetooth adaptor Calibration certificate 12.2. Optional Accessories 386A950 - Paddle adaptor box 386A951 - Variable load adaptor box 339A970 - Test ’n’ Tag Elite mobile bluetooth printer 339A923 - Bluetooth barcode scanner 12.3. Replacement Spare Parts 298A678 - ECG snap adaptors (pack of 10) 386A011 - AC power supply 386A008 - Battery pack 9.6V/2400mAh 386W507 - Paddle adaptor box lead (Red) 386W508 - Paddle adaptor box lead (Black) 43B759 - 4mm socket link for use with variable load adaptor box Rigel Uni-Pulse Instruction Manual – Revision 1.1 31 13. Specifications 13.1. Technical Specifications Energy Measurement Load Resistance Range (Low) Resolution Accuracy Range (High) Accuracy Voltage Current Sampling Rate Cardioversion (Synchronisation) Time Measurement Range Accuracy 50Ω ± 1% non-inductive 0 - 199.9 Joules 0.1 Joules ± 1% of reading ± 0.1 Joule 200 - 600 Joules ± 1% of reading ± 1 Joule 0 - 6000 Volts 0 - 120 Amps 100 kHz sampling frequency From peak of the simulated ECG R-wave to the peak of the defibrillator output pulse. -250 to +250ms 1% of full scale ± 1ms Charge Time Measurement is initiated by pressing the function key and simultaneously charging the defibrillator. Charge time is recorded after the defibrillator has discharged across the 50Ω load. Discharge Waveform Output Stored Waveform is captured onscreen and stored in memory for download/print. ECG Arrhythmia Simulator ECG full 12-lead simulation including hi-level output. Waveforms Normal Sinus Rhythm (NSR) ST Elevation ST Depression Myocardial Infarction Arrhythmia Waveforms - Ventricular Premature Ventricular Contraction - Intermittent (PVCI) Premature Ventricular Contraction Continuous (PVCC) Bigeminy (BIG) Trigeminy (TRIG) Ventricular Flutter (VFLT) Ventricular Fibrillation - Coarse (VFBC) Ventricular Fibrillation - Fine (VFBF) Monomorphic Ventricular Tachycardia (MVT) Polymorphic Ventricular Tachycardia (PVT) Right-focal Premature Ventricular Contraction (RFPVC) Rigel Uni-Pulse Instruction Manual – Revision 1.1 20 - 300 BPM; Pulse amplitude 0.5, 1, 2, 5mV 20 - 300 BPM; Pulse amplitude 0.5, 1, 2, 5mV 20 - 300 BPM; Pulse amplitude 0.5, 1, 2, 5mV 20 - 300 BPM; Pulse amplitude 0.5, 1, 2, 5mV 80 BPM Fixed; Pulse amplitude 0.5, 1, 2, 5mV 80 BPM Fixed; Pulse amplitude 0.5, 1, 2, 5mV 80 BPM Fixed; Pulse amplitude 0.5, 1, 2, 5mV 80 BPM Fixed; Pulse amplitude 0.5, 1, 2, 5mV 240 BPM Fixed; Pulse amplitude 0.5, 1, 2, 5mV 240 BPM Fixed; Pulse amplitude fixed 240 BPM Fixed; Pulse amplitude fixed 210 BPM Fixed; Pulse amplitude 0.5, 1, 2, 5mV 240 BPM Fixed; Pulse amplitude 0.5, 1, 2, 5mV 80 BPM Fixed; Pulse amplitude 0.5, 1, 2, 5mV 32 Arrhythmia Waveforms - Atrial Conduction First Degree AV Bock (FAVB) Second Degree AV Block - Mobitz I (SAVB_MI) Second Degree AV Block - Mobitz II (SAVB_MII) Third Degree AV Block Right Bundle Branch Block (RBB) Left Bundle Branch Block (LBB) Left Anterior Hemiblock (LAH) 80 BPM Fixed; Pulse amplitude 0.5, 1, 2, 5mV 80 BPM Fixed; Pulse amplitude 0.5, 1, 2, 5mV 80 BPM Fixed; Pulse amplitude 0.5, 1, 2, 5mV 80 BPM Fixed; Pulse amplitude 0.5, 1, 2, 5mV Arrhythmia Waveforms - Atrial Sinus Arrhythmia (SAR) Missing Beat (MB) Atrial Flutter (AFLT) Atrial Fibrillation (AFB) Paroxysmal Atrial Tachycardia (PAT) Junctional Premature Contraction (JPC) 20 - 300 BPM; Pulse amplitude 0.5, 1, 2, 5mV 80 BPM Fixed; Pulse amplitude 0.5, 1, 2, 5mV 20 - 300 BPM; Pulse amplitude 0.5, 1, 2, 5mV 20 - 300 BPM; Pulse amplitude 0.5, 1, 2, 5mV 180 BPM Fixed; Pulse amplitude 0.5, 1, 2, 5mV 80 BPM Fixed; Pulse amplitude 0.5, 1, 2, 5mV Performance Waveforms Sine Square Triangle Pulse 0.1 - 100Hz; Pulse amplitude 0.5, 1, 2, 5mV 0.1 - 100Hz; Pulse amplitude 0.5, 1, 2, 5mV 0.1 - 100Hz; Pulse amplitude 0.5, 1, 2, 5mV 0.1 - 100Hz; Pulse amplitude 0.5, 1, 2, 5mV Pacer Waveforms Synchronous Atrial Asynchronous Atrial Pacer 60 BPM Ventricular Pacer 70 BPM Atrial Pacer 70 BPM R-wave Detection 70 BPM 80 BPM Fixed; Pulse amplitude 0.5, 1, 2, 5mV 80 BPM Fixed; Pulse amplitude 0.5, 1, 2, 5mV 80 BPM Fixed; Pulse amplitude 0.5, 1, 2, 5mV 20 - 300 BPM; Pulse amplitude 0.5, 1, 2, 5mV; Pulse width 0.1 - 2ms 20 - 300 BPM; Pulse amplitude 0.5, 1, 2, 5mV; Pulse width 0.1 - 2ms 60 BPM Fixed; Pulse amplitude 0.5, 1, 2, 5mV; Pulse width 0.1 - 2ms 70 BPM Fixed; Pulse amplitude 0.5, 1, 2, 5mV; Pulse width 0.1 - 2ms 70 BPM Fixed BPM; Pulse amplitude 0.5, 1, 2, 5mV; Pulse width 0.1 - 2ms 70 BPM Fixed; Pulse amplitude 0.5, 1, 2, 5mV; Pulse width 0.1 - 2ms Waveform Output Low Level Hi Level 12-lead ECG and on Paddles Output Jack Accuracy Rate Amplitude ± 1% ± 2% (LA-LL), ± 10% (Paddles) Rigel Uni-Pulse Instruction Manual – Revision 1.1 33 13.2. General Specifications Dimensions Weight Operation Mains Supply Storage Environment Operating Conditions Environmental Protection Communication Display Memory 220mm x 150mm x 90mm (L x W x H) 1.5kg 12V/2400mAh Nickel Metal Hydride battery pack 110/230V AC; 48 to 66Hz, 35VA power supply -15°C to +60°C 0°C to +40°C IP 40 Bluetooth and USB LCD colour graphic display ¼” VGA 1000 test results including graphs 14. Support 14.1. Contact Us Sales and Delivery enquiries Tel: +44 (0) 191 587 8730 Fax: +44 (0) 191 586 0227 Email: [email protected] Technical enquiries Tel: +44 (0) 191 587 8701 Email: [email protected] Service, Calibration and Repair Tel: +44 (0) 191 587 8739 Fax: +44 (0) 191 518 4666 Email: [email protected] Rigel Medical 15 - 18 Bracken Hill South West Industrial Estate Peterlee County Durham SR8 2SW United Kingdom Part of Rigel Uni-Pulse Instruction Manual – Revision 1.1 34