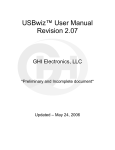
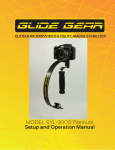
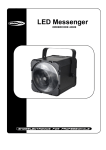
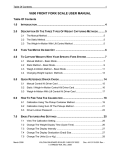
1
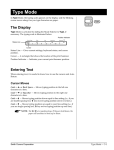
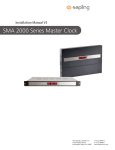
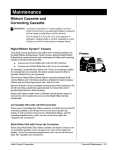
;; ;; W My Most Popular Features Correcting Cassette Easy to change and snap into place. Automatic Memory Correction Instant correction. WordEraser Erases an entire word. Spell-Right Dictionary Identifies spelling errors. Self Demonstration... Activate this Self Demonstration Program and discover my most popular features. This built-in Demo is easy to use. Follow the instructions below. Code + Z Demo 1. Insert Paper. 2. Press and hold Code while pressing Z. 3. Release both. This User’s Manual should be used with the following models: Spellmate 500 and Spellmate 700. Both the software contained in this model and this User’s Manual are protected by Copyright Smith Corona Corporation, 1994. 2 Smith Corona Corporation Table of Contents Hardware Basics Enhanced Text Typewriter Diagram ....................................... 5 Setting Up ........................................................ 6 Paper Support ............................................. 7 Turning the Typewriter On ...................... 7 Inserting Paper ........................................... 7 Automatically Ejecting Paper .............. 8 Platen Knob/Variable Line Spacer ..... 8 Selecting Volume Control ......................... 9 Turning the Typewriter Off ...................... 9 Keyboard Diagram ....................................... 10 Code Key ................................................... 10 Shift Keys ................................................... 10 Lock Key .................................................... 10 Indicator Light .......................................... 11 Caps Lock Key .......................................... 11 Activating Caps Lock .......................... 11 Repeat Action ....................................... 11 Bold ................................................................. 24 Auto Underscore .......................................... 24 Activating Word Underscore ................. 24 Activating Underscore All ...................... 24 Manual Underscore ................................. 24 Auto Center ................................................... 25 Superscript/Subscript .................................. 25 Typing Superscripts ................................. 25 Typing Subscripts .................................... 26 Correcting Superscript and Subscript Errors ................................... 26 Keyboard II Characters ................................ 26 Accessing Keyboard II ............................. 26 Format Margins and Tabs ......................................... 12 Margins ...................................................... 12 Changing Margins ............................... 12 Tabs ............................................................ 13 Regular Tabs ......................................... 13 Decimal Tabs ........................................ 13 Using Tabs ............................................ 14 Clearing a Tab ...................................... 14 Clearing All Tabs Quickly .................. 14 Pitch ................................................................ 15 Line Spacing .................................................. 15 Impression Control ....................................... 16 End of Page Warning ................................... 16 Deactivating the End of Page Warning 16 Auto Indent ................................................... 17 Setting Temporary Indents ..................... 17 Correcting Text On-Line Correction ...................................... 18 Correct Key ............................................... 18 WordEraser® Key .................................... 19 LineEraser® Key ...................................... 19 To Stop LineEraser .............................. 19 Half Space ................................................. 20 Adding a Character ............................. 20 Removing a Character ........................ 20 Character Swap® .......................................... 21 Word Swap® ................................................. 22 Off-Line Correction ...................................... 23 Forward Correct ....................................... 23 Smith Corona Corporation Spell-Right® Dictionary The Dictionary .............................................. 27 Spell-Right ..................................................... 29 Turning Off/On Spell-Right ................... 29 WordFind® .................................................... 29 Other Features Index Up/Index Down ................................ 30 Auto Return ................................................... 30 Deactivating Auto Return ....................... 30 Abbreviation Feature ................................... 31 Abbreviation Lists .................................... 32 General Words and Phrases ............... 32 Request Phrases ................................... 32 Salutations and Closings .................... 33 Holidays ................................................ 33 Months and Days ................................. 33 Thank You Phrases .............................. 33 Care and Maintenance Ribbon Cassette and Correcting Cassette .................................. 34 Correctable Film with Lift-Off Correction ......................................... 34 Multi-Strike Film with Cover-Up Correction ......................................... 34 Removing the Ribbon Cassette .......... 35 Inserting the Ribbon Cassette ............ 35 Correcting Cassette .................................. 35 Removing the Correcting Cassette .... 35 Inserting a New Correcting Cassette 36 Printwheels .................................................... 36 Removing the Printwheel ....................... 36 Inserting a Printwheel ............................. 37 3 Cleaning ......................................................... 37 Printwheel ................................................. 37 Platen ......................................................... 37 Cover/Keyboard/Sound Shield ............ 37 Check Points .................................................. 38 Obtaining Service ......................................... 38 Shipping Instructions ................................... 39 Stabilizing the Carrier Mechanism ........ 39 Packing the Typewriter ........................... 40 Supplies and Accessories Correctable Film Ribbon Cassettes ............ 41 Multi-Strike Ribbon Cassettes .................... 41 Start-Rite® ................................................. 42 Changeable Printwheels ......................... 42 Important Papers Safe Operating Recommendations ............. 43 Product Consumer Warranty ..................... 44 Limited Warranty ..................................... 44 90 Day Warranty .................................. 44 Limited Warranty ................................ 44 FCC ................................................................. 45 Quick Reference Guide ................................ 48 4 Smith Corona Corporation Hardware Basics Typewriter Diagram IMPORTANT: Be sure to save all packing materials. If you move or ship the typewriter, it should be repacked in the original carton. To secure the unit for transport, see “Care and Maintenance.” This diagram depicts only basic features. For information on coded features, see specific chapters or Quick Reference Guide on back cover. 1. Handle 2. Keyboard Cover/ Paper Support 3. Sound Shield 4. Power Switch 5. Typing Scale 6. Platen Knob/Variable Line Spacer 7. Keyboard 8. Paper Alignment Mark 9. Platen 10. Carrier Mechanism 11. Paper Release Lever 2 1 3 II II • •• • II • • • • II • • • • II •••• II • • • • II • • • • II • • • • II •••• II • • • • II II 5 6 4 7 2 8 3 10 9 11 Product appearance and/or specifications are subject to change without notice. Smith Corona Corporation 5 Setting Up Before you can use your typewriter, you must remove the packing materials from the carrier mechanism. This is essential to the proper functioning of your typewriter. Do not turn the unit on until you have released the carrier mechanism (10). Follow the steps listed below using the typewriter diagram for reference. The numbers on the diagram correspond to those in the instructions. 1. Remove keyboard cover (2) from the typewriter. The cover also functions as a paper support. (See “Paper Support.”) 2. Tilt the sound shield (3) toward you. 3. Remove the rubber band (left side first) from the tabs. 4. Remove the carrier restraint card. 5. Remove the ribbon cassette. If the typewriter ribbon is slack, advance it by turning the gear wheel on the bottom of the cassette in the direction indicated (see illustration). 6. Place the cassette back on the carrier, and return the sound shield to its original position. You will hear it snap into place. 6 Smith Corona Corporation Paper Support Your keyboard cover also functions as a paper support. 1. Remove the cover from the keyboard if you have not already done so. II II • •• • II • • • • II • 2. Turn the cover upside down and align the tabs with the slots behind the paper alignment mark (8). • • • II •••• II • • • • II • • • • II • • • • II •••• II • • • • II II 3. Slide the tabs into the slots to provide an angled paper support for your typing page. Turning the Typewriter On The electrical cord is stored on the back of the unit. Remove the plug from the protective slot and unwind the cord for use. 1. Plug the typewriter into a proper electrical outlet. (Use the correct electrical current.) 2. The symbol indicates the unit is in Standby mode. This means your keyboard is inactive until you select ON (|). Move the power switch (4) to ON (|). The carrier (10) moves to the preset left margin. Inserting Paper NOTE: Your typewriter handles 12” wide paper and a 9” typing line. Standard bond paper stock is recommended for best quality. Copier paper, erasable bonds and very heavily textured bond papers do not print well with Correctable Film Ribbons. For these papers, we recommend High Density Correctable or Multi-Strike Film. If typing stencils, use those specifically designed for daisywheel printers. 1. Insert paper securely in the slot behind the platen (9) against the paper alignment mark. (For 12” wide paper, center on the platen area.) 2. Press Code + Left Shift/Paper In. Paper automatically advances to approximately one inch from the top of the page. Smith Corona Corporation Code Shift Paper In 7 3. Advance the paper by using the Index Up/Down feature or Return key. 4. Push the paper release lever (11) back, and straighten the paper if necessary. Return lever to original position. Automatically Ejecting Paper Code Shift Paper Out When you reach the end of a page you can automatically eject your paper by pressing Code + Right Shift/Paper Out key. The paper begins ejecting immediately. NOTE: The platen may rotate a few seconds after ejecting paper. Platen Knob/ Variable Line Spacer Rotate the platen knob to position the paper up or down at variable line positions. (You should not use this feature if you are using the end of page warning option.) 8 Smith Corona Corporation Selecting Volume Control The typewriter will sound a beep when you activate certain features or type a word the unit does not recognize (see “The Dictionary”). You can adjust the volume of these beeps by pressing and holding Code while pressing the V key until the volume setting you wish is reached or the volume is turned off. When turned off, no beeps will be heard. The volume has been set to a medium level at the factory. Each time you turn your typewriter on, it will be reset for the medium volume. Code V Turning the Typewriter Off When typing is completed, move the power switch to Standby. We suggest you unplug the typewriter if it will not be used for an extended period of time. Smith Corona Corporation 9 Keyboard Diagram Tab S 1 ! @ # $ % ¢ & * ( ) + 1 2 3 4 5 6 7 8 9 0 = Q Tab 2 Tab C Lock 3 W ^ ç A S E R ` D F Caps Lock Y ¿ G U ~ [ H J I Find Z X Demo Abbr Shift 4 T é Paper In C B N Bold Margin L R Code O P D. Tab P. End K L M , 1 : ; . . , 7 2 § 11 ¶ ' ? / 8 Reloc Shift Paper Out Correct 9 1. Tab Set 7. Spacebar/Halfspace 2. Tab/Tab Clear 8. WordEraser/LineEraser 9. Correct 3. Lock/Caps Lock 4. Shift/Paper In 10. Shift/Paper Out 5. Code 11. Return/ Relocate 6. Margin L/R 12. Back Space Code Key The Code key is used in combination with other keys to activate features. Code key combinations are activated by pressing and holding the Code key while pressing the second key. For a complete list of Code functions, see the back of this manual. Code Shift Keys Shift Paper In Lock Caps Lock press again... Lock Caps Lock 10 12 Return 4 " ® WordEraser LineEraser Half Space 6 5 ] Ind V 1 Back Space Press Shift while typing an alpha key to type upper case letters or to type the characters located on the top of certain keys, such as $, %. Lock Key Press Lock to type continuously in upper case characters. The Lock light will come on when Lock is pressed. To deactivate Lock, press Lock or a Shift key. The light goes out. Smith Corona Corporation 10 Indicator Light The Shift Lock light will flash to indicate an error condition. See the chart below on how to deactivate it. Reason To Stop The typewriter sound shield is not closed properly. Snap sound shield shut. The typewriter has received an incorrect command. Press either Shift or Code. You typed an error or a word not in the dictionary (if activated). Correct word or type a space. Refer to the appropriate section in this manual for proper instructions. Caps Lock Key The Caps Lock feature enables you to type both numbers and capital letters without accessing the Shift keys. Activating Caps Lock 1. Press Code + Caps Lock. A beep is heard, and the Shift Lock Light goes on. Lock Caps Lock Code 2. Type your text. All letters will print in upper case. All numbers and punctuation will print normally. 3. Press Code + Caps Lock or Caps Lock to deactivate Caps Lock. NOTE: If Shift is pressed, lower case characters and other punctuation/symbols on the top of the number keys can be accessed. RRRRRR Repeat Action All keys will automatically repeat when held down except the following Keyboard II characters: ^ ` ~ . Smith Corona Corporation R ` 11 Format Each time you turn on your typewriter, a preset format is activated. It is set for general typing purposes. These settings remain active until you change them. Margins and Tabs Margins Margins are preset depending on your pitch setting. They are: Position Desired Left Margin 10 Pitch (Pica) 12 Pitch (Elite) 15 Pitch (Micro) Left Margin 12 14 18 Right Margin 72 86 108 Changing Margins When you need to change the margins, follow the instructions below: 1. Press Spacebar to desired left margin. Margin L R 2. Press Margin. Unit beeps. 3. Press Spacebar to desired right margin. Position Desired Right Margin Code 12 4. Press Code + Margin. The unit beeps. NOTE: Your typewriter will beep once to signal that you are 5 spaces from the right hand margin. Margin L R Smith Corona Corporation Tabs You can set up to eight tabs, either regular or decimal. Tabs may be set outside of margins. Regular Tab Decimal Tab Stop This is a Regular Tab 123.56 12.47 2.09 Regular Tabs Position Print Hammer Regular tabs justify text at the tab stop. To set a regular tab: Tab S 1. Position print hammer to desired location. 2. Press Tab S. Unit beeps. Decimal Tabs Decimal tabs are used to align numbers with the decimal point. To set a decimal tab: Position Print Hammer O Code D.Tab 1. Position the print hammer at desired location. 2. Press Code + D. Tab (O). Unit beeps. 3. Repeat steps 1 and 2 to set more decimal tabs if desired. 4. Press Return when all tabs are set. Smith Corona Corporation Return Reloc 13 Tab Tab C Type Text Using Tabs Once tabs are set, they can be used as you are typing your text. 1. Press Tab (Tab C) to tab location. 2. Type text. If using a decimal tab, type the numbers preceding the decimal point. The carrier moves to the left for each number you type. If you make a mistake, press Tab to start again. 3. Type the decimal point. The numbers print to this point. 4. Type the numbers following the decimal point. Position Print Hammer Clearing a Tab Both types of tabs are cleared the same way. Code Tab Tab C 1. Position print hammer to tab setting. 2. Press Code + Tab (Tab C). Release immediately. Unit beeps. Clearing All Tabs Quickly Code Tab Tab C (hold down) 14 Press and hold Code + Tab (Tab C) until 2 beeps are heard. If you are positioned at a tab stop, you will hear 3 beeps. Smith Corona Corporation Pitch Your typewriter has been designed with triple pitch capabilities. To set the Pitch: Press Code + Tab Set for 10 Pitch. Press Code + 1 for 12 Pitch. 10 Code 10 Pitch Code Press Code + 2 for 15 Pitch. Unit beeps when selecting pitch. NOTE: Your typewriter is set at 10 pitch. Change the printwheel if you select another pitch. Changing pitch in the middle of a line erases Correction Memory. However, after the new pitch is selected, Correction Memory begins again. Tab S 12 ! 1 12 Pitch Code 15 @ 2 15 Pitch Line Spacing Each time you turn the typewriter on, it is set for single line spacing. You can change line spacing to 11⁄2 line spacing or double line spacing. To change line spacing: Press Code + 3 for single line spacing. Press Code + 4 for 11⁄2 line spacing. 1 Code # 3 Single Line 1/ $ 1 2 Code 4 One and a Half Line Press Code + 5 for double line spacing. Unit beeps when selecting line spacing. Code 2 % 5 Double Line Smith Corona Corporation 15 Impression Control Code L Light M Code Medium H Code Impression control is the force used by the print mechanism to strike the paper. When you turn the typewriter on, impression control is set at medium. You can change to light or heavy impression. It is recommended that you select heavy impression when typing stencils or carbons and when using Script or Orator printwheels. For normal typing, use medium impression. To set impression control: Press Code + L for light impression. Press Code + M for medium impression. Press Code + H for heavy impression. Heavy The unit beeps when Impression Control is changed. NOTE: Standard bond paper stock is recommended for best quality. Copier paper, erasable bonds and very heavily textured bond papers do not print well with Correctable Film Ribbons. For these papers, we recommend High Density Correctable or Multi-Strike Film. If typing stencils, use those specifically designed for daisywheel printers. End of Page Warning P Code P.End Code Shift Paper In You can program your typewriter to beep 1” from the bottom of 11” paper. After you hear the beep, do not attempt to add additional lines of text. To set the End of Page Warning: 1. Press Code + P. End (P). Unit beeps. 2. Insert paper using Code + Paper In (Shift). IMPORTANT: Do not use the platen knob while using the End of Page feature. If you do, the line count will be inaccurate. Use the Automatic Paper Insert feature to insert paper. To adjust the typing position, use Code + Index Up, Code + Index Down or Return. The line counter is reset each time you use the Automatic Paper Insert feature. Code P P.End Deactivating the End of Page Warning Press Code + P. End (P). The unit does not beep. 16 Smith Corona Corporation Auto Indent Your typewriter can set a temporary left margin. In the example below, the second paragraph automatically indents twelve spaces. Section V: This section evaluates the Bold Print feature. Research indicates that boldfaced text is a popular and frequently used feature on the typewriter. It improves the appearance of letters and documents... Setting Temporary Indents 1. Press Spacebar or Tab to position print hammer to indent location. Position Print Hammer K Code Ind 2. Press Code + Ind (K). Unit beeps. 3. Type Text. When Return is pressed carrier returns to indented position. 4. Press Code + Ind (K). Carrier advances one line and returns to the original margin. Type Text Return Reloc Code K Ind Smith Corona Corporation 17 Correcting Text While you are creating text, there are several ways to correct errors. You can remove characters, words, or entire lines of text. IMPORTANT: Bold or Auto Underscore must be reactivated prior to correcting characters with those enhancements or correction will not occur. On-Line Correction The typewriter can automatically correct all characters in a one-line memory buffer. You can also correct characters no longer in this Correction Memory buffer with an extra step. After correcting an error, you can quickly return/relocate to your previous typing position. IMPORTANT: If you changed printwheels, be sure to insert the proper printwheel before making corrections. Position Print Hammer Use Correct for erasing character(s) in Correction Memory. Correct Type Correction Code Correct Key Return Reloc 1. Position the print hammer on the incorrect character and then press Correct. Hold down Correct to continue correcting, or press Back Space and then Correct again until all characters are removed. 2. Type correction. 3. Press Code + Reloc (Return) if necessary to relocate. The unit beeps. NOTE: You erase Correction Memory when you turn off the typewriter, press Return, change pitch, or use the Half Space feature. 18 Smith Corona Corporation WordEraser ® Key Position Print Hammer Use WordEraser for erasing word(s) in Correction Memory. 1. Position the print hammer on any character of the right most word to be corrected, and then press WordEraser. If you press WordEraser while between words, the word to the left of the space will be deleted. 2. Type correction. WordEraser LineEraser Type Correction Code Return 3. Press Code + Reloc (Return) if necessary to relocate. The unit beeps. Reloc NOTE: You can use the WordFind feature to quickly locate to misspelled words within Correction Memory. LineEraser ® Key Position Print Hammer Use LineEraser to erase a line in Correction Memory. 1. Position the print hammer on any character in the line to be erased. WordEraser LineEraser 2. Press Code + LineEraser (WordEraser). The entire line is erased, and the carrier rests on the last erased character. To Stop LineEraser Press Code + S. Erasing will stop immediately; the print hammer remains at the last character erased. Smith Corona Corporation Code S 19 Half Space The Half Space feature is used when making corrections when you omit a character or type one too many. When the Half Space feature is activated, the typing position moves a half space to the right. Regular spacing returns when the Half Space feature is deactivated. NOTE: When you activate the Half Space feature, the character Correction Memory is erased. The typewriter remembers the half spaced characters until the Half Space feature is deactivated. Then, the typewriter begins to remember normally spaced characters again. Adding Another Character Find Quick brwn fox Erase Quick brwn fox Back Space Adding a Character 1. Press Correct or WordEraser to erase error. 2. Press Backspace to position the carrier one space before the first character of the erased word. 3. Press Code + Halfspace (Spacebar). Print hammer advances a half space. 4. Type correct word. 5. Press Code + Halfspace (Spacebar). Quick brwn fox Correct Quick brown brwn fox Removing Another Character Find Quick broown fox Erase Quick broown fox Correct Quick broown brown fox 20 Removing a Character 1. Press Correct or WordEraser to erase error. 2. Press Code + Halfspace (Spacebar). Print hammer advances a half space. 3. Type the correct word. 4. Press Code + Halfspace (Spacebar). NOTE: Before activating the Half Space feature on another line, you have to remove the error using off-line correction procedures. (See “Off-Line Correction.”) Smith Corona Corporation Character Swap ® Character Swap allows you to correct immediately adjacent transposed letters. For example, you can quickly change “Teh” to “The” and “Ad og” to “A dog.” The characters must be in the Correction Memory; that is, they must be on the current line of text. Characters will maintain upper or lower case status when swapped. Characters and spaces can also be swapped. Bold and Underscore must be activated if swapping characters with these enhancements. To use Character Swap: 1. Press Back Space to second of the two characters. Back Space Code . . Code Return Reloc to swap a character with the 2. Press Code + preceding one. The print hammer relocates to the right of the swapped character. 3. Press Code + Reloc (Return), if necessary, to relocate. NOTE: If you try to swap non-adjacent characters, the Shift Lock light will flash. Press any key, and the light will stop flashing. Smith Corona Corporation 21 Word Swap ® Word Swap allows you to reverse the order of two words or group of alpha characters immediately adjacent to one another on a line within Correction Memory. For example: To or be not to be To be or not to be Words that are transposed must be separated by a single space. Characters such as a hyphen (-) and apostrophe (’) are considered part of a word. If you use any other symbol at the end of a word or between words (such as a number, punctuation, etc.), the Shift Lock light will flash to indicate an error. If you try to swap non-adjacent words, the Shift Lock light will flash. Press any key and the light will stop flashing. Words will maintain original upper/lower case status. For example: WORD great great WORD Bold and Underscore must be activated to swap words with these enhancements. Back Space NOTE: Words can only be up to 25 characters in length. To use Word Swap: Code Code , , Return Reloc 22 1. Press Back Space to any character in the second word. 2. Press Code + to swap it with preceding word. The print hammer locates to the right of the rightmost word that was swapped. 3. Press Code + Reloc (Return), if necessary, to relocate. Smith Corona Corporation Off-Line Correction You can use the Off-Line Correction feature to correct several characters on previous lines. IMPORTANT: If End of Page Option is activated, do not use the platen knob when positioning the print hammer on the line where the error is located as the line count may be inaccurate. To correct an error not in the Correction Memory: 1. Press Code + Up (6), Down (7), or Return to position the print hammer on the line containing the incorrect character. 2. Press Back Space or Spacebar to incorrect character. (See note next page for enhanced text.) Position Print Hammer Code Correct Retype Incorrect Character Type Correct Character Code Return 3. Press Code + Correct. The unit beeps. 4. Retype the incorrect character to remove it. Reloc 5. Type the correct character. 6. Press Code + Reloc (Return), if necessary, to relocate. Forward Correct Position Print Hammer To correct several characters or words not in Correction Memory: 1. Press Code + Up (6), Down (7), or Return to position the print hammer on the line containing the incorrect characters or words. 2. Press Back Space or Spacebar to the first incorrect character. Code Correct (twice) Retype Error 3. Press Code + Correct twice. Two beeps are heard. 4. Retype the error to remove it. (As you type, the typewriter erases each character. You may have to adjust typing speed so that the typewriter removes characters correctly.) 5. When all characters are erased, press Code + Correct. The print hammer returns to the location where you activated forward correct. 6. Type the correction. Code Correct Type Correction Code Return Reloc 7. Press Code + Reloc (Return), if necessary, to relocate. Smith Corona Corporation 23 Enhanced Text You can enhance your text by using Bold, Auto Center, Underscore, or a different Typestyle or Pitch. IMPORTANT: Bold and Auto Underscore must be activated before correcting characters having these enhancements. Bold Code B This feature is used for highlighting text. To use Bold: Bold 1. Press Code + Bold (B). Unit beeps. 2. Type text. 3. Press Code + Bold (B) to deactivate Bold. Auto Underscore You can automatically underscore just the words or the words and spaces using the Auto Underscore feature. Activating Word Underscore Word 1. Press Code + Word ( _ / - ). Unit beeps. Code 2. Type text. 3. Press Code + Word ( _ / - ) to deactivate Underscore. Activating Underscore All Code All + = 1. Press Code + All ( + / = ). Unit beeps. 2. Type text. 3. Press Code + All ( + / = ) to deactivate Underscore. Manual Underscore Word Shift Paper In You can manually go back and underscore text. 1. Position print hammer under the first character of the text to be underscored. 2. Press Shift + —. 24 Smith Corona Corporation Center Auto Center This feature automatically centers text between current margins. To use Auto Center: 1. Press Code + Center (0). Unit beeps. The carrier moves to the center. ) Code 0 Type Text Return 2. Type the text. The carrier will back space in half space increments for each character typed. Reloc 3. Press Return. Text types onto the page automatically centered. 4. Press Return again to move to the next line and return to normal margins. Return NOTE: If you make a mistake, press Code + Center to restart centering. If you decide not to center text, press Return prior to entering text. Press Return again to return to the left margin. Reloc Superscript / Subscript Your typewriter easily creates superscript and subscript characters. Typing Superscripts 1. Press Code + Super (9). The typing position moves up 1⁄2 line. Super Code ( 9 2. Type the superscript. The carrier returns to the original line. Smith Corona Corporation 25 Typing Subscripts Sub Code * 8 1. Press Code + Sub (8). The typing position moves down 1⁄2 line. 2. Type the subscript. The carrier returns to the original line. NOTE: If you superscript or subscript more than one character, you must repeat steps 1 and 2 above. If you decide not to type a superscript or subscript after activating the feature, press Correct to return to the original line. Activate Superscript or Subscript Correcting Superscript and Subscript Errors Code To correct errors made while using Superscript or Subscript: Correct 1. Press Back Space to error. Type Correct Character 2. Activate superscript or subscript. 3. Press Code + Correct. 4. Type the incorrect character. It is erased and carrier returns to original line. Keyboard II Characters The Keyboard II feature allows you to access the international characters and special symbols that appear on the bottom right of certain keys. Accessing Keyboard II Press Code + Keyboard II character key. For those characters ( ^ ~ ` ) printed above the letters, type the KB II character first. The print hammer remains in place so you can type a letter below the symbol. NOTE: You may wish to deactivate the dictionary when typing KBII characters. 26 Smith Corona Corporation Spell-Right ® Dictionary Spell-Right Dictionary is an electronic dictionary which instantly signals misspelled words. WordFind finds misspelled words. The Dictionary Each time your typewriter is turned on, the dictionary is activated. It beeps to alert you of a possible misspelling. NOTE: A group of letters will be considered a word if it is followed by a space, carrier return, tab, index up, index down, subscript, superscript, pitch change, number or any non-alpha character. Spell-Right will check for the following errors: Double Word Check Examples: as as word word Capitalization Check If the first character following a period, question mark, or exclamation point and two spaces is not capitalized. For example: at the dance. we The dictionary also beeps when it finds: werd – misspelling wrod – transposition worrd – double strike wo rd – unwanted space wrd – character omission continued… Smith Corona Corporation 27 Hyphens If a word is hyphenated and the hyphen is followed by a carrier return, the dictionary will continue from one line to the next. Example: “Congratulations on the purchase of your new electronic typewriter.” The word “electronic” would be checked. Only the root words of hyphenated words and words followed by an apostrophe ( ’ ) or apostrophe S ( ’s ) will be checked – not the placement of hyphens or uses of apostrophes. Examples: Mother-in-law (would be accepted.) Mother in-law (would also be accepted although incorrect.) Spell-Right will not check: Capitalization (except as noted under capitalization check.) Single characters Numbers Any non-alpha character 28 Smith Corona Corporation Spell-Right 1. Type text as usual. When you misspell a word or type one that is not found in the dictionary, a twotoned beep is heard, and the Shift Lock light flashes. 2. Press Correct or WordEraser. The corrected word will also be checked. Turning Off / On Spell-Right To turn the dictionary off: Press Code + Code D Code F (D). No beep is heard. To turn it back on: Press Code + (D) again. A beep is heard. WordFind ® When you type very fast, you may type a few words after you hear the beep signal an incorrect word. You can use WordFind to locate an error made within Correction Memory. To Find an incorrect word: 1. Press Code + Find (F). The print hammer glides back to the incorrect word. Find 2. Press Correct or WordEraser. 3. Press Code + Find (F) to locate other errors. When you press Code + Find (F) and there are no more errors, the print hammer automatically returns to your previous typing position. NOTE: Changing pitch in the middle of a line or using the Half Space feature deletes Correction Memory. After a pitch change or the use of a half space, the Find feature will not operate on text entered prior to the pitch change or use of a half space. The Find feature will operate only on the current line. Smith Corona Corporation 29 Other Features Your typewriter also has Index Up/Down, and Auto Return. Index Up/ Index Down Up Code Code ¢ 6 Down & 7 This feature moves the paper up or down in increments equal to the current line space setting. This feature is useful to maintain accurate line spacing when correcting errors on different lines. Also, it is necessary to use this feature instead of the platen knob when End of Page Warning is activated so the unit can keep track of lines. To use Index Up/Down: 1. Press Code + Up (6) to move the typing position up (paper down). 2. Press Code + Down (7) to move the typing position down (paper up). NOTE: These are repeating keys. If they are held down, the paper will continue to move up or down. Auto Return Return Code Back Space You can program your typewriter to automatically return at the end of each line. When a space or hyphen is typed in the “warning zone,” which begins five spaces before the right margin, the carrier automatically returns to the next line. For lengthy words falling at the end of the line, simply type a hyphen as you normally would, and the carrier returns automatically. To activate Auto Return: 1. Press Code + Return (Back Space). Unit beeps. 2. Type text. Do not press Return at the end of a line. Deactivating Auto Return Press Code + Return (Back Space). 30 Smith Corona Corporation Abbreviation Feature The Abbreviation feature allows you to quickly insert a pre-programmed word or phrase into your document. For example, if you frequently find yourself typing “Best Regards,” you can insert its abbreviation, and the unit will type the phrase. A list of all the abbreviations available follows the instructions. You may use Bold, Underline, or Caps Lock to enhance this text if you activate it before inserting the abbreviation. NOTE: The Abbreviation feature can not be activated when the Auto Center or Decimal Tab features are activated. To activate the Abbreviation feature: Code X Abbr 1. Position the print hammer where you want the phrase to appear. 2. Press Code + Abbr (X) to activate the Abbreviation feature. A beep is heard. NOTE: If you wish to exit the feature prior to typing in a label or after the first character of the label is entered, simply press Code + Abbr (X) to deactivate the feature. 3. Type the two-character abbreviation. Both upper or lower case characters are accepted. If you make a mistake on the first character of the abbreviation, press Correct or WordEraser. If the second character typed is incorrect, the unit beeps and the Shift Lock light flashes. Reenter the full twocharacter abbreviation again. 4. Phrase prints and the feature is deactivated. The abbreviation, however, will not print. Once the phrase is printed it will be in the correction buffer on the line. Smith Corona Corporation 31 Abbreviation Lists General Words and Phrases (Labels in upper or lower case accepted) AM Air Mail AP Appendix AN Any help you can give me will be greatly appreciated AS as soon as possible BI Bibliography CM Certified Mail CF Confidential DI Distribution DH Do not hesitate at any time to call on me ED EDUCATION: EM EMPLOYMENT: EF Enclosed you will find EN Enclosures FX Facsimile FE For example, HC Handle with Care ND Have a nice day IE I am enclosing AC I appreciate your cooperation LR I look forward to your reply IN Introduction IT Itinerary PH It is always a pleasure to hear TN My telephone number is NA Name and Address NL Newsletter OB OBJECTIVE: PO Per our telephone conversation, PC Personal & Confidential PT Please take into consideration RN Reference No.: RM Registered Mail 32 RD SF SS SI SJ SU TC QR Revision date: satisfactory Social Security SPECIAL INTERESTS: Subject: substantially Table of Contents The best of wishes for a quick recovery! CD The completion date IL The information listed below UC Under the circumstances UV University of UM U.S. Mail AB We appreciate your business MH We must hear from you by FH We will be looking forward to hearing from you WE WORK EXPERIENCE: YI You are invited to YA Your attention to this matter will be greatly appreciated. Request Phrases FA If I can be of further assistance, please contact me HQ If you have any questions, please don’t hesitate to call PA Please confirm this action upon receipt PM Please contact me at PL Please let me hear from you PK Please let me know PR Please let us have your reply by PS Please sign the enclosed documents WS Please write soon ER Please use the enclosed envelope for your reply Smith Corona Corporation RR Return receipt requested TD Thanksgiving Day Salutations and Closings Months and Days AF BR CG CO CY MI MR DM RS MS SM GY HB HH KR MC JA FB AU SE OC NO DE MO TU WD TS FR SA SN RY SC SY VS VT VB VR YV YT Affectionately, Best regards, Congratulations Cordially, Cordially yours, Dear Miss Dear Mr. Dear Mr. and Mrs. Dear Mrs. Dear Ms. Dear Sir or Madam: Gratefully yours, Happy Birthday Happy Holidays Kind regards, Merry Christmas and Happy New Year Respectfully yours, Sincerely, Sincerely yours, Very sincerely yours, Very truly yours, With our very best wishes, Yours very respectfully, Yours very truly, Yours truly, January February August September October November December Monday Tuesday Wednesday Thursday Friday Saturday Sunday Thank You Phrases TY TH TL TR TV ET TO Thank you Thank you for your help Thank you for your letter Thank you for your recent inquiry Thank you very much I want to express my thanks I would like to take this opportunity to Holidays XM ID HA HK LD MD NY Christmas Independence Day Halloween Hanukkah Labor Day Memorial Day New Year’s Day Smith Corona Corporation 33 Care and Maintenance H SERIES H Right Ribbon System ® Correctable H Ribbon Cassette and Correcting Cassette WARNING: Use Smith Corona brand “H” Series supplies. Use of non-Smith Corona (brand or manufactured) supplies or accessories will not (except as noted below) void this warranty. THE WARRANTY WILL BE VOID if the typewriter is damaged or rendered wholly or partially inoperable as a result of using a non-Smith Corona supply or accessory item(s). Your Smith Corona typewriter uses Ribbon and Correcting Cassettes with the Right Ribbon System® feature. Smith Corona’s patented Right Ribbon System feature assures that the right combination of ribbon and correcting cassette is inserted in the typewriter. Assures use of Correctable film with Lift-Off correction. Assures use of Multi-Strike film with Cover-Up correction. For example: Correctable film ribbon with Cover-Up correcting cassette. If a mismatched set is inserted, the ribbon cassette cannot be fully or properly inserted into your typewriter. The exclusive Right Ribbon System feature using the patented Smith Corona Ribbon and Correcting Cassettes is designed to make changing ribbons and correcting tapes quick, easy, and error-free. Because of Smith Corona’s patented correcting tape feed mechanism, the lift-off correcting cassette has approximately two times the yield of spooled tapes found in other machines. Replace the ribbon cassette when a different colored portion begins to unwind from the Cassette. Be sure to use the Right Ribbon System combination. Correctable Film with Lift-Off Correction When using Correctable film ribbon cassettes, use Smith Corona Lift-Off correcting cassettes. Lift-Off tape removes your errors quickly and cleanly. It will not remove the print of a Multi-Strike ribbon. Lift-Off correcting cassettes have a yellow cut-out on the lower right. See “Supplies and Accessories.” Multi-Strike Film with Cover-Up Correction When using Multi-Strike film ribbon cassettes, use Smith Corona Cover-Up correcting cassettes. Cover-Up tape covers your errors neatly and quickly. Cover-Up correcting cassettes have a pink cut-out on the lower right. See “Supplies and Accessories.” 34 Smith Corona Corporation Removing the Ribbon Cassette Replace the ribbon cassette when a different colored portion begins to unwind from it. 1. Tilt sound shield toward you. 2. Grasp cassette on both sides. 3. Lift cassette STRAIGHT up and out. Inserting the Ribbon Cassette 1. Turn the gear wheel on the bottom of the cassette in the direction indicated to tightly wind the cassette. 2. Turn the cassette over with the name face up and the ribbon toward the print hammer. 3. Set the cassette in the carrier while guiding the ribbon between the printwheel and the typing guide. Press down. Ribbon snaps into place. 4. Return the sound shield to its original position. Be sure it snaps into place. NOTE: Stencils designed specifically for daisywheel typewriters perform best when the print ribbon is inserted. To determine which brand best fits your individual requirements, check with your office supplies retailer. Correcting Cassette Replace the correcting cassette when a different colored portion unwinds from the right spool. Be sure to use the Right Ribbon System combination. Removing the Correcting Cassette 1. Tilt sound shield toward you, and remove the print ribbon cassette. 2. Grasp the correcting cassette on both sides as shown. Lift it up and out. Smith Corona Corporation 35 Inserting a New Correcting Cassette 1. Turn appropriate gear wheel on bottom of the correcting cassette in direction indicated by arrows to wind tightly. 2. Hold correcting cassette (using both hands as shown) with the Smith Corona name facing up. 3. Guide correcting tape between the printwheel and typing guide and position left gear wheel on left mount and right gear wheel on right mount. 4. Snap correcting cassette securely in place. IMPORTANT: After the cassette is mounted, tighten slack in tape by moving red plastic lever toward platen. The lever is located under left side of cassette towards the platen. Repeat as many times as necessary. 5. Replace ribbon cassette. Be sure printwheel and print hammer are secure. 6. Return sound shield to its original position. Be sure it is closed securely. Printwheels Removing the Printwheel 1. Tilt sound shield toward you. 2. Remove the ribbon cassette and correcting cassette. 3. Locate the print hammer release lever (left of print hammer). Pull the lever forward until the print hammer mechanism springs away from the printwheel. 4. Lift the printwheel out. 36 Smith Corona Corporation Inserting a Printwheel 1. Drop printwheel between print hammer and typing guide with type style name facing you. 2. Push the print hammer release lever back until the print hammer mechanism snaps into place. 3. Replace the ribbon cassette and correcting cassette. 4. Return the sound shield to its original position. The unit should automatically reinitialize. If this does not occur, check to make sure the sound shield is closed securely and, if necessary, turn your unit off and then on again. Cleaning Do not attempt to disassemble the typewriter to clean it. IMPORTANT: Always unplug the machine before using cleaning solutions on its surfaces. Printwheel To remove residue, dip the characters into a small container of ethyl or isopropyl alcohol (rubbing alcohol) and wipe with a clean dry cloth. Do not soak the printwheel. Platen Wipe surface with a clean cloth dampened with ethyl or isopropyl alcohol (rubbing alcohol). Cover /Keyboard /Sound Shield To clean the cover or keyboard, dampen a sponge with a mild ammonia or soap solution. DO NOT use household cleaners containing chlorinated compounds. DO NOT spray anything directly on the product. WARNING: Keep all solvents and petroleum distillates (gasoline, kerosene, lighter fluids, etc.) away from plastic parts. Keep all cleaning solutions away from electrical components and moving parts. Smith Corona Corporation 37 Check Points If your typewriter does not function properly, check the following: ✔ Is the typewriter plugged into a live socket? ✔ Is the typewriter switched on? ✔ Is the sound shield completely closed? ✔ Are the printwheel, ribbon cassette and the correcting cassette properly installed? ✔ Have the ribbon or correcting cassette been used up? ✔ Is the carrier completely disengaged? ✔ Are compatible ribbon and correcting cassettes installed? ✔ Is the print hammer in a locked position? ✔ Has a foreign object fallen into the typewriter? If the typewriter still does not work properly after checking the above, contact your nearest Smith Corona Service Center. Obtaining Service If you are experiencing difficulty, before returning the unit for service, call Consumer Affairs, toll-free at 1-800-448-1018, for assistance. Customer Service Representatives are available to assist you Monday through Friday, from 8:00 AM to 6:00 PM. NOTE: If you need to send your unit for service, to qualify for Warranty, proof of purchase must accompany the unit. Your sales receipt is your proof of purchase. 38 Smith Corona Corporation Shipping Instructions IMPORTANT: When the machine is to be shipped for any reason, the carrier mechanism inside the typewriter must be stabilized to prevent movement. The typewriter as a whole must be properly protected from shipping and handling hazards. Use original packing material to pack the unit. Stabilizing the Carrier Mechanism 1. Unplug the unit. 2 Tilt the sound shield toward you. 3. Select a rubber band to secure the print mechanism. 4. Place the rubber band around the tab on the right side of the carrier mechanism. 5. Stretch the rubber band over the top of the mechanism and around the tab on the left side. 6. Move the carrier to the right end of the machine until it locks into place. You will hear it click into place. 7. Wrap the cord around the cord wrap panel approximately three (3) times. Some excess cord will remain loose. 8. Secure the plug in the protection slot, and snap the cord into the cord restraint. ; 9. Tuck the excess cord up under the lip. 10. Return the sound shield to its original position and tape shut. 11. Place the keyboard cover on the typewriter. Your typewriter is ready for packing. NOTE: If the carrier cannot be put into the correct position, ball up single sheets of newspaper and insert them on each side of the carrier until all open spaces are filled to capacity. Smith Corona Corporation 39 Packing the Typewriter Pack the typewriter in the original materials, if possible: 1. Place both foam end-caps on the unit. 2. Insert the unit into the box, and tape it shut. 3. In large letters, address the package for shipment to the nearest service location. Remember to include your return address, and retain your shipping receipt. If you do not have the original packing materials: 1. Use box slightly larger than the typewriter. 2. Place the unit in a large plastic bag. 3. Place at least 2” of packing material in the bottom of the box for cushioning. 4. Place the typewriter inside the box and fill the sides and top with more packing material (2” of material on all sides). 5. Seal carton using either filament tape or wide plastic tape. 6. Address the package for shipment to the nearest service location. Remember to include your return address and retain your shipping receipt. 40 Smith Corona Corporation Supplies and Accessories Smith Corona produces the following Supplies and Accessories. WARNING: Use Smith Corona “H” Series supplies which have been designed specifically for this product. Use of non-Smith Corona supplies may render the unit inoperable. Correctable Film Ribbon Cassettes For UNMATCHED SHARPNESS AND CLARITY, use Smith Corona black Correctable Film Ribbon Cassettes and “lift off” errors with Smith Corona Lift-Off Correcting Cassettes. Correctable Film Ribbon is transferred to the paper when typing and can be used only once. Stock No. Correctable Black Film Ribbon for clean correction and general purpose typing applications. Yields approximately 25% more characters per cassette than High Density Correctable Film Ribbon. Correctable Film Ribbon (Dual Pack) ................................................................. 21000 Correctable Film Ribbon (6-Pack) ....................................................................... 67108 High Density Correctable Black Film Ribbon for bolder, darker print. Especially for use on difficult to image papers (i.e., rough textured, slick surfaced papers.) High Density Correctable Film (Dual Pack) ...................................................... 21010 Lift-Off Correcting Cassette Single Pack ................................................................................................................ 21060 3-Pack ........................................................................................................................ 67116 Multi-Strike Ribbon Cassettes FOR HIGHER CHARACTER YIELD – Use Smith Corona Multi-Strike Ribbon Cassettes and “cover-up” errors with Smith Corona Cover-Up Correcting Cassettes. Multi-Strike Black Ribbon ...................................................................................... 21025 Cover-Up Correcting Cassette .............................................................................. 21065 Smith Corona Corporation 41 Start-Rite ® Start-Rite .................................................................................................................. 63503 3 Printwheels (Presidential 12, Tempo 10, Script 10/12) 4 Correctable Film Ribbon Cassettes 1 Lift-Off Correcting Cassette Start-Rite II .............................................................................................................. 67173 2 Printwheels (Script 10/12, Letter Gothic 10/12) 3 Correctable Film Ribbon Cassettes 1 Lift-Off Correcting Cassette Start-Rite kit contents vary by country. Changeable Printwheels A variety of H Series printwheels with different type styles are available from your Smith Corona product merchandiser. PICA TYPE STYLES: 20700 Regency 10 (Courier 10) 20704 Tempo 10 20714 Orator 10 ELITE TYPE STYLES: 20702 Regency 12 (Courier 12) 20716 Presidential 12 (Prestige 12) 20706 Tempo 12 PICA OR ELITE TYPE STYLES: 20708 Script 10/12 20712 Courier Italic 10/12 20710 Letter Gothic 10/12 Other: 20718 Micro 15 To protect printwheels, store them in their original holders. 42 Smith Corona Corporation Important Papers Safe Operating Recommendations To avoid unnecessary operator injury or damage to the machine, please review the following recommendations. USE THE CORRECT VOLTAGE to avoid electrical short circuiting, overheating or shocks. If in doubt, check the electrical rating label affixed to the unit. Smith Corona does not recommend attaching your unit to any power source other than that which is indicated on the original electric rating label of the machine. Smith Corona does not recommend the use of a voltage converter. THE UNIT SHOULD BE PLUGGED into an outlet which is nearby and easily accessible. ALWAYS HAVE THE UNIT SERVICED by a qualified service technician. There are no user-serviceable parts inside. TO AVOID ELECTRICAL SHOCK, never insert metal objects such as screwdrivers, paper clips, nail files, etc. inside the unit. For safety’s sake, never place any object inside the unit. BEFORE REACHING INTO THE CARRIER PATH AREA, always switch to Standby or Off, depending on the model. KEEP FINGERS, HAIR, JEWELRY, etc. away from the carrier area when in operation. IF THE UNIT IS DROPPED, the insulation system may be disturbed. Have the unit checked by a qualified service technician before using it again. DO NOT remove the housing from the unit. AVOID PLACING THE UNIT near an excessively warm or humid location. IF LIQUIDS ARE SPILLED OR SPLASHED on the unit, immediately unplug it. Have the unit checked by a qualified service technician. BEFORE CLEANING any part of your unit, make sure it is unplugged. WHEN FINISHED TYPING, switch to Standby or Off. Unplug unit if it is not to be used for an extended period. Unplug unit for a complete cut from the main electrical circuit. WARNING: To reduce the risk of fire or electric shock, do NOT expose unit to rain or moisture. Smith Corona Corporation 43 Product Consumer Warranty Limited Warranty 90 Day Warranty Smith Corona warrants this typewriter against defects in material or workmanship for a period of 90 days from the date of original purchase for use, and agrees to repair or, at our option, replace any defective unit without charge for either parts or labor. Proof of Purchase will be required. Limited Warranty Following the first 90 days from the date of purchase and thereafter until 1 year from the date of purchase Smith Corona will replace any defective part at no charge. There will be a standard charge for labor and the cost of transportation. IMPORTANT: This warranty does not cover damage resulting from accident, misuse or abuse, any modification or alteration including attaching the unit to other than the recommended receptacle or voltage, nor does it cover ribbon replacement or cleaning of the unit. THIS WARRANTY IS VOID WHEN SERVICE OR REPAIRS ARE PERFORMED BY A NON-AUTHORIZED SERVICE LOCATION. This warranty does not cover shipping expenses to and from a service location. NO RESPONSIBILITY IS ASSUMED FOR ANY SPECIAL, INCIDENTAL, OR CONSEQUENTIAL DAMAGES. You may obtain warranty service through one of our service locations. To obtain the location of the nearest Service Center, call toll-free: 1-800-448-1018 The toll-free number operates Monday through Friday, from 8:00 a.m. to 6:00 p.m. Eastern Time. Simply take or ship the unit prepaid to the nearest service location. Damage occurring during transit is not covered by this warranty. NOTE: No other warranty, written or verbal, is authorized by Smith Corona. This warranty applies to units sold in the United States and Puerto Rico only. This warranty gives you specific legal rights, and you may also have other rights which vary from state to state. Some states do not allow the exclusion or limitation of incidental or consequential damages or limitations on how long an implied warranty lasts, so the above exclusion and limitations may not apply to you. Smith Corona Corporation 839 Route 13 South P.O. Box 2090 Cortland, New York 13045-0980 WARNING: Use Smith Corona “H” Series supplies. Use of non-Smith Corona (brand or manufactured) supplies or accessories will not (except as noted below) void this warranty. THE WARRANTY WILL BE VOID if the typewriter is damaged or rendered wholly or partially inoperable as a result of using a non-Smith Corona supply or accessory item(s). 44 Smith Corona Corporation FCC The following information is provided to you in accordance with the rules and regulations of the United States Federal Communications Commission. Questions concerning this information can be directed to Smith Corona Corporation by writing: Smith Corona Corporation 839 Route 13 South Box 2090 Cortland, NY 13045 NOTE: This typewriter generates and uses radio-frequency energy and if not installed and used properly, that is, in strict accordance with the manufacturer’s instructions, may cause interference to radio and television reception. It has been type tested and found to comply with the limits for a Class B typewriter in accordance with the specifications in Sub-part J of Part 15 of FCC rules, which are designed to provide reasonable protection against such interference in a residential installation. However, there is no guarantee that interference will not occur in a particular installation. If this typewriter does cause interference to radio or television reception, which can be determined by turning the typewriter off and on, the user is encouraged to try to correct the interference with one or more of the following measures: Reorient the receiving antenna. Relocate the typewriter with respect to the receiver. Move the typewriter away from the receiver. Plug the typewriter into a different outlet so that typewriter and receiver are on different branch circuits. If necessary, the user should consult the dealer or an experienced radio/television technician for additional suggestions. The user may find the following booklet prepared by the Federal Communications Commission helpful: “How to Identify and Resolve Radio-TV Interference Problems.” This booklet is available from the U.S. Government Printing Office, Washington, DC 20402, Stock No. 004-00-00345-4 NOTICE: Any modification or alteration of a typewriter which allows electronic communication with a computer or attaching it to a receptacle or module interface which is not recommended will void Smith Corona’s warranty on this product to the extent that any such modification may be related to a failure. Some typewriters are not designed as computer printers and when modified to perform this function may be in violation of the safety and emission rules and regulations. NOTE: This digital apparatus does not exceed the class B limits for radio emissions from digital apparatus as set out in the radio interference regulations of the Canadian Department of Communications. For your convenience and protection make a record of the model number and serial number. The serial number is located on the inside of the typewriter on the bottom right side. Use these numbers when ordering supplies and accessories and for identification in case of theft. Model Name _______________________________ Serial Number ______________________________ Date of Purchase ____________________________ Smith Corona Corporation Smith Corona Corporation 1994 45 Quick Reference Guide Function Abbreviation Auto Return Bold Center Caps Lock Character Swap Clear One or All Tabs Corrects Character(s), On-line Corrects One Character, Off-line Corrects Word(s) On-line Dictionary Double Line Spacing End of Page Warning Erase one line of text LineEraser Forward Correct Half Space Heavy Impression Control Indent Keyboard II (^ ˜ `) Left Margin Light Impression Control Medium Impression Control Moves Carrier to Tab Locations Manual Underscore 11⁄2 Line Spacing Paper Insert Paper Eject Relocate to previous typing position Right Margin Self-Demonstration Set 10 Pitch (Pica) Set 12 Pitch (Elite) Set 15 Pitch (Micro) Set Decimal Tab Set Regular Tabs Single Line Spacing Stop LineEraser Subscript Superscript Typing Position Up Typing Position Down WordFind Word Swap Underscore All Underscore Word Volume Control 799548 Command Code + X Code + Back Space Code + B Code + Zero (0) Code + Lock Code + Period (. ) Code + Tab (Tab C) Correct Code + Correct WordEraser Code + D Code + 5 Code + P (P. End) Code + WordEraser Code + Correct (twice) Code + Spacebar Code + H Code + K (Ind) Code + Desired Keyboard II character Margin Code + L Code + M Tab Shift + — Code + 4 Code + Left Shift/Paper In Code + Right Shift/Paper Out Code + Return/Relocate Code + Margin Code + Z Code + Tab S Code + 1 Code + 2 Code + O (D. Tab) Tab S Code + 3 Code + S Code + 8 Code + 9 Code + 6 Code + 7 Code + F Code + Comma (,) Code + Equal (=) Code + Hyphen (-) Code + V NAEL, NACD Printed in USA