1
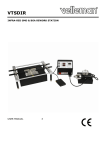
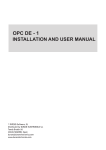
CAM
MSCC3
3G
REV 01
REV.
3G CA
AMERA
CAMSCC3G
Rev. 01
Figure 1
09/08/2011
2
©Velleman® nv
CAMSCC3G
Rev. 01
Figure 2
09/08/2011
3
©Velleman® nv
CAMSC
CC3G
Rev. 01
0
User manual
1. Inttroduction
n
To all residents of the
t
European
n Union
Importtant environm
mental information abou
ut this produ
uct
This symbol on the deviice or the package indicates that disposa
al of the devic
ce
after its liffecycle could harm
h
the enviironment.
Do not dispose of the un
nit (or batteries) as unsorte
ed municipal waste;
w
it shou
uld
be taken to a specialized company fo
or recycling.
This device
e should be re
eturned to you
ur distributor or to a local recycling
r
serviice.
Respect th
he local enviro
onmental rules
s.
If in do
oubt, contactt your local waste
w
dispos
sal authoritie
es.
Thank you
y
for choosin
ng Velleman! Please
P
read the manual thorroughly before
e bringing this
device in
nto service. If the device wa
as damaged in
n transit, don'tt install or use
e it and contac
ct
your dea
aler.
2. Saffety instru
uctions
Keep the dev
vice away from
m children and
d unauthorised
d users.
Always discon
nnect mains power
p
when th
he device is no
ot in use or when
w
servicing or
maintenance activities are performed.
There are no user-servicea
able parts inside the device. Refer to an authorized de
ealer
for service an
nd/or spare pa
arts.
3. Ge
eneral Guid
delines
Refer to the Velleman® Service and
a
Quality Warranty
W
on the last page
es of this manual.
evice away fro
om extreme heat and dust.
Keep this de
Protect this device from shocks
s
and ab
buse. Avoid brute force whe
en operating the
device.
•
•
•
•
•
•
Familiarise yourse
elf with the functions of the
e device before
e actually usin
ng it.
All modifications
m
o the device are
of
a forbidden for safety rea
asons. Damag
ge caused by user
u
mod
difications to the device is not
n covered by
y the warranty
y.
Only
y use the device for its inten
nded purpose. Using the de
evice in an unauthorised wa
ay
will void
v
the warra
anty.
Dam
mage caused by
b disregard of
o certain guidelines in this manual is nott covered by the
warrranty and the dealer will no
ot accept responsibility for any
a
ensuing defects
d
or
prob
blems.
Only
y use this deviice in compliance with priva
acy laws and regulations. Refer
R
to the local
auth
horities for mo
ore information.
A qu
ualified technic
cian should install and serv
vice this device
e.
4. Fea
atures
•
•
•
•
remo
ote video secu
urity using the
e 3G mobile phone
p
network
k
with night vision IR
I LEDs
builtt-in heater to prevent conde
ensation and enables opera
ation at low te
emperatures
up to
o 20 mobile 3G-phones
3
can
n connect to the camera - security code protected
09/08/201
11
4
©Velleman
n® nv
CAMSCC3G
Rev. 01
5. Overview
Refer to the illustrations on pages 2 and 3 of this manual.
CAMSCC3G
A lens
B IR LEDs
C back cover
D wall mounting bracket
E camera mounting bracket
F 5Vdc input
G on/off switch
H
I
J
K
L
M
N
O
battery status LED
microphone
network status LED
mini USB port
USIM card slot
reset button
washer
bolt
interior
1 ground
2 +12VDC
3 heater
4
5
6
alarm trigger: 0 ~ 3 minutes
alarm
normal closed (NC)
6. Preliminary settings
Turning on the device
• The camera can be switched on/off using the Power Supply Switch [G].
• To turn on or switch off the device move the switch [G] from the “OFF” to the “ON”
position or vice versa using a small flat screwdriver.
7. Installation
•
A USIM card (not included) must be inserted into the device before it can be used,
disabling its PIN code using a video phone.
• Check to ensure that the device is switched off and the AC adaptor is unplugged before
inserting or removing the USIM card.
• The device will not function properly unless a USIM is inserted. In this case, the device
will note an anomaly and a red light will appear on the LED Network [J] and BATTERY
[H] LEDs.
• Insert the USIM card as shown in the illustration on page 3 of this manual into the slot
[L]. Remember to lock the USIM card after it is inserted by sliding the lock to the left.
Note 1: Check to ensure that the USIM card has been inserted as illustrated in the figure.
Note 2: Take care when inserting the USIM card, since the metal contacts on the USIM
card can be easily damaged/scratched.
Suggestions for installing the device
•
•
•
•
•
Do not position the device in front of light sources (to avoid overexposure).
Do not place any objects within a 1 meter radius of the internal visual angle of the
device (images could be unintelligible).
Do not position the device in a basement; it may not have network coverage.
Do not cover the device’s video camera with an object during a video call (image
quality may be compromised).
Do not cover the device with objects containing metallic materials (signal quality may
be compromised)
Fastening the cable glands
Refer to the illustration on page 3 of this manual.
Fastening the bracket
Refer to the illustration on page 3 of this manual.
09/08/2011
5
©Velleman® nv
CAMSCC3G
Rev. 01
Fastening the camera to the bracket
Refer to the illustration on page 3 of this manual. Make sure to insert the washers [N] in
the indicated places.
Terminal box wires and cabling
Refer to the illustration on page 3 and the overview in §4 of this manual.
8. Administrator management
Administrator management and alarm calls
• The administrator – the person authorised to send configuration commands – is defined
when the first video call to the device is made.
• When asked for a PIN number, enter the code found inside the bag stored in the device’s
box.
• The CAMSCC3 will call the administrator number during an alarm.
9. Activation
Connecting the Charger
•
•
•
•
•
•
Insert the charger into the CAMSCC3G as indicated in the illustration on page 3 of this
manual.
Plug the charger into the 12VDC input [F].
The Battery and Network lights on the device will turn red and flash rapidly (once every
second) on an off during this first phase.
Once the device registers that a charger has been inserted, the battery LED [H] will turn
on. Battery status is described in the figures below.
If the battery LED [H] is red and flashes rapidly (once every second), it is out of charge.
The battery takes approximately 30 minutes to charge up to its minimum operative
level. Do not switch on the device if the battery is below its minimum operative level. If
the battery LED [H] is on and flashing slowly (once every 3 seconds), the battery has
been charged up to its minimum operative level.
Battery status is described in the figure below.
09/08/2011
6
©Velleman® nv
CAMSCC3G
•
•
•
Rev. 01
The network LED [J] will display a yellow light while the device searches for the UMTS
network. This will then turn green and start flashing rapidly. The LED will show battery
levels after it has measured battery capacity. Network status is described below.
Once the device is connected to the network, the network LED [J] will turn green and
stops flashing.
The device and all its functions are ready for use once the network LED [J] turns green
and the battery LED [H] displays the level charge the battery has.
Activating the service
•
•
•
Follow the instructions below to carry out the authentication procedure and activate
video services.
Video call the CAMSCC3 with a video phone (dial the number of the device and activate
the video call function from the video phone).
A request will be made for a four (4) digit PIN code – found inside the devices’ box. This
will activate the transmission of images recorded by the CAMSCC3G. The illustration
below will be displayed on your video phone.
•
•
Enter the PIN code by pressing the appropriate keys on your video phone.
The device will then check the PIN code you entered. If the PIN code is correct, that
telephone number will be added to the device's memory (saved in a list of
authorisations). The number used to make the first call to the device to establish a
connection will be given the title of Administrator. If the PIN code is incorrect you have
two more chances to enter the correct PIN code.
Note 1: The device will automatically disconnect a video call after 3 failed attempts to
enter a PIN code, or after 1 minute.
• Once authenticated, the device will emit a sound to indicate that the video call has
begun. Images recorded by the CAMSCC3G can then be seen in real time.
09/08/2011
7
©Velleman® nv
CAMSCC3G
•
Rev. 01
A PIN code must only be entered the first time the video call services are used. Once the
number is added to the device's memory (List of Authorisations), it will always be
permitted to connect to the device without the need to enter a PIN code.
Disconnecting a video call
•
•
The user interrupts the connection of the video call from their video phone.
The transmission of images recorded by the CAMSCC3G is interrupted and the video call
is disconnected.
Note 2: for safety reasons, the device always keeps a "List of Authorisations” stored in its
internal memory where it saves information on authorised users.
Only authorised users can use the services supplied by the device.
The List of Authorisations can save information on up to 20 users. To be automatically
added to the List of Authorisations, users must video call the device and enter
correctly enter its PIN code. The first user on the list is the Administrator, who is
authorised to configure the device by using SMS commands (please see the
“management" section).
Note 3: if a video call is made to the device by a user not on the list – once 20 authorised
users are listed and stored in the memory - the device will not recognise the caller,
who will be unable to connect to the device.
Warning 1: do not conceal your number while making a video call. The device will be
unable to recognise the caller and will refuse the connection.
Note 4: CAMSCC3G video services can be used even when the charger is disconnected. A
video call will not be connected if battery capacity is insufficient (below 5%).
Note 5: Video calls will be terminated if battery capacity has reached its minimum
operative level (below 5%) and an authorised user calls and activates the device. The
user will receive a warning that the battery is low before the call is terminated.
Note 6: the CAMSCC3G must be placed in a fixed position. To ensure that video call
quality remains high, place the device in an appropriate position checking the network
LED [J] - which shows the strength of the radio signal received by the device.
10.
Advanced functions for the limited access mode
Management
•
Only the administrator - the first user saved on the device’s List of Authorisations – is
authorised to change settings on the List of Authorisations.
• The Administrator can send commands to the device using SMS text messages. These
can be used to change a number of settings on the List of Authorisations.
• The Administrator can use 6 different commands. They are:
1) Change the number of users saved on the List of Authorisations;
2) Change the Administrator's number;
3) Delete an authorised user;
4) Delete all authorised users;
5) Enter a number as an authorised user;
6) change the PIN code.
Note: SMS COMMANDS are not caps sensitive.
Warning: Should the Administrator change his/her video phone – for example following
an MNP request – we recommend the new number be saved as Administrator. For any
problems connected to an Administrator number change, please contact Customer
Services.
1) To change the number of users saved in the List of Authorisations
•
The List of Authorisations has been programmed to save 20 authorised users. The
Administrator can change this predefined number to any number between 1 and 20
by sending an SMS message to the device containing the following text:
#modlist*[NUMBER]#[PIN]#
09/08/2011
8
©Velleman® nv
CAMSCC3G
Note:
Rev. 01
[NUMBER] must be a number between 1 and 20.
[PIN] is the correct 4 digit pin code
For example, the following message can be sent to limit the List of Authorisations to
only 3 users: #modlist*3#1234#
Warning: All information on excess users will be automatically deleted once the number
of users saved in the List of Authorisations is changed, if the new number is lower
than the previous one.
• No more than 20 users can be saved on the List of Authorisations
2) To change the Administrator’s telephone number:
•
The Administrator’s telephone number can be changed by sending an SMS text
message to the device from the Administrator’s phone.
Warning: The Administrator’s number can only be changed five times. Please contact
Customer Services if the number needs to be changed again after five changes.
• To change this number, the Administrator must send an SMS message to the device
containing the following text:
#changead*[OLDNUMBER]*[NEWNUMBER]#[PIN]#
Note:
[OLDNUMER] is the Administrator’s old number.
[NEWNUMBER] is the new Administrator number.
[PIN] is the correct 4 digit pin code
For example if:
(OLD NUMBER) = +3931111111
(NEW NUMBER) = +3932222222
(PIN) = 1234
SMS Command: #changead*+393931111111*+393932222222#1234#
3) To delete a specific authorised user
•
A specific authorised user can be deleted by sending an SMS message to the device
from the Administrator phone containing the following text:
#del*[NUMBER]#[PIN]#
Note:
[NUMBER] is the user number you want to delete.
[PIN] is the correct 4 digit pin code
For example, send the following command to delete the number +3931234567
from the List of Authorisations: #del*+393931234567#1234#
Warning: The Administrator number cannot be deleted by sending this command.
4) To delete all authorised users
•
All authorised users can be deleted from the List of Authorisations by sending an
SMS message to the device from the Administrator phone containing the following
text:
#deluser#[PIN]#
Note: [PIN] is the correct 4 digit pin code
For example: #deluser#1234#
Warning: All users will be deleted from the List of Authorisations once the device has
received the command, with the exception of the Administrator.
5) To enter new numbers as authorised users
•
A specific authorised user can be added to the List of Authorisations by sending an
SMS message to the device from the Administrator phone containing the following
text:
#add*[NUMBER]#[PIN]#
09/08/2011
9
©Velleman® nv
CAMSCC3G
Rev. 01
Note:
[NUMBER] is the number you want to add to the List of Authorisations.
[PIN] is the correct 4 digit pin code
For example, if you want to add the number +3937654321 to the List as an
authorised user: #add#+393937654321#1234#
Warning: The [NUMBER] will not be added to the List of Authorisations once the
number of numbers saved on the list has reached its limit. The SMS message will be
ignored if the [NUMBER] is already found on the list.
6) To change the PIN code
• The PIN code can be changed by sending an SMS message to the device from the
Administrator phone containing the following text:
#pin*[NEW_PIN]#[PIN] #
Note:
[NEW PIN] is the 4 digit number you want to use as a PIN code.
[PIN] is the 4 digit number you want to change.
For example send the following message to change PIN 1234 to a new PIN
0987: #PIN*0987#1234#
Refer to the table below for an overview of all Administrator SMS commands.
SMS Command
Description
#modlist*[NUMBER]#[PIN]#
Use to change the number of users
saved on the List of Authorisations
#changead*[OLDNUMBER]*[NEWNUMBER]#[PIN]# Use to change the telephone number
belonging to the Administrator
Example: #changead*+393931111111*+393932222222#1234#
Use to delete a specific authorised
#del*[NUMBER]#[PIN]#
user
Example: #del*+393931234567#1234#
Example: #modlist*3#1234#
#deluser#[PIN]#
Use to delete all authorised users
Example: #deluser#1234#
#add*[NUMBER]#[PIN]#
Use to enter new numbers as
authorised users
Example: #add*+393937654321#1234#
#pin*[NEW_PIN]#[PIN] #
Use to change the PIN code
Example: #pin*0987#1234#
11.
•
Problem solving
A list is provided below describing a series of situations which may take place while the
device is in use. Please check the list before contacting Customer Services.
P1. Restarting the device (resetting procedure)
•
The device can be restarted by pressing the reset button and keeping it pressed for at
least 5 seconds.
Note: The device will be automatically restarted by pressing the reset button. All users
will be deleted from the List of Authorisations, with the exception of the Administrator
and the PIN code.
P2. The Network LED is off
•
Check that the USIM card has been inserted into the USIM slot and that is correctly
locked.
• If the USIM card has been inserted and locked correctly and the Network Light is still off,
press the reset button for 5 seconds to restart the device.
Note: All users will be deleted from the List of Authorisations once the device is reset,
with the exception of the Administrator.
• Please contact Customer Services if the device still fails to function properly after it has
been reset.
09/08/2011
10
©Velleman® nv
CAMSCC3G
Rev. 01
P3. The network LED is red and continues flashing on and off
•
•
•
•
•
Check that the USIM card has been inserted into the USIM slot and that is correctly
locked.
If the network LED stays red and continues to flash on and off, move the device to
another position because the radio signal is insufficient in that particular position.
Using your video phone, check for UMTS network coverage.
If the LED has not changed to yellow or green after you have tried a number of different
positions, press the reset button for 5 seconds to restart the device.
Note: All users will be deleted from the List of Authorisations once the device is reset,
with the exception of the Administrator.
Please contact Customer Services if the device still fails to function properly after it has
been reset.
P4. The battery LED is red and continues flashing on and off
•
Check that the USIM card has been inserted into the USIM slot and that is correctly
locked.
• Check that the charger is properly connected to the device and that it has been
connected to a 220v AC power supply for at least 3 hours.
• If the charger has been connected to the device in a correct manner and if it has been
connected to a 220V AC power supply for at least 3 hours and the battery LED is still red
and continues flashing on and off, press the reset button for 5 seconds to restart the
device.
Note: All users will be deleted from the List of Authorisations once the device is reset,
with the exception of the Administrator.
• Please contact Customer Services if the device still fails to function properly after it has
been reset.
P5. The battery and network lights are red and remain on
•
•
•
•
If both the network and battery LEDs are red and remain on (but are not flashing),
perform the procedure to switch off/restart the device.
Move the battery switch [G] from the “ON” to the “OFF” position to switch off the
device.
Move the battery switch [G] from the “OFF” to the “ON” position to switch on the device.
Please contact Customer Services if, after carrying out the procedure to switch
off/restart the device, both the Network and Battery Lights are red and remain on (but
are not flashing).
P6. SMS command errors when configuring the device
•
The device will ignore all SMS text messages it receives containing errors and syntax
mistakes. It will also ignore all SMS text messages sent by users without Administrator
privileges. If you have made a mistake, just send a new, valid SMS text message.
P7. The device does not switch on when I move the Power switch
•
•
•
•
First of all, switch off the device, remove and reconnect the charger; then attempt to
switch on the device again. If the charger is not connected to the device, charge up the
battery completely and try again.
If the device still does not switch on and the battery is completely charged, carry out the
switch off/restart procedure.
To switch off/restart the device:
o Move the battery switch from the “ON” to the “OFF” position to switch off the device
completely.
o Move the battery switch from the “OFF” to the “ON” position to switch on the device.
Please contact Customer Services if the device still fails to function properly after it has
been reset.
09/08/2011
11
©Velleman® nv
CAMSCC3G
12.
Rev. 01
Important security information
Please read the following information before using the CAMSCC3G.
Carefully read the following precautions in order to reduce the risk of personal injury from
electric shocks, fires and to reduce the risk of damaging the equipment.
13.
General precautions
Precautions for the battery and for the adaptor
•
•
•
•
•
•
•
•
Never connect or disconnect the AC current adaptor with wet hands. Connecting or
disconnecting the AC current adaptor from a power supply with wet hands may cause an
electric shock.
Never place the AC current adaptor on wooden surfaces (or any other surface which
could be damaged by heat) when in use because its temperature rises when it is on.
Always place it on materials which isolate heat.
Never cover the AC adaptor with an object when in use and never place it next to a heat
source. An excessive increase in temperature could prejudice its functioning.
Do not dismantle or attempt to repair the AC adaptor and never change its plugs or
wires. You could run the risk of receiving an electric shock.
Do not dismantle or modify the battery.
Stop using the device if you have noted anomalous temperatures, smells, staining or
deformations or if it behaves in an abnormal manner when in use, while charging or
when stored.
A continued use of the CAMSCC3G video camera under any of these conditions could
lead to the combustion of battery liquids or could cause the battery to crack.
Do not touch any liquids leaking out from a damaged battery for any reason. This liquid
may cause serious lesions if it comes into contact with the skin or eyes. If the liquid
comes into contact with the eyes rinse, thoroughly with clean water and contact a doctor
immediately.
If the liquid comes into contact with clothing or skin, wash immediately with clean water.
Always use the cloths supplied in the package to clean the camera’s lenses and always
use a wet or antistatic cloth to clean the device. Do not use chemical detergents or
abrasives as these could damage the device.
Third party equipment
The use of equipment, AC adaptors or third party accessories which have not been
manufactured or authorised by VELLEMAN invalidate the product's warranty and prejudice
the safety of the device itself.
Precautions for repairs
No part of the device, battery or charger may be repaired by the user. Do not attempt to
dismantle or repair these parts on your own as it may lead to fires, electric shocks and
faults. Always contact an authorised customer services centre for repairs and substitutions.
09/08/2011
12
©Velleman® nv
CAMSCC3G
14.
Rev. 01
Technical specifications
Alarm video call
Heater
Technology
Camera
IP rating
Connectivity
Microphone
remote control
Video calls
automatic video call
from a 3G mobile phone
Messages
Battery
Privacy
power supply
operating temperature
dimensions
weight
Other characteristics
Through the NC contact
Automatic power supply thermostat
UMTS
colour CCD image sensor
CCD100k pixel, 352(H) x 288(V) -PALField angle 58” diagonal,46” horizontal, 38” vertical
54
USB port for SW updates
Sensitivity greater – 40 dB
over 3G network
Answers and makes video calls from every operator
through the NC alarm contact
limited up to 20 users
Receives SMS text configuration messages
2200mAh for an autonomy of 330 hours in standby, 4 hours
of video calls, 3,2 hours of video calls during the night.
Access is granted to see the images by entering a PIN code
5Vdc adaptor (incl.)
-25°C ~ 70°C
220 x 80 x 95mm
680 gr (incl.bracket)
LED battery light, cover for malfunctions
Reset button
Wall support bracket
Use this device with original accessories only. Velleman nv cannot be held
responsible in the event of damage or injury resulted from (incorrect) use of this
device.
For more info concerning this product and the latest version of this user manual,
please visit our website www.velleman.eu.
The information in this manual is subject to change without prior notice.
© COPYRIGHT NOTICE
The copyright to this manual is owned by Velleman nv. All worldwide rights reserved.
No part of this manual or may be copied, reproduced, translated or reduced to any electronic medium or
otherwise without the prior written consent of the copyright holder.
09/08/2011
13
©Velleman® nv
Velleman® Service and Quality Warranty
Since its foundation in 1972, Velleman® acquired
extensive experience in the electronics world and
currently distributes its products in over 85
countries.
All our products fulfil strict quality requirements
and legal stipulations in the EU. In order to
ensure the quality, our products regularly go
through an extra quality check, both by an
internal quality department and by specialized
external organisations. If, all precautionary
measures notwithstanding, problems should
occur, please make appeal to our warranty (see
guarantee conditions).
General Warranty Conditions Concerning
Consumer Products (for EU):
• All consumer products are subject to a 24month warranty on production flaws and
defective material as from the original date of
purchase.
• Velleman® can decide to replace an article with
an equivalent article, or to refund the retail value
totally or partially when the complaint is valid
and a free repair or replacement of the article is
impossible, or if the expenses are out of
proportion.
You will be delivered a replacing article or a
refund at the value of 100% of the purchase
price in case of a flaw occurred in the first year
after the date of purchase and delivery, or a
replacing article at 50% of the purchase price or
a refund at the value of 50% of the retail value in
case of a flaw occurred in the second year after
the date of purchase and delivery.
• Not covered by warranty:
- all direct or indirect damage caused after
delivery to the article (e.g. by oxidation, shocks,
falls, dust, dirt, humidity...), and by the article,
as well as its contents (e.g. data loss),
compensation for loss of profits;
- consumable goods, parts or accessories that
are subject to an aging process during normal
use, such as batteries (rechargeable, nonrechargeable, built-in or replaceable), lamps,
rubber parts, drive belts... (unlimited list);
- flaws resulting from fire, water damage,
lightning, accident, natural disaster, etc. …;
- flaws caused deliberately, negligently or
resulting from improper handling, negligent
maintenance, abusive use or use contrary to the
manufacturer’s instructions;
- damage caused by a commercial, professional
or collective use of the article (the warranty
validity will be reduced to six (6) months when
the article is used professionally);
- damage resulting from an inappropriate
packing and shipping of the article;
- all damage caused by modification, repair or
alteration performed by a third party without
written permission by Velleman®.
• Articles to be repaired must be delivered to
your Velleman® dealer, solidly packed
(preferably in the original packaging), and be
completed with the original receipt of purchase
and a clear flaw description.
• Hint: In order to save on cost and time, please
reread the manual and check if the flaw is caused
by obvious causes prior to presenting the article
for repair. Note that returning a non-defective
article can also involve handling costs.
• Repairs occurring after warranty expiration are
subject to shipping costs.
• The above conditions are without prejudice to
all commercial warranties.
The above enumeration is subject to
modification according to the article (see
article’s manual).