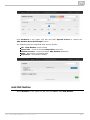
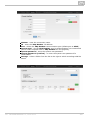
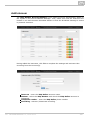
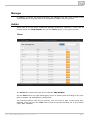
1
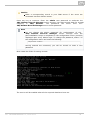
2N® NetStar
2N® NetStar Records Manager
Installation and user manual
Version
4.3.0
www.2n.cz
The 2N TELEKOMUNIKACE a.s. is a Czech manufacturer and supplier of telecommunications
equipment.
The product family developed by 2N TELEKOMUNIKACE a.s. includes GSM gateways, private
branch exchanges (PBX), and door and lift communicators. 2N TELEKOMUNIKACE a.s. has
been ranked among the Czech top companies for years and represented a symbol of
stability and prosperity on the telecommunications market for almost two decades. At
present, we export our products into over 120 countries worldwide and have exclusive
distributors on all continents.
2N® is a registered trademark of 2N TELEKOMUNIKACE a.s. Any product and/or other
names mentioned herein are registered trademarks and/or trademarks or brands protected
by law.
2N TELEKOMUNIKACE a.s. administers the FAQ database to help you quickly find
information and to answer your questions about 2N products and services. On
www.faq.2n.cz you can find information regarding products adjustment and instructions for
optimum use and procedures „What to do if...“.
2N TELEKOMUNIKACE a.s. hereby declares that the 2N® NetStar product complies with all
basic requirements and other relevant provisions of the 1999/5/EC directive. For the full
wording of the Declaration of Conformity see the CD-ROM (if enclosed) or our website at
www.2n.cz.
The 2N TELEKOMUNIKACE a.s. is the holder of the ISO 9001:2009 certificate. All
development, production and distribution processes of the company are managed by this
standard and guarantee a high quality, technical level and professional aspect of all our
products.
Content
Content
2N® NetStar Records Manager Manual
.................. 4
1. 2N® NetStar Records Manager Installation Wizard . . . . . . . . . . . . . . . . . . . . . . . 5
2. 2N® NetStar Records Manager Configuration . . . . . . . . . . . . . . . . . . . . . . . . . . . 11
3. 2N® NetStar Records Manager User Manual . . . . . . . . . . . . . . . . . . . . . . . . . . . 17
2N® NetStar Records Manager
Manual
The 2N® NetStar Records Manager allows for a simple management and rapid
filtration of recorded calls according to various categories, for example number (called
and calling), date and time. Immediately after login, each user will see its call records
and, depending on the allocated user rights, any other user call records (Administrator,
e.g.). You can play your records via your Internet browser, make comments using the
2N® NetStar Records Manager web interface or download the records to your PC for
later use.
After installation on the server, each user will be able to log in easily via its unique URL
in the Internet browser. Make sure that there is a functional Internet connection to
make the system work properly.
Content:
1. 2N® NetStar Records Manager Installation Wizard
2. 2N® NetStar Records Manager Configuration
3. 2N® NetStar Records Manager User Manual
2N® TELEKOMUNIKACE a.s., www.2n.cz
4
1. 2N® NetStar Records Manager Installation Wizard
Installation
Install the 2N® NetStar Records Manager directly on a hardware PC or virtualisation
platform (VMware, Oracle VM VirtualBox, etc.).
Caution
Make sure that the following minimum PC/virtualisation platform
configuration requirements are met while installing the
2N® NetStar Records Manager to avoid system malfunction!
64bit processor
4 GB RAM
100 GB free hard disk space
Caution
The size of recordings made by 2N® NetStar is approximately 1 MB per
1 minute record. Therefore, check the capacity of your hard disk.
Note
Make sure before installing the 2N® NetStar Records Manager onto a
virtualisation platform that VT-x or AMD-V or any other similar
virtualisation function is enabled according to the hardware PC processor
type .
Example of Virtualisation Platform Installation
Connect the received ISO file with the 2N® NetStar Records Manager installation to
the CD/DVD drive in the virtualisation platform that meets the minimum configuration
requirements mentioned above. Set booting from the CD/DVD drive and start the
virtual PC. When the ISO file has been read, the following screen will be displayed:
2N® TELEKOMUNIKACE a.s., www.2n.cz
5
Select the first option on this screen and the first option on the next screen (Use all
space) and click Next.
2N® TELEKOMUNIKACE a.s., www.2n.cz
6
When the installation is completed, the virtual PC gets restarted. If the booting
sequence was changed in the virtual PC configuration, we recommend you to return
Booting from hard disk to the first place.
After booting from hard disk is completed, you will see the login window:
Log in to complete the installation process: login admin and password 2n.
Upon login, the post-installation script will start automatically to complete the
2N® NetStar Records Manager installation.
Caution
The post-installation script takes a few minutes. Be very careful while
entering data and do not interrupt or skip over the script to avoid the
2N® NetStar Records Manager malfunction.
Language is the first script selection.
2N® TELEKOMUNIKACE a.s., www.2n.cz
7
Having selected the language version, enter the server hostname.
Select the interface to be used for connection (this IP address will then be entered into
the Internet browser if necessary).
If the DHCP server is available in the network, you can keep the assigned IP address or
set the static IP address. If you select No, you will be invited to enter a new IP
address, network mask, default gateway and primary and secondary DNS.
Now choose the type of user connection to the 2N® NetStar Records Manager : IP
address or Domain name. If you select the latter option, you will be asked to enter the
domain name.
2N® TELEKOMUNIKACE a.s., www.2n.cz
8
Caution
Make a corresponding record in your DNS server if the users are
connected via their domain names.
Press any key to continue. Enter the admin user password to authorise the
2N® NetStar Records Manager server storage. Use these access data for storage
mapping in 2N® NetStar . The password can differ from the
2N® NetStar Records Manager server access password.
Note
Do not change the admin password for authorisation of the
2N® NetStar Records Manager server storage until the
post-installation script is completed in the configuration menu (console)
displayed upon every Admin login. To change the password, select 7 in
the configuration menu and enter the following:
smbpasswd –a admin
Having entered the command, you will be invited to enter a new
password.
Now create the folder for saving records.
The service will be enabled when all the required data have been set.
2N® TELEKOMUNIKACE a.s., www.2n.cz
9
Press any key to complete installation. Now log in via your Internet browser and start
using the 2N® NetStar Records Manager. The configuration menu below will be
displayed upon Admin login.
Caution
Please set the correct time (via the NTP server - option 4, e.g.) before
using the 2N® NetStar Records Manager as correct time setting is
crucial for some functions.
2N® TELEKOMUNIKACE a.s., www.2n.cz
10
2. 2N® NetStar Records Manager Configuration
Section content:
First Login
Add 2N® NetStar
Add Intercom
Users
Storage Mapping in 2N® NetStar
First Login
Having completed installation, enter the 2N® NetStar Records Manager server IP
address or domain name into your Internet browser.
Note
Use Internet Explorer 8 and higher, Mozilla Firefox or Google Chrome for
your web login.
For the first login, use the 2N® NetStar Records Manager server Superadmin
account: name superadmin and password 2n. Click the logged-in user name in the
right-hand upper screen corner to change the Superadmin password after login if
necessary.
The start screen is displayed after a successful login.
2N® TELEKOMUNIKACE a.s., www.2n.cz
11
Click NetStars in the upper tool bar and then Upload licence to upload the
2N® NetStar Records Manager licence.
The following data are displayed after licence upload:
SN - 2N® NetStar serial number
Intercoms - count of licensed 2N® Helios intercoms
NetStar servers - count of licensed 2N® NetStar platforms
Date - last licence verification date
Expiration - licence time validity
Add 2N® NetStar
Select NetStars in the upper tool bar and click Add to add 2N® NetStar.
2N® TELEKOMUNIKACE a.s., www.2n.cz
12
NetStar - enter the connection name.
IP - enter the 2N® NetStar IP address.
Port - define the 2N® NetStar communication port (default port is 6543).
System user - set the 2N® NetStar user for authentication (we recommend
you to create a special user in 2N® NetStar for this purpose).
System password - enter the system user password.
System password (confirm) - re-enter the system user password for
confirmation.
Storage - select a folder from the list to the right to which recordings shall be
saved.
2N® TELEKOMUNIKACE a.s., www.2n.cz
13
Add Intercom
The 2N® NetStar Records Manager server adds intercoms automatically based on
the replies to the sent broadcast message. Thus, make sure that the intercoms are
located in one and the same broadcast domain or that the broadcast message is resent
by network elements.
Having added the intercoms, click Edit to complete the settings and activate video
recording from the intercom(s).
Intercom - enter the 2N® Helios intercom name.
NetStar - select the 2N® NetStar with which the 2N® Helios intercom is
registered.
Telephone number - enter the 2N® Helios phone number.
Recording - activate / deactivate recording.
2N® TELEKOMUNIKACE a.s., www.2n.cz
14
Caution
Make sure that the phone number matches the number under which the
intercom is registered with 2N® NetStar to avoid video recording error.
Use the Find field in the upper right-hand corner to search intercoms according to the
following parameters (Intercom, IP, NetStar, Telephone number):
Intercom - enter the 2N® Helios name.
IP - enter the 2N® Helios IP address.
NetStar - enter the IP address of the 2N® NetStar with which the 2N® Helios
intercom is registered.
Telephone number - enter the 2N® Helios phone number.
Availability - display information on 2N® Helios availability.
Step
Intercom edit
Activate / Deactivate intercom
Delete intercom
Arrange the 2N® Helios intercoms in any column. Click on the column name to
display an arrow: arrow up means descending order and arrow down means ascending
order.
Users
The Users tab provides a list of all users from all the 2N® NetStars added. The users
are read automatically when the 2N® NetStar licence is added and can be updated
manually by clicking the Update icon. Each user is automatically assigned the lowest
role (Agent) at the beginning. Superadmin or Admin can change the user roles. The
Admin, Manager and Agent roles have the following rights:
Admin - has access to all records within the 2N® NetStar it is assigned to and
may set user roles.
Manager - has access to its records and records of the users assigned to its
group.
Agent - views its records only.
Note
User login data and passwords are obtained from 2N® NetStar. Change
the data and password via the Users – User rights menu in the NsAdmin
configuration tool. A subsequent password change via the
2N® NetStar Records Manager web interface changes the password in
2N® NetStar too.
Storage Mapping in 2N® NetStar
Storage mapping in 2N® NetStar via the NsAdmin configuration tool is the next step.
Add a physical storage in the Global data – Storage Manager menu displayed using the
right mouse click (Add).
2N® TELEKOMUNIKACE a.s., www.2n.cz
15
Caution
Make sure that the network storage name does not include diacritics and
spaces.
Enter the storage name and confirm.
Set Network as Storage type.
Access port - set the 2N® NetStar Records Manager server address in the
\\ip_address\share format.
Free size (B) - define what space shall be used; enter -1 to use the whole disk
capacity.
Login - enter admin.
Password - enter the password used for installation (refer to Section 1 of this
manual).
Connect attempt in (s) - define when connection attempt shall be repeated after
storage failure.
After storage mapping, a row will be added to the Detected Storages table. If all the
parameters have been set correctly, the State column will include the Operating valu
e.
Now right-click on Voice Record, select Add physical storage mapping and select
the currently added storage.
Having added the storage, select the Move evidence of files to storage and Keep
files removed from records options.
Enter the name of the record-saving directory created during installation into the Path
field.
Finally, set Record format .wav. Refer to the Global data - Global parameters me
nu for settings.
2N® TELEKOMUNIKACE a.s., www.2n.cz
16
3. 2N® NetStar Records Manager User Manual
Section content:
Login
Agent
Manager
Admin
Login
Log in with the user name and password assigned to you.
Agent
The upper tool bar provides the following options:
Records
User Settings - change the user password if necessary.
Log out - log out.
The start screen displays the Records tab including the list of records.
2N® TELEKOMUNIKACE a.s., www.2n.cz
17
Records
Use the Find function to search records according to Name, Calling, Called, Note
or Time.
The searched string need not be precise, you can enter just a part of the string.
Example: Enter '20' into the Find field to find all records including '20' in any column
(Name, Calling, Called, Note, Time).
The following buttons are located next to the Find field:
Download - download records to a PC.
Edit - edit a note.
Delete
Click the buttons to operate the currently filtered records.
There four fields below the buttons (Time from, Time to, Calling, Called) for more
detailed search and a Filter button for search confirmation. Use this type of search for
search in defined columns and an absolute match.
The last part of the Records tab provides a seven-column list of all or filtered-out
records:
2N® TELEKOMUNIKACE a.s., www.2n.cz
18
Name - record name
A / V - audio or video
Calling - calling number
Called - called number
Note - note to record
Time - recording time
Step - buttons for operations with selected records
Arrange the records in any column. Click on the column name to display an arrow:
arrow up means descending order and arrow down means ascending order.
The Step column includes four buttons for operations with selected records.
Click the first button to play a record, the second to edit a note, the third to delete a
record and the fourth to save a record into a PC.
There are tool bars above and below the list including the following buttons:
Previous records - is applied after 10,000 records
First - first list page
Previous - page preceding the current list page
Number of pages from 1 to 200 - list page number
Next - page following the current list page
Last - last list page
Next records - is applied after 10,000 records
One list page displays 50 records. When page 200 is reached (10,000 records), the
Previous records and Next records buttons will become applicable and page
numbering will be 1 to 200 again.
2N® TELEKOMUNIKACE a.s., www.2n.cz
19
Manager
In addition to having all Agent properties, the Manager can also view records of the
users assigned to its group. Admin or Superadmin assigns users to groups.
Admin
Admin has all of the above mentioned Manager properties. Moreover, it can view all
records within one 2N® NetStar and use the Users option in the upper tool bar.
Users
The Users tab includes all users of the selected 2N® NetStar.
Use the Find field in the right-hand upper corner to search users according to the User,
Role or NetStar (IP address/port) parameters.
The searched string need not be precise, you can enter a part of the string only.
Example: Enter '20' into the Find field to find all records including '20' in any column
(User, Role, NetStar).
2N® TELEKOMUNIKACE a.s., www.2n.cz
20
Click the Refresh, button next to the Find field to update the records in accordance
with the selected 2N® NetStar (in case users are added/deleted/renamed in
2N® NetStar).
The user list includes four columns:
User - user name
Role - user role
NetStar - 2N® NetStar address and port
Step - click Edit to change a user role
Arrange the records in any column. Click on the column name to display an arrow:
arrow up means descending order and arrow down means ascending order.
2N® TELEKOMUNIKACE a.s., www.2n.cz
21