1
5. INSTALLATION LOCATIONS
7. PART NAMES OF FRONT PANEL
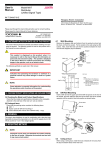
● Avoid the following environments for installation locations:
Areas with vibration, corrosive gases, dust, water, oil, solvents, direct sunlight, radiation, a strong electric field, and/or a strong
magnetic field
● If there is any risk of a surge being induced into the power line
and/or signal lines due to lightning or other factors, a dedicated
lightning arrester should be used as protection for both this unit
and a field-installed device.
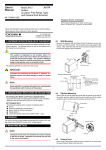
The figure below shows the MH7D with its front panel (cover) being
open.
Output-1
Zero-adjustment volume
Span-adjustment volume
Power indicator lamp
Lit during power on
Output-2
Zero-adjustment volume
Span-adjustment volume
6. EXTERNAL WIRING
WARNING
To avoid the risk of an electric shock, turn off the power
supply and use a tester or similar device to ensure that no
power is supplied to a cable to be connected, before carring
out wiring work.
8. MAINTENANCE
The product starts running immediately when the power is turned on;
however, it needs 10 to 15 minutes of warm-up before it meets the
specified performance.
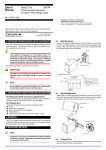
Wiring should be connected to the terminals on the socket of the product. The terminals for external connections are of M3.5 screws. Use
crimp-on terminal lugs for connections to the terminals.
● Recommended cables: A nominal cross-sectional area of 0.5 mm2
or thicker for signal cables, and that of 1.25 mm2 or thicker for
power cables.
8.1
Receiving resistor
for current input
5
7
Ri
N–
8
GND
8
7
6
5
9
4
9
Output-2
11
+
–
10 11
6
–
Ri: 250 external receiving resistor
for current input (RES-250)
3
1
2
Output-1
1
2
Calibration Procedure
(1) Connect the instruments as shown below. First adjust the output-1
signal and then the output-2 signal.
(2) Use the DC voltage/current standard and apply input signals
equivalent to 0, 25, 50, 75, and 100% of the input span to the
product. Check to see the corresponding output voltages are 0,
25, 50, 75, and 100% respectively and within the specified accuracy rating. “R” is used for current output.
● If the output signals are out of the accuracy rating range, adjust
the output signal level using the zero and span adjustment volumes on front face of the product.
+
L+
10
8.2
Input
Power Supply
Calibration Apparatus
● A DC voltage/current standard (Yokogawa 7651 or the equivalent)
● A digital multimater (Yokogawa 7561 or the equivalent)
● A precision resistor of 250 ± 0.01%, 1 W
+
–
Receiving resistor
for current input
Power supply
IMPORTANT
L
N
● The power line and input/output signal lines should be
installed away from noise-generating sources. Other
wise accuracy cannot be guaranteed.
● The grounding resistance must be 100 Ω (JIS Class D
grounding). The length and thickness of the grounding
cable should be as short and thick as possible. Directly
connect the lead from the ground terminal (terminal no.
9) of the product to the ground. Do not carry out daisychained inter-ground terminal wiring.
● Use of the product ignoring the specifications may
cause overheating or damage. Before turning on the
power, ensure the following:
(a) Power supply voltage and input signal value applied
to the product should meet the required
specifications.
(b) The external wiring to the terminals and wiring to
ground are as specifications.
● Do not operate the product in the presence of
flammable or explosive gases or vapors. To do so is
highly dangerous.
● The product is sensitive to static electricity; exercise
care in operating it. Before you operate the product,
touch a nearby metal part to discharge static electricity.
GND
7
Input
8
8
7
6
5
9
4
9
Output-2
10
Ro
11
Digital
multimater
Ro: 250 precision resistor
for current output
2
10 11
5
Ri
DC voltge/
current
standard
6
Ri: External receiving resistor for
current input
3
1
Output-1
2
1
Ro
2
Digital
multimater
Ro: 250 precision resistor
for current output
IM 77J04H07-02E
2nd Edition June 01,2004-00