1
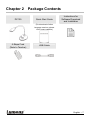
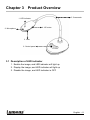
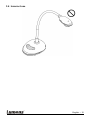
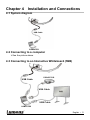
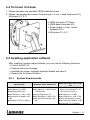
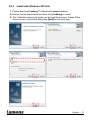
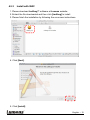
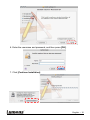
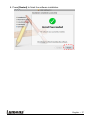
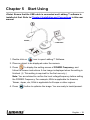
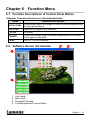
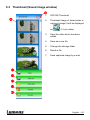
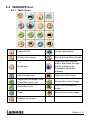
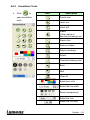
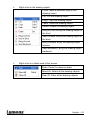
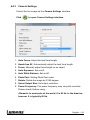
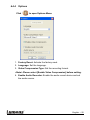
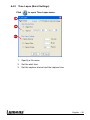
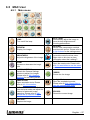
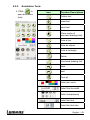
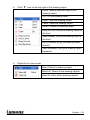
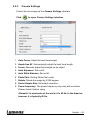
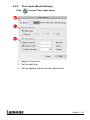
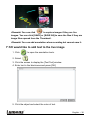
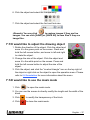
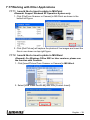
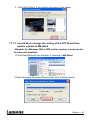
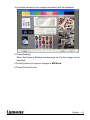
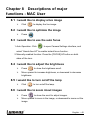
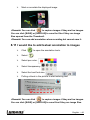
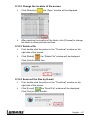
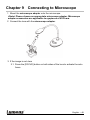
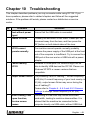
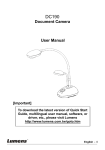
DC125 Document Camera User Manual - English [Important] To download the latest version of Quick Start Guide, multilingual user manual, software, or driver, etc., please visit Lumens http://www.lumens.com.tw/goto.htm Table of Contents Copyright Information ..................................................................................... 4 Chapter 1 Safety Instructions ...................................................................... 5 Precautions ................................................................................................ 6 FCC Warning ............................................................................................. 6 EN55022 (CE Radiation) Warning .............................................................. 6 Chapter 2 Package Contents ....................................................................... 7 Chapter 3 Product Overview ........................................................................ 8 3.1 Description of LED indicator ............................................................. 8 3.2 Relative Operation Position .............................................................. 9 3.3 Correct use ....................................................................................... 9 3.4 Incorrect use ................................................................................... 10 Chapter 4 Installation and Connections.................................................... 11 4.1 System diagram .............................................................................. 11 4.2 Connecting to a computer ............................................................... 11 4.3 Connecting to an Interactive Whiteboard (IWB) .............................. 11 4.4 To mount it at desk.......................................................................... 12 4.5 Installing application software ......................................................... 12 Chapter 5 Start Using ................................................................................. 18 Chapter 6 Function Menu ........................................................................... 19 6.1 Function Descriptions of Control Panel Button................................ 19 6.2 Software Screen Introduction .......................................................... 19 6.3 Thumbnail (Saved image window) .................................................. 20 6.4 WINDOWS User ............................................................................. 21 6.4.1 Main menu ...................................................................................... 21 6.4.2 Annotation Tools ............................................................................. 22 English - 1 6.4.3 Camera Settings ............................................................................. 24 6.4.4 Options ........................................................................................... 25 6.4.5 Time Lapse (Burst Settings)............................................................ 26 6.5 MAC User ....................................................................................... 27 6.5.1 Main menu ...................................................................................... 27 6.5.2 Annotation Tools ............................................................................. 28 6.5.3 Camera Settings ............................................................................. 30 6.5.4 Options ........................................................................................... 31 6.5.5 Time Lapse (Burst Settings)............................................................ 32 Chapter 7 Descriptions of major functions - Windows User ................... 33 7.1 I would like to display a live image .................................................. 33 7.2 I would like to optimize the image ................................................... 33 7.3 I would like to use the auto focus .................................................... 33 7.4 I would like to adjust the brightness ................................................ 33 7.5 I would like to turn on/off the lamp .................................................. 33 7.6 I would like to zoom in/out images .................................................. 33 7.7 I would like to capture images ......................................................... 34 7.8 I would like to record videos............................................................ 34 7.9 I would like to set up the timer ........................................................ 34 7.10 I would like to freeze images........................................................... 35 7.11 I would like to annotate the live image ............................................ 35 7.12 I would like to add text to the live image ......................................... 36 7.13 I would like to adjust the drawing object .......................................... 37 7.14 I would like to use the mask mode .................................................. 37 7.15 I would like to use the emphasizing mode ...................................... 38 7.16 I would like to manage saved image files ........................................ 38 7.17 Working with Other Applications ..................................................... 39 Chapter 8 Descriptions of major functions - MAC User........................... 42 English - 2 8.1 I would like to display a live image .................................................. 42 8.2 I would like to optimize the image ................................................... 42 8.3 I would like to use the auto focus .................................................... 42 8.4 I would like to adjust the brightness ................................................ 42 8.5 I would like to turn on/off the lamp .................................................. 42 8.6 I would like to zoom in/out images .................................................. 42 8.7 I would like to capture images ......................................................... 43 8.8 I would like to capture images continuously .................................... 43 8.9 I would like to freeze the live image ................................................ 43 8.10 I would like to annotate the displayed image................................... 43 8.11 I would like to add textual annotation to images.............................. 44 8.12 I would like to record videos............................................................ 45 8.13 I would like to use the mask mode .................................................. 45 8.14 I would like to use the emphasizing mode ...................................... 45 8.15 I would like to manage saved image files ........................................ 46 Chapter 9 Connecting to Microscope ....................................................... 48 Chapter 10 Troubleshooting ...................................................................... 49 English - 3 Copyright Information Copyrights © Lumens Digital Optics Inc. All rights reserved. Lumens is a trademark that is currently being registered by Lumens Digital Optics Inc. Copying, reproducing or transmitting this file is not allowed if a license is not provided by Lumens Digital Optics Inc. unless copying this file is for the purpose of backup after purchasing this product. In order to keep improving the product, Lumens Digital Optics Inc. hereby reserves the right to make changes to product specifications without prior notice. The information in this file is subject to change without prior notice. To fully explain or describe how this product should be used, this manual may refer to names of other products or companies without any intention of infringement. Disclaimer of warranties: Lumens Digital Optics Inc. is neither responsible for any possible technological, editorial errors or omissions, nor responsible for any incidental or related damages arising from providing this file, using, or operating this product. English - 4 Chapter 1 Safety Instructions Always follow these safety instructions when setting up and using the Document Camera: 1. Do not place Document Camera in tilted position. 2. Do not place the Document Camera on an unstable trolley, stand or table. 3. Do not use the Document Camera near water or source of heat. 4. Use attachments only as recommended. 5. Place the Document Camera on a place where the USB cable can be unplugged easily. 6. Unplug the USB cable of Document Camera before cleaning. Use a damp cloth for cleaning. Do not use liquid or aerosol cleaners. 7. Do not block the slots and openings in the Document Camera case. They provide ventilation and prevent the Document Camera from overheating. Do not place the Document Camera on a sofa, rug or other soft surface or install in a recessed place unless proper ventilation is provided. 8. Never push objects of any kind through cabinet slots. Never allow liquid of any kind to spill into the Document Camera. 9. Except as specifically instructed in this User Manual, do not attempt to operate this product by yourself. Opening or removing covers may expose you to dangerous voltages and other hazards. Refer all servicing to licensed service personnel. 10. Unplug the USB cable during thunderstorms or if it is not going to be used for an extended period. Do not place the Document Camera or remote control on top of heat-emitting equipment or shaking objects such as a car, etc. 11. In case of the following situations, please unplug the USB cable of the Document Camera and refer servicing to licensed service personnel: If the USB port becomes damaged or frayed. If liquid is spilled into it or the Document Camera has been exposed to rain or water. English - 5 Precautions Warning: To reduce the risk of fire or electric shock, do not expose this appliance to rain or moisture. Note Risk of Electric Shock Caution: To reduce the risk of electric shock, do not remove cover (or back). No user-serviceable parts inside. Refer servicing to licensed service personnel. This symbol indicates that This symbol indicates there are important that this equipment may operating and contain dangerous maintenance instructions voltage which could cause electric shock. in this User Manual with this unit. FCC Warning This Document Camera has been tested and found to comply with the limits for a Class A computer device, pursuant to Article 15-J of FCC Rules. These limits are designed to provide reasonable protection against harmful interference in a residential installation. EN55022 (CE Radiation) Warning This product is intended for use in a commercial, industrial, or educational environment. It is not intended for residential use. This is a Class A product. In a residential environment it may cause radio interference, in which case the user may be required to take adequate measures. The typical use is in a conference room, meeting room or auditorium. English - 6 Chapter 2 Package Contents DC125 Quick Start Guide Instructions for Software Download and Installation (For download of other language versions, please visit Lumens website) 4-Steps Card (Note to Teacher) USB Cable English - 7 Chapter 3 Product Overview 5. Gooseneck 1. LED indicator 4. AF button 2. Microphone 3. Lens 6. Control panel 3.1 Description of LED indicator 1. Enable the image, and LED indicator will light up 2. Display the image, and LED indicator will light up 3. Disable the image, and LED indicator is OFF English - 8 3.2 Relative Operation Position 3.3 Correct use English - 9 3.4 Incorrect use English - 10 Chapter 4 Installation and Connections 4.1 System diagram USB Cable COMPUTER 4.2 Connecting to a computer See the picture above 4.3 Connecting to an Interactive Whiteboard (IWB) USB Cable PROJECTOR VGA Cable USB Cable COMPUTER English - 11 4.4 To mount it at desk 1. Please purchase the standard VESA installation base. 2. Please use appropriate screws: Screw length = 5 mm + base thickness (H1); M4 screw (P = 0.7) VESA bolt pitch 75*75mm VESA base thickness (H1) Screw length = 5 mm + base thickness (H1) M4 screw (P = 0.7) 4.5 Installing application software After installing Lumens image software, you can use the following functions: Control the DC125. Capture and record images. Annotate the image, highlight important details and save it. Support the full screen function. 4.5.1 System Requirements Windows XP Min CPU: P4 2.8 GHz Min Memory: 512 MB Supporting Direct X 9 Min Resolution: 1024 x 768 Min Hard Drive Space: 500 MB Windows XP SP2 or above Windows Vista / Windows 7 Min CPU: P4 2.8 GHz Min Memory: 1 GB (32-bits)/ 2 GB(64-bits) Supporting Direct X 9 Min Resolution: 1024 x 768 Min Hard Drive Space: 500 MB MAC OS X 10.4 / 10.5 / 10.6 / 10.7 Min CPU: PowerPC G4 866 ® MHz or Intel Pentium 1.83 GHz Intel Core 2 Duo Min Memory: 512 MB Min Resolution: 1024 x 768 24-bit color display monitor Min Hard Drive Space: 1 GB QuickTime 7.4.5 or above English - 12 4.5.2 Install with Windows XP/Vista 1. Please download Ladibug™ software at Lumens website. 2. Extract the file downloaded and then click [Ladibug] to install. 3. The installation wizard will guide you through the process. Please follow the on-screen instructions and press [Next] for the next step. English - 13 4. Press [Yes] to create Ladibug™ shortcut on your desktop. 5. Once the installation is completed, press [Finish] and restart the computer. English - 14 4.5.3 Install with MAC 1. Please download Ladibug™ software at Lumens website. 2. Extract the file downloaded and then click [Ladibug] to install. 3. Please finish the installation by following the on-screen instructions. 4. Click [Next]. 5. Click [Install]. English - 15 6. Enter the username and password, and then press [OK]. 7. Click [Continue Installation]. English - 16 8. Press [Restart] to finish the software installation. English - 17 Chapter 5 Start Using <Note> Ensure that the USB cable is connected and Ladibug™ software is installed at first. Refer to Chapter 4 Installation and Connections in this user manual. FOCUS USB Cable 1. Double click on icon to open Ladibug™ Software. 2. Place an object to be displayed under the camera. 3. Press to display the setting screen of POWER Frequency, and follow the screen instructions. A live image is displayed when the setting is finished. (※ This setting is required for the first use only.) Note: You are advised to confirm the local voltage/frequency before setting the POWER Frequency. For example, 60Hz is applicable for America, Taiwan, Japan, etc; 50Hz is applicable for Europe or other regions. 4. Press button to optimize the image. You are ready to teach/present. English - 18 Chapter 6 Function Menu 6.1 Function Descriptions of Control Panel Button <Remark> The below functions are listed alphabetically Name AUTO TUNE CAPTURE FOCUS FREEZE LAMP Function Descriptions Automatically adjust the image to have the best brightness and focusing performance. Capture the image to the computer. AF Button. Freeze the current image to remain temporarily on the screen. Press again to defreeze. Turn on / off LED indicator. 6.2 Software Screen Introduction 1. 2. 3. 4. Live image Main menu Thumbnail Window File Management Function Menu English - 19 6.3 Thumbnail (Saved image window) 1. OFF/ON Thumbnail 2. Thumbnail image of saved video or captured image (It will be displayed as if it is a video) 3. Save the video which has been edited 4. Save as a new file 5. Change the storage folder 6. Delete a file 7. Send captured image by e-mail English - 20 6.4 WINDOWS User 6.4.1 Main menu Lamp On/Off Image Optimization Display live images Set up the recording format Brightness Open the main function menu, and press the right button to display the information about the software Adjust image size Open the mask mode Adjust the live image focus, Photo/Text mode, etc. Freeze the current image Annotation Tools Open the emphasizing mode Timer Record the current image Capture the image English - 21 6.4.2 Annotation Tools Click to open annotation tools. Icon Description Pointer tool Laser tool Insert text Eraser (Clear marks of free-hand drawing tool) Draw a line Draw an ellipse Draw a rectangle Delete Free-hand drawing tool Back Next Clear all Select pen color Select the line width Select transparency Select the font Select the font size English - 22 Right-click on the drawing object Clone: Make a duplicate copy of the drawing object Cut: Cut the drawing object Copy: Copy the drawing object Paste: Paste the drawing object Delete: Delete the drawing object Bring to Front: Bring the drawing object to the front Send to Back: Bring the drawing object to the back Bring Forward: Bring the drawing object forward Send Backward: Bring the drawing object backward Right-click on a blank area of the screen Paste: Paste the drawing object Select All: Select all the drawing objects Clear All: Clear all the drawing objects English - 23 6.4.3 Camera Settings Control the live image via the Camera Settings interface. Click to open Camera Settings interface. 1. Auto Focus: Adjust the best focal length. 2. Hands free AF: Automatically adjust the best focal length. 3. Focus: Manually adjust focal length on an object. 4. Auto Exposure: Set on/off. 5. Auto White Balance: Set on/off. 6. Photo/Text: Setting Photo/Text mode. 7. Rotate: Rotate the image by 0/180 degree. 8. Select Output Size: Set output resolution. 9. Power Frequency: The power frequency may vary with countries. Please check it before using. <Remark> In most parts of the world, it is 50 Hz. In the America, however, it is typically 60 Hz. English - 24 6.4.4 Options Click to open Options Menu. 1. Factory Reset: Activate the factory reset. 2. Language: Set the language. 3. Video Compression Type: Set the recording format. <Note> Please select [Enable Video Compression] before setting. 4. Enable Audio Recorder: Enable the audio record device and set the audio source. English - 25 6.4.5 Time Lapse (Burst Settings) Click to open Time Lapse menu. 1. Specify a file name. 2. Set the start time. 3. Set the capture interval and the capture time. English - 26 6.5 MAC User 6.5.1 Main menu LAMP: Turn on/off the lamp. PREVIEW: Display live images. BRIGHTNESS: Adjust the brightness of the image. ZOOM: Increase or decrease the image size. AUTO TUNE: Automatically adjust the image to have the best brightness and focusing performance. OPTIONS: Select video compression method and the audio source. Please refer to 6.5.4 Options for the setting screen. MAIN: Launch the main functions menu. Right click on this icon to show information about the Ladibug™. Mask Mode: Open the mask mode. Please refer to 8.13 I would like to use the mask mode. CAMERA SETTING: Launch the Camera Settings window to adjust live images. Please refer to 6.5.3 Camera Settings for the setting screen. FREEZE: Freeze the live image. ANNOTATION: Open annotation tools. Please refer to 6.5.2 Annotation. Spotlight Mode: Open the emphasizing mode. Please refer to 8.14 I would like to use the emphasizing mode. TIME LAPSE PHOTOGRAPHY: Use the burst mode and adjust the interval of automatic image capturing. Please refer to 8.8 I would like to capture images continuously. RECORD: Record the current image. CAPTURE: Capture the image. English - 27 6.5.2 Annotation Tools Click to open annotation tools. Icon Function Descriptions Pointer tool Laser tool Insert text Eraser (Clear marks of free-hand drawing tool) Draw a line Draw an ellipse Draw a rectangle Delete Free-hand drawing tool Back Next Clear all Select pen color Select the line width Select transparency Select the font Select the font size English - 28 Click “▼” icon on the top right of the drawing object Clone: Make a duplicate copy of the drawing object Cut: Cut the drawing object Copy: Copy the drawing object Paste: Paste the drawing object Delete: Delete the drawing object Bring to Front: Bring the drawing object to the front Send to Back: Bring the drawing object to the back Bring Forward: Bring the drawing object forward Send Backward: Bring the drawing object backward Right-click on the screen Paste: Paste the drawing object Select All: Select all the drawing objects Clear All: Clear all the drawing objects English - 29 6.5.3 Camera Settings Control the live image via the Camera Settings interface. Click to open Camera Settings interface. 1. Auto Focus: Adjust the best focal length. 2. Hands free AF: Automatically adjust the best focal length. 3. Focus: Manually adjust focal length on an object. 4. Auto Exposure: Set on/off. 5. Auto White Balance: Set on/off. 6. Photo/Text: Setting Photo/Text mode. 7. Rotate: Rotate the image by 0/180 degree. 8. Select Output Size: Set output resolution. 9. Power frequency: The power frequency may vary with countries. Please check it before using. <Remark> In most parts of the world, it is 50 Hz. In the America, however, it is typically 60 Hz. English - 30 6.5.4 Options Click to open Options Menu. 1. Factory Reset: Activate the factory reset. 2. Video Compression Type: Set the recording format. 3. Enable Audio Recorder: Enable the audio record device and set the audio source. English - 31 6.5.5 Click Time Lapse (Burst Settings) to open Time Lapse menu. 1. Specify a file name. 2. Set the start time. 3. Set the capture interval and the capture time. English - 32 Chapter 7 Descriptions of major functions - Windows User 7.1 I would like to display a live image 1. Press to display a live image. 7.2 I would like to optimize the image 1. Press . 7.3 I would like to use the auto focus 1. Auto Operation: Press to open advanced menu, and click to open Camera Settings interface, and select “Hands free AF” to enable instant focus function. 2. Manually enabled function: Press the AF button on the camera head of main unit. 7.4 I would like to adjust the brightness 1. Press to show the brightness scroll. 2. Move upward to increase brightness, or downward to decrease brightness. 7.5 I would like to turn on/off the lamp 1. Click to turn on/off the lamp. 7.6 I would like to zoom in/out images 1. Press to show the scroll to adjust images. 2. Move upward to zoom in the image, or downward to zoom out the image. English - 33 7.7 I would like to capture images 1. Click to capture images. [Note] The captured images will be displayed in the Thumbnail area. 7.8 I would like to record videos 1. Press to open the recording tool. <Remark> Press to change settings including recording format and audio. 2. Click [Record] to start recording. 3. Press [Stop] to stop recording. 4. Click to close the recording tool. 7.9 I would like to set up the timer 1. Click to open burst mode setting. Click [OK] after setting. A. Set up the file name B. Set up the start time C. Set up the time lapse English - 34 A B C [Note] The captured images will be displayed in the Thumbnail area. 7.10 I would like to freeze images 1. Press to freeze the current image on the screen. 7.11 I would like to annotate the live image 1. Press to show annotation tools. 2. The default is the arrow tool [Pointer]. You can select other annotation tools. 3. Select the color of the annotation tool, . 4. Set up the line width, . 5. Select transparency. 6. Add an annotation to the live image. English - 35 to capture images if they are live <Remark> You can click images. You can click [SAVE] or [SAVE AS] to save the files if they are image files opened from the Thumbnail. <Remark> You can add annotation when recording but cannot save it. 7.12 I would like to add text to the live image 1. Click to open the annotation tools. 2. Select . 3. Click the screen to display the [Text Tool] window. 4. Enter text in the blank area and press [OK]. 5. Click the object and select the color of text. English - 36 6. Click the object and select the transparency. 7. Click the object and select the font and font size. <Remark> You can click to capture images if they are live images. You can click [SAVE] or [SAVE AS] to save files if they are image files. 7.13 I would like to adjust the drawing object 1. Rotate the direction of the object: Click the object and move it to the green point on the screen. Press and hold the left mouse button, and move to left and right to rotate the object. 2. Change the size of the object: Click the object and move it to the white point on the screen. Press and hold the left mouse button to adjust the size of the object. 3. Click the object, and click the “inverted triangle” icon on the top right of the object or right-click on the object to open the operation menu. Please refer to 6.4 Annotation for more information about the menu. 7.14 I would like to use the mask mode 1. Click to open the mask mode. 2. You can use the mouse to directly modify the length and the width of the block. 3. Click to modify the transparency of the block. 4. Click to close the mask mode. English - 37 7.15 I would like to use the emphasizing mode 1. Click to open emphasizing mode. 2. You can use the mouse to directly modify the length and the width of the block. 3. Click to modify the transparency of the block. 4. Click to close the emphasizing mode. 7.16 I would like to manage saved image files 7.16.1 Save as a new file 1. First, double-click the picture or image file in the “Thumbnail” window on the left side of the screen. 2. Click [Save as] to display the “Save image” window. 3. Enter the “file name” and click [Save] to finish saving. 7.16.2 Change the location of file access 1. Click [Directory] to display the “Browse Folder” window. 2. After selecting the location of the folder, click [Confirm] to change the folder where the pictures will be saved next time. 7.16.3 Delete a file 1. First, double-click the picture in the “Thumbnail” window on the right side of the screen. 2. Click [Delete] to delete the file. 7.16.4 Send out the files by E-mail 1. First, double-click the picture in the “Thumbnail” window on the right side of the screen. 2. Click [E-mail] to open a new E-mail. English - 38 7.17 Working with Other Applications 7.17.1 I would like to insert a photo in MS-Paint <Remark> Support Windows XP Operation System only. 1. Click [File/From Scanner or Camera] in MS-Paint as shown in the bottom left figure. 2. Click [Get Picture] will capture the photos of live images and insert the files in use shown as top right figure. 7.17.2 I would like to insert a photo in MS-Word <Remark> For Windows Office 2003 or later versions, please use the function with OneNote. 1. Click [Insert/Picture/From Scanner or Camera] in MS-Word. 2. Select [USB Video Device #5] and click [Custom Insert]. English - 39 3. Click [Get Picture]. It will capture the photo of live image. 7.17.3 I would like to change the setting of the DC125 and then capture a photo in MS-Word <Remark> For Windows Office 2003 or later versions, please use the function with OneNote. 1. Click [Insert/Picture/From Scanner or Camera] in MS-Word. 2. Select [Lumens Document Camera] and click [Custom Insert]. Lumens Document Camera English - 40 3. A window showing a live image (see below) will be displayed. 4. Press [Setting]. When the Camera Settings window pops up, the live image can be adjusted. 5. Press [Capture] to capture images in MS-Word. 6. Press [Cancel] to exit. English - 41 Chapter 8 Descriptions of major functions - MAC User 8.1 I would like to display a live image Click to display the live image. 8.2 I would like to optimize the image Press . 8.3 I would like to use the auto focus 1. Auto Operation: Click to open Camera Settings interface, and select “Hands free AF” to enable instant focus function. 2. Manually enabled function: Press the [FOCUS] AF button on both sides of the lens.. 8.4 I would like to adjust the brightness Press to show the brightness scroll. Move upward to increase brightness, or downward to decrease brightness. 8.5 I would like to turn on/off the lamp Click to turn on/off the lamp. 8.6 I would like to zoom in/out images Press to show the scroll to adjust images. Move upward to zoom in the image, or downward to zoom out the image. English - 42 8.7 I would like to capture images Click to capture images. [Note] The captured images will be displayed in the Thumbnail area. 8.8 I would like to capture images continuously Click to open burst mode setting. Click [OK] after setting. <Note> Refer to 6.5.5 Time Lapse for more information about Time Lapse setting. <Note> The captured images will be displayed in the Thumbnail area. 8.9 I would like to freeze the live image Click to freeze the live image of Ladibug™. Click once again to lift the freeze. 8.10 I would like to annotate the displayed image. <Note> To annotate the saved image, please open the pictures of the Thumbnail area. Click Select an annotation tool. Select pen color. Select the line width. Select transparency. to open the annotation tools. English - 43 Mark or annotate the displayed image. <Remark> You can click to capture images if they are live images. You can click [SAVE] or [SAVE AS] to save the files if they are image files opened from the Thumbnail. <Remark> You can add annotation when recording but cannot save it. 8.11 I would like to add textual annotation to images Click to open the annotation tools. Select . Select pen color. Select transparency. Select font and font size. Pulling a block in the picture to start entering text. <Remark> You can click to capture images if they are live images. You can click [SAVE] or [SAVE AS] to save files if they are image files. English - 44 8.12 I would like to record videos Press to open the recording tool. <Note> Click to open the setting window of video format and audio source. Please refer to 6.5.4 Options for more information. Click to start recording. Click to stop recording. Click to close the recording tool. <Remark> You can add annotation when recording but cannot save it. 8.13 I would like to use the mask mode to open the mask mode. Click You can use the mouse to directly modify the length and the width of the block. Click to modify the transparency of the block. Click to close the mask mode. 8.14 I would like to use the emphasizing mode Click You can use the mouse to directly modify the length and the width of the block. Click to open emphasizing mode. to modify the shape and transparency of the block. Click to close the emphasizing mode. English - 45 8.15 I would like to manage saved image files 8.15.1 Save as a new file First, double-click the picture or image file in the “Thumbnail” window on the left side of the screen. Click [Save as] After entering “file name”, click [Save] to finish saving. to display the “Save As” window. English - 46 8.15.2 Change the location of file access Click [Directory] After selecting the location of the folder, click [Choose] to change the folder to save pictures next time. , the “Open” window will be displayed. 8.15.3 Delete a file First, double-click the picture in the “Thumbnail” window on the right side of the screen. Click [Delete] , the “Delete File” window will be displayed. Click [Yes] to delete files. 8.15.4 Send out the files by E-mail First, double-click the picture in the “Thumbnail” window on the right side of the screen. the “Email File” window will be displayed. Click [E-mail] Click [Yes] to open e-mails. English - 47 Chapter 9 Connecting to Microscope 1 Mount the microscope adapter onto the microscope. <Note> Please choose an appropriate microscope adapter. Microscope adapter accessories are applicable to eyepieces of Ø 28 mm. 2 Connect the lens with the microscope adaptor. 3 If the image is not clear 3.1. Press the [FOCUS] button on both sides of the lens to activate the auto focus. English - 48 Chapter 10 Troubleshooting This chapter describes problems you may encounter while using DC125. If you have questions, please refer to related chapters and follow all the suggested solutions. If the problem still exists, please contact our distributors or service center. No. Problems Solutions 1 Boot without power signal Ensure that the USB cable is connected. 2 Unable to focus Probably the document is too close. Please pull the document away from the lens, and then press the [AF] button on both lateral sides of the lens. 3 DC125 cannot operate normally The machine cannot operate normally probably because the power supply of the USB port at the front end of the computer is insufficient. Try to connect to a USB port at the rear end or a USB hub with a power adapter. 4 Cannot identify DC125 Outdated or incomplete OS versions might not be able to identify USB devices like DC125. Please use Windows XP SP2 or newer versions that are compatible. 5 Output screen flicker The presetting value of Ladibug™ current frequency is 60 (Hz). If current frequency of your local country is 50 (Hz), output screen flicker may occur during the use of Ladibug™. Please refer to Chapter 6 - 6.4.3 and 6.5.3 Camera Settings to change Power frequency to 50 (Hz). 6 When running Time Lapse function, Preview screen freezes Connecting to USB Hub may cause insufficient band-width, leading to machine abnormalities. It is advised that the machine be connected to the computer directly via USB cable, without USB Hub. English - 49


![DC120 Visual Presenter User Manual [Important]](http://vs1.manualzilla.com/store/data/005845319_1-bd6fa75798b576fdb4accb3798bb8932-150x150.png)