1
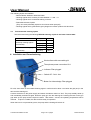
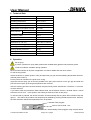
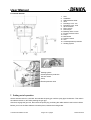
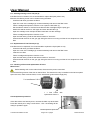
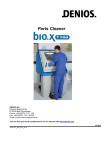
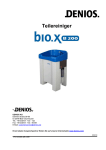
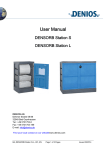
Parts Cleaner
S 600
DENIOS AG
Dehmer Straße 58-66
D-32549 Bad Oeynhausen
Phone: +49 (0)5731 7 53 - 122
Fax: +49 (0)5731 7 53 - 95 951
Email : [email protected]
You can find your local contact person on our Internet site www.denios.com
01/2010
Mat.-No.: 175926
User Manual
Contents
1. Safety instructions..................................................................................................... 3 2. Application and intended use ................................................................................... 3 3. Technical description ................................................................................................ 3 3.1 Suitable cleaning liquids .................................................................................................................... 3 3.2 Recommended cleaning liquids......................................................................................................... 4 4. Installation and Commissioning ............................................................................... 4 5. Technical Data ............................................................................................................ 5 6. Operation .................................................................................................................... 5 7. Putting out of operation ............................................................................................ 6 8. Maintenance and repair ............................................................................................. 7 8.1 Maintenance schedule....................................................................................................................... 7 8.2 Replacement of liquid ........................................................................................................................ 7 8.3 Cleaning filtering screen 100 μm (2) ................................................................................................. 8 8.4 Replacement of fine filter 30 μm (3) .................................................................................................. 8 8.5 Checking of fuses and replacement of fuses .................................................................................... 8 8.6 Error messages ................................................................................................................................. 9 9. Electrical diagram, primary and secondary loop .................................................. 10 10. Declaration of conformity .....................................................................................11 173284 Parts Cleaner S 600
Page 2 of 11 pages
Issued 05/2010
User Manual
1.
Safety instructions
No changes, extensions or modifications may be made to the product without the manufacturer's
authorisation. No liability is accepted for changes made without the manufacturer's authorisation with the
warranty ceasing to be valid in such a case.
Observe the requirements of the Water Management Act (WHG) as well as the applicable
Land-specific regulations (VAwS - regarding systems for handling water hazardous substances.
National regulations and safety regulations have to be adhered to.
Observe the regulation BGR 500, chapter 2.36.
Before putting into service, check if the device is in good order and condition for operational safety. In
case any defects are detected, it must not be used.
Never operated the Parts Cleaner unattended.
Please observe the warning and information signs attached to the device!
The customer must provide a mains supply connection in accordance with the corresponding
regulations (VDE - Association of German Electricians)(refer to the electrical diagram). This must be
checked by a qualified electrician.
(16 A fuse protection, power socket with ground fault circuit interrupter 30 mA)
If the Parts Cleaner is used within dangerous areas (e.g. petrol stations), the applicable safety
instructions have to be met. It is not allowed to operate the device within explosion-hazardous areas.
If cleaning agents are used, follow the instructions on their safety data sheets.
The device can be destructed by frost! If it is not possible to place it in a frost-free room, discharge the
liquid and replace it by an antifreeze agent. After that, get the Parts Cleaner run until the antifreeze
agent comes out of the nozzle.
2. Application and intended use
The Parts Cleaner S600 is a device for manual cleansing of parts and machines with water or a suitable
cleaning agent.
3. Technical description
The Parts Cleaner S600 is equipped with a pressure pump and an electrical flow heater. The cleaning liquid
is heated to 90 °C and is then sprayed on the parts to be cleaned with low pressure using a spray gun. The
polluted liquid is collected in a sump below the cleaning level. It is recycled by sedimentation and cleaning
through a double filter and reused in the cleaning process.
3.1
Suitable cleaning liquids
According to the guidelines for liquid spraying equipment, only such chemical may be used, which are
allowed by the manufacturer.
If other cleaning agents are used, your right to claim under warranty will expire.
The total content of 55 litres can decrease due to evaporation, spreading and splashing. We
recommend testing the pH-value after refilling.
Too high chemical concentration can cause the destruction of the components and your right to claim
under warranty will expire due to wrong operation.
173284 Parts Cleaner S 600
Page 3 of 11 pages
Issued 05/2010
User Manual
The following liquids are forbidden:
- Demineralised, distilled or deionised water
- Cleaning agents which cause a pH-value between < 7 and > 11
- Cleaning agents which cause blue staining on brass
- Flammable solvents, liquids
(They can cause potentially explosive air mixtures when sprayed!)
- Cleaning agents which generate the gas hydrogen as reaction product with aluminium.
3.2
Recommended cleaning liquids
We recommend using the following DENIOS-Cleaning liquids in the Parts Cleaner S600:
Cleaner
Trading units
Item No.
Bottle (1 l)
125608
Can (10 l)
125636
Can (30 l)
125638
Bio-Universal cleaning agent
Bottle (0.5 l)
158016
(concentrate)
Can (30 l)
158017
Workshop cleaning agents
(concentrate)
4. Installation and Commissioning
Work surface with removable grid
Three-phase power connection 16 A
Indicator Filter plugged
Switch Off - Cold - Hot
Button for Acknowledge Filter plugged
Fill cold, clean water or the suitable cleaning agent in until its level is about 3 cm below the grid (55 l) in the
tank and the cleaning tub.
Connect the device to the power supply and switch the selector switch to "Hot". The pump audibly starts up
and immediately switches off again. Direct the spray gun into the cleaning tub. Pressing the lever on the gun
grip starts up the pump and the liquid is heated. After about 1 minute, the operating temperature will be
reached. If vapour is visible, the device will be ready for operation.
When the lever is not pressed anymore, the pump and the heating will switch off.
173284 Parts Cleaner S 600
Page 4 of 11 pages
Issued 05/2010
User Manual
5. Technical Data
Operating pressure
4.5 bar
Spray/Liquid capacity
1.0 l / min
Operating temperature
90 °C in 60 s
Power supply
3P/N/PE 400 V/ 50 Hz
Rated power consumption of heating
6 kW
Rated power consumption of pump
0.11 kW
• Tank below tub
30 litres
• Cleaning tub
25 litres
Filling capacity
Connecting cable
5.0 m
Spray hose lance
Option
Spray hose gun
2.0 m
Dimensions (L x W x H)
750 x 600 x 1180 mm
Dimensions Cleaning grid (L x W)
700 x 500 mm
Net weight
60 kg
Bearing capacity of the tub
50 kg
Filter system
100/30 µm
Noise level
<70 dBA
6. Operation
Risk of injury!
To protect yourself from spray water, please wear suitable safety glasses and protective gloves!
Provide for sufficient ventilation during operation.
Move the Parts Cleaner to its place of application. Provide for stable and even floor surface.
Fix the securing brake.
Switch the device on (switch position "Hot") and press the gun grip until the operating temperature has been
reached (refer to item 5).
Put the part to be cleaned on the grids (max. 25 kg).
Approach with the spray gun as near as possible to the part, press the lever on the gun grip and clean the
part with the hot spray jet as long as all pollutions are removed.
After the cleaning process has been finished, the parts will dry within shortest time. Therefore, no corrosion
must be assumed.
If you want to finish the job with the Parts Cleaner S600, set the selector switch to „On/Cold“ about 1 minute
before the end of work. In this position, the heating is switched off but not the pump.
In case the filter is polluted, the device will switch off automatically and the yellow filter indication lamp will
light up. This switch-off procedure can temporarily be disabled by pressing the black push-button. However,
the filter should be cleaned and replaced as soon as possible.
Indicator Filter plugged"
Switch "Off -On/Cold - Hot"
Acknowledge "Filter plugged" using the push-button
173284 Parts Cleaner S 600
Page 5 of 11 pages
Issued 05/2010
User Manual
Functional Diagram
1.
2.
3.
4.
5.
6.
7.
8.
9.
10.
11.
12.
13.
14.
15.
16.
Grid
Ventilation
Sedimentation sheet
Tank
Discharge cock - tub
Discharge cock - tank
Vacuum switch
Filter 100 μm
Filter 30 μm
Butterfly valve 0.8 mm
Excess pressure valve
Pump
Manometer
Pressure switch
Gun
Overtemperature protection
17. Heating system
Pressure switch
Heating system
Overtemperature protection
Vacuum switch
Pump
Excess pressure valve
7. Putting out of operation
Set the selector switch to „On/Cold“ and activate the spray gun until the spray pipe is lukewarm. Then switch
the selector switch to „Off“ while pressing the gun grip.
After that, engage the gun lock, disconnect the power plug, and hang the cable and the hose into the holders.
Before you move the Parts Cleaner to another place, release the locking brake.
173284 Parts Cleaner S 600
Page 6 of 11 pages
Issued 05/2010
User Manual
8. Maintenance and repair
8.1 Maintenance schedule
Interval
Action
daily
Check the liquid level.
Refill, if necessary.
Monthly or
Replace the liquid, clean tub and filter.
if necessary
Every six months
Check the device visually,
check the hoses and connections for tightness
Yearly
Examination by an expert
as well as after each routine repair
according to BGR 500, chapter 2.36
8.2 Replacement of liquid
The polluted cleaning liquid may not get into the ground, water bodies or into the sewage system.
To be able to discharge the tanks safely, suitable special accessories are available with DENIOS.
The applicable waste code number can be found in the European Waste Catalogue. Contaminated
substances can often be disposed of as a water/oil mixture in other hydrous systems.
-
Set the selector switch to "Off"
-
Open the ball valve (5) and discharge the liquid from the cleaning tub.
-
Set the selector switch to "On/Cold"
-
Clean the grids and remove them. After that, clean the tub using the spray gun.
-
Set the selector switch to "Off"
-
After that, discharge the main tank using the ball valve (6).
-
Clean the tank.
-
Fill cold, clean water or the suitable cleaning agent in, until its level is about 3 cm below the
grid (55 l) in the tank and the cleaning tub.
5
2 Filter cartridges with filtering screen
4
6
2 3
173284 Parts Cleaner S 600
3 Filter cartridges with fine filter
4 Ball valve for filter
5 Discharge cock - tub
6 Discharge cock - tank
Page 7 of 11 pages
Issued 05/2010
User Manual
8.3 Cleaning filtering screen 100 μm (2)
If the filter has to be cleaned, it is recommended to replace the liquid (refer to 9.2)
After that, the filtering screen can be cleaned using the S600.
-
Close the ball valve (4) before the filters.
-
Open the cover of the cartridge (2) counterclockwisely and remove the filter insert.
-
Fill the cartridge with liquid an close the cover. Open the ball valve (4.)
-
Set the selector switch to "On/Cold" and clean the filter cartridge using the spray gun.
-
Switch the selector switch to "Off" again and close the ball valve (4)
-
Open the cartridge cover and put the filter insert back into the cartridge.
-
Fill the cartridge with liquid an close the cover.
-
Open the ball valve (4) and set the selector switch to "On/Cold".
-
Press and hold the lever on the gun grip during the device is running until the air has escaped out of the
filter.
8.4 Replacement of fine filter 30 μm (3)
If the filter has to be replaced, it is recommended to replace the liquid (refer to 9.2)
-
Close the ball valve (4) before the filters.
-
Open the cover of the cartridge (3) counterclockwisely and remove the filter insert.
-
Insert the new filter.
-
Fill the cartridge with liquid an close the cover.
-
Open the ball valve (4) and set the selector switch to "On/Cold".
-
Press and hold the lever on the gun grip during the device is running until the air has escaped out of the
filter.
8.5 Checking of fuses and replacement of fuses
Mains fuses
Before starting work on the mains fuses, disconnect the power connection!
Unscrew the fixing screws of the door on the left front. The electrical circuitry is installed on the left rear panel.
Open the cover, there are three fuses, 2 in the transformer (pull out the orange pins).
2 x transformer 0.8 A
1
x
fuse
holder
with
replacement fuse 4 A
Overtemperature protection
If the device does not heat anymore, unscrew the black cap at the back.
Press the central pin in using a screw driver - click - the heating will be
ready for operation again.
Overtemperature protection
173284 Parts Cleaner S 600
Page 8 of 11 pages
Issued 05/2010
User Manual
8.6 Error messages
Error
No liquid flows out of the jet.
Cause
Action
Mains fuse defective
Check fuse (9.5)
Engage the gun lock,
Plugged jet
remove the jet and blow it out with
pressurized air from the front.
Heating failed, liquid does not
become hot.
Jet is plugged and/ or the
Clean the jet, push the fuse in
overtemperature protection has
again. ()
triggered.
Acknowledge using the black push
button,
Yellow lamp is lighting.
Filter is plugged.
check, which filter is concerned,
clean the filter (9.3) or
replace (9.4).
The yellow lamp lights up although
Open the cock,
the filter has been serviced shortly Cock in the tank is closed.
acknowledge using the black push
before.
button.
173284 Parts Cleaner S 600
Page 9 of 11 pages
Issued 05/2010
User Manual
9. Electrical diagram, primary and secondary loop
173284 Parts Cleaner S 600
Page 10 of 11 pages
Issued 05/2010
User Manual
10. Declaration of conformity
EC Declaration of Conformity
We hereby declare that the product typeParts Cleaner S 600 complies with the following directives:
EC Directives
2006/42/EC
2004/108/EC
Harmonised standards applied
EN 349
EN 12100, -1, -2
E 60204-1
EN 12981-1;-2.
DENIOS AG, 04.01.10
..............................................
Theodor Breucker
Person responsible for documentation
- Board of governors -
Mr. Dr. Ing. R. Adenstedt
Head of Engineering
173284 Parts Cleaner S 600
Page 11 of 11 pages
Issued 05/2010